Easy DIY No-Sew Fleece Crib Rail Cover
Say goodbye to worries about chewed-up crib rails with our DIY no-sew fleece crib rail covers. Is your little one turning their baby crib into a teething ring? Those tiny teeth can leave their mark on both your baby's crib and your peace of mind.
Equipment
- Scissors: You'll need a pair of sharp scissors for cutting the fleece fabric to the correct size.
- Measuring Tape. This will help you accurately measure the length and height of your crib rails, as well as the dimensions of the fabric you'll need to cut.
- Ruler. This is great for both measuring and tracing the cutting lines.
- Marking Pen or Pencil. Use this to mark the cutting lines on the back side of the fabric.
Materials
- Fleece Fabric. The amount of fabric you need will depend on the overall length and height of your crib rails, so measure them beforehand to ensure you purchase enough material. Our size is 22 1/2 inches wide by 52 inches long. (2 pieces). A yard of fleece fabric is 36 x 36 inches. Therefore we needed 3 yards of fleece.
Estimated Cost 10
Instructions
Measurements
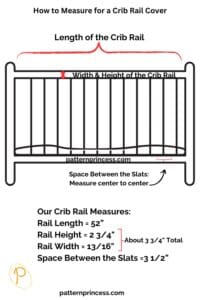
- The first thing you need to do is take the measurements of your crib railing and the length between the slats. Make sure to take your own measurements as cribs can be slightly different sizes.
- Our Crib Measurements:
- Rail Length = 52”
- Rail Height and Width = 3 ¾” Total
- 2 ¾” rail height
- 13/16” rail width
- Between slats: measure center to center = 3 1/2”
- Calculating the height and length of your strip of fleece.
- Since your crib rail is 52 inches long, that is your length. Now, let’s calculate the height.
- When calculating the height, you need to multiply your measurements by 2. This is because you need to have enough fabric to go over the crib rail and tie a knot between each slat.
- When we add the rail height and width, we have approximately 3 ¾”. To make the calculations easier, let’s change this to decimals. 3.75 X 2 = 7.5. Plus, I need 3-5 inches to tie a knot. I chose 5 inches. 5 X 2 = 10. Therefore, the width needs to be 22.5 – 23 inches wide.
- For us, our piece of fleece needs to be 22 1/2 inches wide by 52 inches long.
- Note: We chose to have 1” wide strips X 5” long ties.
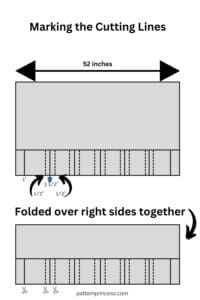
Marking the cutting lines on the fabric.
- Working with one length of fabric at a time, lay the fleece right side down on a flat surface. The table or the floor for marking works nicely.Fleece Fabric.
- We are using 5 inches of fabric for ties. Therefore, we used our ruler to mark 5-inches in from the bottom edge on one side and drew a long line the length of the fabric. We don’t have to mark the other side. I have a time saving trick I’ll explain more below. (The space between where you just marked will be the part that goes over the crib rail).
Marking our Cutting Lines for the Slats
- Since we did not make any special ties for the ends, the first tie will be in the middle of the first slat on either end.
- Therefore, measure 1” in on either side and draw a line from the edge to the line you just drew at the 5” mark.
- Our openings between the slats measured 3 ½”; however, we want 1” ties. Therefore, when measuring our cutting lines, we need to account for that.
- Place your ruler on the 1” line you just drew for the ties on the end. Measure over 3 ½” and draw a line from the 5” mark to the edge of the fabric. Repeat this process across.

- Next draw a line ½” away on either side of the lines you just drew in the previous step. (Cut cutting line will be at this 3” mark).
- (The 3 ½” line is the center of the railing line, by marking the ½” on either side, this is marking off the ties).
Cutting the Fabric
- Fold your fabric lengthwise with the right sides together. I ironed mine to things lined up nicely.
- Cut through both layers of fabric at once. You will be using the lines you just marked as cutting lines. (Only cut up to the 5” line you drew lengthwise. Do not cut past that point).
- Make your first cut at the 1” line on the end up to the 5” marked line.
- Next cut the line at the 3” mark, making sure to stop at the 5” line. Refer to the diagram for help on exactly where to cut.
- Now cut out the piece of fabric by cutting on the 5” line. You should now have a 1” strip of fabric on the left, and a square or rectangular space.
- Continue cutting out the 1” strips along the length of the fleece. Skip the next line, which should be the 3 ½” mark. And cut along the next line. Then skip to the next line and cut. Finally, cut out the piece of fabric by cutting along the 5” line.
- Continue cutting the fabric creating the 1” strips. End with cutting on the marked 1” line on the other end as that is for the other tie.
- Repeat this entire process for the other crib rail cover.
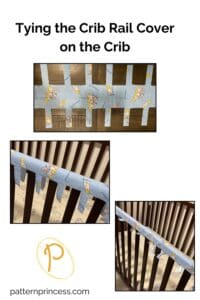
Tie the No-Sew Fleece Crib Rail Cover on the Crib
- I enlisted my daughter’s help for this. Lay the strips on the railing of the crib and start tying the ends together between the slats. To tie them securely, we used a square knot.