
Turn a Circle into Square Easy Crochet Tutorial
Learn how to turn a circle into a square with this free pattern. It’s a great way to turn circular motifs into a usable shape that’s much easier to join with other blocks.
Equipment
- Crochet hook size that matches your yarn weight.
- Crochet Hook Size I 5.5mm
- Scissors:
- Tapestry Needle
Materials
- Yarn. While you can use any yarn weight for this pattern I suggest a worsted weight yarn to practice. Less than 100 yards for each square.
Estimated Cost 5
Instructions
Two Methods to Begin a Circle
- The first thing we do is make a circle to crochet round 1 in. This can be done using one of two methods.Yarn. While you can use any yarn weight for this pattern
- Use a magic ring to form a circle. If you are new to crochet, here is a tutorial on How to Crochet the Magic Circle (magic ring).
- Chain 4 or 5 stitches and slip stitch back into the first chain to form a circle.
- There are pros and cons to each method. Using the magic ring allows you to pull the center closed after crocheting the first round of stitches. However, it may not have as much strength as creating the circle with chain stitches.
Round 1
- In magic ring, CH 3 (Counts as first DC). Work 11 more DC in the circle. Join with a SL ST into the 3rd CH of the starting CH 3. (12)
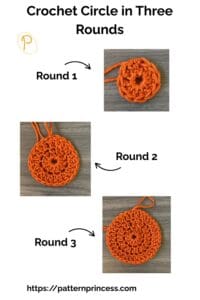
Round 2
- CH 3 (Counts as first DC). DC in same ST as CH 3, 2 DC in each ST around. Join with a SL ST into the top CH of the starting CH 3. (24)
Round 3
- CH 3 (Counts as first DC). DC in the same ST, DC in next ST. [2 DC in next ST , 1 DC in next ST] Repeat between [ ] around. End with a SL ST into the top CH of the first CH 3. (36)
- Turning the Circle into a Square
Round 4
- Attach new color
- CH 3 (Counts as DC). 2C in the same ST, CH 1, 3 DC in the next ST, HDC in each of the next 2 STs, SC in each of the next 3 STs, HDC in each of the next 2 STs. [3 DC in the next ST, CH 1, 3 DC in the next ST, HDC in each of the next 2 STs, SC in each of the next 3 STs, HDC in each of the next 2 STs]. Repeat between [ ] 2 more times. Join with a SL ST to the top ST of the starting CH 3.
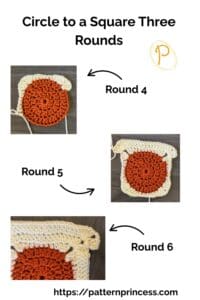
- Note. Not counting the corner stitches, you should have crocheted 7 stitches along your circle between the corners. The corners are worked into 2 stitches 3 DC, CH 1 in one ST and 3 DC in the next ST.
Round 5
- SL ST into the next corner CH 1 SP. CH 3 (Counts as DC). Work (2 DC, CH 1, 3 DC) in the corner SP. [DC in each of the next 13 STs until you reach the next corner then work (3DC, CH 1, 3DC)]. Repeat between [ ] 2 times. End with a DC in the next 13 STs and a SL St into the top CH of the starting CH 3.
- Note. Not counting the corner stitches, you should have crocheted 13 stitches along your straight edge side; 3 DC, CH 1, 3 DC in each corner space.
Round 6
- SL ST into the next corner CH 1 SP. CH 3 (Counts as DC). 2 DC, CH 2, 3 DC in the corner CH 1 SP. DC in each of the next 19 STs until the next corner. In the corner CH 1 SP work (3DC, CH 2, 3 DC). Continue working a DC in each ST of the straight edge and (3DC, CH 2, 3 DC) in each corner CH 1 SP. End with a SL ST into the top CH of the starting CH 3.
Rounds 7 and Beyond
- Repeat round 6. Continue adding rounds if you wish to have a larger granny square. Just keep working a DC into each ST, which will increase by 6 each round, on the Straight edge. And working (3DC, CH 2, 3 DC) in each corner CH SP.
Finishing
- Use the tapestry needle to weave in the yarn tails on the back side of the work. I like to weave back and forth 3 to 5 times. Cut off the excess yarn.
Notes
Abbreviations
- CH = Chain
- DC = Double Crochet
- HDC = Half Double Crochet
- SC = Single Crochet
- SK = Skip
- SL ST = Slip Stitch
- SP = Space
- ST = Stitch
- STs = Stitches
- TR = Treble Crochet
- [ ] = Repeat Between