How to Crochet the Magic Circle Easy Tutorial
Step-by-step guide on how to master the magic circle; sometimes called the magic ring or magic loop. This magic loop creates and adjustable loop that can be loosened or tightened to make a small hole. Save the URL to this page and reference it often when you need to get your next crochet project started.
Equipment
- Crochet Hook: Use a crochet hook that corresponds to the recommended hook size for your yarn.
- Scissors: For cutting the yarn when finishing the magic circle.
Materials
- 1 yard Yarn: Choose any yarn weight and color of your preference. However, if this is your first time, a medium-weight yarn is often recommended for beginners.
Estimated Cost 1
Instructions
Step 1:
- With your working yarn, make the starting loop formation by making a loop (circle) with the yarn.
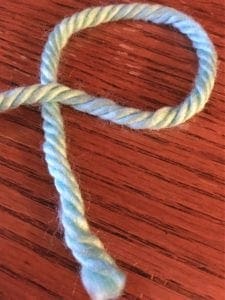
- Note: I am showing you how to magic circle loop on a flat surface today. If feel the best way is to loop the yarn around my three fingers on my left hand. It is a great help in holding the strand of yarn while I get the first stitch completed.
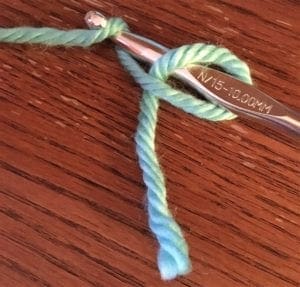
Step 2:
- Put the crochet hook through the loop (circle) and pick up the yarn pulling through the loop from the back to the front.
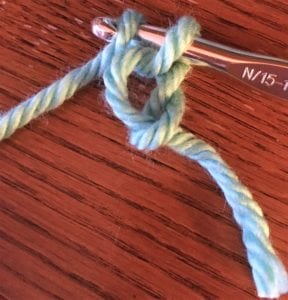
Step 3:
- Insert the hook through the circle, yarn over and draw through. There should be two loops on the hook, as in the diagram below. Draw the loop that was just picked up through the first loop on the hook. You have created a chain one. However, this does not count as a chain one for your project.
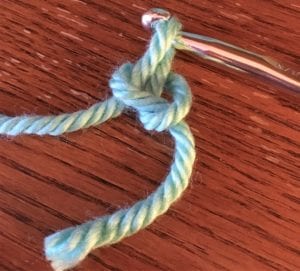
- This completes the magic ring.
- That’s it! It is really that simple to make the adjustable ring. Now you are ready to add whatever crochet stitches your pattern uses, single crochet, double crochet, treble crochet, and so on.