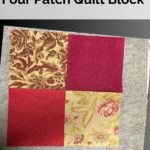
How to Make an Easy Four Patch Quilt Block
One of the easiest and most versatile quilt blocks is the four patch block, which consists of four equal-sized squares arranged in a grid. Quilting is a rewarding and relaxing hobby that allows you to create beautiful and functional objects with your own hands.
Equipment
- Thread
- Equipment/Tools
- Rotary Cutter
- Quilting Ruler
- Cutting Mat
- Rotating Cutting Mat
- Iron
- Ironing Board or Pressing Mat
- Pins
- Sewing Machine
Materials
- Four fabric squares same size or fabric strips cut into rectangles. It is recommended to use at least two different fabrics for a nice contrast.
- Thread
Estimated Cost 1
Instructions
Using Four Squares for the Four-patch Blocks
- You can either cut your own squares of fabric or use a charm pack. This is a fun way to use up those fabric scraps for a real scrappy look too.
- Choose fabrics that complement each other and fit your desired color scheme. You'll need two contrasting fabrics for each block.
- Determine the finished size of your four patch quilt blocks. For example, if you want a 6-inch finished block, you'll need to cut two squares of each fabric measuring 3.5 inches (including a ¼ inch seam allowance). Make sure to cut accurately to ensure precise piecing.
- Take one square from each fabric and place them with the right sides together. Sew a ¼ inch seam along one side, then press the seam allowance towards the dark fabric. Repeat this process with the remaining two squares.
- Take the two pairs you created in the previous step and place them right sides together, aligning the seams. Sew a ¼ inch seam along one side, then press the seam allowance in any direction.
How to Make the Four Patch Quilt Block using the Strip Piecing Method
- Begin by cutting the Strips for The Four Patch Quilt Blocks
- The size of the four patch quilt blocks determined the length and width of the strips. The chart below gives a few measurements of common sized blocks for you to follow.
- When planning the fabric, you can either use the jelly rolls, full widths of fabric, or even fat quarter widths. The longer the width of fabric (WOF), the more two patch rectangles you’ll get.
- For the strips, I used strips of fabric from a jelly roll, which measure 2 ½” X 42”. For the contrasting fabric, I used a printed cream fabric. I cut it into strips to the same size.
- Sewing and Cutting the Strips into Rectangles
- Take a darker colored strip of fabric and a light fabric strip and place the right sides together. Pin in place as needed along the length of the strip.
- Sew together the length of the fabric strips using ¼” seam allowance on one side of the long edge. Remove the pins as you come up to them during sewing.
- Press the seam to the side with the darker fabric. Pressing to the darker side keeps the seam allowance from showing through the quilt top when you’re finished.
- Cutting the Strips into Rectangles
- Use a smaller ruler and line up the center seam with one of the horizontal lines on the ruler. Square off one end of the strips by using a rotary cutter and cutting along the edge of the ruler.
- Next cut the strips apart to create two patch rectangles. Make sure to cut the rectangles to the same width as when you cut the two strips to sew together. My strips are 2 ½” side so I cut my rectangles at the 2 ½” mark. (These are sometimes referred to as a 2 patch at this point).
- Make the Four Patch Quilt Block
- Next, line up 2 two patch rectangles with the center seams nested together and the colors facing the opposite directions.
- Pin at the center to hold in place. Using the ¼” seam allowance, sew the rectangles together, removing the pin as you sew up to it.
- Press the four patch block open.
- The four patch block is now ready to sew into your pattern.
 Quilt Block Notes