Last updated on June 13th, 2026 at 10:06 am
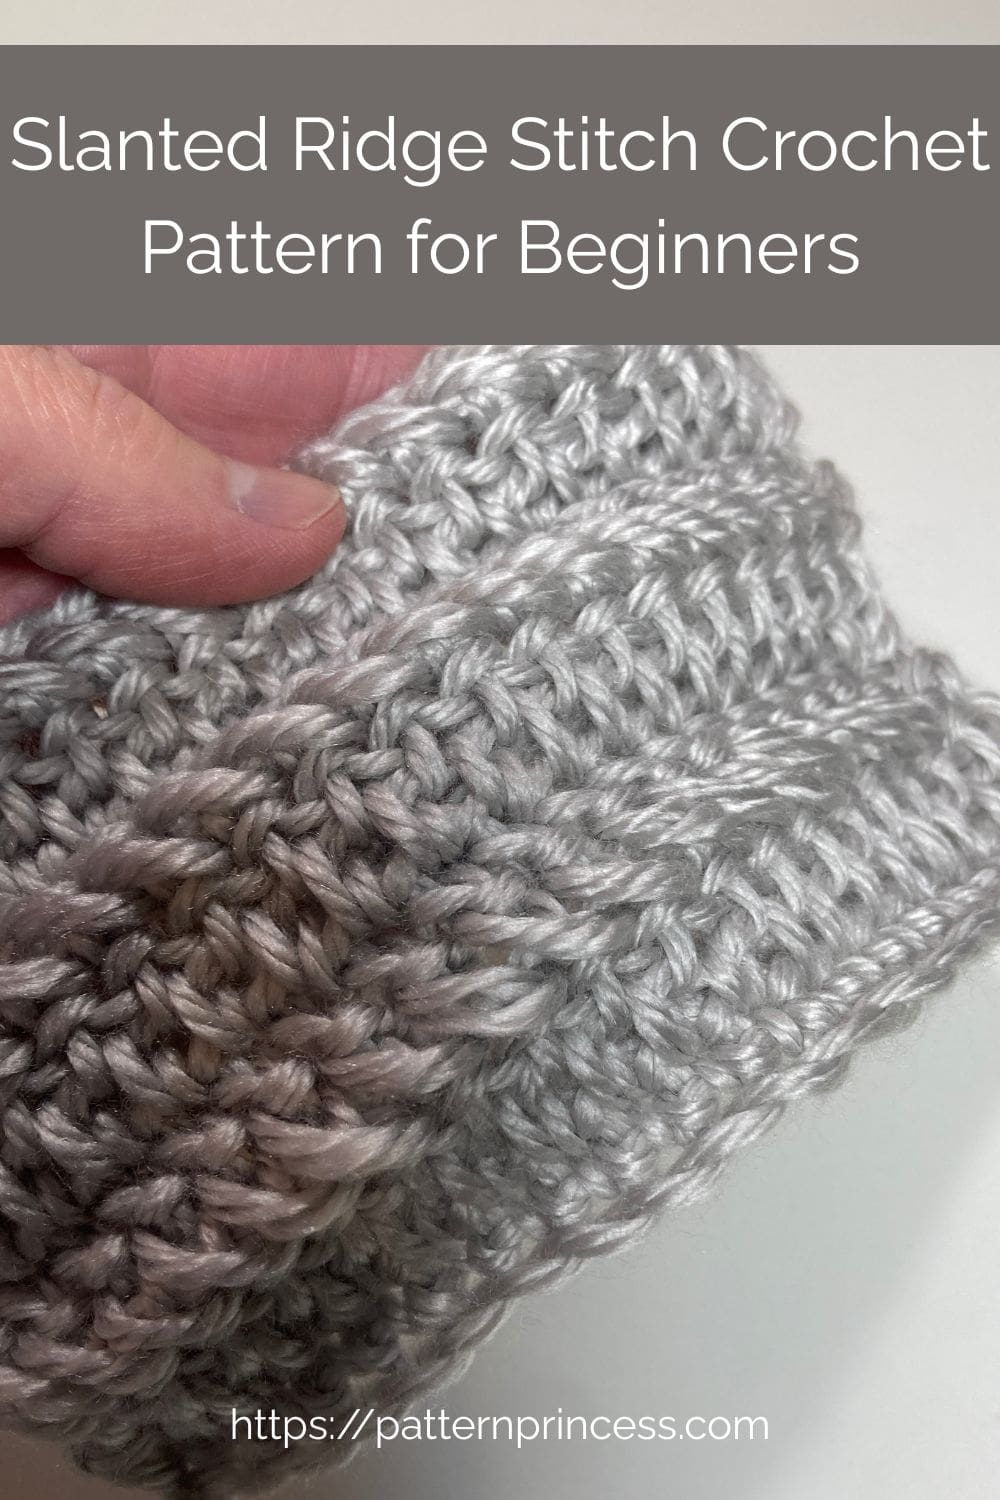
If you love textured crochet stitches that are easy to learn yet look beautifully intricate, you’re going to fall in love with the Slanted Ridge Stitch. This brand-new stitch creates subtle diagonal ridges that add amazing depth and dimension to any project.
It’s a simple twist on the classic double crochet, giving you a fresh, modern texture that’s soft, flexible, and full of character.
Pattern Inspiration
I love the look of the herringbone single crochet, yet I wanted to have a bit more stitch height like the double crochet. After an exhaustive Internet search, I played around with a few stitch samples until I found just the right look.
Blending Crochet Stitches
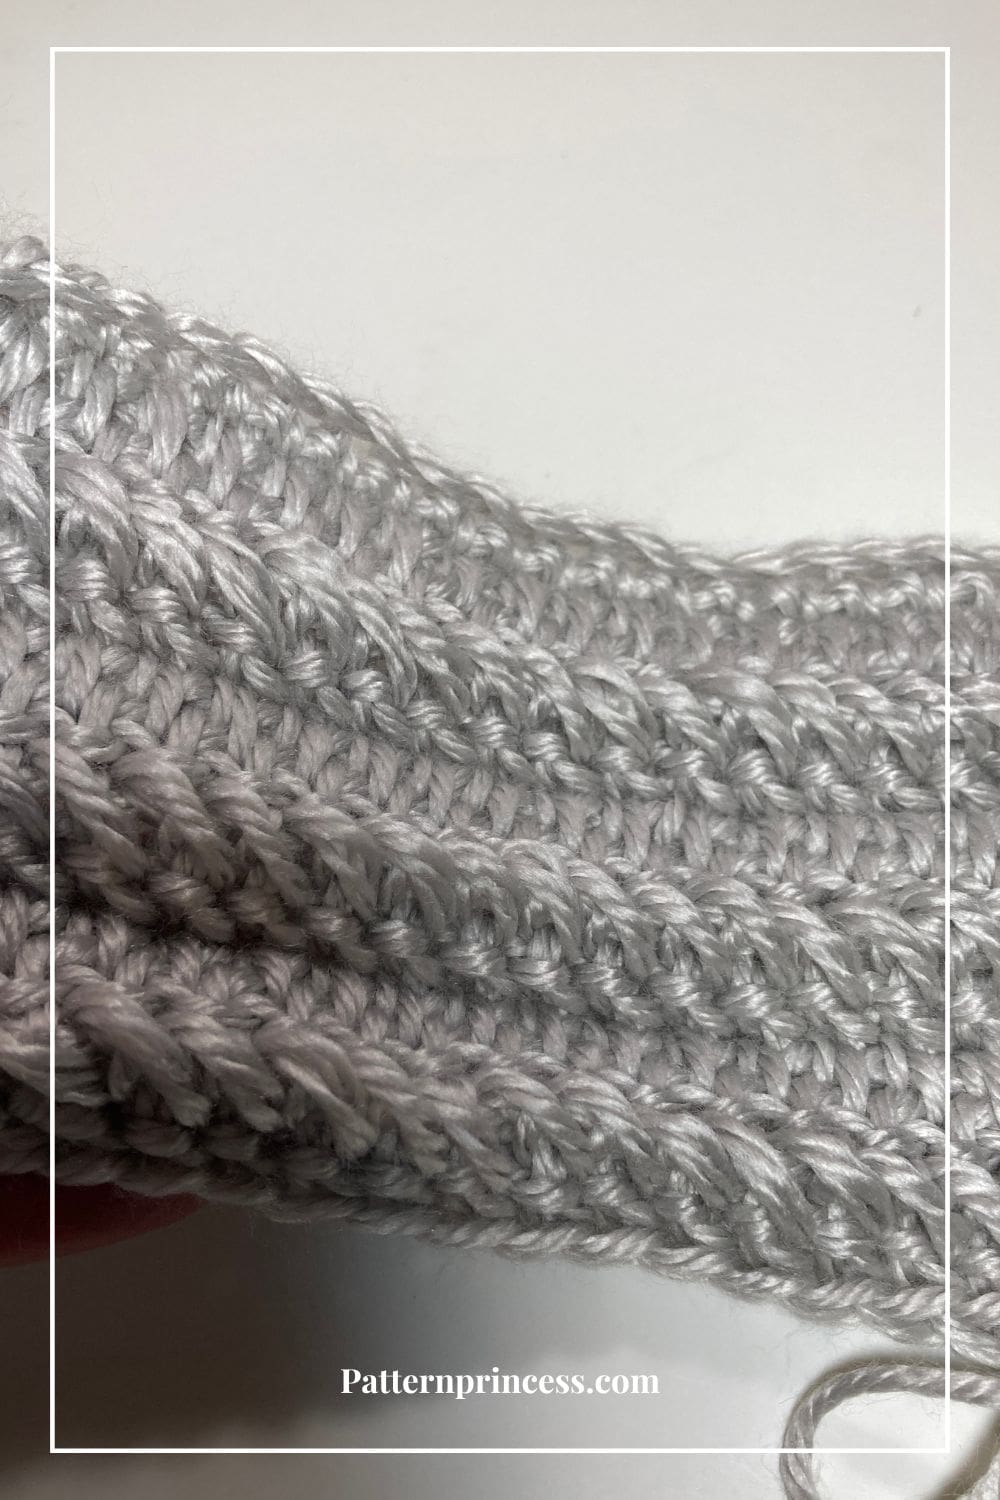
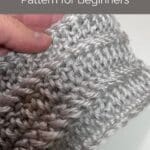
The Slanted Ridge Stitch is a modified version of the herringbone single crochet and double crochet—blending the best of both worlds. You’ll yarn over, insert your hook into the lower leg of the previous stitch and the next stitch, then work through the loops to create that signature slanted texture. It’s a unique technique that’s surprisingly easy once you get the rhythm, and the results are stunning.
This stitch works beautifully for blankets, scarves, ear warmers, and sweaters. Anywhere you want that cozy ribbed texture without extra bulk. It drapes beautifully and adds just enough detail to make your handmade pieces look effortlessly polished.
Keep reading for the free Slanted Ridge Stitch tutorial, complete with step-by-step photos and a video tutorial for both right- and left-handed crocheters. Once you try this one, you’ll see how easy it is to do.
A beautifully textured, easy stitch that adds soft diagonal ridges to any project.
Yarn for this Crochet Stitch
This versatile Slanted Ridge Stitch works beautifully with a range of yarn weights. I’ve tried it with #3 (light) and #4 (medium) weight yarns. While the texture really pops with #4, it still looks lovely with #3. The stitch also adapts wonderfully to solid, variegated, or stripes. It’s a great stitch pattern for projects that showcase color in a unique, textured way. I haven’t tested it with chunky yarns yet, but it could create a bold, dramatic texture for those looking for a thicker fabric.

Get Your Ad Free Printable PDF in our Etsy Shop.
Directions: Slanted Ridge Stitch Crochet Pattern for Beginners
Skill Level
Confident Beginner Crocheter.
You should be able to read a crochet pattern and work double crochet stitches and chain stitches.
Gauge
For the sample shown in the video, I used a medium weight yarn. The gauge will depend on your yarn and crochet hook size.
Size
The size will depend on your number of starting chains and rows.
Note. To change the size, you can use any number of beginning chain stitches.
Abbreviations
- CH = Chain
- DC = Double Crochet
- SK = Skip
- SL ST = Slip Stitch
- ST = Stitch
- STs = Stitches
- [ ] = Repeat Between
Materials
Yarn. While you can use any yarn weight for this pattern, I suggest a worsted weight yarn to practice.
Crochet hook size that matches your yarn weight. Such as a size H 5.0 mm crochet hook or I 5.5 mm crochet hook.
Scissors
Tapestry needle
Crochet Pattern Notes
Written in US terms.
Detailed photos are shown within the written directions. You can find a video tutorial for both a left and right hand crocheter after the written pattern.
Basic Crochet Stitches Used
Chain Stitch (CH ST)
Begin the chain stitch by making a slip knot on the crochet hook. Leave about a 5-inch tail on the yarn. This will be weaved in later.
Next snug up the yarn loop that is on the crochet hook; while it should be firm, it should also be loose enough to slide on the hook with ease.
Keeping the loop on the hook, insert the hook in the stitch, wrap the yarn over the crochet hook from back to front. Draw the yarn through the loop. (The first chain stitch is complete).
HOW TO CROCHET THE CHAIN STITCH video tutorial
Double Crochet (DC). Yarn over, insert the hook through both loops and pull up a loop. Next, yarn over and pull through two loops on the hook. Lastly, yarn over again and pull through the last two loops on the hook.
HOW TO CROCHET THE DOUBLE CROCHET STITCH video tutorial
Begin
Chain Stitches
Start with a Slip Knot. Place a slip knot on your crochet hook.
Work a starting chain using any number of stitches.
Row 1
Insert hook into the second chain and work a SC and in each stitch across. Turn
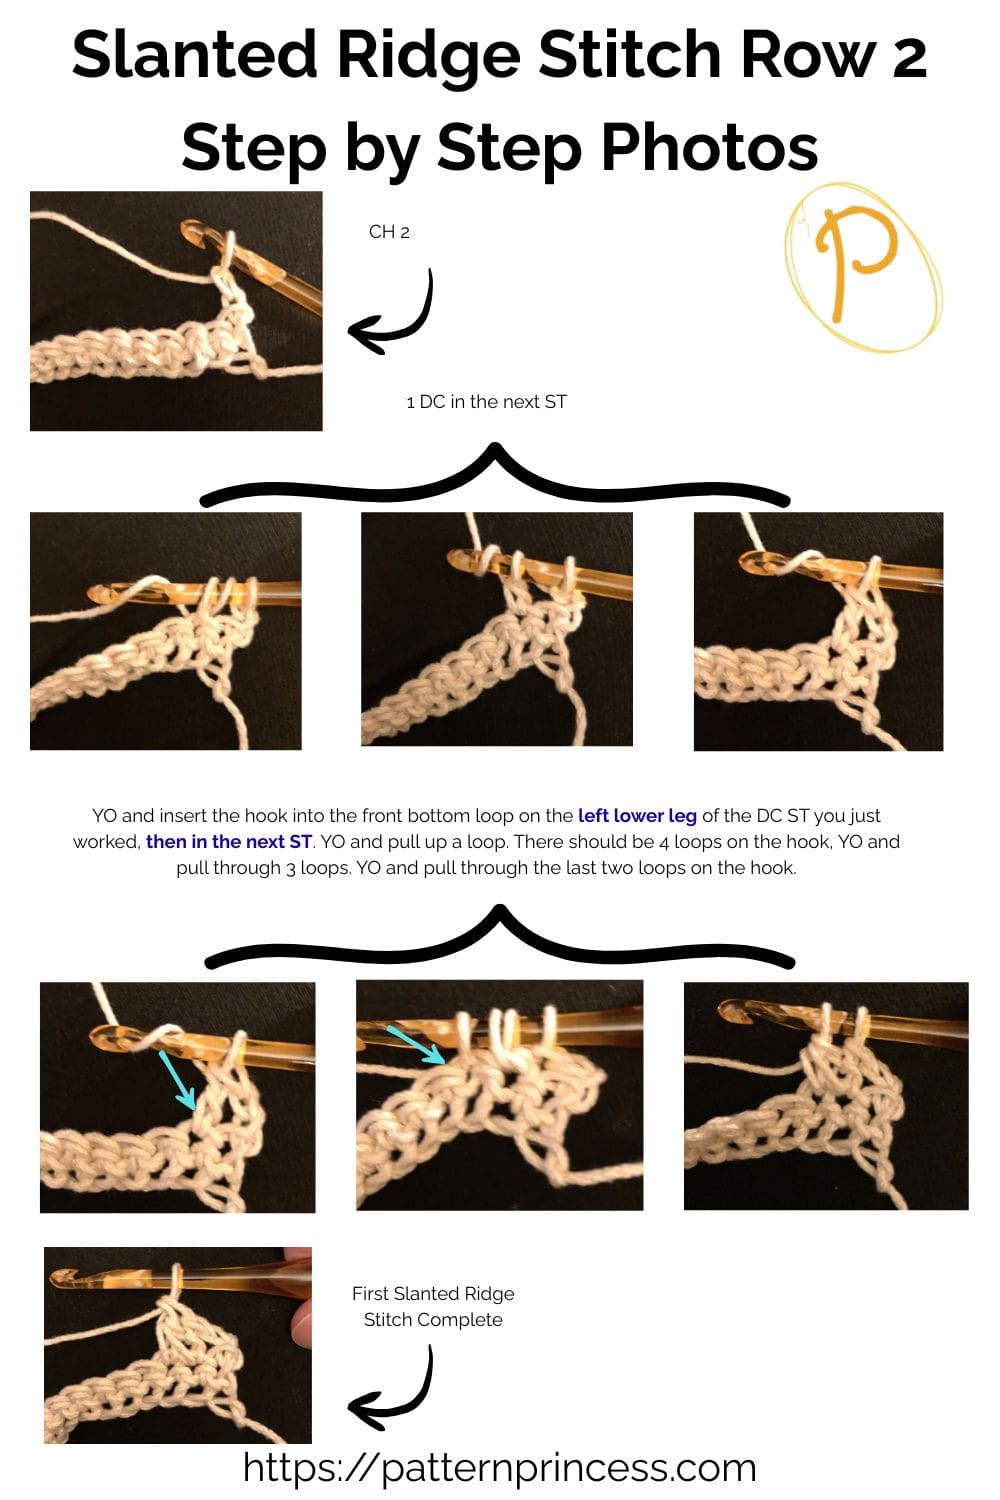
Row 2
CH 2 (Counts as a DC). In the next ST work 1 DC. [In the next ST, YO and insert the hook into the front bottom loop on the left lower leg of the DC ST you just worked, then in the next ST. YO and pull up a loop. There should be 4 loops on the hook, YO and pull through 3 loops. YO and pull through the last two loops on the hook. Repeat between [ ] to the end.
Rows 3 and beyond
Repeat row 2.
Finishing
When you have reached your desired length, cut the yarn leaving about a 12-inch yarn tail. Pull the yarn tail through the last stitch.
Use the yarn needle to weave the yarn through the crochet stitches to secure.
You can find the video tutorials on our YouTube Channel
Slanted Ridge Stitch Videos
We hope you enjoyed this gorgeous crochet stitch. We have other free crochet patterns you may enjoy. Here are a few suggestions.
Slanted Ridge Stitch Crochet Pattern for Beginners
Equipment
- 1 Crochet Hook: size that matches your yarn weight. Such as a size H 5.0 mm crochet hook or I 5.5 mm crochet hook.
- 1 Scissors:
- 1 Tapestry Needle
Materials
- Yarn While you can use any yarn weight for this pattern. I suggest a worsted weight yarn to practice.
Instructions
- Start with a Slip Knot. Place a slip knot on your crochet hook.Yarn
- Work a starting chain using any number of stitches.
Row 1
- Insert hook into the second chain and work a SC and in each stitch across. Turn
Row 2
- CH 2 (Counts as a DC). In the next ST work 1 DC. [In the next ST, YO and insert the hook into the front bottom loop on the left lower leg of the DC ST you just worked, then in the next ST. YO and pull up a loop. There should be 4 loops on the hook, YO and pull through 3 loops. YO and pull through the last two loops on the hook. Repeat between [ ] to the end.
Rows 3 and beyond
- Repeat row 2.
Finishing
- When you have reached your desired length, cut the yarn leaving about a 12-inch yarn tail. Pull the yarn tail through the last stitch.
Notes
- CH = Chain
- DC = Double Crochet
- SK = Skip
- SL ST = Slip Stitch
- ST = Stitch
- STs = Stitches
- [ ] = Repeat Between
You can find the video tutorials on our YouTube Channel
Slanted Ridge Stitch Videos Right Hand https://youtu.be/vLG_3Xdw2aU Left Hand https://youtu.be/wWtcTgwNXZc
You can find Victoria crocheting, quilting, and creating recipes. She has cooked in restaurants for over 20 years, including many larger parties. She learned to crochet when she was just 11 years old and has been crocheting ever since; over 50 years now. Over 40 years ago, she loved her first class in sewing and continues to hone her skills in quilting. Many have enjoyed the handmade gifts over the years. In her professional career, she has worked in management in a wide variety of businesses including higher education as a dean of a division. All the while attending college part-time to achieve her doctorate in higher education with an emphasis in e-learning.
I couldn’t download and print the pattern because it became too complicated with all the steps needed to print just the pattern. email, password, etc. I get emails from you already. If it’s a free pattern to print, then just let me print it.
Hi Angie,
Sorry to hear you are being prompted to enter your email. Maybe make sure you’re signed into Grow? Or maybe your email address was cleaned by the mail service for some reason. Or, last resort, just enter the email address again and it will unlock the printable version.
Vicky
Such an easy stitch with loads of texture.