Last updated on April 7th, 2026 at 11:32 am
Think you’re stuck with the exact yarn? Wrong. These substitution secrets unlock every pattern in your stash without guesswork or frogging. Crocheters are always asking us about using different yarn weights for our patterns. We’ve developed this guide to help you master the skill of substituting yarn.
You find the perfect crochet pattern, but the yarn it calls for is discontinued, too expensive, or just not what you have in your stash.
Happens all the time.
The good news is that you absolutely can substitute different yarn weights in crochet patterns without sacrificing the final result. You just need to understand a few key principles about gauge, fiber content, and how different weights behave in stitch patterns.
Most crochet designers build patterns around specific yarn characteristics, but once you know what to look for on the ball band and how to adjust your hook size accordingly, yarn substitution becomes second nature.
The difference between a successful substitute and a project that looks nothing like the original design comes down to matching more than just the weight category. You need to think about yardage, fiber content, drape, and how your replacement yarn behaves with the stitch pattern.
Here’s exactly how to substitute yarn weights the right way so your crochet projects turn out beautiful every single time.
Understanding Yarn Weight Categories and What They Really Mean
Most crochet patterns list a yarn weight, but that’s just the starting point.
Yarn weight categories range from lace (0) to jumbo (7), and each comes with a typical hook size range and expected gauge. But here’s what many crocheters miss:
Two yarns in the same category can behave completely differently.
A worsted weight wool yarn stretches and bounces back. A worsted cotton yarn does not. That difference alone can completely change your finished project.
When choosing a substitute yarn, check:
- The weight category (DK, worsted, bulky, etc.)
- Recommended hook size on the ball band
- Fiber content and structure
- Yardage per skein
If your substitute yarn suggests a hook that’s two or more sizes different from the pattern, plan on doing extra testing.
Why a Gauge Swatch is Your Best Friend
Skipping the gauge swatch is where most yarn substitutions fall apart.
A gauge swatch tells you whether your yarn + hook combination will produce the same size fabric as the pattern. Without it, you’re guessing—and even a small difference adds up fast.
The Basic Rule of Yarn Substitution
Before diving into the math, remember this simple rule—it explains almost everything about how yarn changes affect your project:
| Yarn Weight Change | What Happens |
| Lighter yarn | You’ll need more stitches and more rows to reach the same size |
| Same yarn | The pattern works as written |
| Heavier yarn | You’ll need fewer stitches and fewer rows, and your project may turn out larger |
This rule is your foundation. Anytime you swap yarn weights, you’re changing how much space each stitch takes up. From there, you can decide whether to adjust your stitch counts—or simply embrace a different finished size.
Once you understand this rule, the rest comes down to measuring your gauge and making a few simple calculations.
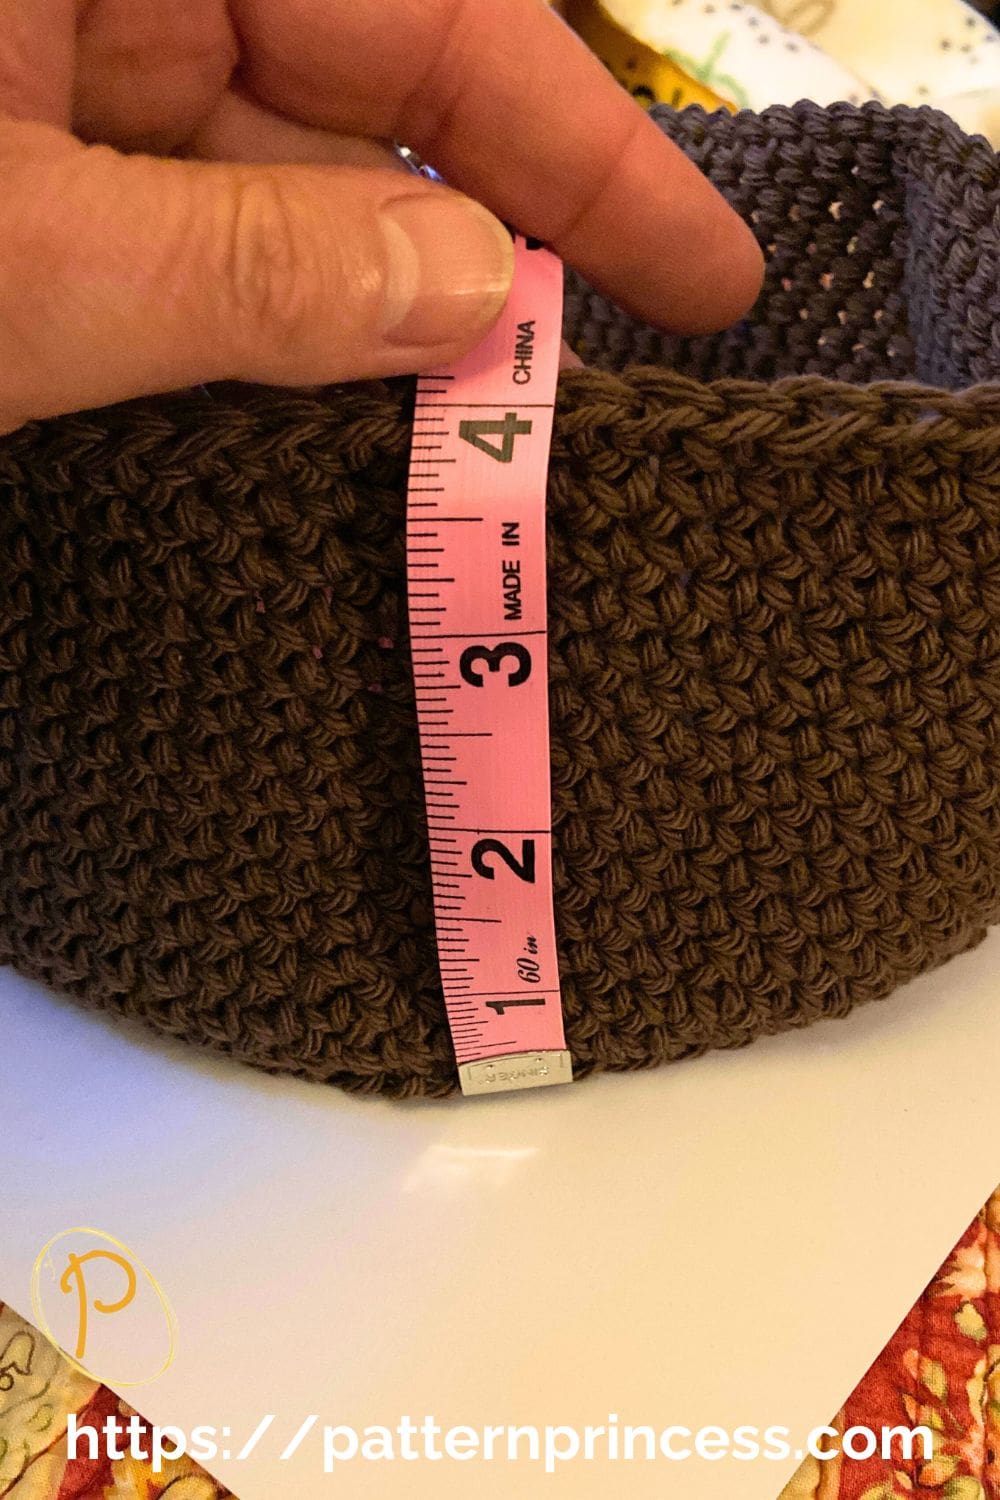
How to Make a Proper Gauge Swatch (Step-by-Step)
- Use the pattern stitch
Don’t just do single crochet unless the pattern uses it. If it’s a textured stitch, use that exact stitch. - Make it big enough
Crochet at least a 6″ x 6″ square (larger than the typical 4″ measurement area). - Work naturally
Don’t crochet tighter or looser than normal—this should reflect your real tension. - Let it rest
Set it aside for a few hours (or overnight). Some fibers relax. - Measure the center
Use a ruler and count stitches and rows within 4 inches.
Step 1: Measure Your Full Gauge (Stitches and Rows)
Let’s say your swatch measures:
- 18 stitches and 22 rows = 4 inches
Now break that down:
- 18 ÷ 4 = 4.5 stitches per inch
- 22 ÷ 4 = 5.5 rows per inch
Now you know exactly how your yarn behaves in both directions.
Step 2: Calculate Your New Stitch Counts
Use these formulas:
Stitches per inch × finished width = stitch count
Rows per inch × finished height = row count
Calculate Stitch Count for Width
If your pattern says the finished piece should be 40 inches wide:
- 40 × 4.5 = 180 stitches needed
Calculate Row Count for Length
If your project should be 30 inches long:
- 30 × 5.5 = 165 rows needed
Pro Tip:
If your row gauge is slightly off but your stitch gauge is perfect, you can often just adjust the number of rows instead of changing hook sizes again. This is especially helpful for blankets and scarves where exact length matters more than row count.
Step 3: Adjust for Stitch Pattern Repeats
If your stitch pattern repeats every 6 stitches:
- Round 180 to the nearest multiple of 6 (in this case, 180 works perfectly)
For rows, most patterns are more flexible—but check if your design has row repeats too.
Quick Gauge Fix Guide
- Too many stitches = too tight → go up a hook size
- Too few stitches = too loose → go down a hook size
Keep adjusting and re-swatching until you match the pattern gauge.
Adjusting for Different Yarn Weights
Sometimes you want to completely change yarn weights—and that’s absolutely doable.
If You Use a Lighter Yarn (ex: worsted → DK):
- Fabric will be thinner
- Project will come out smaller
- You’ll need more stitches and rows
Fix: Increase stitch count using your gauge math
If You Use a Heavier Yarn (ex: worsted → bulky):
- Fabric will be thicker
- Project will grow faster
- You may lose stitch detail
Fix: Decrease stitch count and possibly use a larger hook
Pro Tip: Double Stranding
Holding two strands of lighter yarn together can mimic a heavier yarn weight.
Example:
- 2 strands of DK ≈ worsted weight
- 2 strands of worsted ≈ bulky
Still—always swatch.
Matching Fiber Content and Drape
Fiber content is the most overlooked part of yarn substitution—and one of the most important.
Each fiber behaves differently:
- Wool: stretchy, warm, great for garments
- Cotton: no stretch, structured, cool
- Acrylic: durable, budget-friendly, can be stiff
- Silk/Rayon: soft, drapey, fluid
If a pattern is designed for wool and you swap in cotton, the finished piece may feel heavy or lose shape.
What to Match First:
- Stretch (elastic vs non-elastic)
- Drape (flowy vs structured)
- Warmth
- Care needs (machine washable vs delicate)
Try to stay as close as possible to the original fiber type for best results.
Common Mistakes to Avoid
Even experienced crocheters run into these:
- Skipping the gauge swatch
- Assuming same weight = same result
- Ignoring yardage differences
- Not adjusting stitch counts
- Mixing yarn types with very different textures
- Forgetting dye lots
If something feels off early on—trust that instinct. It’s much better to adjust after a few rows than after finishing the whole project.
Real-Life Examples of Yarn Substitution (With Math)
Once you understand gauge and the basic formulas, the easiest way to build confidence is to see it in action.
Let’s walk through two real examples—one simple (a blanket) and one more advanced (a garment).
Example 1: Substituting Yarn in a Blanket
Blankets are one of the easiest projects to modify because they’re usually simple rectangles. That means you can adjust stitch and row counts without worrying about shaping.
Original Blanket Pattern (Worsted Weight Yarn)
Gauge:
- 18 stitches = 4 inches
- 14 rows = 4 inches
This equals:
- 4.5 stitches per inch
- 3.5 rows per inch
Finished Blanket Size
- Width: 48 inches
- Length: 60 inches
Original Stitch & Row Counts
- Stitches:
48 × 4.5 = 216 stitches - Rows:
60 × 3.5 = 210 rows
Original Blanket Summary
| Measurement | Calculation | Result |
| Width | 48 × 4.5 | 216 stitches |
| Length | 60 × 3.5 | 210 rows |
Using a Lighter Yarn (DK Weight)
After making your swatch, you get:
- 22 stitches = 4 inches
- 18 rows = 4 inches
This equals:
- 5.5 stitches per inch
- 4.5 rows per inch
New Stitch & Row Counts
- Stitches:
48 × 5.5 = 264 stitches - Rows:
60 × 4.5 = 270 rows
DK Yarn Version
| Measurement | Calculation | Result |
| Width | 48 × 5.5 | 264 stitches |
| Length | 60 × 4.5 | 270 rows |
Same blanket size—just more stitches and rows.
Using a Bulkier Yarn
Your swatch measures:
- 14 stitches = 4 inches
- 10 rows = 4 inches
This equals:
- 3.5 stitches per inch
- 2.5 rows per inch
New Stitch & Row Counts
- Stitches:
48 × 3.5 = 168 stitches - Rows:
60 × 2.5 = 150 rows
Bulky Yarn Version
| Measurement | Calculation | Result |
| Width | 48 × 3.5 | 168 stitches |
| Length | 60 × 2.5 | 150 rows |
What This Shows
- Lighter yarn → more stitches and rows
- Heavier yarn → fewer stitches and rows
- Finished size stays the same when you adjust the math
This is the Basic Rule in action.
Example 2: Substituting Yarn in a Crochet Garment
Garments are more complex because they must fit the body and often include shaping.
Let’s break it down simply.
Original Garment (Worsted Yarn)
Gauge:
- 18 stitches = 4 inches
- 14 rows = 4 inches
Equals:
- 4.5 stitches per inch
- 3.5 rows per inch
Target Measurement
- Bust: 42 inches
- Length: 25 inches
Original Stitch & Row Counts
- Bust stitches:
42 × 4.5 = 189 stitches - Length rows:
25 × 3.5 = 88 rows
Original Garment Summary
| Area | Calculation | Result |
| Bust | 42 × 4.5 | 189 stitches |
| Length | 25 × 3.5 | 88 rows |
Using DK Yarn
Swatch results:
- 22 stitches = 4 inches
- 18 rows = 4 inches
Equals:
- 5.5 stitches per inch
- 4.5 rows per inch
New Stitch & Row Counts
- Bust stitches:
42 × 5.5 = 231 stitches - Length rows:
25 × 4.5 = 113 rows
DK Version
| Area | Calculation | Result |
| Bust | 42 × 5.5 | 231 stitches |
| Length | 25 × 4.5 | 113 rows |
Using Bulky Yarn
Swatch results:
- 14 stitches = 4 inches
- 10 rows = 4 inches
Equals:
- 3.5 stitches per inch
- 2.5 rows per inch
New Stitch & Row Counts
- Bust stitches:
42 × 3.5 = 147 stitches - Length rows:
25 × 2.5 = 63 rows
Bulky Version
| Area | Calculation | Result |
| Bust | 42 × 3.5 | 147 stitches |
| Length | 25 × 2.5 | 63 rows |
Why Garment Substitution Is More Complicated
Changing yarn weight affects everything in a garment:
- Yoke depth
- Sleeve width
- Armholes
- Neckline shaping
- Overall drape
Even if your math is correct, the fit and feel can change dramatically.
A Simpler Method: Use the Pattern Schematic
Instead of relying on stitch counts, use the pattern’s measurements.
For example:
- Back width: 21 inches
- Length: 25 inches
- Sleeve width: 15 inches
Then:
- Measure your gauge (stitches & rows per inch)
- Multiply to get your stitch counts
- Crochet until you hit the correct measurements
This works especially well for:
- Drop shoulder sweaters
- Panel-based garments
- Simple cardigans
When Yarn Substitution Works Best
You’ll have the easiest time with:
- Blankets
- Scarves
- Dishcloths
- Rectangular garments
- Simple sweaters
Patterns That Are Harder to Modify
These require more advanced adjustments:
- Raglan sweaters
- Top-down yokes
- Fitted garments
- Colorwork or mosaic crochet
How Yarn Substitution Affects Yardage
Changing yarn weight also changes how much yarn you’ll need.
General rule:
- Lighter yarn → more yardage
- Heavier yarn → less yardage
Because fiber and stitch pattern also affect usage, it’s always smart to buy a little extra.
Final Thought: You Don’t Have to Follow Stitch Counts—Follow Measurements
This is the mindset shift that makes everything click:
- Patterns give stitch counts
- But measurements are what actually matter
Once you trust your gauge and work toward measurements, you can use almost any yarn with confidence.
Yarn Substitution is a Skill You Can Master
Yarn substitution isn’t an exact science—but it is a learnable skill.
Once you understand:
- How to check gauge
- How to adjust stitch counts
- How fiber affects your fabric
You’ll be able to confidently use what you have, save money, and make any pattern your own.
And honestly? Sometimes the substitute yarn turns out even better than the original.
Your next project doesn’t have to wait for the “perfect” yarn.
You already have what you need. You just needed to know how to use it.
Make sure to check out our crochet stitches and crochet tutorials.

You can find Victoria crocheting, quilting, and creating recipes. She has cooked in restaurants for over 20 years, including many larger parties. She learned to crochet when she was just 11 years old and has been crocheting ever since; over 50 years now. Over 40 years ago, she loved her first class in sewing and continues to hone her skills in quilting. Many have enjoyed the handmade gifts over the years. In her professional career, she has worked in management in a wide variety of businesses including higher education as a dean of a division. All the while attending college part-time to achieve her doctorate in higher education with an emphasis in e-learning.