What is crochet gauge and why is it important? If you’ve ever followed a crochet pattern and your project turned out too big, too small, or just…off, you’re not alone.
You followed the pattern exactly. Counted every stitch. Used the recommended yarn. But the final result still didn’t match the picture.
Chances are, crochet gauge was the reason.
And if you’ve been skipping the gauge swatch because it feels like extra work, it could be costing you hours of time and effort.
The good news? Gauge isn’t nearly as complicated as it sounds—and once you understand it, your projects will finally turn out the way they should.
In this guide, we’ll break it down step-by-step so you can understand what gauge is, why it matters, and how to get it right—without frustration.
Crochet Gauge Made Simple (Quick Summary)
If you’re short on time, here’s what you really need to know about crochet gauge:
- Crochet gauge measures how many stitches and rows fit into a 4-inch square
- Matching gauge ensures your project turns out the correct size
- Always make a gauge swatch before starting size-sensitive projects
- Measure from the center of your swatch—not the edges
- If your gauge is off, adjust your hook size (not the pattern)
- Hook brand, yarn type, and tension can all affect your gauge
- Blocking can change gauge, especially with natural fibers
- Your gauge can shift during a project—check it more than once
- For amigurumi, focus on tight, dense stitches rather than exact size
Taking a few minutes to check gauge can save you hours of frustration later.
What Is Crochet Gauge?
Gauge is the most important thing standing between you and a finished item that fits.
Crochet gauge is simply a measurement of how many stitches and rows fit into a specific space—usually 4 inches by 4 inches.
Think of it like this:
- It tells you how tight or loose your crochet stitches are
- It helps ensure your finished project turns out the right size
- It keeps your work consistent with the pattern designer’s gauge intentions
Example:
A pattern might say:
16 stitches x 12 rows = 4 inches in single crochet
That means if you crochet a swatch, your stitches should match those numbers within that space.
Think of gauge like a measuring cup for crochet.
If your measurements are off, your final project will be too.
Grab Your Free Crochet Gauge Cheat Sheet
Want a quick reference you can keep with your crochet supplies? Get the printable at the bottom of this blog post.
Why Crochet Gauge Matters
Gauge is most important when size matters.
Projects Where Gauge Really Matters:
- Wearables (sweaters, hats, baby clothes)
- Fitted items (gloves, socks)
- Blankets with precise dimensions
- Patterns with multiple sizes
Projects Where It Matters Less:
- Dishcloths
- Scarves
- Some blankets (depending on style)
If your gauge is off, your project can turn out:
- Too tight → smaller and stiff
- Too loose → larger and floppy
When a crochet pattern tells you the gauge, it’s giving you a specific measurement: how many stitches and how many rows fit into a 4-inch square when you crochet exactly like the pattern designer did. If your stitch count matches theirs, your finished project will match their specific size. If it doesn’t match, your sweater might fit a toddler instead of you, or your blanket might drape over the sides of your couch like a tablecloth.
Here’s what gauge tells you:
- Stitch gauge: The number of stitches across a 4-inch width
- Row gauge: The number of rows in a 4-inch height
- Hook size used: What the designer used to get those measurements
- Stitch pattern: Whether it’s single crochet, double crochet, or something else
The pattern gauge is the designer’s blueprint. Your job is to match it. If the pattern says 16 stitches and 18 rows equal 4 inches using a 5mm hook, and you’re getting 14 stitches in that same space, your finished piece will be significantly larger than intended. That two-stitch difference compounds across every row.
Think of gauge like baking. If a recipe says one cup of flour and you eyeball it at one and a half cups, your cookies won’t turn out right. Gauge is your measuring cup for crochet.
Crochet Gauge Tracker Sheet
Ready to take the guesswork out of your crochet projects?
This Crochet Gauge Tracker Sheet helps you keep track of your swatches, so you can see what works—and avoid repeating mistakes.
Use it to:
- Record yarn, hook, and gauge details
- Track adjustments that worked
- Build consistency across projects
Click the image below to download your printable tracker.
You’ll get access right away when you join the newsletter (if you’re not already on the list).
What Affects Your Gauge?
Even if you follow the pattern exactly, your gauge may still be different.
Here’s why:
| Factor | How It Affects Gauge |
| Hook size | Larger hook = looser stitches |
| Yarn type | Different fibers stretch differently |
| Tension | Tight vs. loose crocheting style |
| Stitch choice | Some stitches naturally sit tighter or looser |
| Mood & speed | Yes, even this can affect your tension! |
How to Make a Gauge Swatch (Step-by-Step)
This is the step most beginners skip—but it’s the most important.
Start with the Recommended Materials
Use the same:
- Yarn
- Hook size
- Stitch pattern listed in the gauge
- Crochet a Swatch Bigger Than 4 Inches
Don’t aim for exactly 4 inches—go bigger. Make a swatch about 5–6 inches wide and tall.
A good rule:
Chain more than you need. If the pattern gauge says 16 stitches, make a foundation chain of at least 20 stitches. The edges can curl or get wonky, so you want extra room to measure from the center of the swatch where the fabric sits flat and true.
This gives you a more accurate measurement.
- Work in the exact stitch pattern listed. If the pattern uses single crochet, your swatch needs single crochet. If it’s a specific stitch pattern with texture or lacework, replicate that exactly. Using a different stitch gives you useless measurements.
Now you’ve got a sample swatch that represents what the full project will look like. This is the best way to catch sizing problems before they ruin your finished work.
- Check the pattern for gauge information. Look for a section that says something like “16 sc and 18 rows = 4 inches with 5mm hook.” Write down the stitch pattern, number of stitches, number of rows, and recommended hook size.
How to Measure Your Gauge
Making the swatch is half the work. Measuring it correctly is where a lot of people go wrong.
Lay your crochet swatch on a flat surface. Not on your lap, not holding it up in the air, not stretched over your knee. Flat. The fabric needs to sit exactly how it will sit in the finished item, with no pulling or bunching. Any tension you add while measuring will throw off your stitch count and give you a false gauge reading.
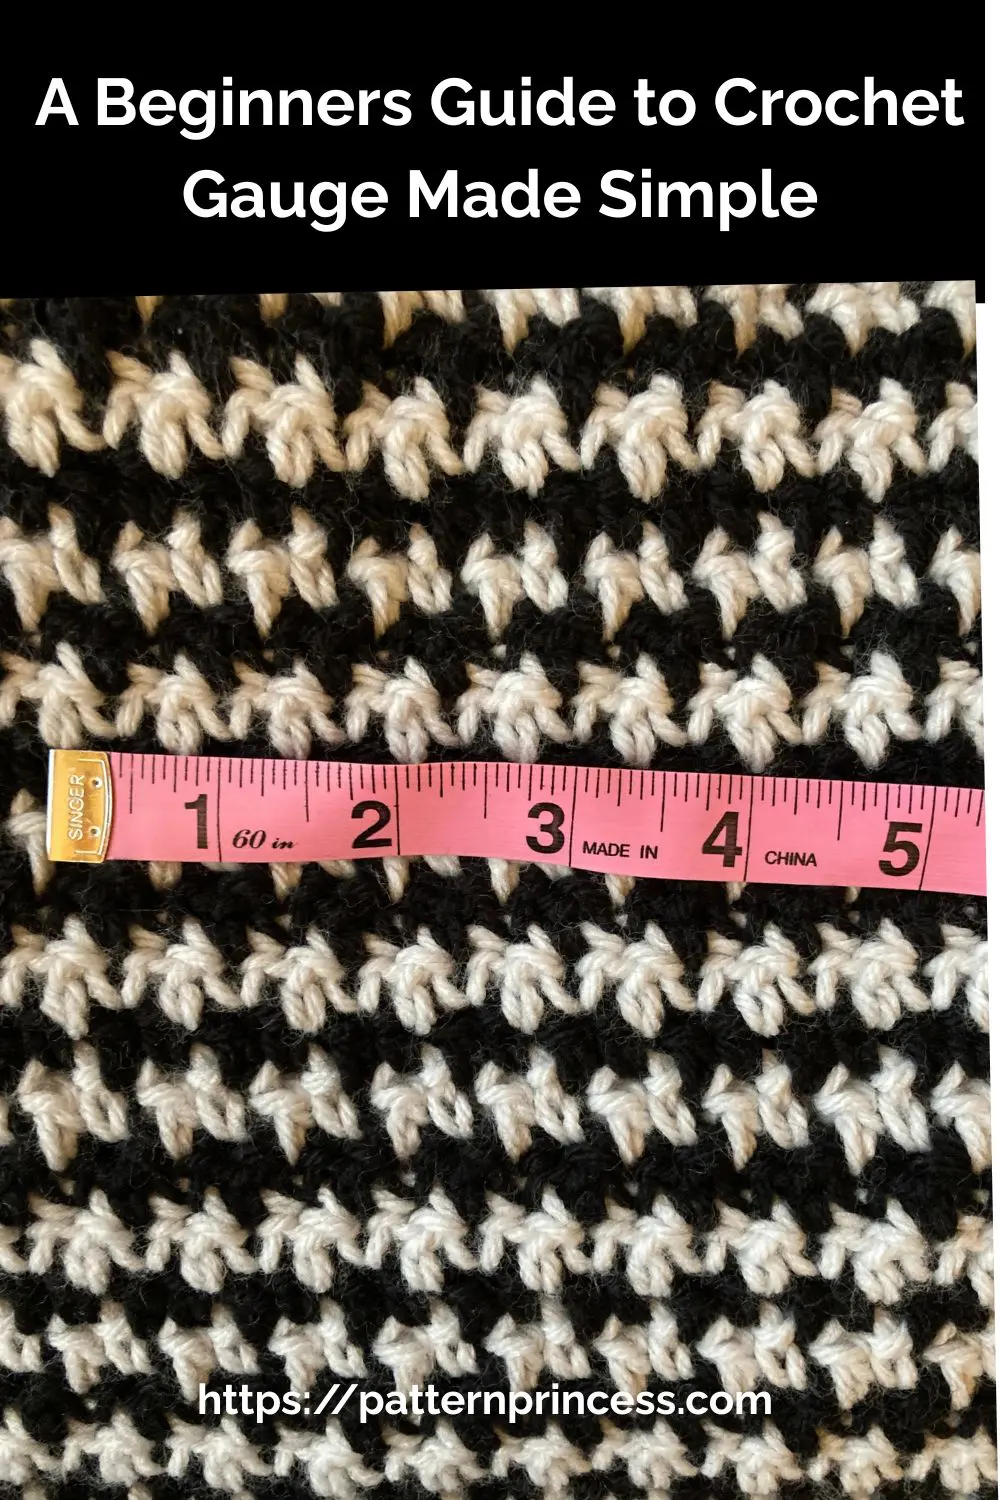
Lay your swatch flat and measure 4 inches in the middle, not the edges.
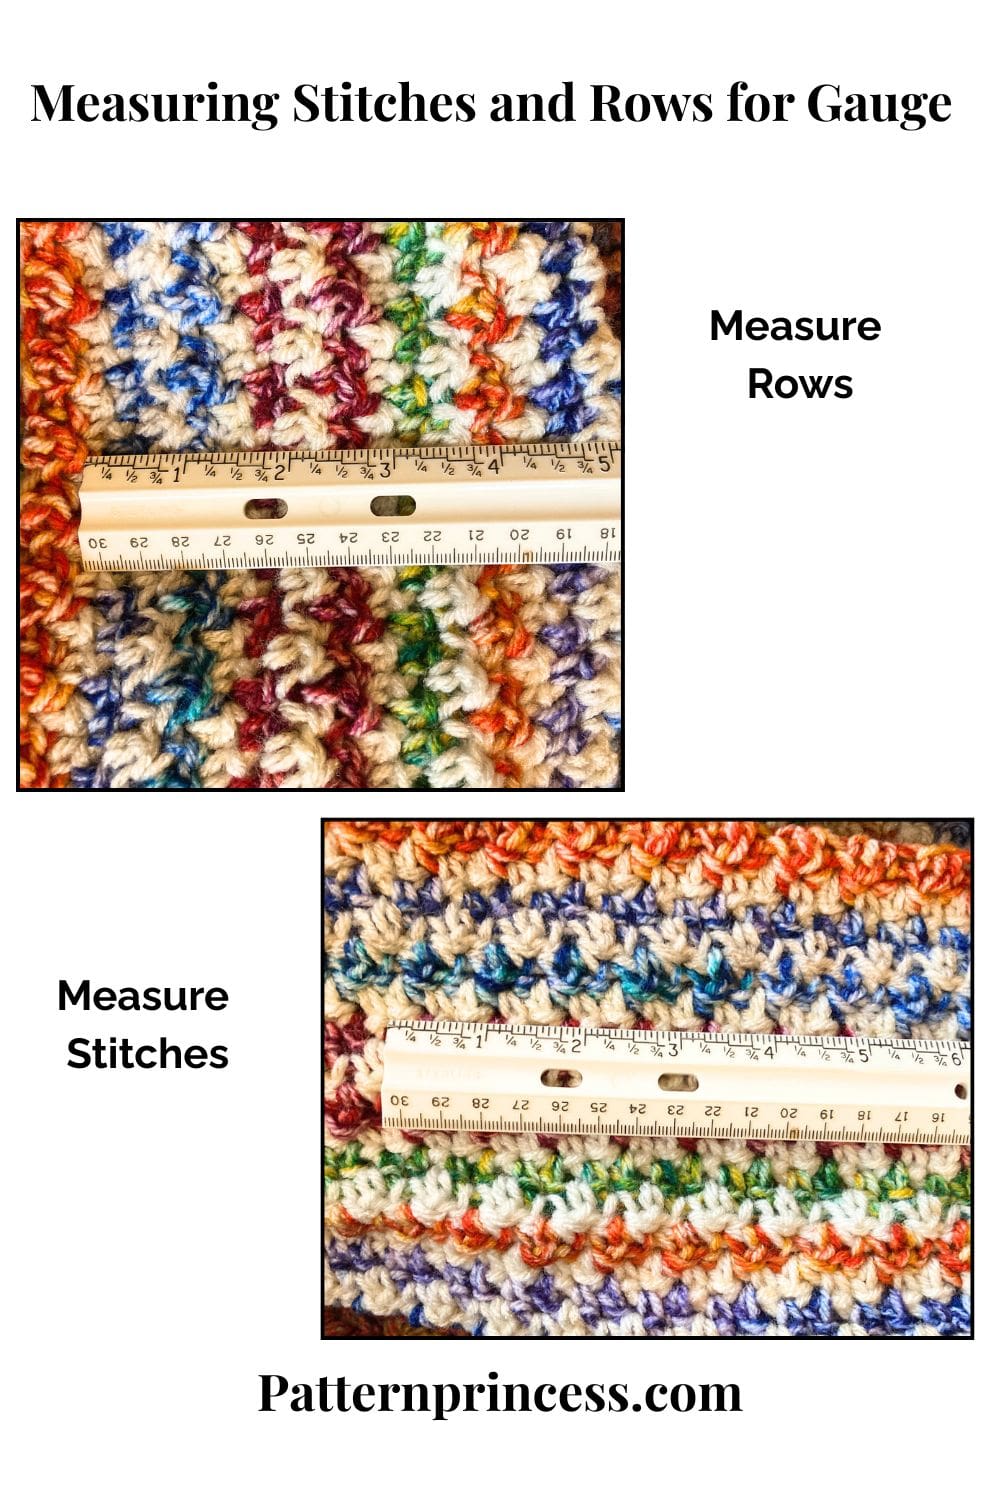
Count:
- How many stitches across
- How many rows vertically
Here’s the right way to measure gauge:
- Use a tape measure or rigid ruler. Soft measuring tapes can stretch. A stiff ruler keeps your measurement honest.
- Measure from the center of the swatch. Place your ruler horizontally across the middle and count how many stitches fit in 4 inches. Don’t count from the edge where the fabric might be tighter or looser.
- Count full stitches only. If you have 15 full stitches and a partial stitch, your stitch count is 15. Partials don’t count toward gauge.
- Measure row gauge vertically. Turn your ruler 90 degrees and count how many rows fit into 4 inches of height. Some patterns care more about row gauge than others, but it’s always smart to check both.
Write down your gauge measurement. If the pattern says 16 stitches and you’re getting 16 stitches, you’ve nailed it. If you’re getting fewer stitches, your work is looser and your finished item will be too big. On the other hand, if you’re getting more stitches, your work is tighter and the finished piece will be too small.
This is the most important part of the whole process. Getting your gauge right here means your project comes out the correct size on the first try.
What to Do When Your Gauge Is Off
Your gauge won’t match on the first try. That’s completely normal.
If your stitch gauge is off by even one or two stitches, you need to adjust. The way you fix it is simple: change your hook size. A larger hook creates fewer stitches per inch because each stitch gets bigger. A smaller hook creates more stitches per inch because the stitches tighten up.
How Your Crochet Hook Brand Can Affect Gauge
Something many crocheters don’t realize is that the brand of crochet hook you use can actually change your gauge.
Even when two hooks are labeled the same size, there can be small differences in:
- The shape of the hook head
- The depth of the throat
- The material (aluminum, plastic, bamboo)
- The handle and grip design
These subtle differences can affect how the yarn slides and how your stitches form.
I notice this all the time. When I switch to a different crochet hook brand, my stitches can suddenly become tighter or looser—without changing anything else. It’s a small shift, but it can make a big difference in your finished project.
That’s why it’s so important to use the same hook brand throughout your entire project, especially when making garments or anything size-sensitive. Mixing hook brands mid-project can lead to uneven tension and noticeable changes in stitch size.
Crochet Gauge Troubleshooting Flowchart
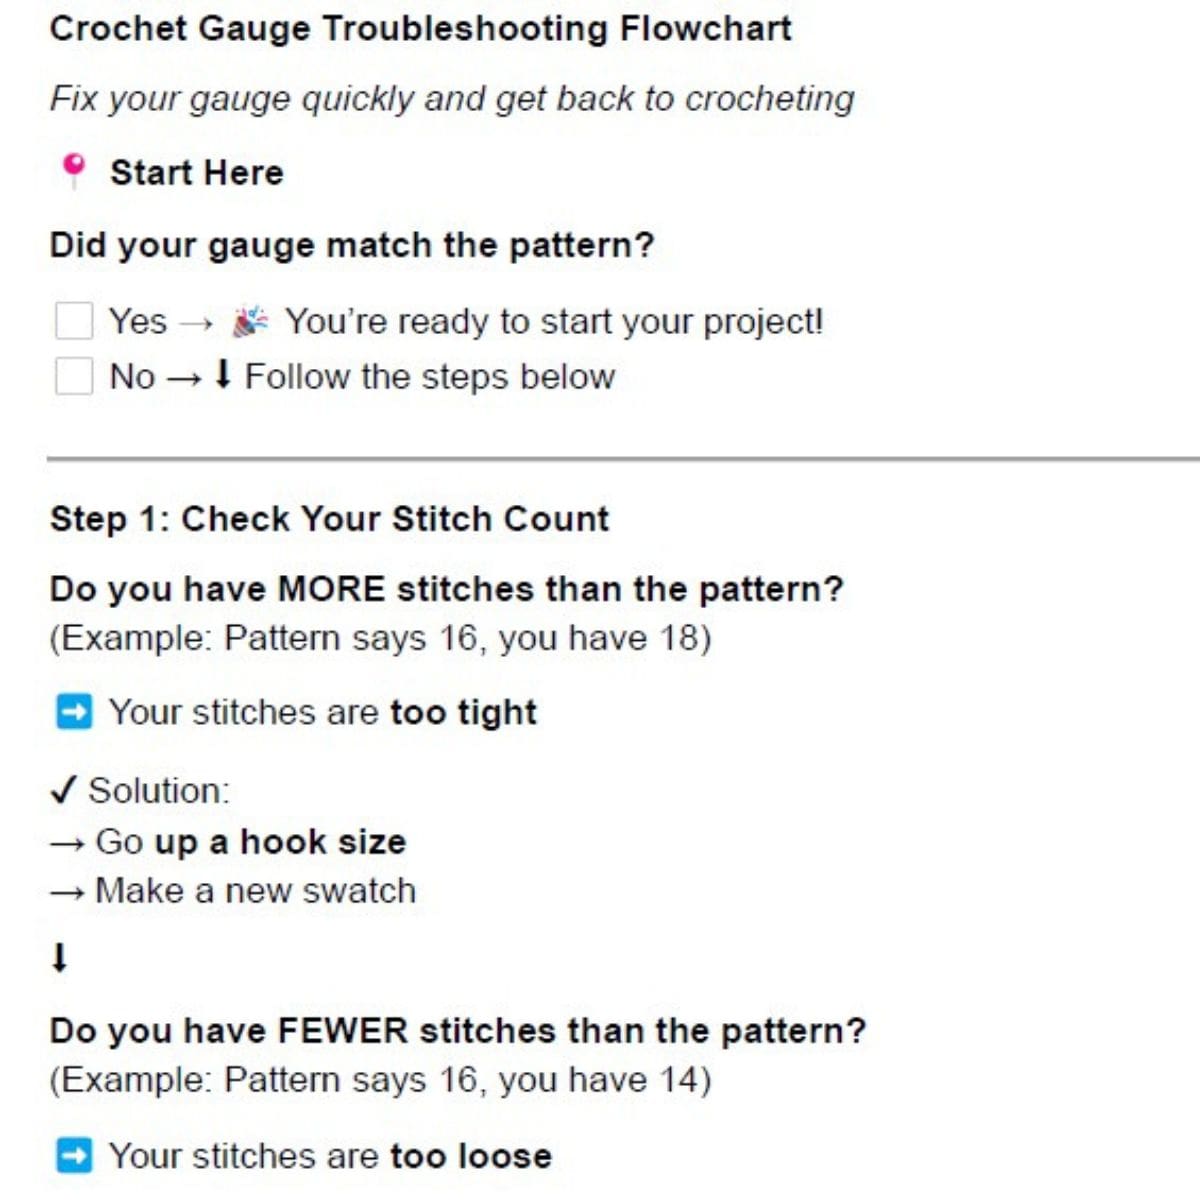
Not sure how to fix your gauge? This makes it simple.
This Crochet Gauge Troubleshooting Flowchart walks you step-by-step through exactly what to do when your stitches don’t match the pattern.
It helps you:
- Quickly identify the problem
- Know whether to go up or down a hook size
- Fix gauge issues without frustration
Click the image below to grab your free flowchart PDF.
New here? Just sign up for the newsletter to unlock the download.
If You’re Struggling to Meet Gauge
Before adjusting your tension too much, try this simple fix:
- Switch to a different crochet hook brand
- Crochet a few test rows to see how your stitches change
- Make a fresh gauge swatch before starting your project
Sometimes, a simple hook change is all it takes to match the pattern gauge—no stress or major adjustments needed.
Beginner Tip
If you find a hook brand that feels comfortable and gives you consistent results, stick with it. Over time, you’ll learn how your personal crochet tension works with that hook, making it much easier to meet gauge in future crochet projects.
Crochet Gauge Cheat Sheet
Here’s a simple way to understand what your results mean:
| Your Gauge Result | What It Means | What To Do |
| Too many stitches | Too tight | Go up a hook size |
| Too few stitches | Too loose | Go down a hook size |
| Rows too short | Tight tension | Relax tension or change hook |
| Rows too tall | Loose tension | Adjust tension or hook size |
| Matches pattern | Perfect! | You’re ready to start |
Here’s how to adjust:
- Too many stitches? Go up a hook size. If you’re getting 18 stitches instead of 16, try a 5.5mm hook instead of the 5mm the pattern recommends.
- Too few stitches? Go down a hook size. If you’re only getting 14 stitches, try a 4.5mm hook.
- Make a new swatch with the adjusted hook. Don’t just assume it’ll work. Crochet another quick gauge swatch with your new hook size and measure again.
- Repeat until your gauge matches. Sometimes it takes two or three swatches to dial it in. That’s fine. Better to spend 30 minutes on swatches than to waste days on a project that doesn’t fit.
Hook brand can matter too. A 5mm Clover hook might feel slightly different than a 5mm Boye hook, and that tiny difference can affect your tension. Stick with one hook brand for your swatch and your project so everything stays consistent.
Once your gauge matches the pattern gauge, you’re good to go. Use that hook size for the entire project and your finished item will come out the designer’s intended size.
Does Blocking Affect Crochet Gauge?
Yes—blocking can change your crochet gauge, especially when working with natural fibers.
Yarns like wool, alpaca, and cotton can stretch, relax, or even slightly shrink depending on how they are blocked. Because of this, if your pattern recommends blocking, it’s important to measure your gauge swatch after it has been blocked and fully dried.
Acrylic yarn behaves a bit differently. It typically doesn’t change much with standard blocking, but steam blocking can relax the fibers if applied carefully. This can slightly alter your stitch size.
Always test this on your gauge swatch first before applying heat to your finished project.
Quick Fiber Guide
| Yarn Type | Blocking Effect on Gauge |
| Wool | Can stretch and relax |
| Alpaca | Often grows (can lengthen) |
| Cotton | May stretch slightly |
| Acrylic | Minimal change (unless steam set) |
Gauge Can Change as You Crochet
Here’s something that doesn’t get talked about enough:
Your crochet gauge isn’t always consistent from start to finish—even for experienced crocheters.
Your tension can naturally shift throughout a project due to things like:
- Stress or fatigue
- Speed of stitching
- Temperature (cold hands vs. warm hands)
- Posture or hand position
- Switching hook grip or technique
This happens to all of us, so don’t feel discouraged if you notice changes along the way.
How to Stay Consistent
For projects where size matters—like garments—it’s helpful to treat gauge as something you check more than once.
Try this:
- Measure your gauge in more than one area of your project
- Check your tension again after completing major sections
- Pay attention to how your fabric feels as you go (denser or looser)
Even small shifts in tension can affect the length, width, and overall fit of your finished piece.
Gauge for Amigurumi
Gauge works a little differently when it comes to amigurumi crochet projects.
Instead of focusing on exact measurements, the goal is to create a firm, dense fabric so the stuffing doesn’t show through your stitches.
You want your stitches to look:
- Tight and even
- Smooth and well-defined
- Free of visible gaps or holes
If your fabric feels loose or you can see the stuffing peeking through, try going down one or two hook sizes until your stitches feel solid and secure.
What Matters Most
With amigurumi, structure matters more than size.
- Your finished piece may turn out slightly bigger or smaller than the pattern
- But as long as your stitches are tight and consistent, your project will look clean and professional
Quick Amigurumi Gauge Tip
A simple test:
If you can easily see light or stuffing through your stitches, your gauge is too loose.
Adjust your hook size and try again until the fabric feels dense and holds its shape.
Crochet Swatch Log
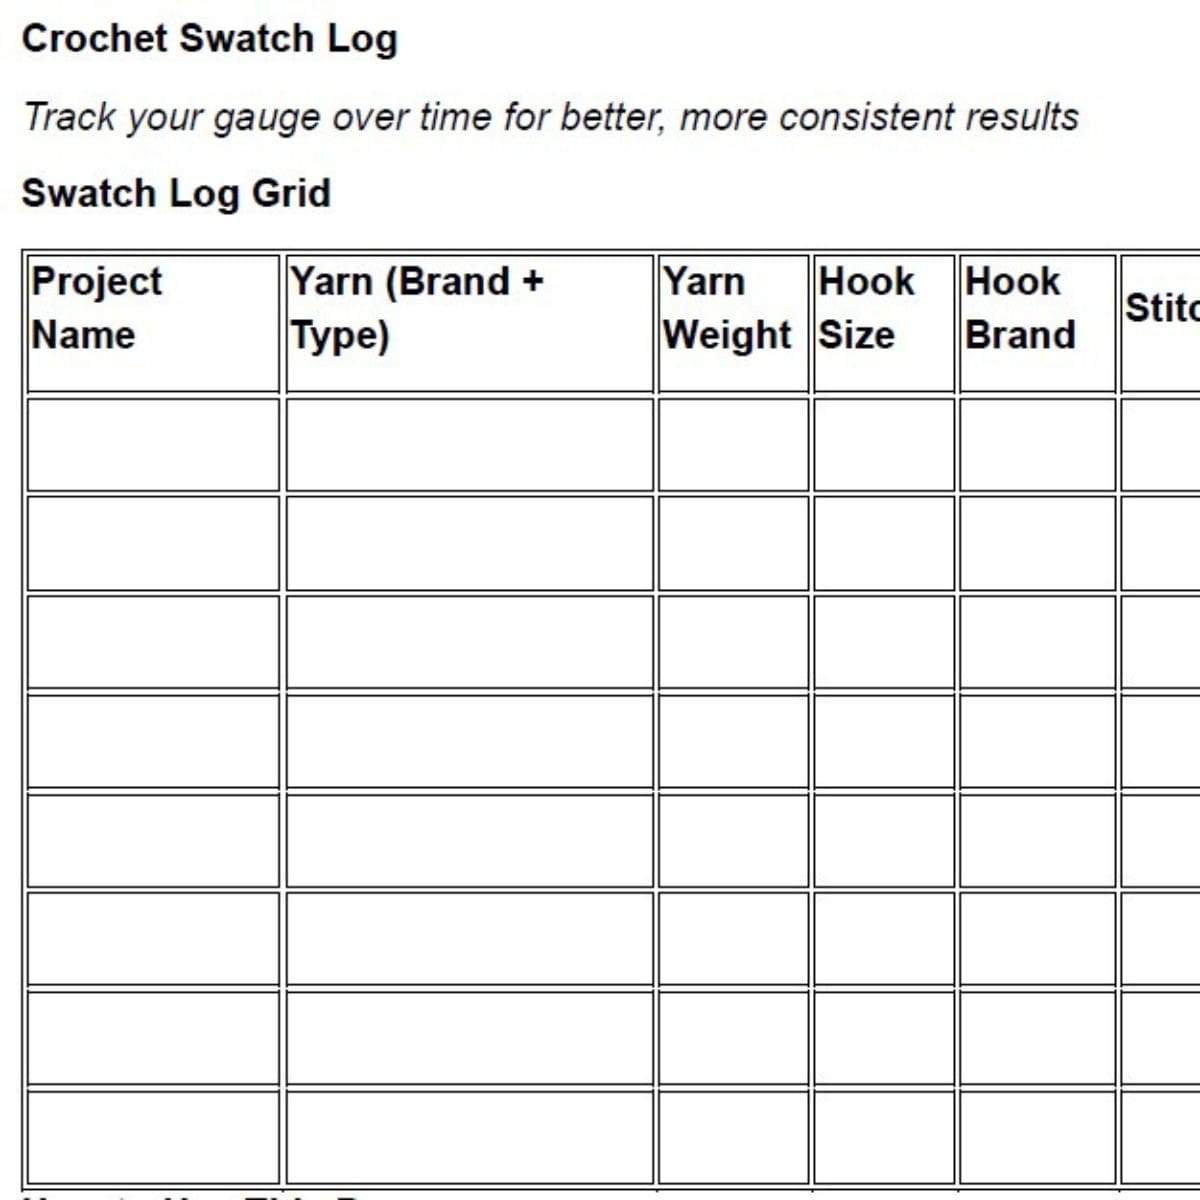
Want to get better at crochet without starting from scratch every time?
This Crochet Swatch Log lets you track your gauge over time, so each new project gets easier and more predictable.
Perfect for:
- Keeping a record of yarn and hook combinations
- Tracking what worked (and what didn’t)
- Building confidence with new patterns
Click the image below to download your printable swatch log.
If you’re not subscribed yet, you’ll be able to sign up and get instant access.
Common Beginner Mistakes (And How to Avoid Them)
Even when you know gauge matters, it’s easy to mess it up.
Skipping the swatch entirely. This is the biggest mistake. You think you’ll save time, but you won’t. You’ll either end up with something unwearable or you’ll rip it all out and start over, which takes ten times longer than making a gauge swatch would have. Every single crochet pattern benefits from a gauge check, especially garments.
Measuring on a rounded surface. If you measure your swatch while it’s draped over your leg or bunched up on the couch, your stitch count will be wrong. Always use a flat surface.
Using a different stitch pattern for the swatch. If the pattern uses half double crochet and you test your gauge with single crochet, the measurements mean nothing. Stitch height changes everything.
Ignoring row gauge. Stitch gauge gets all the attention, but row gauge matters just as much for anything with vertical shaping. If your row count is off, sleeves won’t hit where they’re supposed to and necklines will sit weird.
Switching hooks mid-project. You checked your gauge with one hook, but then you grabbed a different hook halfway through because it felt better in your hand. Now half your project is one gauge and half is another. Stick with the hook that gave you the correct gauge from start to finish.
Do You Always Need to Check Gauge?
Honestly? No—and that’s part of making crochet enjoyable.
You Can Skip Gauge When:
- Making scarves
- Crocheting dishcloths
- Creating relaxed-fit blankets
Don’t Skip Gauge When:
- Making clothing
- Following a fitted pattern
- Size matters to the final result
A Simple Way to Think About Gauge
If all of this still feels confusing, remember this:
Gauge is just your crochet “fingerprint.”
Everyone crochets a little differently.
Gauge helps you match your stitches to the pattern, so your project turns out just right.
Crochet gauge might feel tedious at first, but once you’ve made a few swatches and seen how much they improve your finished projects, it becomes second nature. You’ll stop seeing it as extra work and start seeing it as insurance. The 15 minutes you spend on a gauge swatch is the easiest way to make sure your hours of crocheting actually result in something you can use.
And the next time a pattern lists a gauge, you’ll know exactly what to do with it.
Crochet Gauge Cheat Sheet
Want a quick reference you can keep by your side while you crochet?
This printable Crochet Gauge Cheat Sheet is perfect for beginners who want a simple, no-confusion guide to getting gauge right every time.
It includes:
- Hook size adjustments
- Easy swatch instructions
- A quick troubleshooting guide
Click the image below to download your free PDF.
If you’re not already subscribed, you’ll be prompted to join the newsletter for instant access.

You can find Victoria crocheting, quilting, and creating recipes. She has cooked in restaurants for over 20 years, including many larger parties. She learned to crochet when she was just 11 years old and has been crocheting ever since; over 50 years now. Over 40 years ago, she loved her first class in sewing and continues to hone her skills in quilting. Many have enjoyed the handmade gifts over the years. In her professional career, she has worked in management in a wide variety of businesses including higher education as a dean of a division. All the while attending college part-time to achieve her doctorate in higher education with an emphasis in e-learning.