Last updated on February 19th, 2026 at 08:20 am
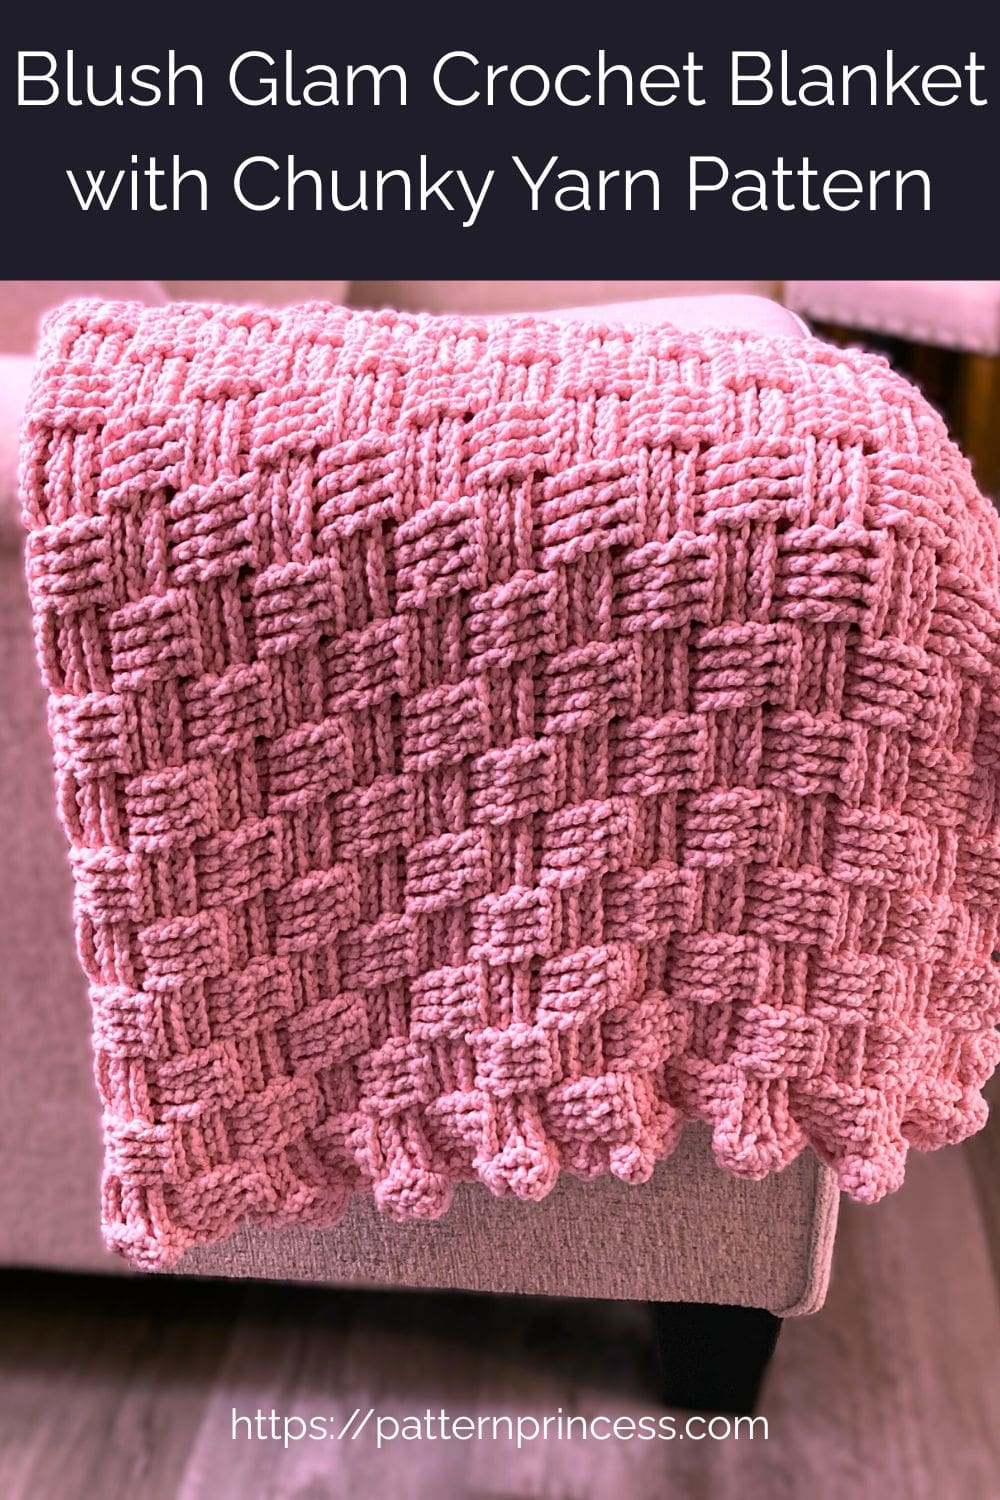
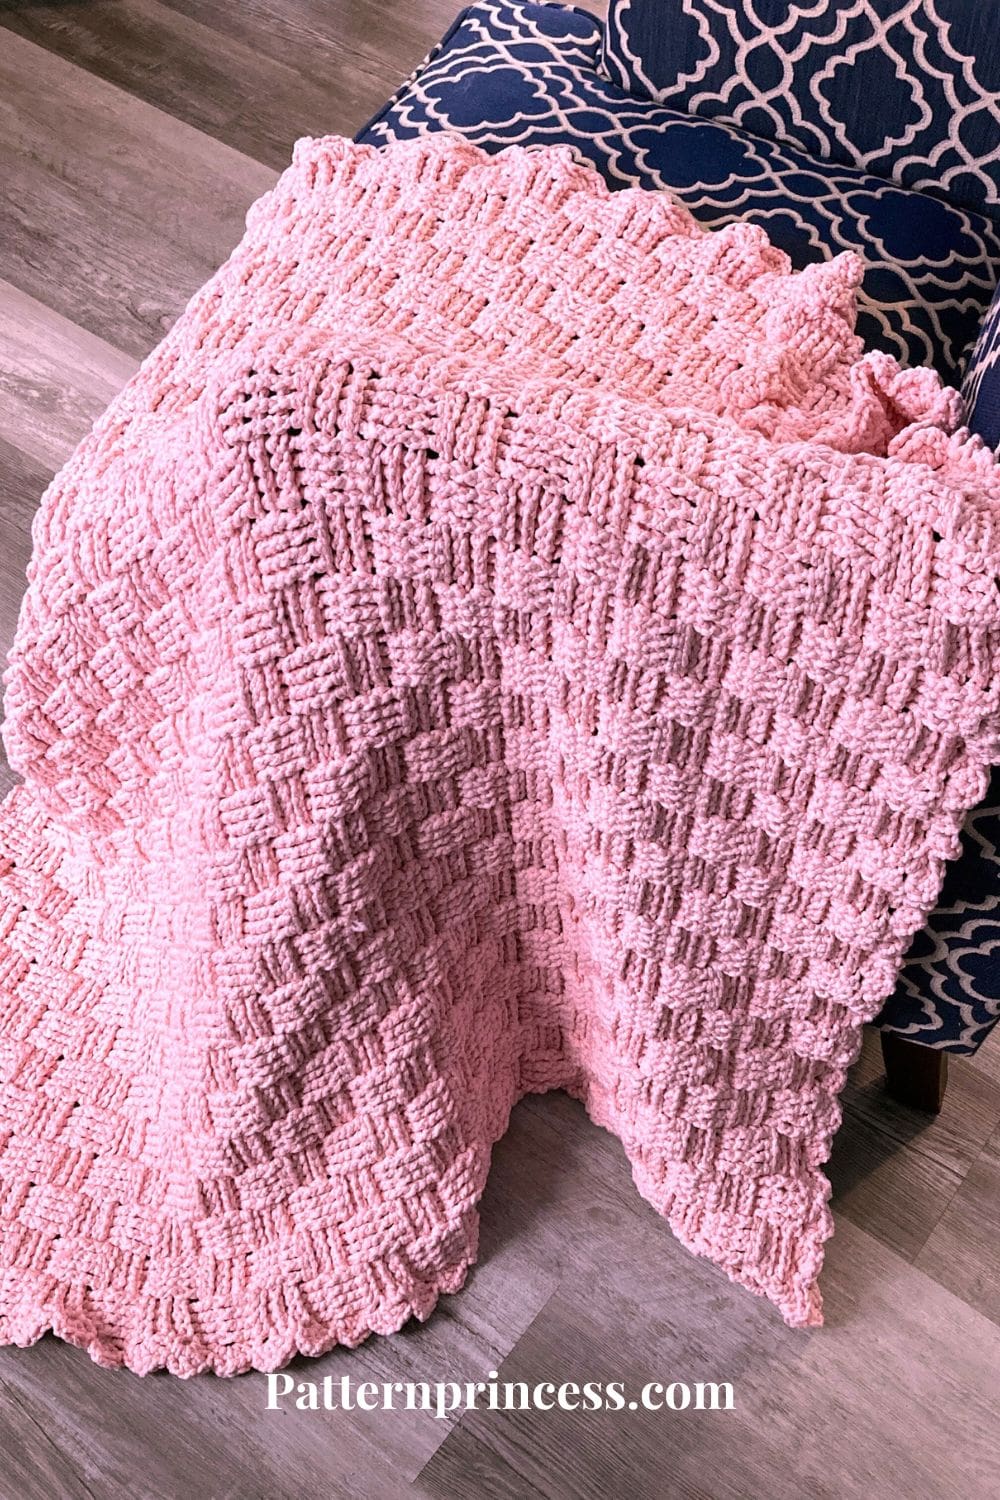
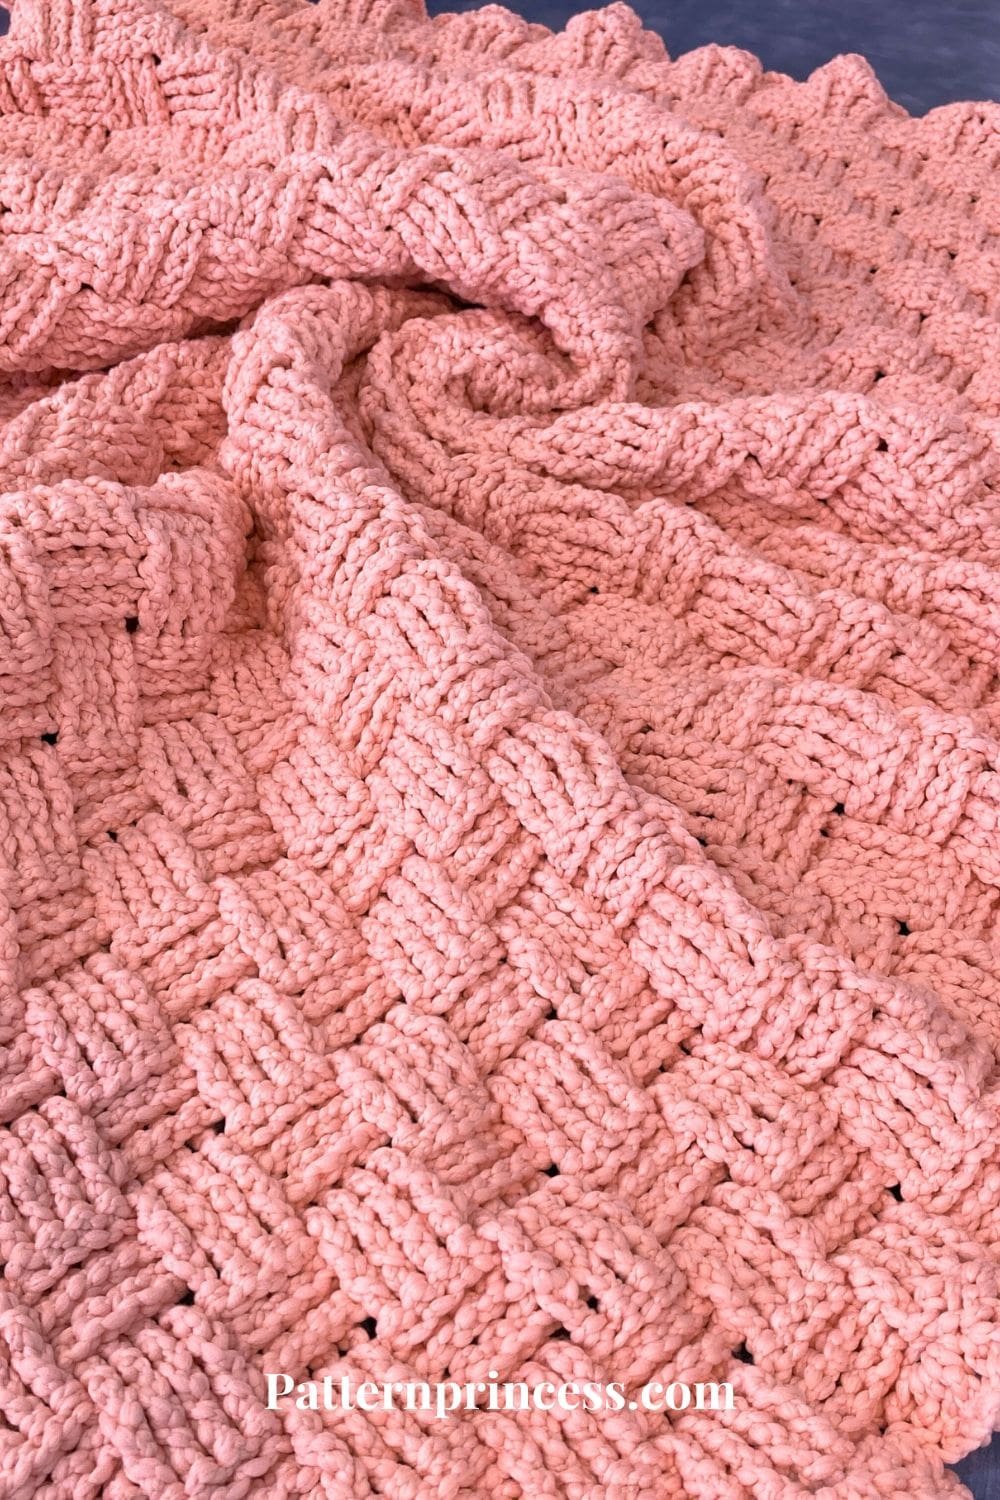
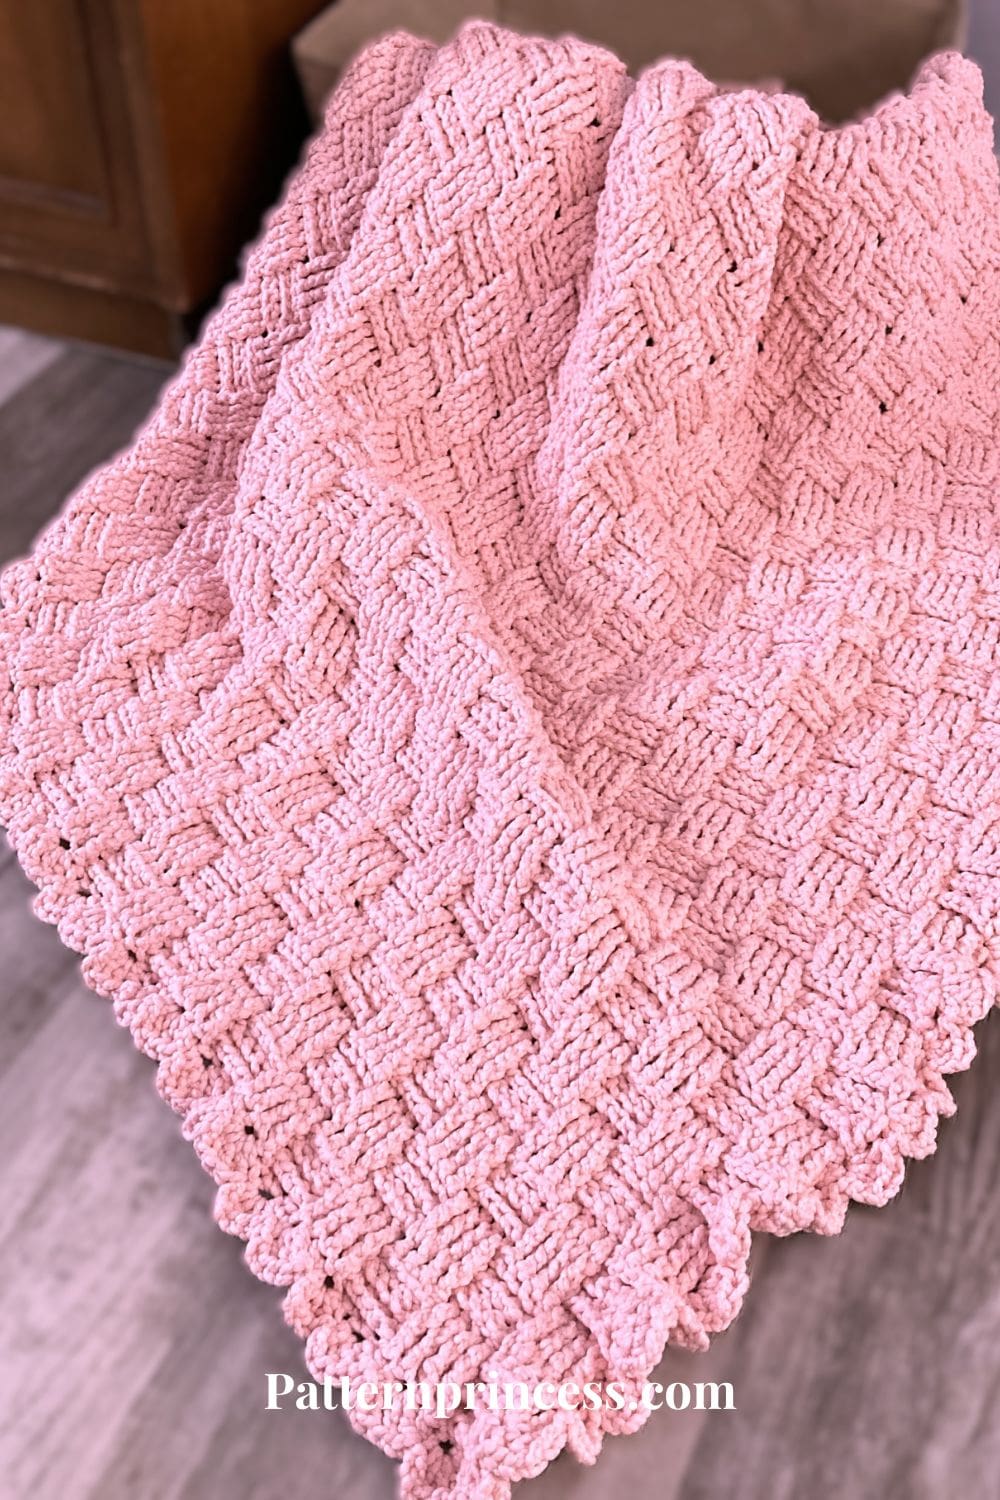
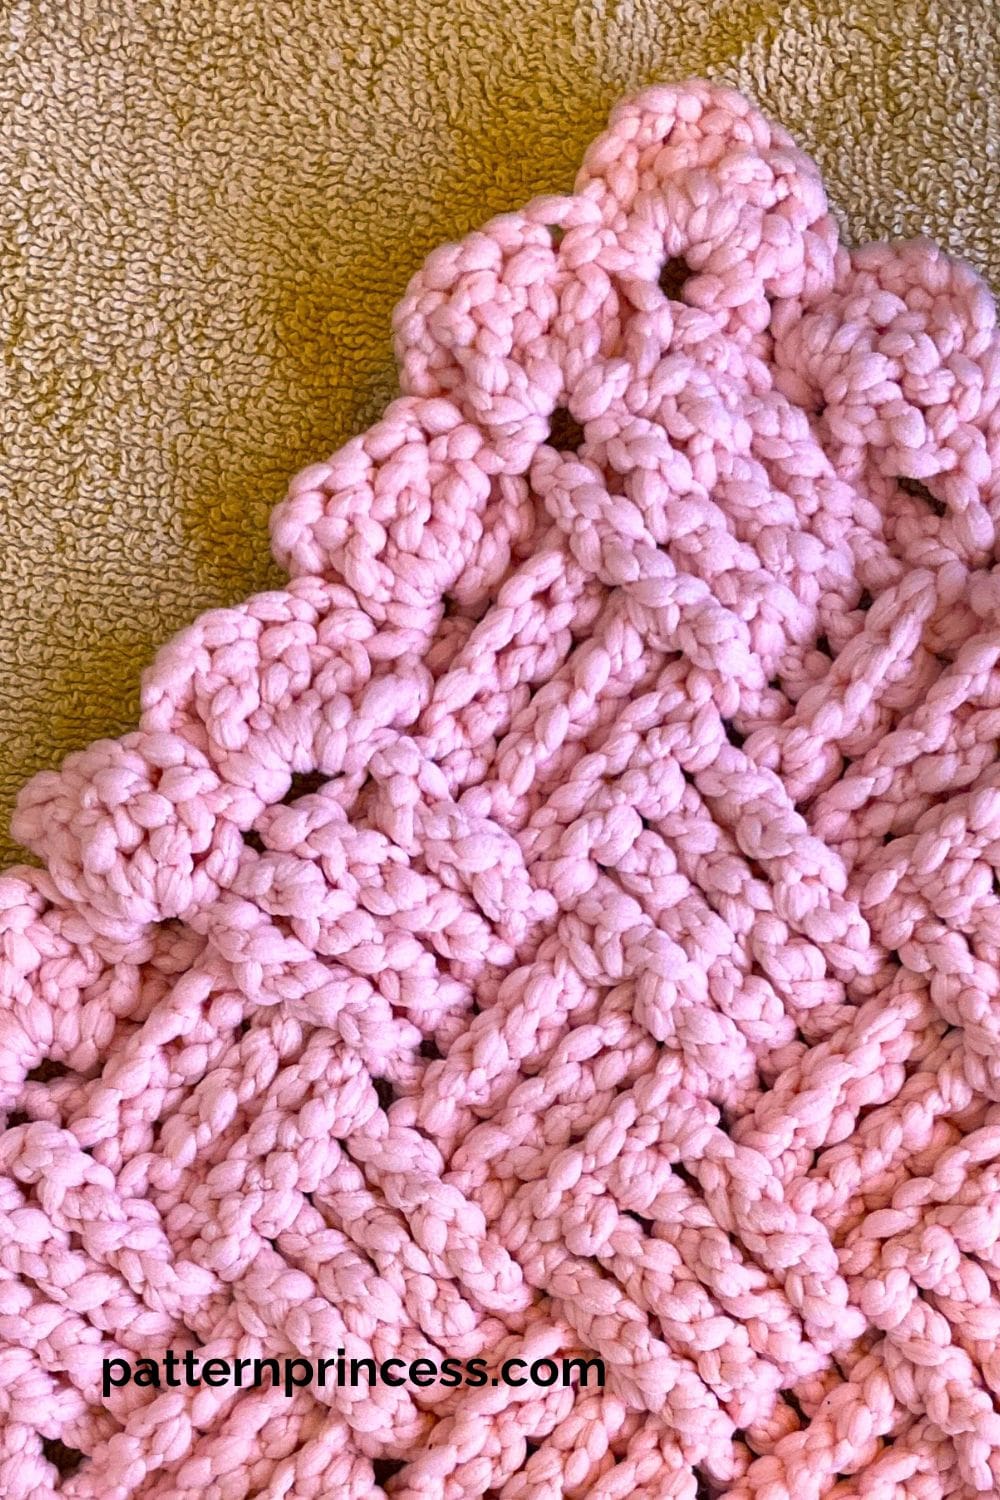
The Blush Glam Crochet Blanket with Chunky Yarn features a soft blush color and rich texture that truly stands out. Some crochet projects just feel a little extra in the best way. This plush chunky yarn makes the basketweave design pop.
This blanket has that glam girl charm while still being cozy, comforting, and perfect for everyday use. It’s the kind of blanket you’ll want to drape over the couch, layer at the foot of the bed, or gift to someone special.
Modern Popular Blankets
Chunky yarn blankets are everywhere right now, and it’s easy to see why. They work up quickly, feel incredibly luxurious, and give you that high-end look without complicated stitches. This pattern was designed to highlight the beauty of chunky yarn, letting the texture shine while keeping the stitch repeat relaxing and advanced beginner-friendly. Whether you’re crocheting while watching TV or settling in for a cozy evening, this is a project you can truly enjoy from start to finish.
Basket Weave Crochet Stitch
This beautiful throw features a stunning basketweave fabric that’s perfect for any space in your home. The all-over pattern gives it an understated, modern vibe and the raised stitching makes it both visually interesting and extra cozy.
While the finished result may appear intricate, the Basketweave stitch is surprisingly straightforward, combining basic front post and back post double crochet stitches to form its signature pattern. Whether you’re aiming to create a sophisticated look or a rustic charm, the Basketweave stitch can elevate any project with its interlocking blocks.
The scallop border uses just 1 round of single crochet, chain stitch, and double crochet stitches.
Make this Blush Glam Blanket in Any Size
One of my favorite things about this pattern is how versatile it is. The Blush Glam Crochet Blanket is offered in five sizes, making it easy to customize for your space or gifting needs. From a sweet baby blanket to a cozy throw or larger blanket, this design adapts beautifully while keeping the same plush texture and cozy feel.
- Baby or Lapghan: 40” x 40”
- Small Throw Blanket (shown): 44” x 44”
- Medium Throw Blanket: 50” x 50”
- Large Throw Blanket: 60” x 60”
- X-Large Throw Blanket: 70” x 70”
These are great starting points, but feel free to experiment based on your space or who you’re making it for. Just remember to keep the stitch multiple in mind when adjusting the starting chain.
What Makes This Blanket Special
- The basketweave stitch adds rich, dimensional texture with a soft, woven look.
- Chunky yarn makes this blanket plush, cozy, and visually stunning.
- Relaxing, repeatable row, which is perfect for mindful stitching.
- Includes five size options so you can make exactly what you need.
- Works up quickly, making it ideal for last-minute gifts or weekend projects.
A Note About the Free Pattern
This free written pattern includes clear instructions for all five sizes and is perfect for crocheters who enjoy cozy, textured projects.
If you prefer an ad-free, printable PDF, it’s available in our Etsy shop for easy printing and offline use.
Yarn Choice: Lion Brand Feels Like Cuddles
For the Blush Glam Crochet Blanket with Chunky Yarn, I used Lion Brand Yarns Feels Like Cuddles in the beautiful Rosewater color. This is a chunky #5 yarn made from 100% polyester, and it truly gives this blanket its soft and plush feel.
This yarn has a velvety, chenille-like texture that pairs beautifully with the basket weave stitch pattern. The soft sheen and fullness of the yarn help the texture stand out, making the woven design really pop without needing complicated stitches.
It’s one of those yarns that instantly elevates a simple pattern and gives it a high-end, boutique look.
Because Feels Like Cuddles is a chunky yarn, this blanket works up quickly and feels wonderfully substantial once finished. The polyester fiber adds durability and easy care, making it a great choice for cozy home décor, everyday use, or gifting.
Directions: Blush Glam Crochet Blanket
Skill Level
This stitch is perfect for an advanced beginner to intermediate crocheter.
You should be able to crochet front post and back post double crochet stitches.
Size
Here are five suggested sizes. The sizes include a 1-inch crochet border all the way around. Therefore, your measurements for the blanket itself will be 2-inches shorter and narrower than the final size.
- Baby or Lapghan: 40” x 40”
- Small Throw Blanket (shown): 44” x 44”
- Medium Throw Blanket: 50” x 50”
- Large Throw Blanket: 60” x 60”
- X-Large Throw Blanket: 70” x 70”
Changing the Size. To change the width, use multiples of 8, then add 4 extra chain stitches. To change the length, add or decrease the number of rows by 3.
Gauge
1.8 stitches and 7.7 rows = 4” x 4” in pattern stitch.
Materials
Lion Brand Yarns Feels Like Cuddles. 100% polyester #5 bulky yarn with 150g/5.3 oz, 150 meters, 164 yards per skein.
Yarn Color: Rosewater
- Baby or Lapghan: 9 skeins, 1,365 yards
- Small Throw Blanket (shown): 10 skeins, 1,640 yards
- Medium Throw Blanket: 13 skeins, 2,120 yards
- Large Throw Blanket: 19 skeins, 3,100 yards
- X-Large Throw Blanket: 26 skeins, 4,160 yards
If you are not able to find the yarn locally, you can purchase it online. Savings Center – Pattern Princess
Size N Crochet Hook 9/10.0mm
Tapestry Needle
Scissors
Stitch Marker
Tape Measure for measuring your project throughout.
Abbreviations
- CH = Chain
- BPDC = Back Post Double Crochet
- DC = Double Crochet
- FPDC = Front Post Double Crochet
- SK = Skip
- SL ST = Slip Stitch
- SP = Space
- ST = Stitch
- STs = Stitches
- [ ] = Repeat Between
Get the free crochet pattern for the straight box stitch on the website:
Crochet Stitches
Chain Stitch (CH ST)
Begin the chain stitch by making a slip knot on the crochet hook. Leave about a 5-inch tail on the yarn. This will be weaved in later.
Next snug up the yarn loop that is on the crochet hook; while it should be firm, it should also be loose enough to slide on the hook with ease.
Keeping the loop on the hook, insert the hook in the stitch, wrap the yarn over the crochet hook from back to front. Draw the yarn through the loop. (The first chain stitch is complete).
HOW TO CROCHET THE CHAIN STITCH video tutorial
Double Crochet (DC)
To work a regular double crochet, yarn over, insert the hook through both loops and pull up a loop. Next, yarn over and pull through two loops on the hook. Lastly, yarn over again and pull through the last two loops on the hook.
HOW TO CROCHET THE DOUBLE CROCHET STITCH video tutorial
How to Work a Front Post or Back Post Double Crochet Stitch
If you are unfamiliar with crocheting the front post and back post double crochet stitches, we have a whole blog post dedicated to showing you the details.
How to Work a Front Post or Back Post Double Crochet Stitch – Pattern Princess
Back Post Double Crochet (BPDC)
The back post stitches appear to recede on the side of the crocheted fabric that is facing you.
- Yarn over, insert the hook from back to front between the posts of the first and second double crochet of the row below.
- Then insert the hook from the front to the back front between the posts of the second and third stitches. (The hook should now be positioned horizontally in front of the double crochet that you are working around).
- Yarn over, pull the yarn over the post of the stitch.
- There should now be 3 loops on the hook. Yarn over, pull the yarn through 2 loops on the hook.
- Last, yarn over again and pull through the last two loops on the hook.
HOW TO CROCHET THE BACK POST DOUBLE CROCHET video tutorial
Front Post Double Crochet (FPDC)
Front post stitches are raised crochet stitches on the surface of the fabric facing you.
When you work front post stitches, you will insert your hook from the front of your work to the back. Insert your hook the front to the back, so that the post you want to crochet around is in front of your hook.
- Yarn over, insert the hook from front to back between the posts of the first and second double crochet of the row below.
- Then insert the hook from the back to the front between the posts of the second and third stitches. (The hook should now be positioned horizontally in back of the post that you are working around).
- Yarn over, pull the yarn around the post of the stitch. There should now be 3 loops on the hook.
- Yarn over, pull the yarn through 2 loops on the hook.
- Lastly, yarn over again and pull through the last two loops on the hook.
HOW TO CROCHET THE FRONT POST DOUBLE CROCHET video tutorial
Straight Box Stitch Cluster. (SC, CH 2, 3 DC) in the same Stitch.

Pattern Notes
Written instructions in US terms.
This pattern looks the same on both sides.
You can find a step-by-step video tutorialfor both a left and right hand crocheter and photos after the written pattern.
Repeat Row 3 until the basketweave blocks form a square shape (for me, this was 3 rows). Then continue alternating the rows between the sets of blocks to create the woven look.
In each row, you’ll always end with a double crochet on the top of the chain 3.
Size reminder. The sizes include a 1-inch crochet border all the way around. Therefore, your measurements for the blanket itself will be 2-inches shorter and narrower than the final size.
The crochet border uses the straight box stitch.
If this is your first time crocheting the basket weave crochet stitch, practice on a small swatch first. Making a 6-row sample helps you get comfortable with the front and back post technique before committing to a full project.
Get the free crochet pattern on the website for the basket weave stitch.
Use a stitch marker if needed. Add a stitch marker at the end of every 3rd row.
Don’t pull too tightly. Tension that’s too tight can make it hard to get your crochet hook into the stitches. A relaxed, even tension gives the best woven effect.
Turn at the end of each row.
Begin Crochet Pattern
Begin Chain Stitches
Start with a Slip Knot. Place a slip knot on your crochet hook.
Work a starting chain using a Stitch multiple of 8 + 4.
- Baby or Lapghan: 108 stitches
- Small Throw Blanket (shown): 124 stitches
- Medium Throw Blanket: 148 stitches
- Large Throw Blanket: 172 stitches
- X-Large Throw Blanket: 204 stitches
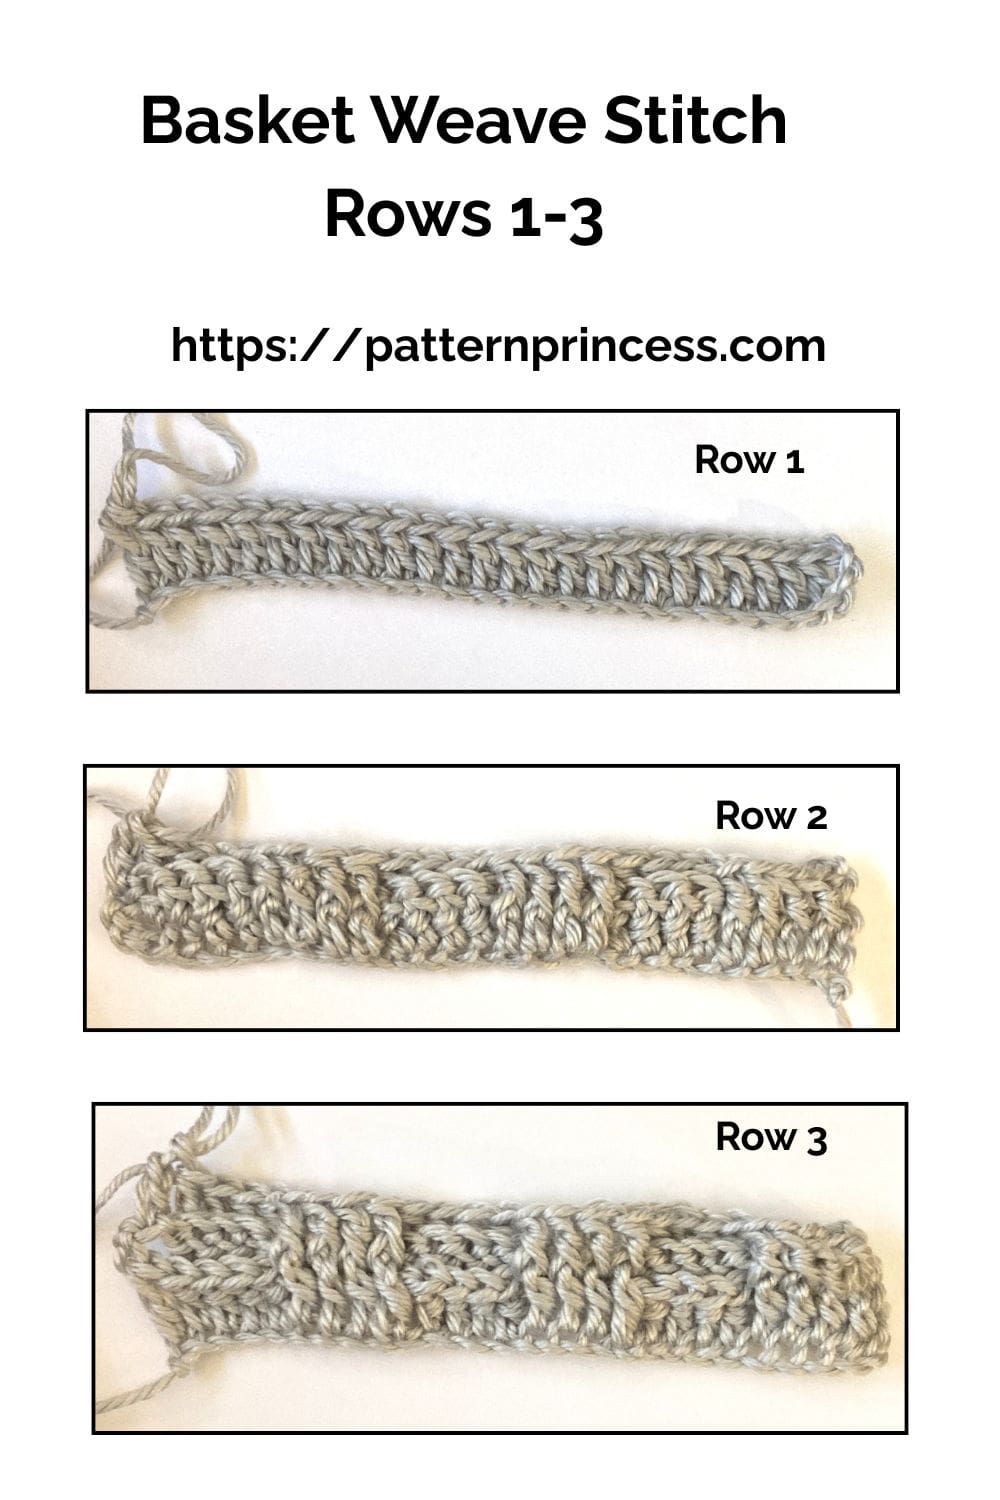
Row 1
In the 4th CH from the hook make a DC and each ST across. Turn
Row 2
CH 3 (Counts as a DC). [Work a FPDC around the next 4 DC STs. Work a BPDC around the next 4 STs]. Repeat the alternating stitches between [ ] across. End with a DC (not around the post) on the top CH of the first 3 skipped chain stitches. Turn
Row 3
CH 3 (Counts as a DC). [Work a FPDC around the next 4 FPDC STs. Work a BPDC around the next 4 BPDC STs]. Repeat the alternating stitches between [ ] across. End with a DC (not around the post) on the top CH of the previous row 3 chain stitches. Turn
Repeat row 3 until you feel that a square is made. For me, 3 rows of this alternating pattern made a square.
Tip: Stitch markers are especially helpful in this pattern. Place one at the end of every 3rd row to keep track of stitch direction changes.
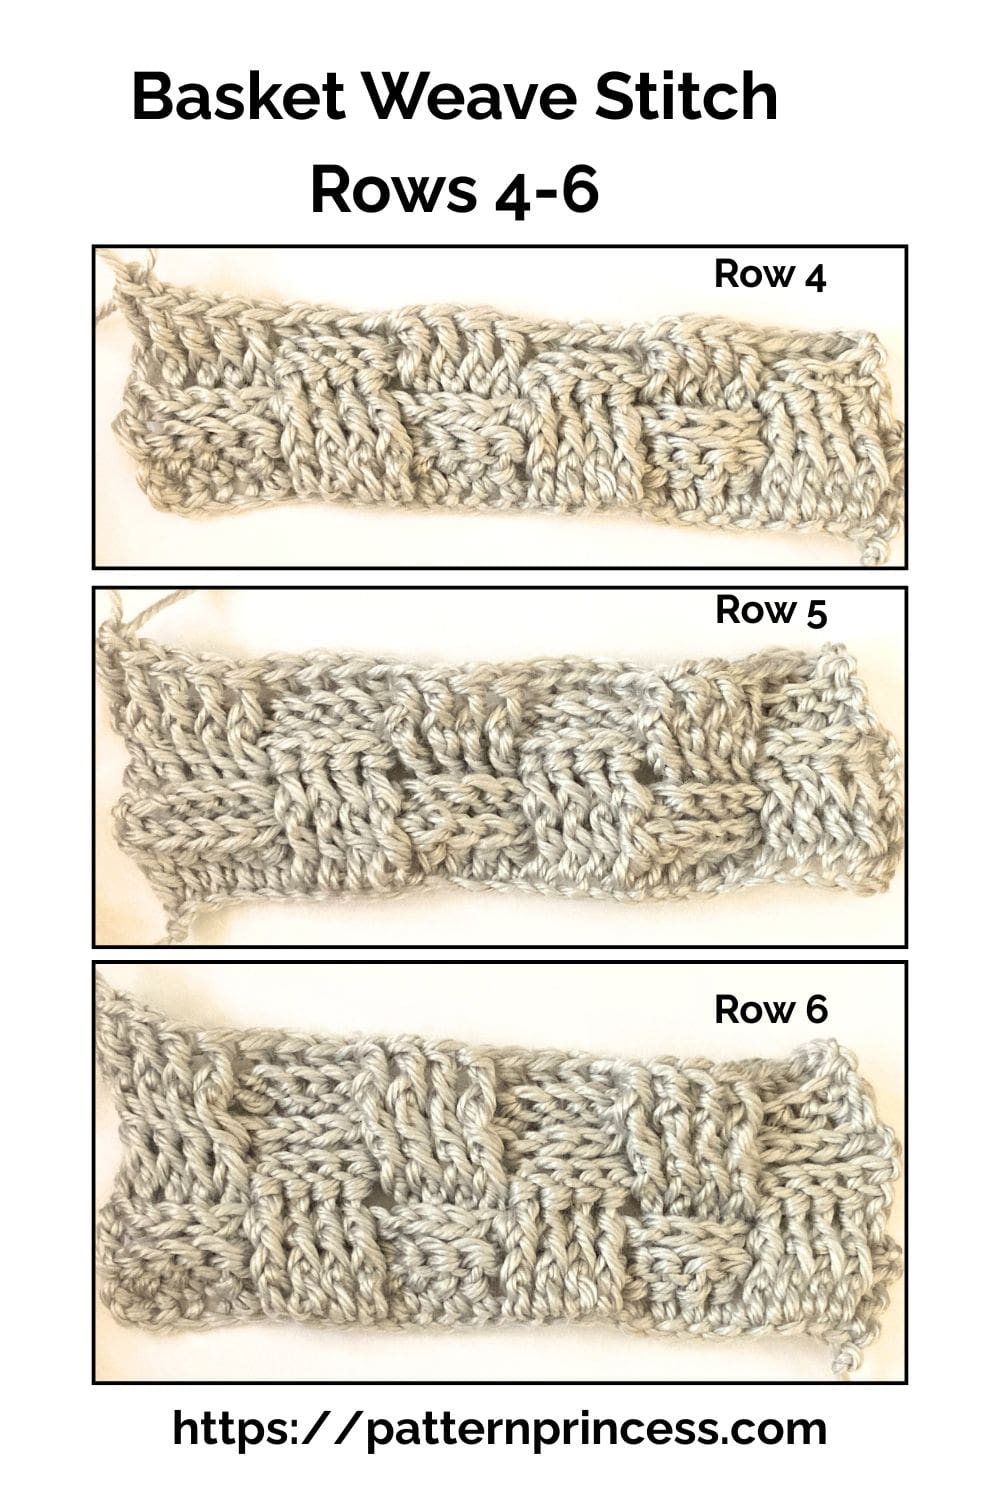
Row 4
For this row, you will be altering the direction of the stitches from the previous round. Tip. I placed a stitch marker at the end of row 3 to see where I was in the crochet pattern.
CH 3 (Counts as a DC). [Work a BPDC around the next 4 FPDC STs. Work a FPDC around the next 4 BPDC STs]. Repeat the alternating stitches between [ ] across. End with a DC (not around the post) on the top CH of the previous row 3 chain stitches. Turn
Row 5
CH 3 (Counts as a DC). [Work a BPDC around the next 4 BPDC STs. Work a FPDC around the next 4 FPDC STs]. Repeat the alternating stitches between [ ] across. End with a DC (not around the post) on the top CH of the previous row 3 chain stitches. Turn
Row 6
CH 3 (Counts as a DC). [Work a BPDC around the next 4 BPDC STs. Work a FPDC around the next 4 FPDC STs]. Repeat the alternating stitches between [ ] across. End with a DC (not around the post) on the top CH of the previous row 3 chain stitches. Turn
Add a stitch marker.
Row 7
Change the direction of the stitches with this row.
CH 3 (Counts as a DC). [Work a FPDC around the next 4 BPDC STs. Work a BPDC around the next 4 FPDC STs]. Repeat the alternating stitches between [ ] across. End with a DC (not around the post) on the top CH of the previous row 3 chain stitches. Turn
Row 8
CH 3 (Counts as a DC). [Work a FPDC around the next 4 FPDC STs. Work a BPDC around the next 4 BPDC STs]. Repeat the alternating stitches between [ ] across. End with a DC (not around the post) on the top CH of the previous row 3 chain stitches. Turn
Row 9
CH 3 (Counts as a DC). [Work a FPDC around the next 4 FPDC STs. Work a BPDC around the next 4 BPDC STs]. Repeat the alternating stitches between [ ] across. End with a DC (not around the post) on the top CH of the previous row 3 chain stitches. Turn
Add a stitch marker.
Row 10
Change the direction of the stitches with this row.
CH 3 (Counts as a DC). [Work a BPDC around the next 4 FPDC STs. Work a FPDC around the next 4 BPDC STs]. Repeat the alternating stitches between [ ] across. End with a DC (not around the post) on the top CH of the previous row 3 chain stitches. Turn
Row 11
CH 3 (Counts as a DC). [Work a BPDC around the next 4 BPDC STs. Work a FPDC around the next 4 FPDC STs]. Repeat the alternating stitches between [ ] across. End with a DC (not around the post) on the top CH of the previous row 3 chain stitches. Turn
Row 12
CH 3 (Counts as a DC). [Work a BPDC around the next 4 BPDC STs. Work a FPDC around the next 4 FPDC STs]. Repeat the alternating stitches between [ ] across. End with a DC (not around the post) on the top CH of the previous row 3 chain stitches. Turn
Rows 13 and Beyond
Continue to repeat rows 7-12 alternating the direction of the stitches.
- Baby or Lapghan: 74 rows
- Small Throw Blanket (shown): 81 rows
- Medium Throw Blanket: 93 rows
- Large Throw Blanket: 112 rows
- X-Large Throw Blanket: 131 rows
Edging Instructions
Row 1
Turn your work and begin the straight box stitch
CH 1 (Doesn’t count as a ST). Work (SC, CH 2, 3 DC) into the same ST. Continue the straight box stitch pattern around the entire edge of the blanket.
Ease the stitches along the top, bottom, and sides. For instance. On the top, [SK 2 STS, in the 3rd ST work (SC, CH 2, 3DC)]. Repeat between [ ] to the first corner. Where you work (SC, CH 2, 3DC). Then on the side I placed the stitches when the rows started and ended rather than the CH spaces, as there was less pulling that way. Continue working the (SC, CH 2, 3DC) around. Join with a SL ST.
Finishing
Use the tapestry needle to weave in any loose ends on the back side of the work. I like to weave back and forth 3 to 5 times. Cut off the excess yarn.
Video Instructions on our YouTube channel of the Crochet Basket Weave Stitch
Right hand basket weave tutorial
Left hand basket weave tutorial
Crocheting the Blush Glam Crochet Blanket with Chunky Yarn Video
Straight Box Stitch Video Tutorials on YouTube
We hope that you have enjoyed this lovely crochet pattern. Here are a few more free crochet patterns to inspire your next project.

You can find Victoria crocheting, quilting, and creating recipes. She has cooked in restaurants for over 20 years, including many larger parties. She learned to crochet when she was just 11 years old and has been crocheting ever since; over 50 years now. Over 40 years ago, she loved her first class in sewing and continues to hone her skills in quilting. Many have enjoyed the handmade gifts over the years. In her professional career, she has worked in management in a wide variety of businesses including higher education as a dean of a division. All the while attending college part-time to achieve her doctorate in higher education with an emphasis in e-learning.