Last updated on March 27th, 2026 at 09:52 am
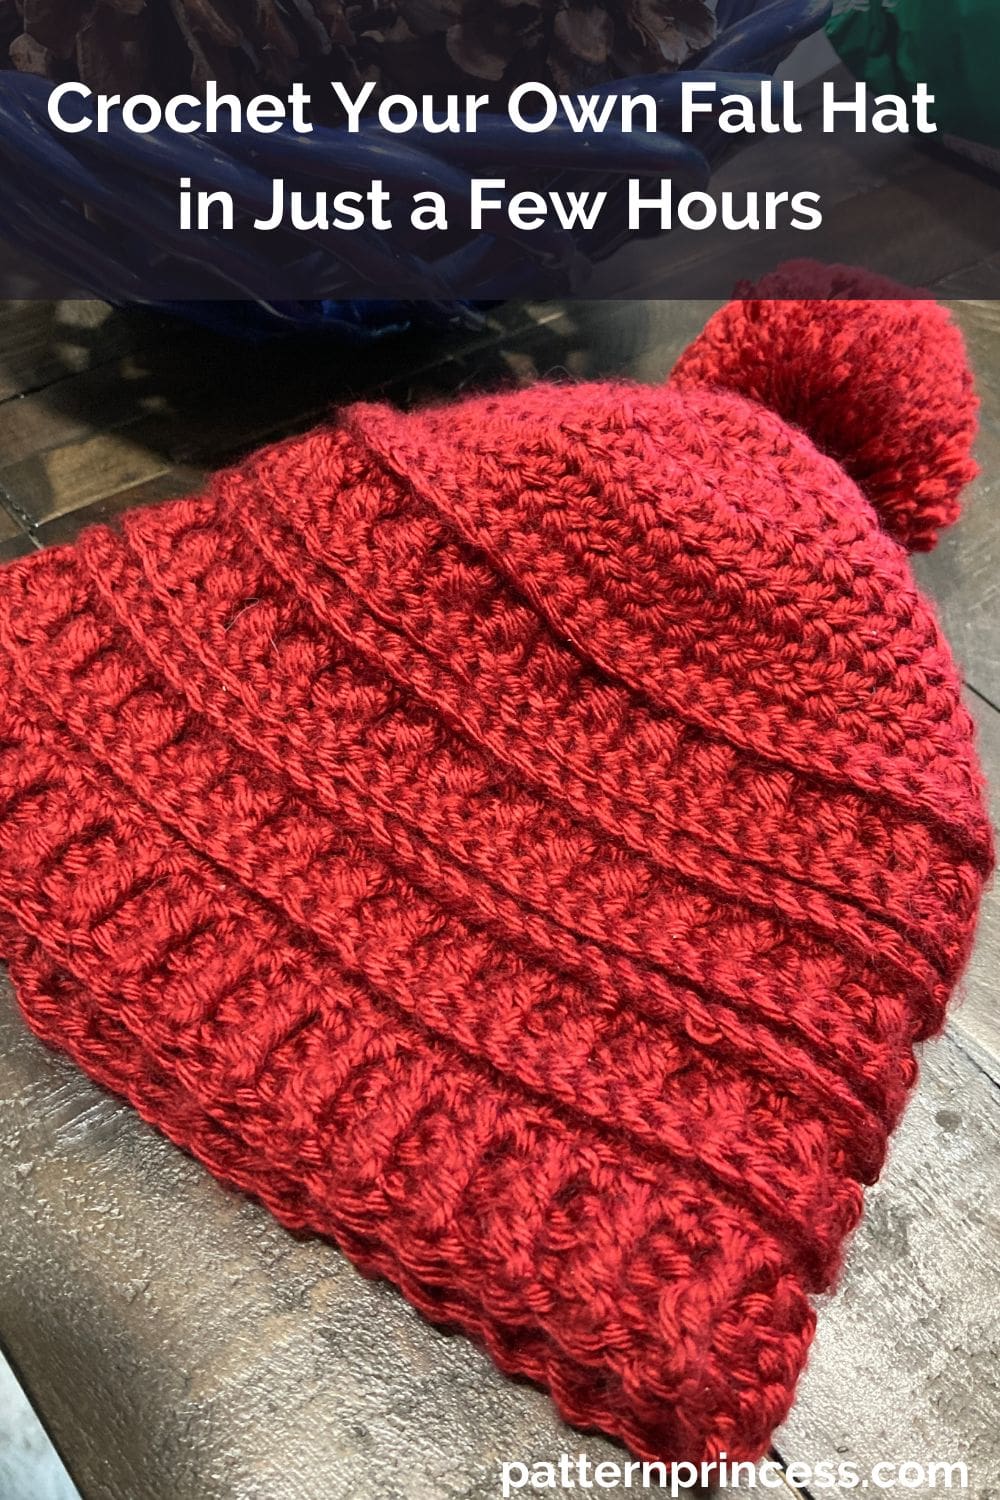
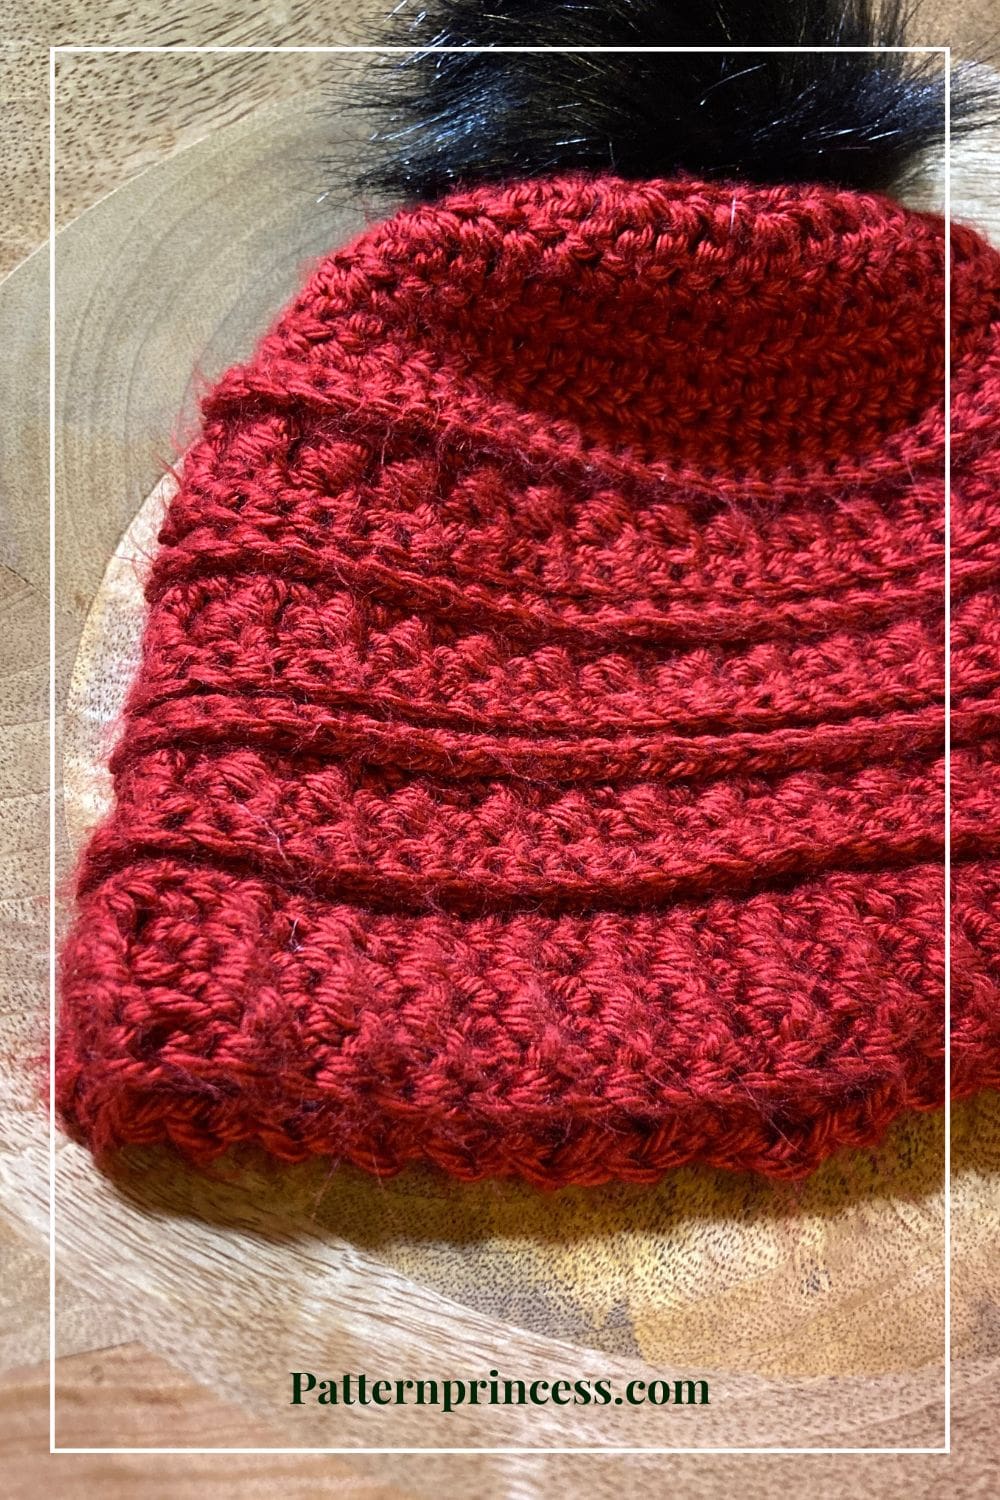
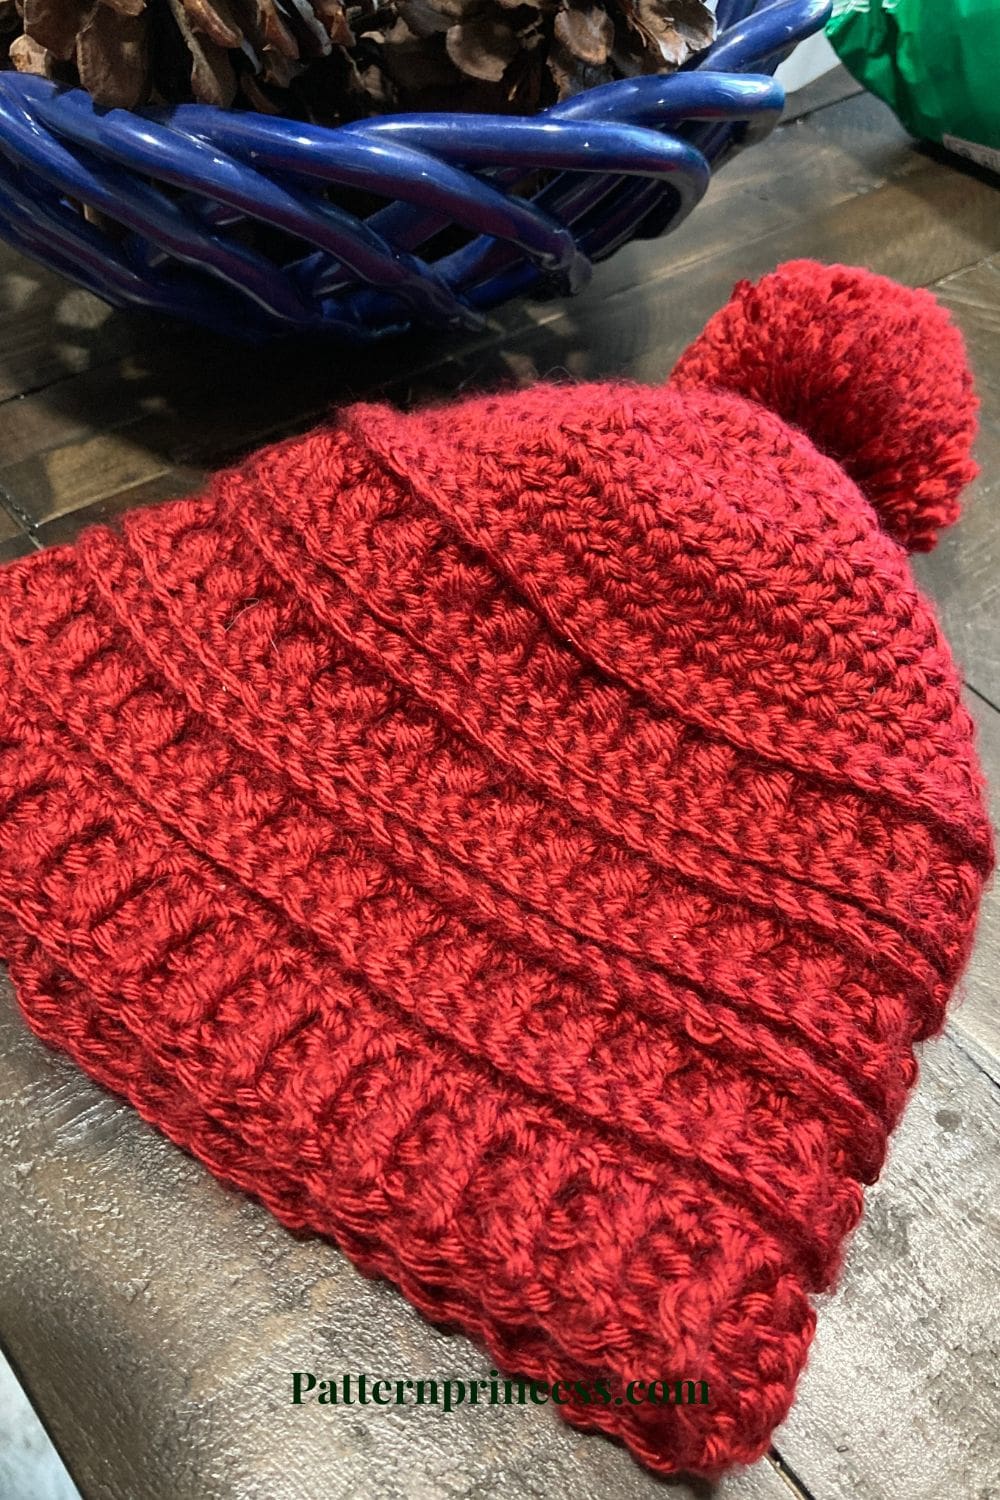
Crochet Your Own Fall Hat in Just a Few Hours. It is a stylish accessory with all the gorgeous texture. Using a combination of stitches in alternating rows provides such a fashion statement.
Create something that is both warm and beautiful at the same time.
As the weather turns cooler and leaves start to fall, there’s nothing like a cozy crochet hat to keep you warm and add a touch of seasonal style.
Since this beanie works up so quickly, you can make this as a last minute gift if needed. Beanies are always wonderful charity projects. Donating something like to someone in need is a lovely personal act.
Crochet Fall Hat in Four Sizes
This autumn crochet hat pattern is a fun, crochet project that combines comfort and fashion, making it the perfect accessory for those crisp fall days. Whether you’re sipping pumpkin spice lattes at the farmer’s market or enjoying a brisk afternoon walk, this hat will become your go-to for all things fall.
You’ll find directions for four different sizes of this cap.
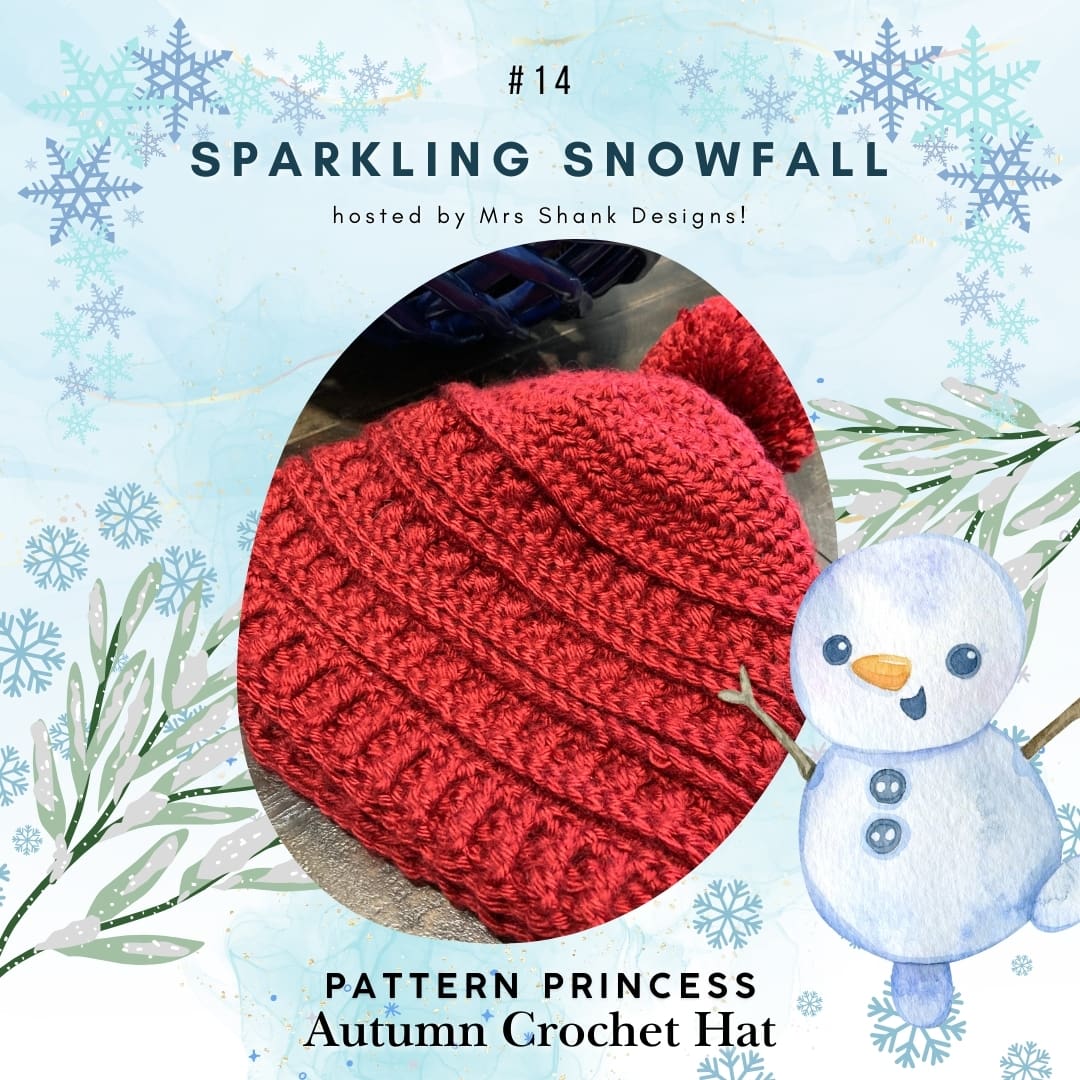
Sparkling Snowfall Blog Hop
This crochet pattern is part of the blog hop for 2024. Every single day, from December 1 to December 31, there is a new featured pattern.
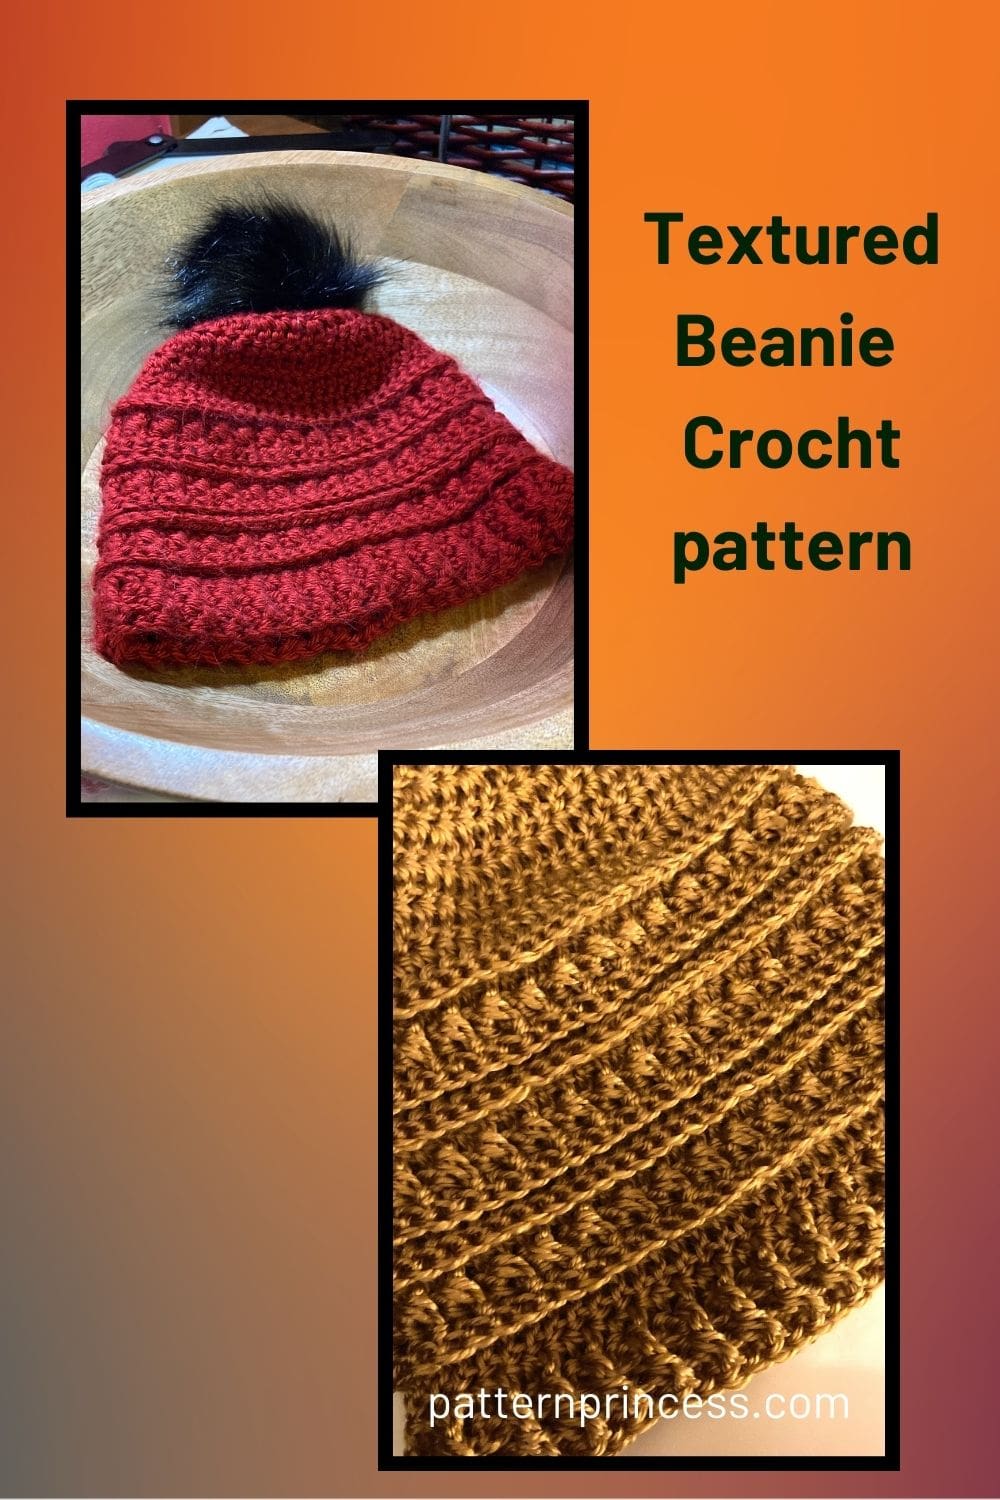
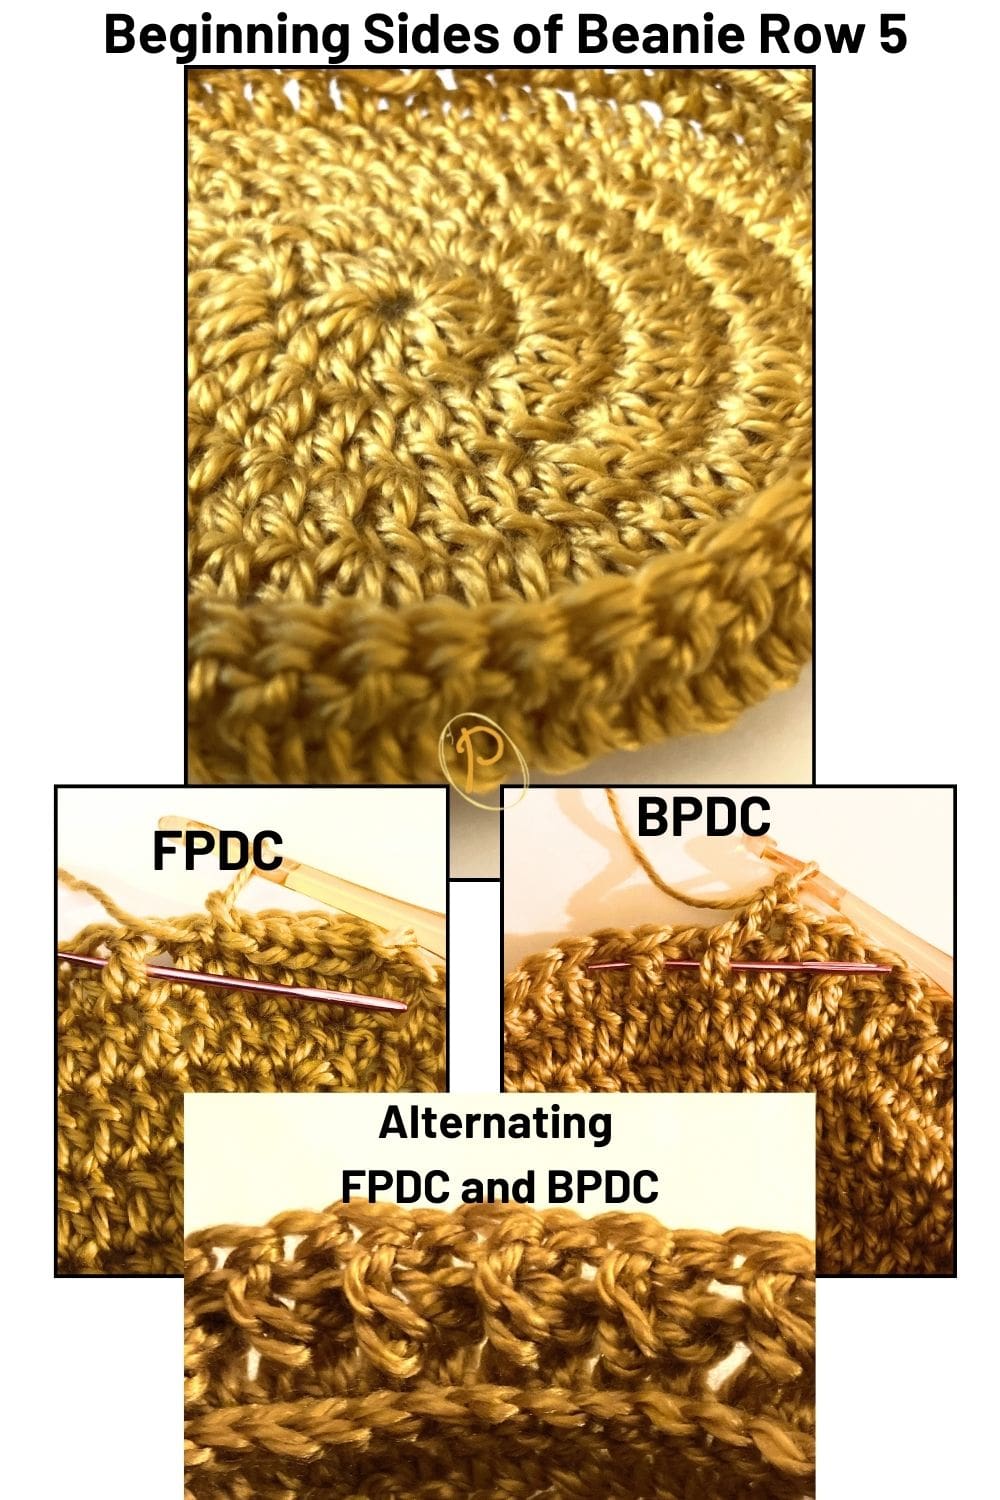
Textured Crochet Technique
Don’t let the textured look scare you. It is simpler than you may think to achieve this textured crochet technique. The front post double crochet and back post double crochet stitches help achieve a unique textured look.
The ridge is completed by using a front post single crochet stitch.
There are photos and video tutorials to help you along the way.
Get Your Ad Free Printable PDF of this pattern in our Etsy Shop.
Yarn Suggestions
Today, I used a Caron Simply Soft yarn. It is a medium worsted weight yarn. Here are some other yarn suggestions if you are not able to find the same yarn I used locally.
This pattern is great for using up your yarn stash.
If you’re looking for other great medium-weight yarns for crocheting a beanie, here are some versatile options:
Lion Brand Vanna’s Choice – A popular, soft, and durable acrylic yarn that comes in a wide range of colors. It’s easy to work with and machine washable, perfect for hats.
Red Heart Soft – Another acrylic yarn known for its softness and smooth texture, Red Heart Soft has a slight sheen, similar to Caron Simply Soft, and a range of beautiful color options.
Paintbox Yarns Simply Aran – This yarn is affordable, soft, and comes in a huge palette of colors, making it great for customizable beanies. It’s durable and easy to care for.
Patons Canadiana – This is a medium-weight, 100% acrylic yarn known for being super soft and easy to work with. It’s a good choice if you’re looking for durability and warmth.
Deborah Norville Everyday Soft Worsted – This anti-pilling yarn is ideal for hats that will see a lot of wear. It has a soft, smooth feel and is easy to care for, perfect for cozy hats.
Each of these yarns is easy to find, has good stitch definition. And comes in a wide array of different colors so you can get just the look you want for your beanie.
Directions: Autumn Crochet Hat
Skill Level
Intermediate Crocheter
Gauge
It’s a good idea to do a gauge swatch measuring after round 4.
Start working the Crown of the pattern for the hat. Measure the diameter of the circle after the first 4 rounds.
Child 2-3 Years 4-inches in diameter.
Child 3-10 Years 4 1/2-inches in diameter.
Teen/Adult Small 5-inches in diameter.
Adult Large 5 1/4-inches in diameter.
Head Size Chart
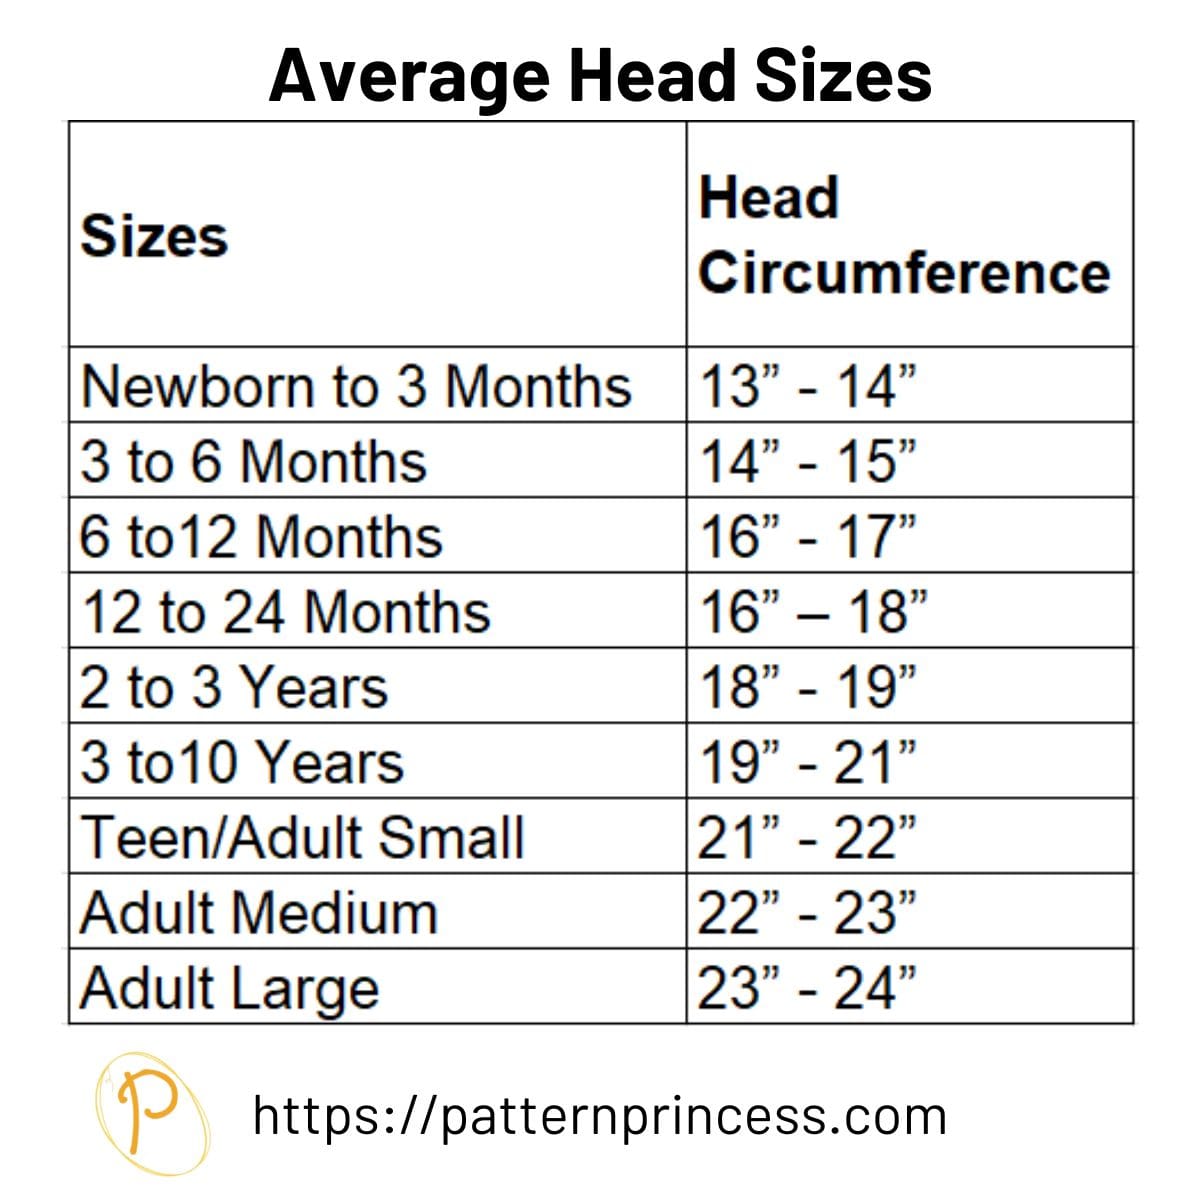
Hat Size
This pattern details four different sizes.
Child 2-3 Years: 8 inches tall X 18-19 inches around.
Child 3-10 Years: 8 inches tall X 19-21 Inches around.
Teen/Adult Small: 9 ½ inches tall X 21-22 inches around.
Adult Large Pattern: 9 ½ inches tall X 23-24 inches around.
Abbreviations
- CH = Chain
- DC = Double Crochet
- BPDC = Back Post Double Crochet
- FPDC = Front Post Double Crochet
- FPSC = Front Post Single Crochet
- SC = Single Crochet
- SK ST = Skip Stitch
- SL ST = Slip Stitch
- ST = Stitch
- STs = Stitches
- [ ] = Repeat Between
Supplies
1 Partial Skein Caron Simply Soft Autumn Red (approximately ¾ of the skein or 240 yards).
Crochet Hook Size I 5.5mm
Tapestry Needle to weave in the ends
Tape Measure
Scissors
Stitch Marker, optional. You may find it easier to tell exactly where the stitches are that you work your slip stitches into if you mark them.
Sewing Needle
Thread
Basic Crochet Stitches
Back Post Double Crochet (BPDC)
The back post stitches appear to recede on the side of the crocheted fabric that is facing you. Note: Because a post stitch is shorter than a normal stitch, you make the turning chain with one chain stitch less than the normal turning chain requires.
Yarn over, insert the hook from back to front between the posts of the first and second double crochet of the row below. Then insert the hook from the front to the back front between the posts of the second and third stitches. (The hook should now be positioned horizontally in front of the double crochet that you are working around). Yarn over, pull the yarn over the post of the stitch. There should now be 3 loops on the hook. Yarn over, pull the yarn through 2 loops on the hook. Last, yarn over again and pull through the last two loops on the hook.
HOW TO CROCHET THE BACK POST DOUBLE CROCHET video tutorial
Double Crochet (DC)
Yarn over, insert the hook through both loops and pull up a loop. Next, yarn over and pull through two loops on the hook. Lastly, yarn over again and pull through the last two loops on the hook.
HOW TO CROCHET THE DOUBLE CROCHET STITCH video tutorial
Front Post Double Crochet (FPDC)
Front post stitches are raised crochet stitches on the surface of the fabric facing you. Note: Because a post stitch is shorter than a normal stitch, you make the turning chain with one chain stitch less than the normal turning chain requires. Yarn over, insert the hook from front to back between the posts of the first and second double crochet of the row below. Then insert the hook from the back to the front between the posts of the second and third stitches. (The hook should now be positioned horizontally behind the double crochet that you are working around). Yarn over, pull the yarn around the post of the stitch. There should now be 3 loops on the hook. Yarn over, pull the yarn through 2 loops on the hook. Lastly, yarn over again and pull through the last two loops on the hook.
HOW TO CROCHET THE FRONT POST DOUBLE CROCHET video tutorial
Here is a video tutorial alternating the FPDC and BPDC. FRONT POST AND BACK POST DOUBLE CROCHET video tutorial.
Single Crochet (SC)
Insert the hook, pull up a loop. Yarn over and pull through the two loops on the hook.
HOW TO CROCHET THE SINGLE CROCHET STITCH video tutorial
Pattern Notes
Pattern is written in US Terms
Except for the first round, when completing the chain 3 at the beginning of the round, it does not count as a stitch. (This is used to help make the joining seam invisible).
When joining for rounds 2 and beyond, work the slip stitch into the first stitch, NOT the top of the first chain 3 as that does not count as a stitch.
The stitch count is noted for each size every round.
Child 2-3 Years Old Pattern 18-19 inches. Starting STs (8)
Child 3-10 Years Old Pattern 19-21 Inches. Starting STs (10)
Teen/Adult Small Pattern 21-22 inches. Starting STs (12)
Adult Large Pattern 23-24 inches. Starting Sts (13)
Pattern Directions
The pattern is written in Teen/Adult Small. The other sizes are indicated in the ( ).
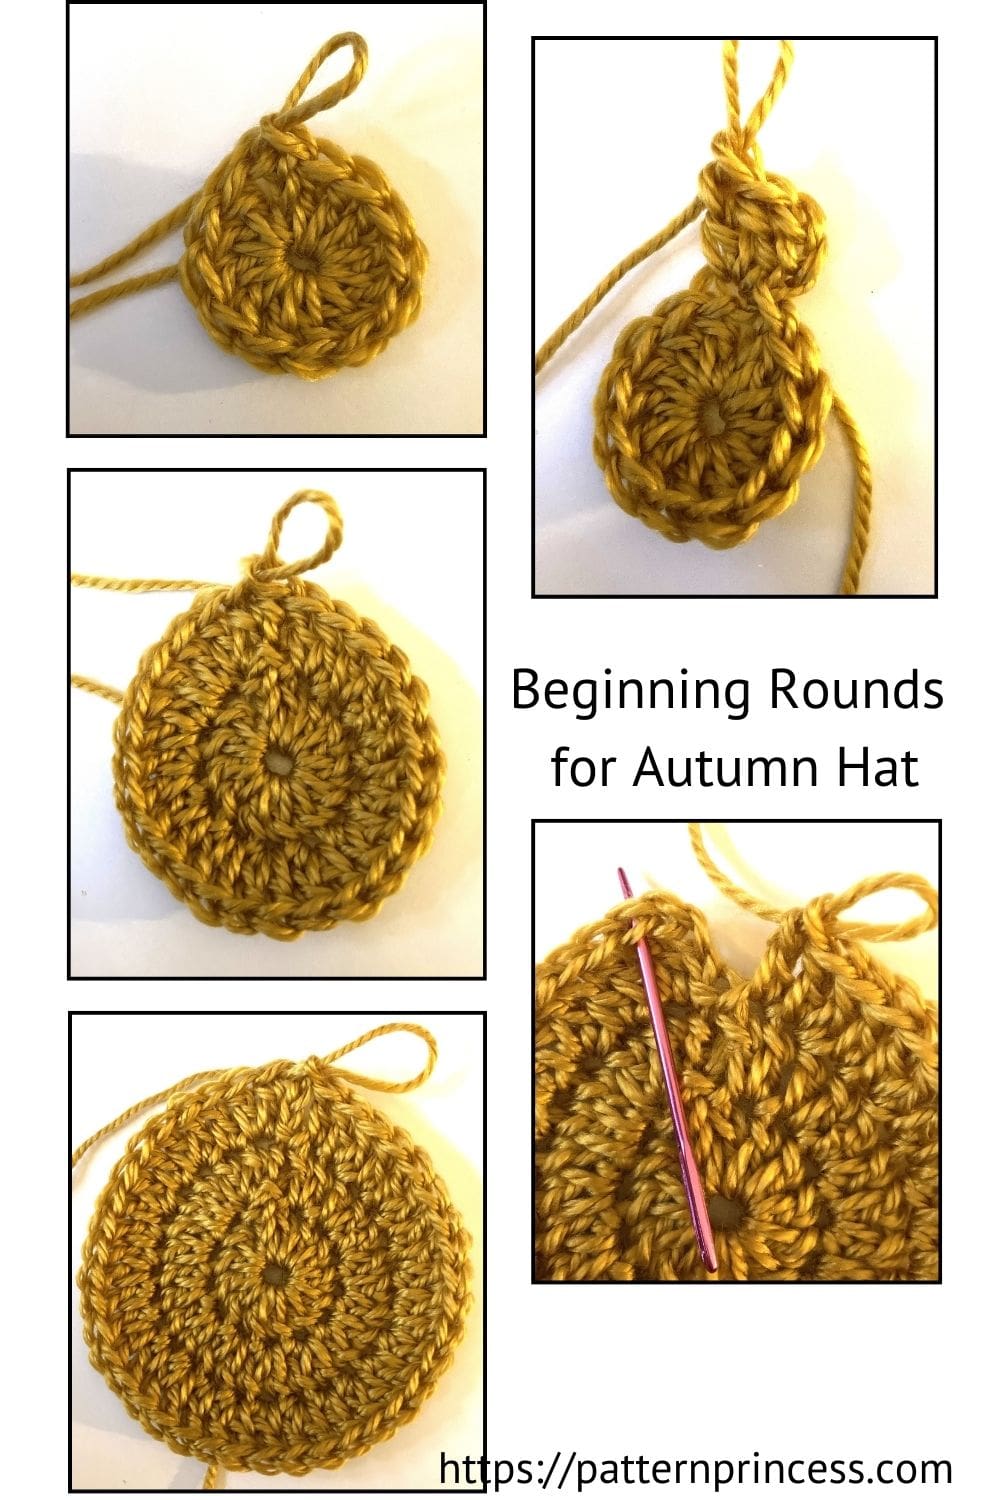
Using a magic ring (or you can CH 4 and SL ST to join and form circle)
Round 1
CH 3 (Counts as a DC). Insert hook into the magic ring and work 11 (7,9,12) DC into the magic ring (circle). Pull the yarn tail to close the ring and SL ST into the top ST of the first CH 3. Do not turn. (12 DC) (8, 10, 13).
Round 2
CH 3 (Does Not Count as a DC). 2 DC in same ST. 2 DC in each DC around. Join with a SL ST to the first DC. (24 DC) (16, 20, 26).
Round 3
CH 3 (Does Not Count as a DC). 2 DC in same ST. 1 DC in the next ST. [2 DC in the next ST, 1 DC in the next ST], repeat around. Join with a SL ST to the first DC. (36 DC) (24, 30, 39).
Round 4
CH 3 (Does Not Count as a DC). 2 DC in same ST. 1 DC in the next 2 STs. [2 DC in the next ST, 1 DC in the next 2 STs], repeat around. Join with a SL ST to the first DC. (48 DC) (32, 40, 52).
Measurements after this round.
Child 2-3 Years: 4-inches in diameter.
Child 3-10 Years: 4 1/2-inches in diameter.
Teen/Adult Small: 5-inches in diameter.
Adult Large: 5 1/4-inches in diameter.
This round starts to form the sides
Round 5 Child 2-3 Years (only)
CH 3 (Does Not Count as a DC). [2 DC in same ST. 1 DC in the next 7 STs]. Repeat around. Join with a SL ST to the first DC. (36 DC)
Round 5 Child 3-10 Years (only)
CH 3 (Does Not Count as a DC). [2 DC in same ST. 1 DC in the next 7 STs]. Repeat around. Join with a SL ST to the first DC. (45 DC)
Round 6 Teen/Adult Small (only)
CH 3 (Does Not Count as a DC). [2 DC in same ST. 1 DC in the next 7 STs]. Repeat around. Join with a SL ST to the first DC. (54 DC)
Round 5 Adult Large (only)
CH 3 (Does Not Count as a DC). [2 DC in same ST. 1 DC in the next 7 STs]. Repeat around until 4 STs are left. Work 2 DC in the next ST and 1 DC in the next 3 STs. Join with a SL ST to the first DC. (59 DC)
Round 6 Child 2-3 Years (only)
CH 3 (Does Not Count as a DC). [2 DC in same ST. 1 DC in the next 7 STs]. Repeat around until 4 STs are left. Work 2 DC in the next ST and 1 DC in the next 3 STs. Join with a SL ST to the first DC. (41 DC)
Round 6 Child 3-10 Years (only)
CH 3 (Does Not Count as a DC). [2 DC in same ST. 1 DC in the next 7 STs]. Repeat around until 5 STs are left. Work 2 DC in the next ST and 1 DC in the next 4 STs. Join with a SL ST to the first DC. (51 DC)
Round 6 Teen/Adult Small (only)
CH 3 (Does Not Count as a DC). [2 DC in same ST. 1 DC in the next 7 STs]. Repeat around until 6 STs are left. Work 2 DC in the next ST and 1 DC in the next 5 STs. Join with a SL ST to the first DC. (61 DC).
Round 6 Adult Large (only)
CH 3 (Does Not Count as a DC). [2 DC in same ST. 1 DC in the next 7 STs]. Repeat around until 3 STs are left. Work 2 DC in the next ST and 1 DC in the next 2 STs. Join with a SL ST to the first DC. (67 DC)
Round 7 Child 2-3 Years (only)
CH 3 (Does Not Count as a DC). [2 DC in same ST. 1 DC in the next 7 STs]. Repeat around until 1 ST left. Work 2 DC in the next ST. Join with a SL ST to the first DC. (47 DC)
Round 7 Child 3-10 Years (only)
CH 3 (Does Not Count as a DC). [2 DC in same ST. 1 DC in the next 7 STs]. Repeat around until 3 STs are left. Work 2 DC in the next ST and 1 DC in the next 2 STs. Join with a SL ST to the first DC. (58 DC)
Row 7 Teen/Adult Small (only)
CH 3 (Does Not Count as a DC). [2 DC in same ST. 1 DC in the next 7 STs]. Repeat around until 5 STs are left. Work 2 DC in the next ST and 4 DC in the next 2 STs. Join with a SL ST to the first DC. (69 DC).
Round 7 Adult Large (only)
CH 3 (Does Not Count as a DC). [2 DC in same ST. 1 DC in the next 7 STs]. Repeat around until 2 STs are left. Work 2 DC in the next ST and 1 DC in the next ST. Join with a SL ST to the first DC. (75 DC)
Row 8
CH 1 (Does Not Count as a ST). FPSC in each DC ST around. SL ST to the first FPSC. (47, 58, 69, 75)
Note. Make sure not to work a stitch around the initial chain 3 of the previous row. That doesn’t count as a stitch. Skip that and join with the SL ST into the first FPSC.
Row 9
CH 2 (Does Not Count as a ST). DC in each ST around. Join with a SL ST into the first DC. (47, 58, 69, 75)
Row 10
CH 2 (Does Not Count as a ST). FPDC around the first DC ST, BPDC around the next DC ST. Continue alternating the FPDC and BPDC around. Join with a SL ST into the first FPDC. (47, 58, 69, 75)
Row 11
CH 1 (Does Not Count as a ST). FPSC in each DC ST around. SL ST to the first FPSC. (47, 58, 69, 75)
Row 12
CH 2 (Does Not Count as a ST). DC in each ST around. Join with a SL ST into the first DC. (47, 58, 69, 75)
Row 13
CH 1 (Does Not Count as a ST). FPSC in each DC ST around. SL ST to the first FPSC. (47, 58, 69, 75)
Row 14
CH 2 (Does Not Count as a ST). DC in each ST around. Join with a SL ST into the first DC. (47, 58, 69, 75)
Row 15
CH 2 (Does Not Count as a ST). FPDC around the first DC ST, BPDC around the next DC ST. Continue alternating the FPDC and BPDC around. Join with a SL ST into the first FPDC. (47, 58, 69, 75)
Row 16
CH 1 (Does Not Count as a ST). FPSC in each DC ST around. SL ST to the first FPSC. (47, 58, 69, 75)
Row 17
CH 2 (Does Not Count as a ST). DC in each ST around. Join with a SL ST into the first DC. (47, 58, 69, 75)
Row 18
CH 1 (Does Not Count as a ST). FPSC in each DC ST around. SL ST to the first FPSC. (47, 58, 69, 75)
Row 19
CH 2 (Does Not Count as a ST). DC in each ST around. Join with a SL ST into the first DC. (47, 58, 69, 75)
Row 20
CH 2 (Does Not Count as a ST). FPDC around the first DC ST, BPDC around the next DC ST. Continue alternating the FPDC and BPDC around. Join with a SL ST into the first FPDC. (47, 58, 69, 75)
Row 21 for Child 2-3 Years and Child 3-10 Years (only)
CH 2 (Does Not Count as a ST). BPDC around the first DC ST, FPDC around the next ST. Continue alternating the BPDC and FPDC around. Join with a SL ST into the first BPDC. (47, 58)
**At this point, the two smaller hat sizes are ready for finishing.
Row 21 Teen/Adult Small and Adult Large (only)
CH 1 (Does Not Count as a ST). FPSC in each DC ST around. SL ST to the first FPSC. (69, 75)
Row 22 Teen/Adult Small and Adult Large (only)
CH 2 (Does Not Count as a ST). DC in each ST around. Join with a SL ST into the first DC. (69, 75)
Row 23 Teen/Adult Small and Adult Large (only)
CH 2 (Does Not Count as a ST). DC in each ST around. Join with a SL ST into the first DC. (69, 75)
Row 24
CH 2 (Does Not Count as a ST). FPDC around the first DC ST, BPDC around the next DC ST. Continue alternating the FPDC and BPDC around. Join with a SL ST into the first FPDC. (69, 75)
Row 25
CH 2 (Does Not Count as a ST). FPDC around the first DC ST, BPDC around the next DC ST. Continue alternating the FPDC and BPDC around. Join with a SL ST into the first FPDC. (69, 75)
Finishing
Cut off the yarn leaving a long tail. I like to leave a 10-12-inch yarn tail. Pull the tail through the last loop on the hook and snug up. Using the yarn needle, weave in ends and cut off excess yarn.
Adding the yarn Pom Pom or a Fur Pom Pom
You can see our tutorial on How to Make a Pom Pom using yarn. How to Make Pom-Poms Easily – Pattern Princess
We show you how to make one using a large pom pom maker. It’s one of my favorite tools.
Optionally, you can use a faux fur pom pom. They can be purchased in craft stores and online. It’s really easy to just sew on. Some have a loop and if you find one like that, just sew a button inside the top of the hat so you can loop the pom pom loop around the button.
If using the fur ones, I like to try and get the kind that snap in. That way, you just use a sewing needle and thread or yarn and yarn needle and sew the snap end into the top of the hat on the inside. Then just snap the fur part onto the snap from the outside.
Your hat is finished.
We hope you enjoyed this free pattern for a crochet beanie. Here are a few other easy crochet patterns to inspire your next project.
I made this mini beanie with a pom pom hat and scarf for the Holiday season.
Holiday Wine Bottle Scarf & Hat Cozy

You can find Victoria crocheting, quilting, and creating recipes. She has cooked in restaurants for over 20 years, including many larger parties. She learned to crochet when she was just 11 years old and has been crocheting ever since; over 50 years now. Over 40 years ago, she loved her first class in sewing and continues to hone her skills in quilting. Many have enjoyed the handmade gifts over the years. In her professional career, she has worked in management in a wide variety of businesses including higher education as a dean of a division. All the while attending college part-time to achieve her doctorate in higher education with an emphasis in e-learning.
PS. on the part where the sides are starting to form, I’m thinking the Teen size small should start with “Round 5” not Round 6, as listed, since the last round was Round 4.
PPS good looking finished hat, by the way. I love the tiers!!
I really like this pattern, it was fun to do. Question: was there supposed to be a ch 1 at the end of all the rows? I just wondered if there was a mistake in the pattern so I added the ch 1 at the end of all rows.
Thanks for asking. When completing the rounds, the chain two does not count as a stitch. Attach the round I the first stitch. It helps close up the space where the rounds are started and ended, which makes it harder to tell where that area is when looking at the hat.