Last updated on November 30th, 2024 at 08:14 am
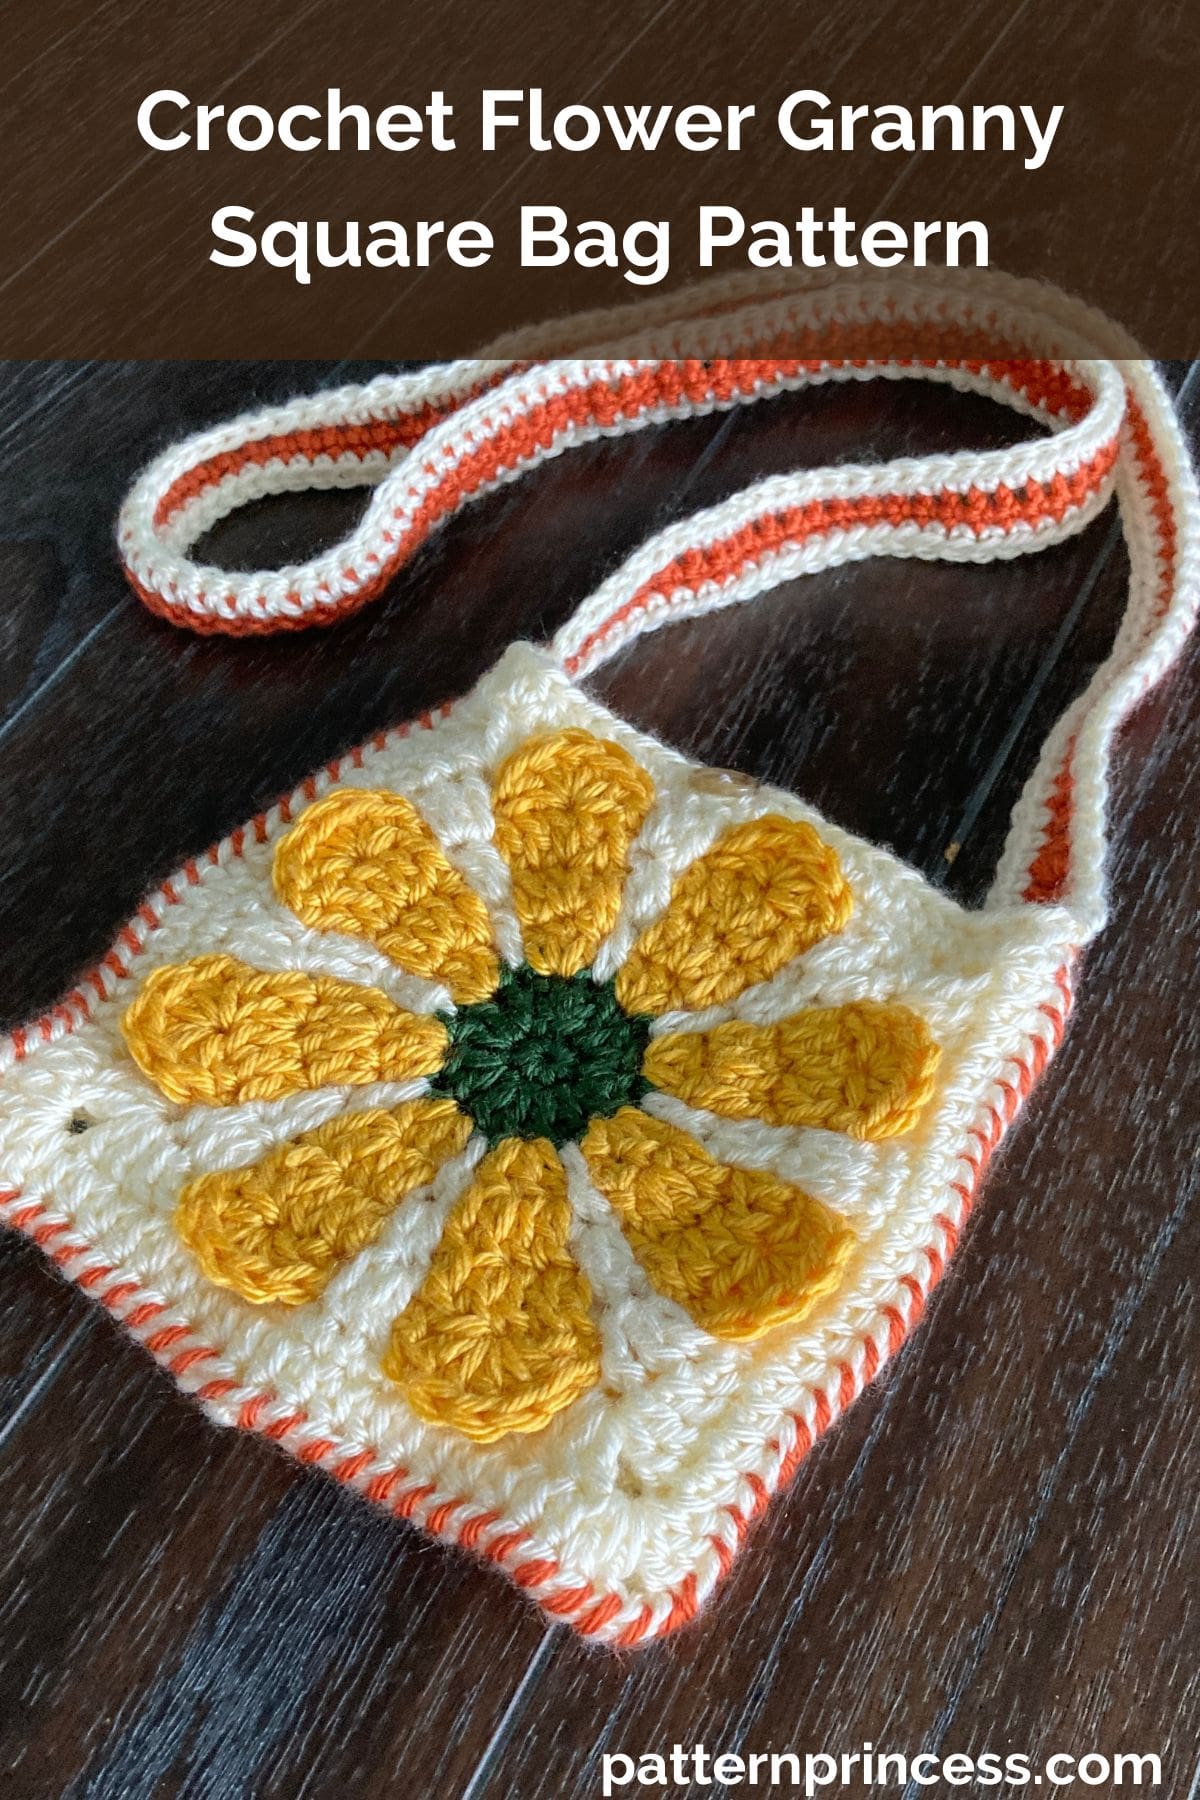
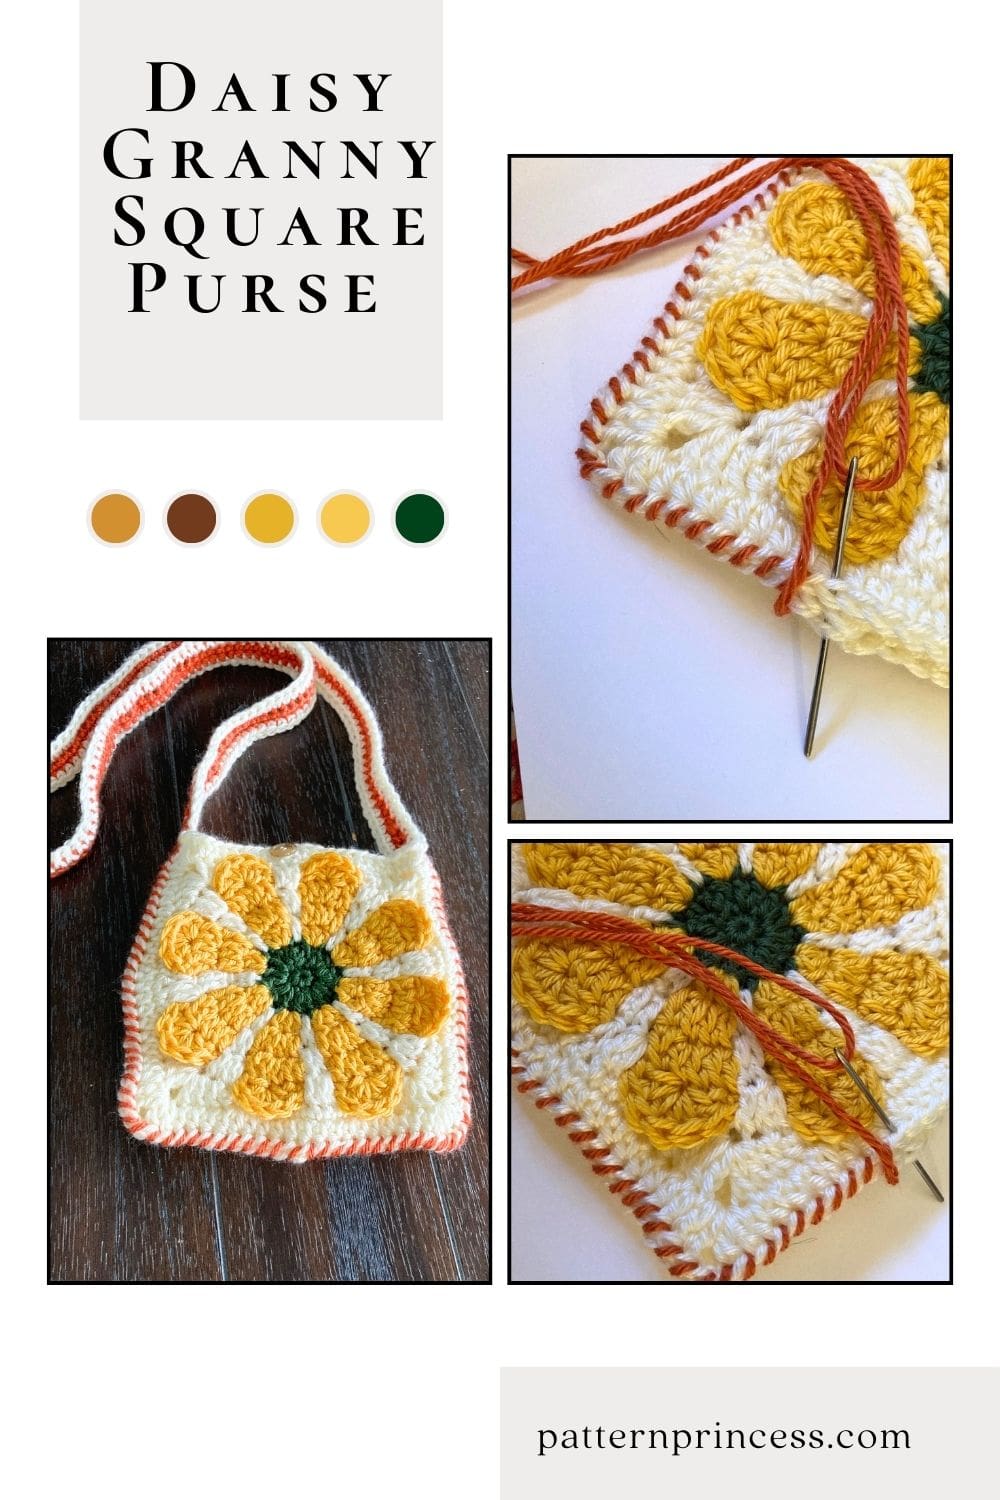
Introducing the Crochet Flower Granny Square Bag. A fun and vibrant accessory that’s perfect for anyone looking to add a touch of retro flair to their everyday style.
This crossbody bag gives simple granny squares a new purpose. Make this in different color combinations for a fun look. Flower granny squares can make for the perfect accessory.
Who Would Love This Bag?
This charming bag is perfect for the crochet enthusiast looking to blend practicality with vintage flair. It’s ideal for those who appreciate the art of recycling yarn scraps into something beautiful and functional. Whether you’re heading to a farmers’ market, a picnic in the park, or simply running errands, this bag adds a touch of handmade elegance to any outing.
Craft Fair Sellers: If you participate in craft fairs or sell handmade items, these bags could be a hit at your next event. Their charming design with a beautiful flower motif and practical size make them an attractive addition to any craft market.
Yarn Scraps Make This Granny Square Bag Versatile and Unique
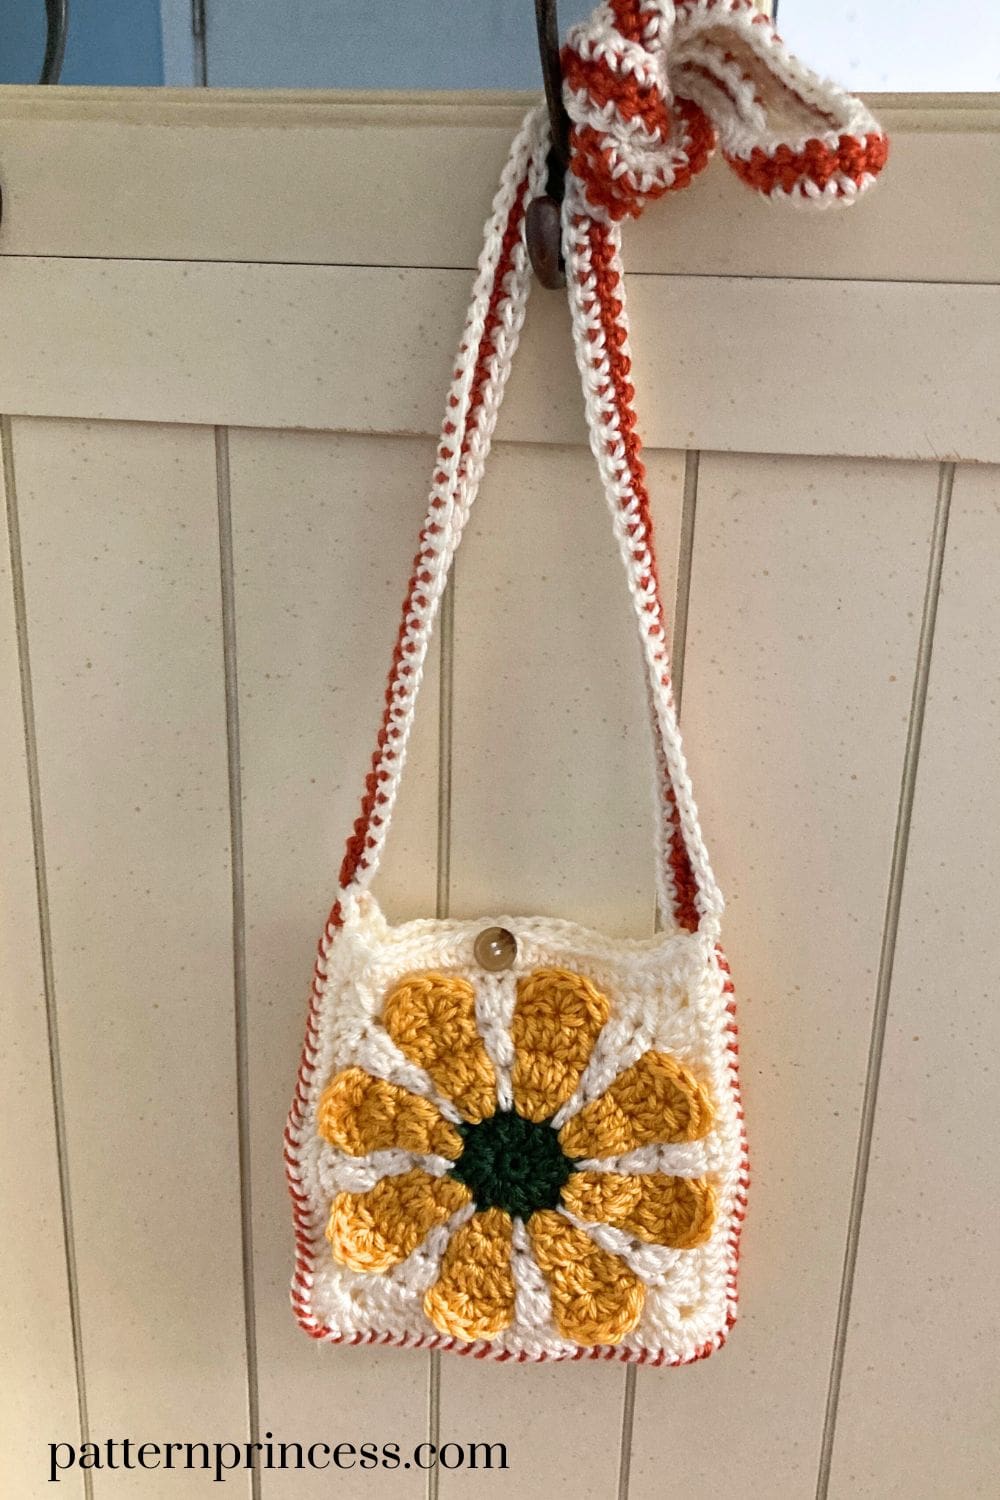
Measuring approximately 7 inches square, this bag is just the right size for carrying essentials like a wallet, keys, phone, or a small book. Just join two crochet squares and add a strap. The crochet strap ensures comfort, while the button closure keeps your belongings secure. What makes this project even more special is its adaptability. This free pattern is perfect for using up those yarn scraps. Customize it with different yarn colors to match your style or create a one-of-a-kind gift for a loved one.
Get Your Ad Free Printable PDF in our Etsy Store
Directions: Crochet Flower Granny Square Bag
Skill Level
Intermediate
While this does use basic crochet stitches, each round is worked slightly differently.
Gauge
17 single crochet every 4 inches and 7 rows of double crochet every 4 inches.
Size
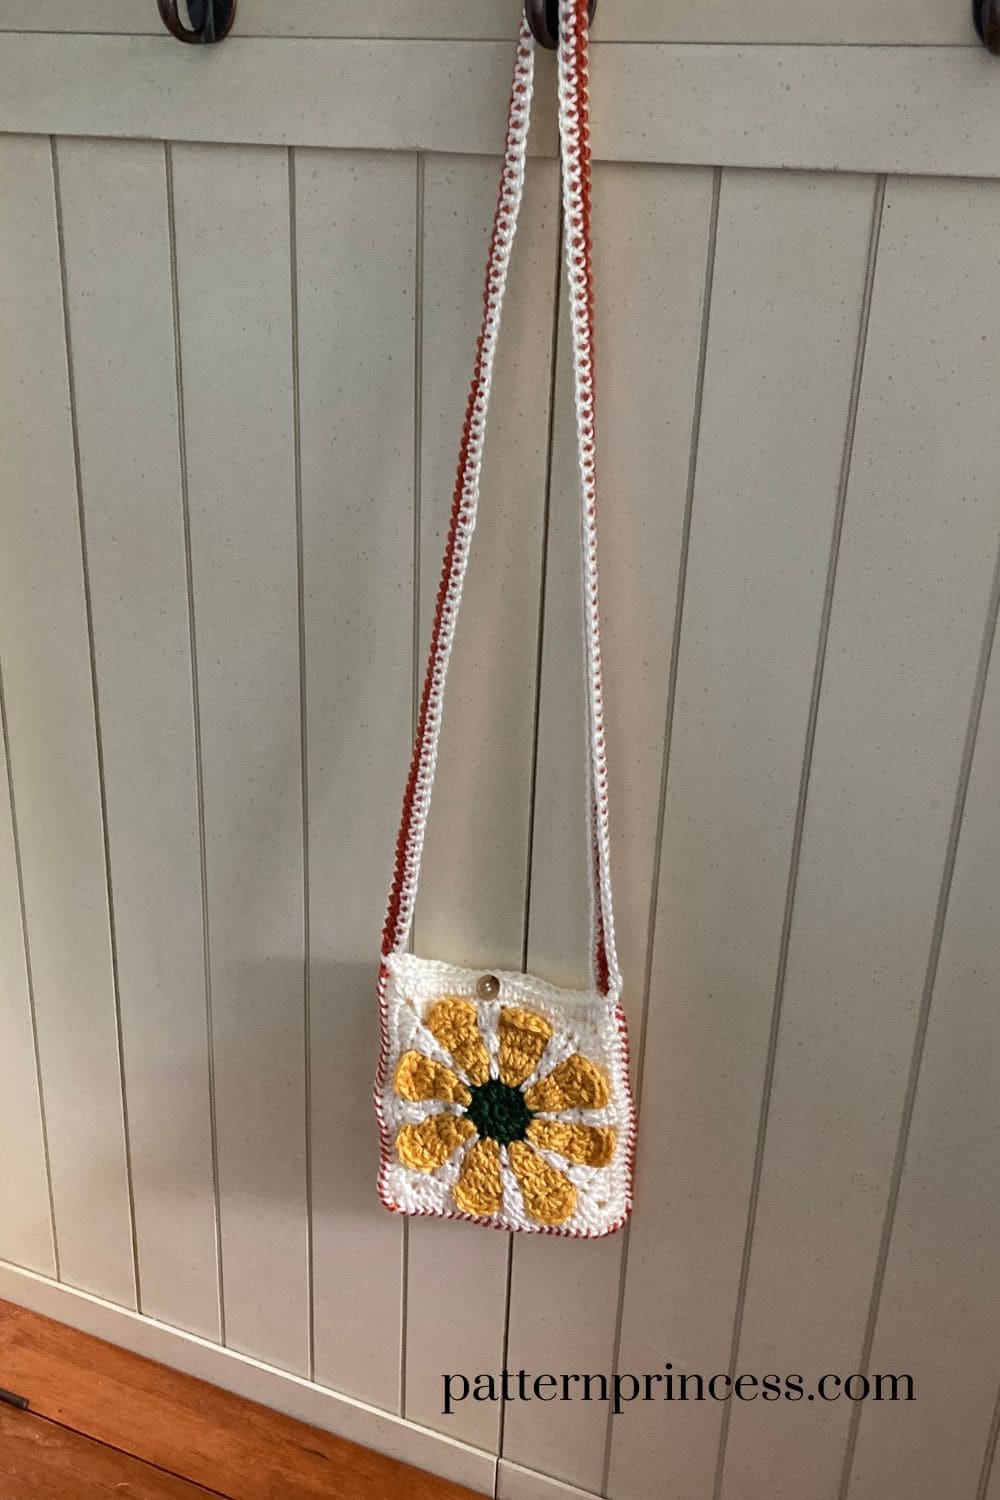
This pattern worked with a medium weight yarn will make a 7 X 7-inch square bag. The strap is 42 inches long.
Materials
Yarn. This pattern uses four different colors of yarn. I used leftover Caron Simply Soft Yarn.
Each square is made using about 150 yards total.
Dark Sage = 60 yards for both squares.
Gold = 120 yards for both squares.
Off White = 120 yards for both squares.
Use another complimentary color for joining the two retro daisy granny squares and the strap.
Pumpkin = 30 yards for joining and the strap.
Off White = 30 yards for the strap.
Total yardage for this crossbody bag, 360 yards.
Crochet Hook Size I, 5.5 mm
Scissors
Tapestry Needle
½ Inch Button
Thread
Sewing Needle
Abbreviations
- CH = Chain
- DC = Double Crochet
- HDC = Half Double Crochet
- SC = Single Crochet
- SK = Skip
- SL ST = Slip Stitch
- SP = Space
- ST = Stitch
- STs = Stitches
- YO = Yarn Over
- [ ] = Repeat Between
Pattern Notes
Written in US Terms.
Find YouTube Videos from our channel to help with this pattern below the written pattern.
Make Two Retro Granny Squares, join them together, crochet a strap and sew on a button.
This square pattern is worked in the round.
The pattern starts with a magic ring, sometimes called a magic circle or magic loop too. If you are unsure of how to do this, we have a whole blog post and video showing how to do this crochet technique.
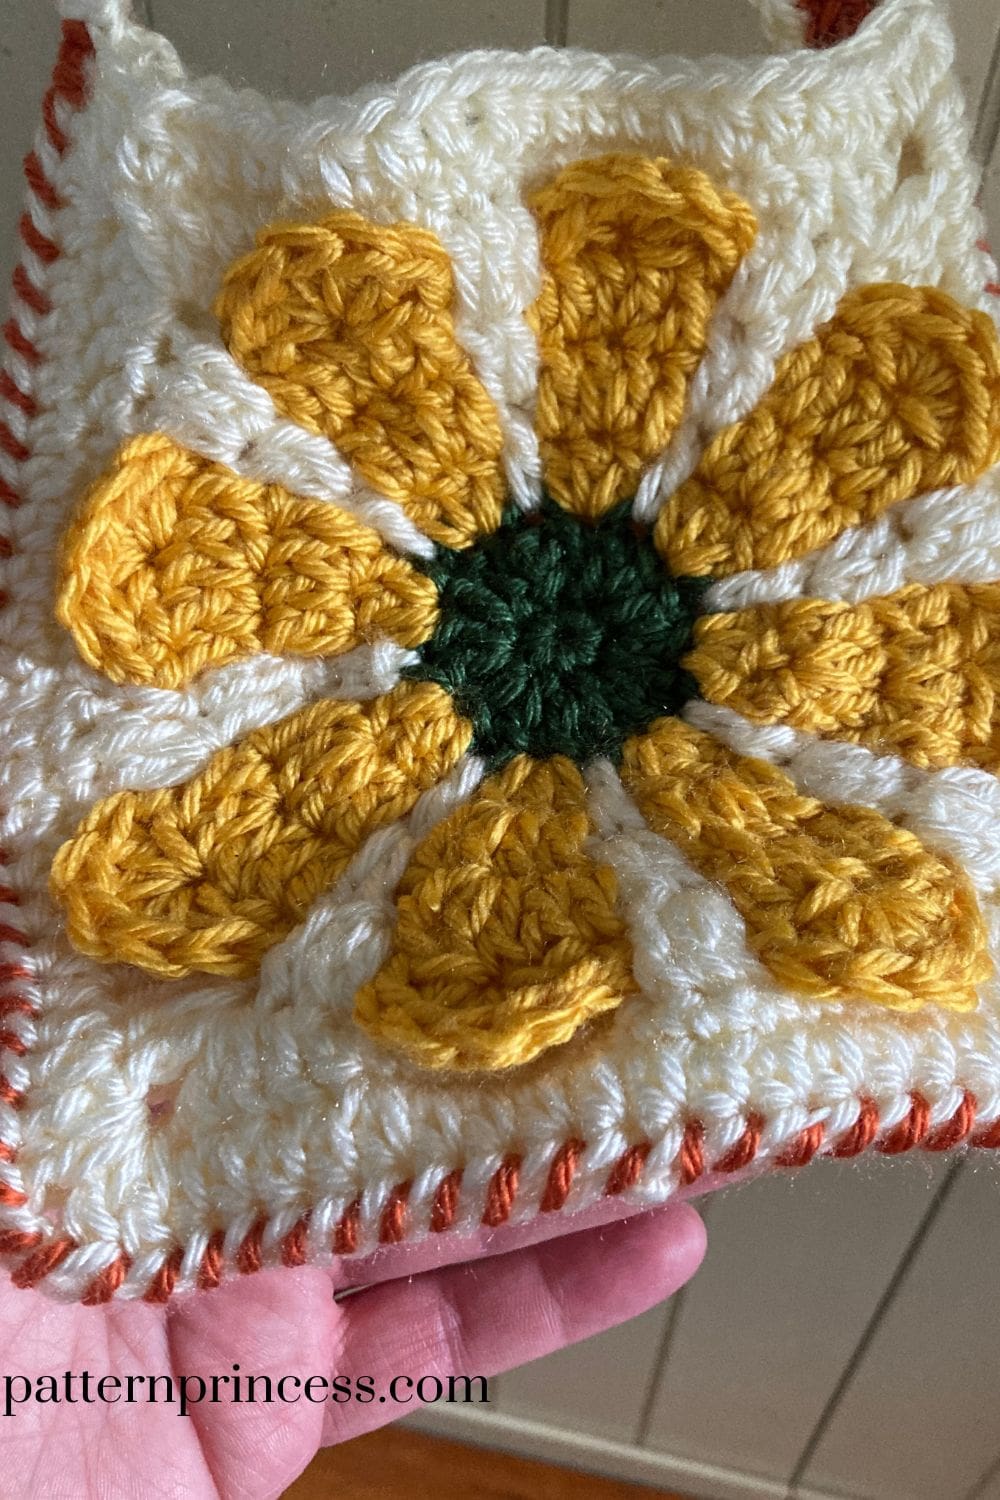
Rounds 1 and 2 make up the center of the flower. Round 3 begins the flower petals. The background color starts with round 4. Color changes are noted in the pattern.
The whip stitch is used to join the two granny squares. The stitches wrap around the edge of the fabric. Leaving an opening in the top, sew around three sides of the squares.
Begin With the Flower Granny Squares (Make 2)
Using the Dark Sage yarn.
Make a Magic Circle. Alternatively, you can also work a CH 4 and SL ST back into the first CH ST to make a circle.
Round 1
Continue using the same yarn.
CH 1 (Doesn’t count as a ST). Work 8 SC inside the magic circle. Pull the yarn tail to close the circle. Make a SL ST into the first SC to close the circle. (8 SC).
How to work the single crochet inside the magic loop. Insert the hook into the circle and pull up a loop, yarn over and pull through both loops. (repeat this 7 more times).
Round 2
Use the same yarn that you did in round 1.
CH 3 (Counts as the first DC of the round). Make one more DC into the first ST. Work 2 DC into every ST around. Make a SL ST into the top of the CH 3. (16 DC including the initial CH 3).
Fasten off the yarn. Cut the yarn leaving 6-10 inches. Pull the yarn tail through the last loop. You can take a moment to weave in your yarn ends now or wait until you are done with the granny square to weave in all six of the yarn ends at once.
Round 3
Join New Color.
Using the Gold yarn, pull the yarn into any one of the stitches in the previous round. Tie a knot.
Insert the hook into the loop. YO and pull up a loop and CH 3. (Counts as the first DC of the round). Make 2 more DC into the same ST. [CH 1, SK the next ST. Work 3 DC into the next ST]. Repeat between [ ] all the way around. End with a CH 1, SK 1, SL ST into the top of the CH 3. (At the end of the round, there will be 8 clusters of 3 DC).
At the end of this round do not fasten off the yarn. Just pull the loop larger so it doesn’t slip out. You can also use a stitch marker to hold the yarn in place while you work on the next round.
Round 4
Join New Color.
Using the Off White yarn, pull the yarn into any one of the stitches of round 2 that we skipped in the previous round. Tie a knot or use a slip stitch through a loop on the hook to add the new yarn color.
For this round, as you work, push the stitches for round 3 away from your work a bit so they are out of the way. The stitches for this round 4 will be worked in front of round 3 stitches and into round 2 stitches.
Insert the hook in the stitch and CH 3. (Counts as the first DC of the round). Then work CH 4, SK over to the next SK ST of round 2 and work a DC. [CH 4, SK over to the next SK ST of round 2 and work a DC]. Repeat between [ ] all the way around. At the end of the round work a CH 4 and SL ST into the top of the CH 3 of the first 7 CH STs. (You should have 8 DC stitches in this round).
At the end of this round do not fasten off the yarn. Just pull the loop larger so it doesn’t slip out.
Round 5
Switch back to the yarn color from round 3.
Insert hook through the CH spaces of round 4 and pull the loop from round 3 to the front side. CH 3. (Counts as the first DC of the round). Work 2 DC into the next ST in the round 3 STs. Keep the round 4 CH STs pushed toward the back of your work and out of the way. Work 1 DC in the last ST of the cluster. [CH 2. Skip the DC from round 4 and work 1 DC in the next ST, 2 DC in the next ST, and 1 DC in the next ST]. Repeat around between [ ]. End with CH 2 and SL ST into the top of the CH 3. (At the end of the round, there will be 8 clusters of 4 DC).
At the end of this round do not fasten off the yarn. Just pull the loop larger so it doesn’t slip out.
Round 6
Switch back to the yarn color from round 4. Pull the loop to the front in one of the CH 1 SPs.
CH 3 (Counts as the first DC of the round). Make one more DC into the first ST. [CH 5, SK the 4 DC and work into the DC ST from round 4. Work 2 DC]. Repeat round between [ ] end with CH 5 and SL ST into the top of the CH 3. (You should have 16 DC stitches in this round).
Round 7
Switch back to the yarn color from round 5. Pull the loop to the front in one of the CH 5 SPs.
Insert the hook through the CH spaces of round 6 and pull the loop from round 5 to the front side. CH 3. (Counts as the first DC of the round). Work 2 DC into the next ST in the round 5 STs. Keep the round 6 CH STs pushed toward the back of your work and out of the way. Work 1 DC in the next 2 STs of the cluster. [CH 2. Skip the 2 DC from round 6 and work 1 DC in the next ST, 2 DC in the next ST, and 1 DC in the next 2 STs]. Repeat around between [ ]. End with CH 2 and SL ST into the top of the CH 3. (At the end of the round, there will be 8 clusters of 5 DC).
Round 8
Continue working with the same yarn. (This round creates the top of the flower petal).
CH 1 (Does not count as a ST). Work SC into the first ST. SK 1 DC ST. work 5 DC into the next ST (should be the middle DC ST). SK 1 DC ST, SC into the next ST. [CH 2. SK the CH 2 of round 7. Work 1 SC into the first ST of the next DC cluster. SK 1 ST, work 5 DC into the next ST, SK 1 ST, work 1 SC into the last ST of the DC cluster]. Repeat between [ ] around. End with a CH 2 and SL ST into the SC ST. (At the end of the round, you should have 8 sections of a SC, 5DC, SC cluster).
Fasten off the yarn. Cut the yarn leaving 6-10 inches. Pull the yarn tail through the last loop.
Round 9
Switch back to the yarn color from round 7. Pull the yarn to the front.
Insert the hook through the CH spaces of round 6 and pull the loop from round 5 to the front side. CH 3. (Counts as the first DC of the round). 2 DC in the next ST in round 7.
Next, flip the top of the flower petal from round 8 down and work 5 DC into the CH SP from round 7 that is behind the flower petal now. Flip the flower petal back up. Working in front of the stitches of round 8, work 1 DC in the first DC ST and 2 DC in the next DC ST. [Flip the flower petal down and work 5 DC in the CH SP. Flip the flower petal back up and work 1 DC in the first ST and 2 DC in the next ST]. Repeat around between [ ] end with a SL ST into the top of the CH 3. (At the end of this round, you should have 8 sections between the flower petals of 3 DC and 8 sections behind the flower petals of 5 DC).
Round 10
This is the first round to turn the circle into a square. CH 1 (Does not count as a ST). Work a SC into the first ST. Work a SC into the next 5 STs. Work a HDC in the next ST. Work a DC into the next ST.
The next stitch becomes the first corner. Work (2 DC, CH 2, 2DC) all in the same ST. DC in the next ST, HDC in the next ST. Work SC into the next 11 STs. HDC in the next ST, DC in the next ST. The next ST becomes the second corner. Work (2 DC, CH 2, 2DC) all in the same ST.
DC in the next ST, HDC in the next ST. Work SC into the next 11 STs. HDC in the next ST, DC in the next ST. The next ST becomes the third corner. Work (2 DC, CH 2, 2DC) all in the same ST.
DC in the next ST, HDC in the next ST. Work SC into the next 11 STs. HDC in the next ST, DC in the next ST. The next ST becomes the fourth corner. Work (2 DC, CH 2, 2DC) all in the same ST.
DC in the next ST, HDC in the next ST. Work SC into the last 5 STs. End with a SL ST into the first SC.
Round 11
Continue using the same yarn.
CH 1 (Does not count as a ST). Work a HDC into the first ST and next 9 STS. In the corner CH 2 SP work (2 DC, CH 2, 2DC). (First corner).
Work a HDC into the next 19 STs. In the corner CH 2 SP work (2 DC, CH 2, 2DC). (Second corner).
Work a HDC into the next 19 STs. In the corner CH 2 SP work (2 DC, CH 2, 2DC). (Third corner).
Work a HDC into the next 19 STs. In the corner CH 2 SP work (2 DC, CH 2, 2DC). (Fourth corner).
Finish the last row with a HDC in the next 9 STs. End with a SL ST into the first ST.
Fasten off the yarn. Cut the yarn leaving 6-10 inches. Pull the yarn tail through the last loop.
Finishing
Use the tapestry needle to weave in the yarn tails on the back side of the work. I like to weave back and forth 3 to 5 times. Cut off the excess yarn.
Joining the Crochet Granny Squares
Take the two squares just made and join them using the whip stitch with the wrong sides together. The whip stitchis a popular method of hand stitching seams that are attractive and durable.
The stitches wrap around the edge of the fabric. Leaving an opening in the top, sew around three sides of the squares.
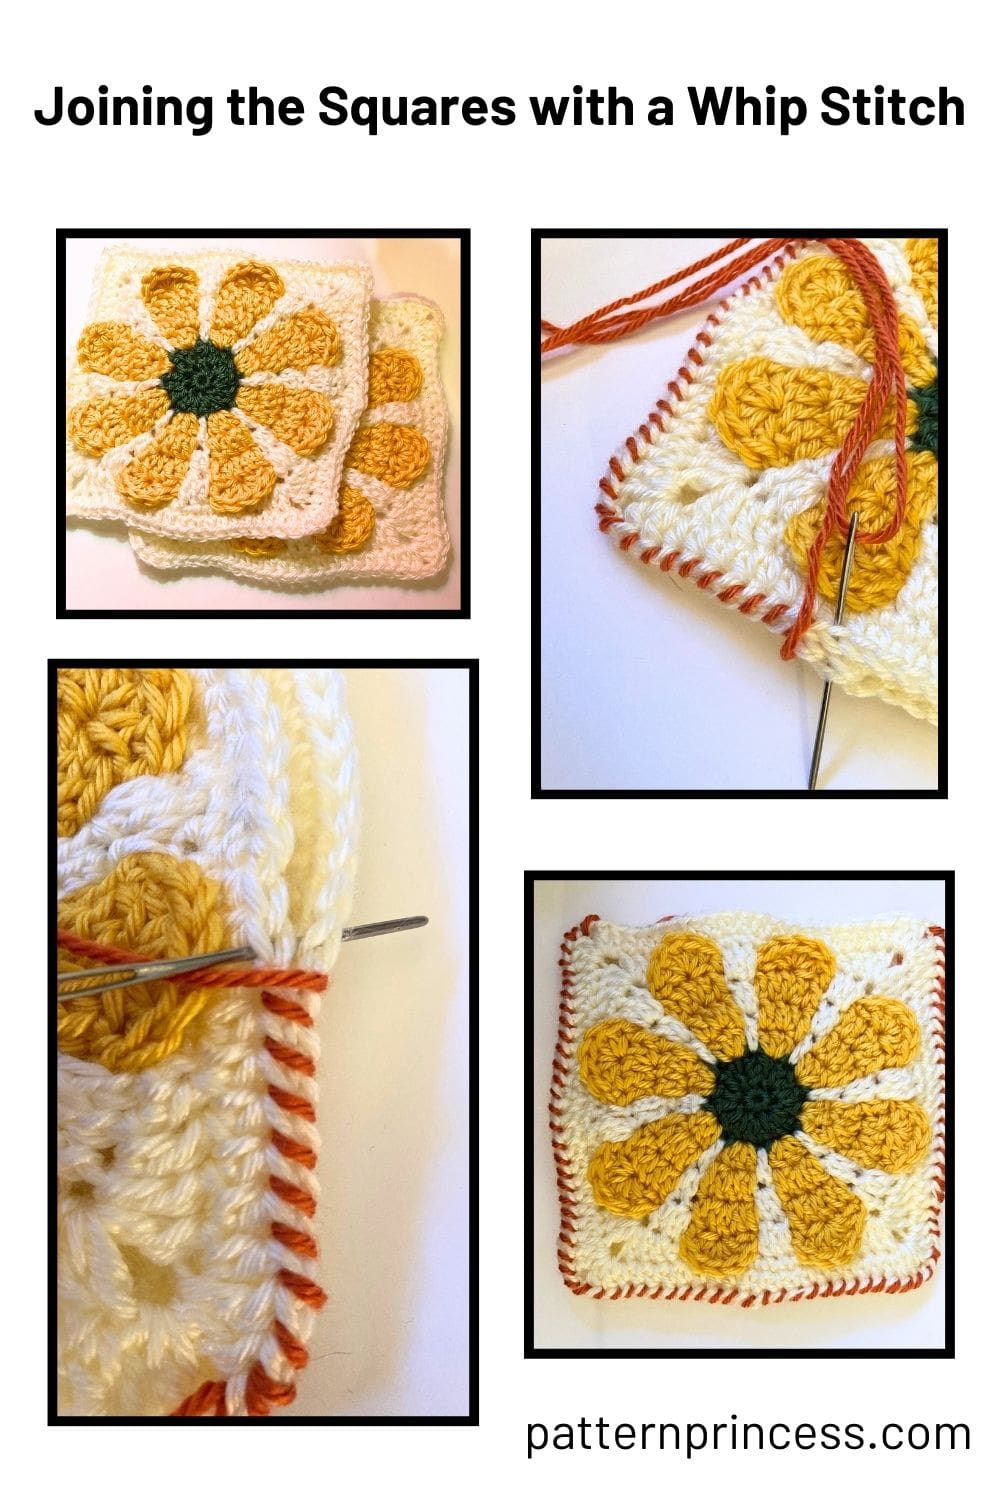
How to Sew the Whip Stitch
Using the Pumpkin color yarn, thread the tapestry needle. Holding the two squares with the wrong sides together aligning the crochet stitches, start in one top corner bringing the tapestry needle through the 2 layers from the bottom to the top leaving a 6–8-inch yarn tail to weave in later.
Next, moving the tapestry needle over to the first loops, insert the needle from the bottom to the top again going through both loops on the bottom and the top squares.
Move over to the next loop and continue working from the bottom to the top inserting the needle through both loops on both squares. You will see the yarn wrapping around the outside of the squares. Continue doing this on all three sides.
When done joining, begin the strap. I chose to weave in the ends through the matching yarn color in the strap. As it will give extra strength where the strap is joined to the bag.
Crocheting and Joining the Strap
Using the Pumpkin yarn, Join the yarn to one of the top corners.
CH 140. Using a SL ST, join to the top corner on the other side of the bag. SL ST one ST over toward the middle and work a SC in the first chain space and in each ST across. End with a SL ST into the top of the bag on the other side. Cut the yarn leaving a yarn tail to be weaved in later.
Change to the off-white yarn.
Join the yarn to the top corner of the bag in the next stitch to where you just ended. Join with a SL ST into the ST of the strap. Work a SC in each ST across. End with a SL ST into the top of the bag on the other side.
SL ST on the bag over to the other top corner square – the other side of the pumpkin yarn. SL ST into the first ST on the Strap. Work a SC in each ST across. End with a SL ST into the top of the bag.
Finishing
Using the yarn needle, weave in all yarn ends into the corresponding yarn colors and cut off any excess yarn.
Adding a Button
Prepare the thread and needle. Use a piece of thread about 20 inches long, thread it through the needle and bring the ends together making a knot.
On the inside middle top of one of the squares, insert the needle and pull the thread almost through. Stop and insert the needle through the middle of the thread, then finish pulling the thread through the yarn. This helps secure the thread.
Next, thread the needle through the back side of a ½ inch button. Then thread the needle back down through the button through the other hole and through the yarn.
Continue to come up one side and go down through the other button hold 4 to 5 times. When done, insert the needle in the yarn behind the button, holding the thread taught near the yarn, wrap the needle around the thread three times. Pull the thread through making a knot. The knot should be close to the yarn. Sometimes, I like to do this one more time before cutting off the excess thread.
YouTube Video Tutorial for the Retro Daisy Granny Square
Right hand video tutorial: https://youtu.be/dmlKwBZ8KeI
Left hand video tutorial: https://youtu.be/nGVqrSE389I
Video Tutorial for Joining the Squares and Crocheting the Strap
That’s it. This beautiful pattern used basic stitches to create a cute bag. Your Crochet Flower Granny Square Bag is ready to use or gift.
There are so many creative ways to use a flower granny square. We also made a bucket bag using this same flower motif. Here are a few other crochet projects for inspiration. As always, we offer the free crochet pattern on the website.

You can find Victoria crocheting, quilting, and creating recipes. She has cooked in restaurants for over 20 years, including many larger parties. She learned to crochet when she was just 11 years old and has been crocheting ever since; over 50 years now. Over 40 years ago, she loved her first class in sewing and continues to hone her skills in quilting. Many have enjoyed the handmade gifts over the years. In her professional career, she has worked in management in a wide variety of businesses including higher education as a dean of a division. All the while attending college part-time to achieve her doctorate in higher education with an emphasis in e-learning.