Last updated on July 25th, 2025 at 10:06 am
This free step-by-step crochet feather stitch tutorial includes written instructions, tips, and visuals to help you crochet this textured stitch with ease. Great for advanced beginners or intermediate crocheters looking for a new technique.
The feather stitch is a stunning technique that gives your projects a soft, textured finish. It’s perfect for blankets, washcloths, and cozy accessories. If you’re looking for a beautiful stitch that adds texture, beauty, and a touch of elegance to your crochet projects, this one does the trick.
Step-by-Step Crochet Tutorial
Even if you’ve never tried this stitch before, don’t worry. It’s much simpler than it looks. Once you get going, it is a one row repeat. You never know, it just might become your new favorite crochet stitch.
The first time I tried the feather stitch, I fell in love with its layered texture and unique style. It’s one of those stitches that looks complicated but is actually easy once you get into the rhythm. I love learning new patterns and sharing them to help others learn.
If you love learning new stitches, make sure to check out our crochet tutorial section.
This one is for basic crochet stitches.
Use this link for special stitch tutorials.
Three Different Methods to Start the Crochet Feather Stitch
When I first searched for a tutorial on the feather stitch, I noticed there are a few different ways to start the pattern. To make learning easier for you, I’ve included three different starting methods in this tutorial. I think that methods 2 and 3 work best if you are going to add a crochet border.
Whether you prefer watching a video or following along with photos, you’ll find step-by-step guidance for each approach. This way, you can choose the method that feels most comfortable and works best for your crochet project.
What Does the Feather Stitch Look Like?
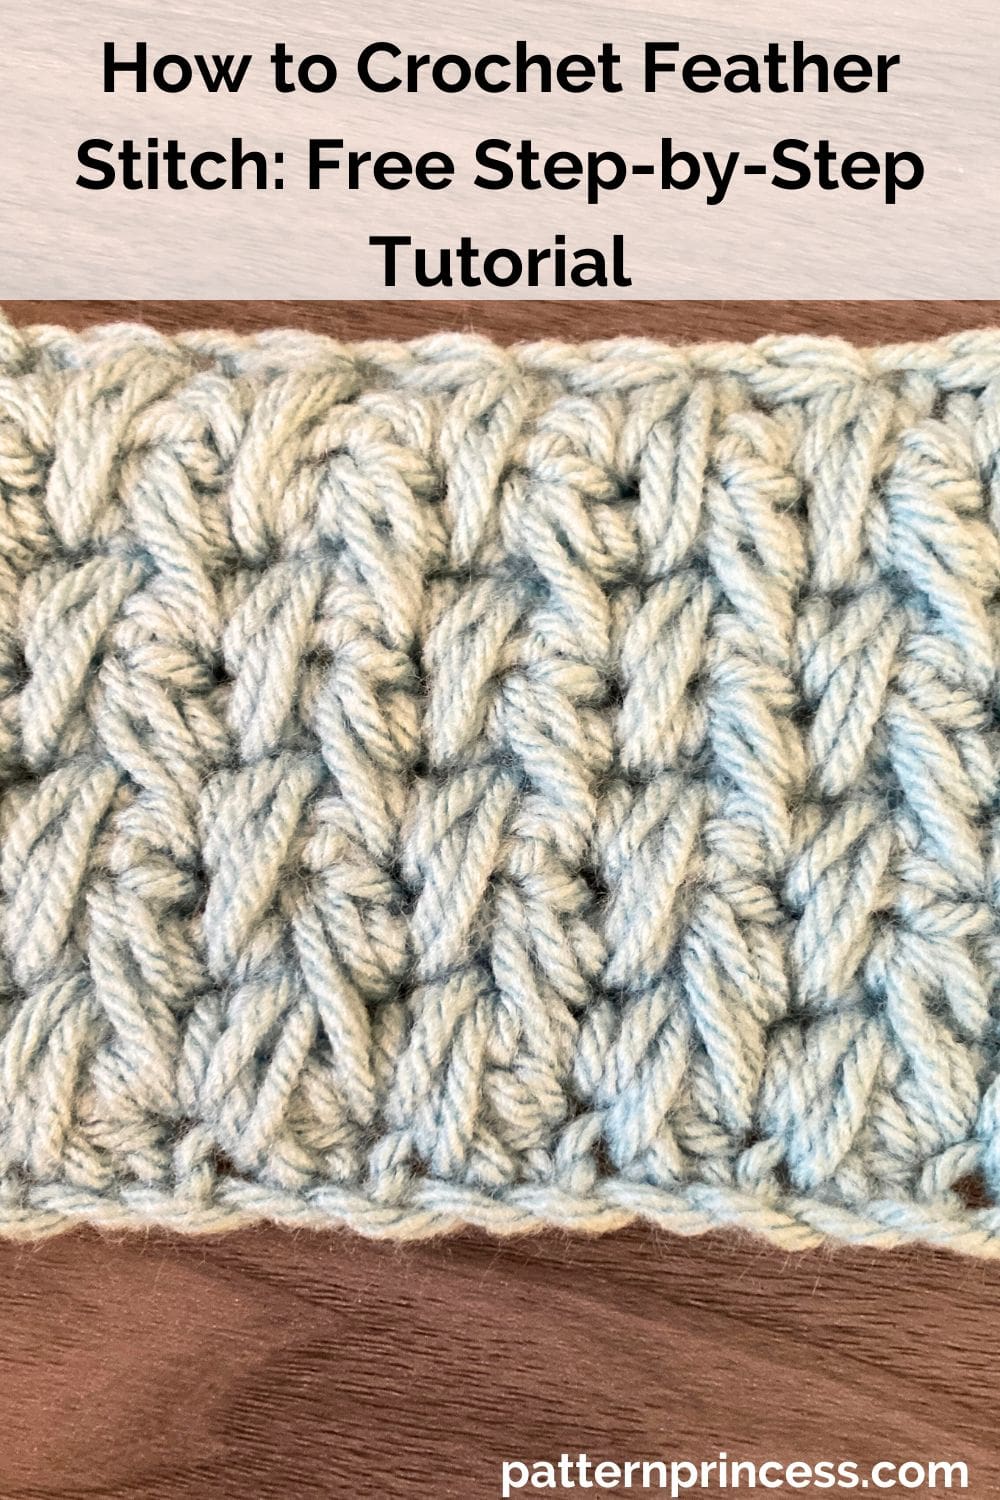
The feather stitch has a beautifully textured, almost braided or layered look, with a soft, flowing appearance that resembles overlapping feathers or cascading chevrons.
It creates a slightly raised surface with vertical and diagonal lines that give the fabric a cozy, 3-dimensional feel. This stitch creates a reversible fabric. That feels rather dense stitch that feels squishy.
The pattern works especially well in solid colors, as it allows the texture to really stand out, and it adds a touch of elegance and visual interest to any project.
It’s often described as elegant with a subtle ripple effect.

What Yarn Weights Work Well with This Stitch?
Choosing the right yarn weight can make all the difference when working the feather stitch. This versatile stitch adapts beautifully to a range of yarn thicknesses, each bringing its own unique texture and drape to your project.
???? Best Yarn Weights for Feather Stitch:
- Worsted Weight (Medium/Category 4)
Most popular choice. Gives the feather stitch nice definition and a cozy texture. Ideal for blankets, scarves, and winter accessories. - DK (Light/Category 3)
Great for lighter projects. Produces a soft, drapey fabric that still highlights the layered texture. Perfect for baby blankets, shawls, or garments. - Sport Weight (Fine/Category 2)
Creates a more delicate look. Works beautifully in finer wearables or lightweight home decor. The stitch pattern remains visible but more subtle. - Bulky Weight (Category 5)
Bold and plush. The texture of the feather stitch becomes more dramatic and sculptural — great for warm blankets or chunky scarves. Just be cautious with yarn that’s too thick, as it may lose stitch clarity.
???? Tips:
- Stick to smooth, non-fuzzy yarns like acrylic, cotton, or wool blends so the stitch definition really pops.
- Avoid heavily textured or novelty yarns (like boucle or eyelash yarn), as they can obscure the feather stitch detail.
- Solid or semi-solid yarns work best to show off the structure — variegated yarns can sometimes overwhelm the pattern.
Crochet Feather Stitch with Stripes or Multicolor Yarn
One of the best things about the feather stitch is how beautifully it plays with color. Whether you’re switching yarns every few rows to create bold stripes or using a variegated yarn for a softer, blended look, this stitch adds texture that really stands out.
Different color choices can enhance your feather stitch projects. And what to watch out for when working with multicolored yarns.
???? Changing Colors Every Few Rows
- This works beautifully with the feather stitch.
- Because of the stitch’s vertical texture and slightly staggered placement, switching colors every 2–4 rows can create a striped or gradient effect that emphasizes the layered, feathery appearance.
- Best results come from contrasting or complementary colors, so the stitch definition still stands out.
- To keep it neat, change colors at the start of a new row and carry the yarn up the side of your work if you plan on putting on a crochet border.
Great forastriped blanket, baby blanket, boho-style scarf, lightweight shawl or a stash-busting project.
???? Using Variegated Yarn
- This can be hit or miss depending on the color transitions.
- Short color changes (like self-striping yarn) may muddy the texture and make the feather stitch pattern harder to see.
- Longer color transitions or subtle tonal shifts work better, giving the stitch a beautiful watercolor-like wash while still showing some of the texture.
- Avoid very high-contrast, fast-changing yarns. They can compete with the stitch’s natural movement.
✨ Tip:
If you’re unsure, try working up a small swatch in your chosen yarn first. It’ll give you a better idea of whether the stitch and the color play nicely together.

Get Your Ad Free Printable PDF in our Etsy Shop.
Directions: How to Crochet Feather Stitch
Skill Level
This stitch is perfect for an advanced beginner.
The hardest part is bringing the hook through all the loops.
Size
For the sample shown in the video, I used a medium weight yarn.
The size will depend on your number of starting chains and rows.
Note. To change the size, there are stitch multiples noted by each of the three methods of starting this pattern.
Gauge
This will depend on the yarn and crochet hook you choose for your project.
Materials
Yarn. While you can use any yarn weight for this pattern, I suggest a worsted weight yarn to practice.
Crochet hook size that matches your yarn weight. Such as a size H 5.0 mm crochet hook or I 5.5 mm crochet hook.
Scissors
Tapestry needle
Abbreviations
- CH = Chain
- FHDC = Foundation Half Double Crochet
- HDC = Half Double Crochet
- SC = Single Crochet
- SK = Skip
- SP = Space
- ST = Stitch
- STs = Stitches
- [ ] = Repeat Between
Pattern Notes
Written in US terms.
Detailed photos are shown within the written directions. You can find a video tutorial for both a left and right hand crocheter after the written pattern.
You can get a free pdf pattern below the written pattern by joining our newsletter community.
Crochet Stitches
Chain Stitch (CH ST)
Begin the chain stitch by making a slip knot on the crochet hook. Leave about a 5-inch tail on the yarn. This will be weaved in later.
Next snug up the yarn loop that is on the crochet hook; while it should be firm, it should also be loose enough to slide on the hook with ease.
Keeping the loop on the hook, insert the hook in the stitch, wrap the yarn over the crochet hook from back to front. Draw the yarn through the loop. Yarn over again and draw the yarn through both loops that are currently on the hook. (The first chain stitch is complete).
HOW TO CROCHET THE CHAIN STITCH video tutorial
Foundation Half Double Crochet (FHDC)
Start with a Slip Knot. Place a slip knot on your crochet hook.
Working the first half double crochet. Chain 2. Yarn over and insert hook into the second chain from the hook. Yarn over and draw up a loop (you will have 3 loops on your hook).
Create the CH ST by working a yarn over and drawing through only the first loop on hook. There will still be 3 loops on the hook.
Complete the half double crochet stitch by yarning over and drawing the loop through all three loops on the hook.
(This creates the first CH ST and HDC ST).
Working the next half double crochet. Yarn over and insert hook into the bottom loops of the last half double crochet. Draw up a loop and pull through first loop on hook. Yarn over and draw through all three loops on hook.
Continue to Desired Length. Repeat the process until you have the number of stitches required for your pattern.
Video Tutorials Half Double Crochet Chainless Foundation
Right hand tutorial
Left hand tutorial
Half Double Crochet (HDC)
Yarn over, insert the hook through both loops of the next stitch and pull up a loop. Yarn over and pull through all three loops on the hook. For height, this stitch is between the single crochet and double crochet.
HOW TO CROCHET THE HALF DOUBLE CROCHET STITCH video tutorial
Special Stitches
Feather Stitch
Yarn over, insert hook in the chain space, yarn over, pull up a loop. There are now three loops on the hook. Yarn over, insert hook in the stitch/chain space in the row below, yarn over, pull up a loop. There are now five loops on the hook, yarn over, insert hook in the next chain space, yarn over, pull up a loop. There are now seven loops on the hook, yarn over and pull through all seven loops. Chain one to close. Feather stitch made Start the next feather stitch in the same chain space.

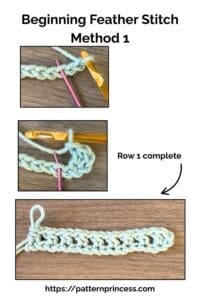
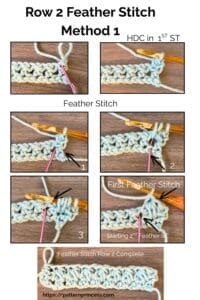
Method 1
Begin Chain Stitches
Start with a Slip Knot. Place a slip knot on your crochet hook.
Work a starting chain using an odd number of stitches. Stitch multiple is 2 + 3.
Row 1
Work a HDC in the third CH from the Hook, CH 1, SK 1, 1 HDC in the next ST. [CH 1, SK 1, HDC in the next ST]. Repeat between [ ] across. End the row with a HDC in the last stitch. Turn
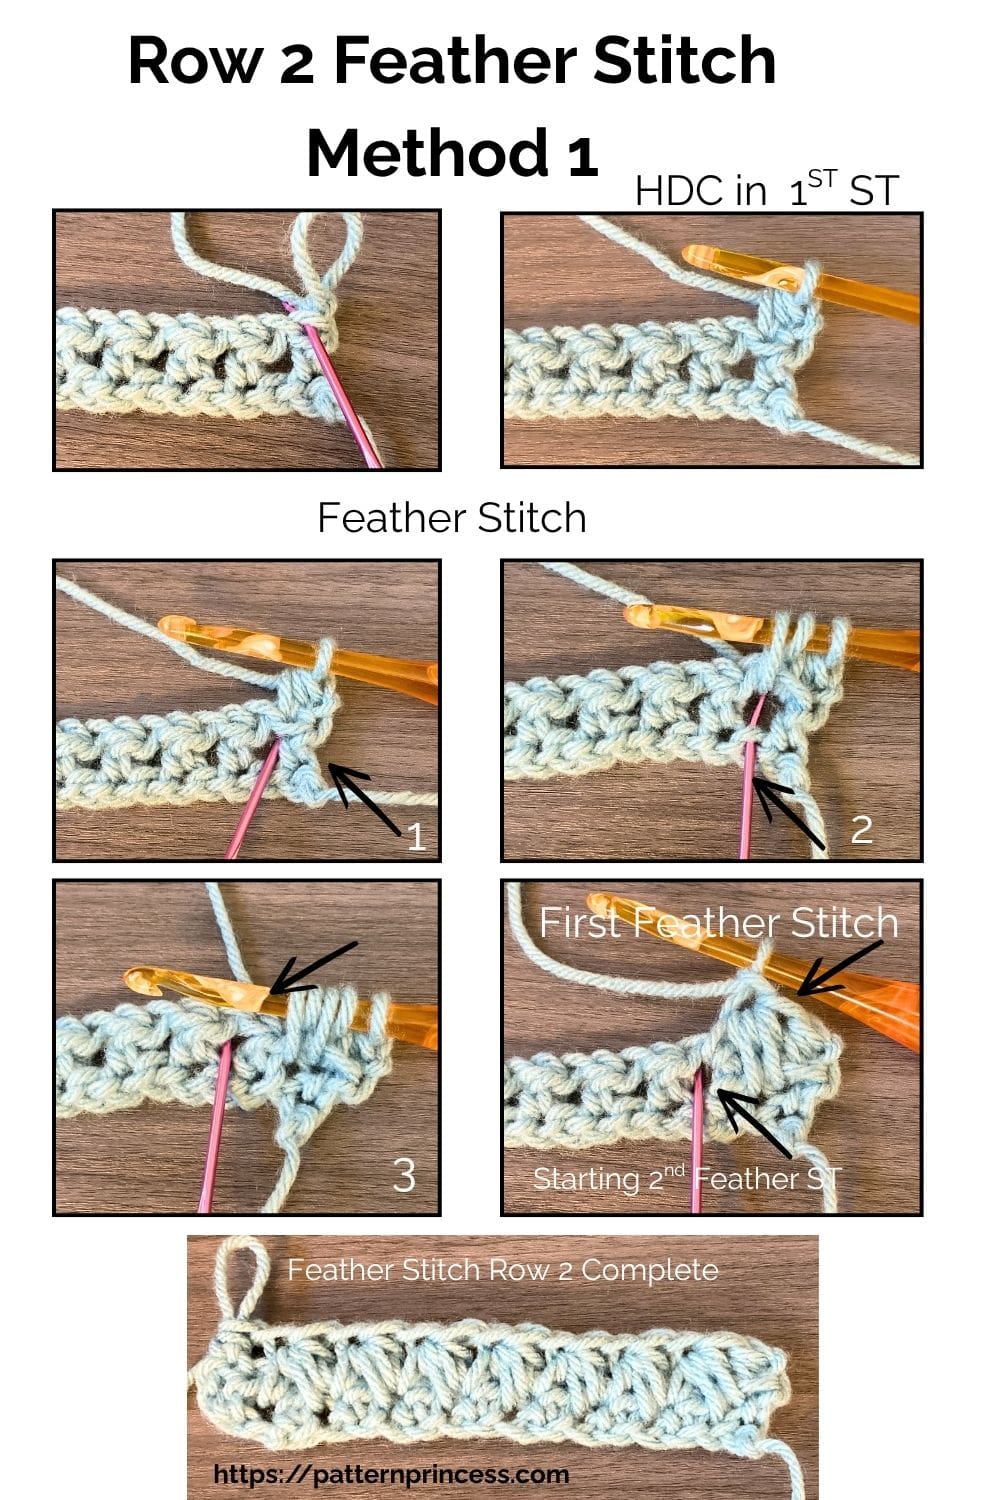
Row 2
CH 1 (Does NOT count as a ST). HDC in the first stitch, CH 1. Work the feather stitch across. End with a HDC in the last ST. Turn
Feather Stitch.
Yarn over, insert hook in the chain space, yarn over, pull up a loop. There are now three loops on the hook. Yarn over, insert hook in the chain space (the skipped stitch directly in the chain stitch row below). There are now five loops on the hook, yarn over, insert hook in the next chain space, yarn over, pull up a loop. There are now seven loops on the hook, yarn over and pull through all seven loops. Chain one to close. Feather stitch made. Start the next feather stitch in the same chain space.
Row 3
CH 1 (Does NOT count as a ST). HDC in the first ST, CH 1. Work the feather stitch across. End with a HDC in the last ST. Turn
Feather Stitch
Yarn over, insert hook in the chain space, yarn over, pull up a loop. There are now three loops on the hook. Yarn over, insert hook in the chain space in the row below, yarn over, pull up a loop. There are now five loops on the hook, yarn over, insert hook in the next chain space, yarn over, pull up a loop. There are now seven loops on the hook, yarn over and pull through all seven loops. Chain one to close. Feather stitch made Start the next feather stitch in the same chain space.
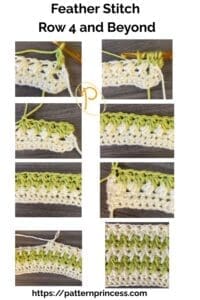
Rows 4 and Beyond
Continue to repeat row 3 until the desired length.
Finishing
Use the tapestry needle to weave in the yarn tails on the back side of the work. I leave a long tail as I like to weave back and forth 3 to 5 times. Cut off the excess yarn.

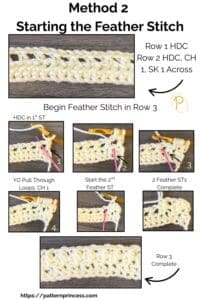
Method 2
Start with a Slip Knot. Place a slip knot on your crochet hook.
Begin Chain Stitches
Start with a chain using an odd number of stitches. Stitch multiple is 2 + 1.
Row 1
HDC in the third CH from hook and in each ST across. Turn
Row 2
CH 1 (Does NOT count as a ST). Work a HDC in the first ST, CH 1, SK 1, 1 HDC in the next ST. [CH 1, SK 1, HDC in the next ST]. Repeat between [ ] across. End the row with a HDC in the last ST. Turn
Row 3
CH 1 (Does NOT count as a ST). HDC in the first ST, CH 1. Work the feather stitch across. End with a HDC in the last ST. Turn
Feather Stitch
Yarn over, insert hook in the chain space, yarn over, pull up a loop. There are now three loops on the hook. Yarn over, insert hook in the chain space in the row below, yarn over, pull up a loop. There are now five loops on the hook, yarn over, insert hook in the next chain space, yarn over, pull up a loop. There are now seven loops on the hook, yarn over and pull through all seven loops. Chain one to close. Feather stitch made Start the next feather stitch in the same chain space.

Rows 4 and Beyond
Continue to repeat row 3 until the desired length.
Note. Working the last row in HDC STs would help the last row look just as nice as the first row.
Finishing
Use the tapestry needle to weave in the yarn tails on the back side of the work. I like to weave back and forth 3 to 5 times. Cut off the excess yarn.

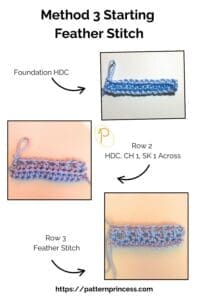
Method 3
Start with a Slip Knot. Place a slip knot on your crochet hook.
Row 1
Ch 2 and make as many FHDC as desired using multiples of 2 + 1.
Row 2
CH 1 (Does NOT count as a ST). Work a HDC in the first ST, CH 1, SK 1, 1 HDC in the next ST. [CH 1, SK 1, HDC in the next ST]. Repeat between [ ] across. End the row with a HDC in the last ST. Turn
Row 3
CH 1 (Does NOT count as a ST). HDC in the first ST, CH 1. Work the feather stitch across. End with a HDC in the last ST. Turn
Feather Stitch
Yarn over, insert hook in the chain space, yarn over, pull up a loop. There are now three loops on the hook. Yarn over, insert hook in the chain space in the row below, yarn over, pull up a loop. There are now five loops on the hook, yarn over, insert hook in the next chain space, yarn over, pull up a loop. There are now seven loops on the hook, yarn over and pull through all seven loops. Chain one to close. Feather stitch made Start the next feather stitch in the same chain space.
Rows 4 and Beyond
Continue to repeat row 3 until the desired length.
Note. Working the last row in HDC STs would help the last row look just as nice as the first row.
Finishing
Use the tapestry needle to weave in the yarn tails on the back side of the work. I like to weave back and forth 3 to 5 times. Cut off the excess yarn.
Video Tutorials on our YouTube channel of the Crochet Feather Stitch
We hope you have enjoyed this free crochet stitch tutorial. Here are some other patterns to inspire your next crochet project.
How to Crochet Feather Stitch: Free Step-by-Step Tutorial
Equipment
- 1 Crochet Hook: A size that matches your yarn weight. Such as a size H 5.0 mm crochet hook or I 5.5 mm crochet hook.
- 1 Scissors:
- 1 Tapestry Needle
Materials
- 100 yards Yarn While you can use any yarn weight for this pattern I suggest a worsted weight yarn to practice.
Instructions
Method 1
- Begin Chain Stitches. Start with a Slip Knot. Place a slip knot on your crochet hook.100 yards Yarn
- Work a starting chain using an odd number of stitches. Stitch multiple is 2 + 3.
- Row 1. Work a HDC in the third CH from the Hook, CH 1, SK 1, 1 HDC in the next ST. [CH 1, SK 1, HDC in the next ST]. Repeat between [ ] across. End the row with a HDC in the last stitch. Turn

- Row 2. CH 1 (Does NOT count as a ST). HDC in the first stitch, CH 1. Work the feather stitch across. End with a HDC in the last ST. Turn
- Feather Stitch. Yarn over, insert hook in the chain space, yarn over, pull up a loop. There are now three loops on the hook. Yarn over, insert hook in the chain space (the skipped stitch directly in the chain stitch row below). There are now five loops on the hook, yarn over, insert hook in the next chain space, yarn over, pull up a loop. There are now seven loops on the hook, yarn over and pull through all seven loops. Chain one to close. Feather stitch made. Start the next feather stitch in the same chain space.
- Row 3. CH 1 (Does NOT count as a ST). HDC in the first ST, CH 1. Work the feather stitch across. End with a HDC in the last ST. Turn
- Feather Stitch. Yarn over, insert hook in the chain space, yarn over, pull up a loop. There are now three loops on the hook. Yarn over, insert hook in the chain space in the row below, yarn over, pull up a loop. There are now five loops on the hook, yarn over, insert hook in the next chain space, yarn over, pull up a loop. There are now seven loops on the hook, yarn over and pull through all seven loops. Chain one to close. Feather stitch made Start the next feather stitch in the same chain space.
- Rows 4 and Beyond. Continue to repeat row 3 until the desired length.
Method 2
- Start with a Slip Knot. Place a slip knot on your crochet hook.
- Begin Chain Stitches. Start with a chain using an odd number of stitches. Stitch multiple is 2 + 1.
- Row 1. HDC in the third CH from hook and in each ST across. Turn
- Row 2. CH 1 (Does NOT count as a ST). Work a HDC in the first ST, CH 1, SK 1, 1 HDC in the next ST. [CH 1, SK 1, HDC in the next ST]. Repeat between [ ] across. End the row with a HDC in the last ST. Turn
- Row 3. CH 1 (Does NOT count as a ST). HDC in the first ST, CH 1. Work the feather stitch across. End with a HDC in the last ST. Turn
- Feather Stitch. Yarn over, insert hook in the chain space, yarn over, pull up a loop. There are now three loops on the hook. Yarn over, insert hook in the chain space in the row below, yarn over, pull up a loop. There are now five loops on the hook, yarn over, insert hook in the next chain space, yarn over, pull up a loop. There are now seven loops on the hook, yarn over and pull through all seven loops. Chain one to close. Feather stitch made Start the next feather stitch in the same chain space.
- Rows 4 and Beyond. Continue to repeat row 3 until the desired length.
- Note. Working the last row in HDC STs would help the last row look just as nice as the first row.
Method 3
- Start with a Slip Knot. Place a slip knot on your crochet hook.
- Row 1. Ch 2 and make as many FHDC as desired using multiples of 2 + 1.
- Row 2. CH 1 (Does NOT count as a ST). Work a HDC in the first ST, CH 1, SK 1, 1 HDC in the next ST. [CH 1, SK 1, HDC in the next ST]. Repeat between [ ] across. End the row with a HDC in the last ST. Turn
- Row 3. CH 1 (Does NOT count as a ST). HDC in the first ST, CH 1. Work the feather stitch across. End with a HDC in the last ST. Turn
- Feather Stitch. Yarn over, insert hook in the chain space, yarn over, pull up a loop. There are now three loops on the hook. Yarn over, insert hook in the chain space in the row below, yarn over, pull up a loop. There are now five loops on the hook, yarn over, insert hook in the next chain space, yarn over, pull up a loop. There are now seven loops on the hook, yarn over and pull through all seven loops. Chain one to close. Feather stitch made Start the next feather stitch in the same chain space.
- Rows 4 and Beyond. Continue to repeat row 3 until the desired length.
- Note. Working the last row in HDC STs would help the last row look just as nice as the first row.
Finishing
- Use the tapestry needle to weave in the yarn tails on the back side of the work. I like to weave back and forth 3 to 5 times. Cut off the excess yarn.
Notes
Abbreviations
- CH = Chain
- FHDC = Foundation Half Double Crochet
- HDC = Half Double Crochet
- SC = Single Crochet
- SK = Skip
- SP = Space
- ST = Stitch
- STs = Stitches
- [ ] = Repeat Between
Pattern Notes
Written in US terms.
You can find Victoria crocheting, quilting, and creating recipes. She has cooked in restaurants for over 20 years, including many larger parties. She learned to crochet when she was just 11 years old and has been crocheting ever since; over 50 years now. Over 40 years ago, she loved her first class in sewing and continues to hone her skills in quilting. Many have enjoyed the handmade gifts over the years. In her professional career, she has worked in management in a wide variety of businesses including higher education as a dean of a division. All the while attending college part-time to achieve her doctorate in higher education with an emphasis in e-learning.
This is a lovely crochet stitch with lots of texture. It’s reversable too.