Last updated on January 19th, 2026 at 09:51 pm
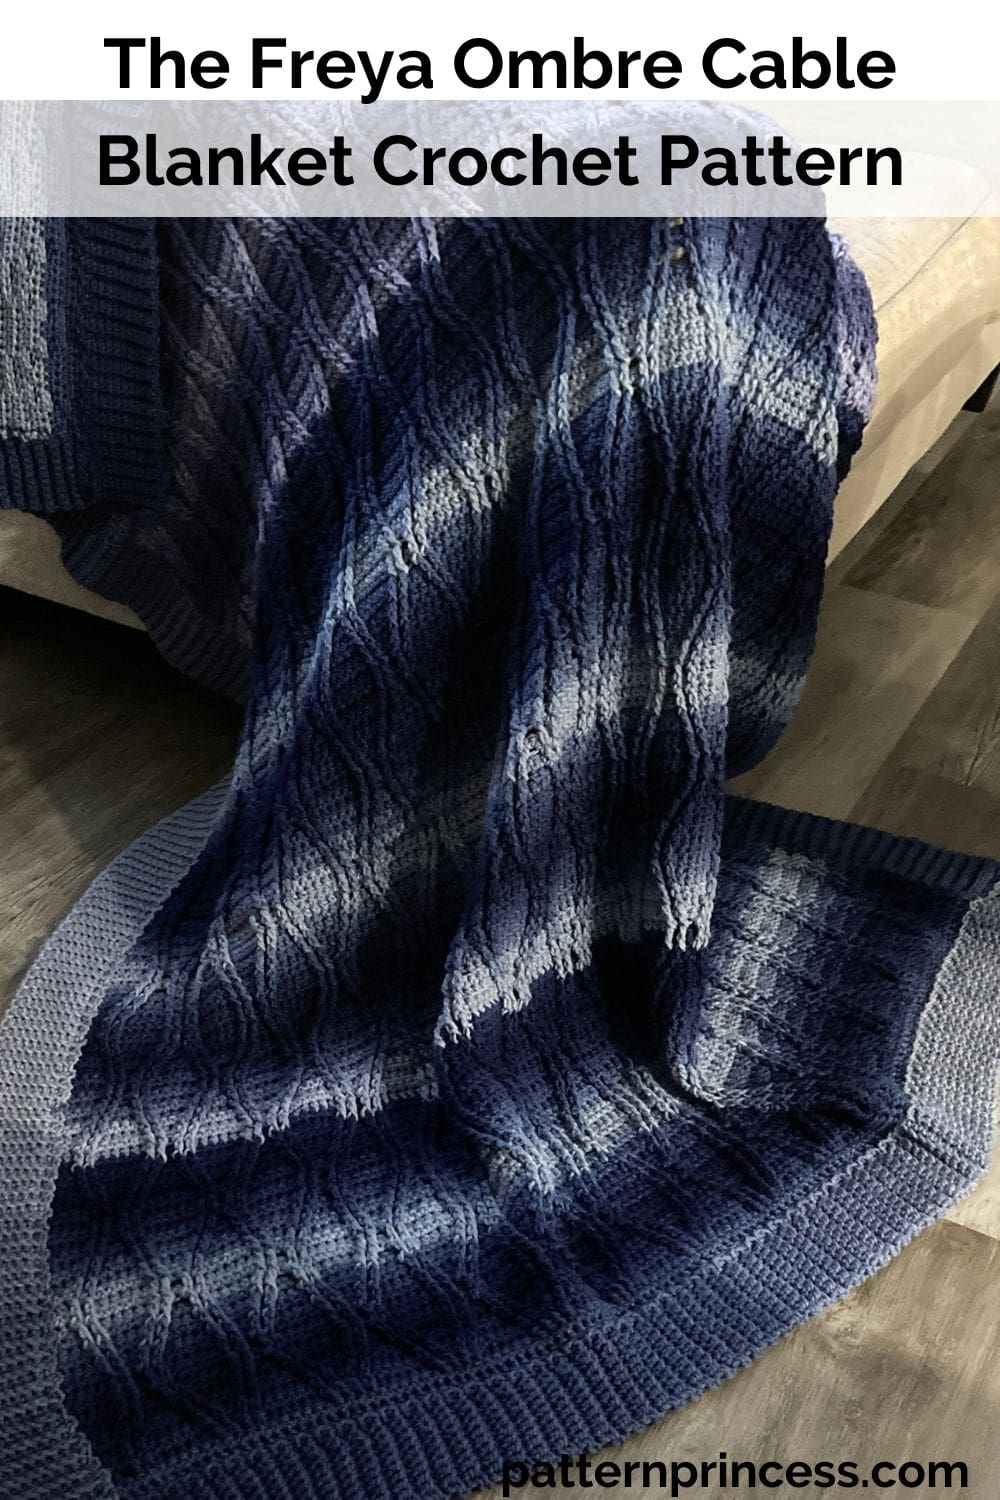
For many crocheters, tackling cables feels like an ambitious leap—but the Freya Ombre Cable Blanket makes it a joy to learn. This pattern offers a graceful introduction to cable techniques while still delivering a sophisticated design.
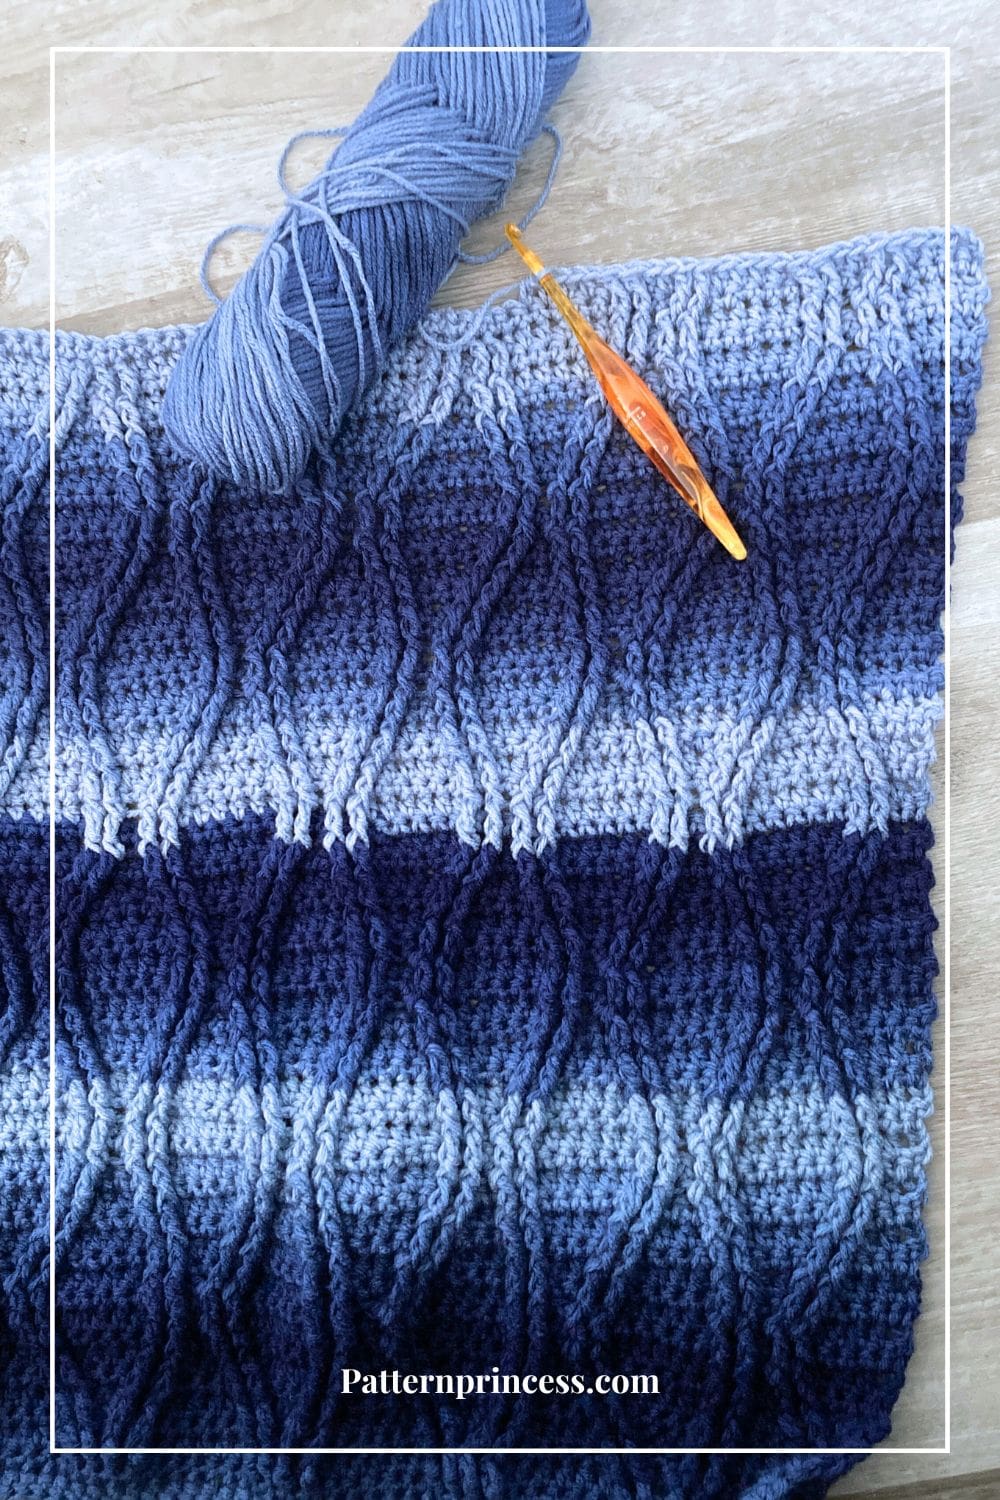
The smooth curves of the cables are beautifully highlighted by the ombre yarn, making each stitch stand out. If you’ve ever wanted to master cables, this blanket is the perfect starting point for creating a timeless treasure.
Have you ever wanted to try crochet cables? This pattern is going to teach you everything you need to know to make your very first beginner crochet cable blanket.
I just love the look of crochet cables. I’ve been admiring this crochet style for several years. Finally, I started practicing a few different patterns and wrote this one using the easiest method. They bring a unique elegance to any crochet project.
Inspired by timeless Irish craftsmanship, this pattern captures the beauty of cables while remaining approachable for those new to the technique. Whether draped over a couch or tucked on a bed, this blanket is a stunning addition to any space.
Make This Free Pattern in Any Size
Make This Free Pattern in Any Size It’s easy to make this pattern in any size using the stitch multiples detailed in the pattern below. However, I’ve designed this pattern in two different sizes of crochet blankets for your convenience.
I crocheted the larger afghan size as we have a few taller people in our family, and this was a great gift to my niece’s family. However, the large throw blanket is also a nice size.
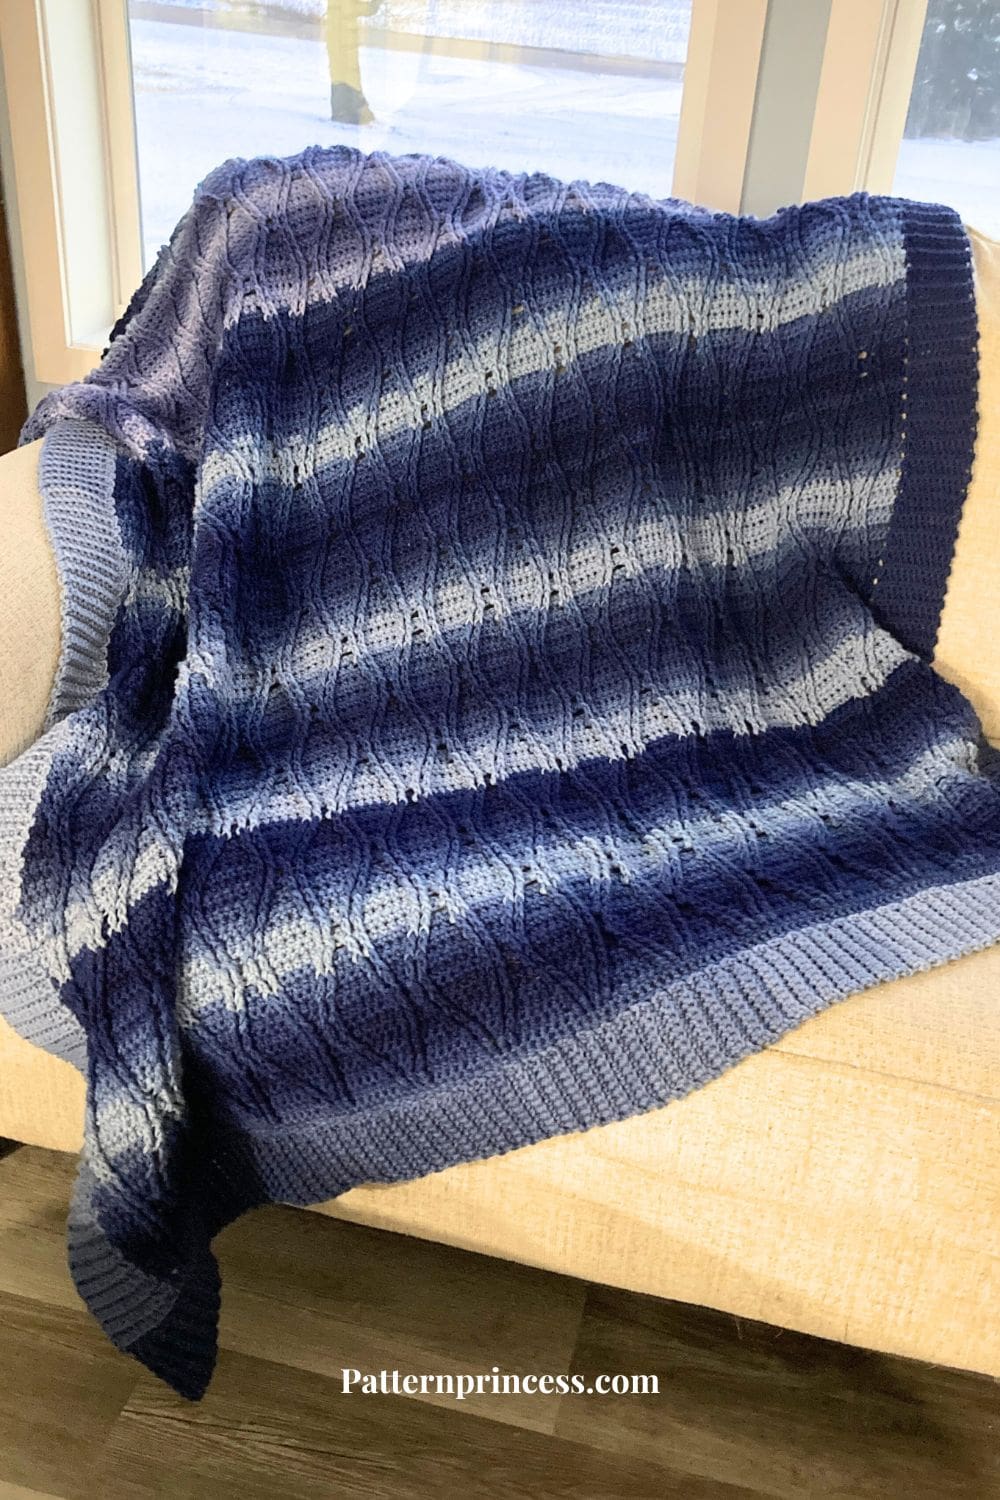
Large Crochet Throw Blanket. 50 inches X 55 inches without border or 54 inches X 59 inches with border.
Afghan. 50 inches X 61 inches without border or 54 inches X 65 inches with border. (shown).
Intermediate Crochet Pattern but Beginner Cabled Blanket Pattern
If this is your first time making a crochet blanket with cables, this one is an easy introduction. Cabled blankets may seem challenging at first, this thoughtfully designed pattern is the perfect introduction for crocheters looking to dive into the world of textured stitches.
With its flowing cable design and soothing ombre effect, this project balances simplicity with stunning results, making it a joy to create.
If you are like me, for many crocheters, tackling cables feels like an ambitious leap—but the Freya Blanket makes it a joy to learn. If you’ve ever wanted to master cables, this blanket is the perfect starting point for creating a timeless treasure.
It really uses simple stitches. Don’t let the 2-17 row repeat scare you away. It’s rows 2-8, then rows 9-17 are rows 8 worked back down to row 2. Every other row is a single crochet. The other rows create cable stitches. Use a combination of half double crochet and treble crochet front post stitches. And the only thing that will change in this row is where you place the stitches.
Pair the Crochet Cable Stitch with Ombre Yarn
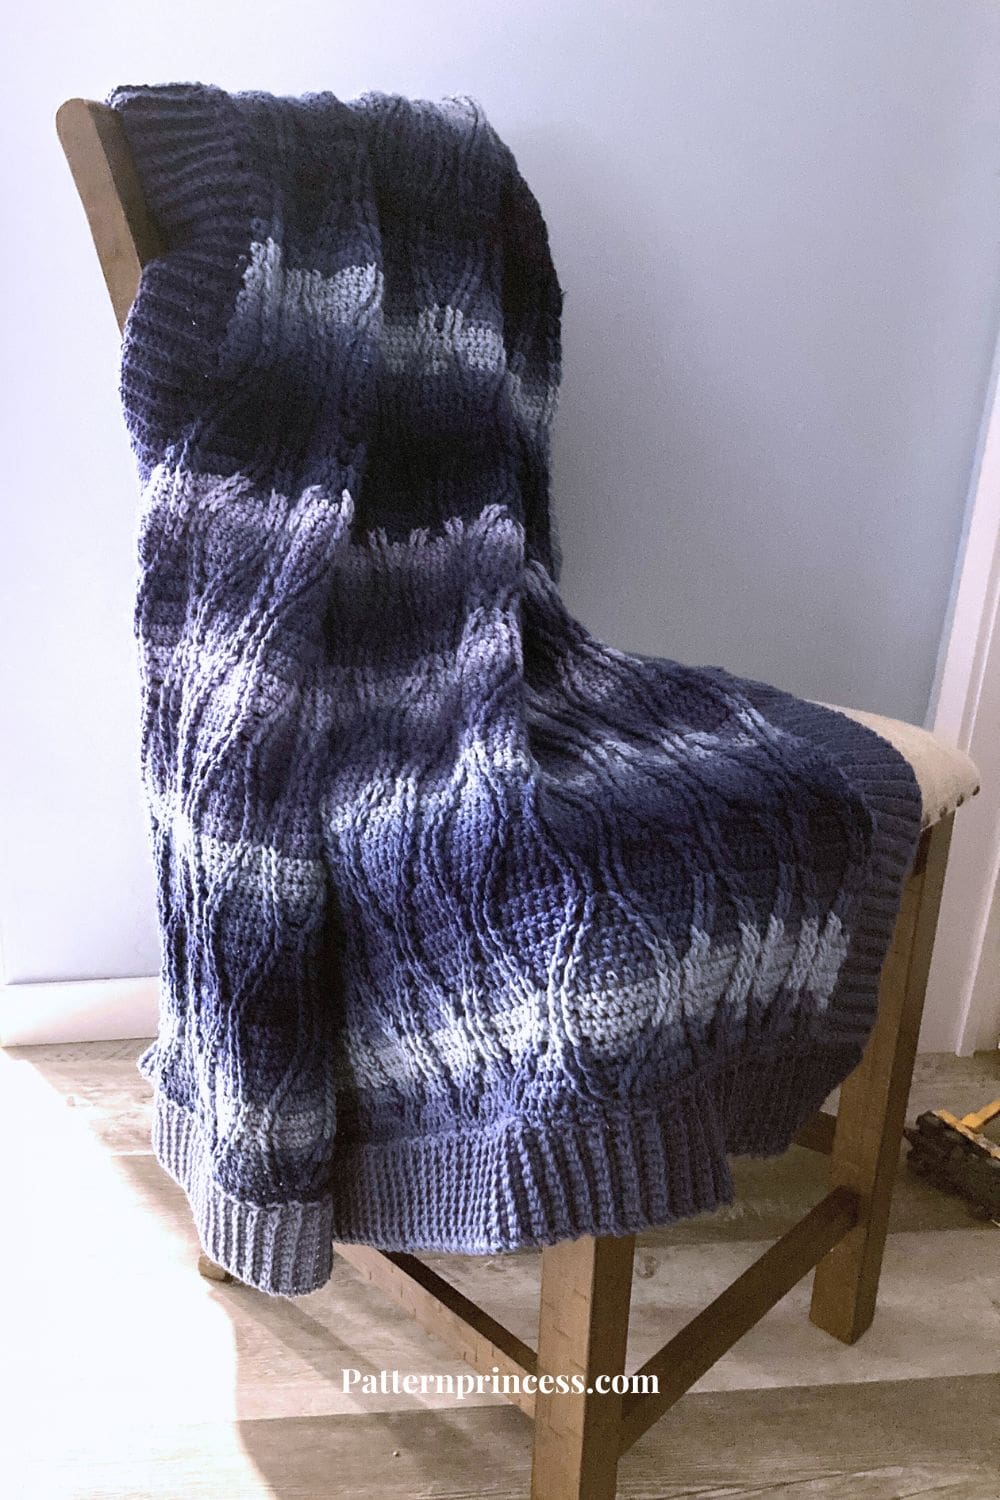
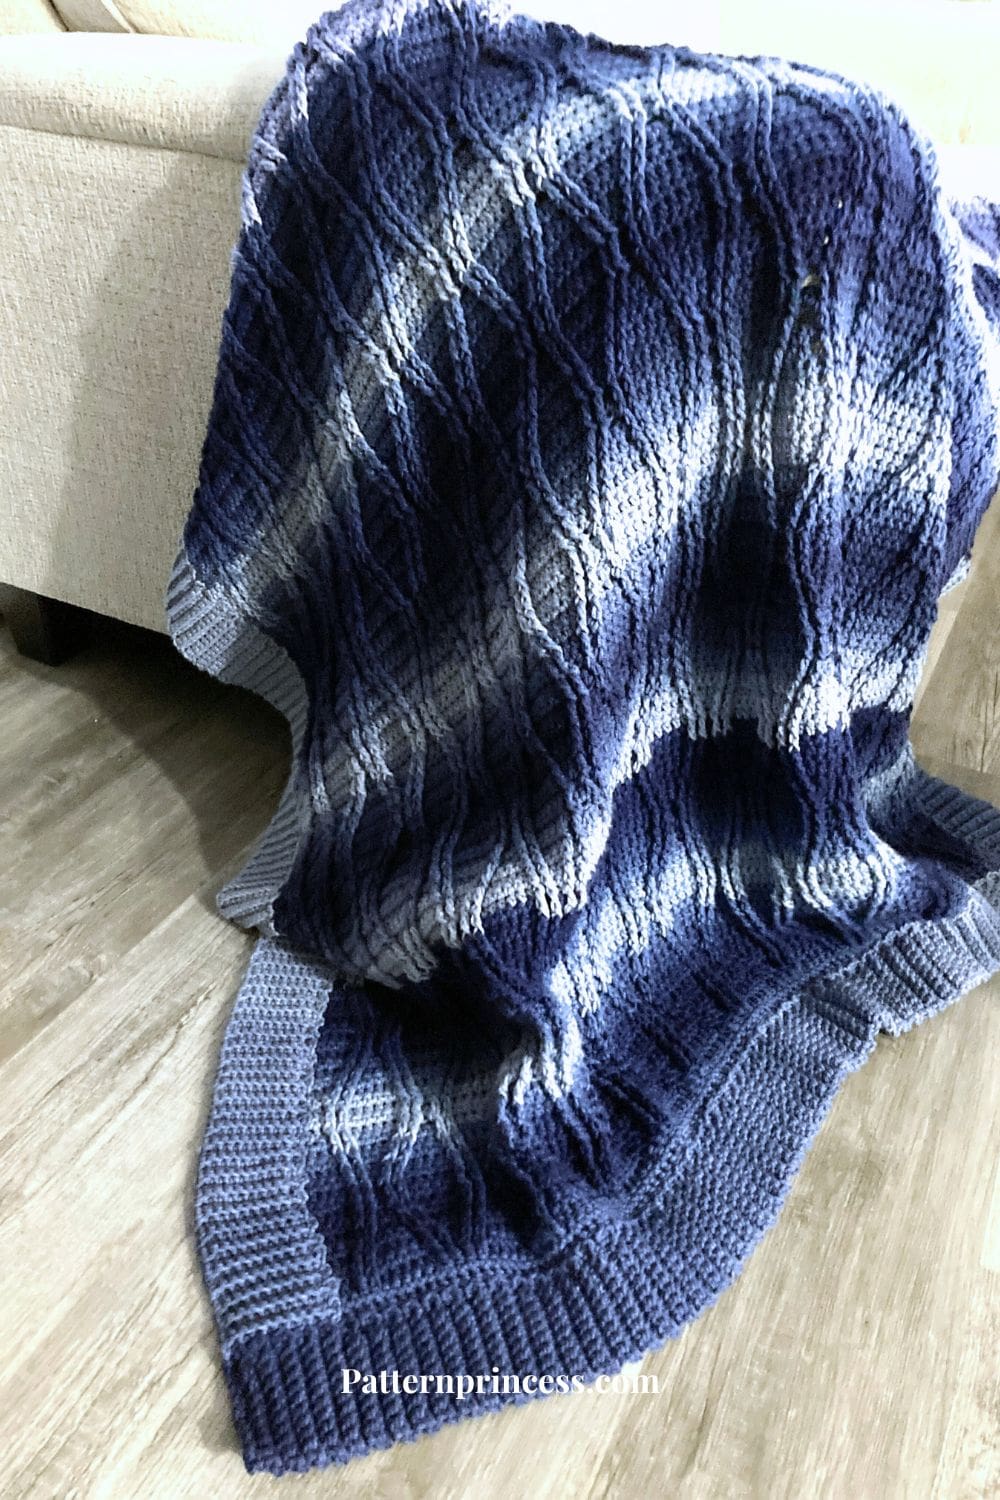
The Freya Ombre Crochet Cable Blanket pairs classic cabled texture with the beauty of ombre yarn, creating a breathtaking blend of depth and color. The gradual shifts in hue highlight the dimensionality of the cables, making each stitch a work of art.
Using a yarn with a subtle gradient ensures the focus stays on the intricate stitchwork, while also adding a touch of modern flair to this timeless design. Choosing the right yarn is key for this project. Look for smooth, medium worsted weight yarn with excellent stitch definition to make those cables truly pop.
I love how this Afghan turned out and I didn’t have many yarn ends to weave in. It was lovely being able to focus on counting my stitches. And making sure that I have the placement of the stitches in the correct spot.
The interplay of bold cables and shifting ombre tones creates a dynamic yet balanced look that is both timeless and contemporary. Whether you’re a seasoned crocheter or ready to try your hand at cables for the first time, this pattern offers a rewarding challenge and a timeless piece you’ll be proud to display.

Get Your PDF Printable Ad-Free Pattern in our Etsy Shop
Directions: The Freya Ombre Cable Blanket Crochet Pattern
Skill Level
Intermediate Crocheter
Gauge
12 stitches and 10 rows = 4 inches
Size
Make this any Size you want using the stitch multiples. Here are two suggested sizes.
Large Throw Blanket. 50 inches X 55 inches without border or 54 inches X 59 inches with border.
Afghan. 50 inches X 61 inches without border or 54 inches X 65 inches with border. (shown).
Change the size using multiples of 10 + 4 Using the Foundation Half Double Crochet.
*Optional beginning. If you want to work the chain stitches, then the first row of half double crochet stitches, start with a chain using stitch multiples of 10 + 5. Tip. When starting this way, the first row of the pattern detailed below will become your row two and so on.
Abbreviations
- BLSC = Back Loop Single Crochet
- CH = Chain
- FHDC = Foundation Half Double Crochet
- FPTR = Front Post Treble Crochet
- HDC = Half Double Crochet
- SC = Single Crochet
- SL ST = Slip Stitch
- ST = Stitch
- STs = Stitches
- [ ] = Repeat Between
Materials
Red Heart Super Saver Ombre yarn. It’s an acrylic yarn. 482 yards per skein. In Navy Ombre Color.
Throw Blanket Size uses 6 ½ skeins or 3,100 yards total.
Afghan Size uses 7 skeins or 3,374 yards total.
If you are not able to find the yarn locally, you can find a link to Yarnspirations to purchase the Red Heart yarn on our Savings Center page.
Supplies
Size I 5.5mm Crochet Hook
Yarn Needle
Scissors
Pattern Notes
Turn at the end of the row.
Written in US terms.
Stitch count is important in this pattern, so make sure to count the correct number of stitches in each row.
When working the Front Post Treble Crochet (FPTR), you will be skipping the single crochet stitch behind the FPTR. If there are 2 FPTR, you will be skipping the 2 SC STs behind. And when working the 4 FPTR, you will be skipping the 4 SC Sts behind.
Row 4 and beyond, work all FPTR in the stitches 2 rows below.
When working the FPTR, you will be changing the direction of the stitches as you work each row. Therefore, stitch placement and counting the stitches are necessary.
For the throw blanket size, work rows 2-17 (11) times and for the afghan size, work rows 2-17 (12) times. The beginning foundation half double crochet number of stitches (width of the blanket) are the same for both sizes.
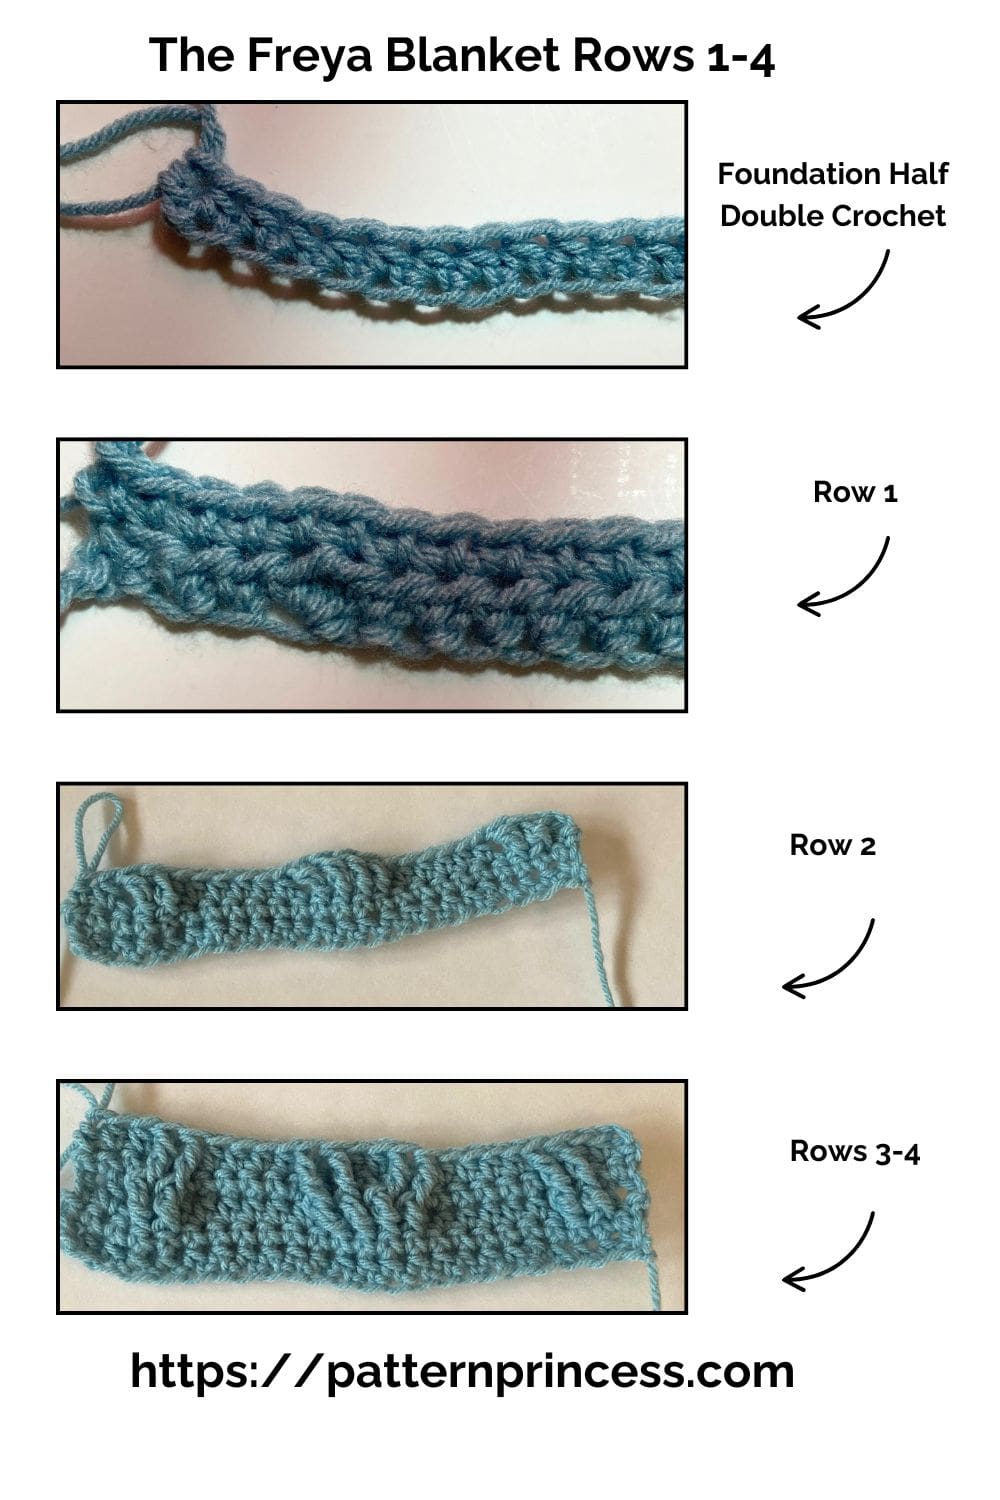
While this pattern doesn’t quite have the step-by-step photo tutorial, there are photos of each row completed.
There are video links for stitch tutorials throughout the pattern to help you master this crochet pattern. Additionally, there are links for video tutorials through row 17 below the written pattern.
Changing Yarn
When changing the yarn, I changed it right where the skein ran out using the magic yarn knot.
Magic Knot Yarn Join
The magic knot is a popular method for joining yarn because it creates a tight, invisible knot that rarely comes undone. Here’s how to do it.
- Lay the end of the new yarn and the old yarn parallel to each other.
- Tie a simple knot with each yarn strand around the other.
- Pull the two knots tightly until they form one strong knot.
- Trim the tails close to the knot.
- This method works well with acrylic yarn, and it’s a great way to join yarn in the middle of a row without breaking your flow.
- Watch the Video on how to do the Magic knot yarn join.
You can find other yarn joining methods on our blog post for How to Join Yarn.
Crochet Stitches
Back Loop Single Crochet (BLSC)
Insert the hook in the back loop only, pull up a loop. Yarn over and pull through the two loops on the hook.
Chain Stitch (CH)
Begin the chain stitch by making a slip knot and adding the loop on the crochet hook.
Keeping the loop on the hook, wrap the yarn over the crochet hook from back to front using the hook to draw the yarn through the loop that is currently on the hook. (The first chain stitch is complete).
HOW TO CROCHET THE CHAIN STITCH video tutorial
Foundation Half Double Crochet (FHDC)
If this stitch is new to you, we have a whole blog post with links to a video tutorial on how to work the foundation half double crochet.
How to Crochet Chainless Foundation Stitches Tutorial
Start with a Slip Knot. Place a slip knot on your crochet hook.
Working the first half double crochet. Chain 2. Yarn over and insert hook into the second chain from the hook. Yarn over and draw up a loop (you will have 3 loops on your hook).
Create the CH ST by working a yarn over and drawing through only the first loop on hook. There will still be 3 loops on the hook.
Complete the half double crochet stitch by yarning over and drawing the loop through all three loops on the hook.
(This creates the first CH ST and HDC ST).
Working the next half double crochet. Yarn over and insert hook into the bottom loops of the last half double crochet. Draw up a loop and pull through first loop on hook. Yarn over and draw through all three loops on hook.
Continue to Desired Length. Repeat the process until you have the number of stitches required for your pattern.
Front Post Treble Crochet (FPTR)
Yarn over twice, insert the crochet hook from the front to the back and then to the front. Going around the post of the stitch indicated. Then draw up a loop yarn over and draw through two loops on the hook. Yarn over and draw through two more loops. Finally, yarn over and draw through the last two loops.
Half Double Crochet (HDC)
Yarn over, insert the hook through both loops of the next stitch and pull up a loop. Yarn over and pull through all three loops on the hook. For height, this stitch is between the single crochet and double crochet.
HOW TO CROCHET THE HALF DOUBLE CROCHET STITCH video tutorial
Single Crochet (SC)
Insert the hook, pull up a loop. Yarn over and pull through the two loops on the hook.
HOW TO CROCHET THE SINGLE CROCHET STITCH video tutorial
Begin Crochet Pattern
Insert the hook, pull up a loop. Yarn over and pull through the two loops on the hook.
Work 144 FHDC stitches.
Row 1
CH 1 (Does Not count as a ST). SC in first ST and each ST across. Turn
Row 2
CH 2 (Counts as a HDC). Work 1 HDC in the next ST. [1 FPTR in the next 2 STs below, 1 HDC in the next 6 STs, 1 FPTR in the next 2 STs below]. Repeat between [ ] across. End with 1 HDC in the last 2 STs.
Row 3
CH 1 (Does Not count as a ST). SC in first ST and each ST across. Turn
Row 4
CH 2 (Counts as a HDC). Work 1 HDC in the next 2 STs. [1 FPTR in the next 2 STs below, 1 HDC in the next 4 STs, 1 FPTR in the next 2 STs below, 1 HDC in the next 2 STs]. Repeat between [ ] across. End with 1 HDC in the last ST.
Row 5
CH 1 (Does Not count as a ST). SC in first ST and each ST across. Turn
Row 6
CH 2 (Counts as a HDC). Work 1 HDC in the next 3 STs. 1 FPTR in the next 2 STs below, 1 HDC in the next 2 STs, 1 FPTR in the next 2 STs below. [Work 1 HDC in the next 4 STs. 1 FPTR in the next 2 STs below, 1 HDC in the next 2 STs, 1 FPTR in the next 2 STs below]. Repeat between [ ] across. End with 1 HDC in the last 4 STs.
Row 7
CH 1 (Does Not count as a ST). SC in first ST and each ST across. Turn
Row 8
CH 2 (Counts as a HDC). Work 1 HDC in the next 4 STs. [1 FPTR in the next 4 STs below, 1 HDC in the next 6 STs]. Repeat between [ ] across. End with 1 FPTR in the next 4 STs below and 1 HDC in the last 5 STs. Turn
Row 9
CH 1 (Does Not count as a ST). SC in first ST and each ST across. Turn

Row 10
(repeat row 8)
CH 2 (Counts as a HDC). Work 1 HDC in the next 4 STs. [1 FPTR in the next 4 STs below, 1 HDC in the next 6 STs]. Repeat between [ ] across. End with 1 FPTR in the next 4 STs below and 1 HDC in the last 5 STs. Turn
Row 11
CH 1 (Does Not count as a ST). SC in first ST and each ST across. Turn
Row 12
(repeat row 6)
CH 2 (Counts as a HDC). Work 1 HDC in the next 3 STs. 1 FPTR in the next 2 STs below, 1 HDC in the next 2 STs, 1 FPTR in the next 2 STs below. [Work 1 HDC in the next 4 STs. 1 FPTR in the next 2 STs below, 1 HDC in the next 2 STs, 1 FPTR in the next 2 STs below]. Repeat between [ ] across. End with 1 HDC in the last 4 STs.
Row 13
CH 1 (Does Not count as a ST). SC in first ST and each ST across. Turn
Row 14
(repeat row 4)
CH 2 (Counts as a HDC). Work 1 HDC in the next 2 STs. [1 FPTR in the next 2 STs below, 1 HDC in the next 4 STs, 1 FPTR in the next 2 STs below, 1 HDC in the next 2 STs]. Repeat between [ ] across. End with 1 HDC in the last ST.
Row 15
CH 1 (Does Not count as a ST). SC in first ST and each ST across. Turn
Row 16
(repeat row 2)
CH 2 (Counts as a HDC). Work 1 HDC in the next ST. [1 FPTR in the next 2 STs below, 1 HDC in the next 6 STs, 1 FPTR in the next 2 STs below]. Repeat between [ ] across. End with 1 HDC in the last 2 STs.
Row 17
CH 1 (Does Not count as a ST). SC in first ST and each ST across. Turn
Throw Blanket Size. Repeat Rows 2-17 ten more times.
Afghan Size. Repeat Rows 2-17 11 more times.
Finishing
After you work the last ST, cut off the yarn leaving about a 12-inch long tail. Pull the yarn tail through the last loop on the hook.
Thread the yarn needle with the yarn tails and weave them through the crochet stitches back and forth until the yarn feels secure. Snip off the excess yarn.
If you are a beginner crocheter, you can find more detail on finishing your crochet project on the website.
You can be done at this point, or you can add the crochet ribbed border.
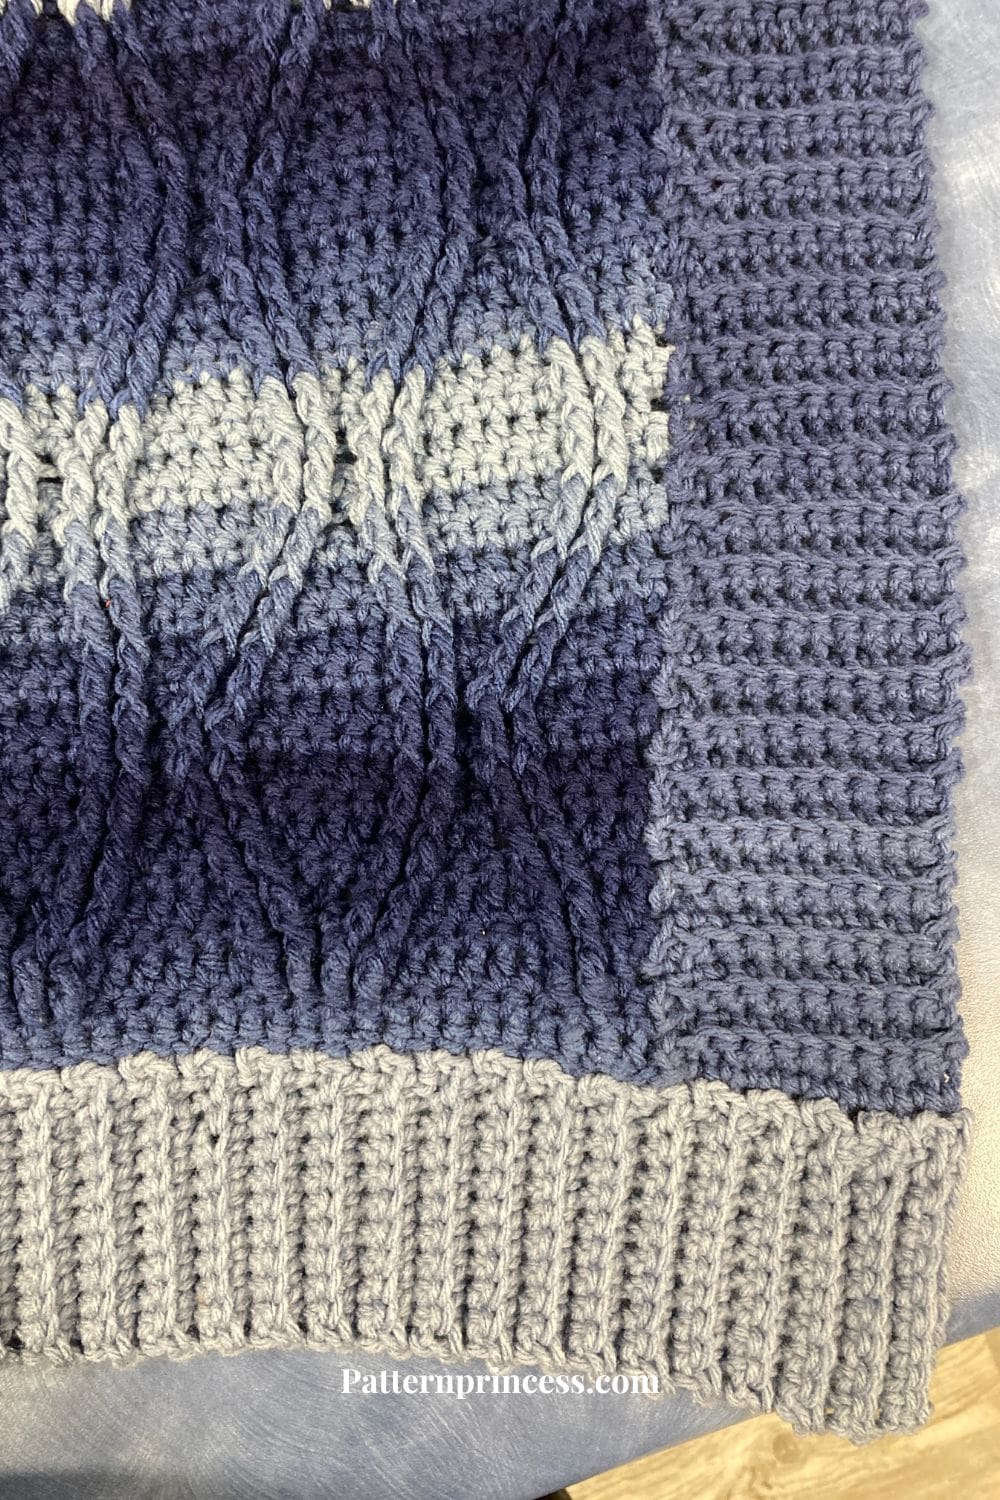
Crochet Border: Back Loop Single Crochet Ribbed Stitch
The border consists of ribbed lines that frame the blanket.
When working the stitches on the sides of the crochet project, ease the stitches along with side about the same width as you would be working in the stitches in the top and bottom of the project.
Right Side and Wrong Side. This ribbing technique creates a distinct right and wrong side (or front and back side) to your fabric. Therefore, if your project has a distinct right and wrong side to it, you’ll need to attach your yarn for the ribbing with the front side facing you.
Forward Rows and Return Rows. The forward rows are the rows worked while moving away from the body of the project. Return rows are those worked moving back toward the body.
Slip Stitches. Work 2 or 3 slip stitches at the end of the return rows. One is to anchor the return row and the next one or two are to set up for the next forward row.
Begin Crochet Pattern
Start by making a slip knot and adding the loop on the hook.
Start with the Sides of the Blanket. Join the yarn to a corner on one of the sides of your crochet project. Attach your yarn to the right side of the fabric (the front side with the cables facing you).
Chain your desired number of chains for your foundation chain.
For my border, I used a chain of 11.
Now we’ll work back down the chain toward the edge of the blanket or crochet project. Work a SC into the second chain and in each ST across. Next, work a SL ST back into the SP where we joined our yarn. Work 1 SL ST into the next 1 or 2 STs. (I used 2 stitches for a better foundation).
Row 1 completed
Row 2
Turn your work. SK the 2 or 3 SL STS (In my sample it is 3 SL STs). Work a SC BLO into each ST across. (Forward pass completed). Begin the return pass. CH 1, SC BLO into each ST across. Work a SL ST back into the base of the row in the body of the project. And work a SL ST into the next 1 or 2 STs. (I used 2 stitches).
*For my blanket there should be 10 SC BLO and 3 SL STs.
Rows 3 and Beyond
Continue to repeat row 2. Working the forward and return rows as needed.
Crocheting the Top and Bottom Borders. When you are finished with the sides.
Fasten off and weave in ends securely with a tapestry needle.
Join the yarn to a corner on either the top or bottom of your crochet project with the front side facing you. (The outer edge where you just worked your side ribbing border).
Then continue working the forward and return passes of the pattern.
Finishing
Leave a 10-12-inch-long yarn tail. Pull through the last loop on the hook. Using your tapestry needle. Weave the yarn back and forth in the same color yarn until snug. Trim off any excess.
Video Tutorials on Our Youtube Channel
Crochet Video Tutorials for the Back Loop Single Crochet Ribbing
The Freya Ombre Cable Blanket Crochet Pattern
We hope you have enjoyed making this free crochet pattern. We hope you had an impressive result just like ours. Here are a few other patterns to inspire your next crochet projects.

You can find Victoria crocheting, quilting, and creating recipes. She has cooked in restaurants for over 20 years, including many larger parties. She learned to crochet when she was just 11 years old and has been crocheting ever since; over 50 years now. Over 40 years ago, she loved her first class in sewing and continues to hone her skills in quilting. Many have enjoyed the handmade gifts over the years. In her professional career, she has worked in management in a wide variety of businesses including higher education as a dean of a division. All the while attending college part-time to achieve her doctorate in higher education with an emphasis in e-learning.