Last updated on March 27th, 2026 at 09:42 am
Introducing the Beginner-Friendly Veralyn 3-in-1 Crochet Turtleneck Hooded Scarf, a seamless blend of versatility, warmth, and elegance. This thoughtfully designed pattern offers the perfect combination of function and fashion, transitioning effortlessly between a hooded scarf, a cozy turtleneck cowl, and a chic shawl.
The ultimate cold-weather accessory with a blend of warmth, comfort, and versatility.
Designed with simplicity in mind with this beginner-friendly pattern. Crafted with a solid yarn color and a refined crochet stitch, this accessory exudes understated sophistication.
Whether you’re seeking a statement piece for your winter wardrobe or a timeless handmade gift, the Veralyn design provides just that with an all-in-one design.

Beginner-Friendly 3-in-1 Crochet Pattern
The blanket stitch is the star of the Veralyn 3-in-1 Crochet Turtleneck Hooded Scarf Pattern. It gives the pattern a soft, cozy feel with just the right amount of detail. Simple enough for confident beginners, and fun to make for more experienced crocheters.
This simple, one-row repeat creates a beautifully textured design that’s both visually appealing and easy to work up. The stitch combines basic crochet techniques, single crochet and double crochet. Worked in alternating spaces.
Its rhythmic repetition makes it a relaxing and enjoyable crochet experience while producing a fabric with a delightful drape. Whether you’re creating this project as a gift or for yourself, the blanket stitch guarantees a timeless, polished finish.
Four Sizes for the Turtleneck Hooded Scarf
Stay warm in style with the Veralyn Turtleneck Scarf. A modern crochet pattern that’s as practical as it is cozy. Whether you wear it as a classic scarf on your shoulders or as a hood over your head, the turtleneck adds extra warmth and comfort.
Quick and beginner-friendly pattern with sizes for both children and adults. The small is recommended for the child size with the other three recommended for teen to adult size.
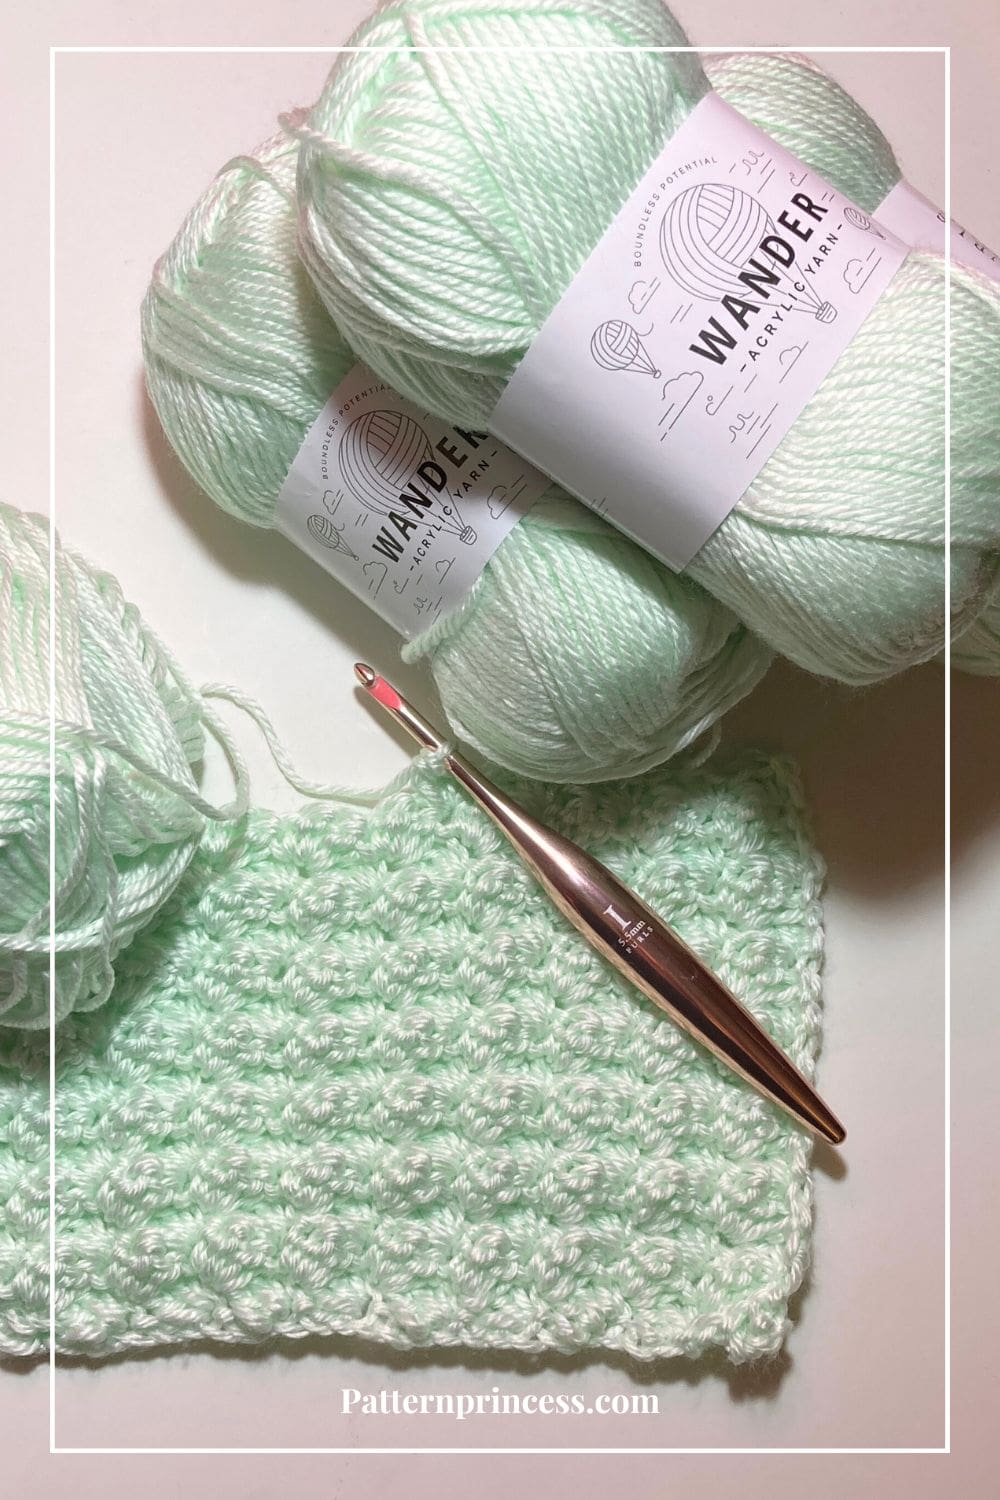
Wander Acrylic Yarn
We’ve teamed up with Furls Fiber Arts to bring you this unique and versatile scarf pattern. They provided gorgeous yarn Wander Acrylic Yarn – Wintermint. Along with this gorgeous Blush Streamline Metal crochet hook. Make sure to check them out on our Savings Center page.
The basic stitches work up beautifully with medium weight yarn. I used a lovely yarn from Furls called Wander. There are so many different colors to choose from. Create a classic and versatile look, stick to neutrals, or choose a vibrant hue for a bold statement piece.
It’s soft and comfortable against the skin. Making this a great choice, as this scarf is designed to be worn close to the neck and face.
Prefer a bulky yarn or lighter weight yarn? No problem. Just make sure to use a tape measure to determine your size.
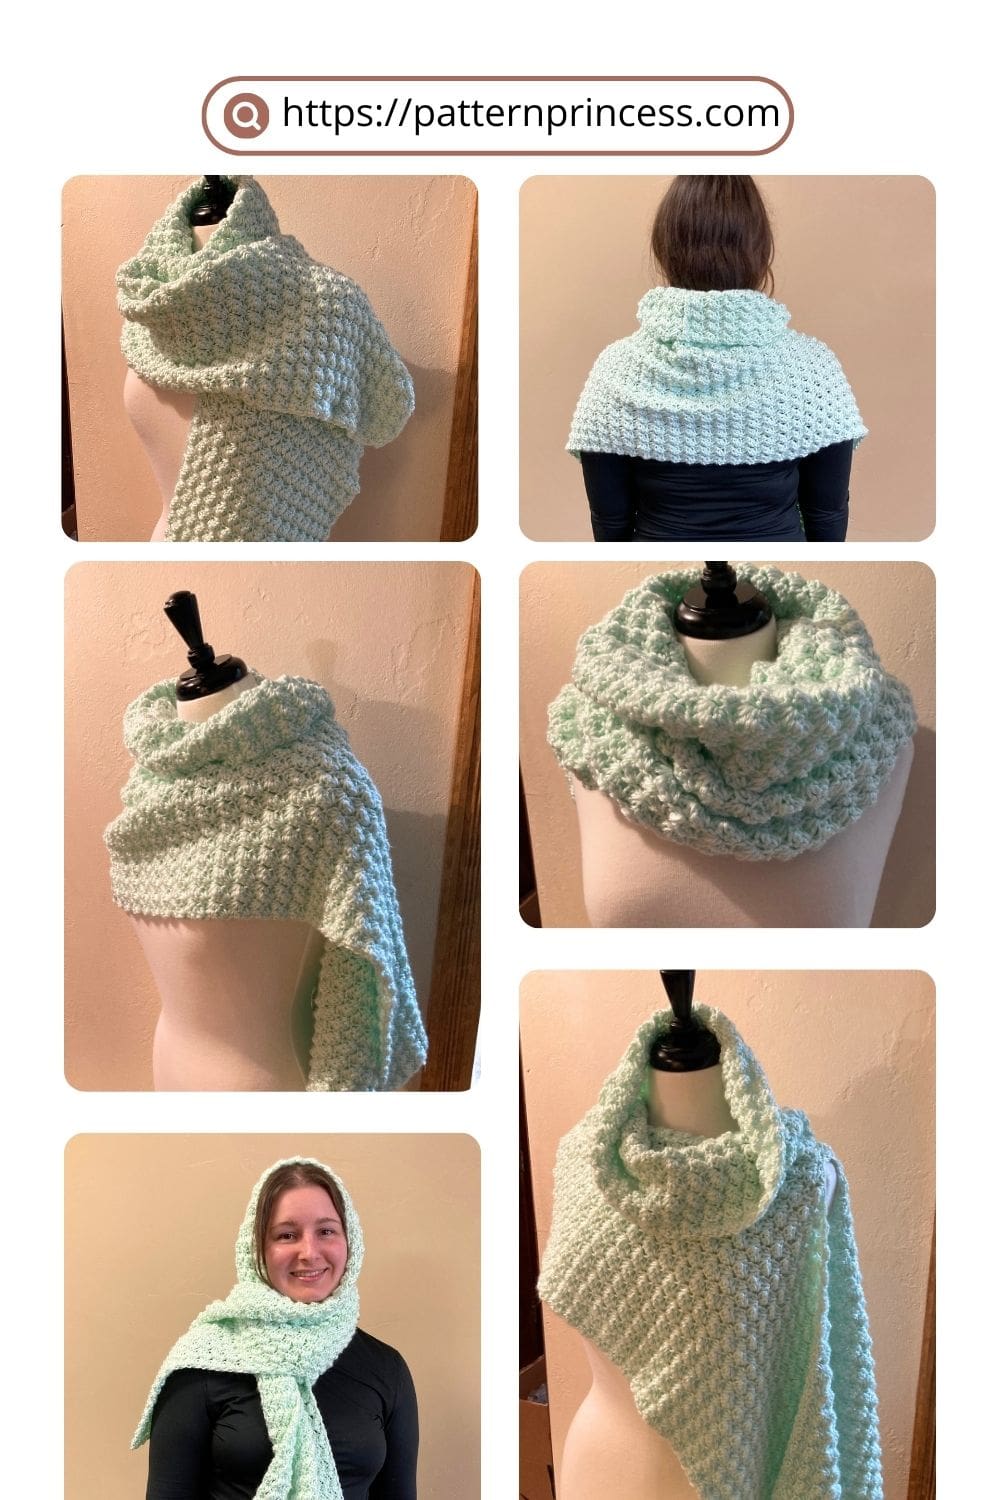
How to Style the Veralyn 3-in-1 Crochet Turtleneck Hooded Scarf Pattern.
It really could be called a 4-in-1 scarf and neck warmer combination pattern.
1. Crochet Scarf Hood, Hoodie Scarf, or Hoodie Shawl
This versatile style combines warmth and elegance, making it perfect for colder weather.
Wear as a Hooded Scarf by wearing the cowl around your neck and letting the ends of the scarf hang loose or wrap them once for added coziness.
The width of the scarf drapes over the shoulders. Optionally, you can pull this up and wear it as a hood. Or keep that over the shoulders and pull the cowl up over your head as a hood to keep your ears and head warm.
This look offers both practicality and flair, ideal for staying warm while adding a chic touch to your outfit.
2. Crochet Neck Warmer
Transform your hooded scarf into a snug neck warmer with ease. To achieve this look slip the neck warmer over your heat and wrap the scarf around your neck multiple times. Tuck in any loose ends for a polished appearance.
Adjust it to sit closely against your neck to trap warmth or wear it more loosely for a casual vibe. This style is great for pairing with jackets or coats, offering a cozy and compact accessory for chilly days.
3. Turtleneck Scarf
The turtleneck scarf look provides both style and comfort, with a slightly elevated feel. To wear it fold or scrunch the hood section down to create a thick, cozy collar that resembles a turtleneck.
Wrap the scarf ends around your neck or let them hang naturally for a relaxed look. This option is perfect for layering with sweaters or wearing indoors for added warmth without the bulk of a traditional scarf.

4. Asymmetrical Poncho Style
For a unique and fashion-forward twist, try wearing the Veralyn 3-in-1 Crochet Turtleneck Hooded Scarf in an asymmetrical poncho style. This look adds warmth and a stylish drape, making it perfect for layering over sweaters or long-sleeve tops.
To achieve this look, start by putting the scarf on as a neck warmer, with the center opening resting over one shoulder. Allow the longer side to cascade down your arm while tucking the shorter end underneath or styling it across the chest for an elegant drape.
This asymmetrical poncho effect creates a cozy yet sophisticated look, adding effortless warmth and dimension to your outfit. It’s a great way to showcase the texture of the blanket stitch while making a bold fashion statement.
5. Balaclava Scarf Style
For ultimate warmth and full coverage against the cold, you can wear the Turtleneck Hooded Scarf as a balaclava scarf. This style is perfect for windy or snowy days when you need extra protection from the elements.
To wear it this way start by gently pulling the turtleneck portion up over your mouth and nose, covering the lower half of your face like a cozy mask.
Take the wider portion of the scarf that normally drapes over your shoulders and pull it up over your head, creating a full-coverage hood. Wrap the scarf ends around your shoulders, crossing them in front or letting them drape naturally for added warmth and style.
This balaclava-style wrap keeps your face, head, and neck warm while allowing breathability and movement. Whether you’re braving a winter storm or simply want an ultra-cozy layering option, this is the perfect way to stay snug and stylish!
Each of these styles allows you to get creative and adjust the look to suit your needs and outfit.
Get Your Ad Free Printable PDF in our Etsy Shop
Directions: Veralyn 3-in-1 Crochet Turtleneck Hooded Scarf
Skill Level
Easy
Gauge
15 SC across and 9 rows of the pattern = 4 x 4in
You can use any yarn you wish for this pattern. If you have a different gauge just use a tape measure to check the dimensions of the rectangles. Just work the number of stitches and rows to match the measurements of your desired size provided in the pattern.
Size
- Small: Scarf = 10 X 45 Inches, Cowl = 6 X 17 inches
- Medium: Scarf = 11 X 55 inches, Cowl = 7 X 20 inches
- Large: Scarf = 12 X 65 inches, Cowl = 8 X 26 inches (shown)
- X-Large: Scarf = 12 X 85 inches, Cowl = 8 X 30 inches
To change the width the beginning chains can be changed using multiples of 3. To change the length, increase or decrease the rows.
Abbreviations
- CH = Chain
- DC = Double Crochet
- SC = Single Crochet
- SK = Skip
- SL ST = Slip Stitch
- ST = Stitch
- STs = Stitches
- [ ] = Repeat Between
Pattern Notes
Written in US Crochet Terms.
The initial chain 2 at the beginning of each row will count as a double crochet.
Turn at the end of each row.
This pattern is worked as two separate rectangles. Then the cowl is joined into a circle. This cowl is joined to the rectangle scarf.
Make sure to make a swatch to check your gauge with mine. Ideally, measure each rectangle and crochet to the desired size. That way if your gauge is different than mine, your crochet project will turn out as expected.
Crochet Stitches
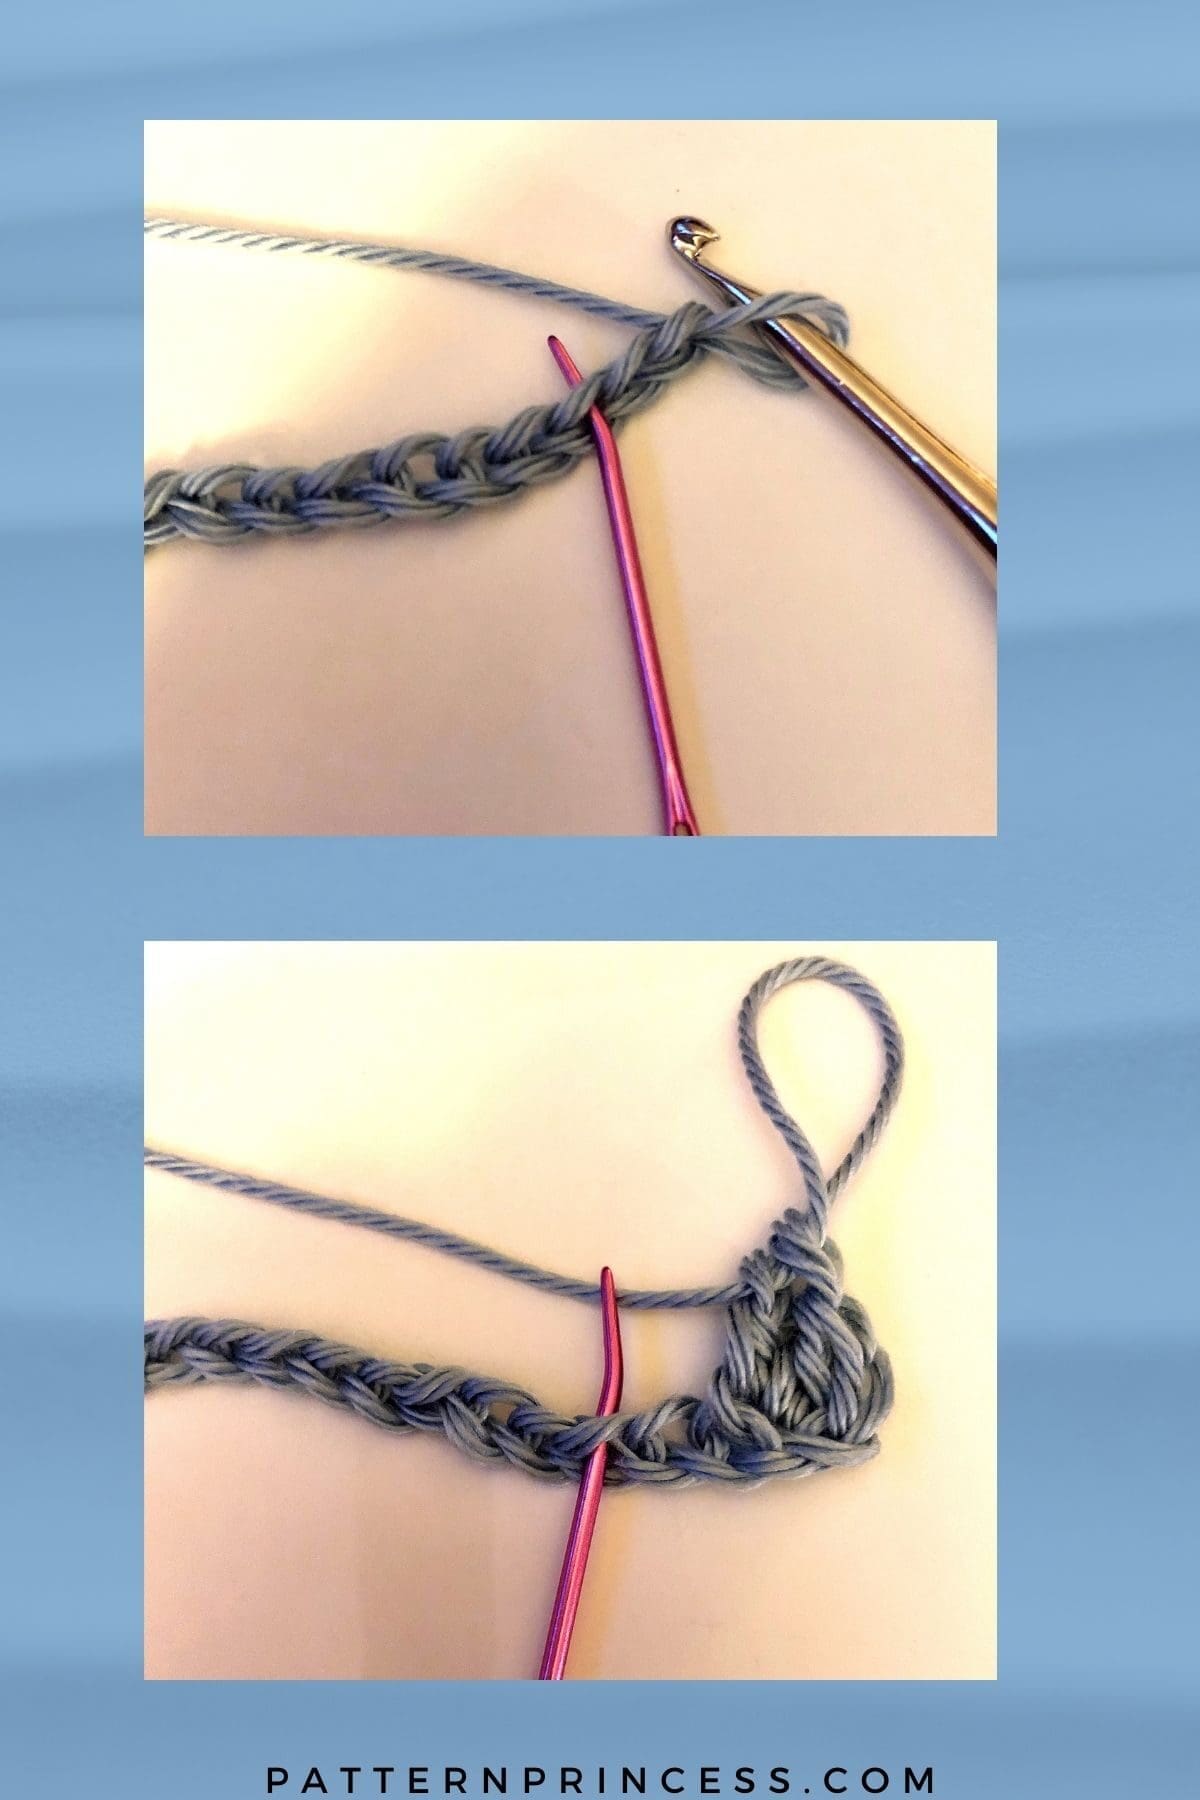
Chain Stitch (CH)
Begin the chain stitch by making a slip knot on the crochet hook. Leave about a 5-inch tail on the yarn. This will be weaved in later.
Next snug up the yarn loop that is on the crochet hook; while it should be firm, it should also be loose enough to slide on the hook with ease.
Keeping the loop on the hook, insert the hook in the stitch, wrap the yarn over the crochet hook from back to front. Draw the yarn through the loop. Yarn over again and draw the yarn through both loops that are currently on the hook. (The first chain stitch is complete).
HOW TO CROCHET THE CHAIN STITCH video tutorial
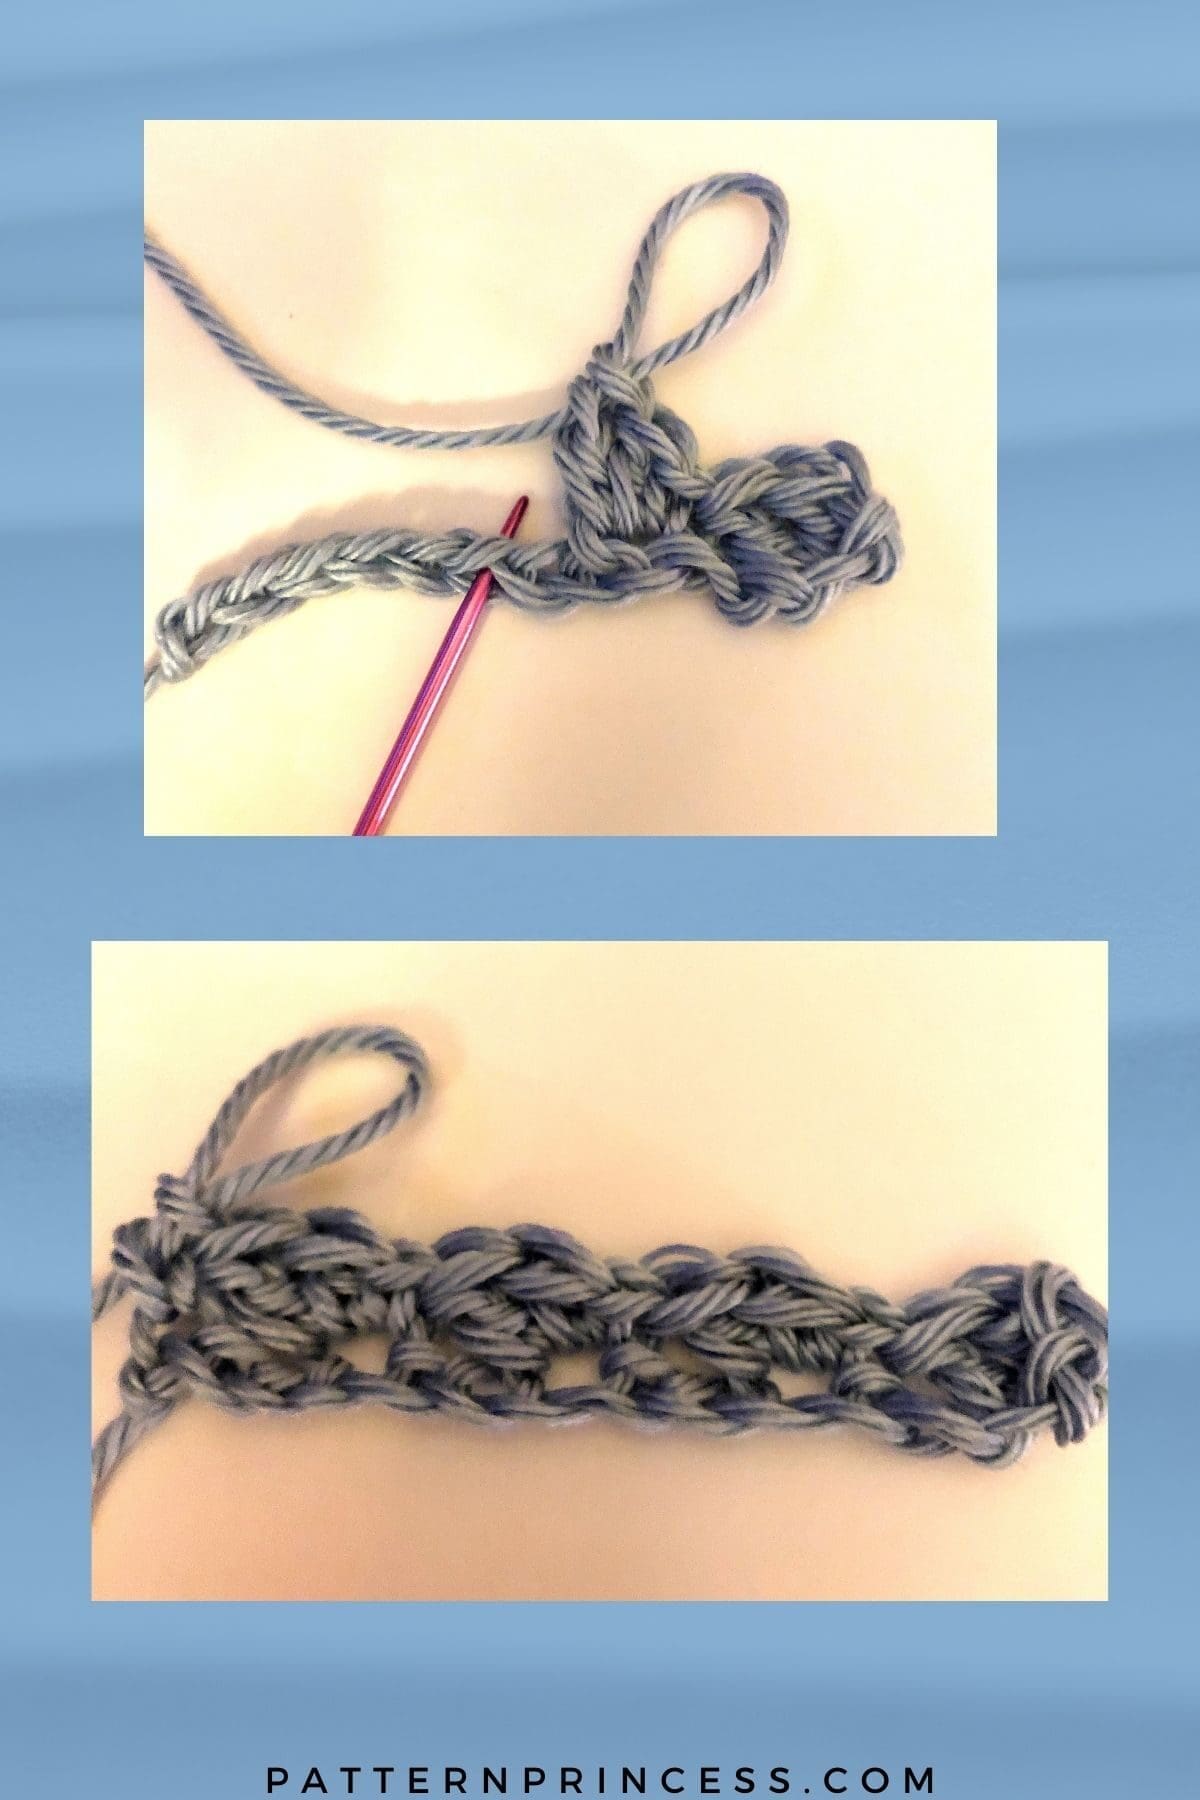
Double Crochet Stitch (DC)
Yarn over, insert the hook through both loops and pull up a loop. Next, yarn over and pull through two loops on the hook. Lastly, yarn over again and pull through the last two loops on the hook.
HOW TO CROCHET THE DOUBLE CROCHET STITCH video tutorial
Single Crochet Stitch (SC)
Insert the hook, pull up a loop. Yarn over and pull through the two loops on the hook.
HOW TO CROCHET THE SINGLE CROCHET STITCH video tutorial
Materials
Wander Acrylic Yarn from Furls Fiber Arts. Number 4 medium weight yarn 120 yards in each skein. Yarn Color Wintermint.
To make the yarn stretch as far as I could, I used the partial skein leftover from the neck warmer when crocheting the scarf.
I also used the Russian yarn join to secure the yarn for the next skein of yarn right where I ran out. If you are not familiar with this method, you can find more about how to change yarn.
- Small. 4 skeins, 480 yards total.
- Medium. 5 skeins, 600 yards total.
- Large. 6 skeins, 720 yards total.
- X-Large. 8 skeins, 960 yards total.
Crochet Hook Size I 5.5mm
Tapestry Needle
Scissors
Measuring Tape
Stitch Marker
Clip
Begin Crochet Pattern for the Turtleneck/Cowl
- Small Cowl: CH 24
- Medium Cowl: CH 27
- Large Cowl: CH 30 (shown)
- X-Large Cowl: Ch 30
Row 1
2 DC in the 3rd CH from the hook, [SK 2 CH, in the next CH, SC and 2 DC]. Repeat from [ ] across until the last 3 CH. SK 2 STs and end with SC in last ST. Turn.
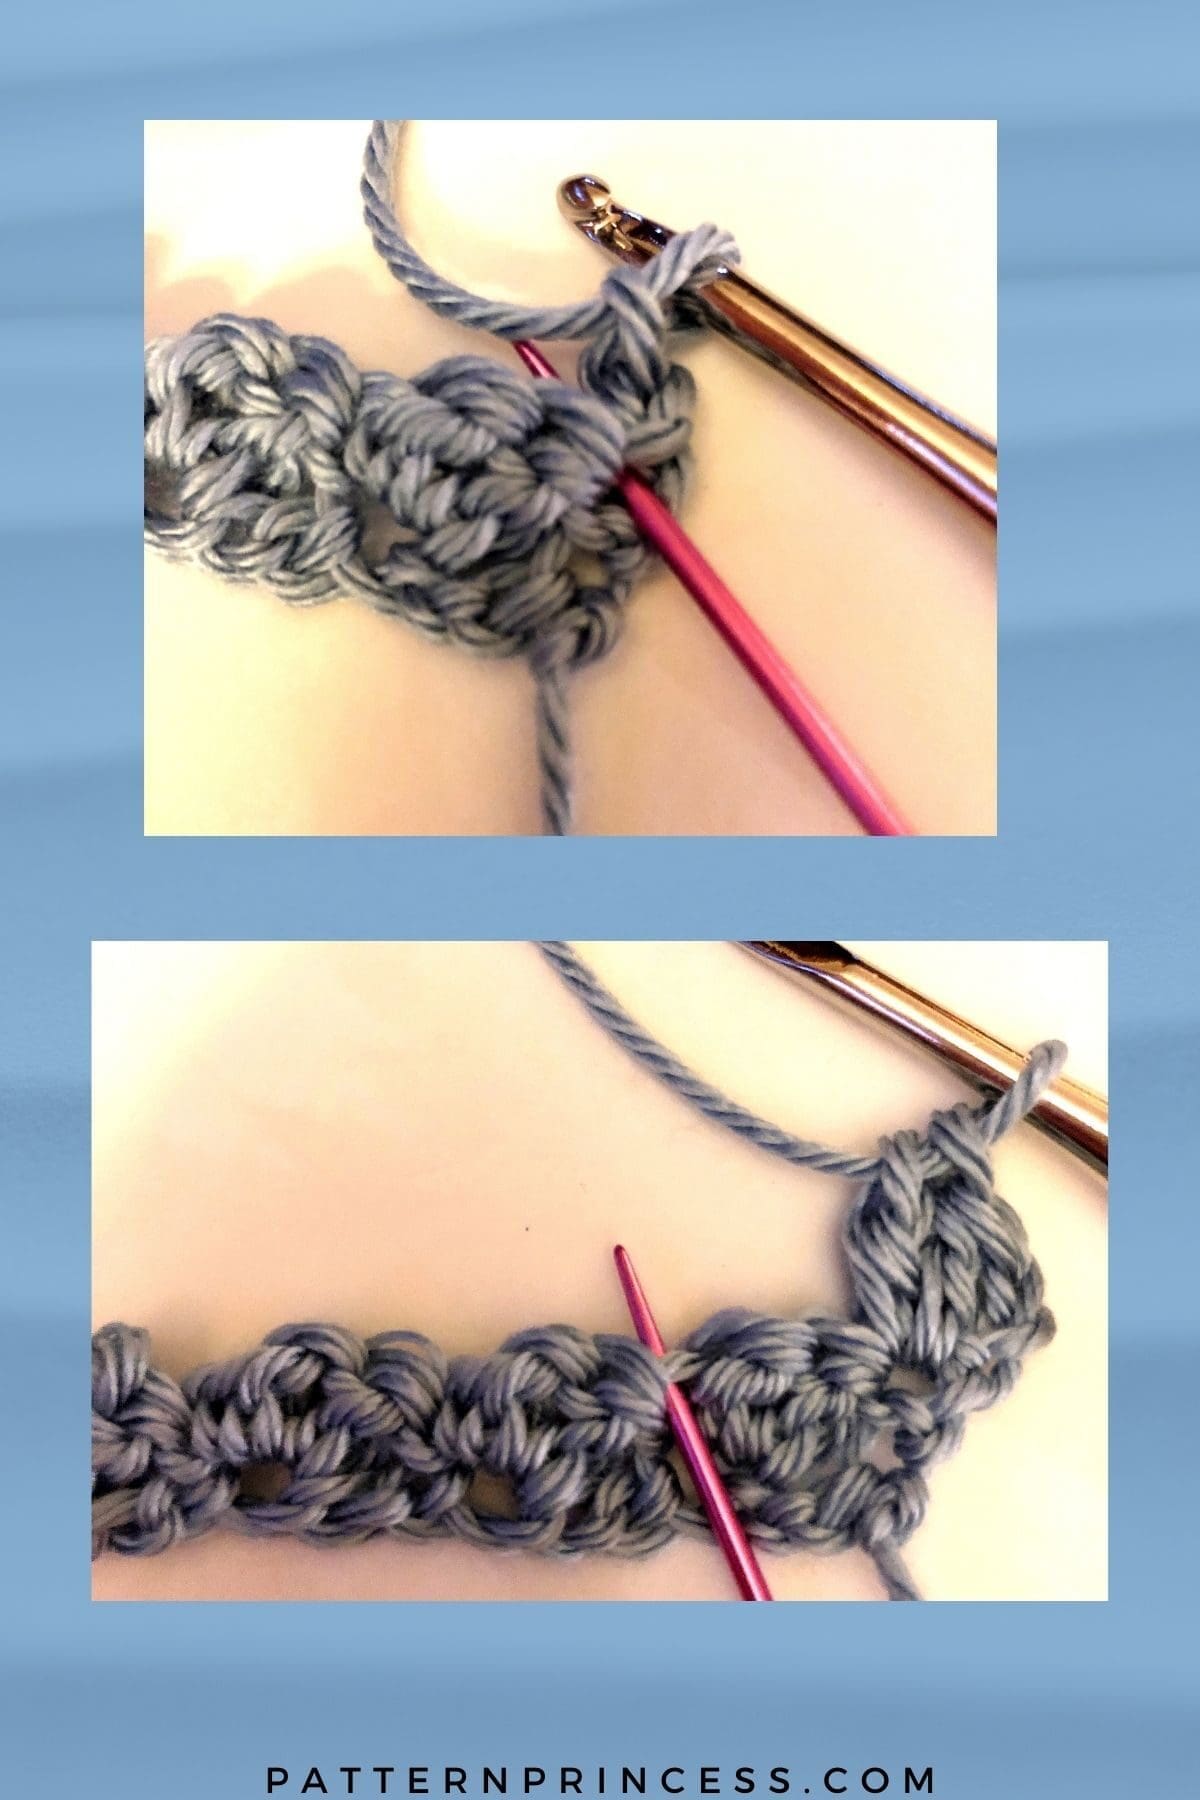
Row 2
CH 2 (counts as a DC). 2DC in Same ST. [SK 2 DC, in the next ST Work a SC and 2 DC in SC in ST]. Repeat until the last 3 STs remain. Skip 2 STs and end with a SC in the last ST. Turn
Rows 3 and Beyond
Repeat Row 2.
- Small Cowl: 40 Rows
- Medium Cowl: 47 Rows
- Large Cowl: 60 Rows (shown)
- X-Large Cowl: 69 Rows
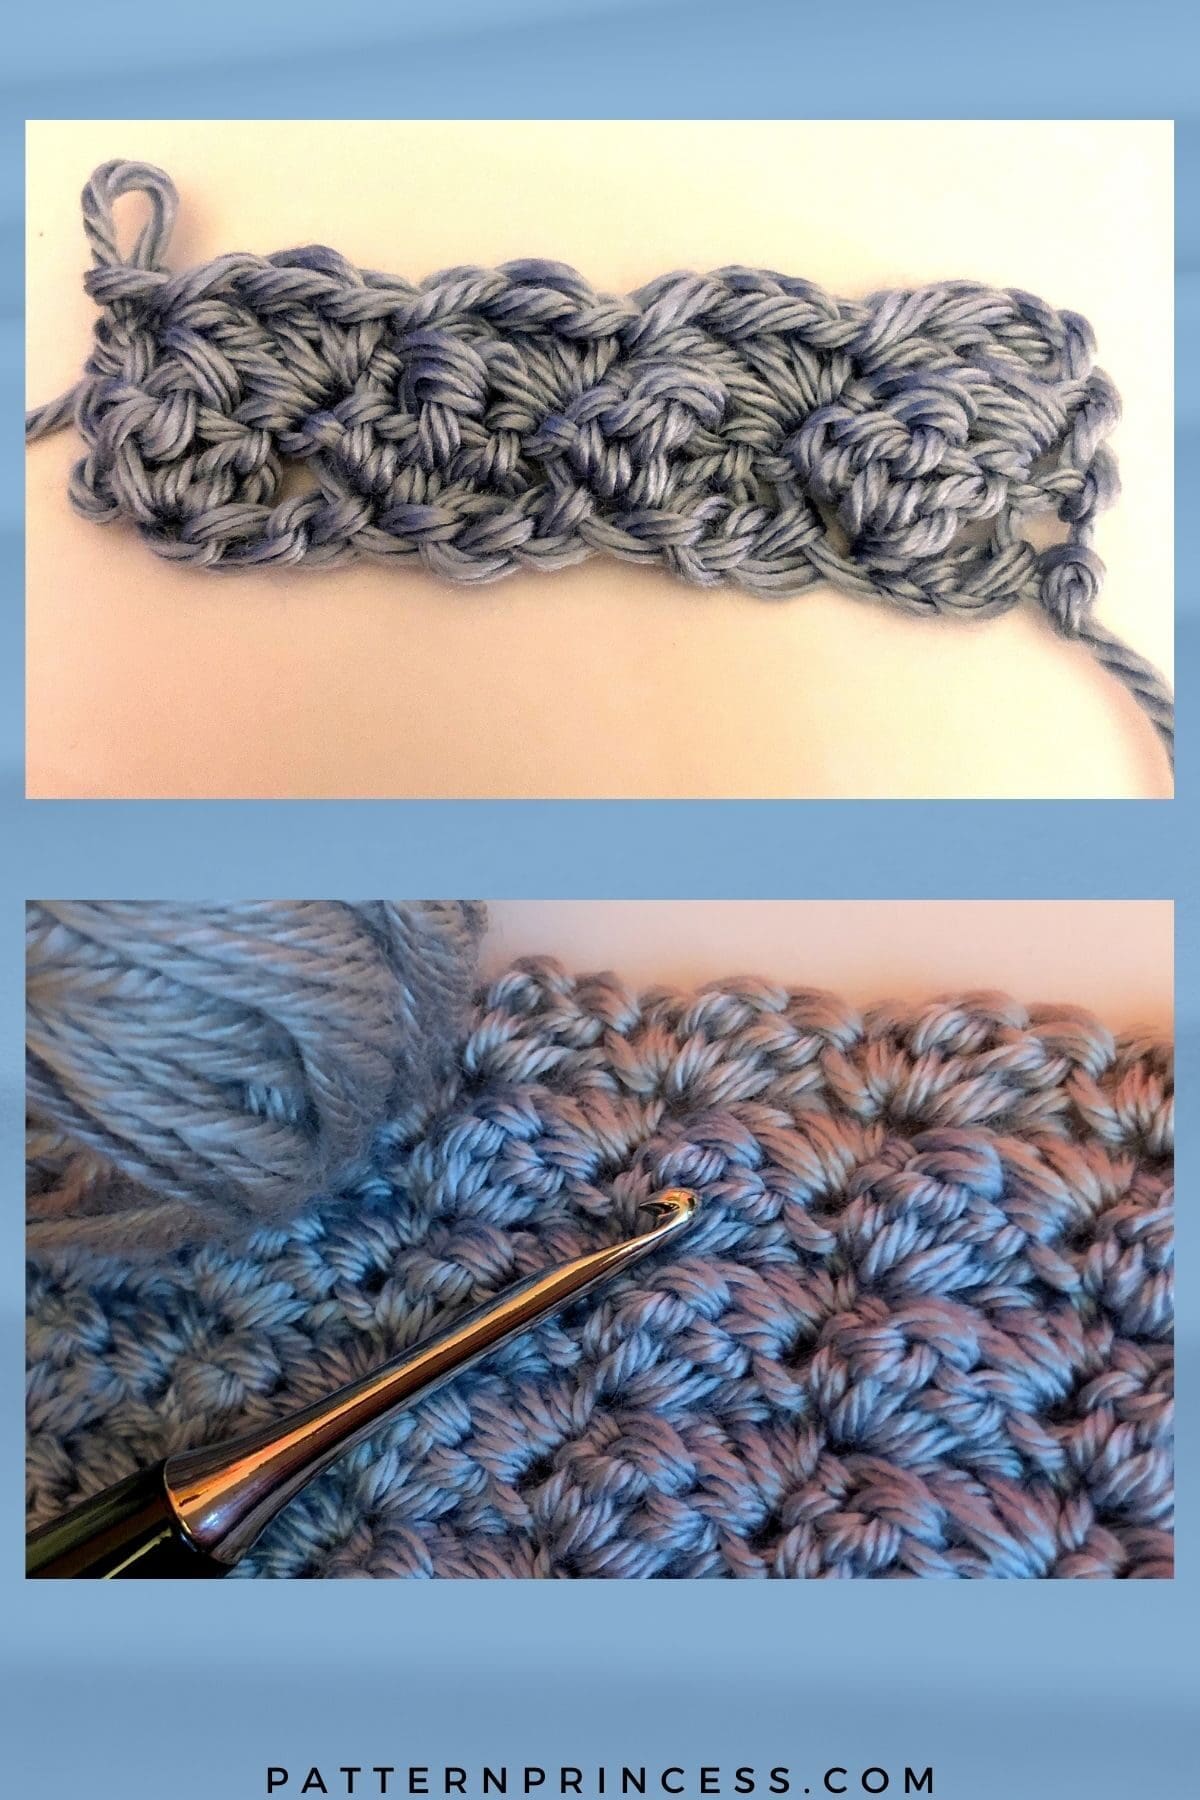
Seaming the Turtleneck/Cowl
When you have completed the last row. Leave a yarn length of approximately 30 inches. You will be using this to sew the cowl ends together.
Joining the rectangle to create a circular infinity scarf
You can use any method to join the ends. A slip stitch or a single crochet through both ends. You could use the yarn needle and work a whip stitch through both ends.
Today, I chose to work a whip stitch using the tapestry needle.
- Align the ends of the scarf.
- Hint: when placing your needle into the stitches to sew together, place it into the first row of blanket stitches itself. Not the chain stitch row. If you sew together using the chain stitch row, you’ll end up with an unsightly gap. So, I skip that row and use the first row of blanket stitches to sew into.
- Starting where you ended your last stitch, insert the needle in the stitch directly across. Pull the yarn through.
- Move over to the next stitch and bring it back through the layers to the other side. Pull the yarn through.
- Continue working steps 3 and 4 until you reach the end of the seam. Weave the yarn ends through and cut off the excess length.
Next, move onto the scarf
Begin Crochet Pattern for the Scarf
- Small Cowl: CH 39
- Medium Cowl: CH 42
- Large Cowl: CH 45 (shown)
- X-Large Cowl: Ch 45
Row 1
2 DC in the 3rd CH from the hook, [SK 2 CH, in the next CH, SC and 2 DC]. Repeat from [ ] across until the last 3 CH. SK 2 STs and end with SC in last ST. Turn.
Row 2
CH 2 (counts as a DC). 2DC in Same ST. [SK 2 DC, in the next ST Work a SC and 2 DC in SC in ST]. Repeat until the last 3 STs remain. Skip 2 STs and end with a SC in the last ST. Turn
Rows 3 and Beyond
Repeat Row 2.
- Small Cowl: 102 Rows
- Medium Cowl: 125 Rows
- Large Cowl: 144 Rows (shown)
- X-Large Cowl: 193 Rows
Finish the Scarf
Weave the yarn ends through and cut off the excess length.
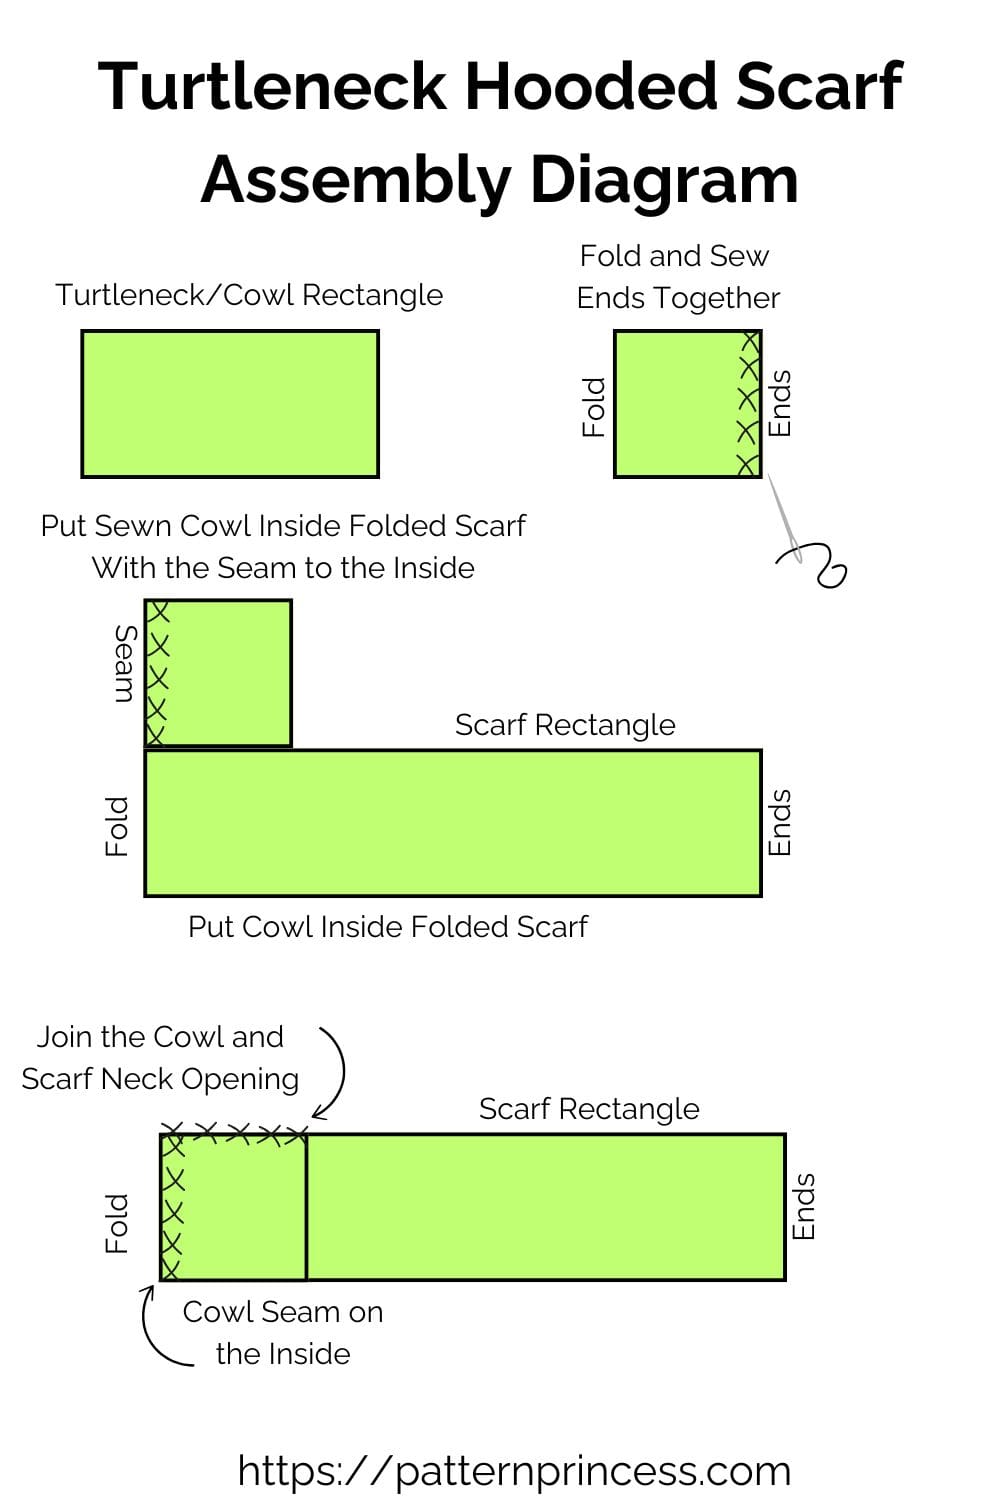
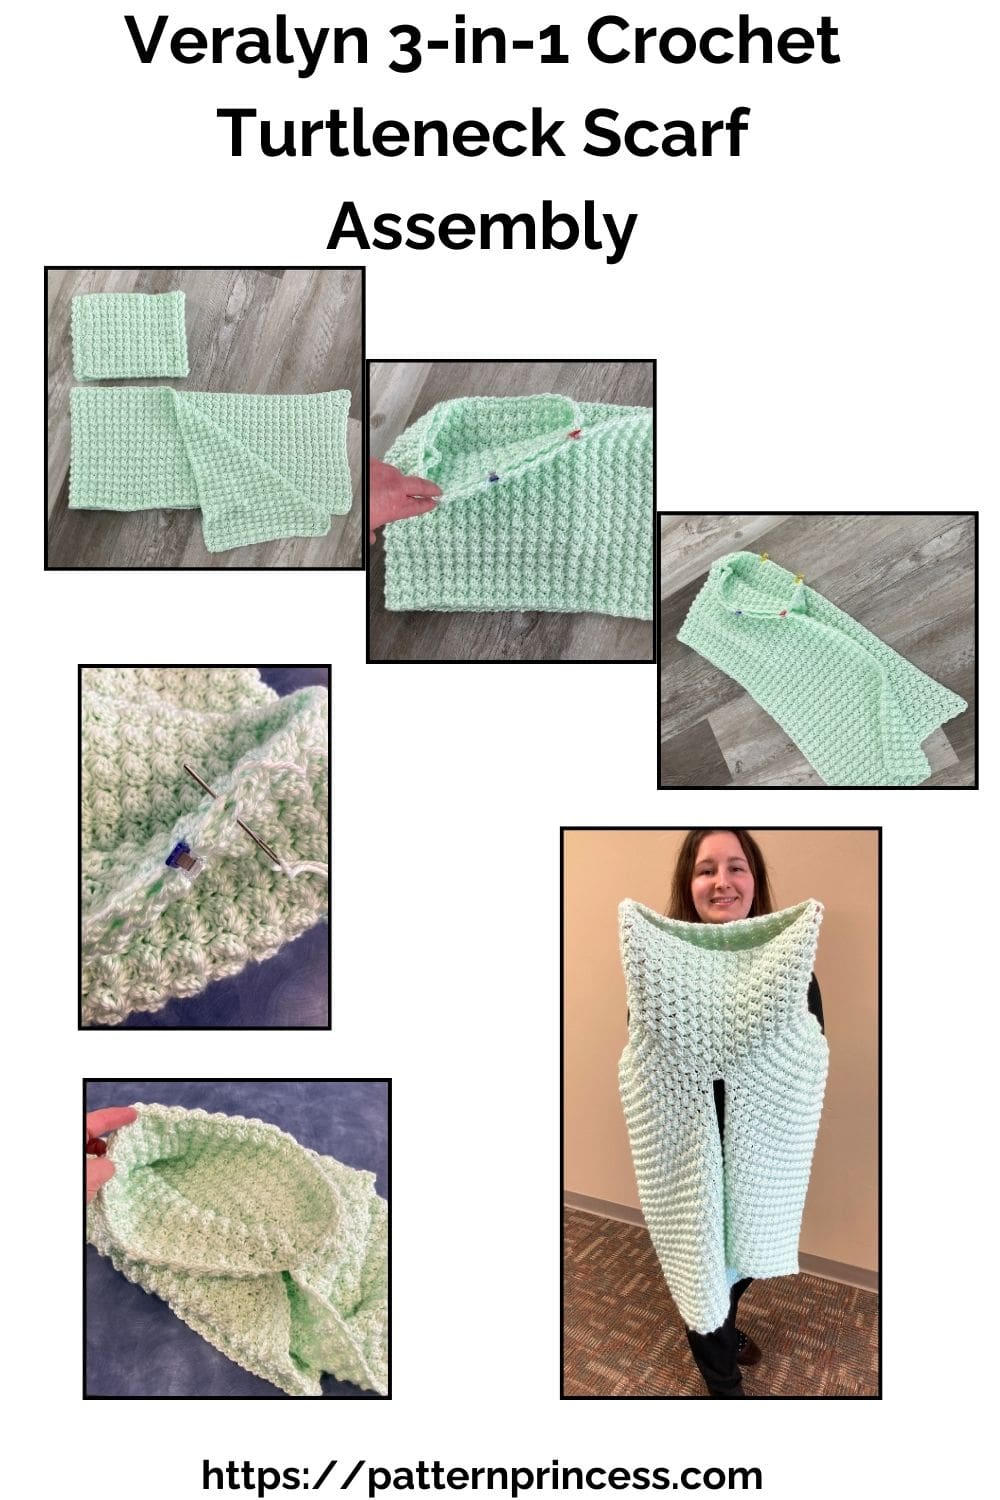
Assembly
Lay the scarf flat and fold in half. Mark the center of the fold with a clip or a stitch marker.
With the seam of the cowl turned to the inside, position the cowl inside the folded scarf aligning the seam with the stitch marker on the fold. Place a stitch marker or clip on the other side of the cowl to mark the center spot.
Use clips to secure the cowl and scarf to the center spot of the cowl, ensuring it’s evenly distributed. The long scarf ends will hang freely.
Thread the Yarn Needle
Using a yarn needle and a length of yarn two and a half times the circumference of the cowl, sew the cowl to the poncho.
Begin at one end of the cowl leaving a 6–8-inch yarn tail. Insert the needle through both the edge of the cowl and the scarf.
Use a whipstitch or mattress stitch to sew the collar to the poncho:
- Whipstitch. Insert the needle from back to front, wrapping the yarn around the edges in a spiral motion.
- Mattress Stitch. Work through the middle of the stitches on the edges of both pieces, creating an almost invisible seam.
Keep the Tension Even. As you sew, ensure the yarn is snug but not so tight that it puckers or distorts the fabric.
Finish the Seam
Once you’ve sewn all the way around the neckline, weave in any remaining yarn tails with the yarn needle, hiding it within the stitches of the poncho or collar.
Cut off the excess yarn. Turn inside out and enjoy styling your new turtleneck hooded scarf.
YouTube Video Tutorial on How to Crochet the Blanket Stitch
Video Joining the Cowl and Joining the Cowl to the Scarf.
We hope that you have enjoyed this free pattern. Here are a few more free crochet patterns to inspire your next project.

You can find Victoria crocheting, quilting, and creating recipes. She has cooked in restaurants for over 20 years, including many larger parties. She learned to crochet when she was just 11 years old and has been crocheting ever since; over 50 years now. Over 40 years ago, she loved her first class in sewing and continues to hone her skills in quilting. Many have enjoyed the handmade gifts over the years. In her professional career, she has worked in management in a wide variety of businesses including higher education as a dean of a division. All the while attending college part-time to achieve her doctorate in higher education with an emphasis in e-learning.