Last updated on March 27th, 2026 at 09:38 am
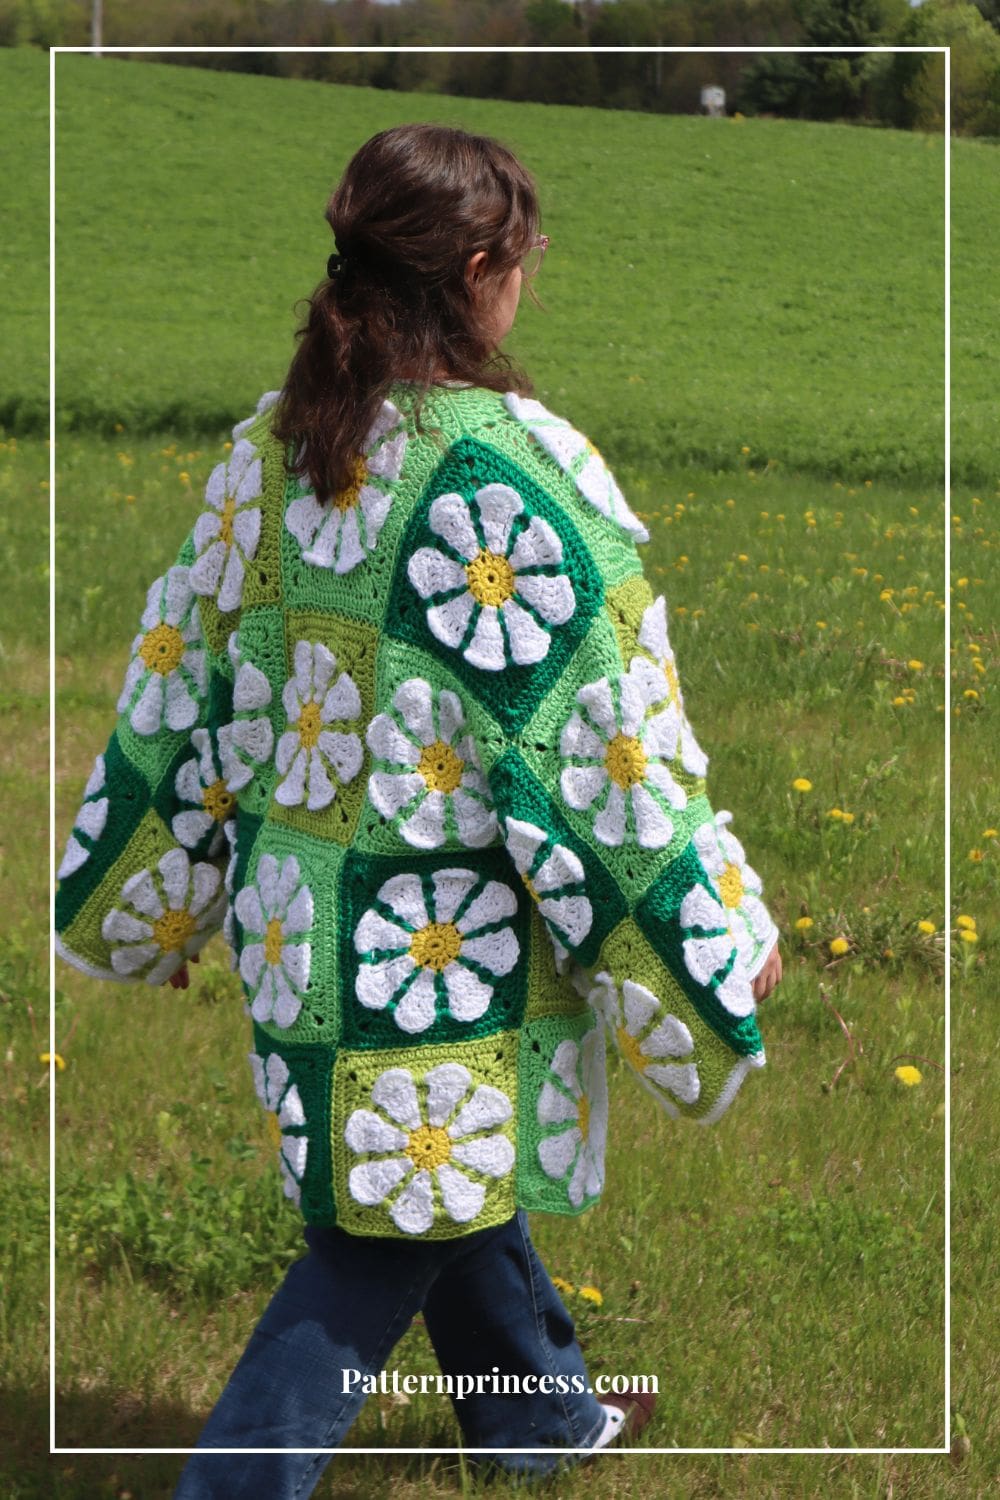
This Vintage Style Retro Daisy Granny Flower Cardigan Pattern is inspired by the fashion style back in the 1970s. Retro style is making a big comeback in fashion.
And crochet is right at the heart of it. From granny square bags to patchwork sweaters, handmade pieces are showing up on runways and in everyday wardrobes. This daisy cardigan fits right in with the trend. It’s playful, eye-catching, and gives off major 70s vibes in the best way.
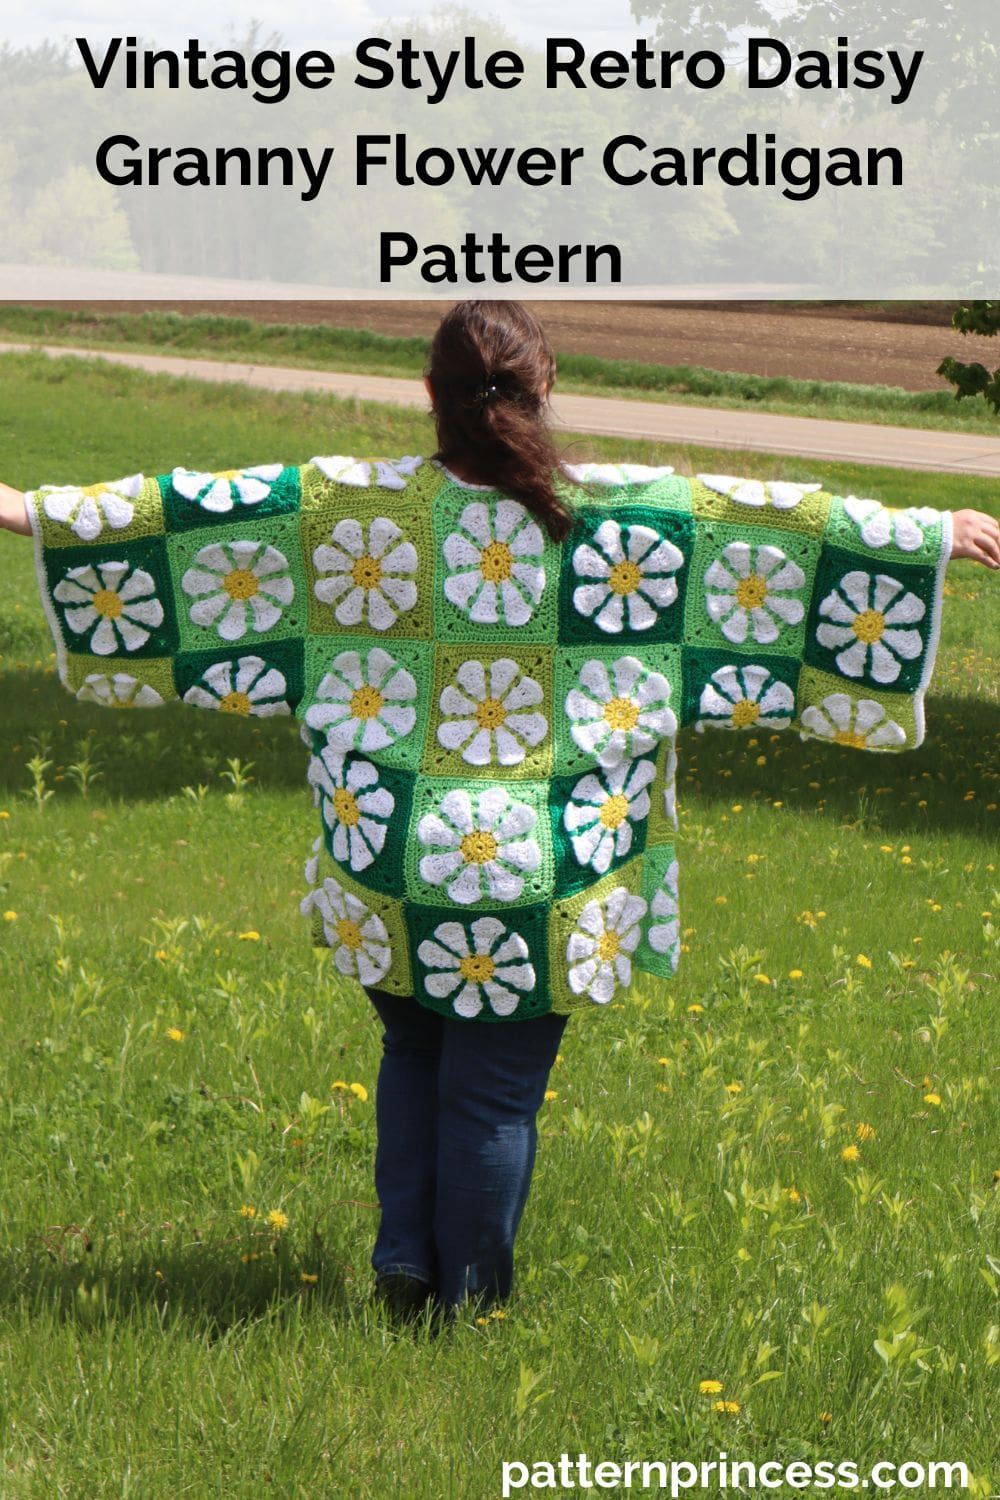
There’s something so special about vintage crochet. The colors, the textures, and the timeless patterns bring a feeling of comfort and charm. That’s exactly what inspired this Granny Flower Cardigan Pattern. It’s cheerful, cozy, and full of nostalgic flower power.
This pattern has a step-by-step video tutorial for making the squares. It’s straightforward and easy to follow. There is a bit more of seaming as you’ll need to make each square separate first. When the cold season hits, you’ll be ready for your wardrobe to stand out.
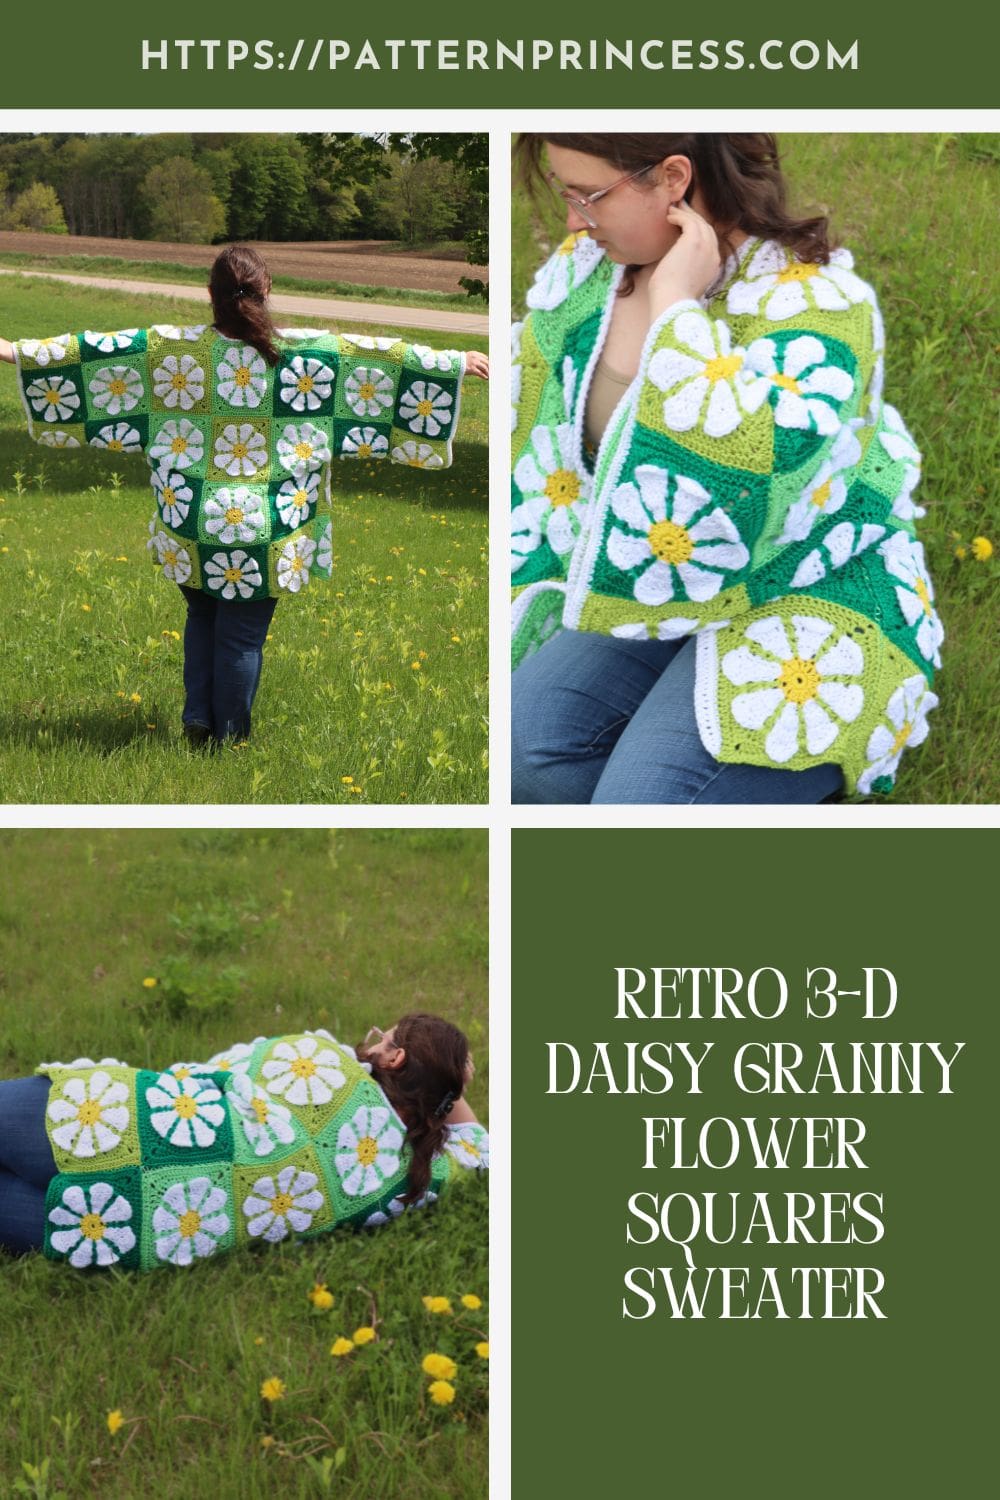
Retro 3-D Daisy Granny Flower Squares
Each square is carefully crafted to create a one-of-a-kind design that will make you stand out in any crowd.
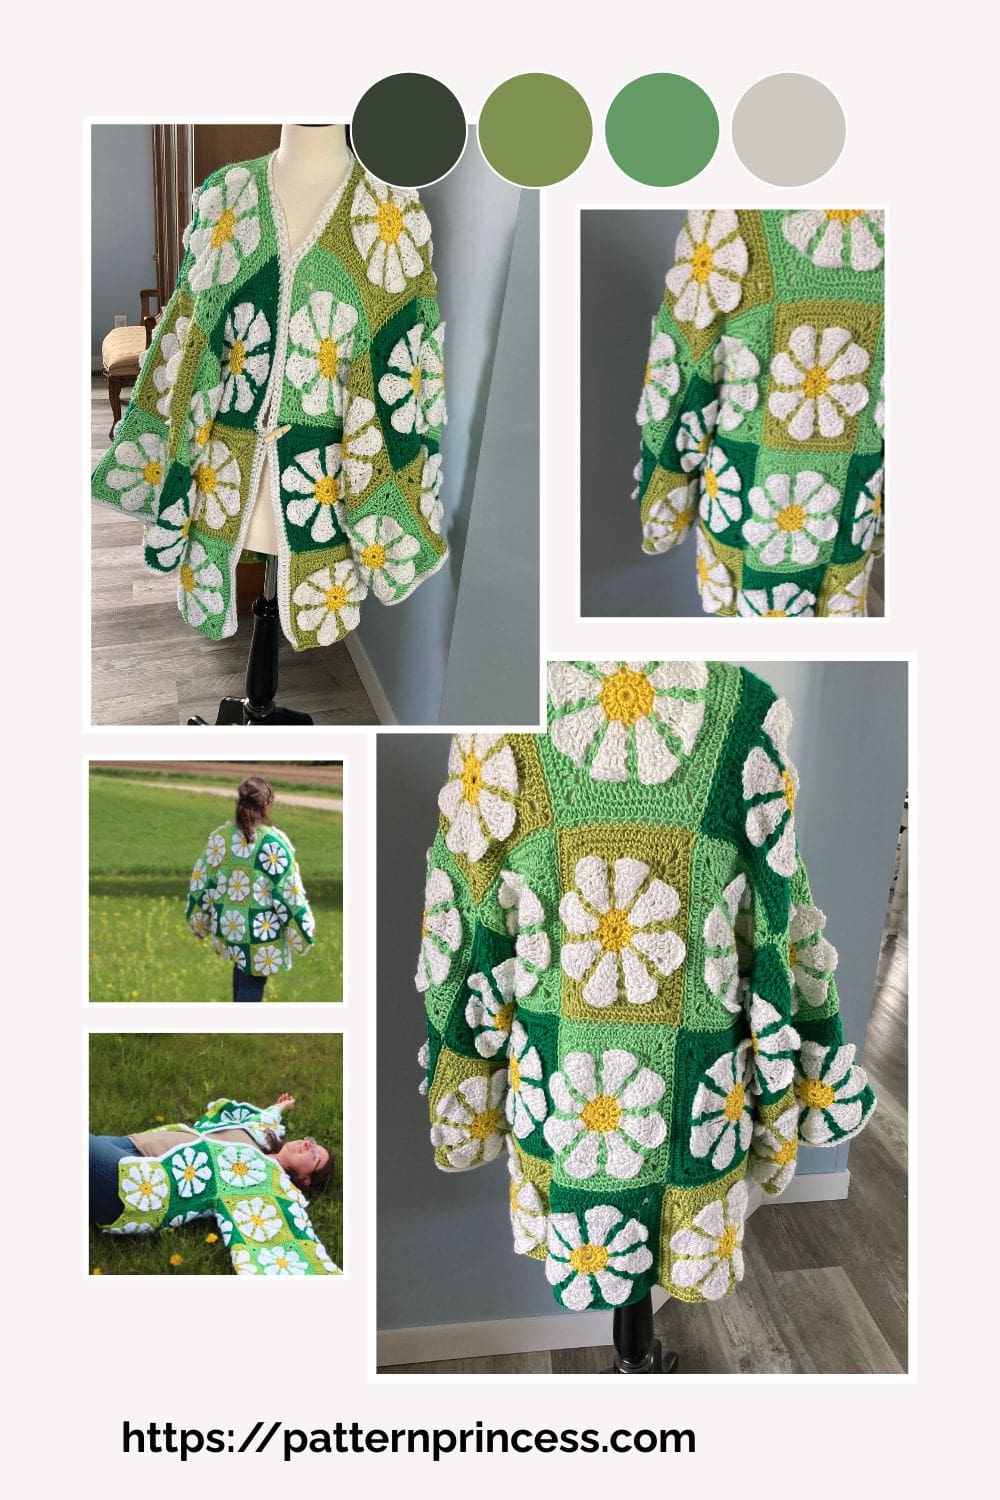
This cardigan shown is made with retro daisy granny squares in a mix of green backgrounds and bright white petals with sunny yellow centers.
Crochet your flower granny squares and join them. This pattern uses a whip stitch to join the squares. Crochet the collar and you’re done. I think we can say it’s truly a groovy project.
Whip stitch the squares together, crochet the collar and you’re done.
Whether you’re new to granny squares or a seasoned crocheter, you’ll enjoy watching this jacket come together one square at a time. It’s a statement piece that’s as fun to wear as it is to make.
Relaxed Fit
The relaxed fit and open front make this cardigan perfect for layering. Toss it on over jeans and a tee or wear it with a sundress on a breezy day.
The vintage look adds a handmade touch to any outfit, and it’s sure to be a conversation starter.
If you love retro crochet, flower motifs, and making cozy wearables, this pattern is for you.
Directions: Vintage Style Retro Daisy Granny Flower Cardigan Pattern
Skill Level
Intermediate
Gauge
17 stitches and 7 rows of double crochet every 4 inches. 11 rounds makes 8” X 8” squares.
Tip – Check Your Gauge. Make sure to do a gauge square. If you use different yarn and crochet hook or have a tighter or loose crochet stitch style, it will change the final size of the square and garment. For instance, my mother’s gauge in 11 rounds makes a 6” X 6” square. Therefore, that would change the number of squares she would need to achieve the same size.
Size
This pattern is written in 4 sizes. The size shown is L/XL.
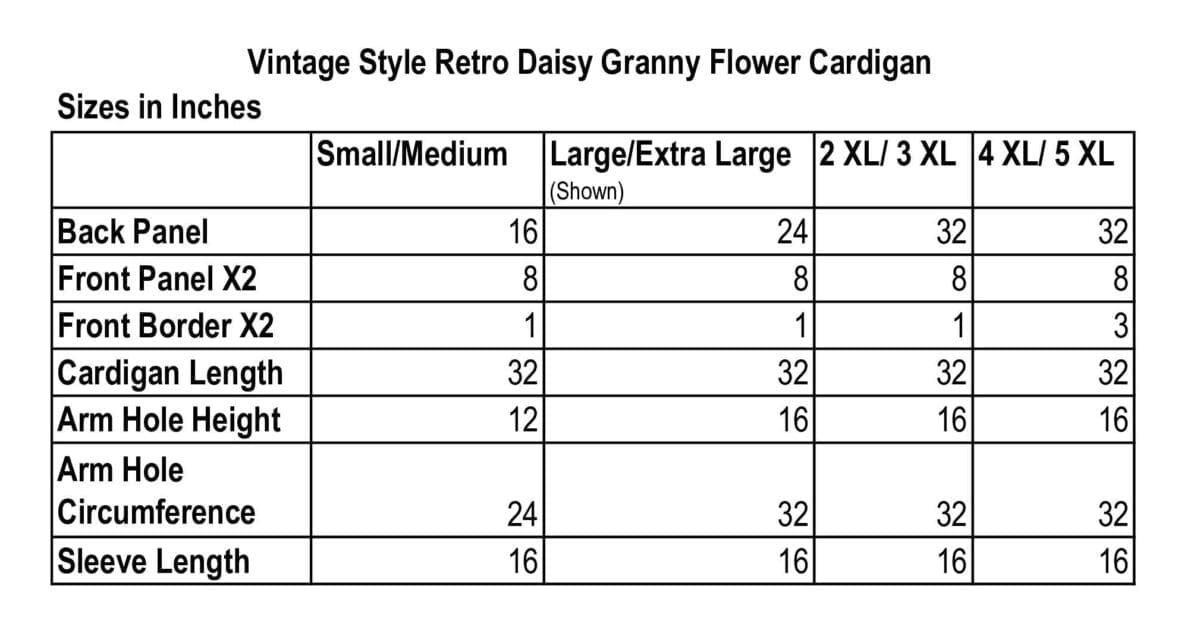
- S/M
- L/XL
- 2XL/3XL
- 4XL/5XL
Materials
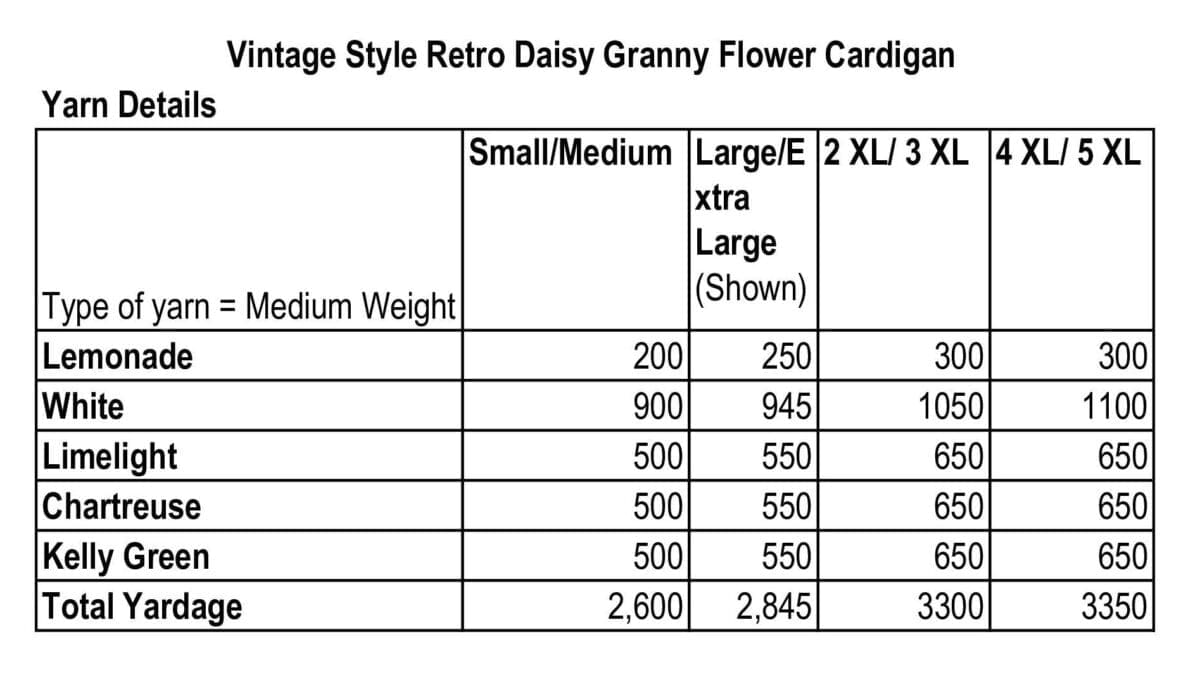
Yarn. I used five different colors of Carol Simply Soft Yarn. 100% acrylic #4 worsted weight yarn. 6 ounces/170g/315 yd skein. For the daisy granny squares, plan on about 150 yards of yarn for each square.
Refer to the photo to see how I alternated the colors. For the daisy center, I used Lemonade. The petals all use the White yarn. Then the background colors are alternated between Limelight, Chartreuse, and Kelly Green colors.
- Crochet Hook Size I, 5.5 mm hook.
- Scissors
- Tapestry Needle
- 1, 2” Oblong Button
Abbreviations
- CH = Chain
- DC = Double Crochet
- HDC = Half Double Crochet
- SC = Single Crochet
- SK = Skip
- SL ST = Slip Stitch
- SP = Space
- ST = Stitch
- STs = Stitches
- YO = Yarn Over
- [ ] = Repeat Between
Get Your Ad Free Printable Pattern in our Etsy Shop
Pattern Notes
Written in US Terms.
The granny square pattern is worked in the round. Then the squares are joined into four rectangles. Sew the rectangles together, then finally crochet a handle to the top of the bag.
When making the daisy granny square, leave a 6-10 inch yarn tail on when cutting the yarn off. This gives plenty of yarn length to weave in.
Rounds 1 and 2 make up the center of the flower. Round 3 begins the flower petals. The background color starts with round 4.
You can adjust the length of the strap based on where you want the bag to hang by increasing or decreasing the rows.
Links for Video Tutorials for making the retro granny square and joining squares using the invisible join are located below the written pattern.

Details on Each Retro Daisy Flower Granny Cardigan
Please refer to the Photos to help with the number of granny squares to make and joining. Here is additional information to help clarify. Keep in mind, the size shown is the L/XL.
S/M cardigan
There are two rows of 4 squares for the back. The sleeves consist of 6 squares on each side. When joining the sleeve to the garment, join the garment shoulder seam and side seam before adding the sleeve. Leave a 12” opening measured from the shoulder seam down the side seam. Join the 6 squares together to form the sleeve. 2 squares for the length and 3 squares for circumference. With the right sides together, align the shoulder seam with the top seam for the sleeve. Whip stitch in place.
L/XL cardigan
There are three rows of 4 squares for the back. The sleeves consist of 8 squares on each side joined, but they don’t have to be joined into a circle.The square seams are the same for the garment and the sleeves. Therefore, you can lay the garment flat, align the front two squares and back two squares. Then seam the side and under arm at the same time.
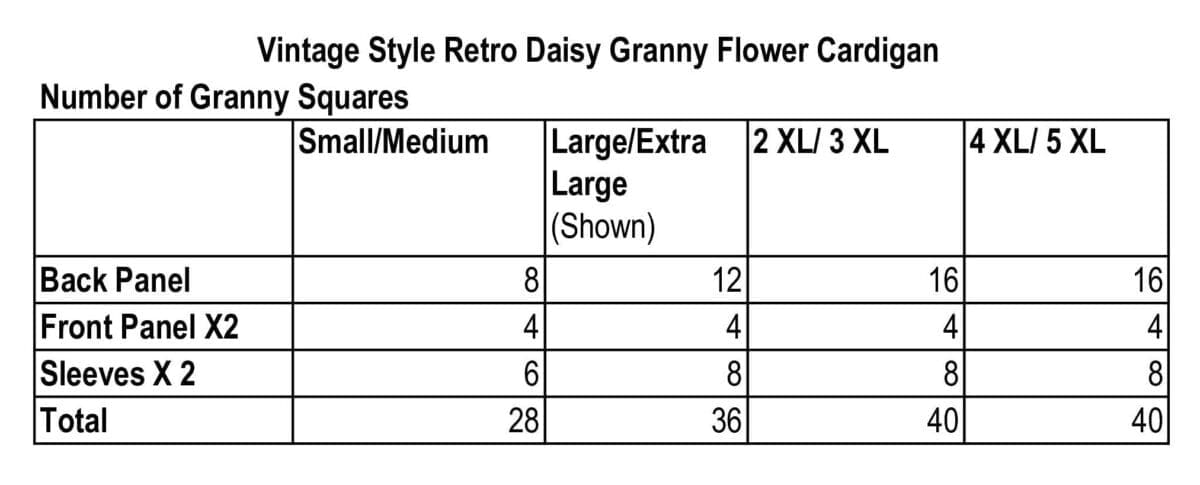
2XL/3XL cardigan
There are four rows of 4 squares for the back. The sleeves consist of 8 squares on each side joined, but they don’t have to be joined into a circle.The square seams are the same for the garment and the sleeves. Therefore, you can lay the garment flat, align the front two squares and back two squares. Then seam the side and under arm at the same time.
4XL/5XL cardigan
There are four rows of 4 squares for the back. The sleeves consist of 8 squares on each side joined, but they don’t have to be joined into a circle. The square seams are the same for the garment and the sleeves. Therefore, you can lay the garment flat, align the front two squares and back two squares. Then seam the side and under arm at the same time. This size also has an additional 4-6 inches added to the front by crocheting an extra border on each side. Starting in the middle of the second square from the top and crocheting to the bottom edge.
Begin:
**Please refer to the chart for the number of granny squares to make for each size. Reminder, make sure to check your gauge as this can change the size of the final garment.
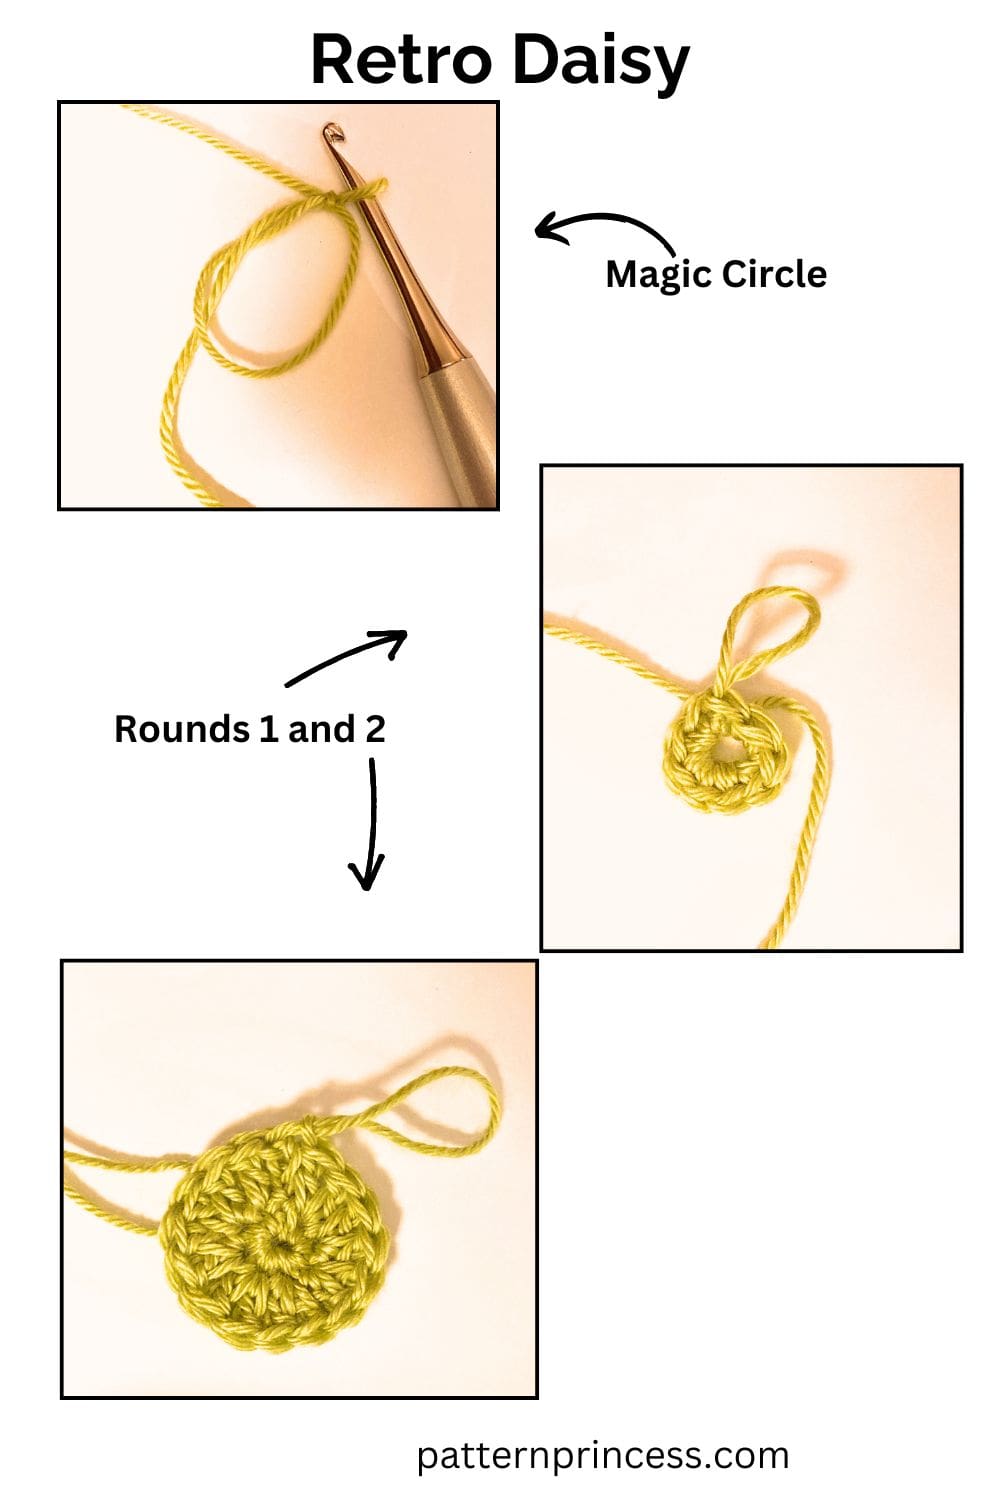
Make a Magic Circle. Sometimes it is called a magic loop or magic ring. Alternatively, you can also work a CH 4 and SL ST back into the first CH ST to make a circle.
Round 1
Continue using the same yarn.
CH 1 (Doesn’t count as a ST). Work 8 SC inside the magic circle. Pull the yarn tail to close the circle. Make a SL ST into the first SC to close the circle. (8 SC).
How to work the single crochet inside the magic loop. Insert the hook into the circle and pull up a loop, yarn over and pull through both loops. (repeat this 7 more times).
Round 2
Use the same yarn that you did in round 1.
CH 3 (Counts as the first DC of the round). Make one more DC into the first ST. Work 2 DC into every ST around. Make a SL ST into the top of the CH 3. (16 DC including the initial CH 3).
Fasten off the yarn. Cut the yarn leaving 6-10 inches. Pull the yarn tail through the last loop. You can take a moment to weave in your yarn ends now or wait until you are done with the granny square to weave in all six of the yarn ends at once.
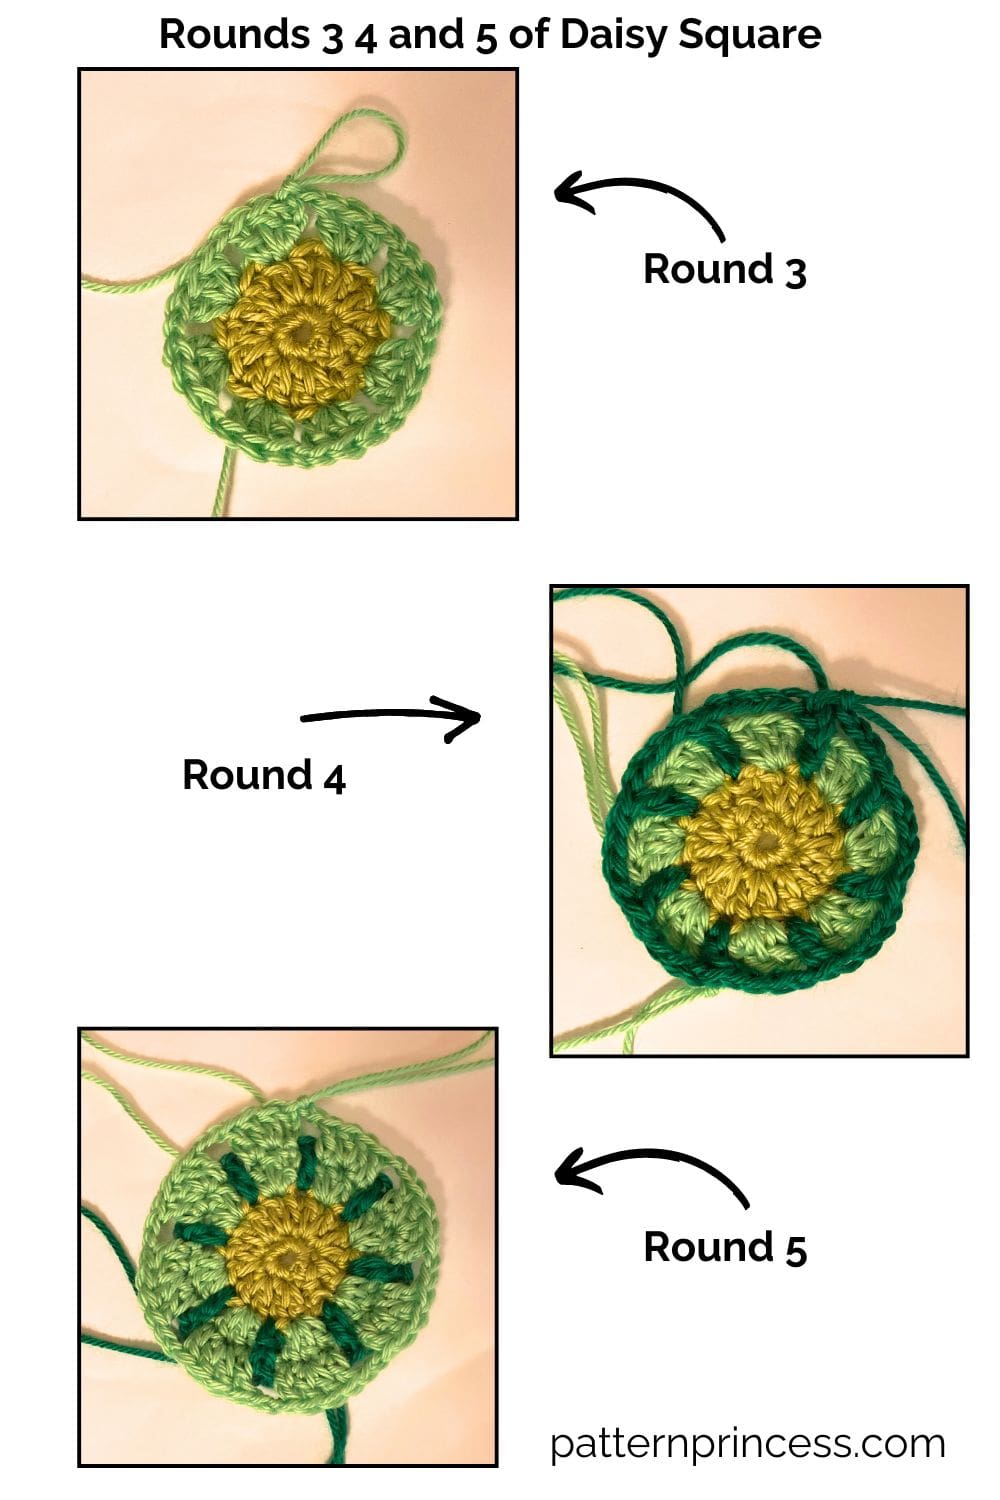
Round 3
Add a new yarn color. Pull the yarn into any one of the stitches in the previous round. Tie a knot.
Insert the hook into the loop. YO and pull up a loop and CH 3. (Counts as the first DC of the round). Make 2 more DC into the same ST. [CH 1, SK the next ST. Work 3 DC into the next ST]. Repeat between [ ] all the way around. End with a CH 1, SK 1, SL ST into the top of the CH 3. (At the end of the round, there will be 8 clusters of 3 DC).
At the end of this round do not fasten off the yarn. Just pull the loop larger so it doesn’t slip out. You can also use a stitch marker to hold the yarn in place while you work on the next round.
Round 4
Add a new yarn color. Pull the yarn into any one of the stitches of round 2 that we skipped in the previous round. Tie a knot or use a slip stitch through a loop on the hook to add the new yarn color.
For this round, as you work, push the stitches for round 3 away from your work a bit so they are out of the way. The stitches for this round 4 will be worked in front of round 3 stitches and into round 2 stitches.
Insert the hook in the stitch and CH 3. (Counts as the first DC of the round). Then work CH 4, SK over to the next SK ST of round 2 and work a DC. [CH 4, SK over to the next SK ST of round 2 and work a DC]. Repeat between [ ] all the way around. At the end of the round work a CH 4 and SL ST into the top of the CH 3 of the first 7 CH STs. (You should have 8 DC stitches in this round).
At the end of this round do not fasten off the yarn. Just pull the loop larger so it doesn’t slip out.
Round 5
Switch back to the yarn color from round 3.
Insert hook through the CH spaces of round 4 and pull the loop from round 3 to the front side. CH 3. (Counts as the first DC of the round). Work 2 DC into the next ST in the round 3 STs. Keep the round 4 CH STs pushed toward the back of your work and out of the way. Work 1 DC in the last ST of the cluster. [CH 2. Skip the DC from round 4 and work 1 DC in the next ST, 2 DC in the next ST, and 1 DC in the next ST]. Repeat around between [ ]. End with CH 2 and SL ST into the top of the CH 3. (At the end of the round, there will be 8 clusters of 4 DC).
At the end of this round do not fasten off the yarn. Just pull the loop larger so it doesn’t slip out.
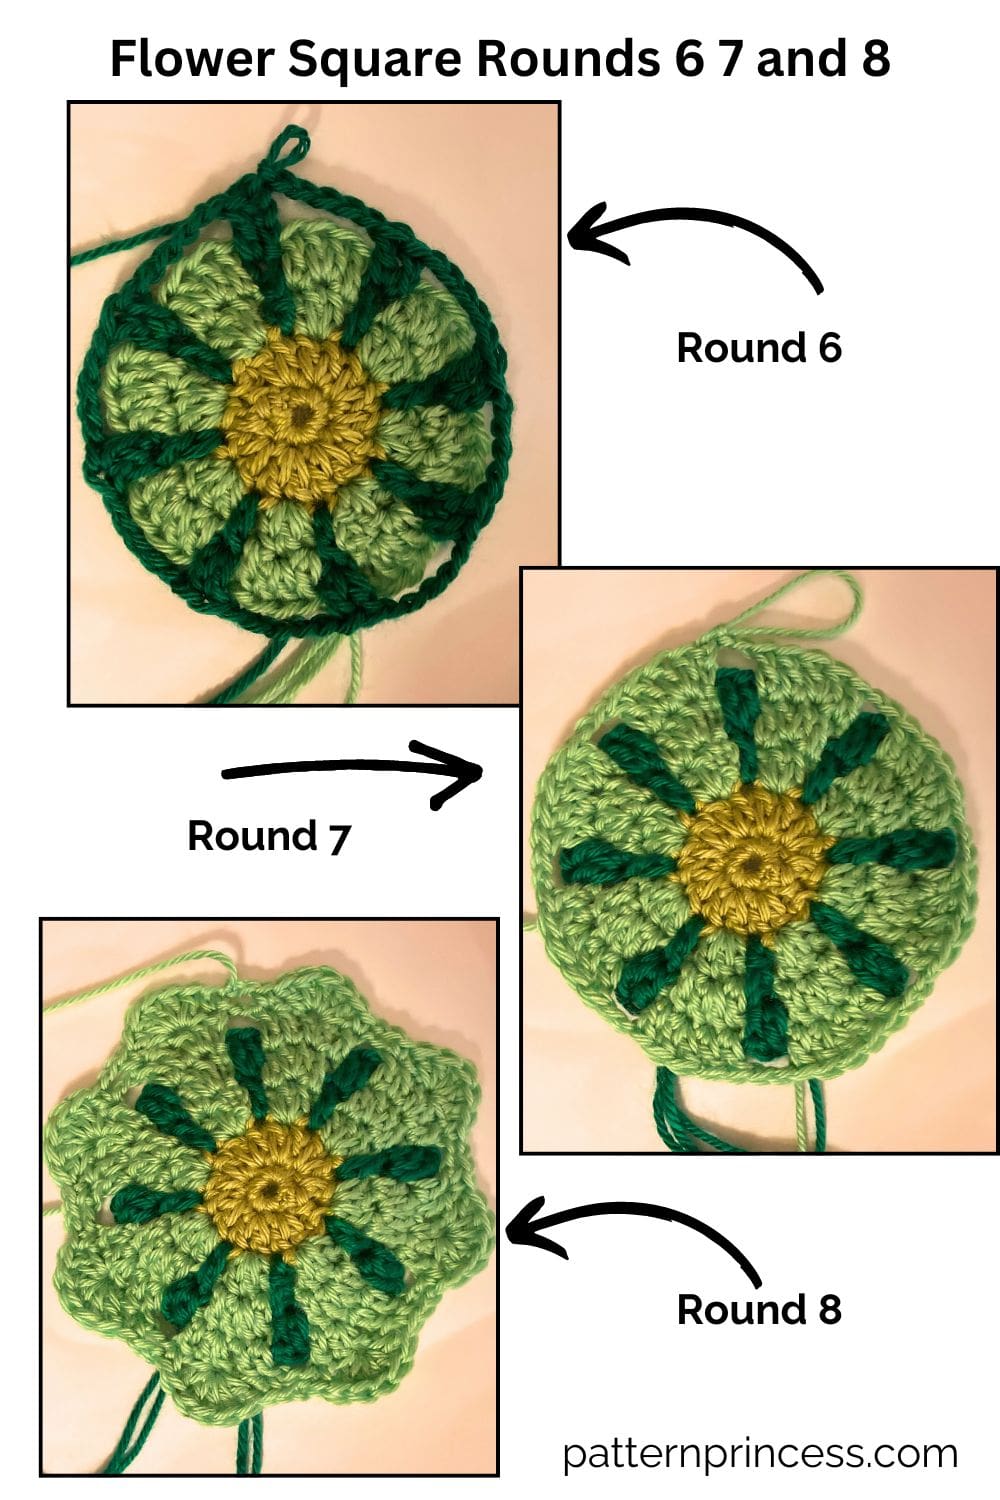
Round 6
Switch back to the yarn color from round 4. Pull the loop to the front in one of the CH 1 SPs.
CH 3 (Counts as the first DC of the round). Make one more DC into the first ST. [CH 5, SK the 4 DC and work into the DC ST from round 4. Work 2 DC]. Repeat round between [ ] end with CH 5 and SL ST into the top of the CH 3. (You should have 16 DC stitches in this round).
Round 7
Switch back to the yarn color from round 5. Pull the loop to the front in one of the CH 5 SPs.
Insert the hook through the CH spaces of round 6 and pull the loop from round 5 to the front side. CH 3. (Counts as the first DC of the round). Work 2 DC into the next ST in the round 5 STs. Keep the round 6 CH STs pushed toward the back of your work and out of the way. Work 1 DC in the next 2 STs of the cluster. [CH 2. Skip the 2 DC from round 6 and work 1 DC in the next ST, 2 DC in the next ST, and 1 DC in the next 2 STs]. Repeat around between [ ]. End with CH 2 and SL ST into the top of the CH 3. (At the end of the round, there will be 8 clusters of 5 DC).
Round 8
Continue working with the same yarn. (This round creates the top of the flower petal).
CH 1 (Does not count as a ST). Work SC into the first ST. SK 1 DC ST. work 5 DC into the next ST (should be the middle DC ST). SK 1 DC ST, SC into the next ST. [CH 2. SK the CH 2 of round 7. Work 1 SC into the first ST of the next DC cluster. SK 1 ST, work 5 DC into the next ST, SK 1 ST, work 1 SC into the last ST of the DC cluster]. Repeat between [ ] around. End with a CH 2 and SL ST into the SC ST. (At the end of the round, you should have 8 sections of a SC, 5DC, SC cluster).
Fasten off the yarn. Cut the yarn leaving 6-10 inches. Pull the yarn tail through the last loop.
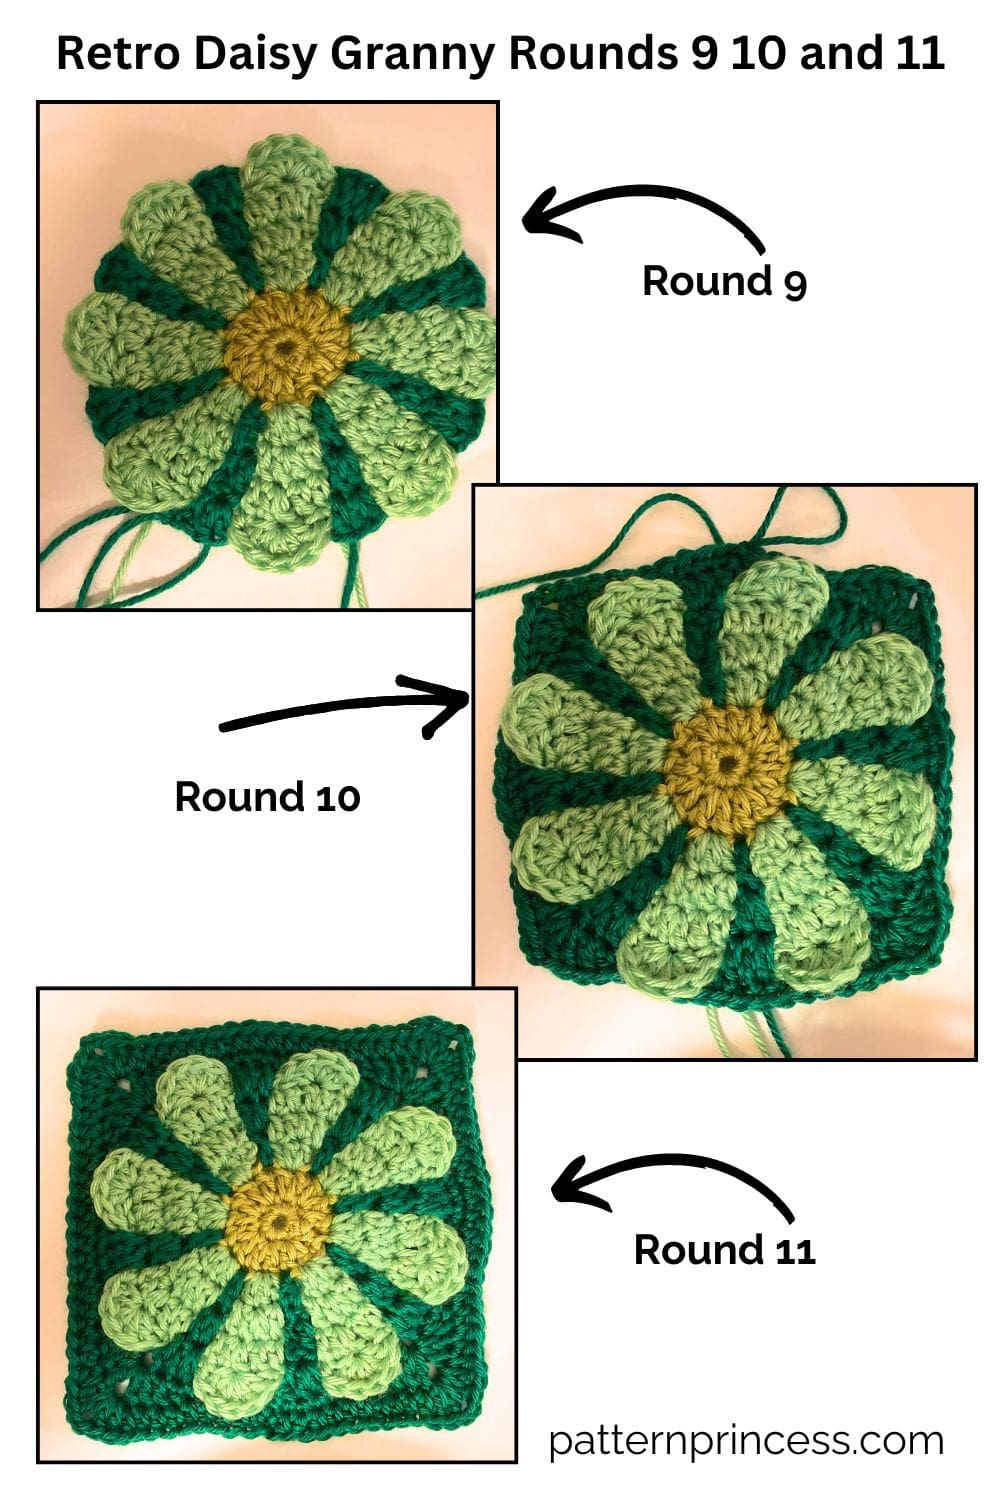
Round 9
Switch back to the yarn color from round 7. Pull the yarn to the front.
Insert the hook through the CH spaces of round 6 and pull the loop from round 5 to the front side. CH 3. (Counts as the first DC of the round). 2 DC in the next ST in round 7.
Next, flip the top of the flower petal from round 8 down and work 5 DC into the CH SP from round 7 that is behind the flower petal now. Flip the flower petal back up. Working in front of the stitches of round 8, work 1 DC in the first DC ST and 2 DC in the next DC ST. [Flip the flower petal down and work 5 DC in the CH SP. Flip the flower petal back up and work 1 DC in the first ST and 2 DC in the next ST]. Repeat around between [ ] end with a SL ST into the top of the CH 3. (At the end of this round, you should have 8 sections between the flower petals of 3 DC and 8 sections behind the flower petals of 5 DC).
Round 10
This is the first round to turn the circle into a square. CH 1 (Does not count as a ST). Work a SC into the first ST. Work a SC into the next 5 STs. Work a HDC in the next ST. Work a DC into the next ST.
The next stitch becomes the first corner. Work (2 DC, CH 2, 2DC) all in the same ST. DC in the next ST, HDC in the next ST. Work SC into the next 11 STs. HDC in the next ST, DC in the next ST. The next ST becomes the second corner. Work (2 DC, CH 2, 2DC) all in the same ST.
DC in the next ST, HDC in the next ST. Work SC into the next 11 STs. HDC in the next ST, DC in the next ST. The next ST becomes the third corner. Work (2 DC, CH 2, 2DC) all in the same ST.
DC in the next ST, HDC in the next ST. Work SC into the next 11 STs. HDC in the next ST, DC in the next ST. The next ST becomes the fourth corner. Work (2 DC, CH 2, 2DC) all in the same ST.
DC in the next ST, HDC in the next ST. Work SC into the last 5 STs. End with a SL ST into the first SC.
Round 11
Continue using the same yarn.
CH 1 (Does not count as a ST). Work a HDC into the first ST and next 9 STS. In the corner CH 2 SP work (2 DC, CH 2, 2DC). (First corner).
Work a HDC into the next 19 STs. In the corner CH 2 SP work (2 DC, CH 2, 2DC). (Second corner).
Work a HDC into the next 19 STs. In the corner CH 2 SP work (2 DC, CH 2, 2DC). (Third corner).
Work a HDC into the next 19 STs. In the corner CH 2 SP work (2 DC, CH 2, 2DC). (Fourth corner).
Finish the last row with a HDC in the next 9 STs. End with a SL ST into the first ST.
Fasten off the yarn. Cut the yarn leaving 6-10 inches. Pull the yarn tail through the last loop.
Finishing
Use the tapestry needle to weave in the yarn tails on the back side of the work. I like to weave back and forth 3 to 5 times. Cut off the excess yarn.
Continue this process to make your Retro Daisy Granny Squares.
Assembling your Retro Daisy Granny Flower Cardigan
Please refer to the diagram for granny square placement. For a flat seam, use the invisible join to seam the granny squares together. There is a video tutorial showing this below the written pattern.
Layout the rectangles as indicated in the diagram. Begin seaming the rectangles together. To do this, hold the squares with the wrong sides together aligning the stitches. Use an extra-long piece of yarn strands to join them. After you have finished joining these two squares, don’t cut off the yarn. Keep using the yarn to continue joining the squares as needed.
Finishing
Use the tapestry needle to weave in the yarn tails on the back side of the work. I like to weave back and forth 3 to 5 times. Cut off the excess yarn.
Crocheting a Border
Sleeves
Join the white yarn to any stitch on the bottom edge. CH 1(Does not count as a ST). SC in the first ST and in each ST across. End with a SL ST into the first SC.
Repeat the process for the other sleeve.
Front Collar
Join the white yarn to the bottom of one of the sides of the front lapel. CH 1 (Does not count as a ST). Work a HDC in the first ST and in each ST up the side until you reach the middle of the second square from the top. Then continue working a SC ST around the neckline until you reach the middle of the second square from the top on the other side. Then continue working a HDC in each ST to the bottom ST of the other side.
Your collar can be done at this point. However, you can make this area as wide as you like. For the 4XL/5XL size. We recommend adding 2-3 inches onto the collar. We’d continue working HDC STs from the bottom to the center of the second square from the top on each side until your desired size.
Finishing
Use the tapestry needle to weave in the yarn tails on the back side of the work. I like to weave back and forth 3 to 5 times. Cut off the excess yarn.
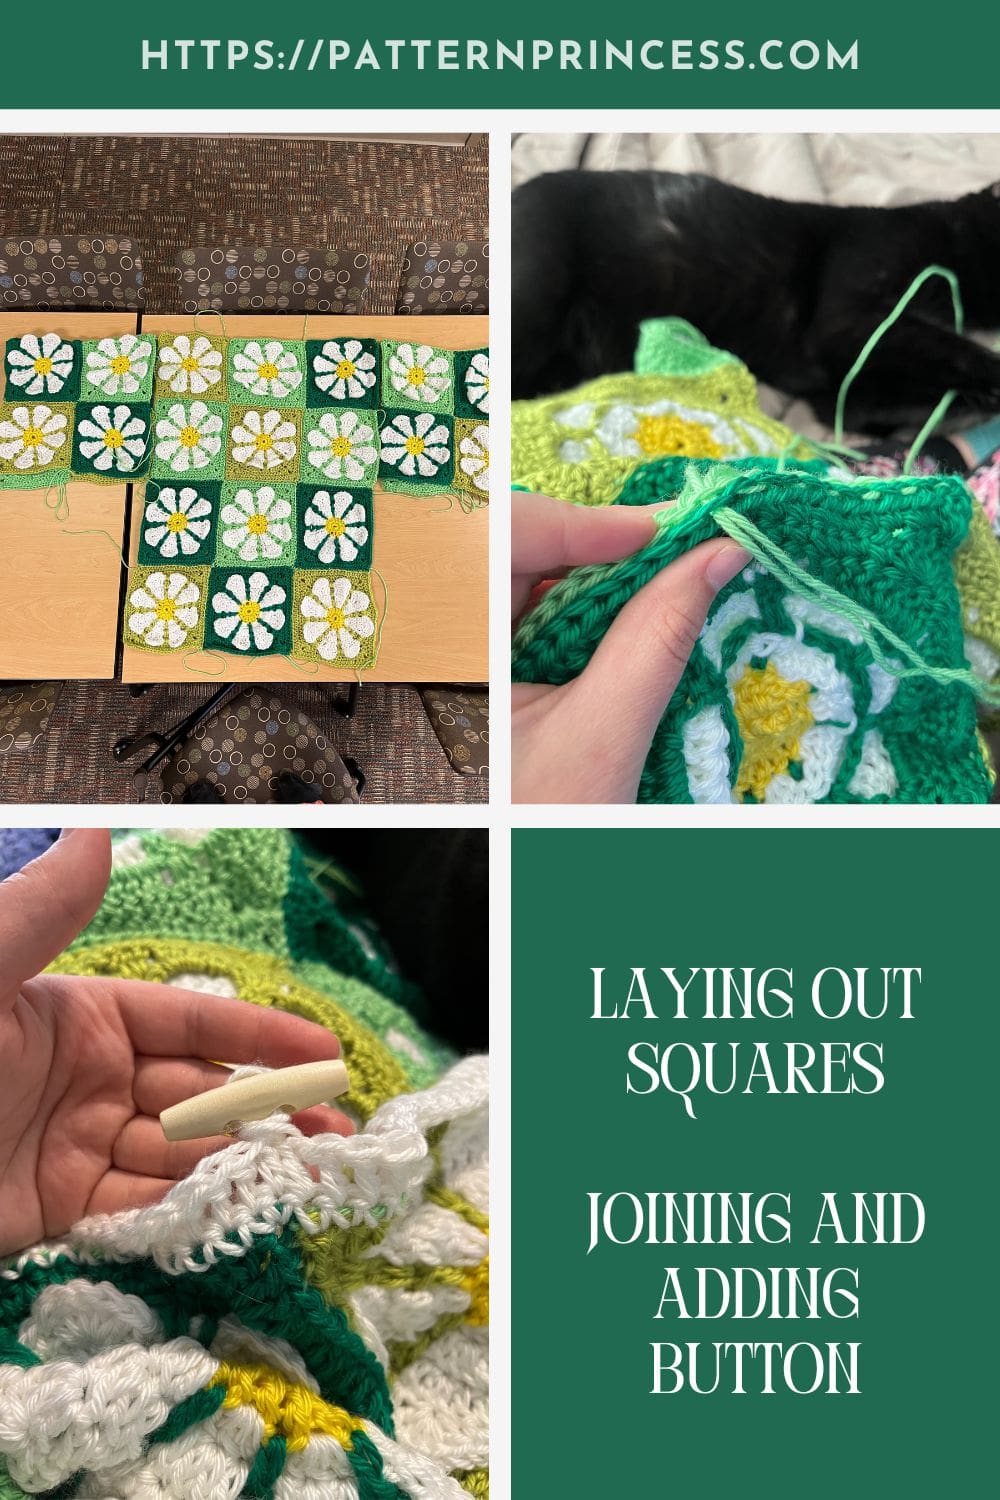
Sewing the Button (optional)
If desired, sew in a 2” oblong button to the front.
Place the button in the middle. Right between the top two squares and bottom two squares of the right side.
To sew on the button, first make sure that the yarn and yarn needle fit through the holes in the button. Use a yarn length about 15-20 inches in length and thread a yarn needle. Bring the yarn up through the underside of the lapel through the buttonhole. Making sure to leave a tail for securing. Insert the yarn needle back down through the next button hold and back down through the lapel. Repeat this step a few times.
Secure the yarn on the underside of the garment by weaving in the yarn in the same color. Snip off any excess yarn.
Video Tutorials
On the YouTube Channel, you can find a video tutorial for the Retro Daisy Granny Square and joining the squares using the invisible join stitch.
Invisible Join video tutorial:
We hope that you have enjoyed this lovely crochet pattern.

You can find Victoria crocheting, quilting, and creating recipes. She has cooked in restaurants for over 20 years, including many larger parties. She learned to crochet when she was just 11 years old and has been crocheting ever since; over 50 years now. Over 40 years ago, she loved her first class in sewing and continues to hone her skills in quilting. Many have enjoyed the handmade gifts over the years. In her professional career, she has worked in management in a wide variety of businesses including higher education as a dean of a division. All the while attending college part-time to achieve her doctorate in higher education with an emphasis in e-learning.