Have you ever heard of a daisy scallop floral border? My daughter is working on a blanket, and she wanted to have a unique crochet border.
It took over a week and many swatches until we found the look we liked. Then we had to get the stitch multiple figured out.
We designed this cute pattern, and I love how it’s turning out. It’s a simple once you get the hand of it. A fun design that’s perfect for adding a border around a granny square blanket, baby blanket, a shawl, or scarf. This would look nice in many different color combinations and crochet blankets.
It’s only one row of stitches to achieve this gorgeous floral border. Once you get the first few figured out, it becomes an easy crochet border to do as it is a repeating pattern.
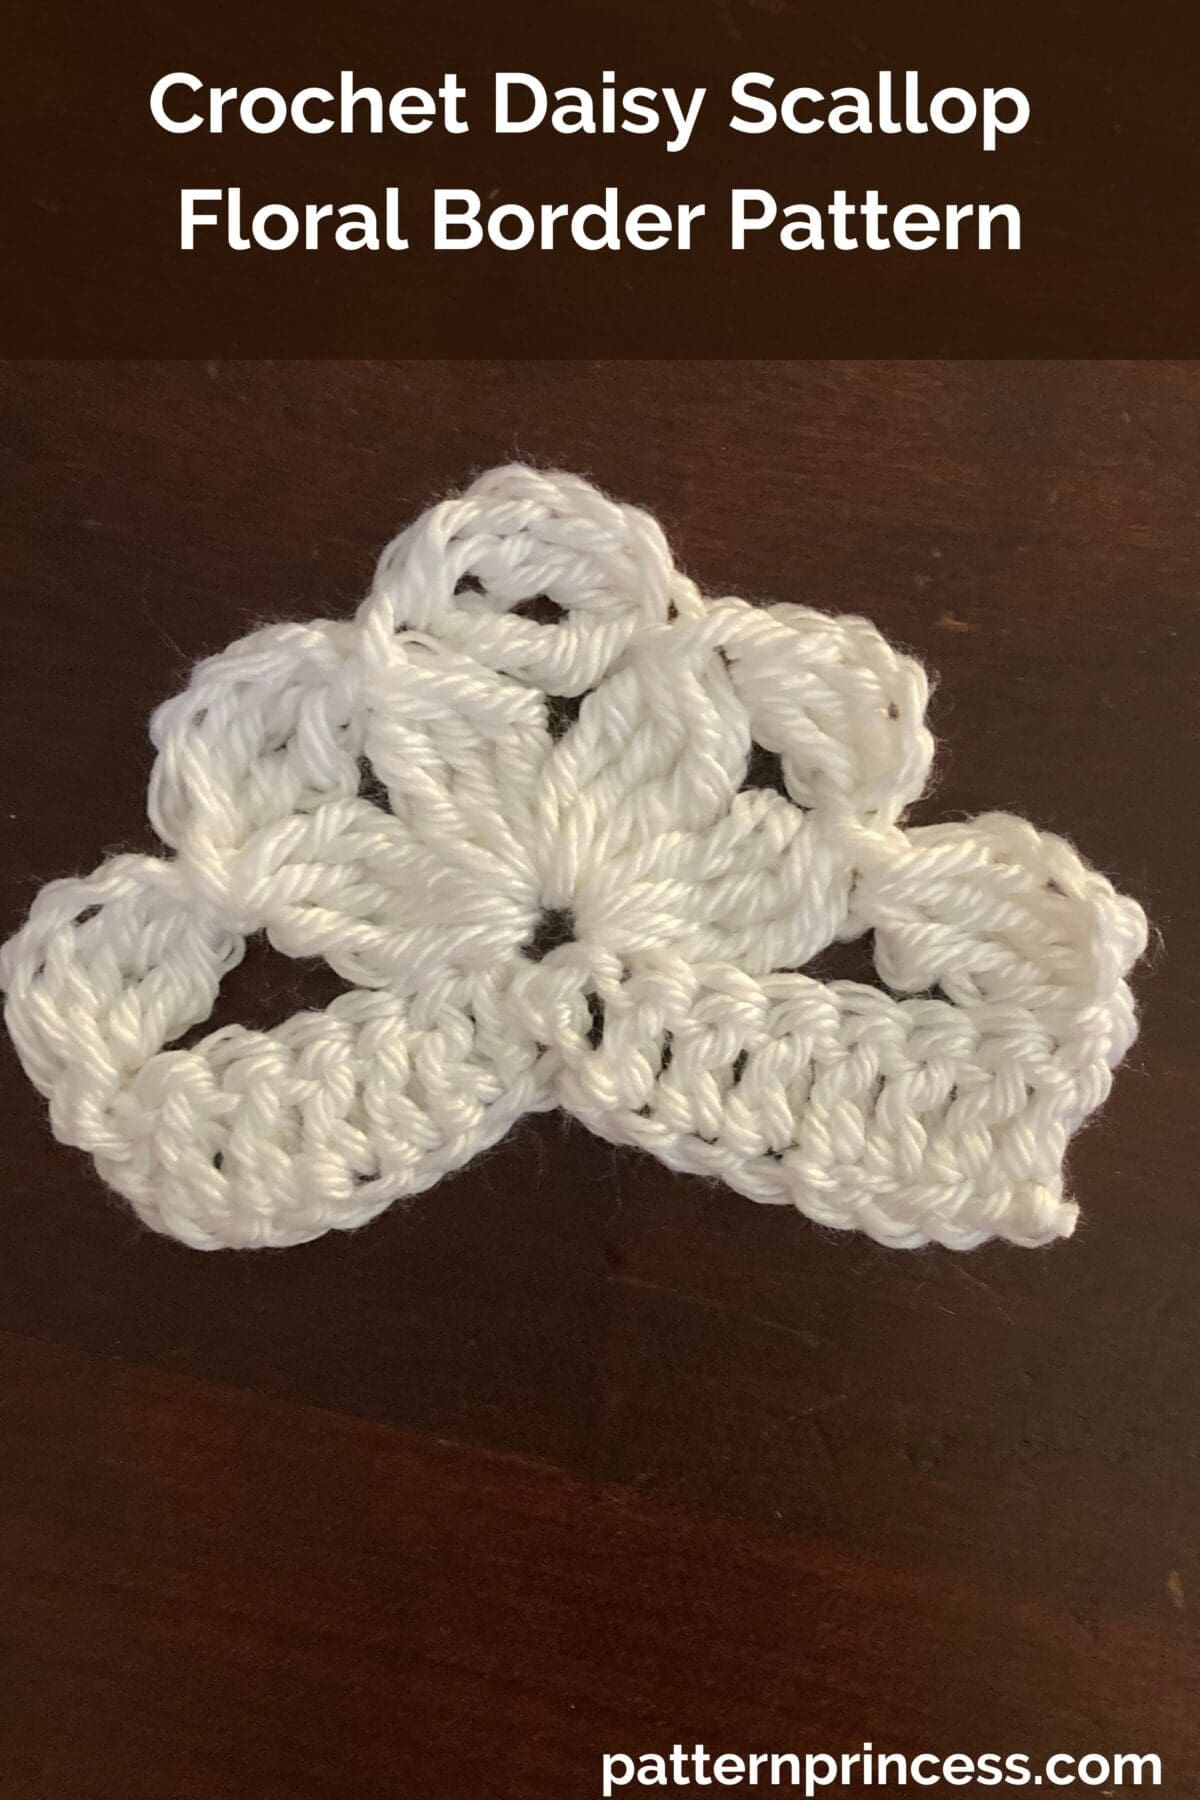
Daisy Scalloped Border
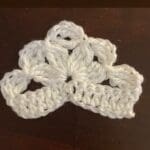
It’s a cute daisy scallop border pattern with a lot of height and a flowery design. Basically, the flowers look like half-daisies with scalloped edges on the petals. I think it adds such a sweet detail and a gorgeous decorative touch to your finished item.
We wanted to share the pattern in case anyone else is looking for a cute border to finish off a project.
What yarn works well for this pattern?
We used a medium weight yarn, and it looks nice. It might be a little hard to do this with chunky yarn. However, we would recommend using a worsted weight yarn, a number 3 DK weight yarn, or a lighter fine weight yarn. A nice light color or white yarn really helps this pop and take on the flowery feel.
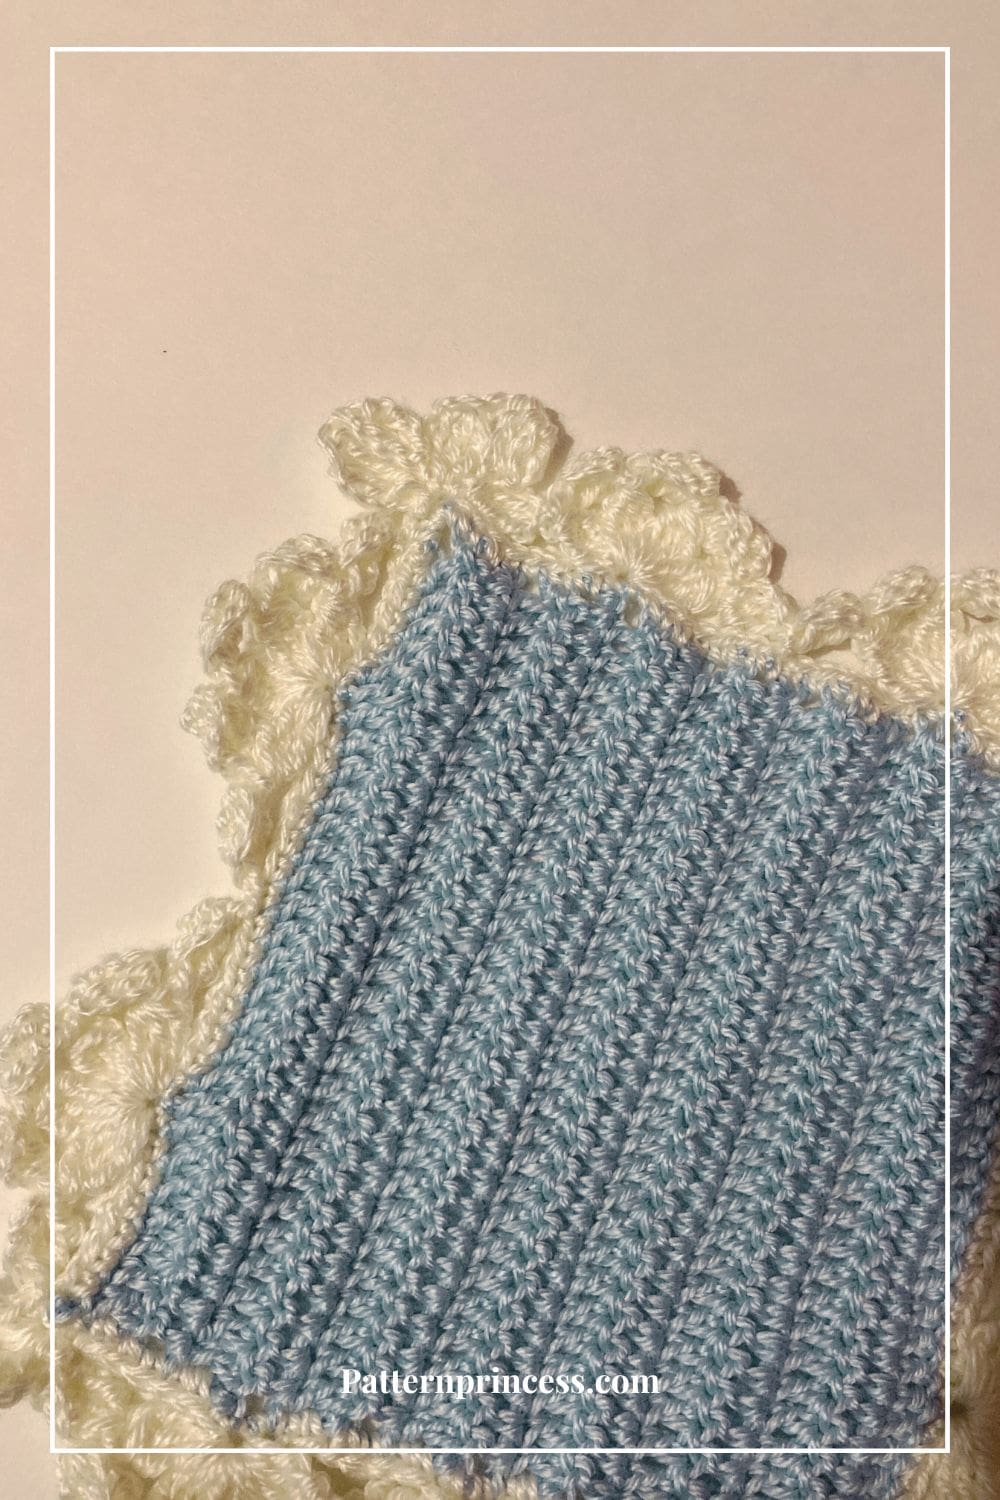
Directions: Crochet Daisy Scallop Floral Border
Skill Level
Intermediate Crocheter
While we feel this is a pattern more suited for an experienced crocheter, the repetitive nature of the pattern makes this a relatively easy pattern to master.
Gauge
The gauge will depend on the yarn and hook used. For our sample, we used Caron Simply Soft yarn and had 13 SC and 14 rows with a 5 mm (U.S. H/8) crochet hook.
Size
Approximately 4 inches per daisy scallop cluster.
Change the size by using multiples of 15.
Materials
Medium worsted weight yarn works great with this pattern. The amount of yarn needed will depend on the project you are making using this daisy scallop border.
Crochet Hook Size that works with the yarn you are using.
Tapestry Needle
Scissors
Abbreviations
- CH = Chain
- SK = Skip
- SL ST = Slip Stitch
- ST = Stitch
- STs = Stitches
- TC = Treble Crochet
- 2 TC-CL = 2 Treble Crochet Cluster
- 3 TC-CL = 3 Treble Crochet Cluster
- [ ] = Repeat Between
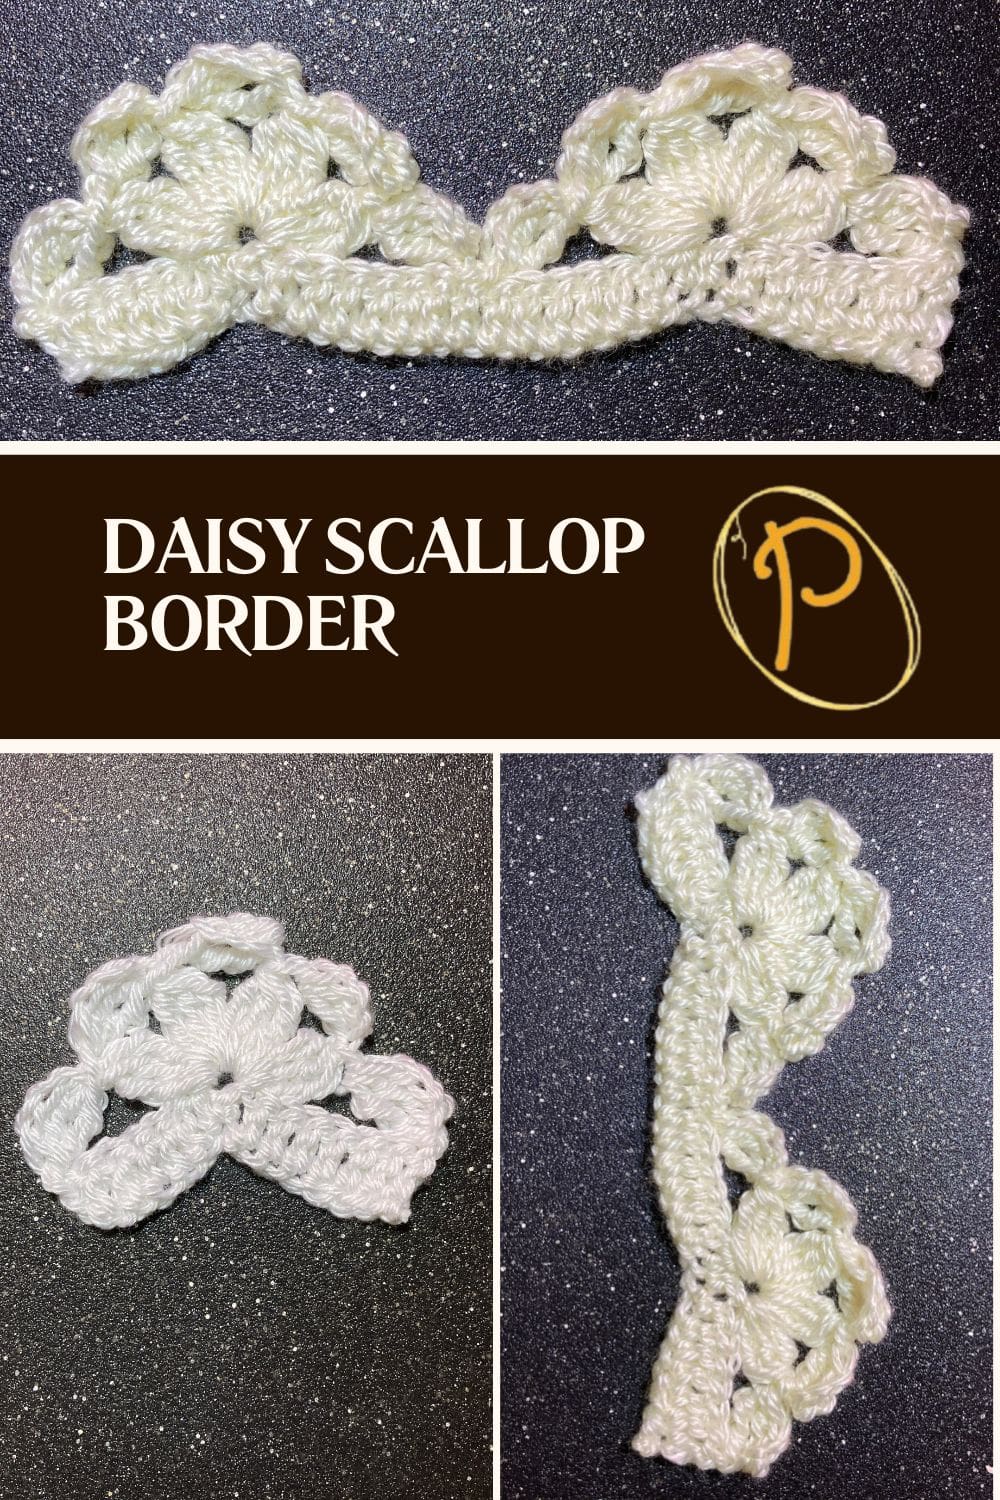
Pattern Notes
This pattern is written in US Terms.
You can find links on our You Tube channel for a video tutorial for this daisy scallop floral border below the written pattern. For both right hand and left hand crocheters.
Work the stitches on the right side of your project. Since this is only one round of stitches, there is no need to turn your work.
This floral border pattern is just one row of stitches.
However, on our swatches, we thought it looked better if a round of single crochet stitches are done before adding the border.
If you plan on adding the round of single crochet stitches before this border pattern, you’ll have extra stitches by the corner. Join your yarn in the stitch just after the 3 corner stitches. At the end of the row, you’ll end up doing 1 slip stitch to the middle corner stitch and 1 slip stitch after the corner stitch.
If adding a border, we have three ideas below the written pattern for you to try and see if you like them.
Special Stitches
Treble Crochet (TC)
- YO twice, insert your hook, YO and pull up a loop, YO and pull through two loops, YO and pull through two loops again, YO and pull through remaining two loops.
2 Treble Crochet Cluster (2TC-CL)
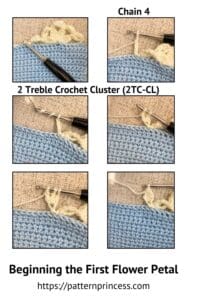
- YO twice, insert your hook, YO and pull up a loop, YO and pull through two loops, YO and pull through two loops again. There should be two loops on the hook.
- YO twice, insert your hook, YO and pull up a loop, YO and pull through two loops, YO and pull through two loops again. There should be three loops on the hook.
- YO and pull through the remaining three loops.
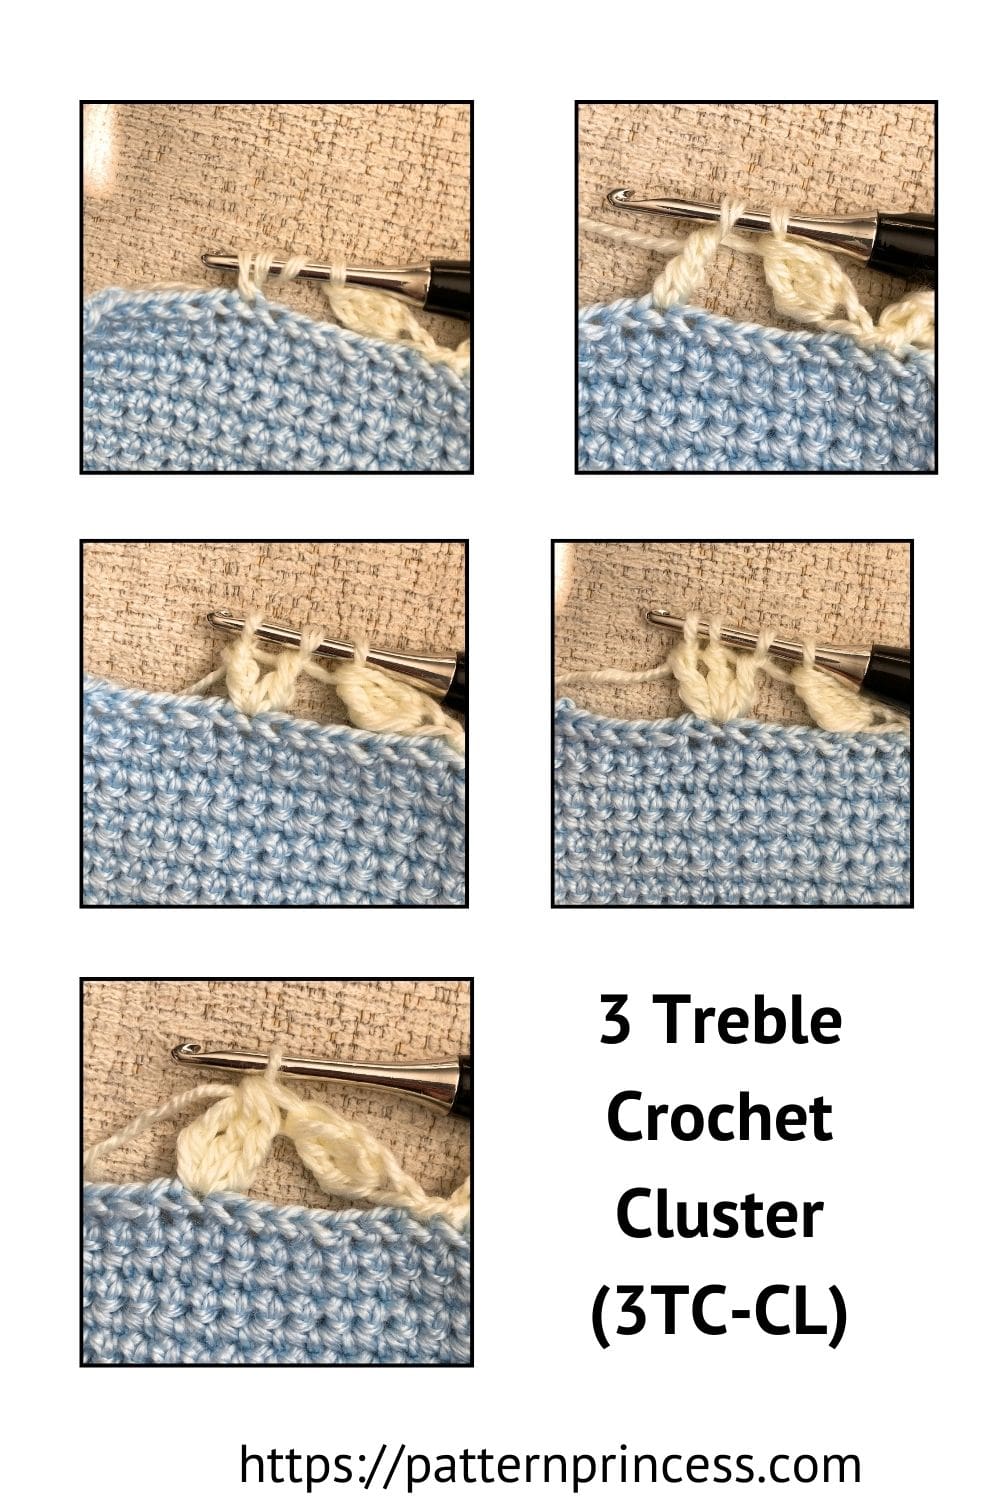
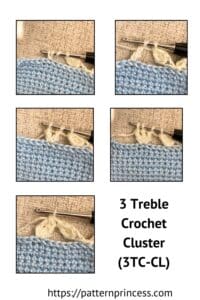
3 Treble Crochet Cluster (3TC-CL)
- YO twice, insert your hook, YO and pull up a loop, YO and pull through two loops, YO and pull through two loops again. There should be two loops on the hook.
- YO twice, insert your hook, YO and pull up a loop, YO and pull through two loops, YO and pull through two loops again. There should be three loops on the hook.
- YO twice, insert your hook, YO and pull up a loop, YO and pull through two loops, YO and pull through two loops again. There should be four loops on the hook.
- YO and pull through the remaining four loops.
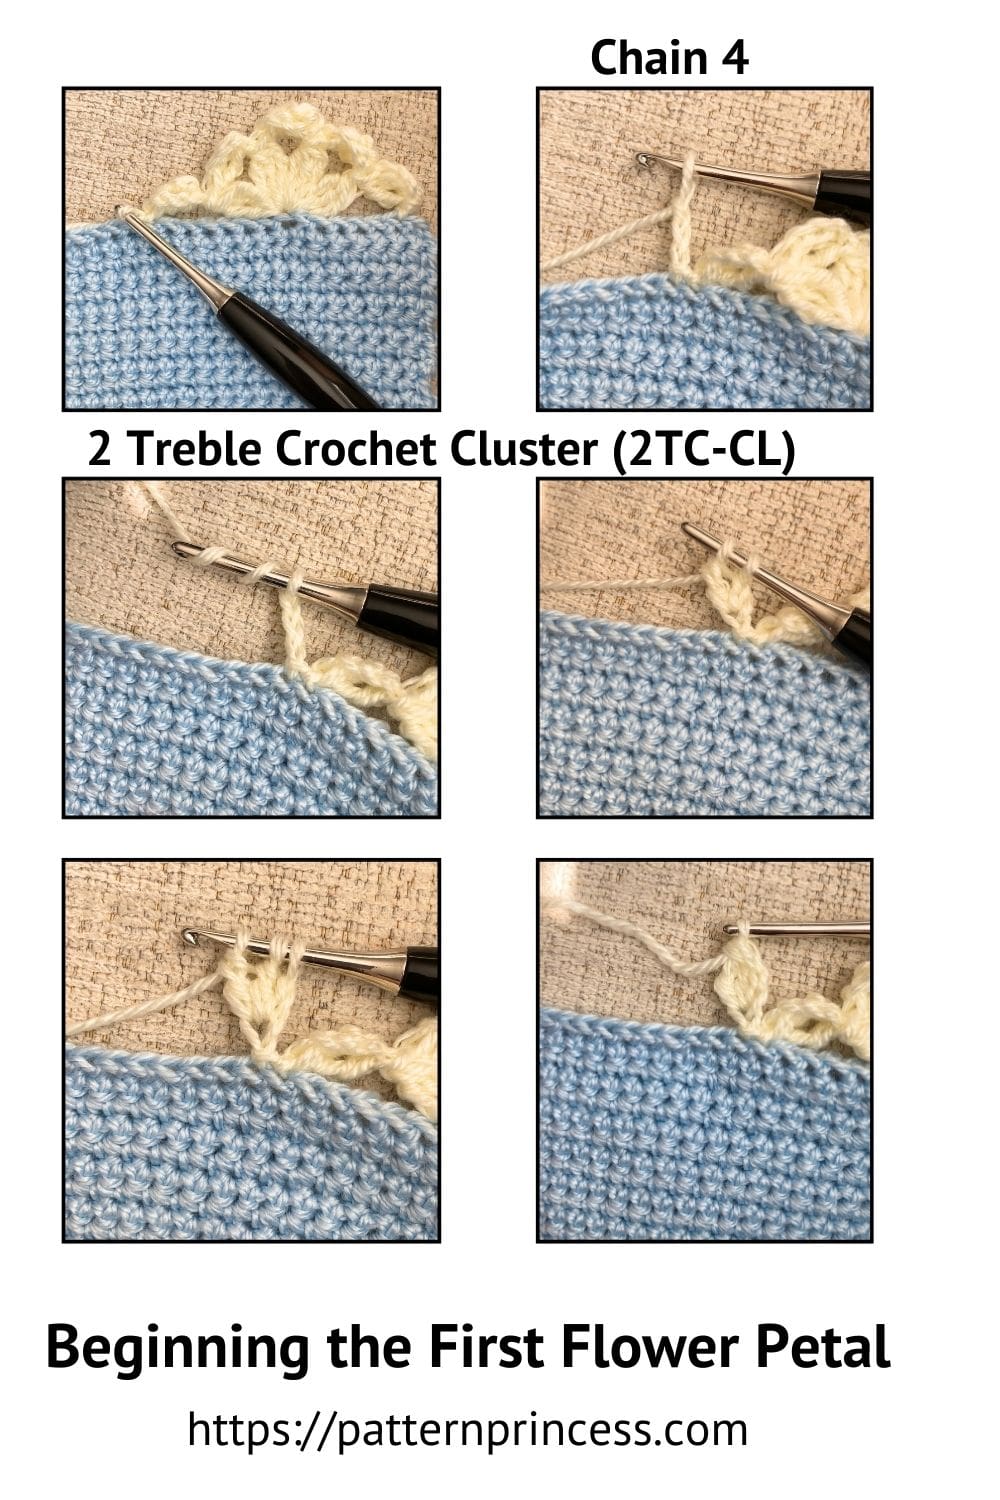
Pattern
You’ll need a multiple of 15 to work this pattern.
Start with a slip knot and a loop on the crochet hook. Join the yarn to your project.
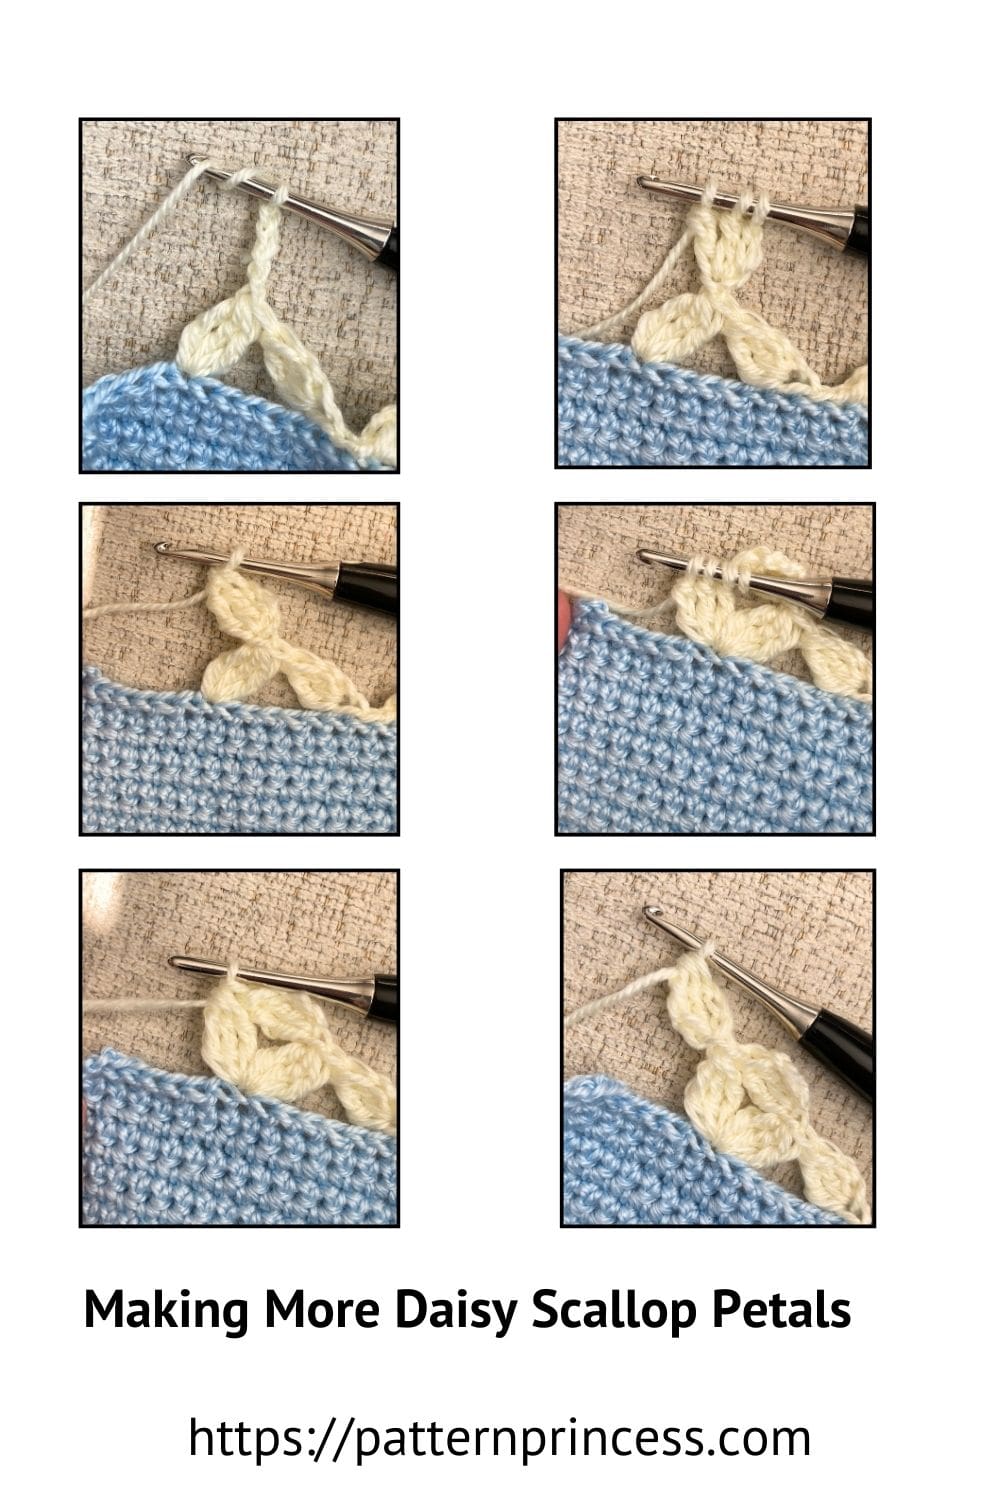
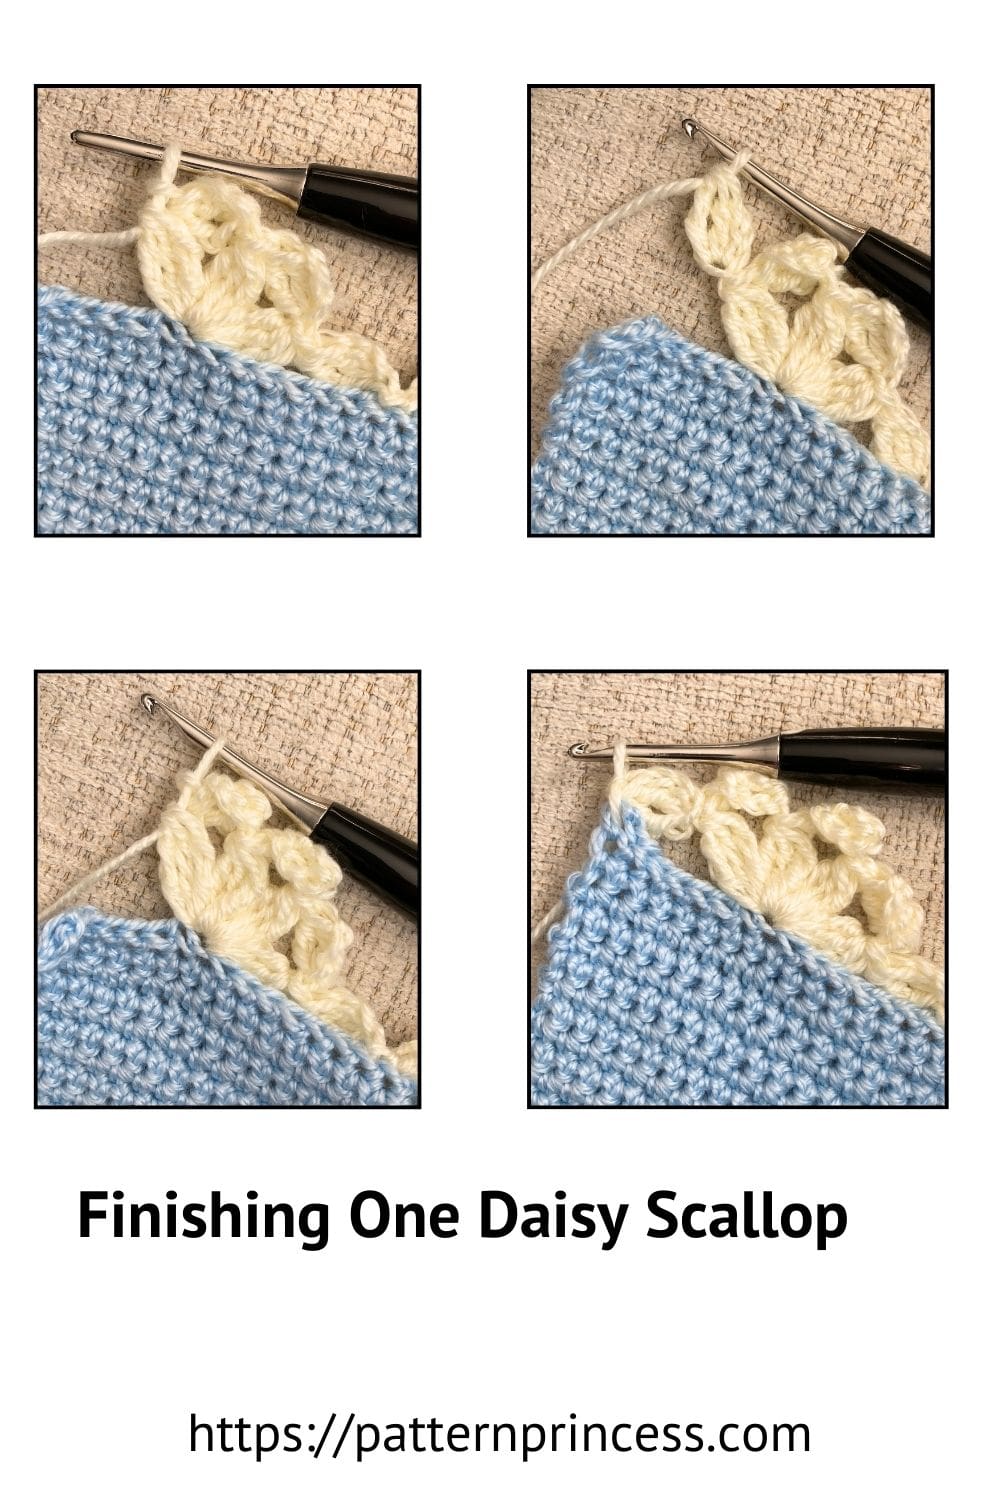
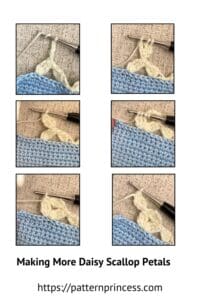
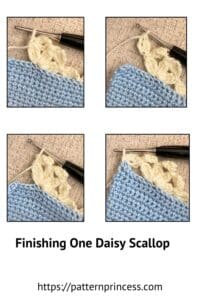
CH 4 (Counts as TC). Work a 2 TC-CL in the first ST of the CH 4. SK the next 6 STs. In the 7th CH work a 3 TC-CL. [CH 4 (Counts as TC). Work a 2 TC-CL in the first ST of the CH 4. 3 TC-CL in the same ST as before]. Repeat between [ ] 2 times. CH 4 (Counts as TC). Work a 2 TC-CL in the first ST of the CH 4. SK the next 6 STs. In the 7th CH work a SL ST.
SL ST to the next ST.
Repeat the Pattern
Finishing
Cut the yarn leaving a 10-12 inch yarn tail. Pull the yarn tail through the last stitch. Using the tapestry needle, weave all yarn ends in and trim off any excess yarn.
You Tube Tutorials for the Crochet Daisy Scallop Floral Border
Three Versions of Corner Stitch Patterns
Here are three different ideas on corner stitch patterns if you happen to be adding this to a baby blanket or throw blanket.
Note. We found that we like to do a round of single crochet stitches around before adding this border. When doing the single crochet, work three single crochet stitches in each corner.
If you added a round of single crochet stitches with 3 in each corner, SL ST into the next corner ST. SL ST into the first ST on the side of STs you are working on to continue working around with the daisy scallop pattern.
Version 1 Corner Stitches
SL ST to the corner ST. Work (SC, 5 DC, SC) all in the corner ST. SL ST into the first ST on the side of STs you are working on to continue working around with the daisy scallop pattern.
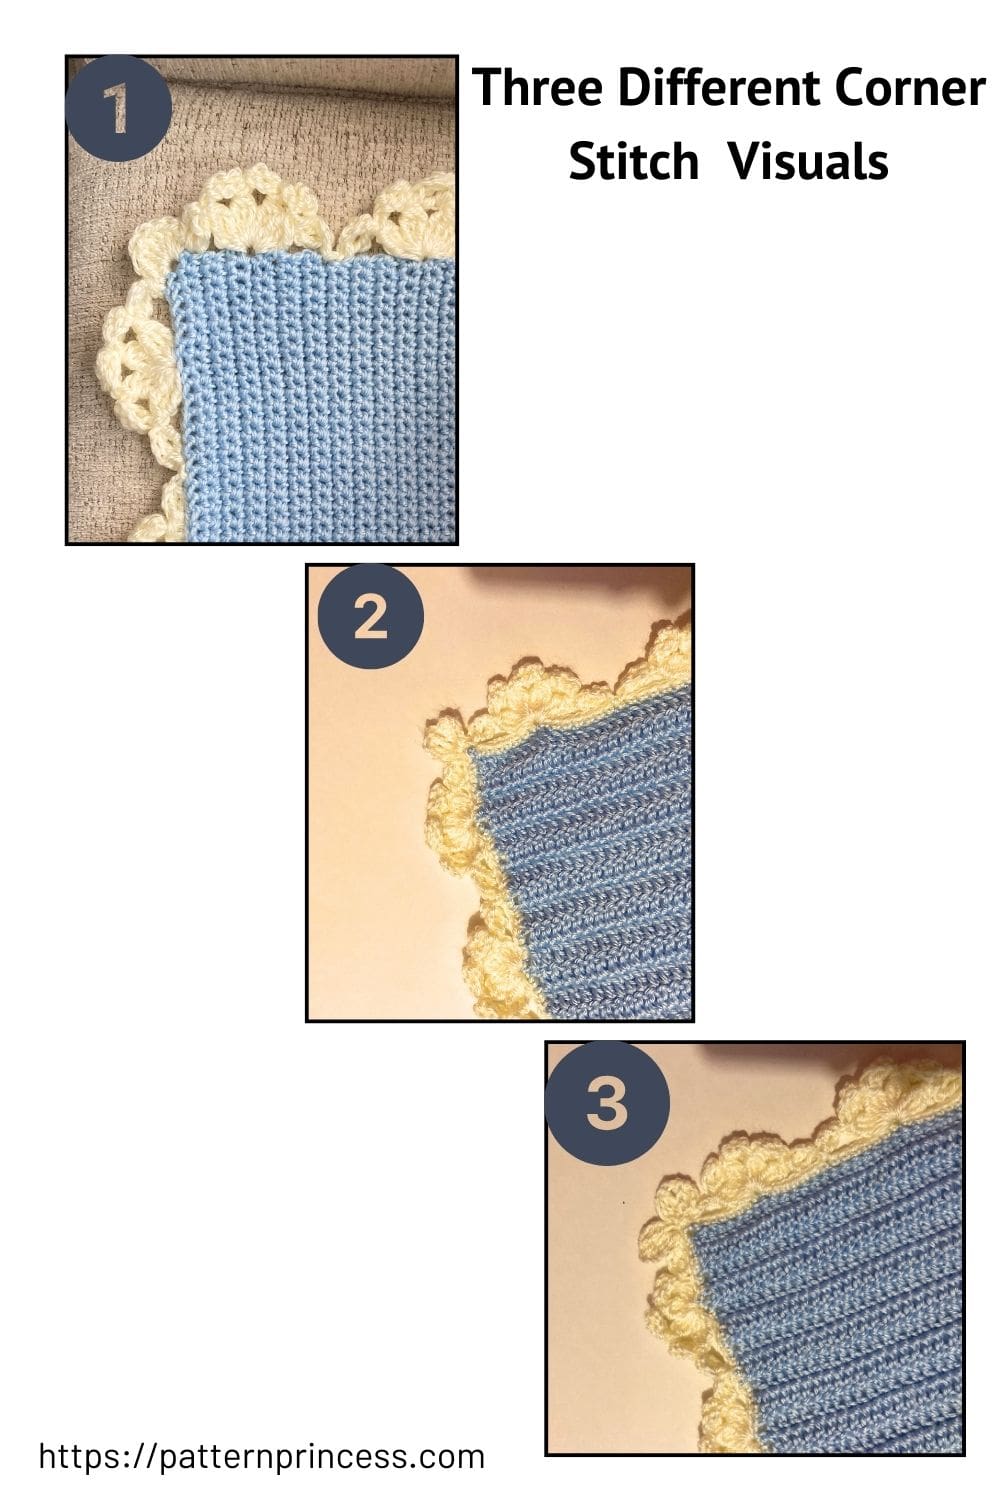
Version 2 Corner Stitches
SL ST to the corner ST. Work CH 4, 2 TC-CL in the first ST of the CH 4. CH 6. Work 2 TC-CL in the 4th CH from the hook. SL ST back into the corner ST. SL ST into the first ST on the side of STs you are working on to continue working around with the daisy scallop pattern.
Version 3 Corner Stitches
SL ST to the corner ST. (Work CH 4, 2 TC-CL in the first ST of the CH 4. CH 6. Work 2 TC-CL in the 4th CH from the hook. SL ST back into the corner ST). Repeat (Work CH 4, 2 TC-CL in the first ST of the CH 4. CH 6. Work 2 TC-CL in the 4th CH from the hook. SL ST back into the corner ST). SL ST back into the corner ST. SL ST into the first ST on the side of STs you are working on to continue working around with the daisy scallop pattern.
Crochet Daisy Scallop Floral Border Pattern
Equipment
- Crochet Hook Size that works with the yarn you are using.
- Tapestry Needle
- Scissors:
Materials
- Medium worsted weight yarn works great with this pattern. The amount of yarn needed will depend on the project you are making using this daisy scallop border.
Instructions
- Step 1. Start with a slip knot and a loop on the crochet hook.
- Step 2. Join the yarn to your project.
- Step 3. CH 4 (Counts as TC).
- Step 4. Work a 2 TC-CL in the first ST of the CH 4.

- Step 5. SK the next 6 STs. In the 7th CH work a 3 TC-CL.

- Step 6. [CH 4 (Counts as TC). Work a 2 TC-CL in the first ST of the CH 4. 3 TC-CL in the same ST as before]. Repeat between [ ] 2 times.

- Step 7. CH 4 (Counts as TC). Work a 2 TC-CL in the first ST of the CH 4.
- Step 8. SK the next 6 STs. In the 7th CH work a SL ST.

- SL ST to the next ST to repeat the pattern as needed.
- Finishing
- Cut the yarn leaving a 10-12 inch yarn tail. Pull the yarn tail through the last stitch. Using the tapestry needle, weave all yarn ends in and trim off any excess yarn.
Notes
Pattern Notes
This pattern is written in US Terms.You can find links on our You Tube channel for a video tutorial for this daisy scallop floral border below the written pattern. For both right hand and left hand crocheters.
Work the stitches on the right side of your project. Since this is only one round of stitches, there is no need to turn your work.
This floral border pattern is just one row of stitches.
However, on our swatches, we thought it looked better if a round of single crochet stitches are done before adding the border.
If you plan on adding the round of single crochet stitches before this border pattern, you’ll have extra stitches by the corner. Join your yarn in the stitch just after the 3 corner stitches. At the end of the row, you’ll end up doing 1 slip stitch to the middle corner stitch and 1 slip stitch after the corner stitch.
If adding a border, we have three ideas below the written pattern for you to try and see if you like them.
Special Stitches
Treble Crochet (TC)1. YO twice, insert your hook, YO and pull up a loop, YO and pull through two loops, YO and pull through two loops again, YO and pull through remaining two loops.
2 Treble Crochet Cluster (2TC-CL)
1. YO twice, insert your hook, YO and pull up a loop, YO and pull through two loops, YO and pull through two loops again. There should be two loops on the hook.
2. YO twice, insert your hook, YO and pull up a loop, YO and pull through two loops, YO and pull through two loops again. There should be three loops on the hook.
3. YO and pull through the remaining three loops. 3 Treble Crochet Cluster (3TC-CL)
1. YO twice, insert your hook, YO and pull up a loop, YO and pull through two loops, YO and pull through two loops again. There should be two loops on the hook.
2. YO twice, insert your hook, YO and pull up a loop, YO and pull through two loops, YO and pull through two loops again. There should be three loops on the hook.
3. YO twice, insert your hook, YO and pull up a loop, YO and pull through two loops, YO and pull through two loops again. There should be four loops on the hook.
4. YO and pull through the remaining four loops. right hand video tutorial: https://youtu.be/j504_On8ncQ left hand video tutorial: https://youtu.be/syglf8tpm9s
Here are other free crochet patterns to inspire your next project.

You can find Victoria crocheting, quilting, and creating recipes. She has cooked in restaurants for over 20 years, including many larger parties. She learned to crochet when she was just 11 years old and has been crocheting ever since; over 50 years now. Over 40 years ago, she loved her first class in sewing and continues to hone her skills in quilting. Many have enjoyed the handmade gifts over the years. In her professional career, she has worked in management in a wide variety of businesses including higher education as a dean of a division. All the while attending college part-time to achieve her doctorate in higher education with an emphasis in e-learning.

This worked exactly as written, thanks!