Last updated on March 27th, 2026 at 09:41 am
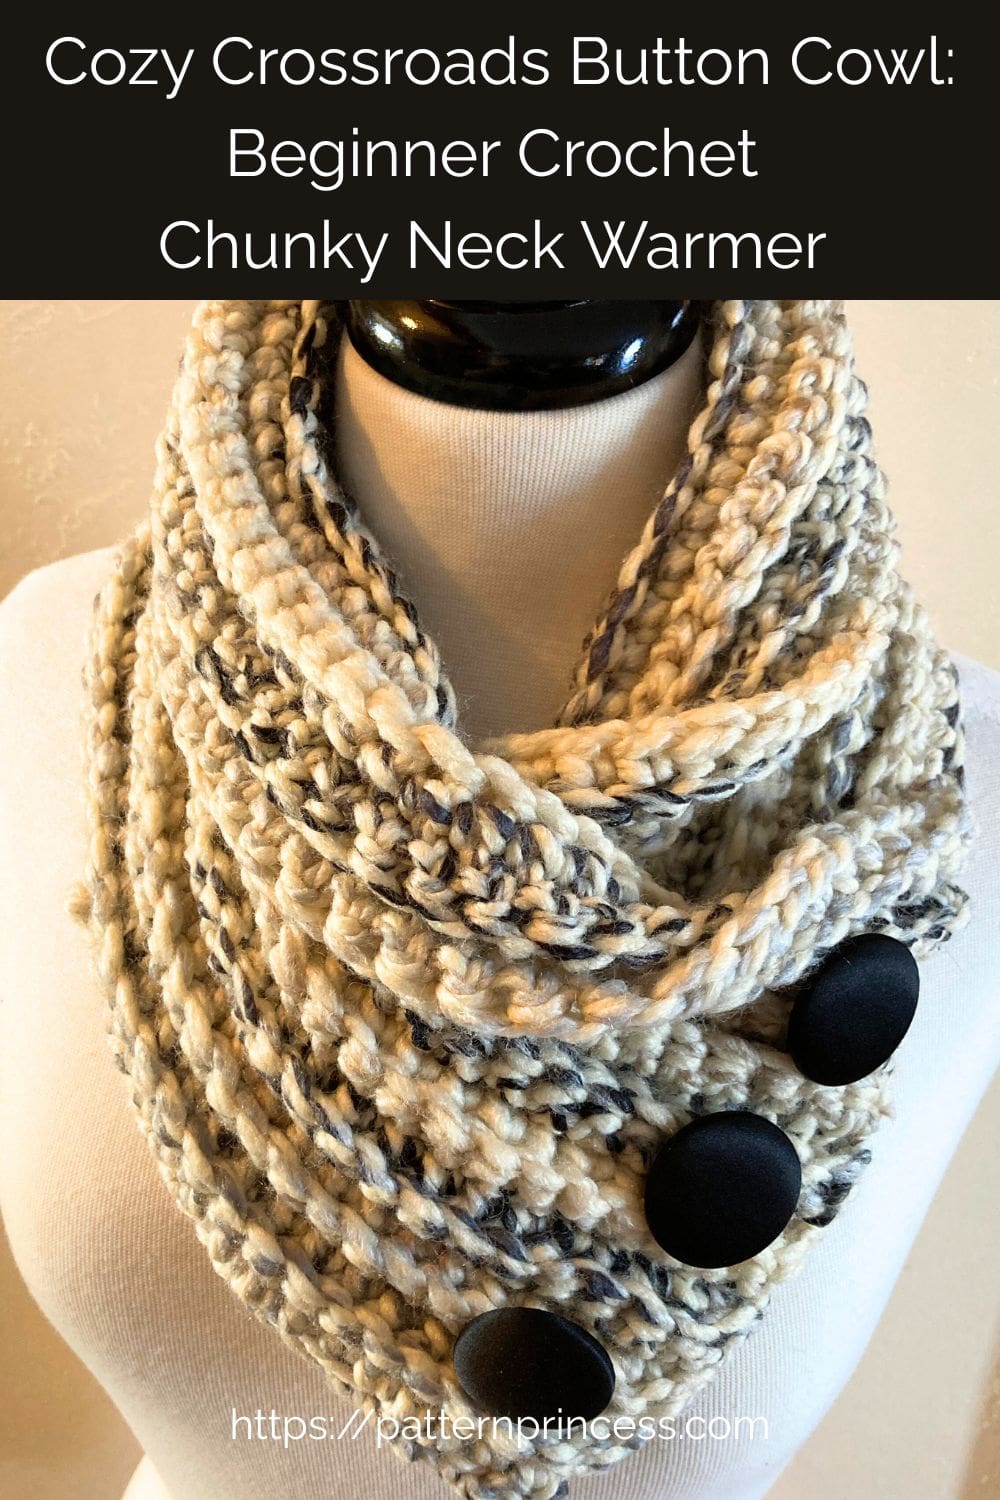
The Cozy Crossroads Button Cowl was designed for exactly those days when you want comfort, warmth, and a little bit of handmade charm all wrapped into one easy project. This chunky crochet neck warmer works up quickly, uses simple stitches, and adds that perfect finishing touch to coats, sweaters, and flannels alike.
Whether you’re heading out for chores, school pickup, or a quick trip to town, this beginner-friendly free pattern for a crochet cowl is a practical and stylish accessory you’ll reach for again and again.
One of my favorite things about this pattern is how versatile it is. With the same stitch pattern and construction, you can create two very different looks just by changing your yarn. From smooth and bold to rustic and cozy. It’s a wonderful way to use up chunky yarn in your stash while still ending up with a polished, gift-worthy piece.
There’s just something extra special about a cozy handmade layer that you can throw on and instantly feel warm and put together.
❤️ Why We Love This Pattern
We love the Cozy Crossroads Button Cowl because it’s the kind of project that gives you big results without complicated techniques.
The stitch pattern is simple and repetitive, making it perfect for beginners or for more experienced crocheters who want a relaxing, no-stress project. It’s also a fantastic pattern for last-minute gifts since it works up quickly with chunky yarn and only requires basic crochet skills.
Another reason this pattern is a favorite is the fit and function. The ends are joined so you just slip it over your heat and your ready to head out the door.
The chunky neck warmer sits comfortably around the neck while still giving you styling options. Worn snug and cozy or slightly looser for a relaxed, layered look. It stays in place, blocks the wind, and feels much warmer than a typical scarf without all the extra bulk.
And of course, we love how easily this pattern adapts to different yarns and personal style.
Use a smooth chunky yarn for clean stitch definition and bold color or choose a textured or marled yarn for a softer, farmhouse-inspired look. No matter which yarn you choose, the result is a chunky crochet neck warmer that feels timeless, practical, and beautifully handmade.
???? Choosing Your Yarn: Two Cozy Looks, One Easy Pattern
This chunky cowl can look different depending on the yarn you choose. Use the same stitches and construction no matter what yarn you choose. But the finished style can feel completely different. Which makes this beginner-friendly crochet neck warmer extra fun to customize.
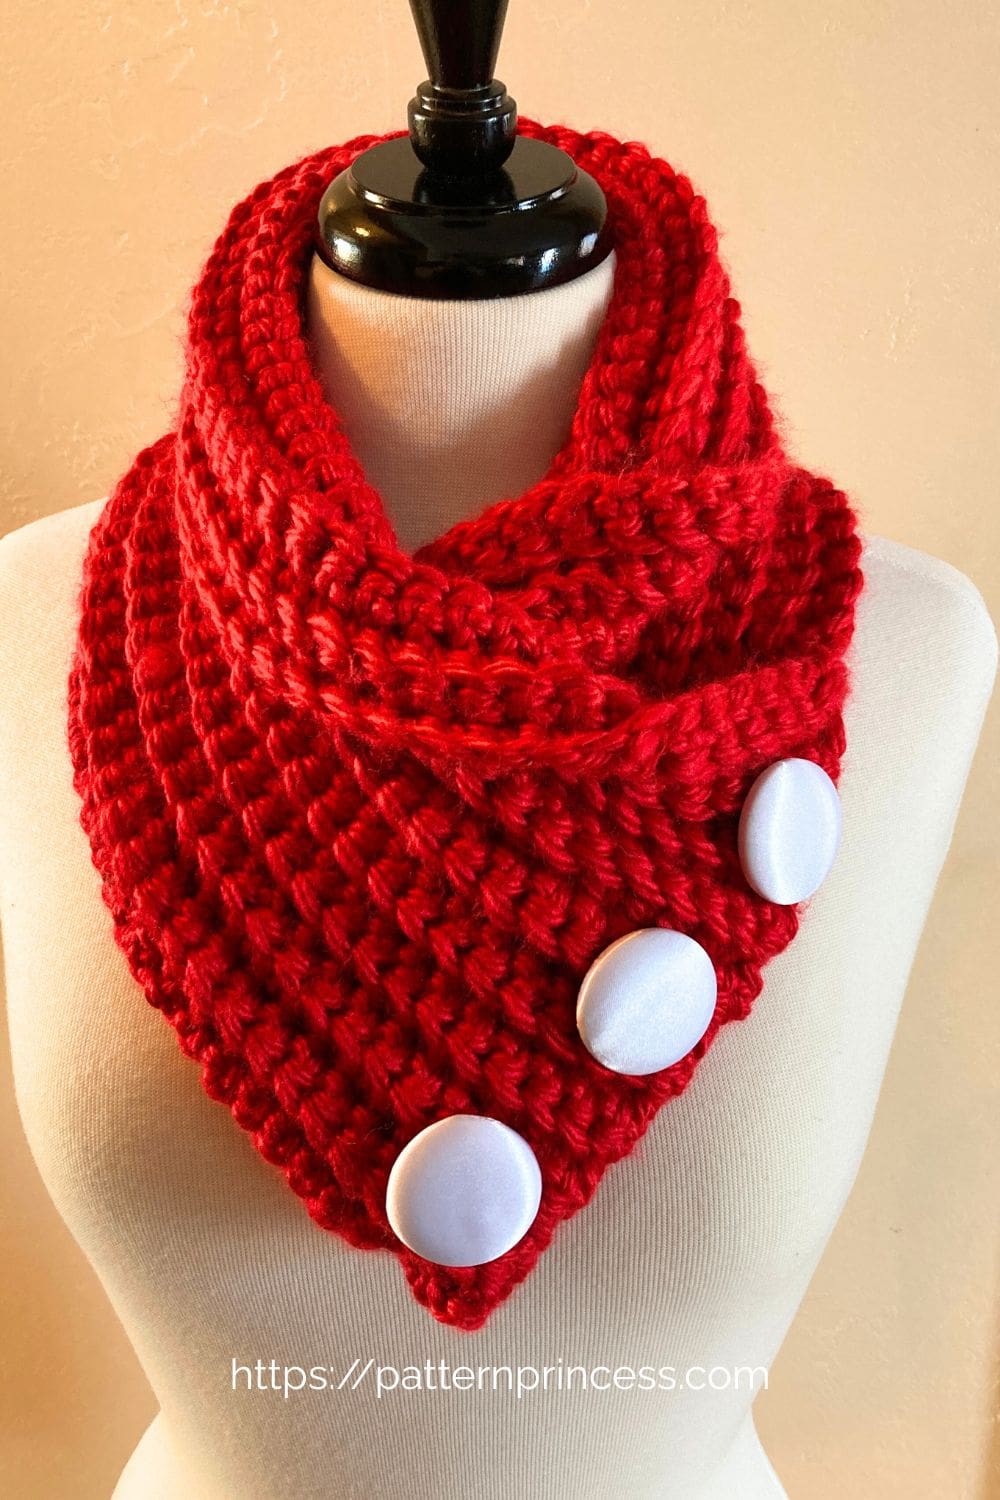
Yarn Option A: Smooth Chunky Yarn (Shown in Red)
If you love clean lines and bold color, a smooth chunky yarn is a great choice for this button cowl crochet pattern. With this type of yarn, the stitches are much more defined, giving the cowl a classic chunky crochet look.
The fabric also feels slightly firmer, which helps the cowl hold its shape nicely showing off the buttons and styled around the neck.
This option is perfect if you’re going for:
- A more modern, polished finish
- Bold, solid colors that really stand out
- A structured feel in your bulky yarn crochet scarf
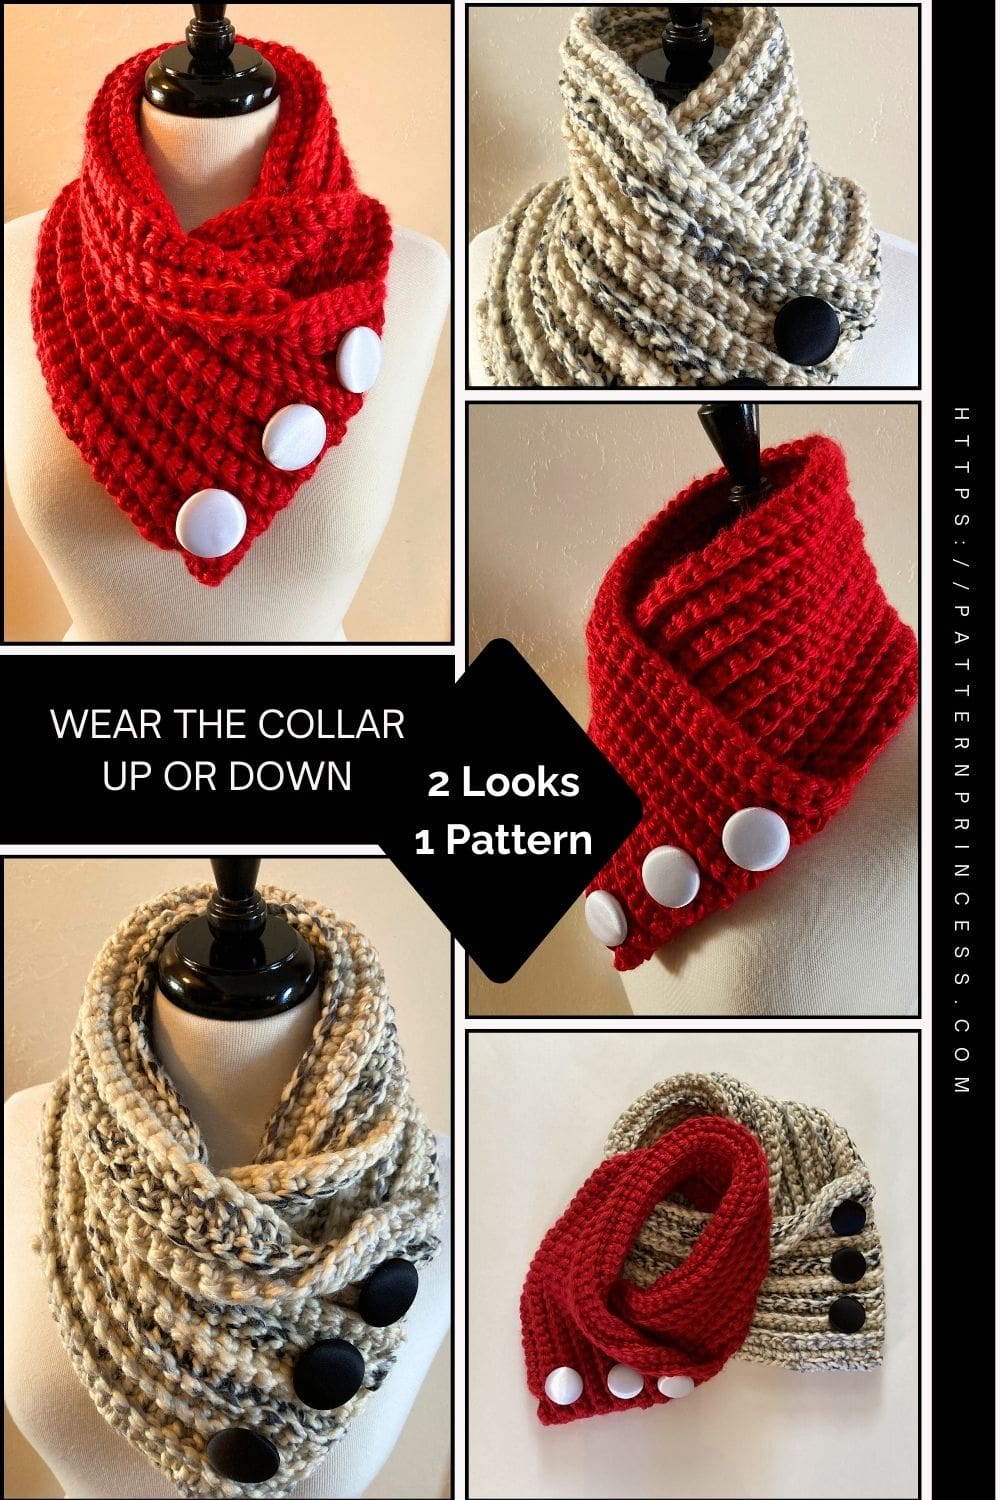
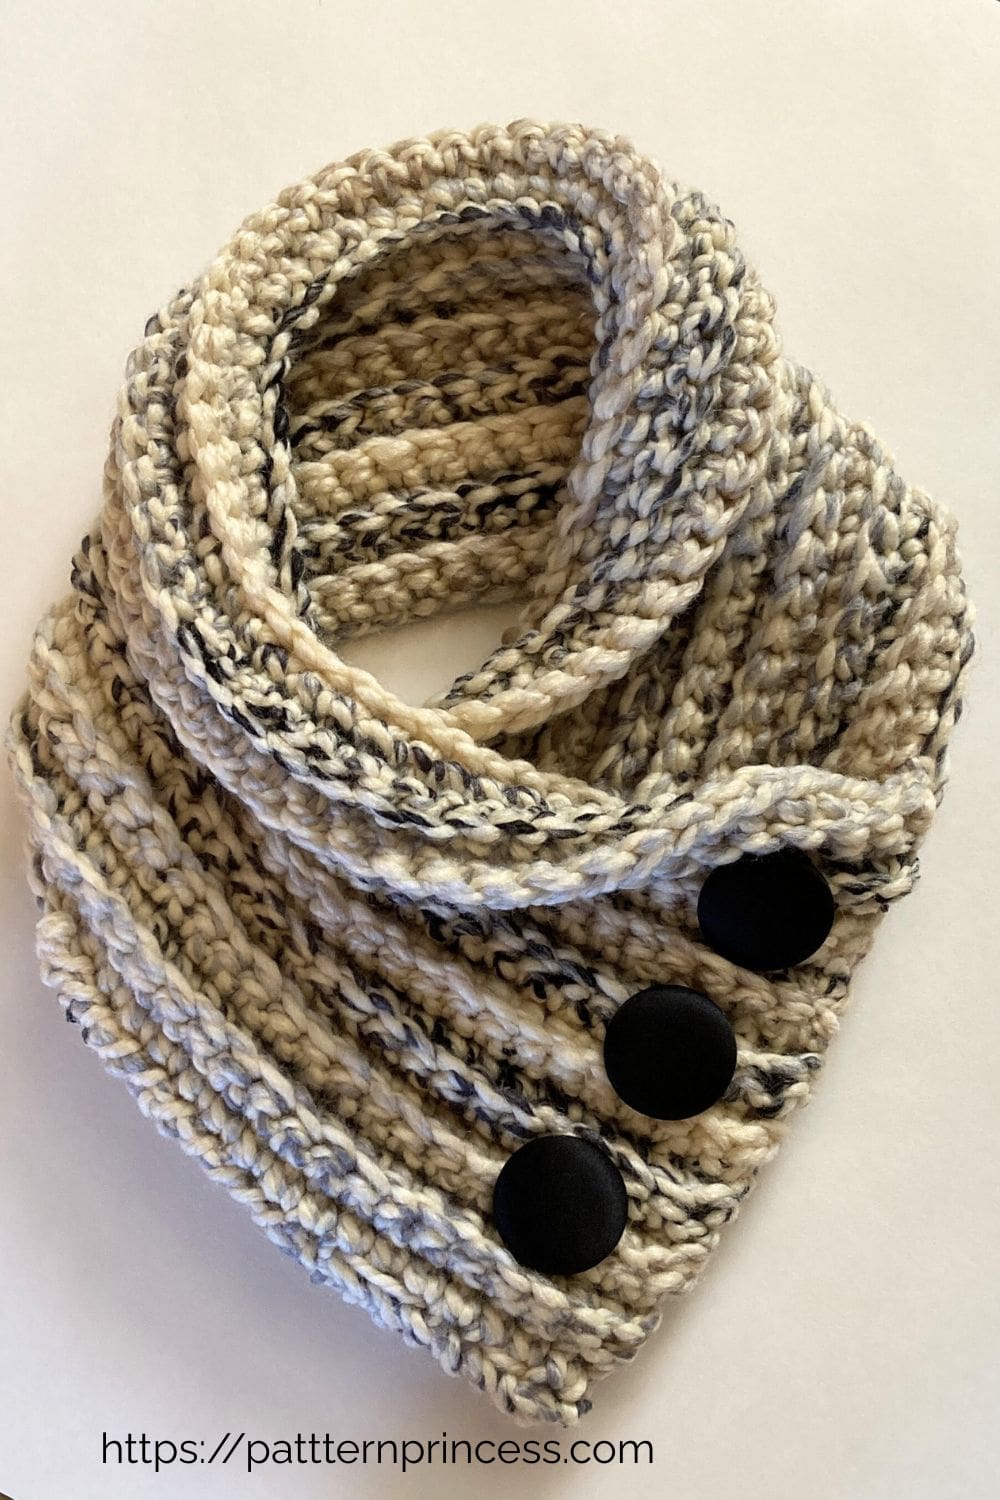
Yarn Option B: Textured or Marled Chunky Yarn (Shown in Neutral)
For a softer, more rustic style, a textured or marled chunky yarn creates a beautifully cozy look. The stitch definition is a bit softer, but you gain lots of visual depth and texture, almost like a handspun or farmhouse-style fabric. This option is especially lovely for casual, everyday wear and pairs beautifully with sweaters, flannels, and winter coats.
This yarn choice gives you:
- A cozy, rustic, farmhouse-inspired feel
- Softer texture and visual depth
- A relaxed, comfy look that’s perfect for a chunky neck warmer
Which Yarn Should You Choose?
The best part? There’s no wrong answer. Both yarn options work beautifully with this beginner crochet pattern, and both create a warm, comfortable button cowl that’s easy to wear and easy to gift. If you like experimenting with different yarns or want to make more than one, this pattern is a great way to get multiple looks from the same simple stitch design.
Whether you choose smooth and bold or rustic and cozy, you’ll end up with an asymmetrical cowl that’s practical, stylish, and perfect for chilly days.
Styling Your Cozy Crossroads Button Cowl
The Cozy Crossroads Button Cowl is one of those accessories that’s easy to dress up or down, making it a staple piece for fall and winter wardrobes.
For everyday wear, try pairing it with a flannel shirt, denim jacket, or cozy sweater for a relaxed look. When the weather turns colder, it layers beautifully over a long-sleeve top and under a heavier coat, adding warmth without the bulk of a full scarf.
Wear it snug and high around the neck for extra warmth or fold the top edge over and let it sit a little lower for a softer, relaxed drape.
Get your ad free printable PDF in our Etsy Shop.
Directions: Cozy Crossroads Button Cowl: Beginner Crochet Chunky Neck Warmer
Skill Level
Beginner-Friendly Easy
Gauge
Approximately 8.5 stitches per 4 inches and 10 rows every 4 inches.
Finished Size
7.5 inches wide X 33 inches long
It’s easy to change the size of the neck warmer by increasing or decreasing the chain stitches and rows by any number.
The beginning number of chain stitches determines the length and the number of rows determines the width.
Materials
Yarn
Super Bulky (6) yarn.
I made this neck warmer in 2 different yarn colors.
Lion Brand Hometown USA Super Bulky 6 Super Bulky yarn in the color Cincinnati Red. 81 yards per skein.
Lion Brand Wool- Ease Thick & Quick River Run 6 Super Bulky yarn in the color Moonlight. 106 yards per skein.
Each cowl uses approximately 120 yards of #6 super bulky yarn. 2 Skeins.
If you cannot find this yarn locally, you can purchase it online. Pattern Princess Savings Center
Crochet Hook Size N, 9.0 MM
Scissors
Yarn Needle
Buttons 3 or 4 of your choice. From ¾ inch to 1 ½ inches in diameter. I used 3 buttons 1 1/2 inches around.
Thread
Sewing Needle
Abbreviations
- CH = Chain
- DC = Double Crochet
- SC = Single Crochet
- ST = Stitch
- STs = Stitches
- [ ] = Repeat Between
Pattern Notes
Written in US Terms.
The pattern is a one row repeat.
The neck warmer is worked lengthwise.
Turn at the end of each row.
Chain 1 at the beginning of rows does not count as a stitch.
You can find Video Tutorials after the written pattern.
Crochet Stitches
Chain Stitch (CH ST)
Begin the chain stitch by making a slip knot on the crochet hook. Leave about a 5-inch tail on the yarn. This will be weaved in later.
Next snug up the yarn loop that is on the crochet hook; while it should be firm, it should also be loose enough to slide on the hook with ease.
Keeping the loop on the hook, wrap the yarn over the crochet hook from back to front. Draw the yarn through the loop. You’ve just made a chain stitch. Continue yarning over and drawing the yarn through the loop on the hook to make more chain stitches.
HOW TO CROCHET THE CHAIN STITCH video tutorial
Single Crochet (SC)
Insert the hook, pull up a loop. Yarn over and pull through the two loops on the hook.
HOW TO CROCHET THE SINGLE CROCHET STITCH video tutorial
Begin Crochet Pattern
Start with a Slip Knot. Place a slip knot on your crochet hook.
Begin by Chaining 70
Row 1
In the second CH from the hook, SC and in each ST across. Turn (69 STs)
Row 2
CH 1 (Doesn’t count as a ST). SC in the back loop of the first ST and each ST across. Turn (69 STs)
Rows 3 through 19
CH 1 (Doesn’t count as a ST). SC in the back loop of the first ST and each ST across. Turn (69 STs)
Finishing
After the last stitch, leave a long yarn tail; approximately 15-20 inches. This will give you enough yarn to sew the ends together to form the neck warmer.
However, before the neck warmer is sewn together, sew the buttons on.
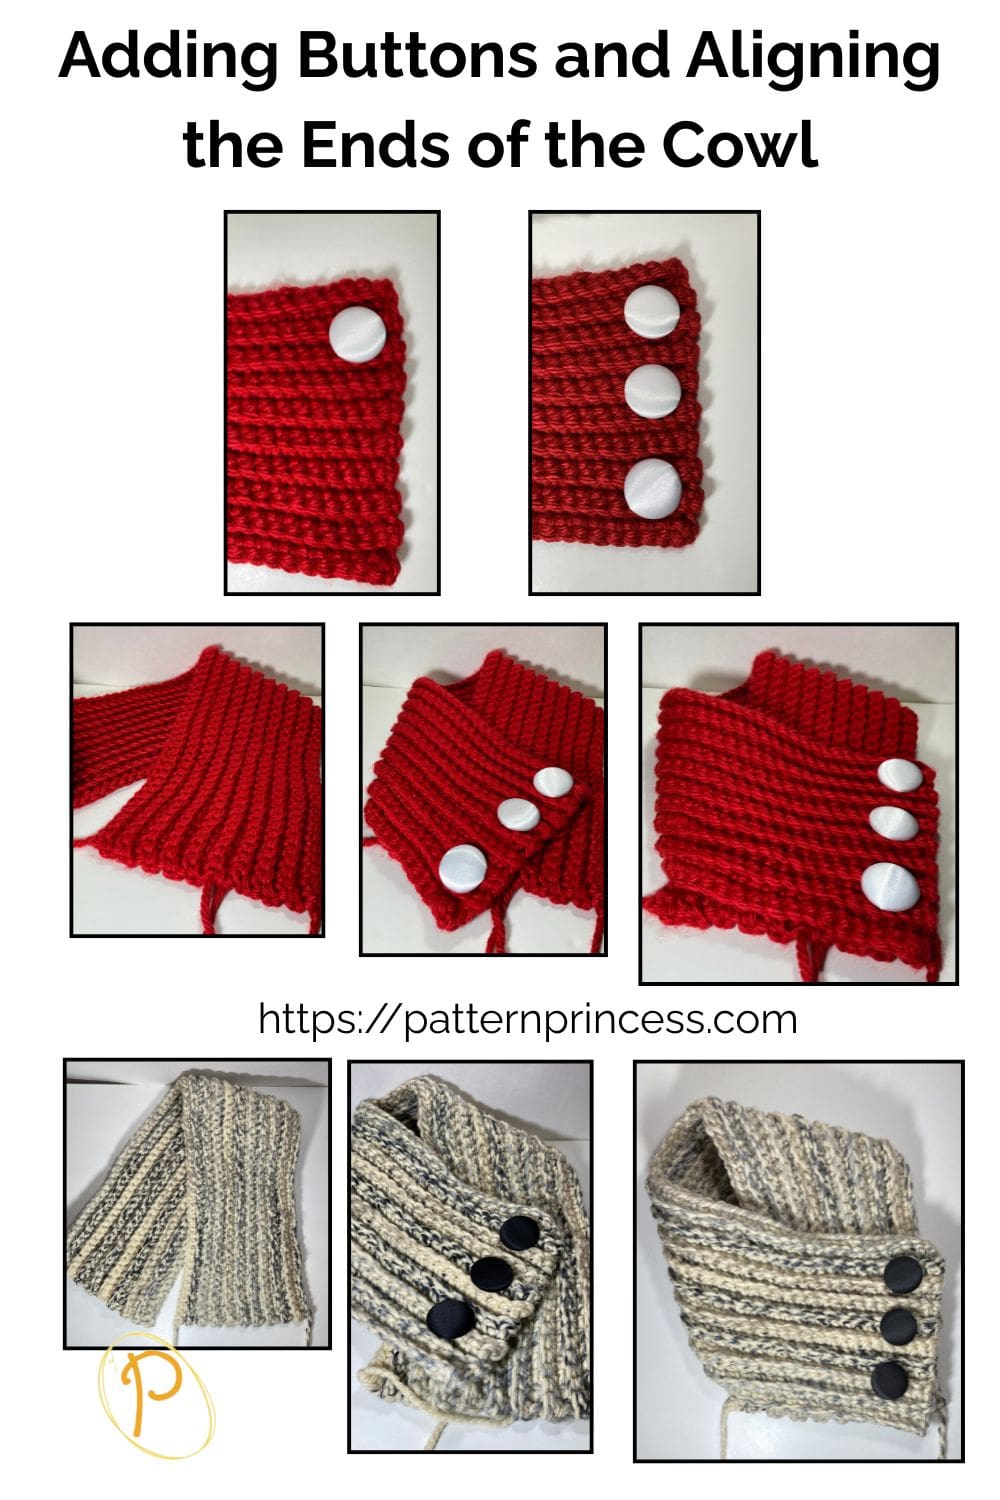
Sewing on the Buttons
Decide where you want the buttons. They will be sewn onto the end of the rectangle that will be on top after joining the ends together. For a balanced look, evenly space the 3 buttons along the edge of the rectangle.
You may find it helpful to use clips or stitch markers to mark the button positions.
Use thread and a sewing needle that fits through the buttonholes.
Threading the Needle
I use the double-thread method. Cut a length of thread or yarn, about 18–24 inches long, and thread it through the sewing needle. Bring the thread ends together and tie a knot at the end to secure it.
Attach the Buttons. Position the first button over its marked spot.
From the back of the rectangle, insert the needle through the crochet fabric and one hole of the button, pulling it until the knot on the thread is close to the crochet fabric.
Insert the needle through the opposite hole (if it’s a two-hole button) or an adjacent hole (if it’s a four-hole button), then back through the rectangle.
Tip. Then pull the needle and thread through the thread from the first pass before the knot. Then pull everything snug. This is a great way to keep the thread from pulling out of the crochet fabric.
Continue working from back to the front and front to the back with the needle and thread to secure the button. (About 3 or 4 times).
Secure the Button. When the button feels securely attached, tie a small knot on the underside of the rectangle to secure the thread.
How to Tie Off the Thread When Sewing Buttons
Finish Your Last Stitch. After sewing the button securely in place, bring the needle and thread to the back side of the collar.
Create the Knot. Hold the thread taut near the base where it exits the fabric. Wrap the thread around the needle three times.
While holding the wraps in place with your fingers, carefully pull the needle and thread all the way through the wraps and through the fabric near the underside of the button.
As you pull, the wraps will slide down to the base of the needle and tighten into a secure knot against the fabric.
Trim the Excess Thread. Use scissors to cut the thread close to the knot, leaving a small tail.
Repeat for Extra Security (Optional). If you want the knot to be extra secure, repeat the process one more time.
This method ensures the knot is secure and tidy, preventing the button from coming loose.
Repeat for the Other Buttons
Sew on the other buttons in the same manner, ensuring they’re evenly spaced and aligned.
Sewing the ends together
Align the points of the rectangle together as shown in the photo.
I placed the right side over the left side. The key is to make sure that the ends come to a point. Once you have the ends positioned where you like, sew through both layers with the long tail of yarn.
Use a whipstitch or mattress stitch to sew the front and back rectangle panels together.
- Whipstitch. Insert the needle from back to front, wrapping the yarn around the edges in a spiral motion.
- Mattress Stitch. Work through the middle of the stitches on the edges of both pieces, creating an almost invisible seam.
Keep the Tension Even. As you sew, ensure the yarn is snug but not so tight that it puckers or distorts the fabric.
Weave in the ends and cut off the excess.
Video Tutorials to Help with the Crochet Stitches
Right hand video of Cozy Crossroads Button Cowl
Left hand video of Cozy Crossroads Button Cowl

You can find Victoria crocheting, quilting, and creating recipes. She has cooked in restaurants for over 20 years, including many larger parties. She learned to crochet when she was just 11 years old and has been crocheting ever since; over 50 years now. Over 40 years ago, she loved her first class in sewing and continues to hone her skills in quilting. Many have enjoyed the handmade gifts over the years. In her professional career, she has worked in management in a wide variety of businesses including higher education as a dean of a division. All the while attending college part-time to achieve her doctorate in higher education with an emphasis in e-learning.