Last updated on April 19th, 2026 at 08:39 pm
See how easy it is to make plastic bag plarn. If you’ve ever ended up with a lot of plastic bags from the grocery store and wondered what to do with them, this is such a great way to give them a second life.
Not only is plarn a practical solution for reusing plastic grocery bags, but it’s also a fun activity you can do while watching a show or sitting at the kitchen table. And once you get the hang of it, you’ll be surprised at how quickly those bags turn into something you can actually use for crochet projects and more.
Eco-Friendly and Budget-Friendly Crafting
Whether you’re looking for eco-friendly crafting ideas or just fun ways to use what you already have, learning how to make plarn is a simple skill with big rewards.
You’ve been throwing away the perfect craft material every single week.
The Beginner’s Method for Making Plarn at Home
Those plastic grocery bags piling up under your sink aren’t trash. They’re actually plastic yarn waiting to happen, and making plarn is one of the most satisfying fun ways to turn something disposable into something useful.
You don’t need fancy equipment or hours of free time. Just a pair of sharp scissors, a flat surface, and about ten minutes to create long strips of durable plastic yarn that works beautifully for crochet projects, reusable shopping bags, and dozens of other creative uses.
Different colors of bags mean different colors of plarn. That flimsy plastic shopping bag from the grocery store becomes surprisingly strong when you transform it into continuous strips of plastic yarn.
Once you learn this simple technique, you’ll never look at plastic bags the same way again.
What Is Plarn?
Plarn is short for plastic yarn. A material made by cutting and looping plastic shopping bags into long strips that can be used much like regular yarn.
While it doesn’t behave exactly like traditional yarn, it’s strong, water-resistant, and perfect for certain types of plarn projects, especially those meant for outdoor or heavy-duty use.
Why You’ll Love Making Plastic Bag Yarn
There are so many reasons to try this:
- A great way to reuse and reduce waste
- Keeps plastic out of landfills
- Costs nothing if you already have bags at home
- A fun activity for beginners and experienced crafters alike
- Perfect for durable crochet projects
If you’ve been saving bags from the grocery store, this is your sign to put them to good use.
Supplies You’ll Need
Making plarn isn’t complicated, but having the right supplies makes the process smoother and faster.
You probably already own everything required. Here’s what to gather before you start:
- A lot of plastic grocery bags. In any color or style. (clean and dry)
- A flat surface (table or countertop works best)
- A pair of sharp scissors
- Optional: sorting bags by different colors for creative projects
The quality of your scissors matters more than you’d think. Dull blades create jagged edges that make your plastic yarn harder to work with and more likely to tear during crochet projects. Sharp scissors give you clean cuts that hold up better when you’re working with the material.
Different types of plastic bags work differently. Thicker bags from boutiques create chunkier plarn that works up faster. While thinner grocery store bags make finer plastic yarn that’s perfect for detailed work. Experiment with what you have to find your favorite texture and thickness.
Make sure to view the video on making plarn after the written pattern.
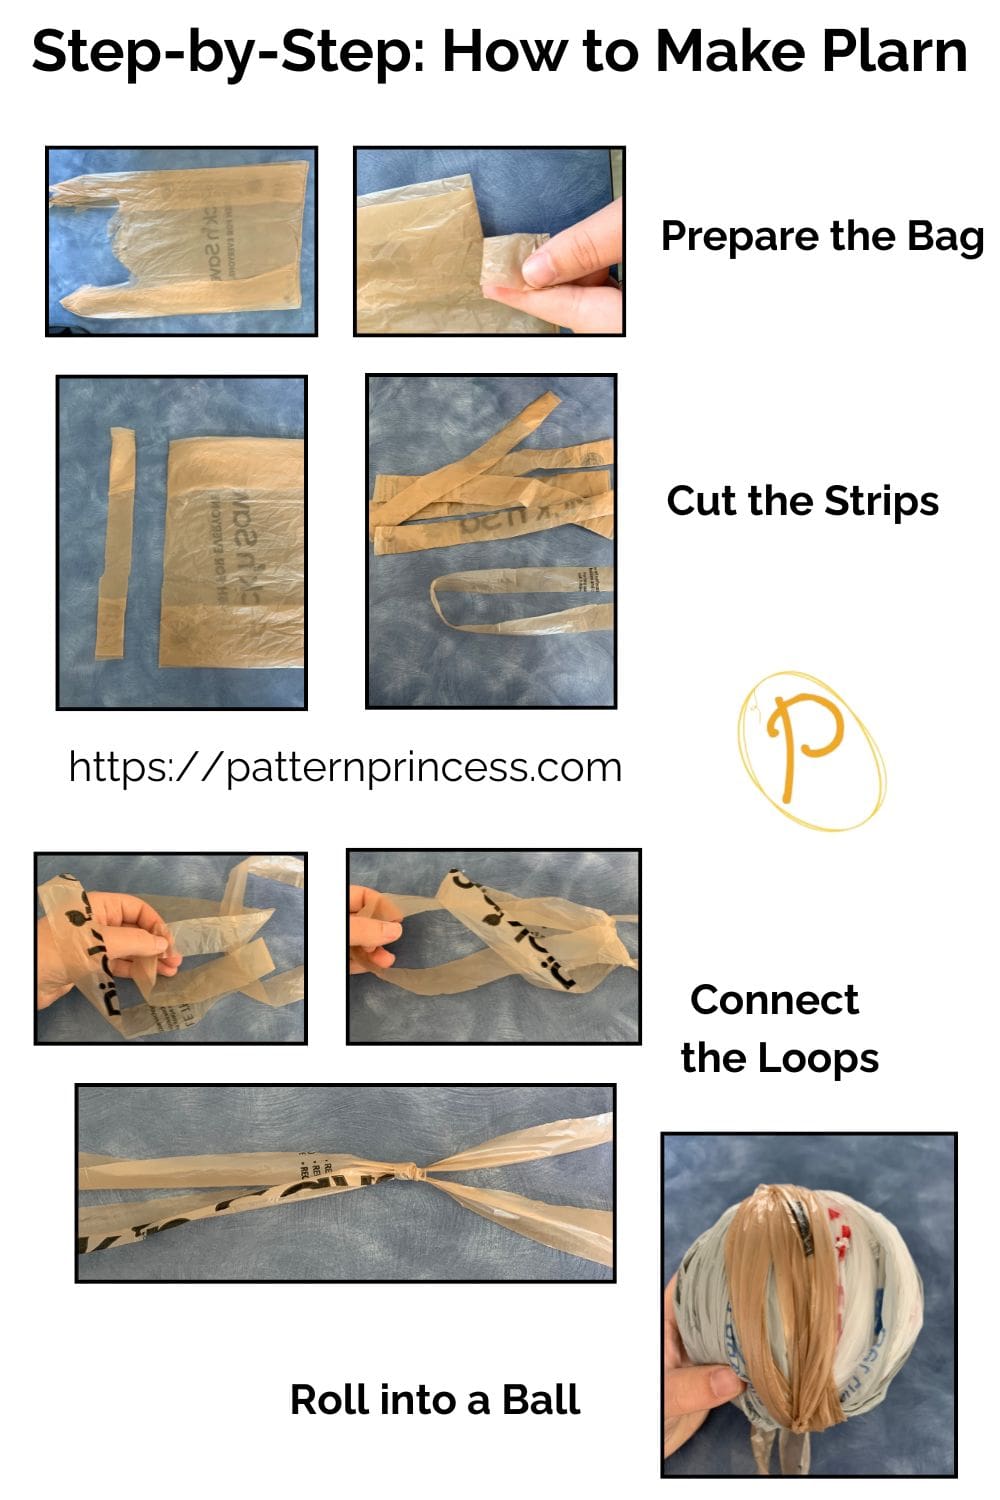
Step-by-Step: How to Make Plarn
1. Flatten and Prepare the Bag
Before you can cut anything, your bags need proper prep work. This step determines how smooth your plarn turns out.
Start by laying your plastic bag on a flat surface. Smooth out all the wrinkles and air pockets with your hands. Any creases or folds will create weak spots in your finished plastic yarn.
Fold the tube in half lengthwise so the side seams line up perfectly. Then fold it in half again. You should now have a rectangle that’s roughly one quarter the width of the original bag.
This folding technique lets you cut multiple layers at once, which saves massive amounts of time when you’re working through a lot of plastic bags.
2. Trim the Top and Bottom
Remove the handles and bottom seam. The handles create bulky knots that interrupt the flow of your strips, and the bottom seam adds unnecessary thickness. Cut straight across the top where the handles attach, then flip the bag over and cut off the bottom of the bag where it’s sealed.
Using your scissors:
- Cut off the handles at the top
- Remove the bottom seam at the bottom of the bag
You’ll be left with a tube-shaped section—the usable part of your plastic bag yarn.
3. Cut Into Strips
Keep your folded bag flat on your work surface. Starting from the folded edge, cut straight across in strips about 1 to 2 inches wide. Don’t worry about being perfectly precise. Slight variations in width won’t ruin your plarn, but try to stay relatively consistent for the smoothest results.
Each cut will create a loop. Your first strip might take a moment to get right, but after that, it becomes quick and repetitive.
You’ll end up with a pile of plastic loops.
4. Connect the Loops to Make Longer Plarn
Individual bags only give you so much material. Connecting multiple strips turns short pieces into usable lengths for actual projects.
The loop method is the cleanest way to join strips without creating weak points.
Take two loops and connect them:
- Slide one loop through another
- Pull the tail through itself (like a slip knot)
- Gently tighten
Repeat this process to create one long strip of plastic bag yarn.
5. Roll Plarn Into a Ball
Loose long strips can tangle into a nightmare. Organized balls work like regular yarn and make crochet projects actually enjoyable.
If you don’t have a yarn winder, wind your connected plarn around your fingers to create the center of your ball, just like you would with regular yarn. After about ten loops, slide the coil off your fingers and start winding the remaining plarn around this core in different directions.
Keep tension consistent but not too tight. Plarn stretched during rolling can lose its shape and elasticity. You want a firm ball that holds together but still has some give when you pull from it during your project.
Store finished balls in a container or bag to keep them clean and separated by color. Different colors let you create patterns and designs in your finished pieces, and keeping them organized means you can grab exactly what you need when inspiration strikes.
Tips for Success
- Keep your strips a consistent width for smoother stitching
- Don’t pull too tight when joining loops
- Mix different colors of bags for a fun, unique look
- Thicker bags create sturdier plarn
- It may take a little practice, but it gets faster each time
Common Mistakes That Waste Time
Even simple processes have pitfalls that slow you down or create frustrating results.
Cutting strips too narrow. Strips thinner than three quarters of an inch take forever to accumulate enough length for projects and tend to stretch out or break during use. Wider strips between 1 and 1.5 inches give you the best balance of strength and workability.
Forgetting to remove the bottom seam. That sealed edge creates a thick bump in your plarn that’s impossible to crochet through smoothly. It interrupts your rhythm and creates visible lumps in finished projects. Always remove it during prep.
Using bags with holes or tears. Damaged bags create weak plarn that breaks mid-project. Inspect each bag before cutting and toss any with visible damage. It’s better to skip a questionable bag than restart a project because your plastic yarn snapped.
Not keeping scissors sharp. This single issue causes more headaches than anything else. Dull blades require more pressure, create ragged edges, and make the entire process feel like work instead of a fun activity. Sharpen or replace your scissors regularly.
Making plarn is one of those rare skills that’s genuinely useful, surprisingly fast to learn, and oddly satisfying once you get your rhythm down. You’re taking something most people throw away and transforming it into material for reusable shopping bags, outdoor mats, or any number of plarn projects.
The best part? You’ll never run out of supply as long as you shop for groceries.

What Can You Make with Plarn?
There are so many fun ways to use plastic yarn! Because it’s durable and water-resistant, it’s ideal for:
- Reusable mats or rugs
- Market bags and reusable shopping bags
- Outdoor cushions
- Basket liners
- Garden ties
- Planter Baskets
- Storage Baskets
These types of plarn projects are not only practical but also a meaningful way to reduce waste in your home.
A Few Notes from Experience
My favorite way to make plarn is the loop method you see above. It’s simple, doesn’t require much time to learn, and works well for most projects.
It might feel a little awkward at first compared to working with regular yarn, but once you get going, it becomes second nature. Before long, you’ll have a steady rhythm and a growing stash of plastic yarn ready for your next project.
Simple Eco-Friendly Plastic yarn
Making plarn is one of those simple skills that just makes sense—especially if you’re trying to live a little more intentionally or reduce waste around your home.
Next time you come home from the grocery store with a handful of bags, instead of tossing them in a drawer, turn them into something useful. It’s a small step, but it’s one that adds up over time.
And who knows? You might just find yourself looking forward to your next batch of plastic bag yarn.
Now you’re ready to use it in your favorite crochet patterns or other creative ideas.
YouTube Video on How to Make Plarn (Plastic Bag Yarn)

You can find Victoria crocheting, quilting, and creating recipes. She has cooked in restaurants for over 20 years, including many larger parties. She learned to crochet when she was just 11 years old and has been crocheting ever since; over 50 years now. Over 40 years ago, she loved her first class in sewing and continues to hone her skills in quilting. Many have enjoyed the handmade gifts over the years. In her professional career, she has worked in management in a wide variety of businesses including higher education as a dean of a division. All the while attending college part-time to achieve her doctorate in higher education with an emphasis in e-learning.