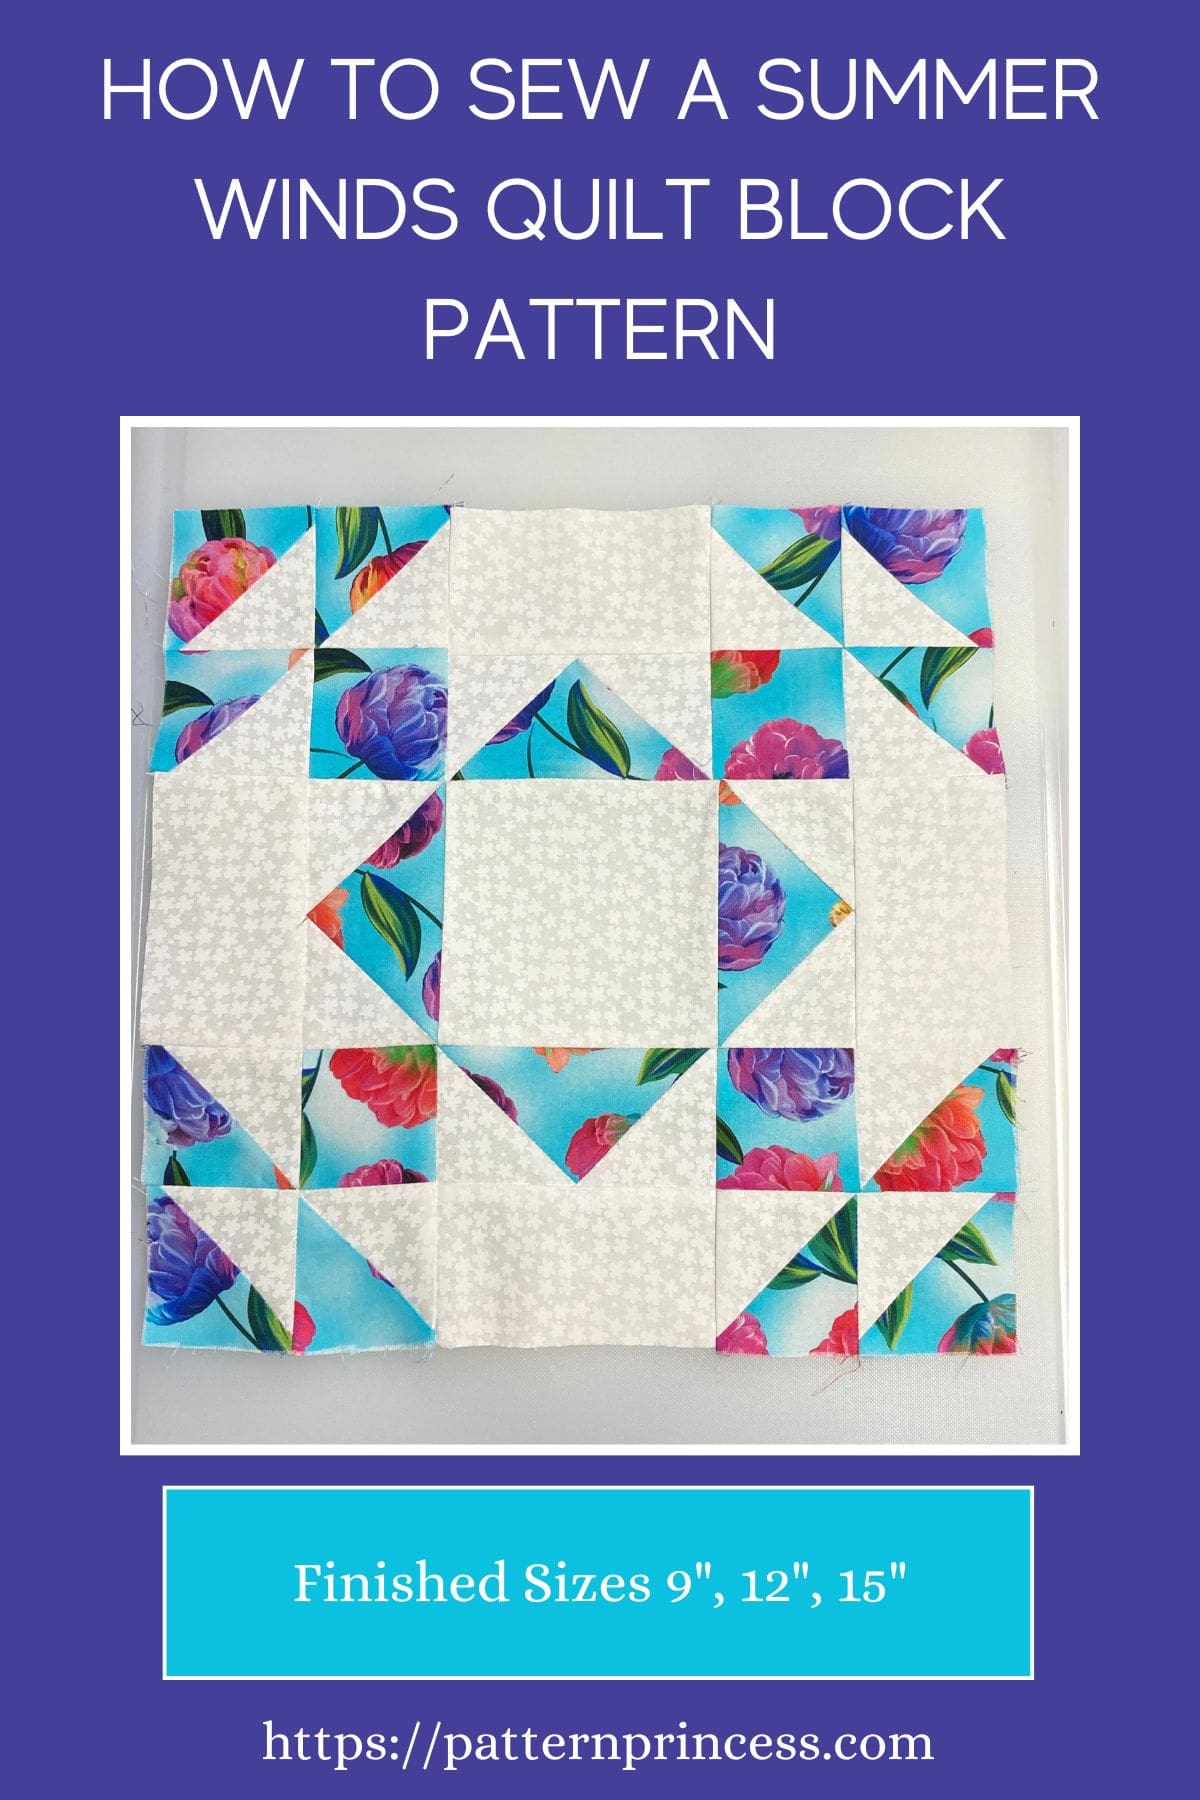
Learn how to sew this gorgeous summer winds quilt block. With its clean lines and dynamic shapes, this pattern is perfect for anyone looking to create a quilt with a modern, yet timeless feel.
This block is fun to sew while offering a stunning visual effect. It’s a beautiful and versatile design that quilters love for its striking appearance.
This block can be used in various quilt projects, from full-sized quilts to smaller items like table runners and wall hangings.
Design Elements
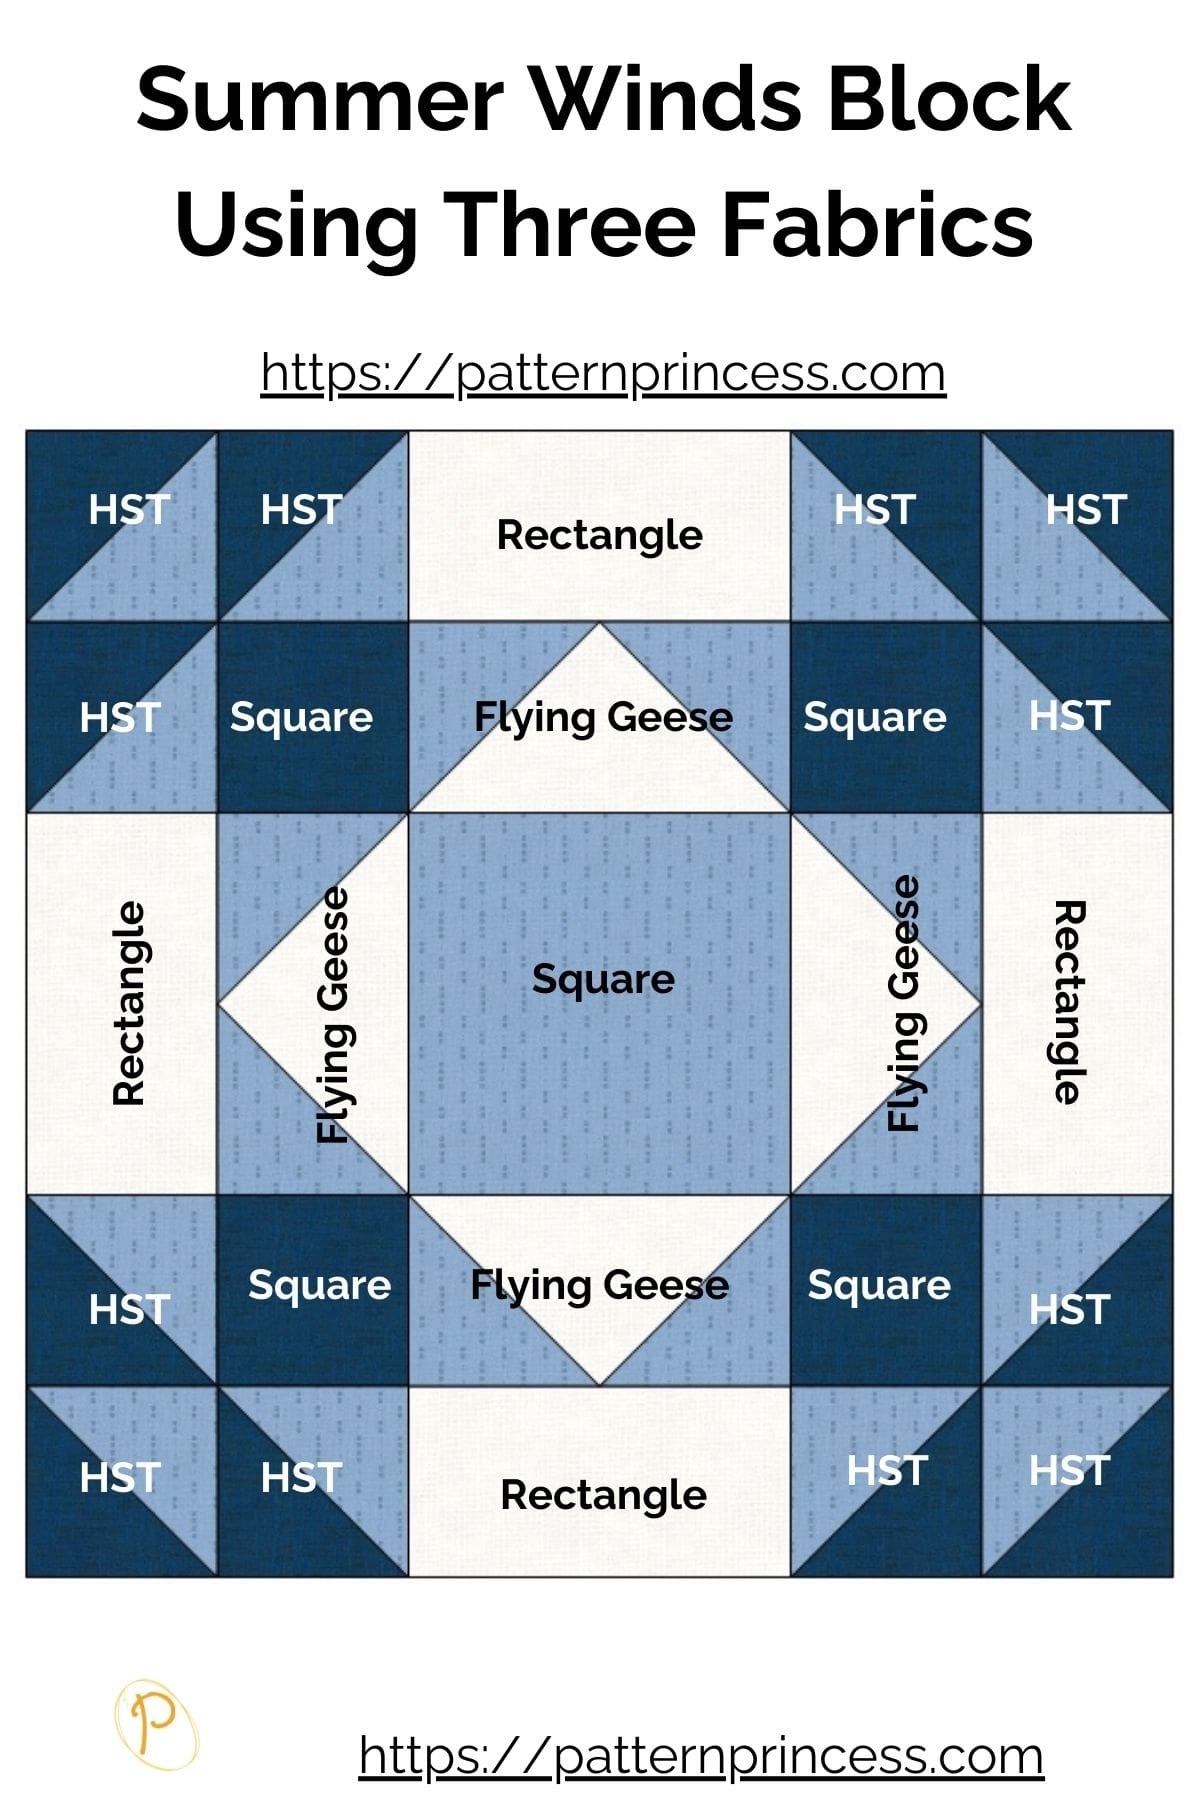
The nine-patch block features a combination of flying geese, half square triangles, and squares. This gives it a sense of movement, reminiscent of summer breezes.
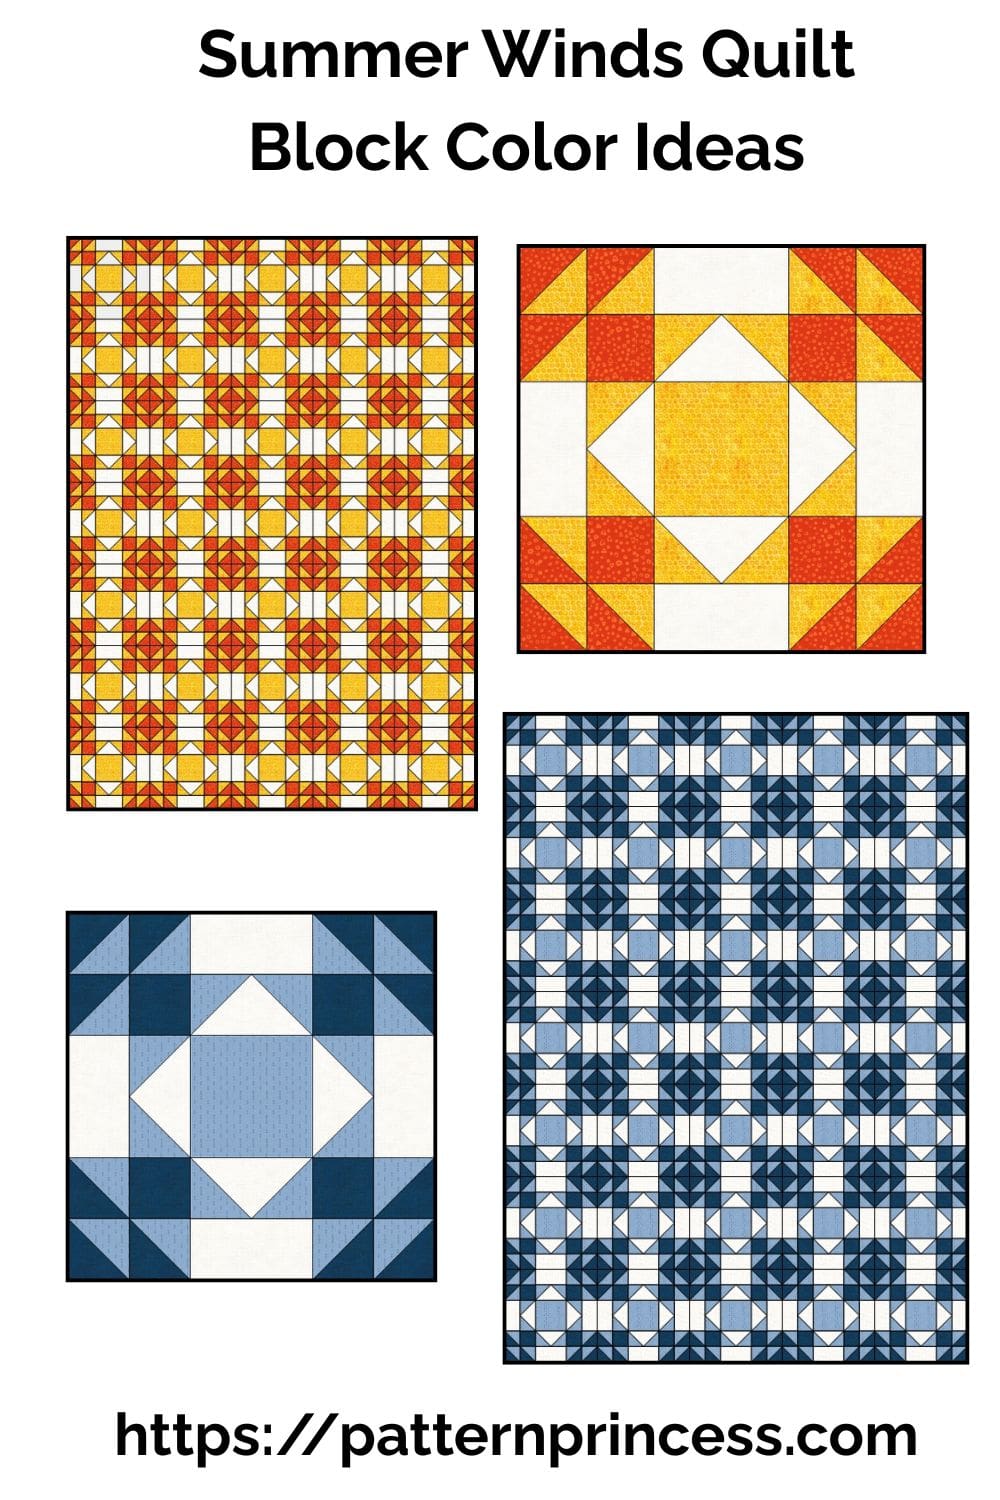
Color Choices. The block looks stunning in a variety of light and dark fabric color schemes. You can use bright, summery colors to enhance the breezy feel or opt for more subdued tones for a different look. This pattern looks nice using two, three, four colors, or even a scrappy version.
This traditional quilt block will work with solid fabrics, printed fabrics, or a combination of the two. However, this block design lends itself to dark squares and light squares.
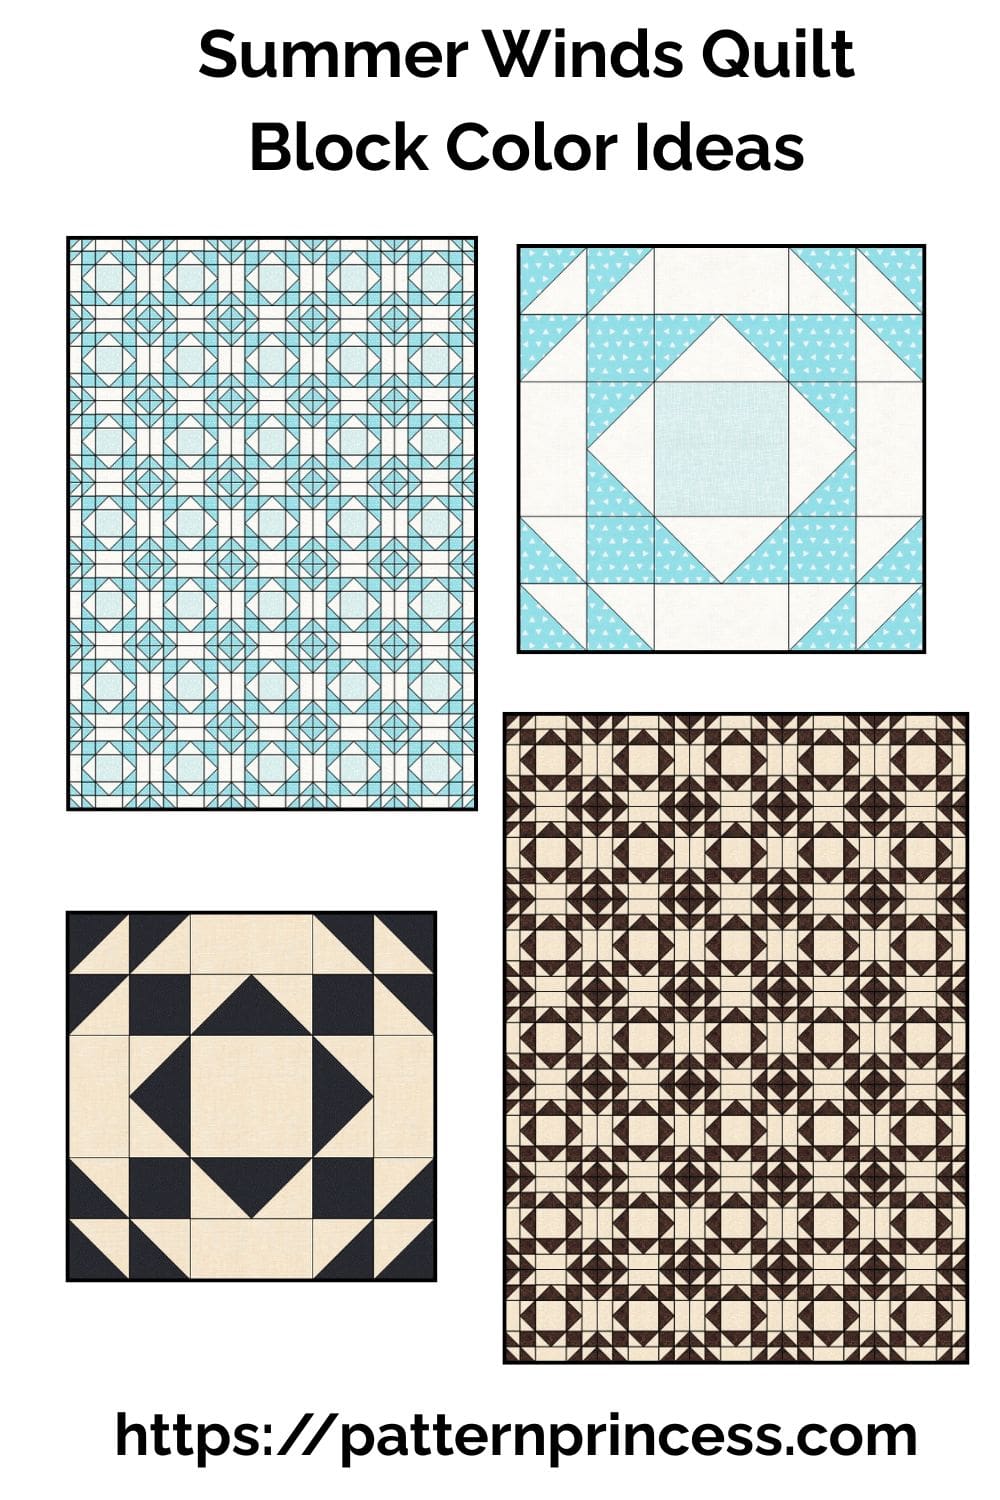
I have included a few graphics of how the look of this finished square will look by changing the colors. It’s amazing how the look of a square can change by just changing where you place the colors of fabric.
Nine Patch Quilt Block
To make things easier, I broke this block into three different units. There are four corner squares, one center square, and the four middle squares surrounding the center unit. Join all nine units together to sew this lovely block.
Sewing Project Size
The step-by-step directions detail three sizes, 9 ½”, 12 ½”, and 15 ½” unfinished square. The finished size will be a 9”, 12”, and 15” square. Just swap out the cutting directions based on the size you are sewing.
Get your ad free summer winds quilt block pattern PDF in our Etsy Shop.
Directions: How to Sew a Summer Winds Quilt Block
Skill Level
Perfect for a confident beginner. You will be using squares, half square triangles, and flying geese units.
Finished Sizes
- 9” X 9”
- 12” X 12”
- 15” X 15”
Equipment/Tools
- Thread
- Rotary Cutter
- Quilting Ruler
- Cutting Mat
- Rotating Cutting Mat
- Iron
- Ironing Board or Pressing Mat
- Pins
- Clips
- Sewing Machine
Materials
I used a few squares from a Free Spirit Charm Pack from the Kaffe Fassett Collective. Along with a fat quarter of white fabric.
Fabric Requirements for Three Different Sizes
15″ finished quilt block
Block, Number of Squares, and Sizes
- A = 1, 5 1/2″ X 5 1/2″
- B = 4, 3″ X 5 1/2″
- C = 4, 3″ X 3″
- D = 6, 4″ X 4″
- E = 6, 4″ X 4″
- F = 4, 3 3/8” X 3 3/8”
- G = 1, 6 ¼” X 6 ¼”
12″ finished quilt block
- A = 1, 4 1/2″ X 4 1/2″
- B = 4, 2 1/2″ X 4 1/2″
- C = 4, 2 1/2″ X 2 1/2″
- D = 6, 3 1/2″ X 3 1/2″
- E = 6, 3 1/2″ X 3 1/2″
- F = 4, 2 7/8” X 2 7/8”
- G = 1, 5 ¼” X 5 ¼”
9″ finished quilt block
- A = 1, 3 1/2″ X 3 1/2″
- B = 4, 2″ X 3 1/2″
- C = 4, 2″ X 2″
- D = 6, 3″ X 3″
- E = 6, 3″ X 3″
- F = 4, 2 3/8” X 2 3/8”
- G = 1, 4 ¼” X 4 ¼”
Pattern Notes
Sew fabrics together using ¼” seam allowances.
Seams can be pressed open, or you can press seams to one side or the other, I will have those suggestions within the instructions.
Sew fabric with the right sides together.
Make sure to lay out your squares on a flat surface before sewing together to make sure that everything is in the correct place and turned the way you want them.
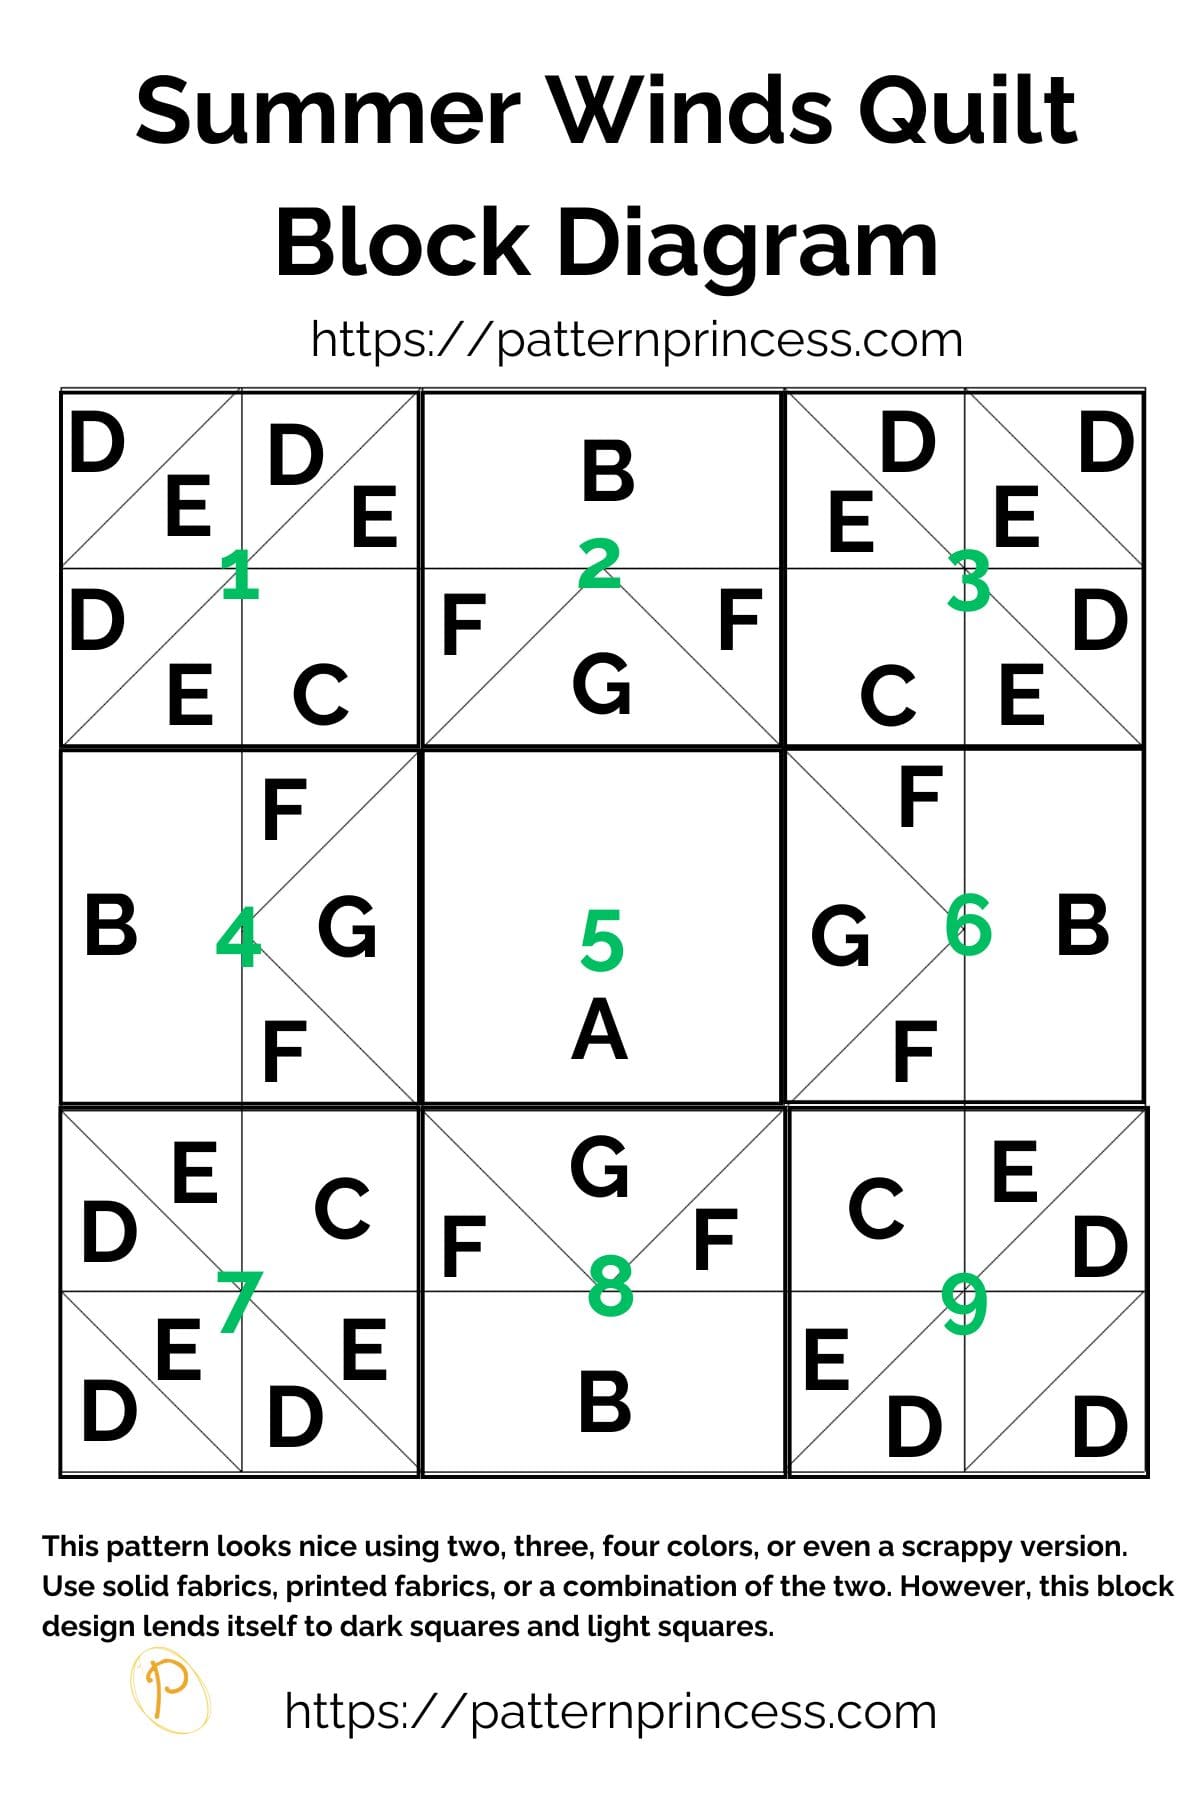
Summer Winds Quilt Block
Here’s a step-by-step guide to sewing a Summer Winds quilt square
Begin by making the sub blocks for sections 1, 3, 7, and 9 as shown in the diagram.
For this block, you will need: C and D in a print fabric, and E in a white fabric.
Use units D and E to create 12 Half Square Triangles from your fabric pieces. Begin by drawing a diagonal line down the center of the block on the wrong side of the lighter fabric.
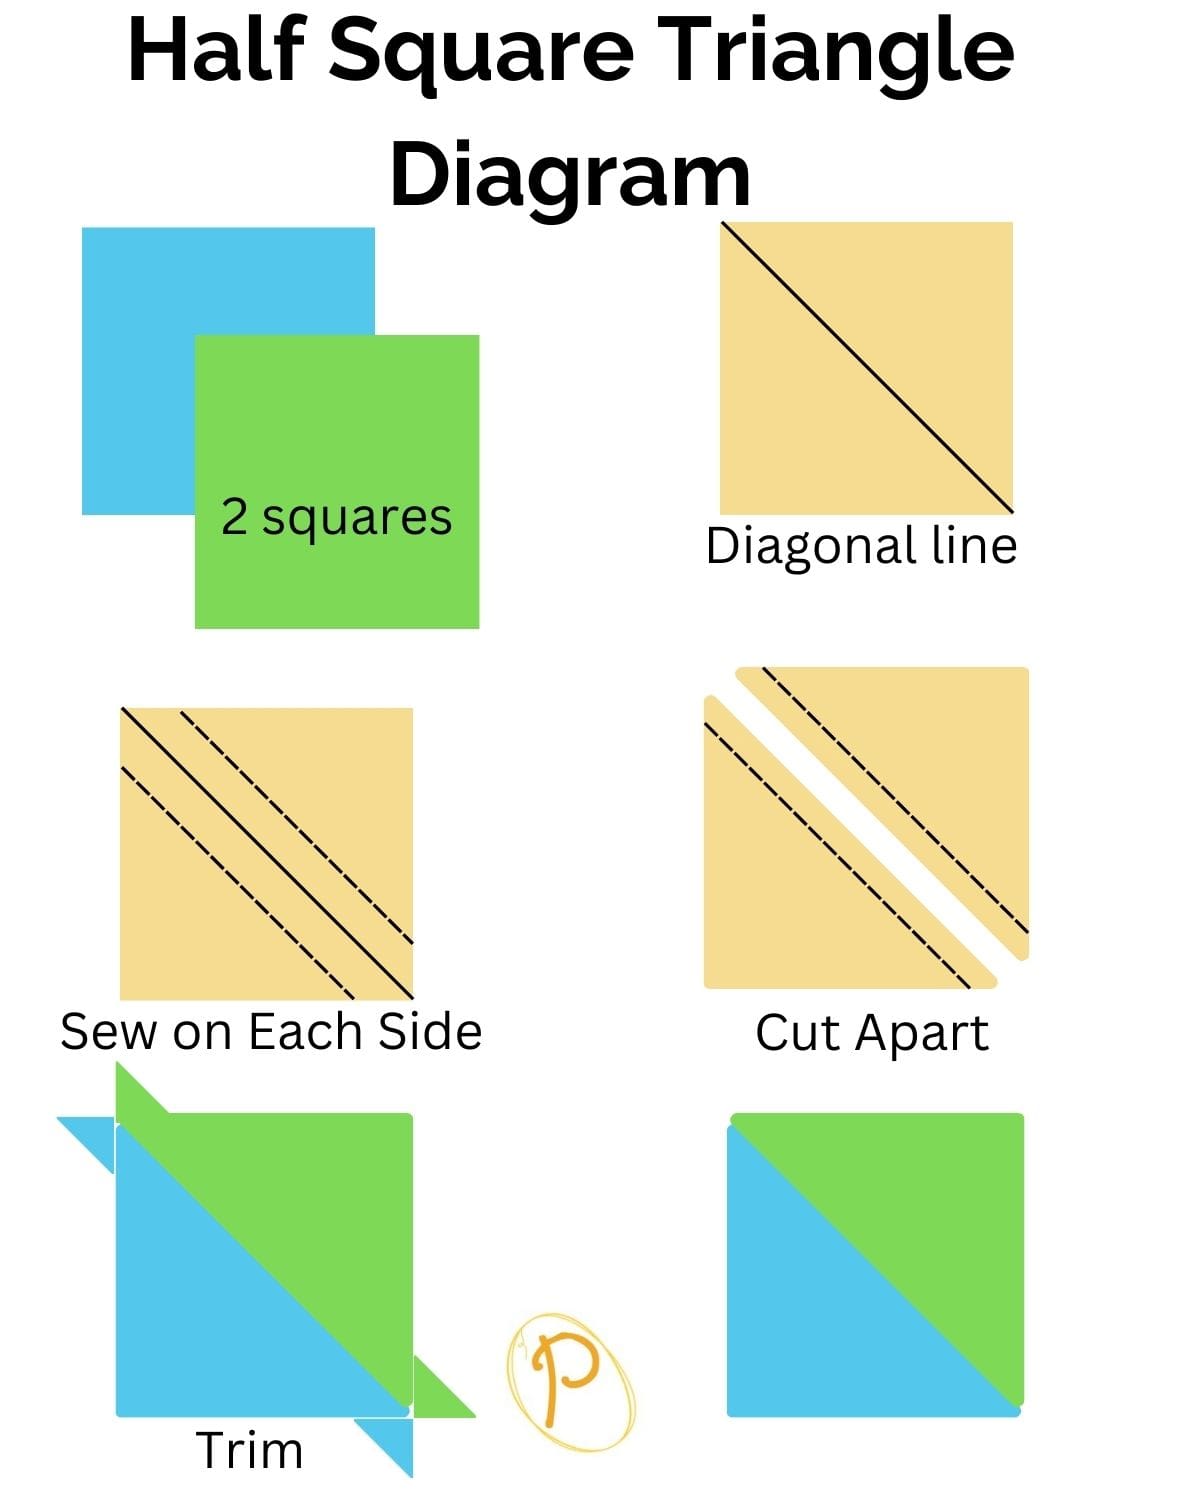
To create the Half Square Triangles, place one white square on top of one print square with the right sides together.
Using your sewing machine, sew ¼” on both sides of the diagonal line.
Using a ruler and rotary cutter, cut along the marked center line. Cut through both layers of the squares along the center line.
Press the seams open or to the darker fabric.
Trim the excess fabric to ensure the block is square.
- 15” Block: Trim the half square triangle to 3” X 3”.
- 12” Block: Trim the half square triangle to 2 ½” x 2 ½”.
- 9” Block: Trim the half square triangle to 2” X 2”.
Repeat steps with the other fabric squares.
You now have 12 half square triangles.
Assembling Sub Blocks 1, 3, 7, and 9.
Arrange the half square triangles and square of fabric in two rows as shown in the diagram for block 1. Refer to diagram.
With the right sides together, using ¼” seam allowance, sew the top two half square triangles (HST) together pressing the seams to the left. Sew the HST and unit C together. Press the seams to the square.
Sew the top and bottom row together making sure to nest the seams.
Press the seam open.
Sub Block 1 is complete. Repeat this process for sub blocks 3, 7, and 9.
If needed, trim the sub blocks.
- 15” Quilt Block: trim sub blocks to 5 ½” X 5 ½”
- 12” Quilt Block: trim sub blocks to 4 ½” X 4 ½”
- 9” Quilt Block: trim sub blocks to 3 ½” X 3 ½”
Make the sub blocks for sections 2, 4, 6, and 8 as shown in the diagram.
For this block, you will need: B and F in a white fabric, and G in a print fabric.
Note: You’ll notice on the color examples of this quilt block, the F and G colors can be swapped for a different look.
Start with making four at a time flying geese.
The instructions below will produce 4 unfinished blocks.
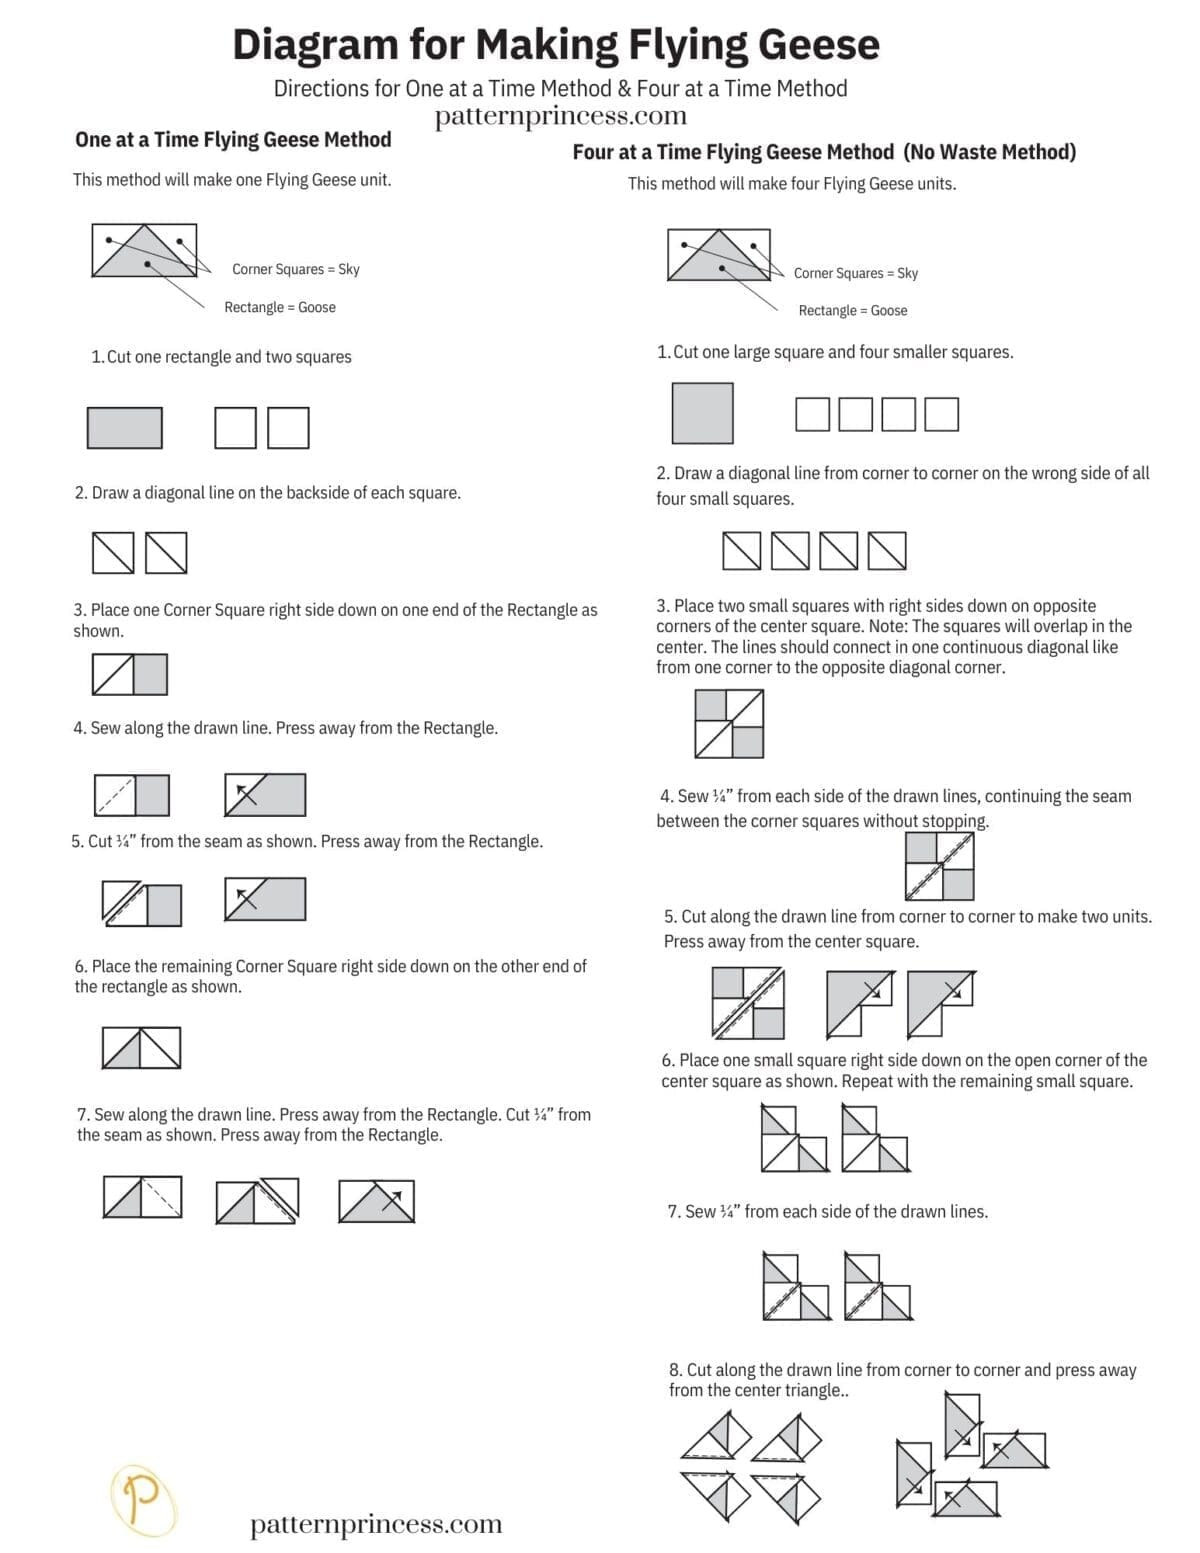
Step 1: Cutting Fabric
For this no-waste method, you’ll need:
- One large unit = G
- Four small units = F
Step 2: Marking Guidelines
On the wrong side of each small square, draw a diagonal line from one corner to the opposite corner using a fabric marking pen or pencil.
Step 3: Placing Pieces
Align two small squares onto opposite corners of the larger square with the right sides together. The marked line should be facing up.
The two small squares will overlap just a little bit in the middle. Pin them in place.
Step 4: Sewing
Sew a scant ¼” seam on both sides of the drawn line.A scant seam is just a little less than ¼”.
Remove the pins as you come up to them. Don’t forget to sew a scant ¼” seam allowance on BOTH sides of the line.
Step 5: Cutting and Pressing
Cut apart on the drawn line to separate into two units. You can use either a rotary cutter or carefully cut along the line with a scissors to separate into two units.
Press each of the units open toward the small “sky” triangle pieces. Some people think that at this stage they look a bit ling “dog ears” poking out.
Step 6: Adding the Remaining Small Squares
For each of the two units align a small square onto the corner without anything sewn to it with the right sides together. The diagonal line should be facing up. Pin in place
Sew a scant ¼” seam on each side of the drawn line.
Step 7: Sewing and Cutting Again
Sew a scant quarter-inch seam on both sides of the drawn diagonal lines. Cut apart on the drawn line of each unit and press the units open toward the small “sky” pieces.
Assembling Sub Blocks 2,4,6 and 8.
Arrange a flying geese block with unit B. Refer to diagram.
With the right sides together, sew together using the ¼” seam allowance. Press the seams to one side or open.
Sub block 2 is complete. Repeat this process for sub blocks 4, 6, and 8.
If needed, trim the sub blocks.
- 15” Quilt Block: trim sub blocks to 5 ½” X 5 ½”
- 12” Quilt Block: trim sub blocks to 4 ½” X 4 ½”
- 9” Quilt Block: trim sub blocks to 3 ½” X 3 ½”
Assemble the Summer Winds Nine Patch Quilt Block
Lay out the quilt blocks according to the diagram.
Continue using ¼” in seam allowance. With the right sides together join sub blocks 7, 8, and 9. Press the seams to the outside.
With the right sides together, join sub blocks 4, 5, and 6. Press the seams to the inside.
Join sub blocks 1, 2, and 3. Pressing the seams to the outside.
Finally, join the top and bottom rows to the middle with the right sides together. Make sure to nest the seams and pin them in place. Press the seams open or to one side.
We hope that you have enjoyed this lovely quilt block.

You can find Victoria crocheting, quilting, and creating recipes. She has cooked in restaurants for over 20 years, including many larger parties. She learned to crochet when she was just 11 years old and has been crocheting ever since; over 50 years now. Over 40 years ago, she loved her first class in sewing and continues to hone her skills in quilting. Many have enjoyed the handmade gifts over the years. In her professional career, she has worked in management in a wide variety of businesses including higher education as a dean of a division. All the while attending college part-time to achieve her doctorate in higher education with an emphasis in e-learning.