Last updated on October 4th, 2025 at 03:16 pm
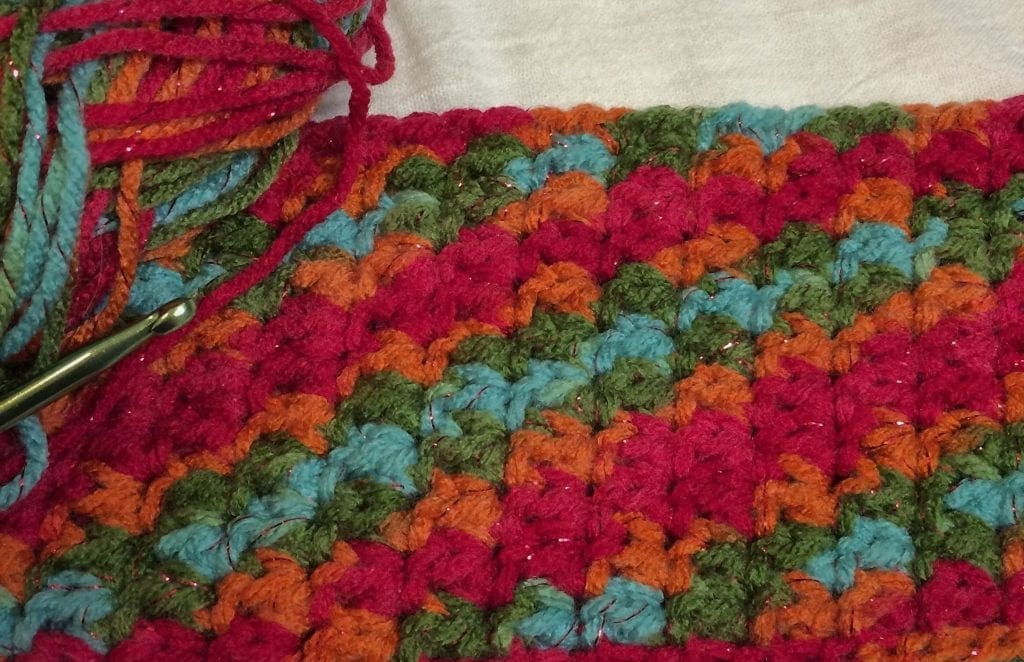
Crochet headband by unplanned color pooling. You are probably wondering about the title of this blog post. I truly just used this variegated yarn from Red Heart.
*Post contains affiliate links*at no additional cost to you for more information please read the disclaimer on the About Us page.
My son-in-law picked out the yarn because he liked the shine in the yarn from the metallic thread. I think that is kind of heart to see in this yarn, but he likes it.

Color Pooling without thinking
Anyway, using this same pattern below. I just started making the headband. I never even noticed what a nice striped pattern was in the headband until I completed the project. And I mean complete. The ends were weaved in and everything! When looking at the final product making sure that all looked okay was the first time that I noticed the striped pattern that happened all by itself.
What I have learned
The key was the yarn itself and how it worked with the pattern. This is the yarn I used; Red Heart Fruity Print metallic. It is available on this link:
I have made a few other crochet items using variegated yarn and noticed that I can get a nicer color pooling effect when I make the stitches in a kind of cluster a bit. Rather than, for instance, a single crochet in a line.
Easy, Quick, and Fun pattern can be made while you are watching a movie. At least, that is what I did. By the end of the movie, the headband was done.
Size:
This pattern measures approximately 4” high by 18-19” around. This headband should fit an adult head. Note: using this same pattern, you could make a headband as big or small as you like just adjust the foundation chain row.
Materials:
I have made this in a number of colors.
Red Heart Fruity Print metallic
Size H Boye aluminum crochet hook
Tapestry needle
Scissors
Abbreviations:
Sc = single crochet
Hdc = half double crochet
Sl st = slip stitch
Ch = chain
Rep = repeat *
St = stitch
Gauge:
12 chains every 4 inches
Instructions:
Row 1:
ch 66, sl st into first ch forming a circle. Be sure not to twist.
Row 2:
ch1, *hdc and sc in next st. Skip the next st.* Repeat between the * for row 2. At the end, sl st to the top of the first hdc of the first row. (not the ch 1)
Rows 3-11:
rep row 2. Fasten off and weave in ends.
Enjoy wearing your headband!
If you loved this post, please share on your fave social media links at the bottom. It helps to show me that these types of posts are helpful – thank you!
Here are other patterns you might enjoy.


You can find Victoria crocheting, quilting, and creating recipes. She has cooked in restaurants for over 20 years, including many larger parties. She learned to crochet when she was just 11 years old and has been crocheting ever since; over 50 years now. Over 40 years ago, she loved her first class in sewing and continues to hone her skills in quilting. Many have enjoyed the handmade gifts over the years. In her professional career, she has worked in management in a wide variety of businesses including higher education as a dean of a division. All the while attending college part-time to achieve her doctorate in higher education with an emphasis in e-learning.

Pingback: Easy Headband - Pattern Princess