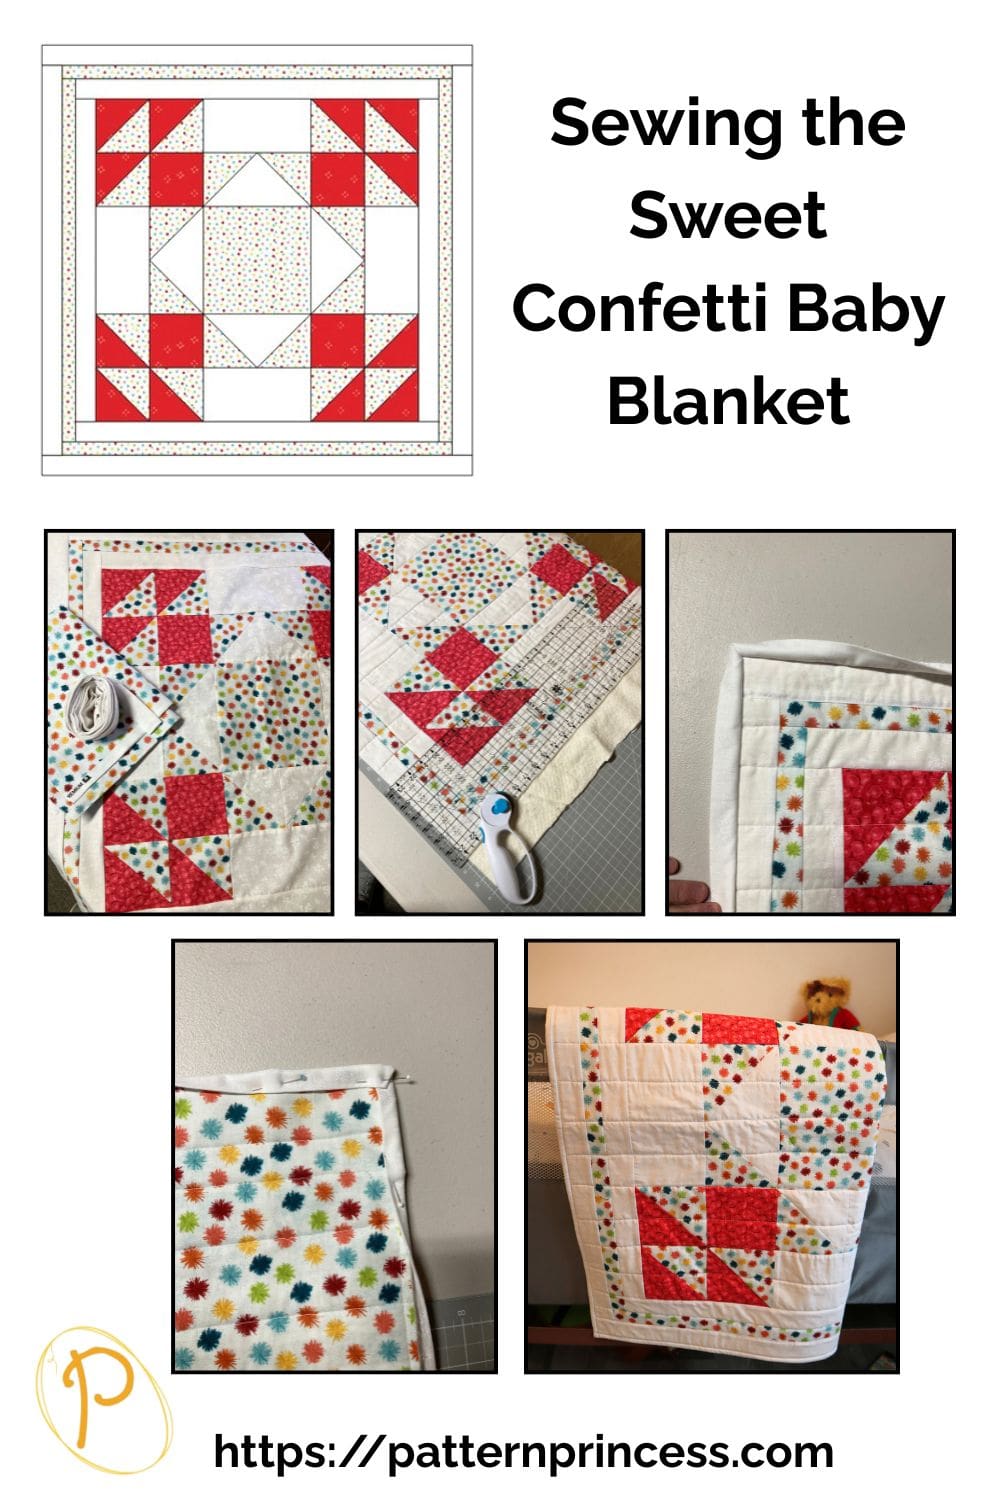
If you’re looking for a sweet, classic baby quilt with a playful twist, the Sweet Confetti Baby Quilt pattern is just the project. This beginner‑friendly pattern uses simple piecing, playful pops of color, and easy‑to‑follow steps that make it approachable for new quilters and satisfying for seasoned makers.
This quilt comes together beautifully with minimal fuss and maximum charm.
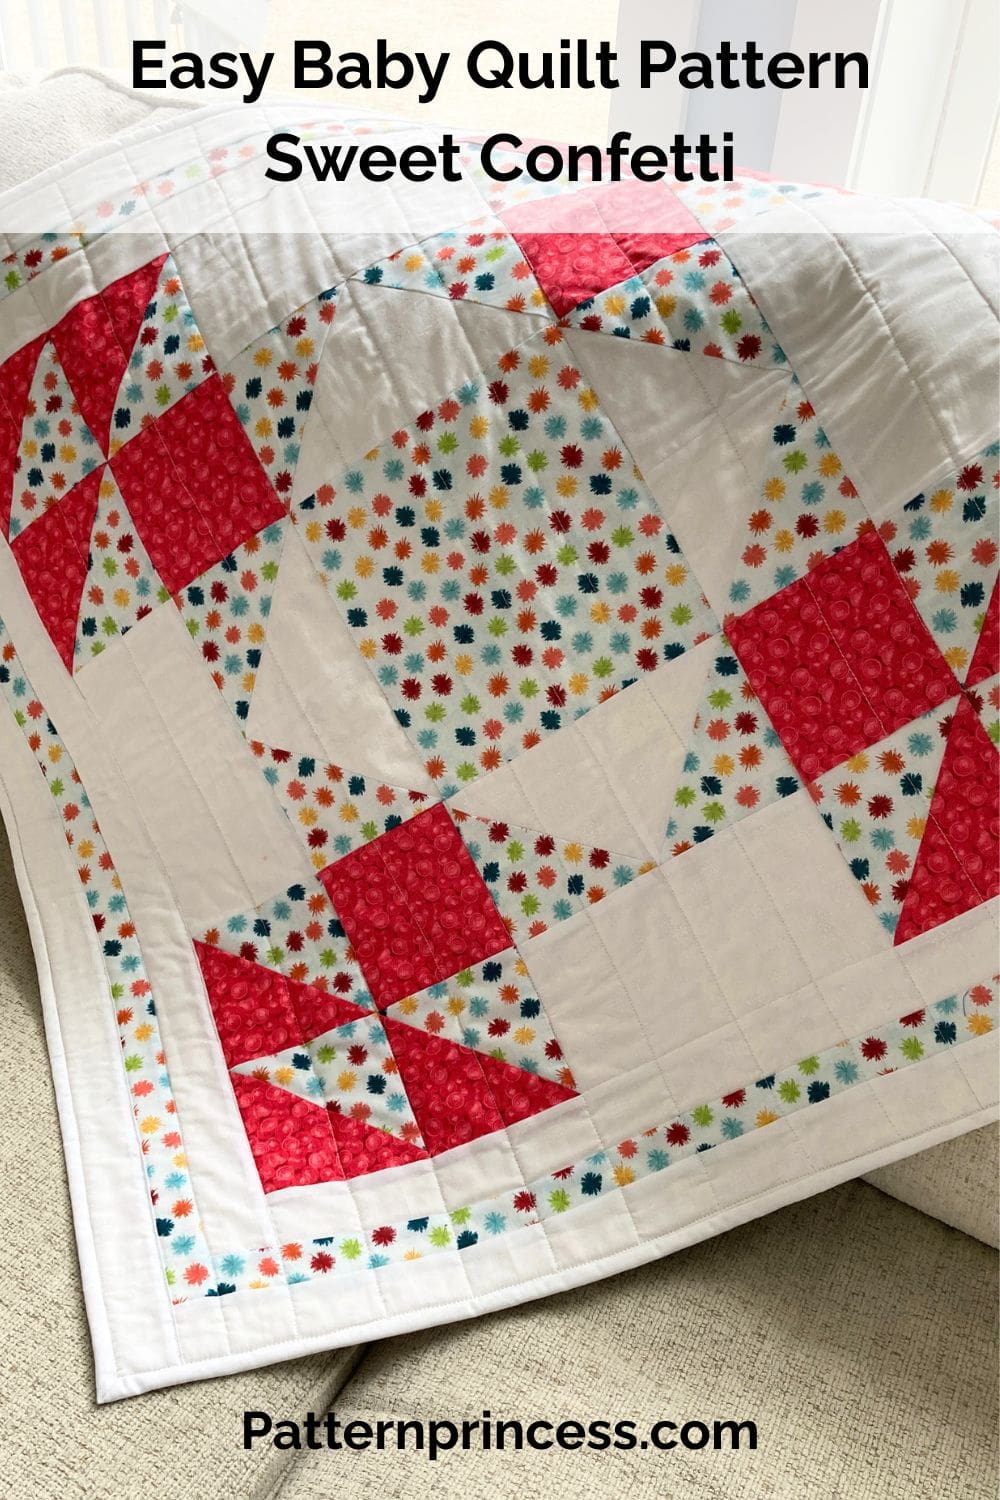
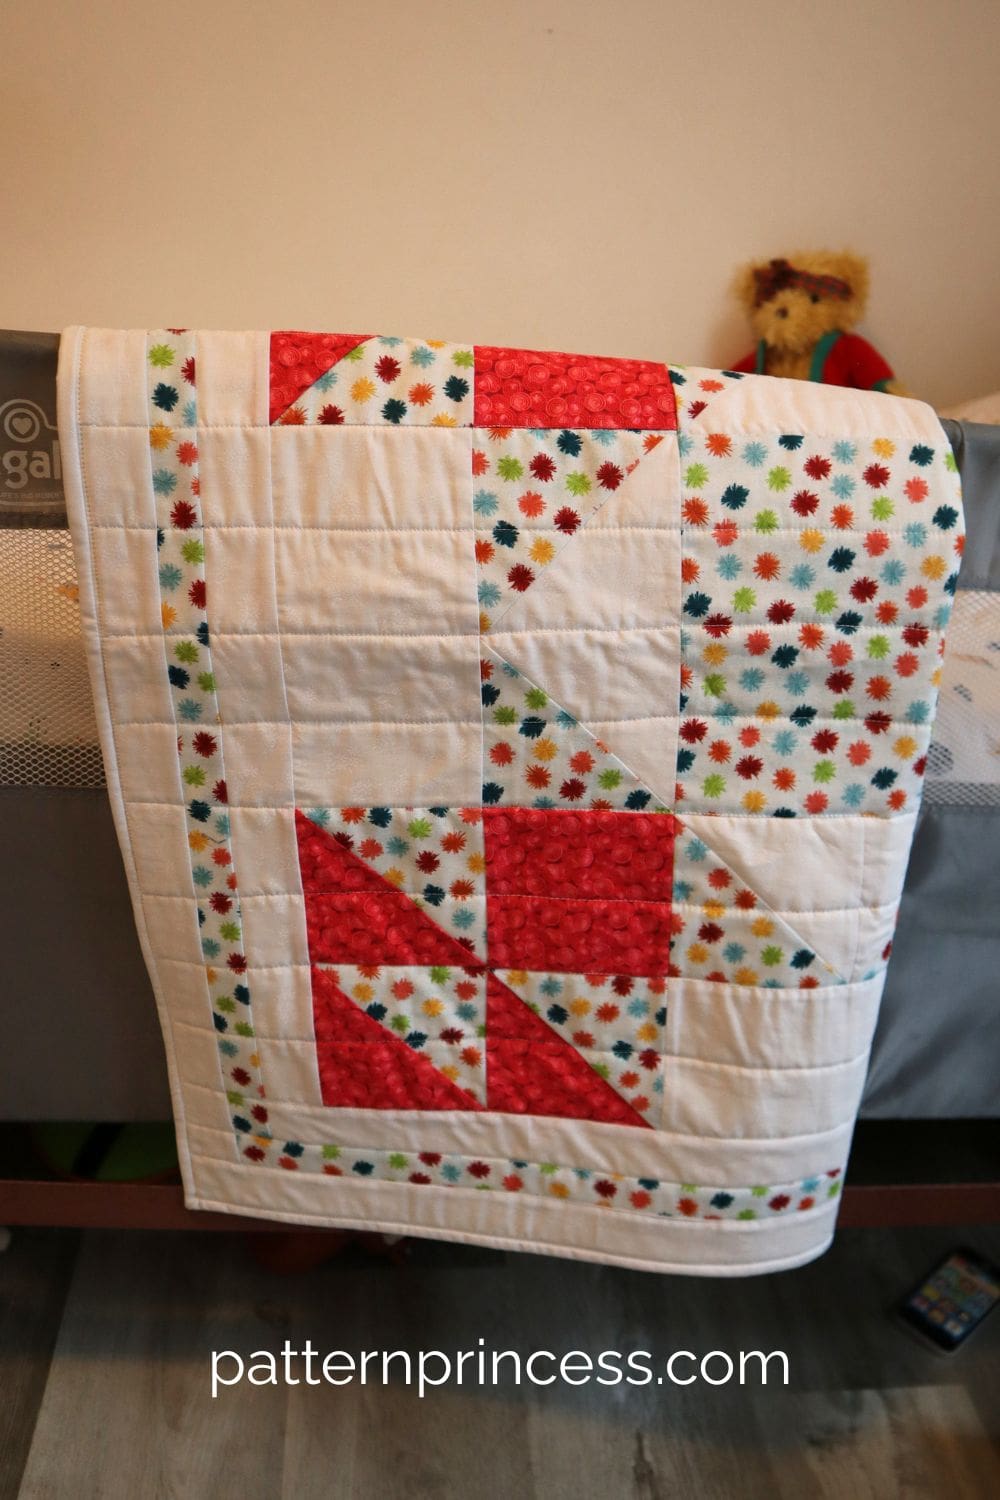
Designed with simplicity in mind, this quilt is perfect for confident beginners and experienced quilters alike. The layout features a striking center square, framed by blocks made using half square triangles and flying geese. The blocks that come together quickly and beautifully.
A simple, sweet baby quilt pattern perfect for gifting. Whether you’re sewing for a new baby, a shower gift, or a keepsake quilt to treasure for years, this design is both approachable and special.
Best of all, the Sweet Confetti Baby Quilt pattern is completely free here on the blog, so you can dive right in and start stitching.
Pattern Highlights Beginner-friendly quilt layout
- Classic patchwork with a playful feel
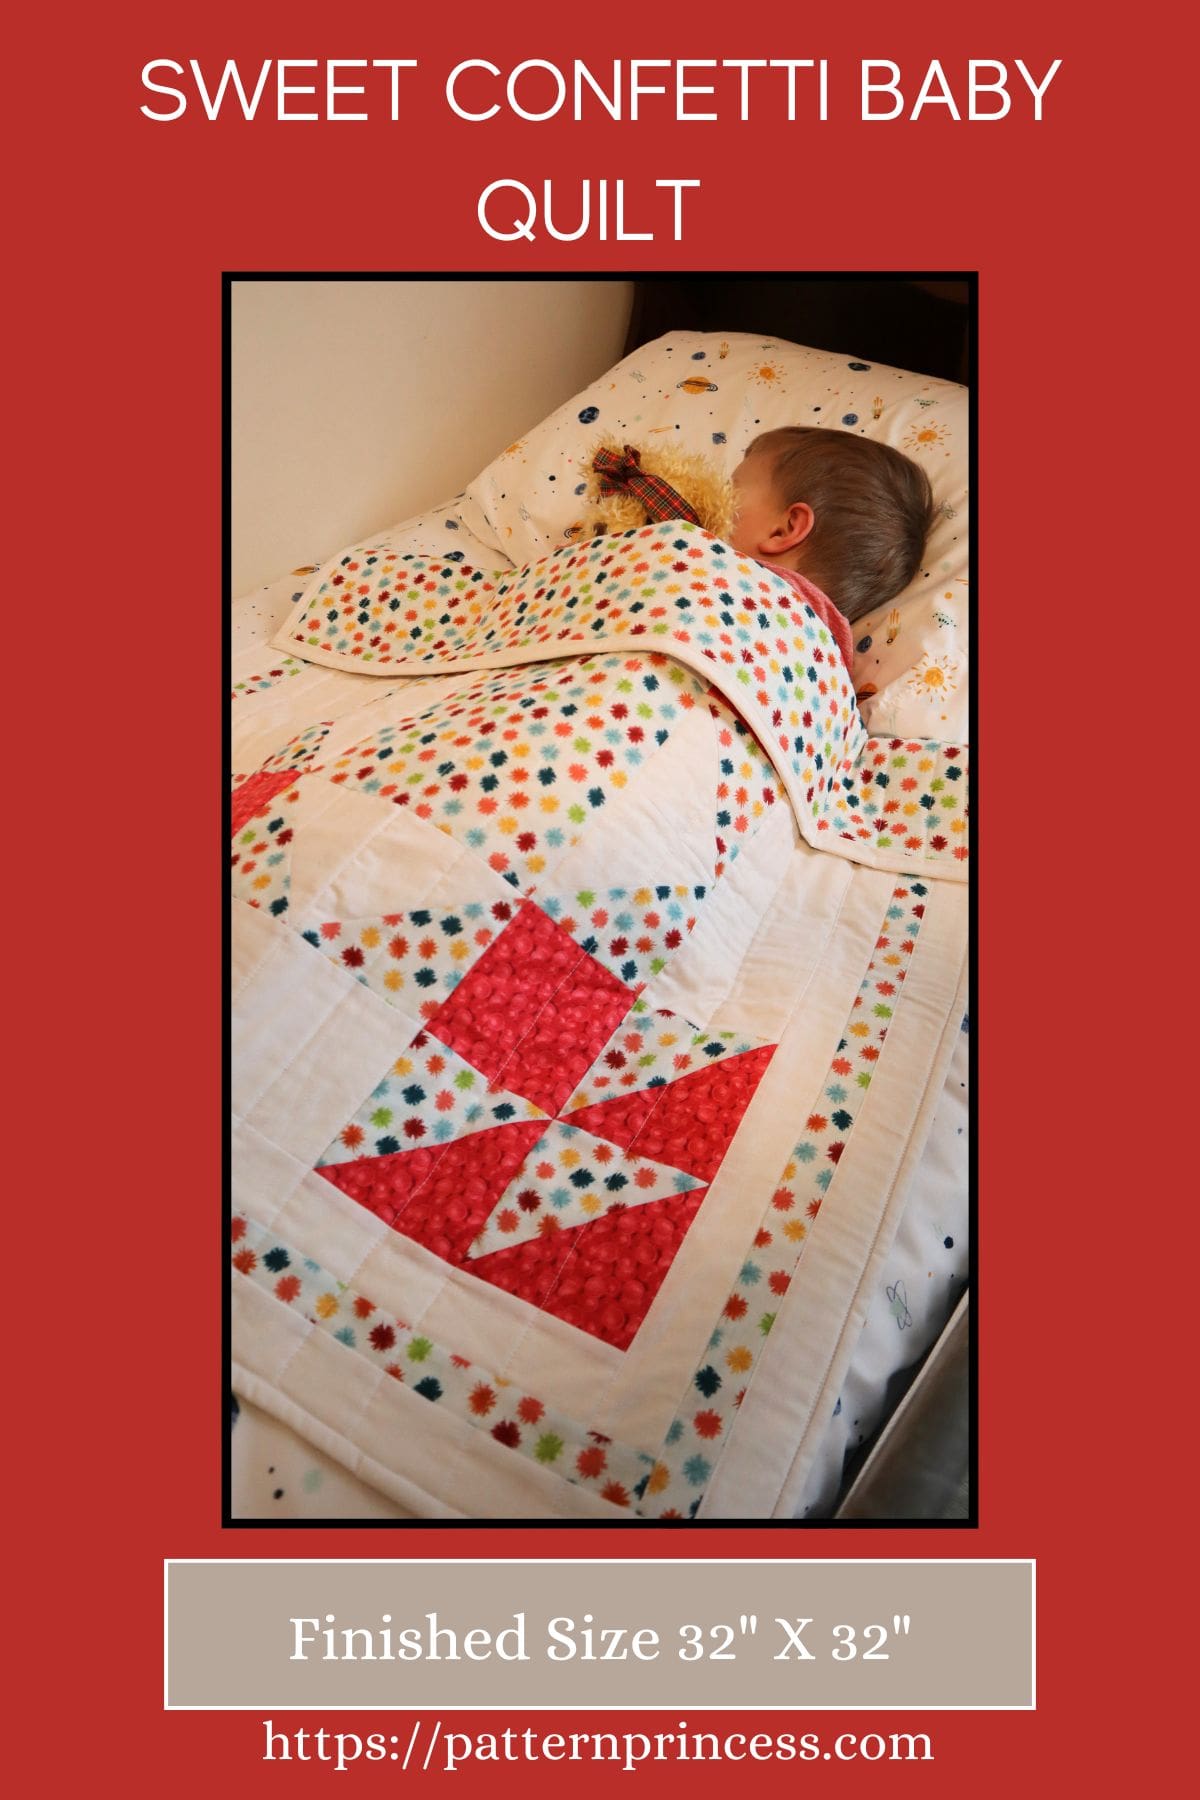
- Perfect baby-size quilt 32″ x 32″
- Fat quarter–friendly and scrap-friendly
- Easy to customize with your favorite color palette
This size is ideal for:
- Newborn and stroller use
- Tummy time
- Baby shower gifts
- Nursery décor or wall hanging
Fabric & Color Inspiration
The Sweet Confetti Baby Quilt really shines when made with a mix of solids and playful prints. I chose a cheerful confetti print paired with bold red and crisp white fabrics to keep the design bright, balanced, and baby-friendly.
This pattern is incredibly versatile. Here are a few fabric ideas to try.
- Soft pastels for a nursery look
- Bold primaries for a playful vibe
- Neutrals with one fun accent print
It’s a great way to use favorite fabrics while still keeping the design cohesive.
Quilting & Finishing Ideas
For quilting, simple straight-line quilting or gentle diagonal lines work beautifully and highlight the patchwork without overpowering it. A soft cotton or low-loft batting keeps the quilt cuddly and perfect for little ones.
Finish with a coordinating binding to frame the quilt and tie the colors together — scrappy binding would also be a charming choice!
Notes Before You Begin
Before getting started, I recommend:
- Reading through the pattern instructions fully
- Pre-washing fabrics if desired
- Accurate cutting and sewing helps ensure that seams line up for a beautiful quilt top.
- Pin your pieces together before sewing them to ensure proper seam alignment.
As always, take it slow, enjoy the process, and don’t stress about perfection — handmade is always the goal.
Get Your Ad Free Printable PDF of the Sweet Confetti Baby Quilt in our Etsy Shop.
Directions: Sweet Confetti Baby Quilt
Skill Level
Easy: Confident Beginner
You should be comfortable with:
- Straight-line sewing
- Accurate cutting
- Basic piecing techniques
This pattern uses simple shapes and standard quilt blocks, making it a great project if you’re ready to move beyond your very first quilt.
Finished Quilt Measurements
Baby 32 X 32 inches
General Cutting and Sewing
The directions for this quilt are for rotary cutting, machine piecing, machine quilting, and the binding is sewn onto the blanket with the sewing machine.
Fabric and Batting Requirements
- White fabric 1 yard
- Red Print fabric 1/2 yard
- Merry Go Round Polka Dot fabric 1 yard
- Backing = 36” x 36”, 1 yard
- Batting = 36” x 36”, 1 yard
- Binding = ¼ yard, 2 ½” X 140” strip
Cutting
Block, Number of Squares, Sizes, and Fabric
- A = 1, 8 1/2″ X 8 1/2″, Merry Go Round Polka Dot fabric
- B = 4, 4 1/2″ X 8 1/2″, White fabric
- C = 4, 4 1/2″ X 4 1/2″, Red Print fabric
- D = 6, 5″ X 5″, Red Print fabric
- E = 6, 5″ X 5″, Merry Go Round Polka Dot fabric
- F = 4, 4 7/8” X 4 7/8”, Merry Go Round Polka Dot fabric
- G = 1, 9 ¼” X 9 ¼”, White fabric
Borders
- Border 1, cut 2, Sides 2” X 24 ½”, cut 2, Top and Bottom 2” X 27 ½”, White fabric
- Border 2, cut 2, Sides 1 ½” X 27 ½”, cut 2, Top and Bottom 1 ½” X 29 ½”, Merry Go Round Polka Dot fabric
- Border 3, cut 2, Sides 2” X 29 ½”, cut 2, Top and Bottom 2” X 32 ½”, White fabric
Equipment/Tools
- Thread
- Rotary Cutter
- Quilting Ruler
- Cutting Mat
- Rotating Cutting Mat
- Iron
- Ironing Board or Pressing Mat
- Pins
- Clips
- Sewing Machine
Pattern Notes
Sew fabrics together using ¼” seam allowances.
Seams can be pressed open, or you can press seams to one side or the other, I will have those suggestions within the instructions.
Sew fabric with the right sides together.
Make sure to lay out your squares on a flat surface before sewing together to make sure that everything is in the correct place and turned the way you want them.
Summer Winds Quilt Block
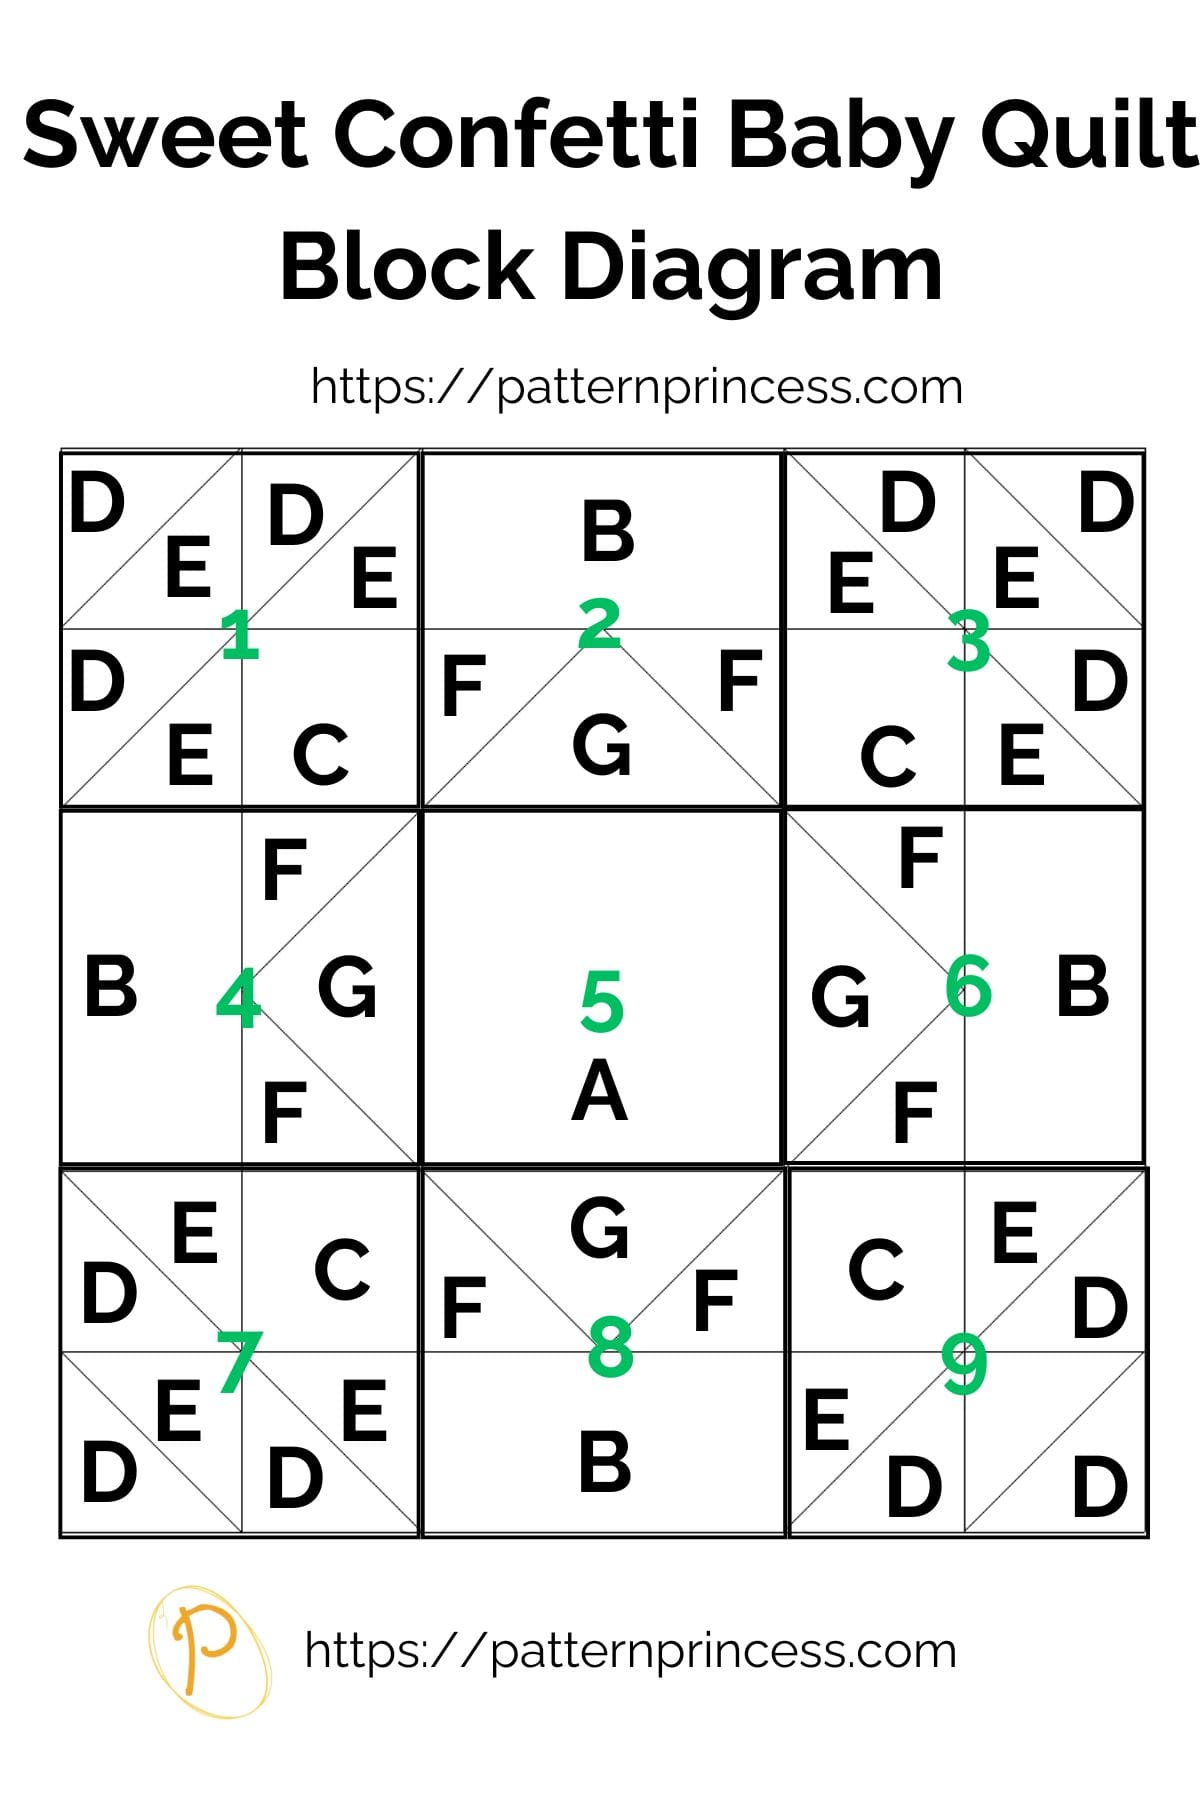
Begin by making the sub blocks for sections 1, 3, 7, and 9 as shown in the diagram.
For this block, you will need units C, D, and E.
- C = 4, 4 1/2″ X 4 1/2″, Red Print fabric
- D = 6, 5″ X 5″, Red Print fabric
- E = 6, 5″ X 5″, Merry Go Round Polka Dot fabric
Use units D and E to create 12 Half Square Triangles from your fabric pieces. Begin by drawing a diagonal line down the center of the block on the wrong side of the lighter fabric.
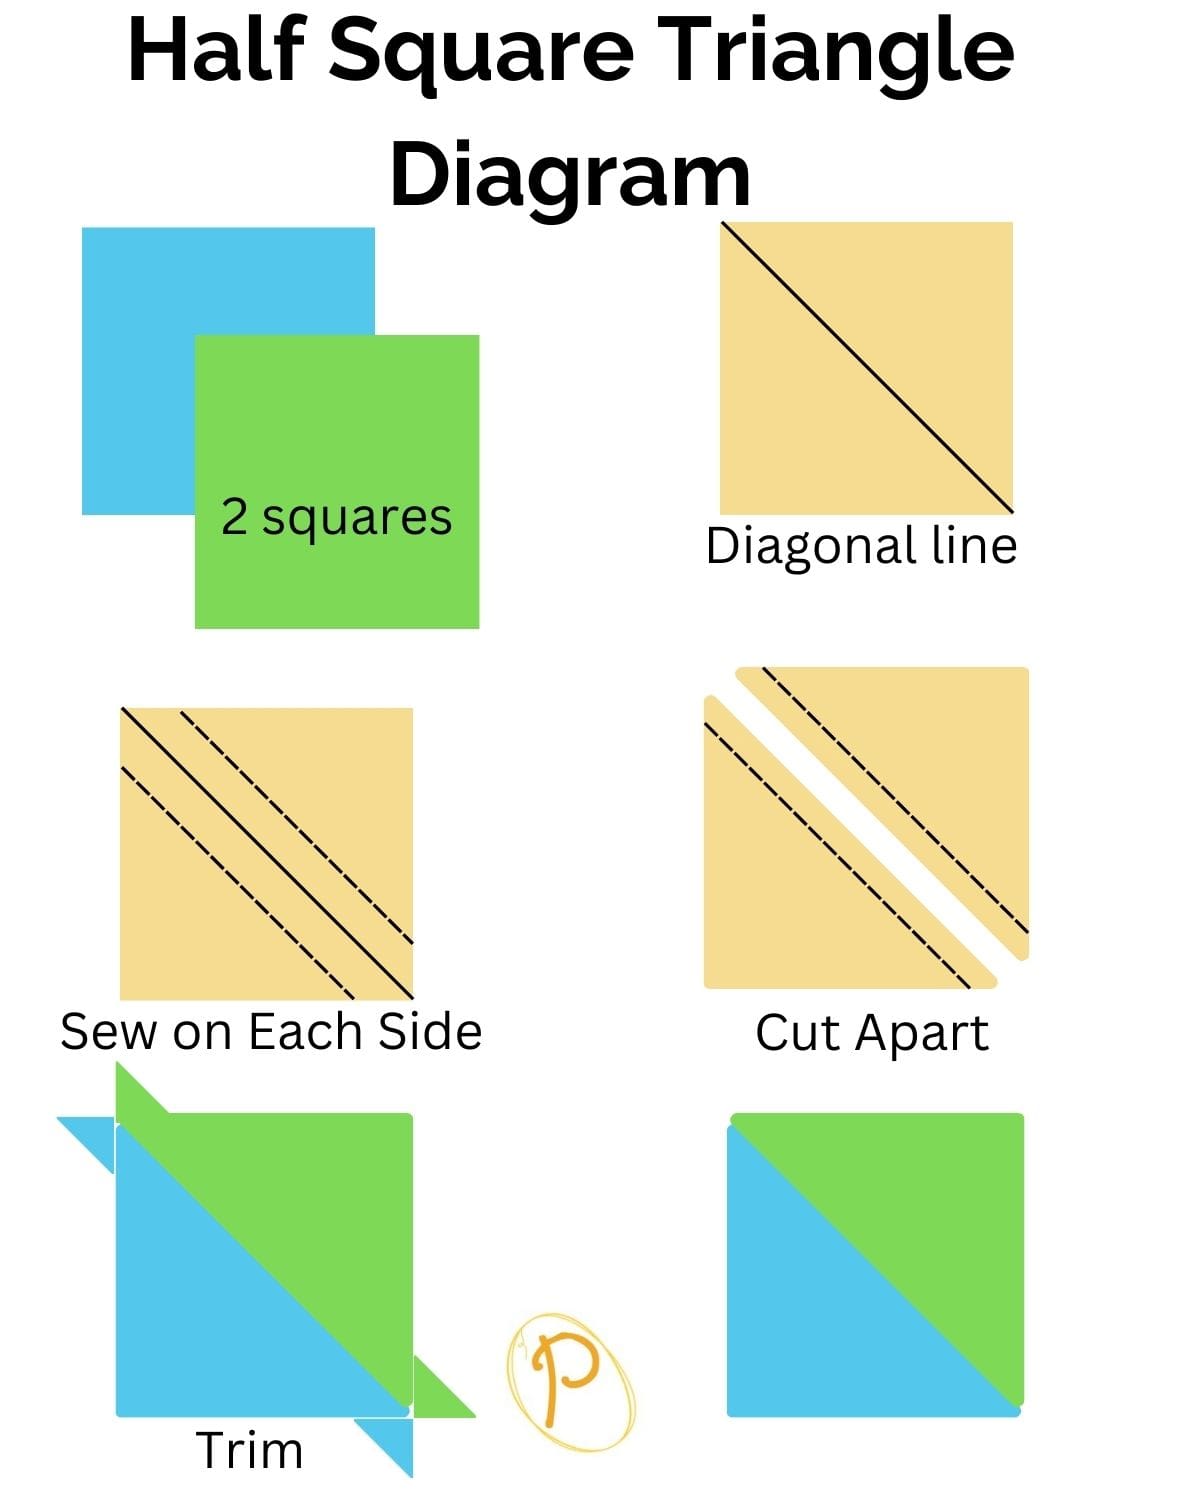
To create the Half Square Triangles, place one polka dot square on top of one red print square with the right sides together.
Using your sewing machine, sew ¼” on both sides of the diagonal line.
Using a ruler and rotary cutter, cut along the marked center line. Cut through both layers of the squares along the center line.
Press the seams open or to the darker fabric.
Trim the excess fabric to ensure the square measures 4 ½” X 4 ½”.
Repeat steps with the other fabric squares.
You now have 12 half square triangles.
Assembling Sub Blocks 1, 3, 7, and 9.
Arrange the half square triangles and square of fabric in two rows as shown in the diagram for block 1. Refer to diagram.
With the right sides together, using ¼” seam allowance, sew the top two half square triangles (HST) together pressing the seams to the left. Sew the HST and unit C together. Press the seams to the square.
Sew the top and bottom row together making sure to nest the seams.
Press the seam open.
Sub Block 1 is complete. Repeat this process for sub blocks 3, 7, and 9.
If needed, trim the sub blocks to 8 ½” X 8 ½”.
Make the sub blocks for sections 2, 4, 6, and 8 as shown in the diagram.
For this block, you will need units B, F, and G.
- B = 4, 4 1/2″ X 8 1/2″, White fabric
- F = 4, 4 7/8” X 4 7/8”, Merry Go Round Polka Dot fabric
- G = 1, 9 ¼” X 9 ¼”, White fabric
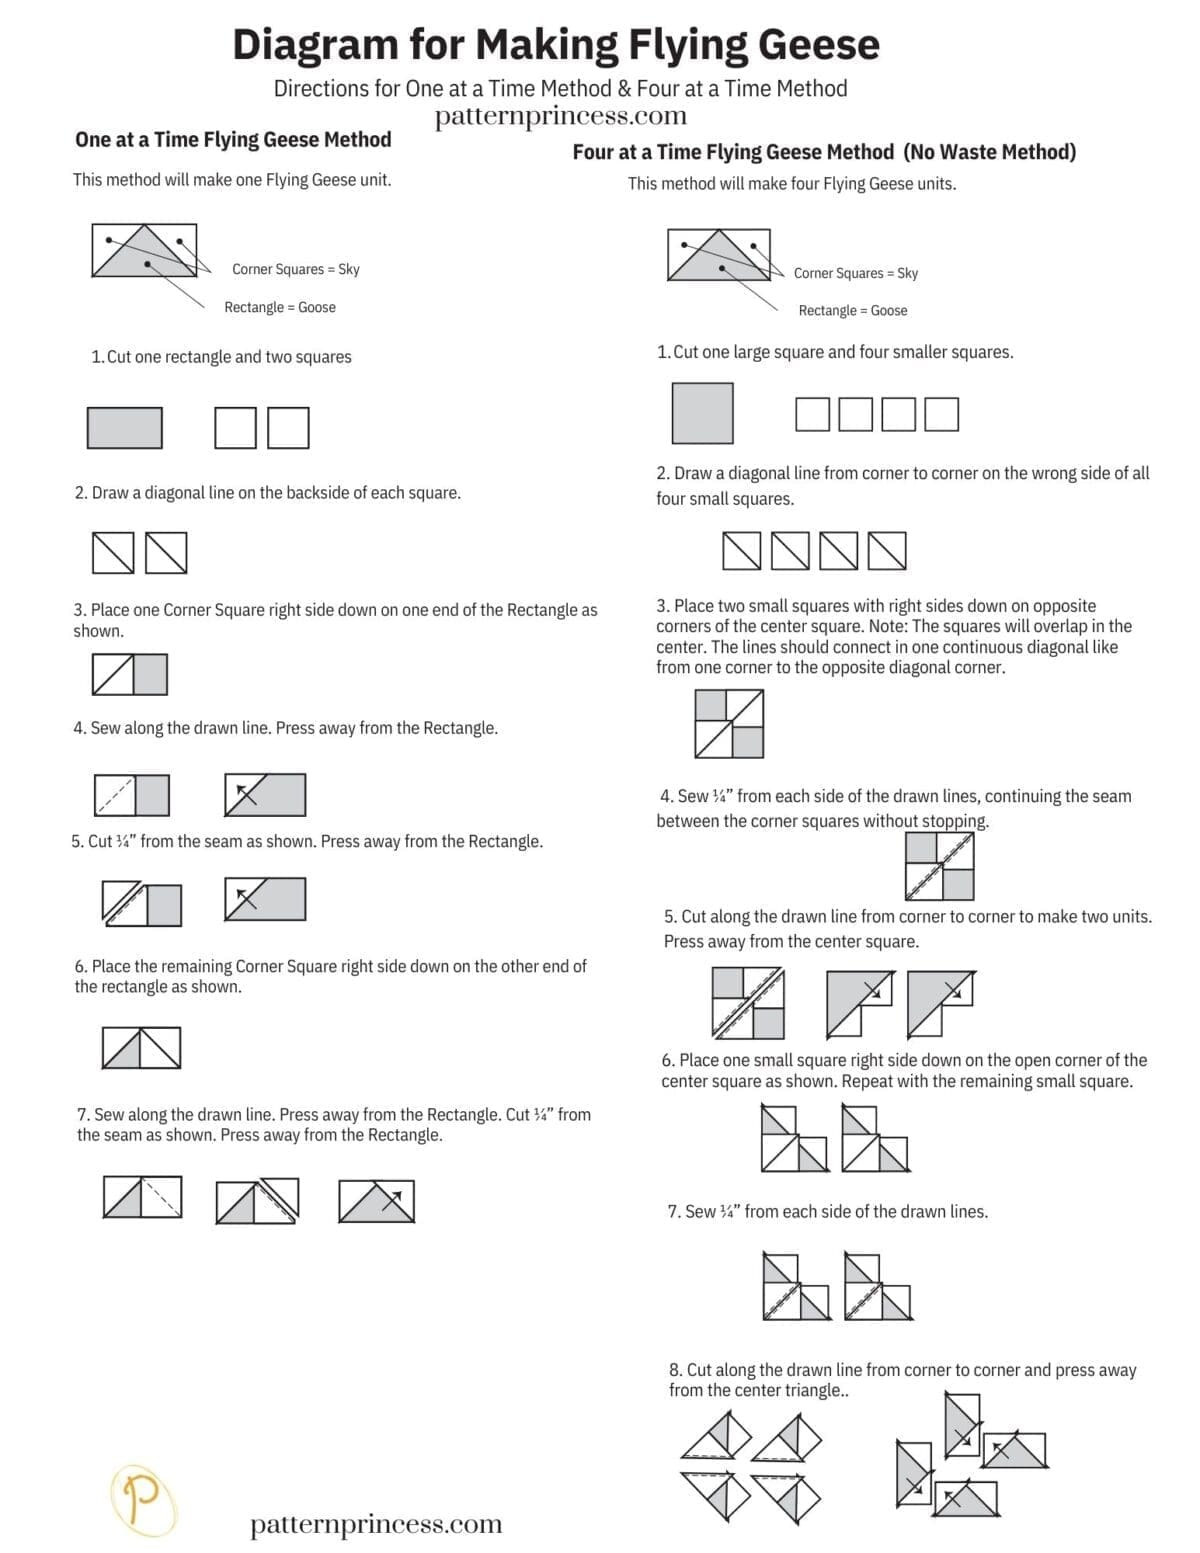
Start with making four at a time flying geese.
The instructions below will produce 4 unfinished blocks.
Step 1: Cutting Fabric
For this no-waste method, you’ll need:
- One large unit = G
- Four small units = F
Step 2: Marking Guidelines
On the wrong side of each small square, draw a diagonal line from one corner to the opposite corner using a fabric marking pen or pencil.
Step 3: Placing Pieces
Align two small squares onto opposite corners of the larger square with the right sides together. The marked line should be facing up.
The two small squares will overlap just a little bit in the middle. Pin them in place.
Step 4: Sewing
Sew a scant ¼” seam on both sides of the drawn line.A scant seam is just a little less than ¼”.
Step 5: Cutting and Pressing
Cut apart on the drawn line to separate into two units. You can use either a rotary cutter or carefully cut along the line with a scissors to separate into two units.
Press each of the units open toward the small “sky” triangle pieces. Some people think that at this stage they look a bit ling “dog ears” poking out.
Step 6: Adding the Remaining Small Squares
For each of the two units align a small square onto the corner without anything sewn to it with the right sides together. The diagonal line should be facing up. Pin in place
Sew a scant ¼” seam on each side of the drawn line.
Step 7: Sewing and Cutting Again
Sew a scant quarter-inch seam on both sides of the drawn diagonal lines. Cut apart on the drawn line of each unit and press the units open toward the small “sky” pieces.
You should now have four flying geese measuring 4 1/2″ X 8 1/2″.
Assembling Sub Blocks 2,4,6 and 8.
Arrange a flying geese block with the B unit. Refer to diagram.
With the right sides together, sew together using the ¼” seam allowance. Press the seams to one side or open.
Sub block 2 is complete. Repeat this process for sub blocks 4, 6, and 8.
If needed, trim the sub blocks to 8 ½” X 8 ½”.
Assemble the Quilt Block
Lay out the quilt blocks according to the diagram.
Continue using ¼” in seam allowance. With the right sides together join sub blocks 7, 8, and 9. Press the seams to the outside.
With the right sides together, join sub blocks 4, 5, and 6. Press the seams to the inside.
Join sub blocks 1, 2, and 3. Pressing the seams to the outside.
Finally, join the top and bottom rows to the middle with the right sides together. Make sure to nest the seams and pin them in place. Press the seams open or to one side.
The quilt top should measure 24 ½” X 24 ½” at this point.
Adding the Three Borders
For this step, you will be sewing border sashing on the sides and top of the quilt block.
- Border 1, cut 2, Sides 2” X 24 ½”, cut 2, Top and Bottom 2” X 27 ½”, White fabric
- Border 2, cut 2, Sides 1 ½” X 27 ½”, cut 2, Top and Bottom 1 ½” X 29 ½”, Merry Go Round Polka Dot fabric
- Border 3, cut 2, Sides 2” X 29 ½”, cut 2, Top and Bottom 2” X 32 ½”, White fabric
First Border in White Fabric
Using the 2 vertical pieces of sashing, pin on the sides of the quilt top with the right sides together. Using ¼-inch seam allowance, sew 1 sashing strip to each side of the quilt.
Press all seams to the outside or open.
Using the 2 horizontal pieces of sashing, pin on the top and bottom of the quilt top with the right sides together. Using ¼-inch seam allowance, sew 1 sashing strip to each side of the quilt.
Second Border in Merry Go Round Polka Dot Fabric
Using the 2 vertical pieces of sashing, pin on the sides of the quilt top with the right sides together. Using ¼-inch seam allowance, sew 1 sashing strip to each side of the quilt.
Press all seams to the outside or open.
Using the 2 horizontal pieces of sashing, pin on the top and bottom of the quilt top with the right sides together. Using ¼-inch seam allowance, sew 1 sashing strip to each side of the quilt.
Third Border in White Fabric
Using the 2 vertical pieces of sashing, pin on the sides of the quilt top with the right sides together. Using ¼-inch seam allowance, sew 1 sashing strip to each side of the quilt.
Press all seams to the outside or open.
Using the 2 horizontal pieces of sashing, pin on the top and bottom of the quilt top with the right sides together. Using ¼-inch seam allowance, sew 1 sashing strip to each side of the quilt.
Layer the Quilt Top, Batting, and Backing Fabric
Now that the quilt top is done, it is time to layer the quilt backing fabric, batting, and the quilt top. This is often referred to as the quilt sandwich.
The backing fabric and the batting should be a few inches larger all the way around than the quilt top.
This makes sure that there is backing and batting covering the entire quilt top fabric. If you cut it too close and there is any slippage, you might end up with an edge that does not have the bottom part of the quilt sandwich. Refer to the fabric requirements chart for the recommended sizes for the backing and batting.
Begin by placing the backing fabric on a flat solid surface, right side down facing out. Smooth out any wrinkles.
Use painters’ tape to secure the edges of the fabric down. This will help hold it in place and reduce the chance of a wrinkle developing as you place the next two layers.
Next, center the batting on top of the backing fabric smoothing out any wrinkles.
Finally, place the quilt top on the batting, centering it with the right side up. Smooth out any wrinkles.
Basting the Quilt Layers Together
Tack all three layers together using 1 ½” stainless steel pins or spray baste if preferred.
Put a pin in each corner and around the entire quilt about every 5-6 inches or so through all three layers.
This holds things in place, so they don’t move around while you are sewing the layers together using a quilting design of your choice.
Trim the Batting and Backing Fabric Before Binding
After the quilting process, trim the batting and the backing fabric. A large cutting mat, longer ruler, and a rotary cutter work nicely for this.
To do this, lay the quilt flat. Place the ruler along the edge of the quilt and use it as a guide to run your rotary cutter against to trim the quilt batting and backing to the size of the quilt top. Do this on all four sides.
Sew the Binding to the Quilt
Create a strip of fabric 2 ½” X 140”.
To prepare the binding strips. You can use jelly roll strips or cut 2 ½ inch width of fabric strips and join them together to make the length needed for each quilt size.
Once the strips are sewn together, fold in half lengthwise with wrong sides together and press.
Pin the raw edge of the binding onto raw edge of the quilt top. I generally start in the middle of a side leaving approximately a 3-5” tail hanging.
Note: This hanging part will be used to sew to the other end of the binding strip when you have finished sewing all four sides of the binding onto the quilt.
Sew the binding to the quilt top. Making sure to miter the corners and join the binding. Pro Tip. I use a walking foot as it helps all the layers slide under the sewing foot easier.
Fold the binding over the edge making sure to cover the sewing line and press with an iron. Use clips to secure.
Sew close to the sewing line on the front to secure the folded edge on the back of the quilt.
Alternatively, you can use your sewing machine to sew the binding on the front of the quilt and hand stitch the folded edge to the back of the quilt. We hope that you have enjoyed this lovely quilt pattern.
XO
Vicky & Casey

You can find Victoria crocheting, quilting, and creating recipes. She has cooked in restaurants for over 20 years, including many larger parties. She learned to crochet when she was just 11 years old and has been crocheting ever since; over 50 years now. Over 40 years ago, she loved her first class in sewing and continues to hone her skills in quilting. Many have enjoyed the handmade gifts over the years. In her professional career, she has worked in management in a wide variety of businesses including higher education as a dean of a division. All the while attending college part-time to achieve her doctorate in higher education with an emphasis in e-learning.