Last updated on July 4th, 2024 at 11:31 pm
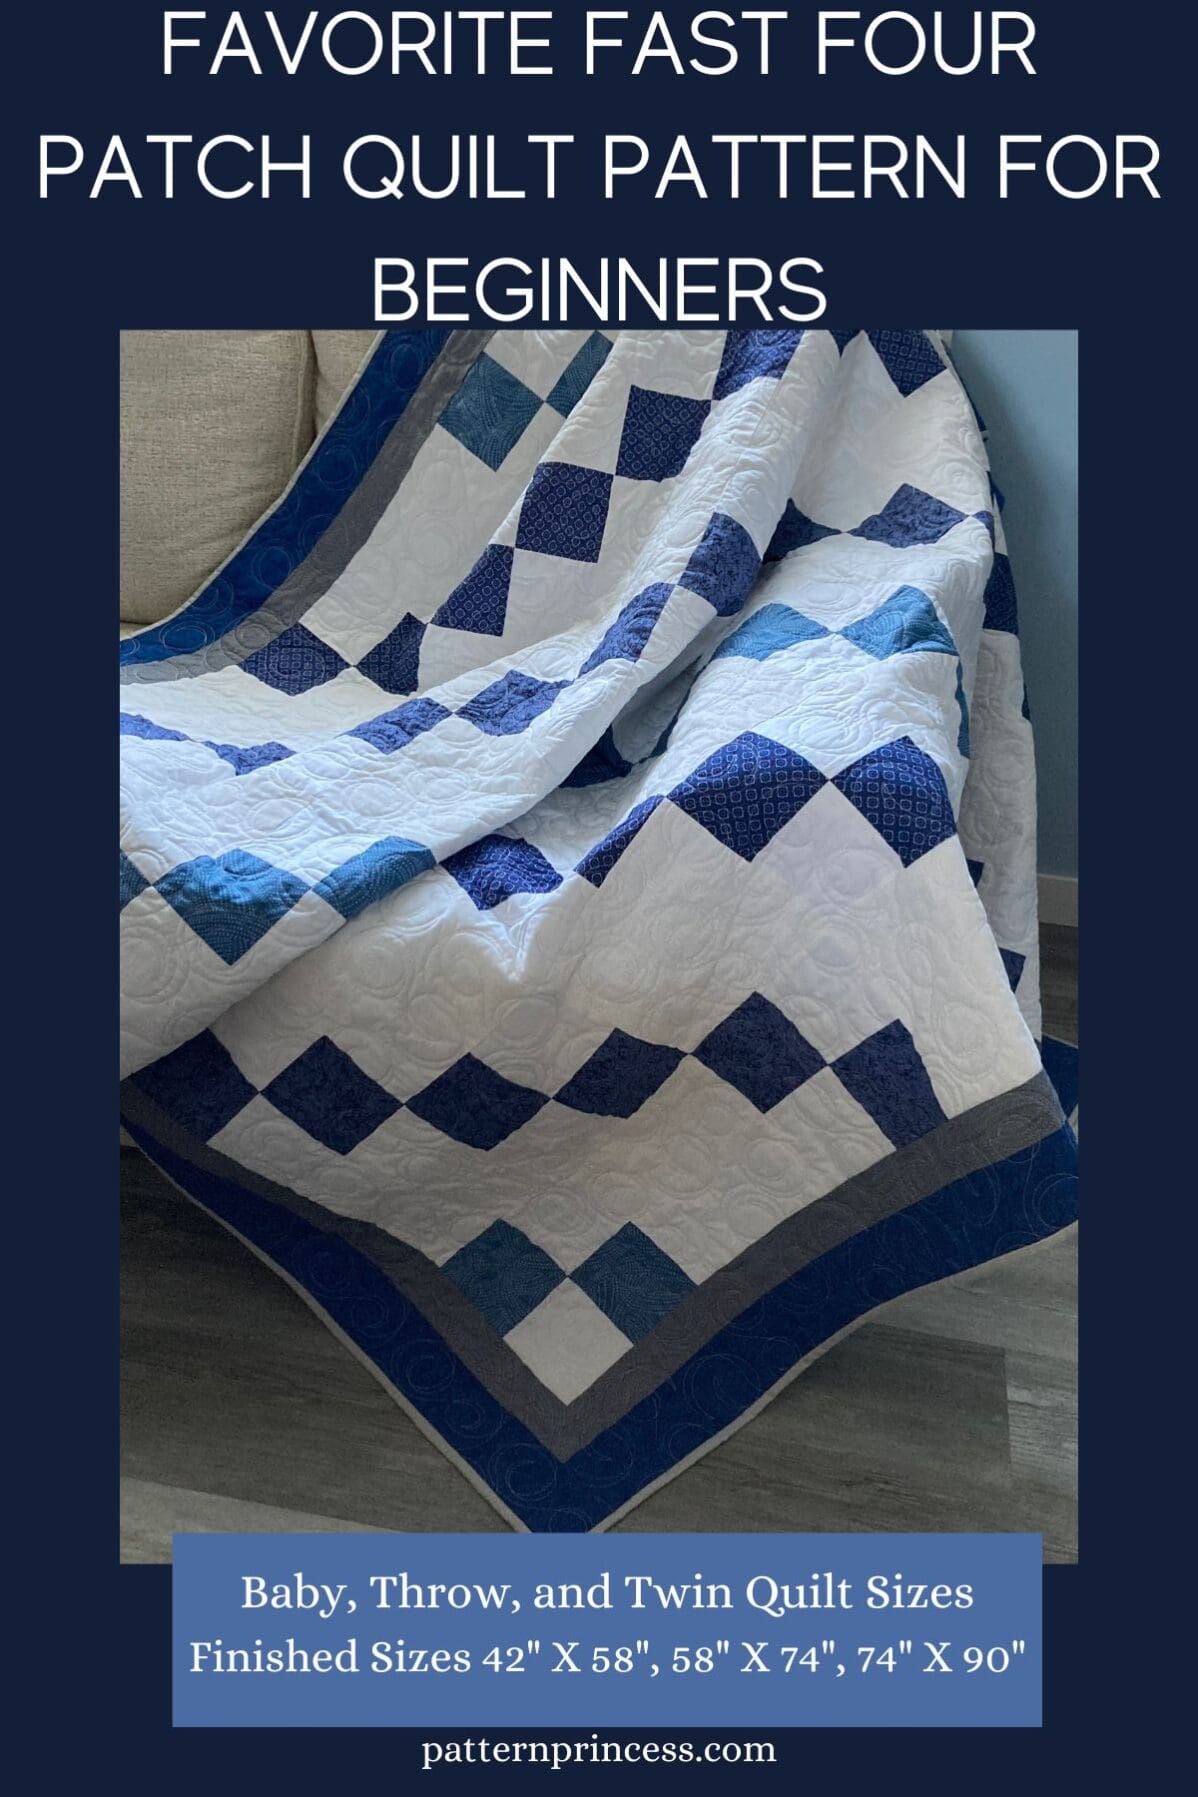
Introducing our Favorite Fast Four Patch Quilt Pattern for Beginners. This delightful quilt pattern is specially designed to make quilting a breeze, even for those new to the craft.
You will not believe how quickly you create this quilt. If you are on the lookout for a last-minute gift ideas, this is the pattern for you. It’s an easy pattern that can be used to make a simple patchwork quilt using different fabrics.
With its simple yet stunning four patch design, this quilt is the perfect project to showcase your creativity and bring cozy warmth to any space. This is perfect for a beginning quilter, yet a great pattern for quilters of all skill levels.
Crafted with love and attention to detail, our quilt pattern ensures easy piecing and precise alignment, allowing you to easily create a beautiful handmade treasure for yourself or as a thoughtful gift for loved ones.
Post contains affiliate links, and we earn commissions if you shop through the links on this page. For more information, please read the disclosure section under the About Us page.
Easy And Fast Four Patch Quilt Patterns
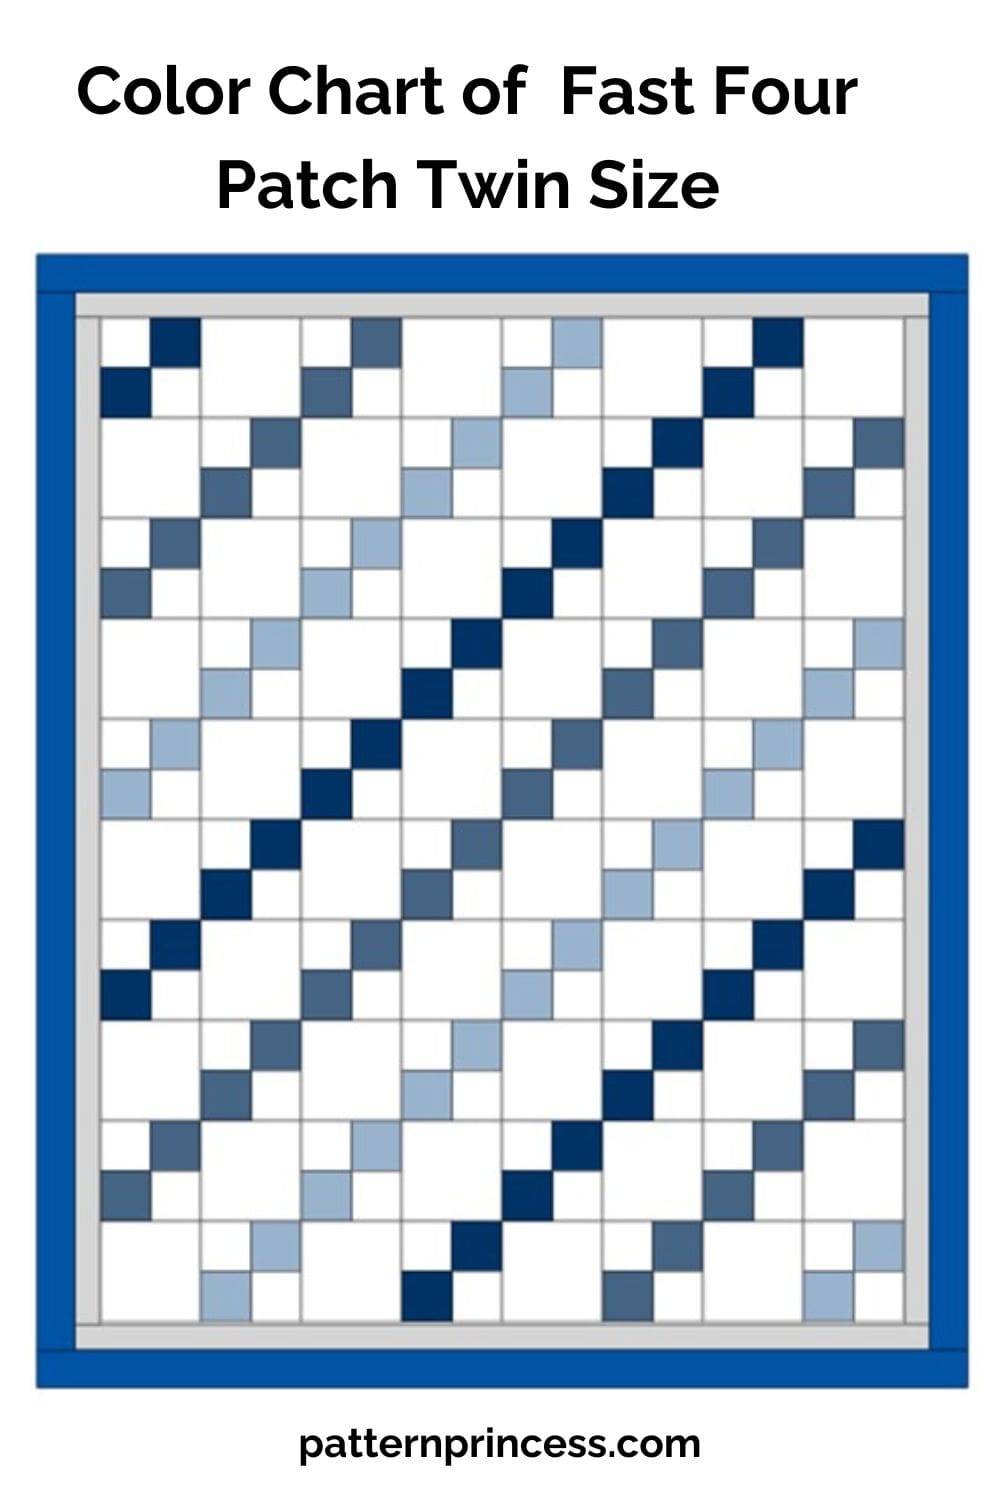
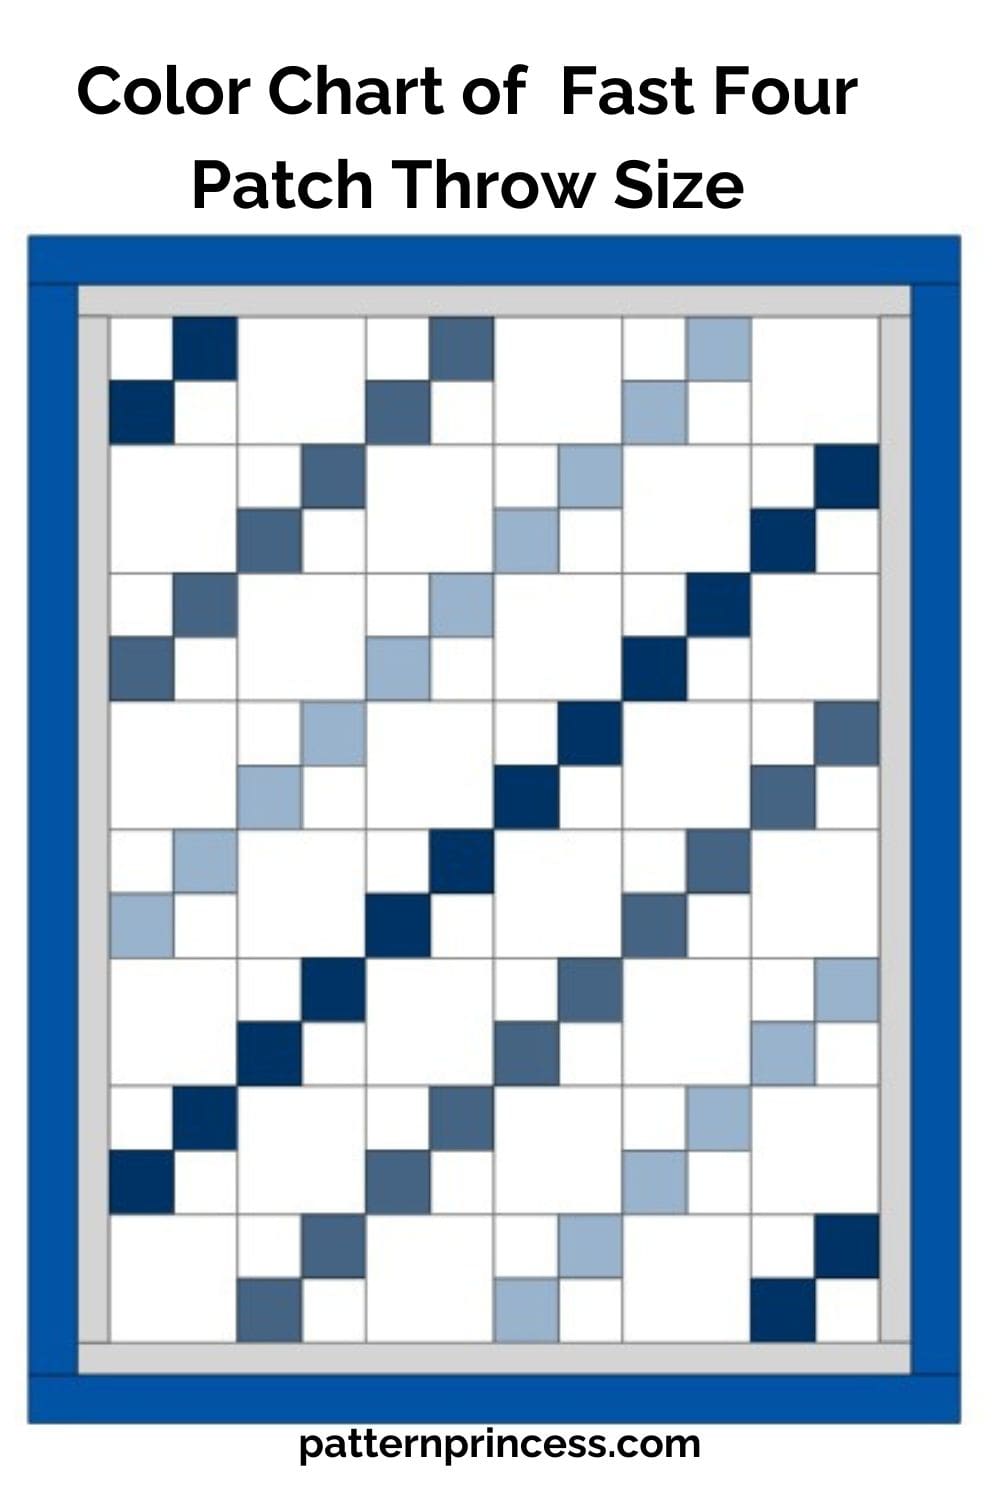
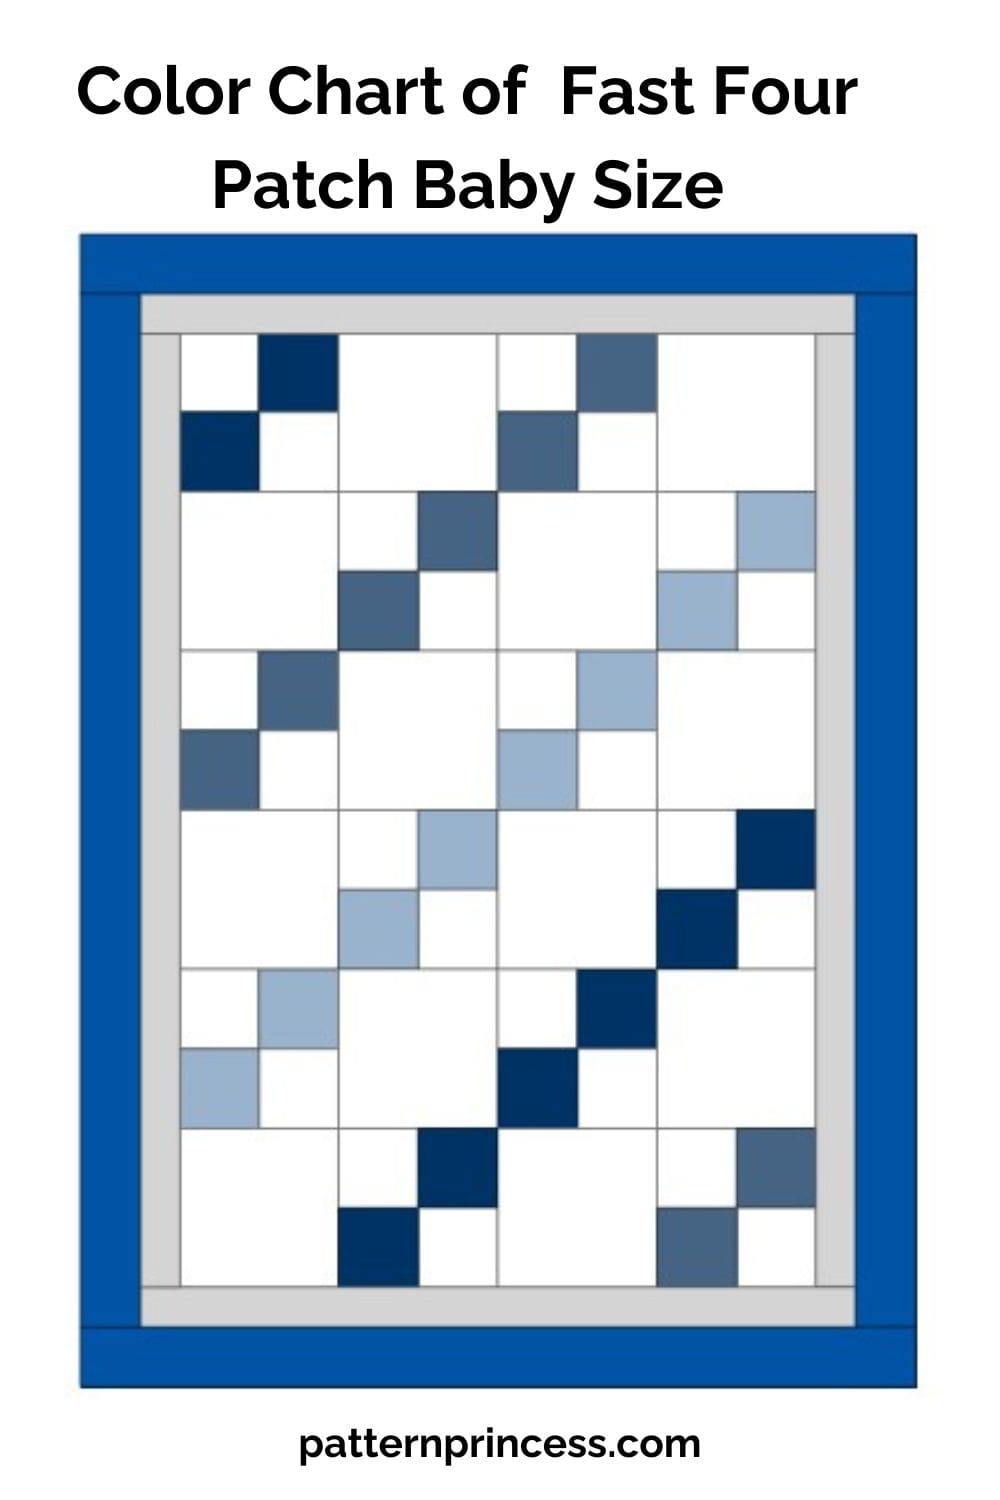
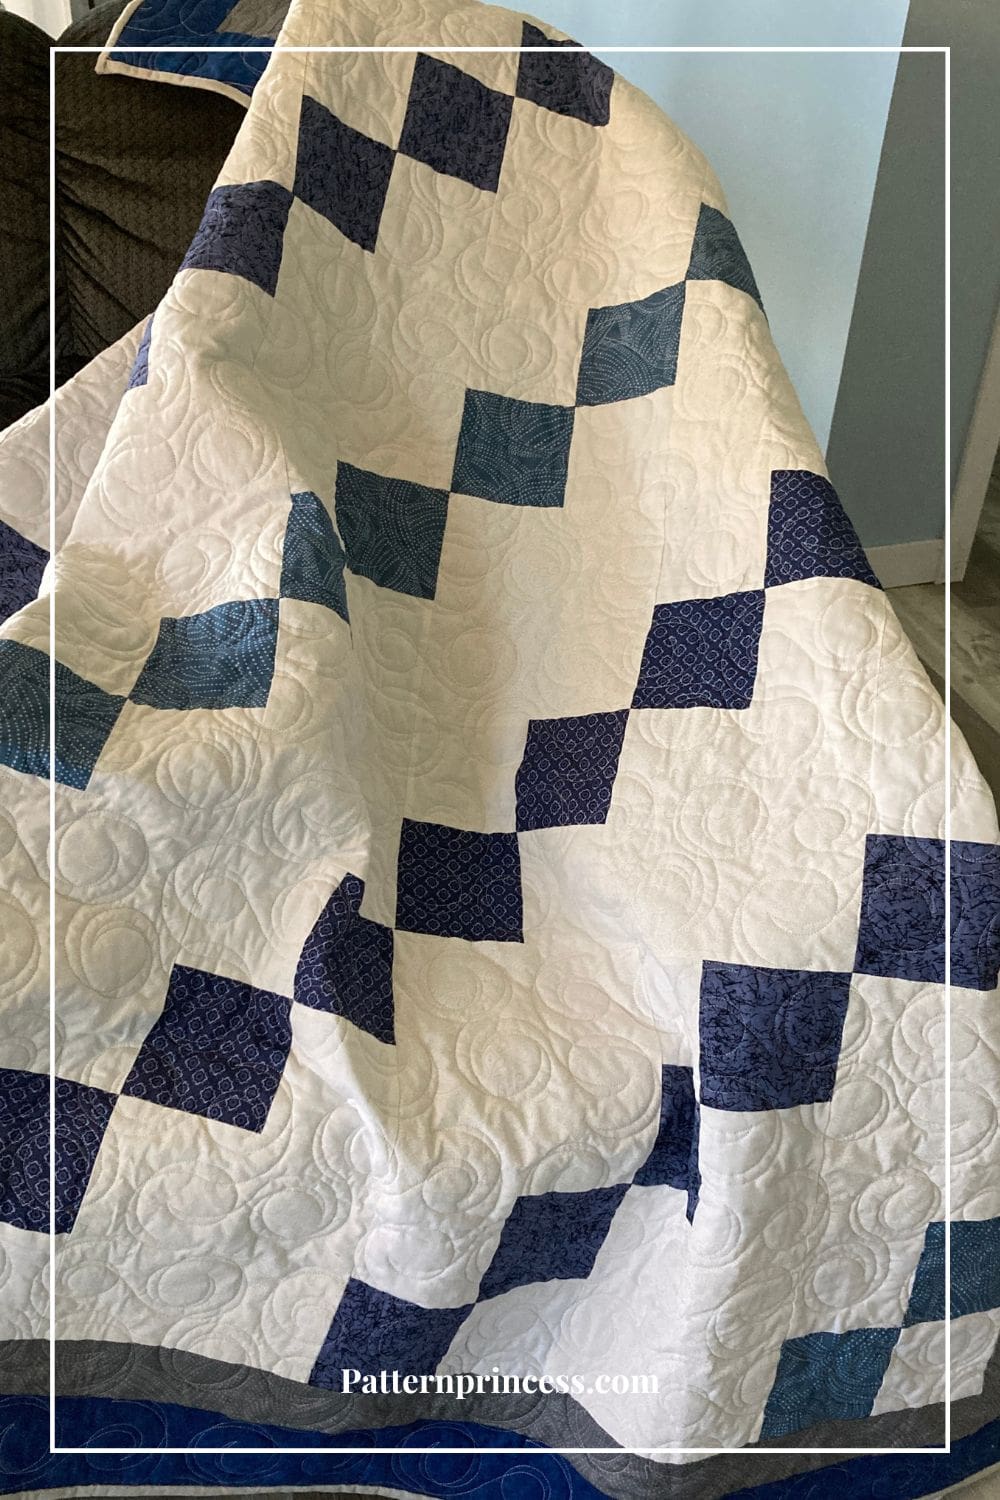
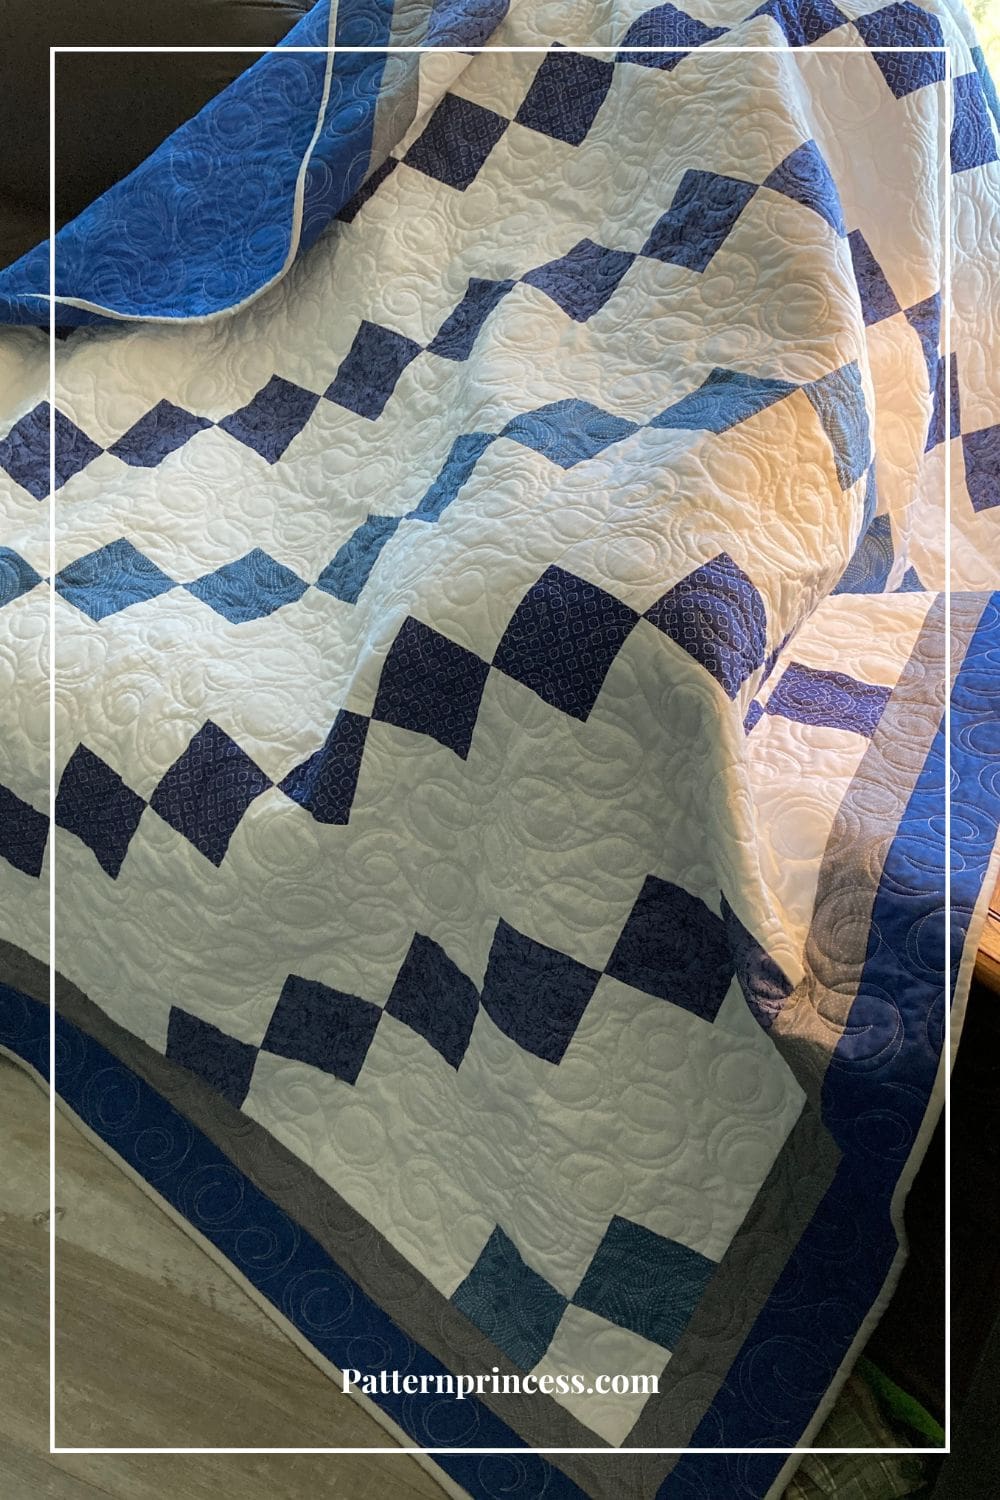
The charming four patch design adds a classic touch to any project, while this is done in a crisp white and three shades of blue it would look lovely in different colors too.
Perfect for those just starting out their quilting journey. Yet fun for those quilters looking for a quick and satisfying project.
With simple instructions and helpful tips, you’ll be amazed at how quickly your quilt comes together. This quilt pattern uses a combination of four patch squares and solid squares, which makes for a quick and easy sewing pattern.
Whether you want to create a cozy lap quilt, baby quilt, throw quilt, or a beautiful bedspread, this versatile pattern is sure to become your go-to. If you are in a hurry, this makes a really quick baby quilt. You don’t have to use a special color scheme either, a patchwork design is a great choice too.
I actually sewed the four patch squares together while I was working on another quilt. Easy Four Patch Quilt Pattern Ombre Sunset. It’s another simple quilt pattern with detailed instructions.
While it is another four patch quilt pattern, there are quite a few more colors used for the ombre effect. Therefore, I cut out all my squares for this blue and white quilt and made my four patch squares along with the sunset quilt. I used the squares of one quilt as leaders and enders of the other quilt.
What is the easiest quilt to make?
Easy quilt patterns use simple shapes. Therefore, the easiest patterns are made from simple shapes such as squares and rectangles. They are easy to cut, line up the seams, and sew.
If this is your first quilt, you may benefit from this article with step-by-step instructions on How to Make a Quilt from Start to Finish 8 Easy Steps.
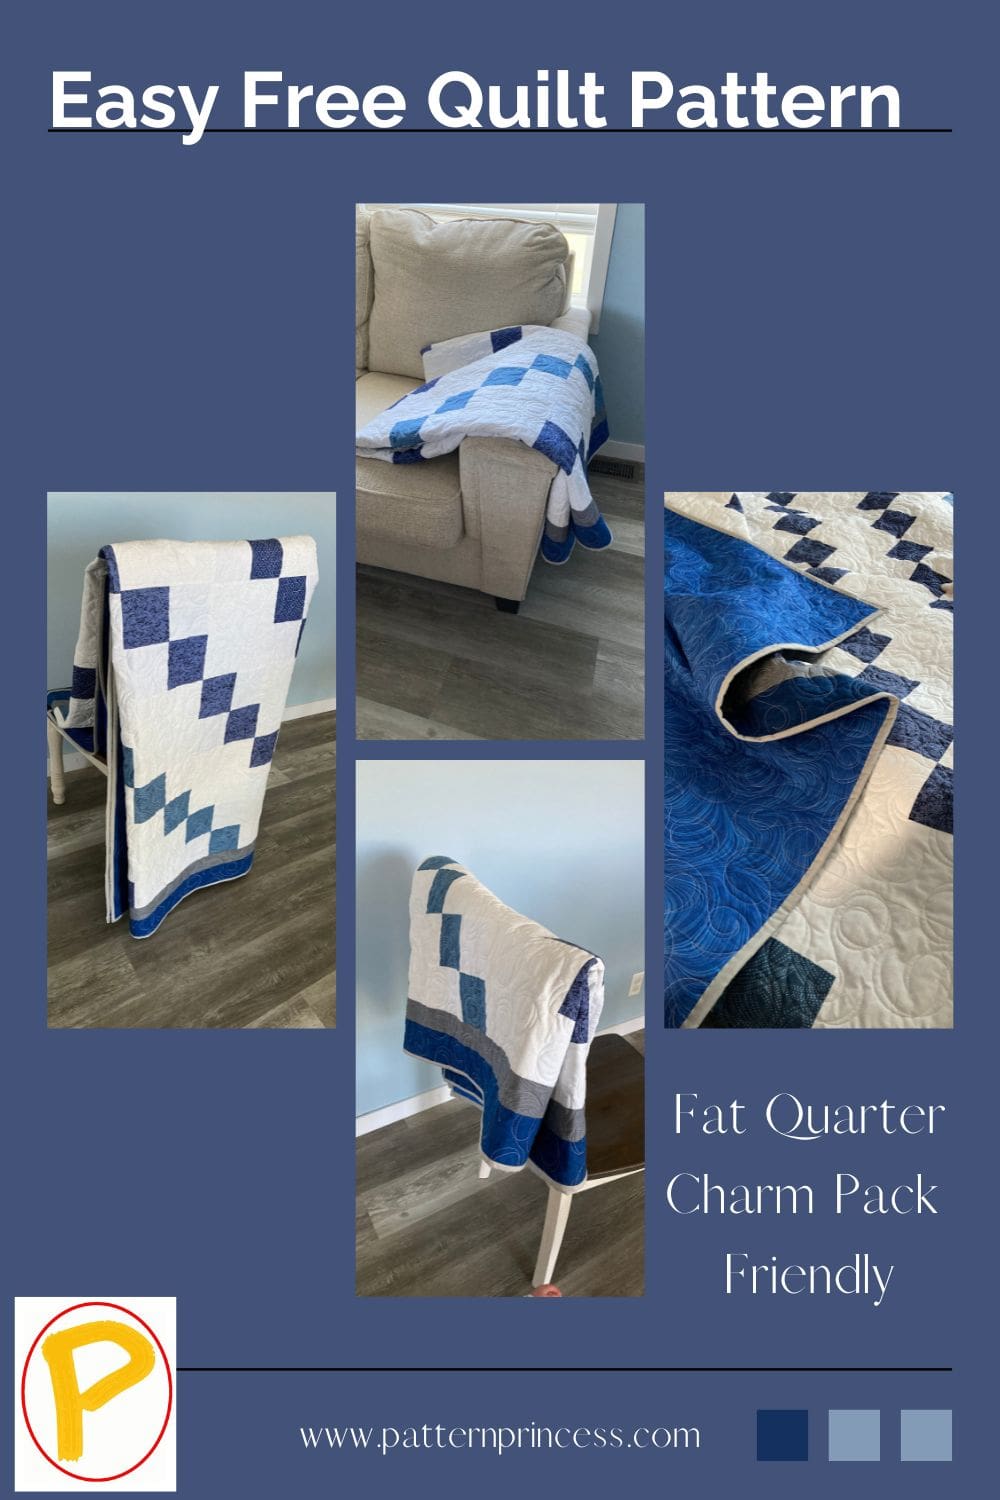
Fat Quarter and Charm Pack Quilt Pattern
It is a simple but effective pattern, and you can make this in any colors you choose. The choice of fabrics is up to you, and there are so many variations you could make. The four patch squares are perfect for fat quarters or charm packs.
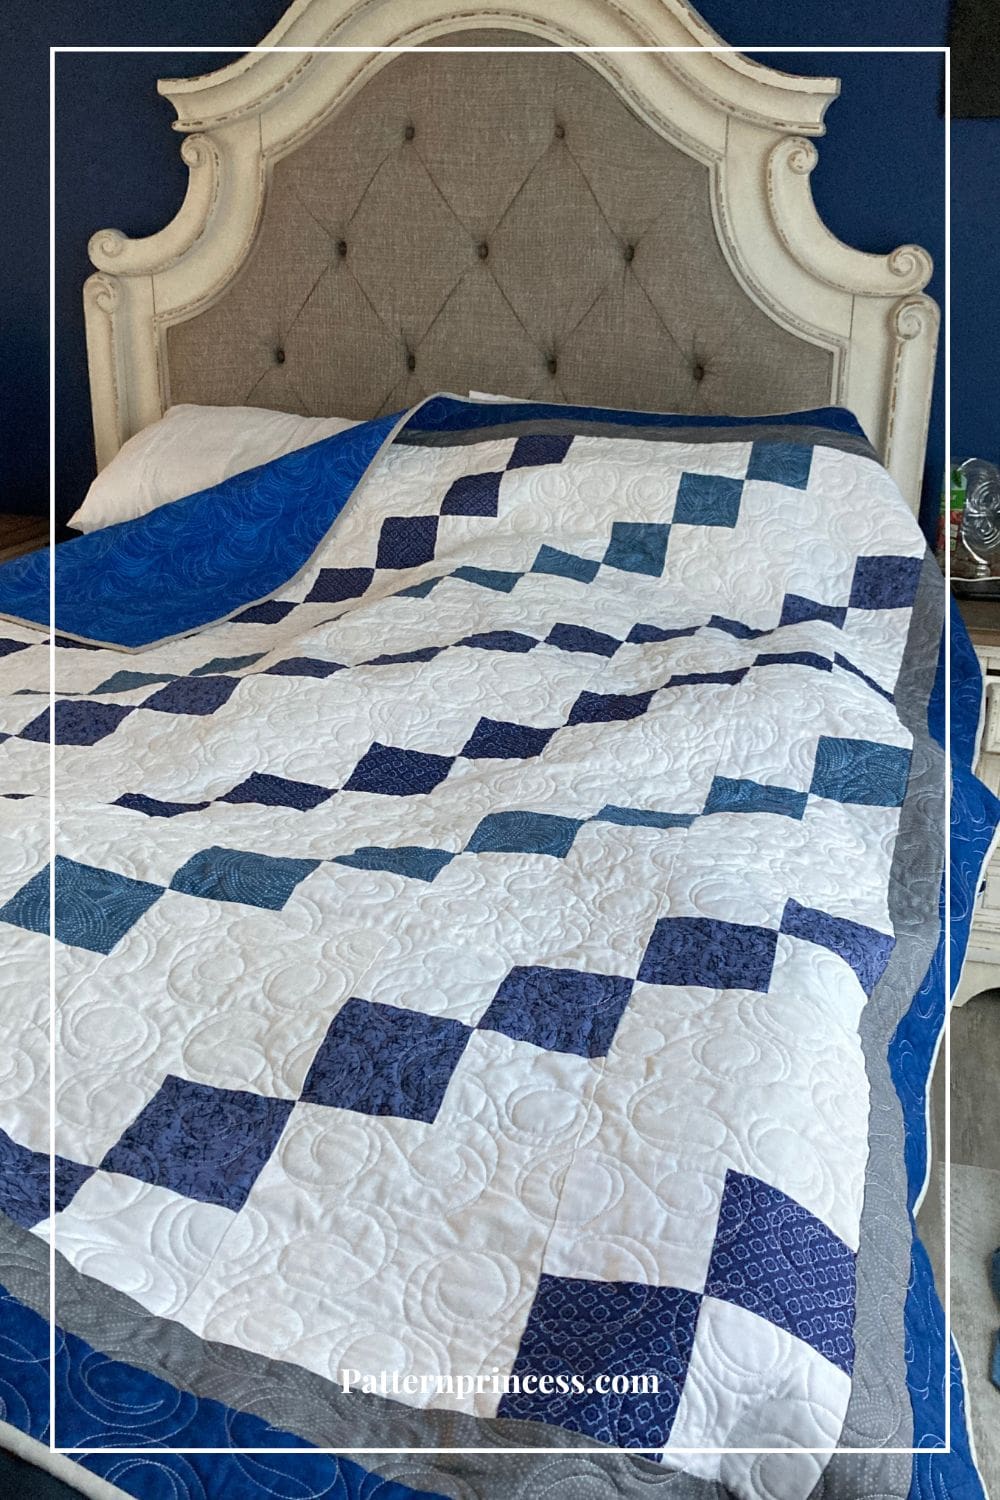
This can be a free queen size quilt pattern if you don’t count the drape. The photo of this quilt on my daughter and son-in-law’s bed lays over the top nicely. They don’t mind that there isn’t any drape as my daughter is the cold one and she steals the blankets anyway.
Make Three Different Sizes of Quilts
This pattern is suitable for beginner quilters, so even if you have never made a quilt before, you can make this pattern. It’s a great project that comes together quickly. This blanket was a joy to make with stunning results.
- Baby 42 X 58 inches
- Throw Size 58 X 74 inches
- Twin Size 74 X 90 inches
Learn How to Make an Easy Four Patch Quilt Block.
There is a chart in the link above showing a few measurements of common sized quilt blocks for you to follow when making your four patch quilt square. However, today, we are using 4 ½” X 4 ½” four-patch blocks for our four patches.
Directions: Favorite Fast Four Patch Quilt Pattern for Beginners
Quilting Skill Level
Easy – Confident Beginner
Finished Quilt Measurements
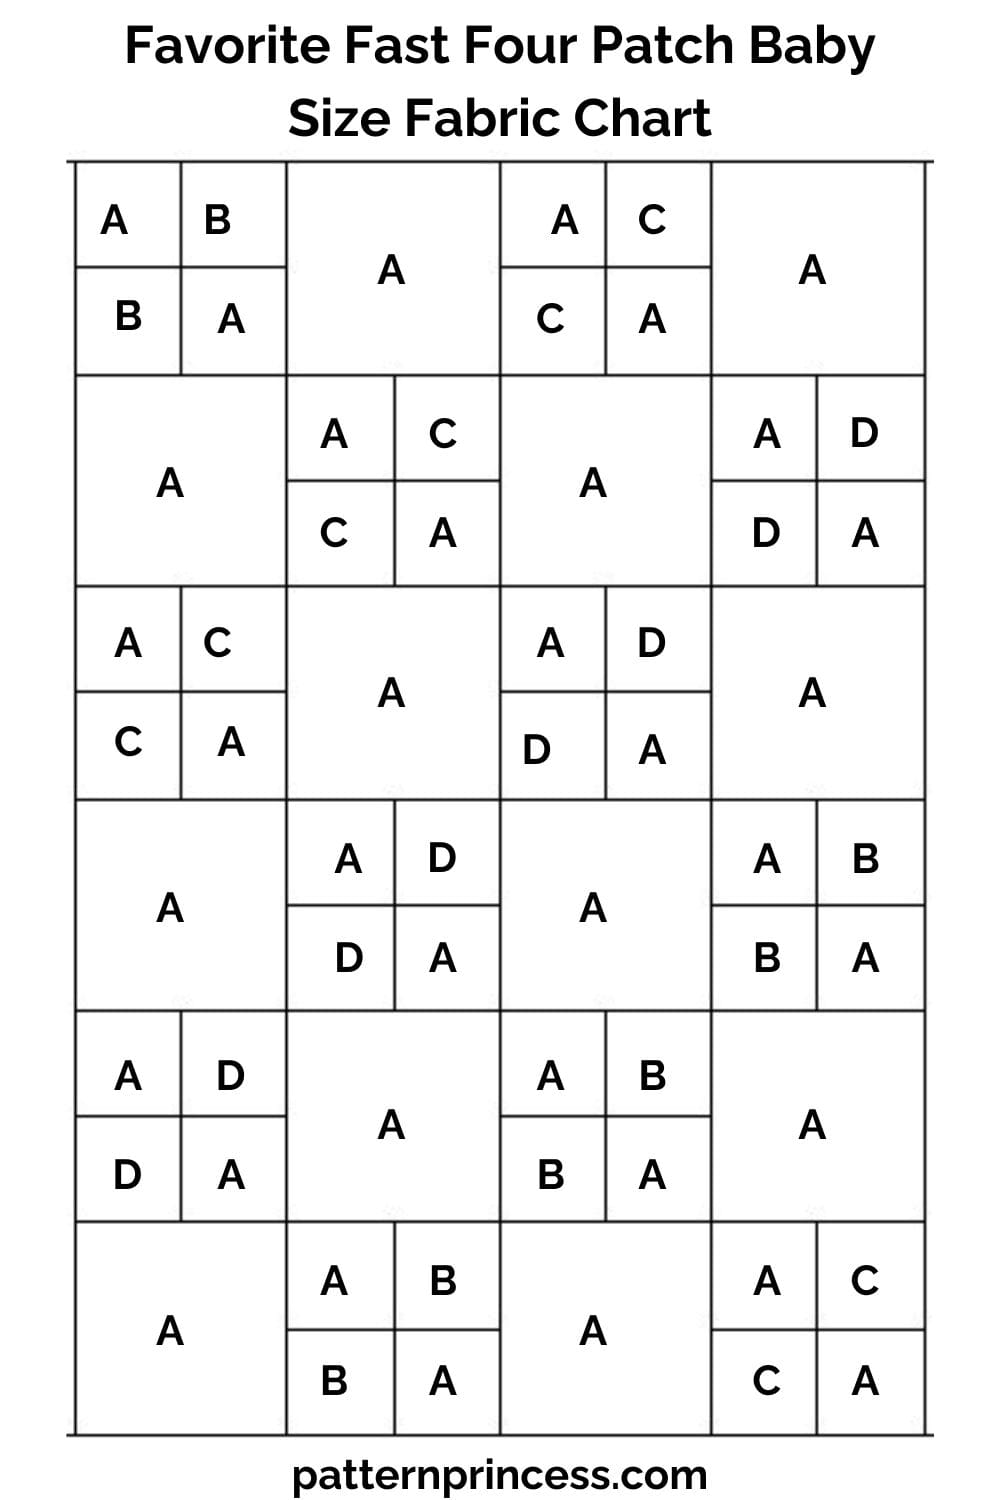
- Baby 42 X 58 inches
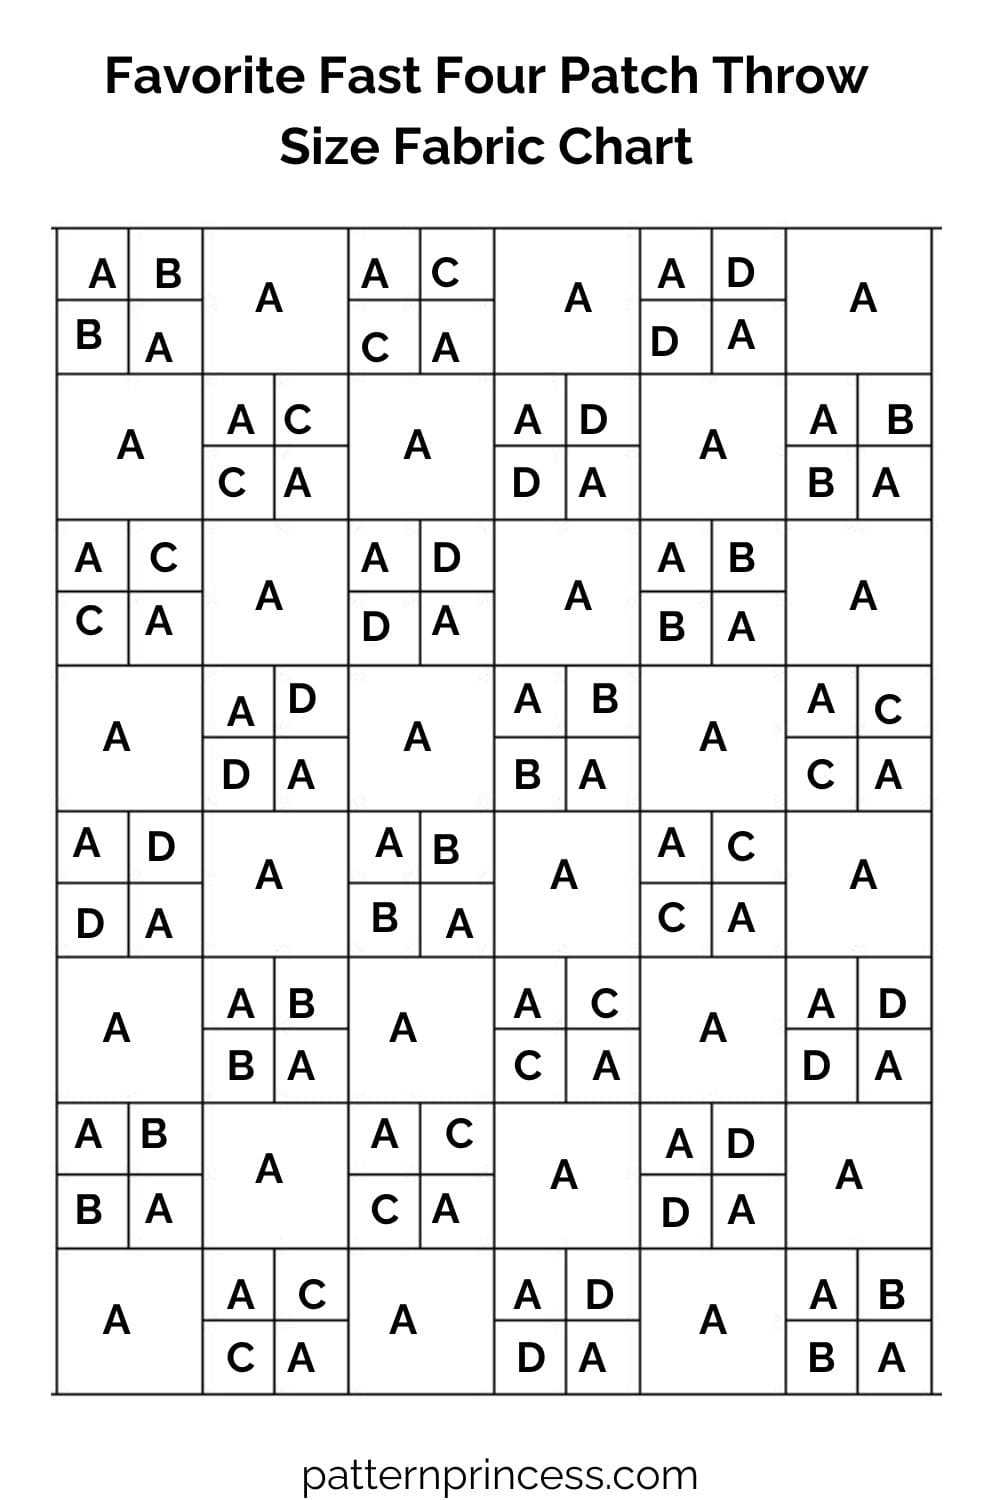
- Throw Size 58 X 74 inches
- Twin Size 74 X 90 inches (pictured)
General Cutting and Sewing
The directions for this quilt are for rotary cutting, machine piecing, machine quilting, and the binding is hand-stitched to the quilt back.
Accurate cutting and sewing helps ensure that seams line up for a beautiful quilt top. Pin your pieces together before sewing them to ensure proper seam alignment.
Pattern Notes
The quilt shown is the Twin Size Quilt 74 X 90 inches, shown. Uses 8-inch finished blocks. Both the throw size and the baby size blankets also use 8-inch finished blocks.
If you are using fat quarters to make your 4 ½” X 4 ½” squares, you can get 16 out of each one.
Choose any contrasting or complimenting colors of fabric.
All sewing in this tutorial uses ¼” seam allowance.
All fabric is sewn right sides together unless otherwise noted.
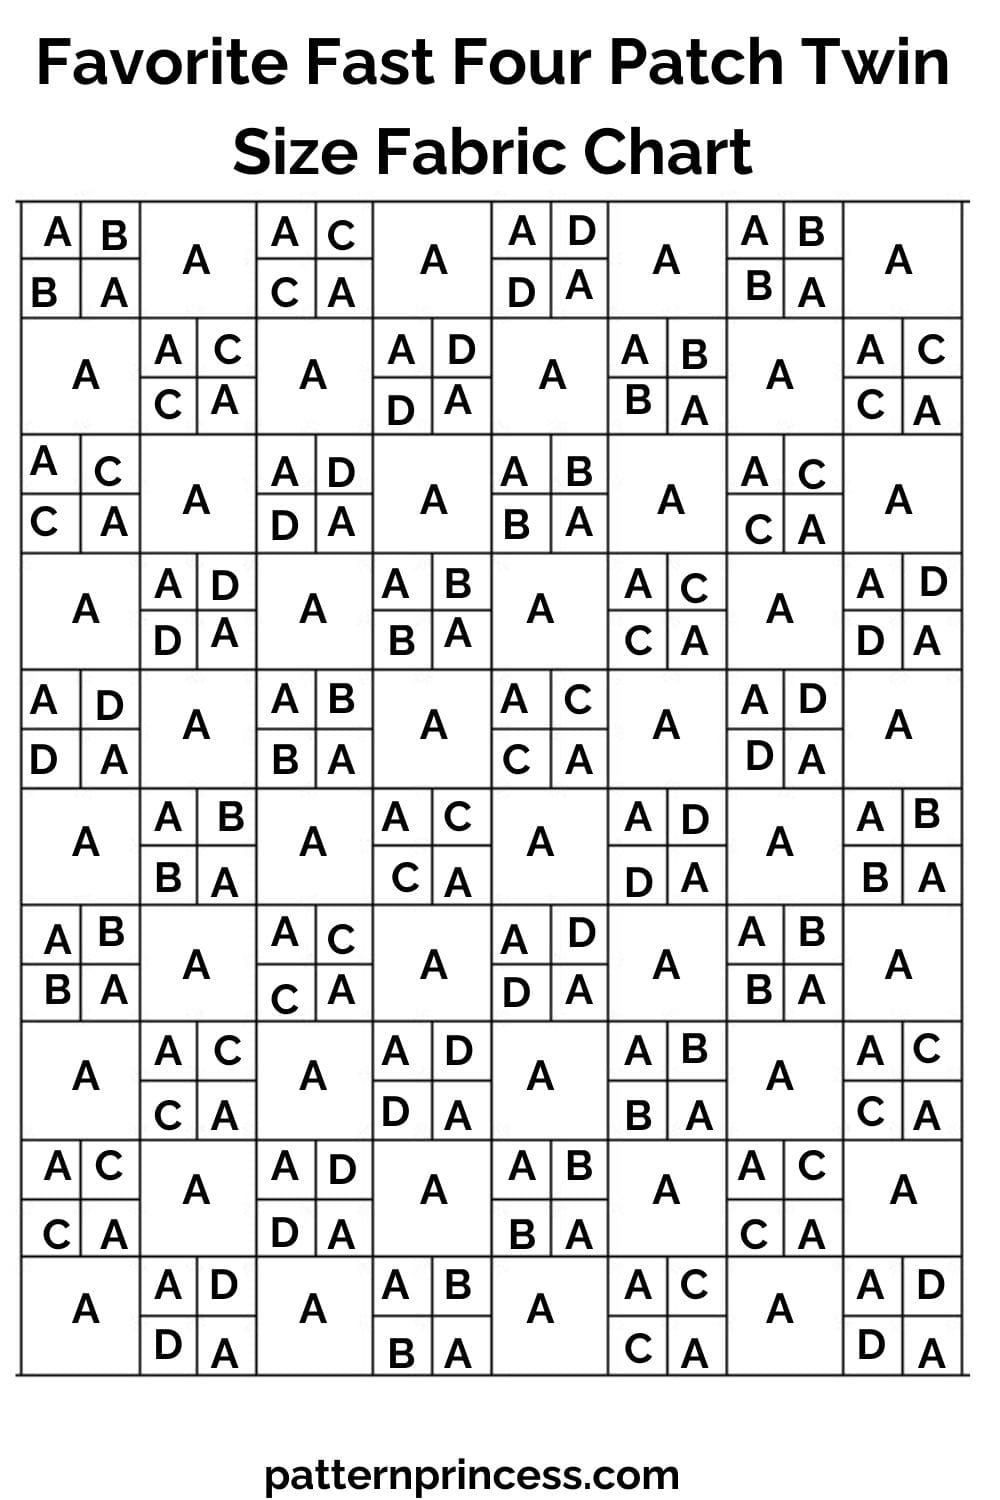
There are both colored photos and charts to help with the construction of all three blankets.
You can use the strip piecing method. When you want to make a lot of four patch blocks, this method is a great way to save you a ton of time.
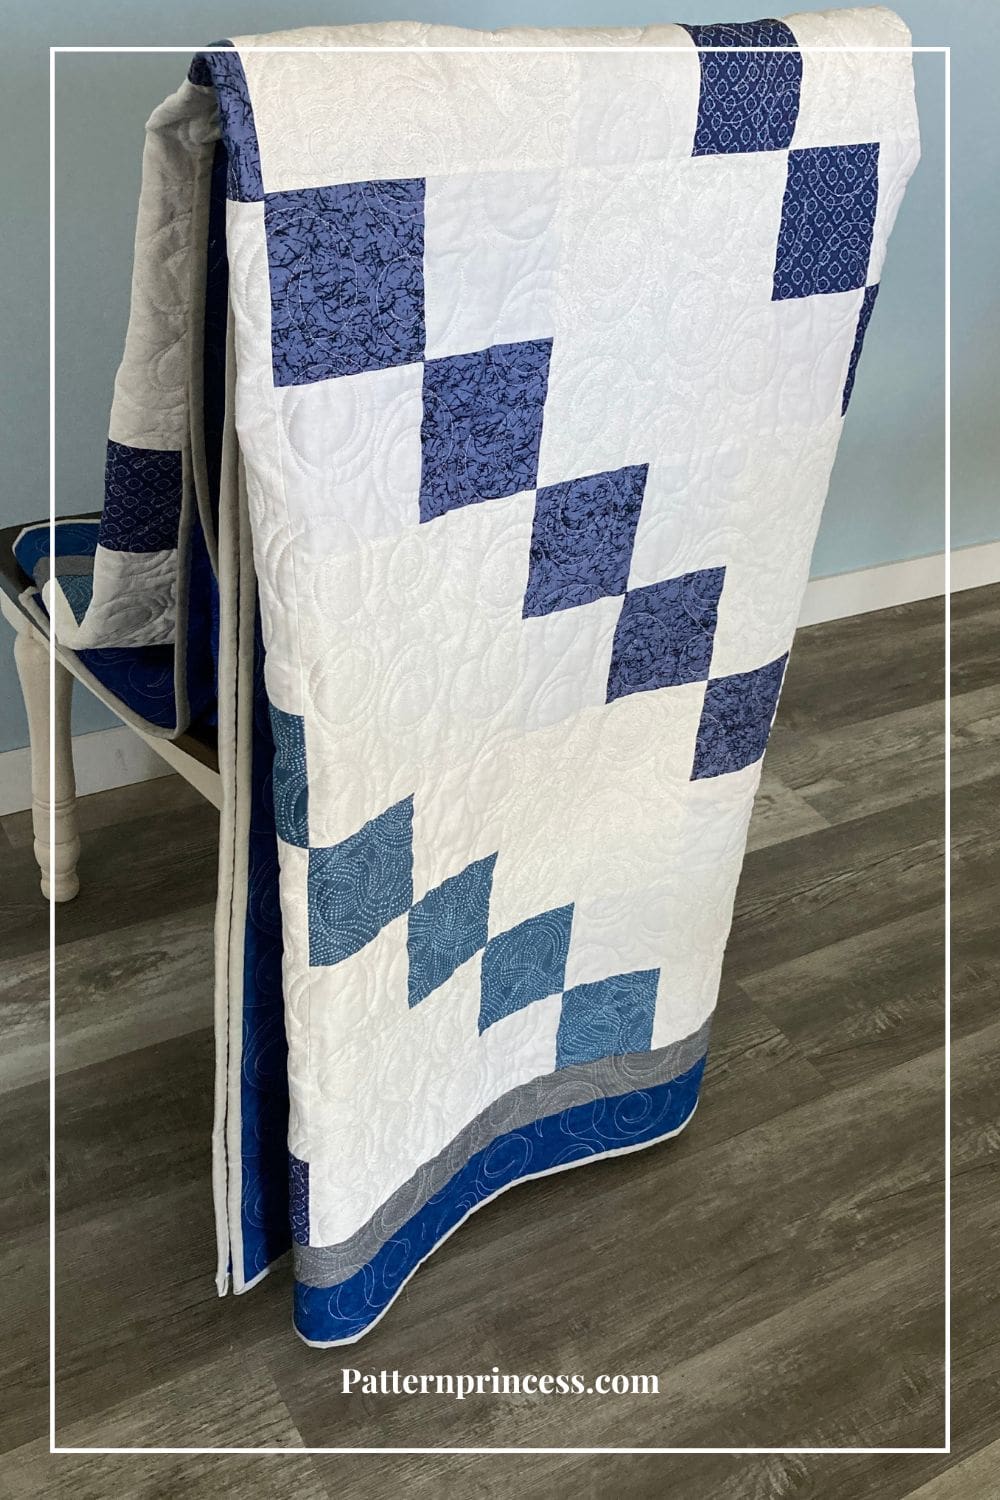
The color squares of the four patches align in diagonal lines throughout the blankets.
You can find more details on making a four patch quilt block on the website. 4-Patch blocks for me make the easiest quilt pattern. Perfect for precut fabric too.
Materials and Equipment/Tools
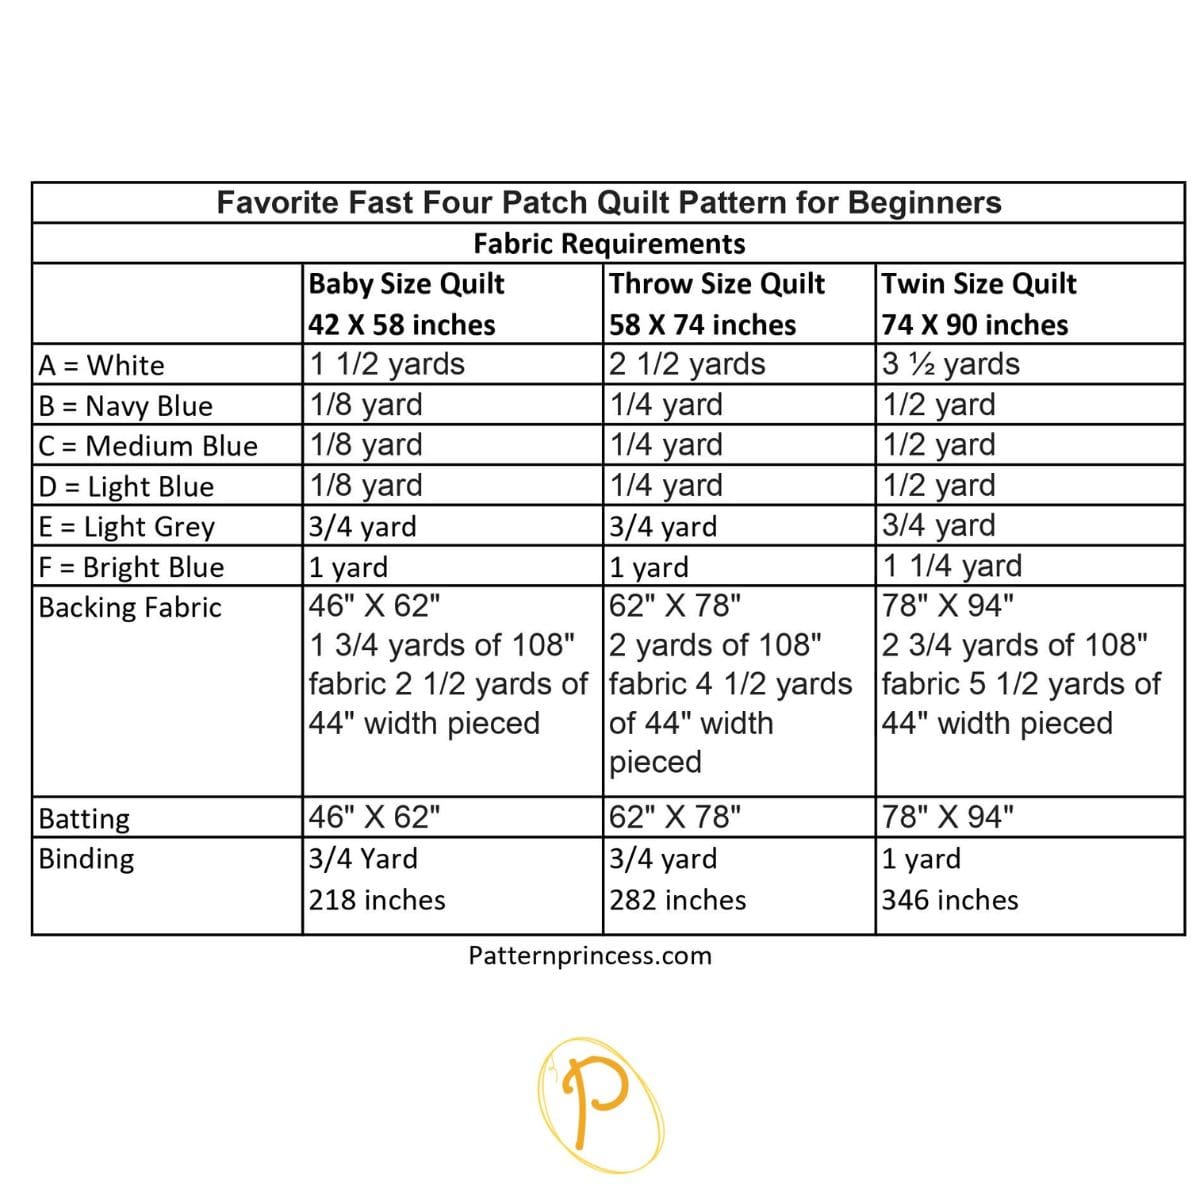
The fabric requirements for the quilt tip, backing, binding, and the batting needed are noted both in the chart and by each quilt size below.
However, all the quilts will use the following materials and tools to complete.
- Thread
- Rotary Cutter
- Quilting Ruler
- Cutting Mat
- Rotating Cutting Mat
- Iron
- Ironing Board or Pressing Mat
- Pins
- Clips
- Sewing Machine
- My Favorite Quilting Supplies
Twin Size Quilt Details
Size 74 X 90 inches
- A = White 3 ½ yards
- B = Navy Blue 1/2 yard
- C = Medium Blue 1/2 yard
- D = Light Blue 1/2 yard
Borders
- E = Light Grey ¾ yard
- F = Bright Blue 1 ¼ yard
- Backing = 78″ X 94″. 2 3/4 yards of 108″ fabric 5 1/2 yards of 44″ width pieced.
- Batting = 78″ X 94″.
- Binding = 1 yard, 2 ½” X 346” strip.
Fabric Cutting Directions for Twin Blanket
There are 8 blocks across and 10 blocks down for a total of 80 fabric squares.
- A = White cut 40 squares, 8 ½” X 8 ½” and 80 squares 4 ½” X 4 ½”.
- B = Navy Blue 26 squares, 4 ½” X 4 ½”.
- C = Medium Blue 28 squares, 4 ½” X 4 ½”.
- D = Light Blue 26 squares, 4 ½” X 4 ½”.
Borders
- E = Light Grey cut 2 strips, 2 ½” X 80 ½” and 2 strips 2 ½” X 68 ½”.
- F = Bright Blue cut 2 strips, 3 ½” X 84 ½” and 2 strips 3 ½” X 74 ½”.
Quilt Top Sewing Directions: Favorite Fast Four Patch Quilt Pattern for Beginners
Twin Quilt Top
Begin by cutting the fabric.
- A = White cut 40 squares, 8 ½” X 8 ½” and 80 squares 4 ½” X 4 ½”.
- B = Navy Blue 26 squares, 4 ½” X 4 ½”.
- C = Medium Blue 28 squares, 4 ½” X 4 ½”.
- D = Light Blue 26 squares, 4 ½” X 4 ½”.
Set these aside.
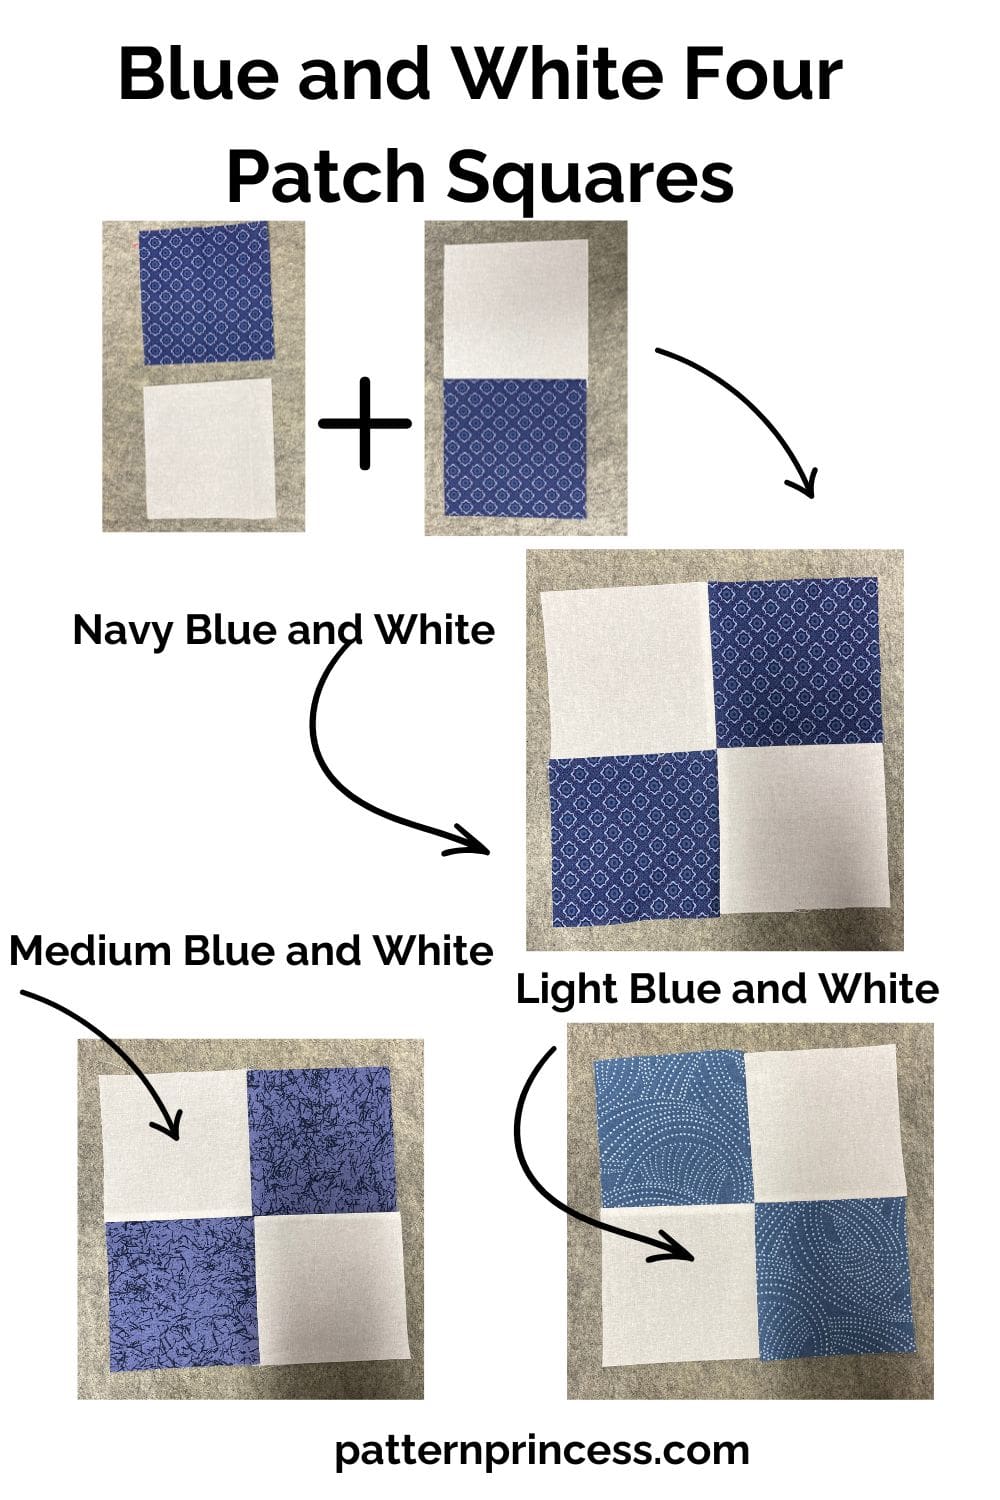
Next Make the four patch squares.
Join a white 4 ½” X 4 ½” square with a navy blue 4 ½” X 4 ½” square. Continue joining the navy blue and white squares. Press the seams to the navy blue side. You now have 26 navy blue and white 2 patch rectangles.
Next, line up 2 two patch rectangles with the center seams nested together and the colors facing the opposite directions.
Pin at the center to hold in place. Using the ¼” seam allowance, sew the rectangles together, removing the pin as you sew up to it.
Press the four patch block open.
The four patch block is now ready to sew into your pattern.
Continue sewing the rest of the four patch blocks.
Repeat all the steps outlined to make the four patches for the 28 medium squares joined to the white squares and 26 light blue squares.
You now have 40 four patches 8 ½” X 8 ½” unfinished size ready to sew into your quilt top.
Throw Quilt Blanket Details
Size 58 X 74 inches
- A = White 2 ½ yards
- B = Navy Blue ¼ yard
- C = Medium Blue ¼ yard
- D = Light Blue ¼ yard
Borders
- E = Light Grey ¾ yard
- F = Bright Blue 1 yard
- Backing = 62″ X 78″. 2 yards of 108″ fabric 4 1/2 yards of 44″ width pieced.
- Batting = 62″ X 78″.
- Binding = 3/4 yard, 2 ½” X 282” strip.
Fabric Cutting Directions for Throw Blanket
There are 6 blocks across and 8 blocks down for a total of 48 fabric squares.
- A = White cut 24 squares, 8 ½” X 8 ½” and 48 squares 4 ½” X 4 ½”.
- B = Navy Blue 16 squares, 4 ½” X 4 ½”.
- C = Medium Blue 16 squares, 4 ½” X 4 ½”.
- D = Light Blue 16 squares, 4 ½” X 4 ½”.
Borders
- E = Light Grey cut 2 strips, 2 ½” X 64 ½” and 2 strips 2 ½” X 52 ½”.
- F = Bright Blue cut 2 strips, 3 ½” X 68 ½” and 2 strips 3 ½” X 58 ½”.
Throw Quilt Top
Begin by cutting the fabric.
- A = White cut 24 squares, 8 ½” X 8 ½” and 48 squares 4 ½” X 4 ½”.
- B = Navy Blue 16 squares, 4 ½” X 4 ½”.
- C = Medium Blue 16 squares, 4 ½” X 4 ½”.
- D = Light Blue 16 squares, 4 ½” X 4 ½”.
Set these aside.
Next Make the four patch squares.
Join a white 4 ½” X 4 ½” square with a navy blue 4 ½” X 4 ½” square. Continue joining the navy blue and white squares. Press the seams to the navy blue side. You now have 16 navy blue and white 2 patch rectangles.
Next, line up 2 two patch rectangles with the center seams nested together and the colors facing the opposite directions.
Pin at the center to hold in place. Using the ¼” seam allowance, sew the rectangles together, removing the pin as you sew up to it.
Press the four patch block open.
The four patch block is now ready to sew into your pattern.
Continue sewing the rest of the four patch blocks.
Repeat all the steps outlined to make the four patches for the 16 medium squares joined to the white squares and 16 light blue squares.
You now have 24 four patches 8 ½” X 8 ½” unfinished size ready to sew into your quilt top.
Baby Quilt Details
Size 42 X 58 inches
- A = White 1 ½ yards
- B = Navy Blue 1/8 yard
- C = Medium Blue 1/8 yard
- D = Light Blue 1/8 yard
Borders
- E = Light Grey ¾ yard
- F = Bright Blue 1 yard
- Backing = 46″ X 62″. 1 3/4 yards of 108″ fabric 2 1/2 yards of 44″ width pieced.
- Batting = 46″ X 62″.
- Binding = 3/4 yard, 2 ½” X 218” strip.
Fabric Cutting Directions for Baby Blanket
There are 4 blocks across and 6 blocks down for a total of 24 fabric squares.
- A = White cut 12 squares, 8 ½” X 8 ½” and 24 squares 4 ½” X 4 ½”.
- B = Navy Blue 8 squares, 4 ½” X 4 ½”.
- C = Medium Blue 8 squares, 4 ½” X 4 ½”.
- D = Light Blue 8 squares, 4 ½” X 4 ½”.
Borders
E = Light Grey cut 2 strips, 2 ½” X 48 ½” and 2 strips 2 ½” X 36 ½”.
F = Bright Blue cut 2 strips, 3 ½” X 52 ½” and 2 strips 3 ½” X 42 ½”.
Baby Quilt Top
Begin by cutting the fabric.
- A = White cut 12 squares, 8 ½” X 8 ½” and 24 squares 4 ½” X 4 ½”.
- B = Navy Blue 8 squares, 4 ½” X 4 ½”.
- C = Medium Blue 8 squares, 4 ½” X 4 ½”.
- D = Light Blue 8 squares, 4 ½” X 4 ½”.
Set these aside.
Next Make the four patch squares.
Join a white 4 ½” X 4 ½” square with a navy blue 4 ½” X 4 ½” square. Continue joining the navy blue and white squares. Press the seams to the darker fabric. You now have 8 navy blue and white 2 patch rectangles.
Next, line up 2 two patch rectangles with the center seams nested together and the colors facing the opposite directions.
Pin at the center to hold in place. Using the ¼” seam allowance, sew the rectangles together, removing the pin as you sew up to it.
Press the four patch block open.
The four patch block is now ready to sew into your pattern.
Continue sewing the rest of the four patch blocks.
Repeat all the steps outlined to make the four patches for the 8 medium squares joined to the white squares and 8 light blue squares.
You now have 12 four patches 8 ½” X 8 ½” unfinished size ready to sew into your quilt top.
Quilt Top Sewing Directions for All Three Sizes
Sewing the Rows Together
Trim all squares and four patches as needed to 4 ½” X 4 ½”.
Use the diagram for each quilt size to lay out the squares for row 1 at the bottom of the quilt.
Alternate a white color square 8 ½” X 8 ½” between the four patches across the row.
Sew each square together with the right sides together using ¼” seam allowance. Press the seams to one side or open. Pro Tip. Press the first row seams one way and the next row the other way. Continue alternating which way you press the seams. This helps you nest the seams later when you sew one row to the next.
Continue using the chart to lay out the rest of the rows, sewing them together, pressing the seams in opposite directions.
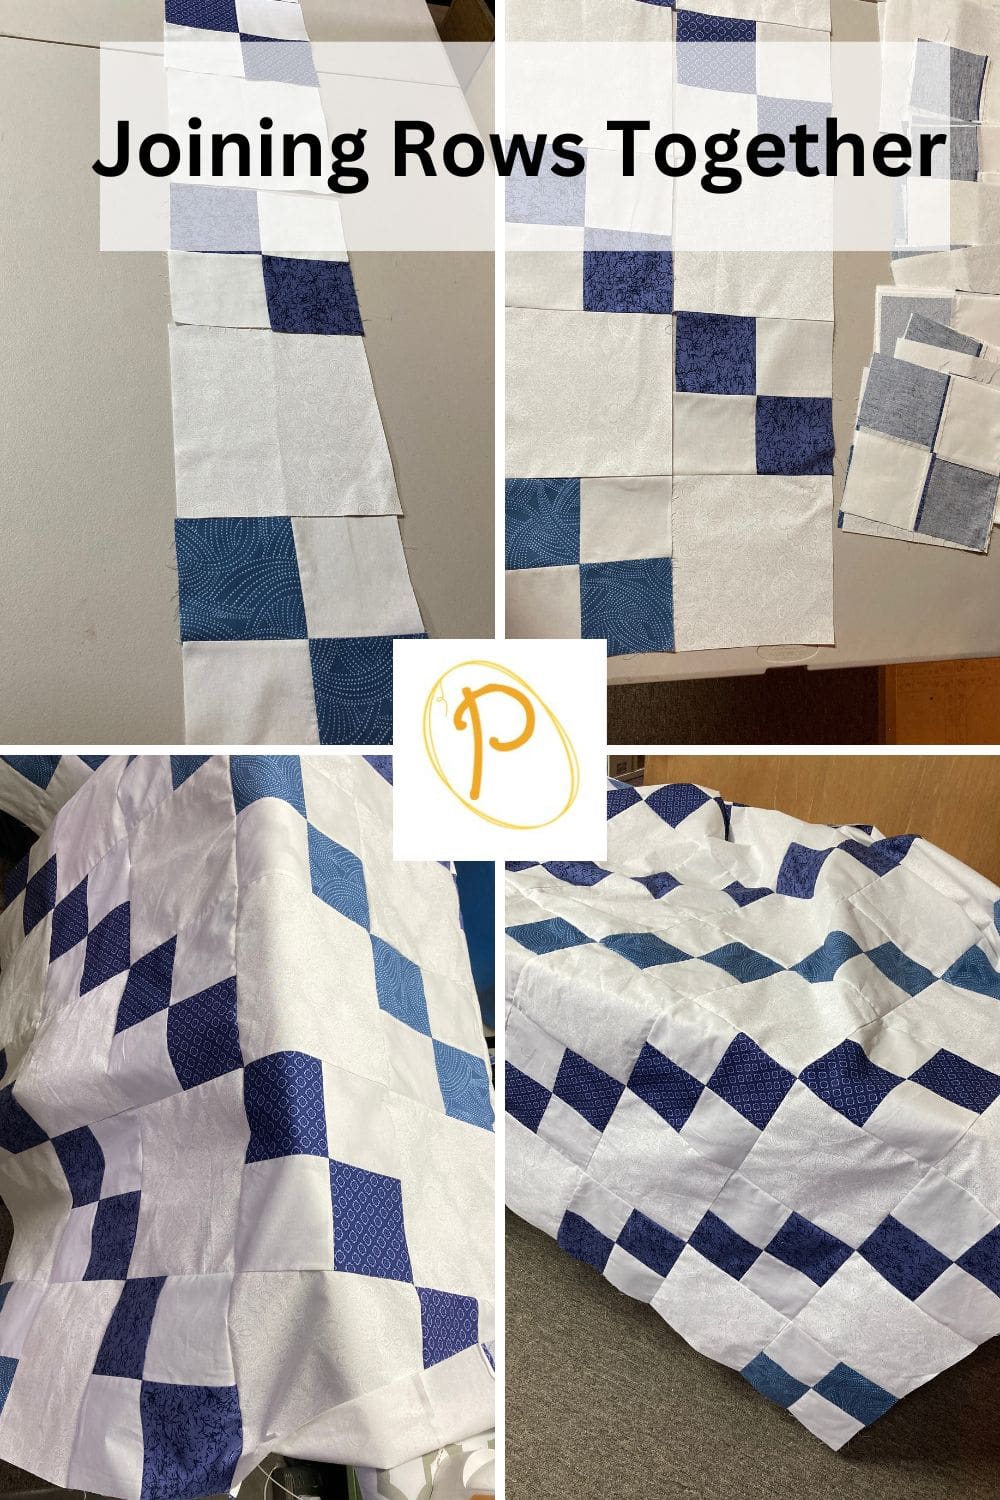
Joining the Rows
Once all the rows are sewn, join each row. Place row 2 on top of row 1 with the right sides together. Align and nest the seams securing with a pin.
Sew together using ¼” seam allowance removing the pins as you sew up to them.
Continue sewing the rows together making sure to align and nest the seams. Press the seams to one side or open.
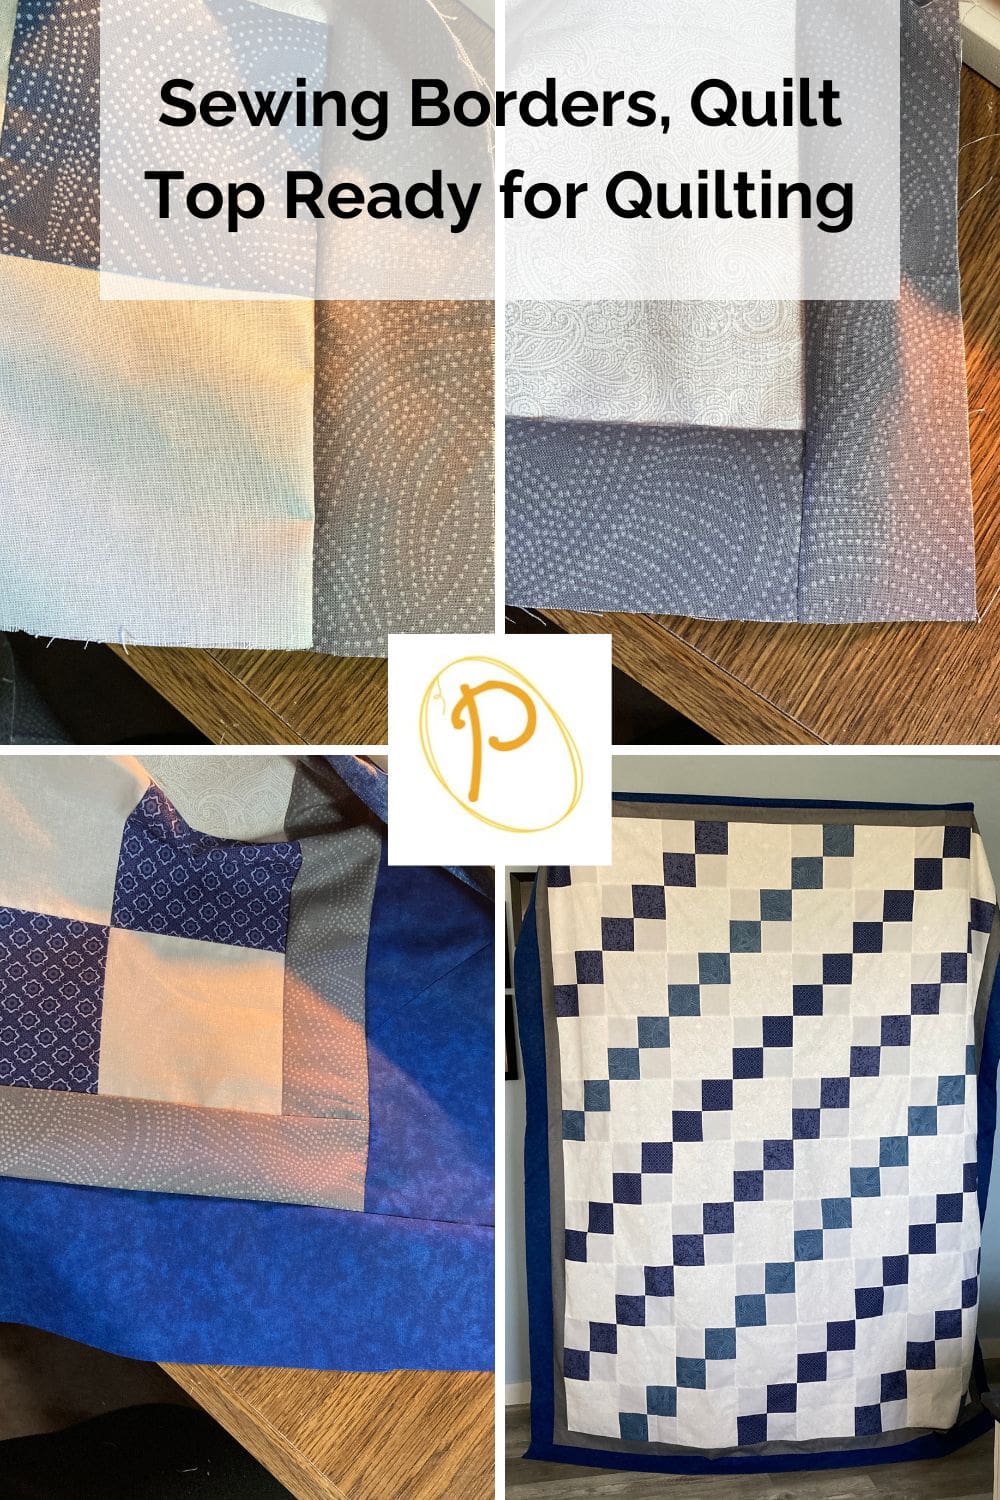
Adding the Two Borders
Use the appropriate strips for the quilt size you are making.
Baby Quilt Border Sizes
- E = Light Grey cut 2 strips, 2 ½” X 48 ½” and 2 strips 2 ½” X 36 ½”.
- F = Bright Blue cut 2 strips, 3 ½” X 52 ½” and 2 strips 3 ½” X 42 ½”.
Throw Quilt Border Sizes
- E = Light Grey cut 2 strips, 2 ½” X 64 ½” and 2 strips 2 ½” X 52 ½”.
- F = Bright Blue cut 2 strips, 3 ½” X 68 ½” and 2 strips 3 ½” X 58 ½”.
Twin Quilt Border Sizes
- E = Light Grey cut 2 strips, 2 ½” X 80 ½” and 2 strips 2 ½” X 68 ½”.
- F = Bright Blue cut 2 strips, 3 ½” X 84 ½” and 2 strips 3 ½” X 74 ½”.
First Border in Light Grey Fabric
Using the 2 vertical pieces of sashing, pin on the sides of the quilt top with the right sides together. Using ¼-inch seam allowance, sew 1 sashing strip to each side of the quilt.
Press all seams to the outside or open.
Using the 2 horizontal pieces of sashing, pin on the top and bottom of the quilt top with the right sides together. Using ¼-inch seam allowance, sew 1 sashing strip to each side of the quilt.
Second Border in Bright Blue Fabric
Repeat the process of adding the borders as you did with the first one.
Layer the Quilt Top, Batting, and Backing Fabric
Now that the quilt top is done, it is time to layer the quilt backing fabric, batting, and the quilt top. This is often referred to as the quilt sandwich.
The backing fabric and the batting should be a few inches larger all the way around than the quilt top.
This makes sure that there is backing and batting covering the entire quilt top fabric. If you cut it too close and there is any slippage, you might end up with an edge that does not have the bottom part of the quilt sandwich. Refer to the fabric requirements chart for the recommended sizes for the backing and batting.
Begin by placing the backing fabric on a flat solid surface, right side down facing out. Smooth out any wrinkles. Use painters’ tape to secure the edges of the fabric down. This will help hold it in place and reduce the chance of a wrinkle developing as you place the next two layers.
Next, center the batting on top of the backing fabric smoothing out any wrinkles.
Finally, place the quilt top on the batting, centering it with the right side up. Smooth out any wrinkles.
Basting the Quilt Layers Together
Tack all three layers together using 1 ½” stainless steel pins or spray baste if preferred.
Put a pin in each corner and around the entire quilt about every 5-6 inches or so through all three layers.
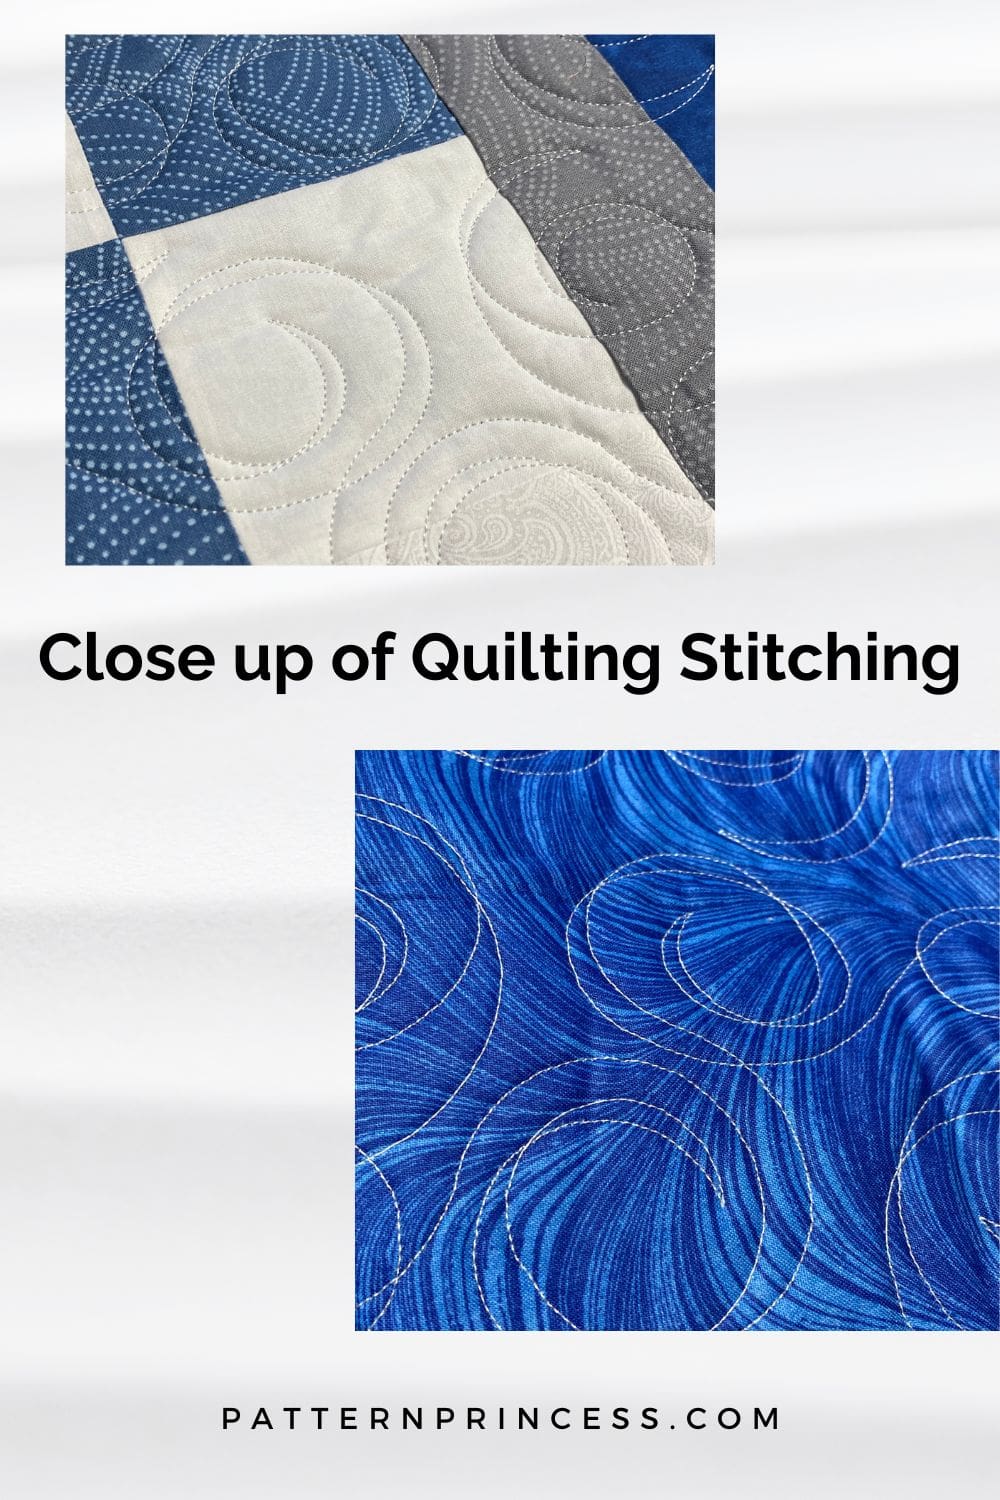
This holds things in place, so they don’t move around while you are sewing the layers together using a quilting design of your choice.
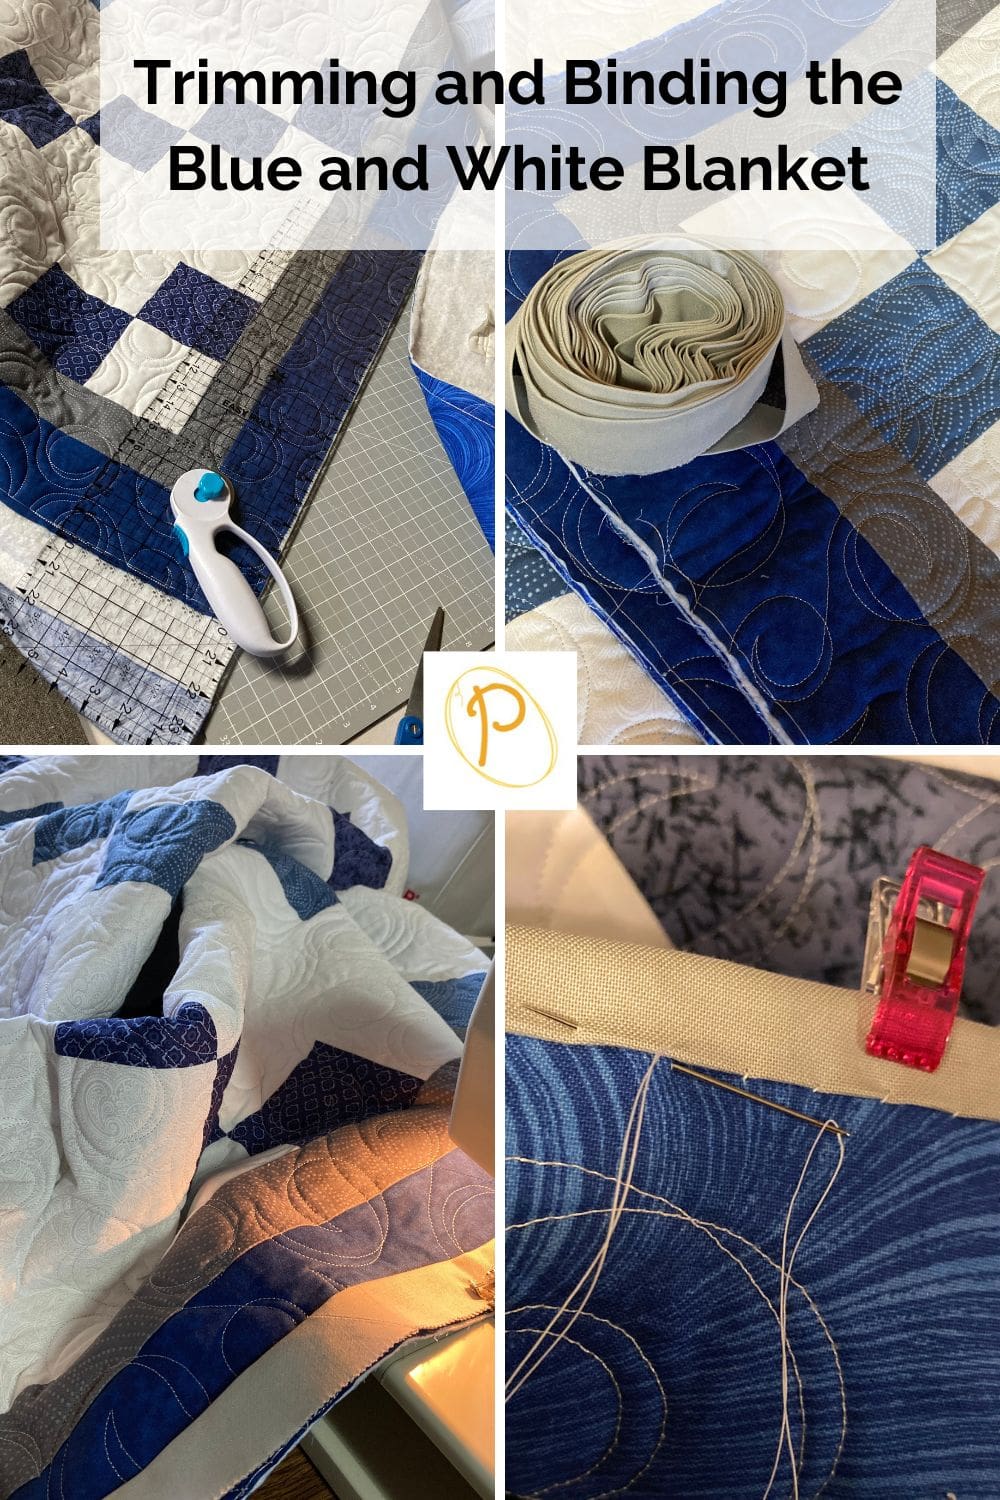
Trim the Batting and Backing Fabric Before Binding
After the quilting process, trim the batting and the backing fabric. A large cutting mat, longer ruler, and a rotary cutter work nicely for this.
To do this, lay the quilt flat. Place the ruler along the edge of the quilt and use it as a guide to run your rotary cutter against to trim the quilt batting and backing to the size of the quilt top. Do this on all four sides.
Sew the Binding to the Quilt
- Baby Quilt Binding Strip 2 ½” X 218”.
- Throw Quilt Binding Strip 2 ½” X 282”.
- Twin Quilt Binding Strip 2 ½” X 346”.
First, prepare the binding strips. I used the jelly roll strips to make my quilt binding. However, you can cut 2 ½ inch width of fabric strips and join them together to make the length needed for each quilt size.
You can find a tutorial for making binding on the website.
Once the strips are sewn together, fold in half lengthwise with wrong sides together and press.
Pin the raw edge of the binding onto raw edge of the quilt top. I generally start in the middle of a side leaving approximately a 3-5” tail hanging.
Note: This hanging part will be used to sew to the other end of the binding strip when you have finished sewing all four sides of the binding onto the quilt.
Sew the binding onto all four sides making sure to miter the corners and join the binding. Pro Tip. I use a walking foot as it helps all the layers slide under the sewing foot easier.
Sewing the Binding to the Quilt Back
You can use your sewing machine to sew the binding on the back of the quilt. However, I hand-stitched the folded edge of the binding onto the back.
Other free quilt patterns you may enjoy making.

You can find Victoria crocheting, quilting, and creating recipes. She has cooked in restaurants for over 20 years, including many larger parties. She learned to crochet when she was just 11 years old and has been crocheting ever since; over 50 years now. Over 40 years ago, she loved her first class in sewing and continues to hone her skills in quilting. Many have enjoyed the handmade gifts over the years. In her professional career, she has worked in management in a wide variety of businesses including higher education as a dean of a division. All the while attending college part-time to achieve her doctorate in higher education with an emphasis in e-learning.