Last updated on November 13th, 2024 at 07:29 pm
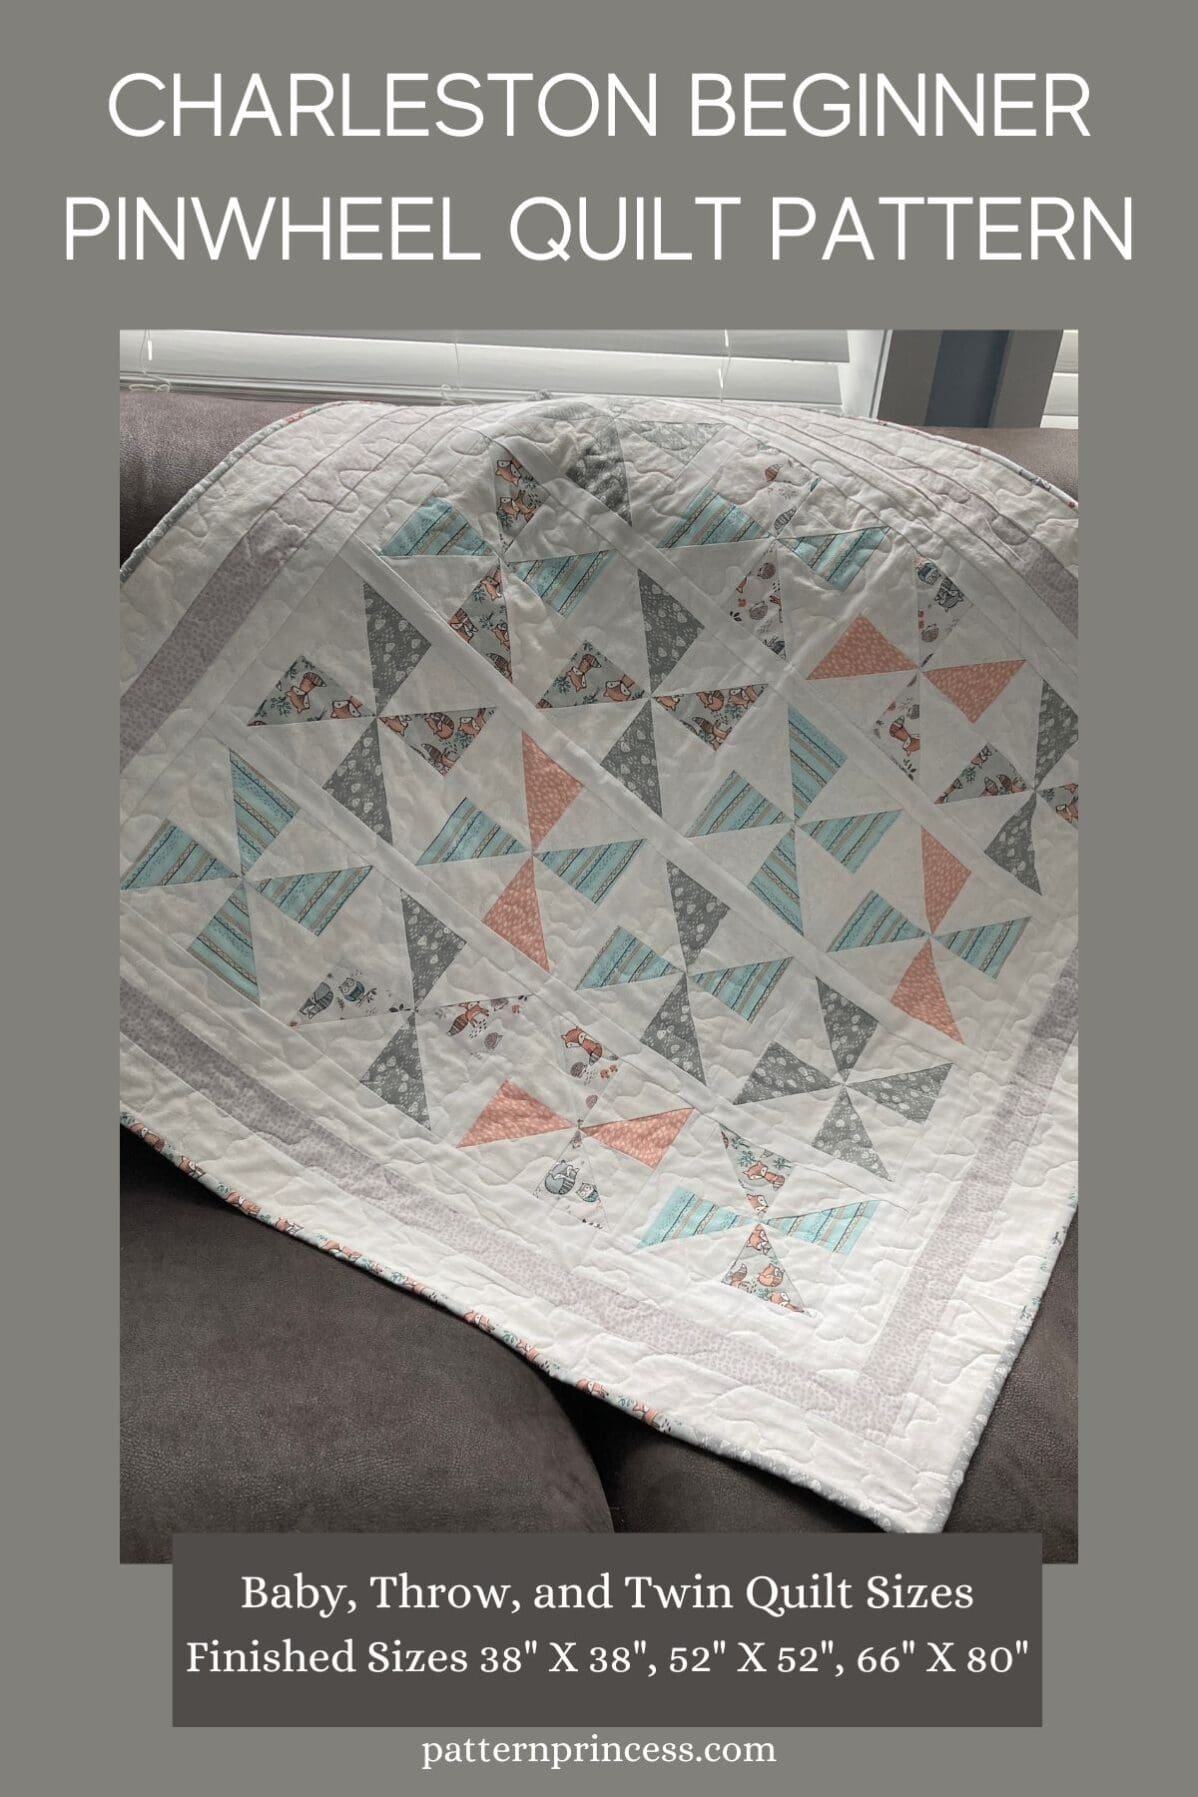
We are so excited to bring you this easy-to-follow tutorial for the free Charleston Beginner Pinwheel Quilt Pattern that will help you make a beautiful quilt in three different sizes.
This pattern is suitable for beginners, so even if you have never made a quilt before, you will find this pattern straightforward and enjoyable.
With a few simple steps and some creative fabric choices, you will be able to make a quilt that is both stunning and unique. We hope you find this post helpful and inspiring.
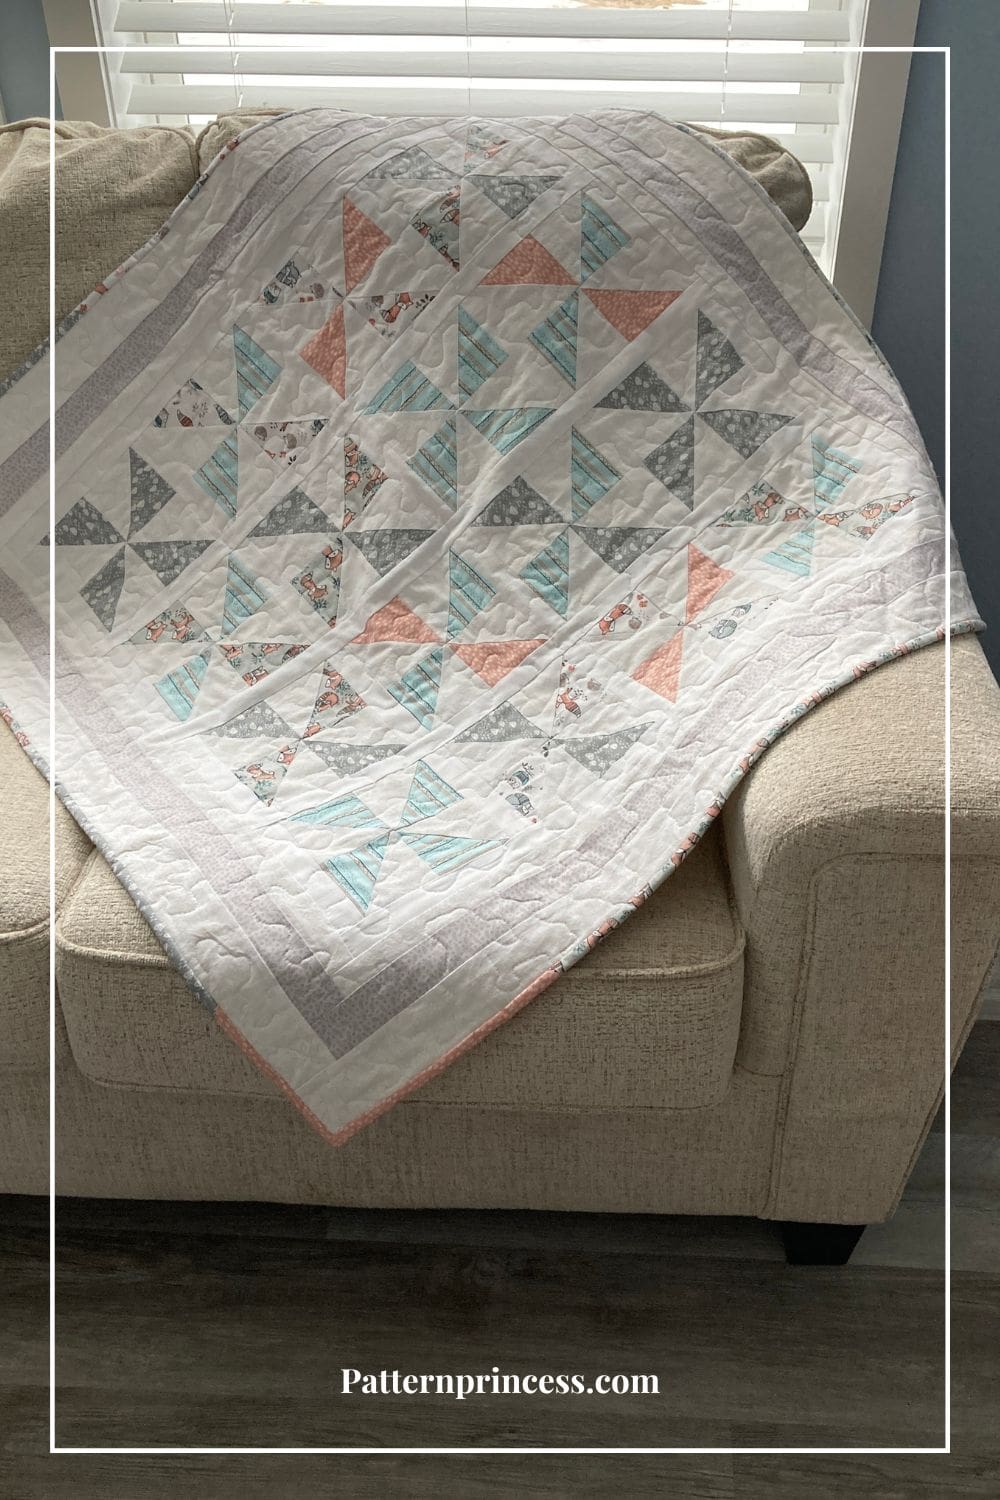
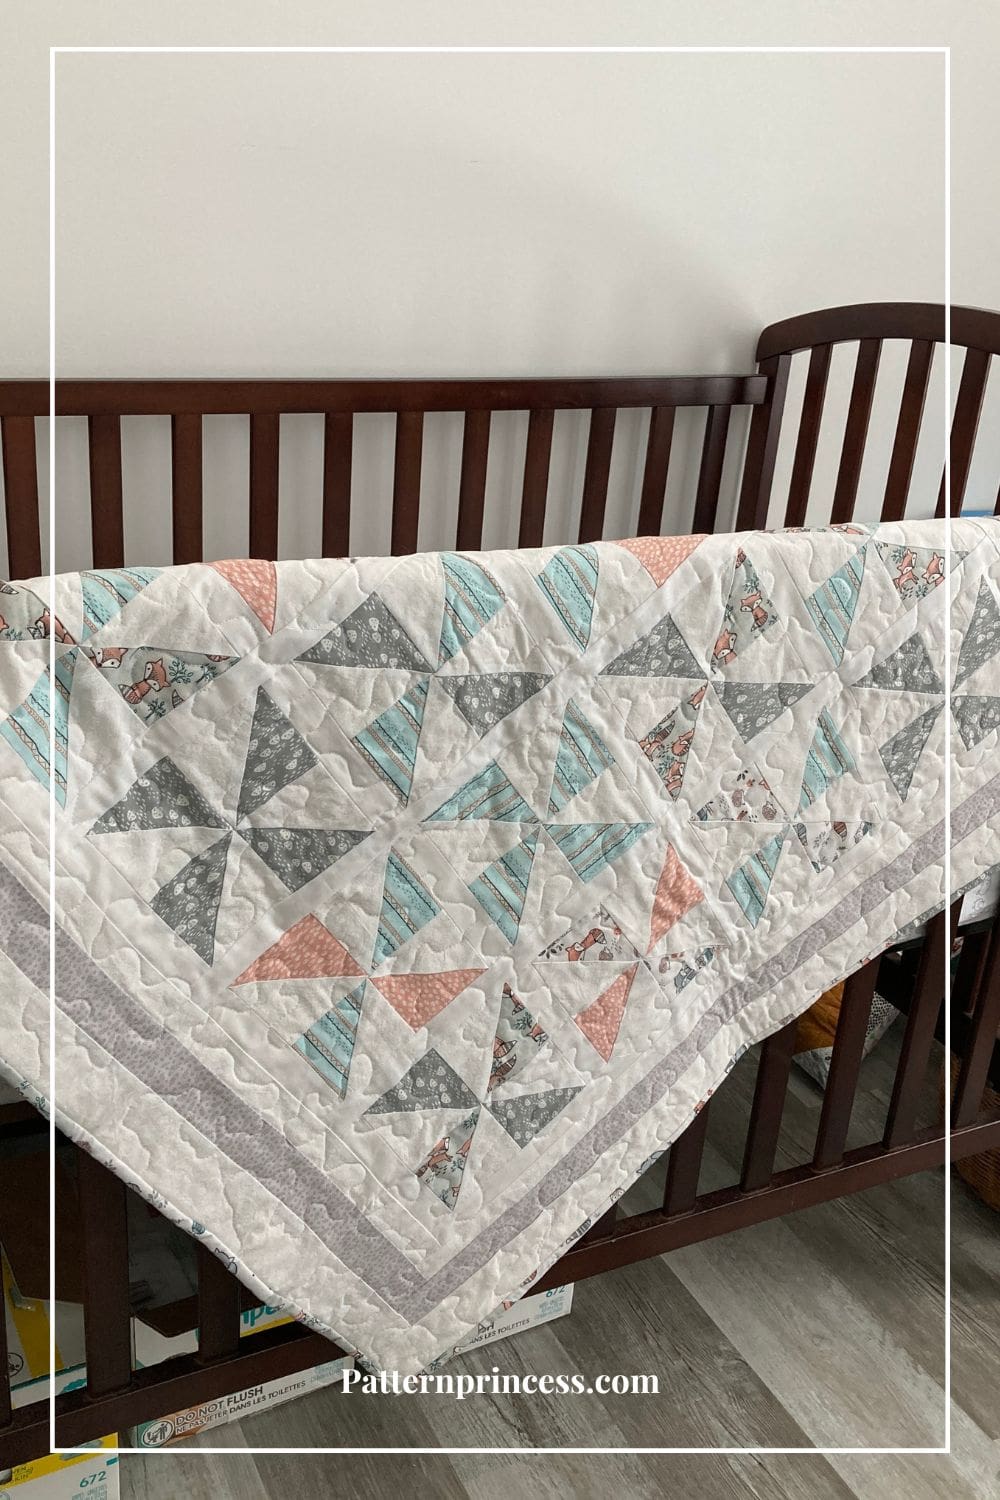
So gorgeous and so sweet. Just perfect for a gender neutral baby quilt. Enjoy making this easy Pinwheel Quilt Pattern featuring sweet pinwheels spinning amidst white sashing and borders. Perfect for a baby blanket, throw quilt or beautiful bed quilt.
Post contains affiliate links, and we earn commissions if you shop through the links on this page. For more information, please read the disclosure section under the About Us page.
Easy Quilt Pattern in Three Sizes
There’s something magical about transforming fabric into a beautiful work of art, and this pattern won’t disappoint. This super easy quilt pattern comes in three different sizes. You don’t have to be an experienced quilter to enjoy the satisfaction of piecing together this design.
Baby Quilt Size
38 x 38 inches Shown
Throw Size Quilt
52 x 52 inches
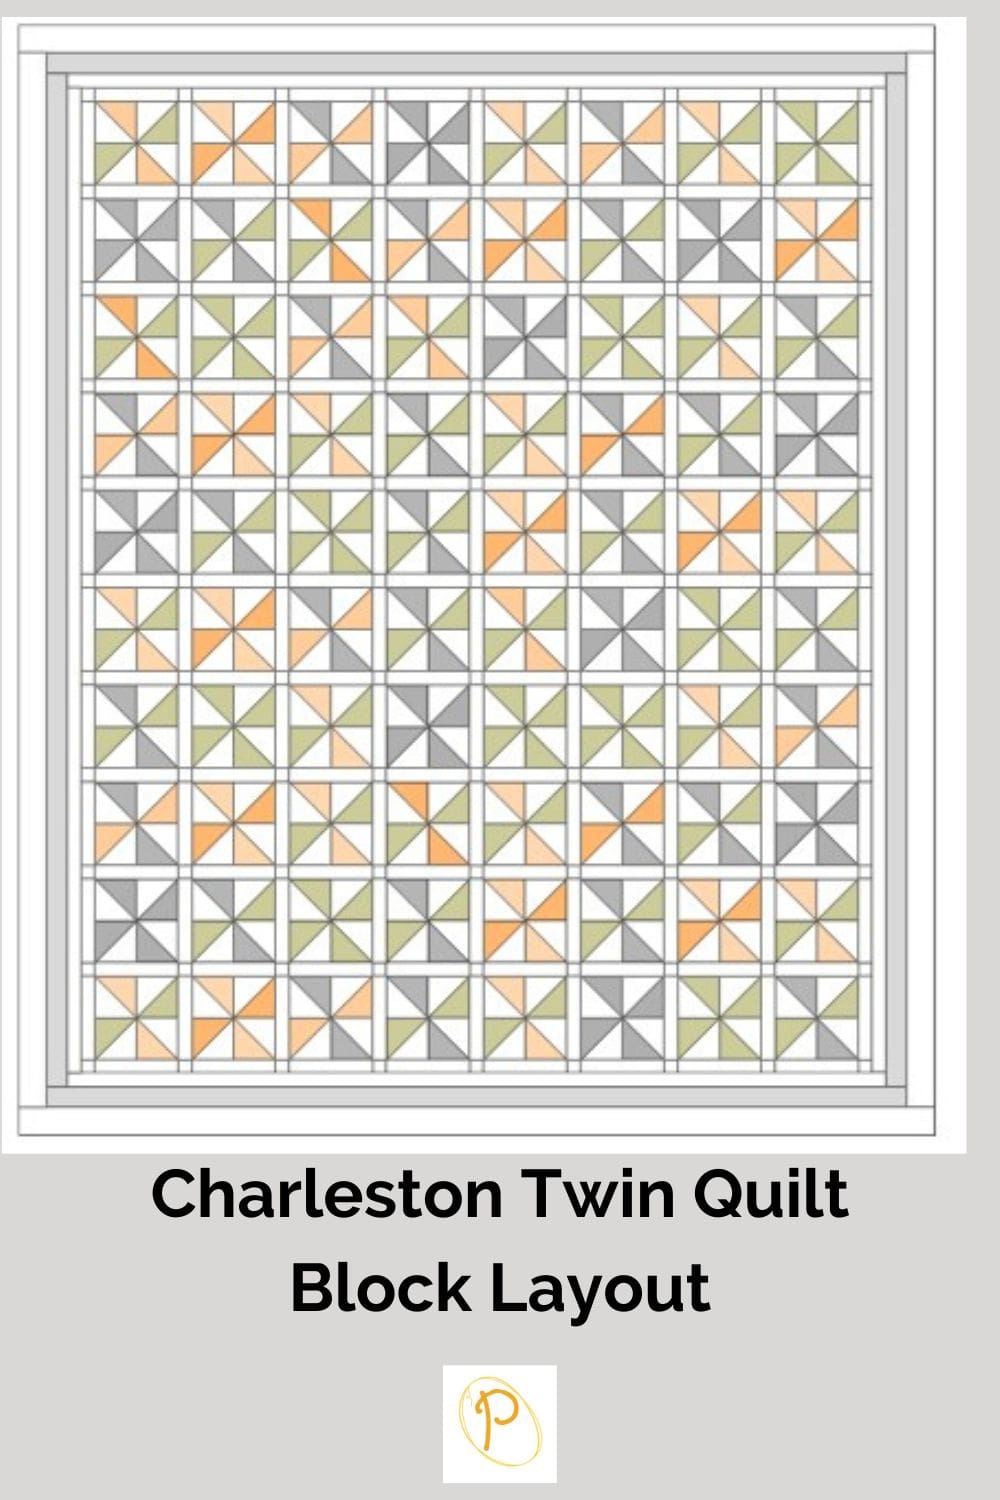
Twin Size Quilt
66 x 80 inches
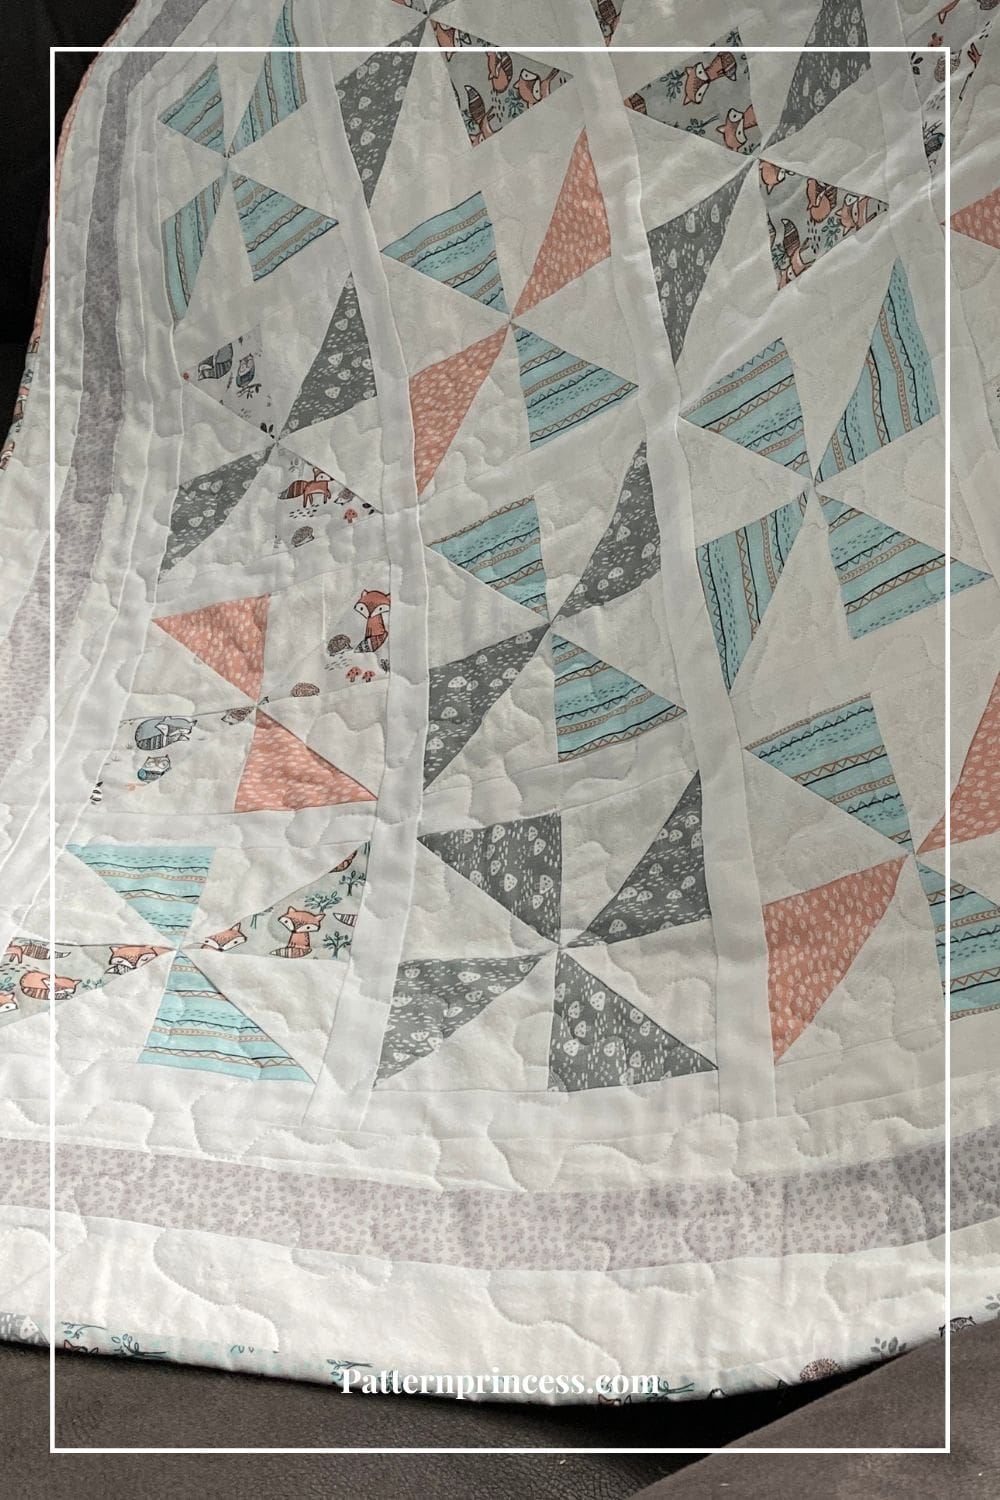
Quilt with Pinwheel Blocks
The pinwheel blocks are made using four squares. Every two squares sewn together and cut apart make two finished half square triangle units. They are made using four completed half square triangle units.
You can find detailed tutorials for the Half Square Triangle Squares and the Pinwheel Quilt Blocks on the website too.
Sew a sashing around each quilt square, add a few borders to make this quilt pop.
Fabric Options for This Easy Baby Quilt
It is beautiful using the nursery style fabric prints. However, this would also look gorgeous in grays, pale blues, spring prints, or even bold fabrics. Turn this into scrappy blanket using leftover fabric squares.
Such quick and easy projects are a joy to make.
Fat Quarter Friendly Quilt Blocks
One day, I saw a package of 5 fat quarters at JoAnn Fabrics. The colors were so complimentary, and I thought it would look lovely as a baby blanket. It was important that I had enough fabric.
To make sure that I had enough, I purchased three packages as I was not completely sure what the final pattern would be.
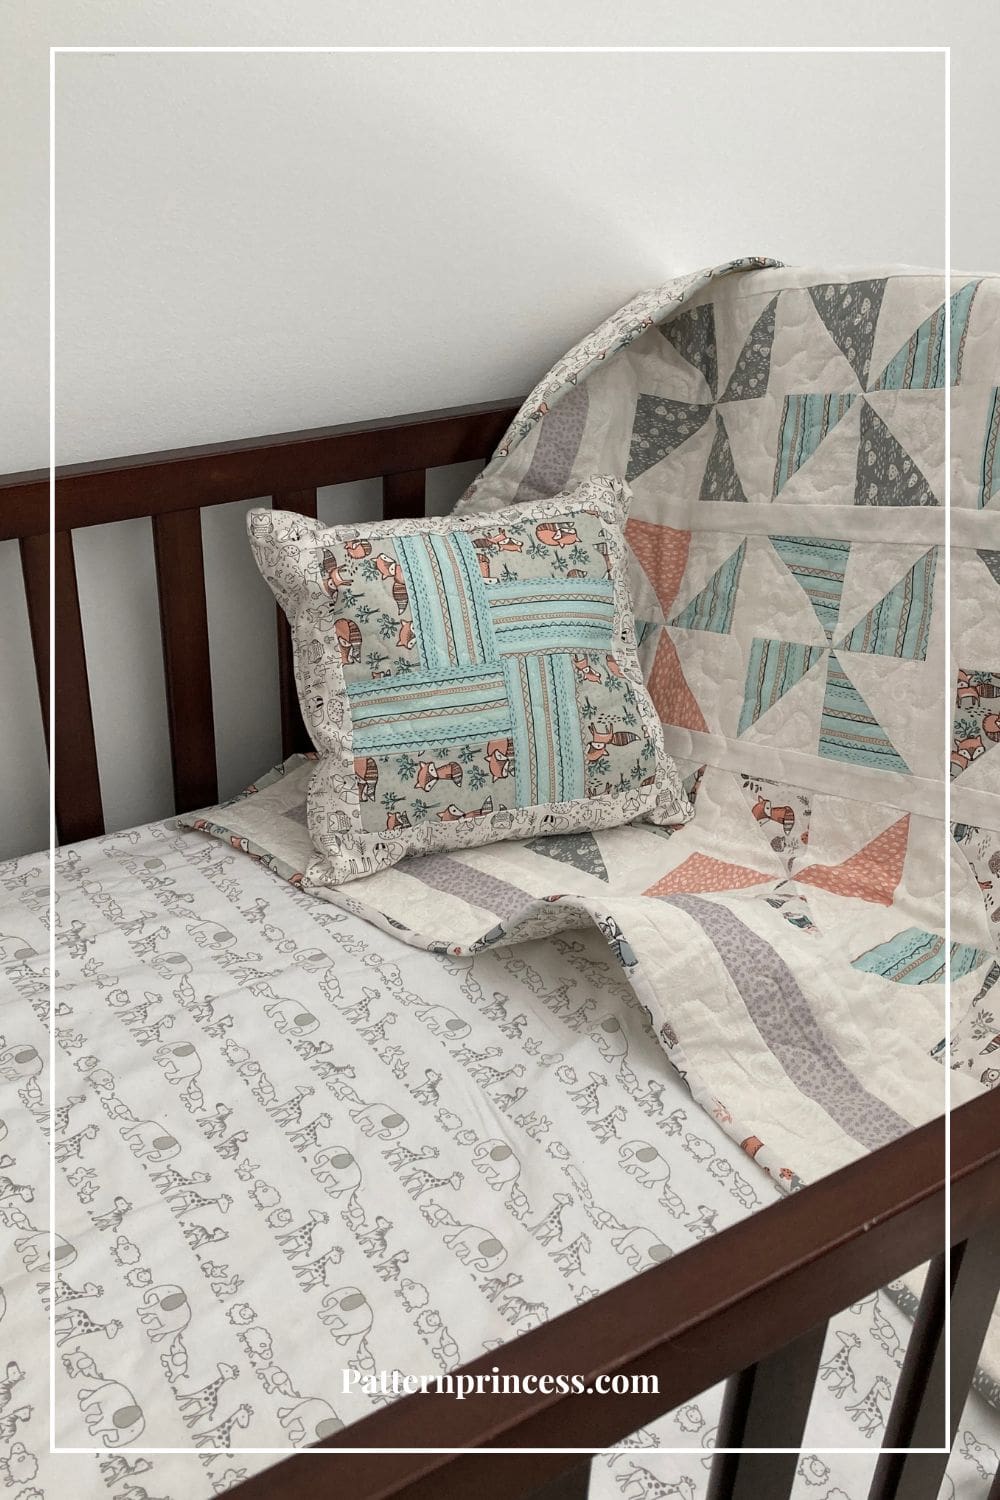
I still have a little of the fabric leftover and I made this baby quilt and the Sweet Dreams Easy Quilt Pattern too. It is amazing that the same fabrics were used for the quilt blocks themselves. Yet, with the different style, they each have such a unique look.
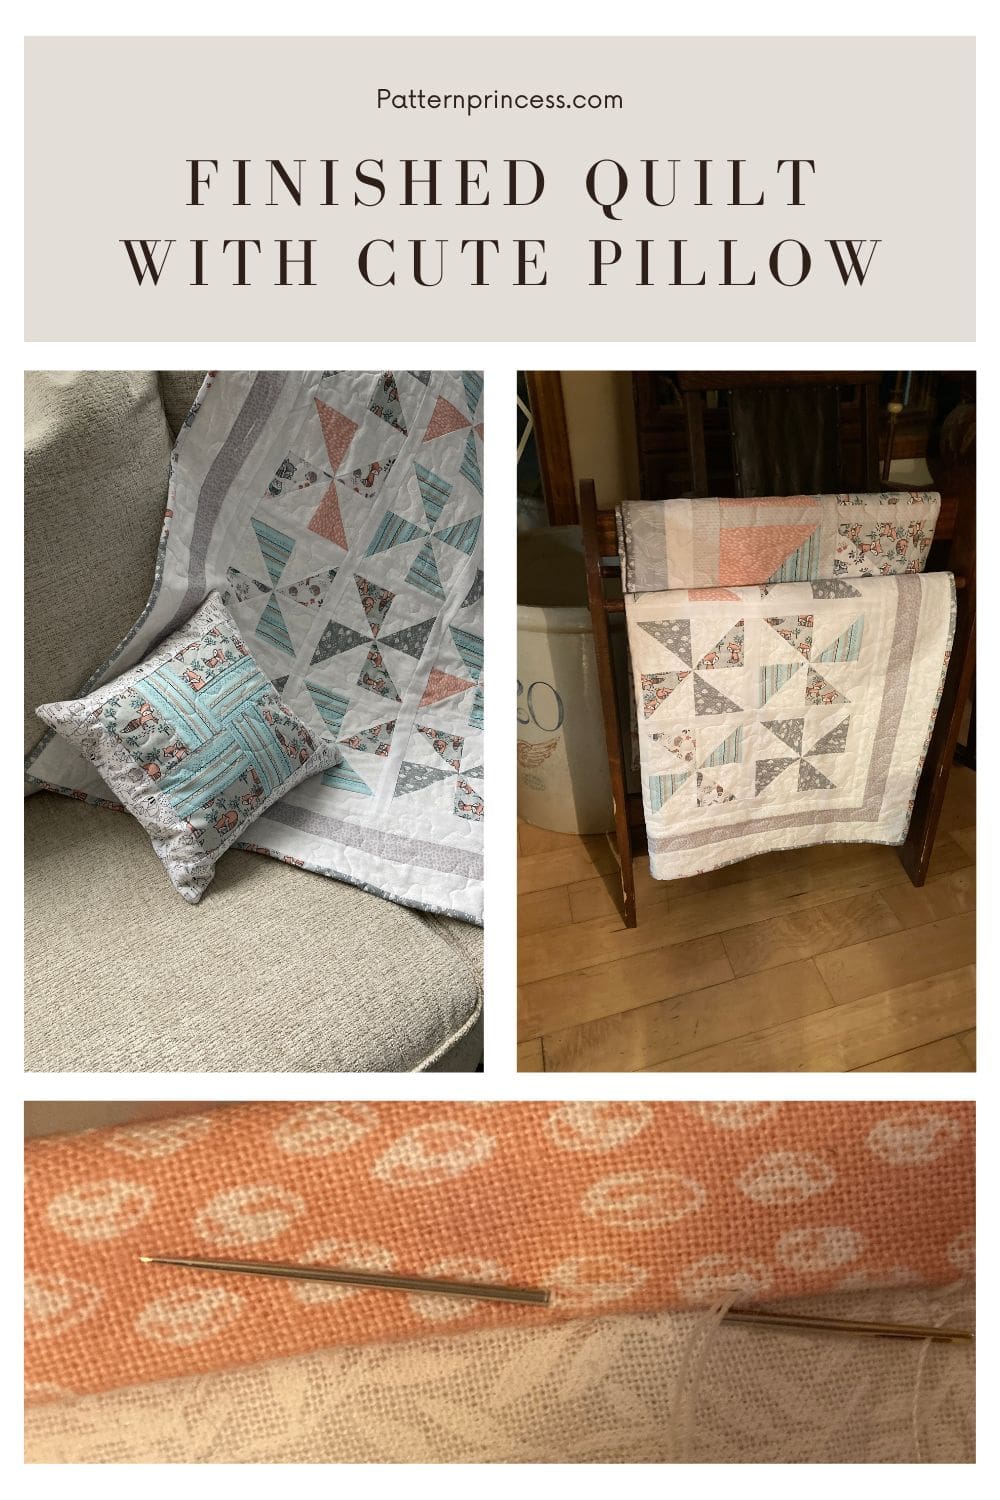
Oh Yeah, I made a Pocket Pillow Cover too! It makes such a lovely gift set for a baby shower.
Directions: Charleston Beginner Pinwheel Quilt Pattern
Quilting Skill Level
Easy – Beginner
Finished Quilt Measurements
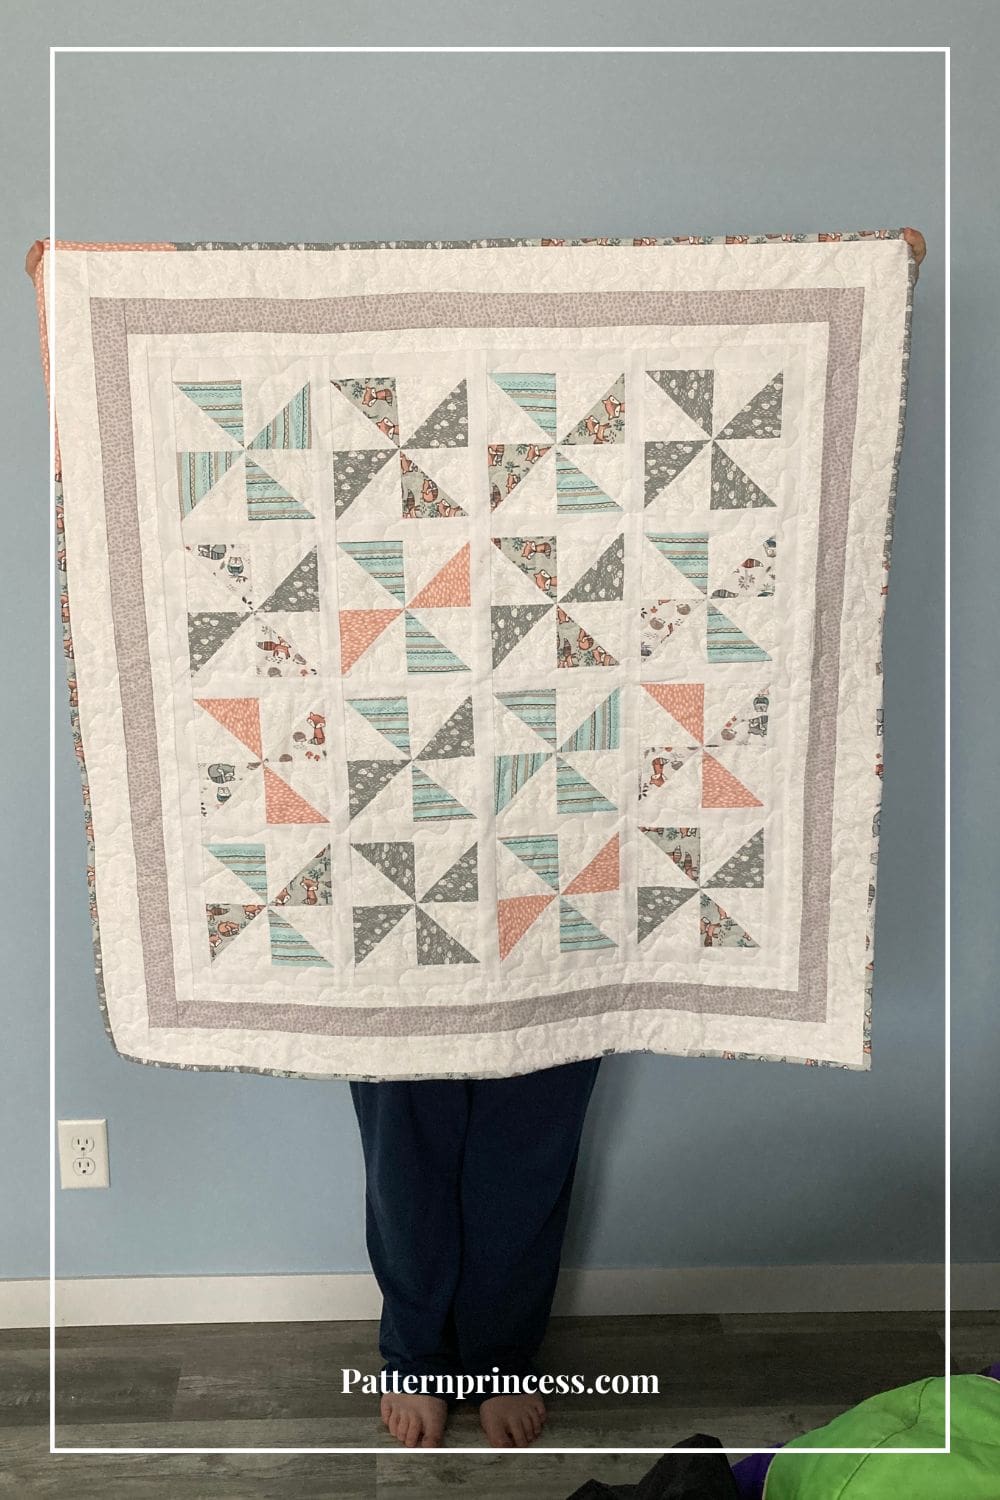
- Baby Quilt Size: 38″ x 38″ (pictured) (16 blocks. 4 squares across, 4 squares long)
- Throw Size: 52″ x 52″ (perfect for youth size) (36 blocks. 6 squares across, 6 squares long)
- Twin Size: 66″ x 80″ (80 blocks. 8 squares across, 10 squares long)
Pattern Notes
Charleston Beginner Pinwheel Quilt is perfect for a precut, fat quarter, fat eighth, and cut yardage quilt pattern that makes four quilt sizes.
I like to make the borders a smidge bit longer and trim them to size after sewn into place. I always worry that I will have this long strip of fabric that is a bit too short. Therefore, you may find that the borders need to be trimmed by ¼ to ½ inch.
For each quilt size the steps for completing the quilt project are the same. You will be using more squares and the sizes of the three borders are different. But the quilting process itself is the same.
Use a ¼-inch seam allowance. I recommend using a special presser foot with a ¼-inch guide if you have one for your machine. This will help you get uniform seams, and matching seams.
Nest your seams. This means that the seams of each row are aligned, and the pieces fit together almost like the pieces of a puzzle.
Right Sides Together. Sew fabric together with right sides together. Unless otherwise noted.
The directions for this quilt are for rotary cutting, machine piecing, machine quilting, and the binding is hand-stitched to the quilt back.
Accurate cutting and sewing enhances your final product. Pin your pieces together before sewing them to ensure proper seam alignment.

Materials and Equipment/Tools
The fabric requirements for the quilt tip, backing, binding, and the batting needed are noted by each quilt size below.
However, all the quilts will use the following materials and tools to complete.
- Thread
- Rotary Cutter
- Quilting Ruler
- Cutting Mat
- Rotating Cutting Mat
- Iron
- Ironing Board or Pressing Mat
- Pins
- Clips
- Sewing Machine
- My Favorite Quilting Supplies

Baby Quilt Details
Size
38 X 38 inches
Materials Needed
One fat quarter pack of 5 different fabric colors for the pinwheel blocks.
2 yards white fabric for the pinwheel blocks, sashing around the blocks, and the first and third border around the baby quilt.
½ yard of grey fabric pieced together for the second border.
Backing Fabric 42 x 42 inches.
Batting 42 x 42 inches.
Binding. Join together leftover fabric from the fat quarters. 2 ½ X 172 inches.
Fabric Measurements
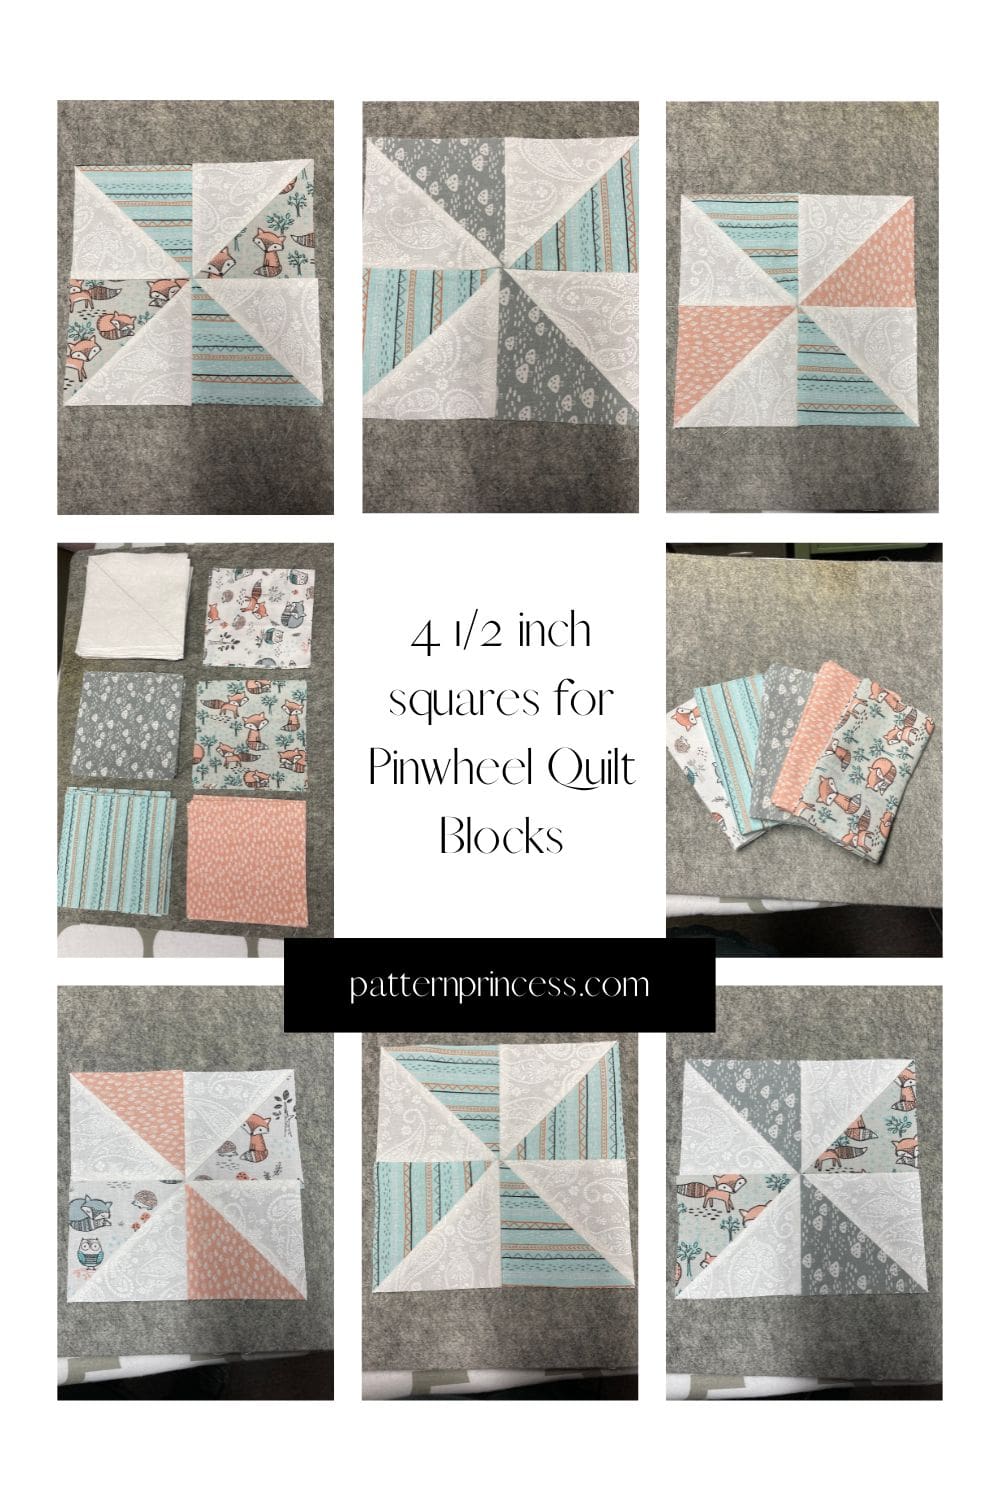
For the Pinwheel quilt blocks I used 5 different pastel colors of fabric paired with white fabric.
A = White Fabric 32 squares, 4 ½ x 4 ½ inches
B = Green/Teal Stripe Fabric 10 squares, 4 ½ x 4 ½ inches
C = Grey Fabric 9 squares, 4 ½ x 4 ½ inches
D = Dark Peach Fabric 4 squares, 4 ½ x 4 ½ inches
E = Blue/Peach Animal Print Fabric 5 squares, 4 ½ x 4 ½ inches
F = White Animal Print Fabric 4 squares, 4 ½ x 4 ½ inches
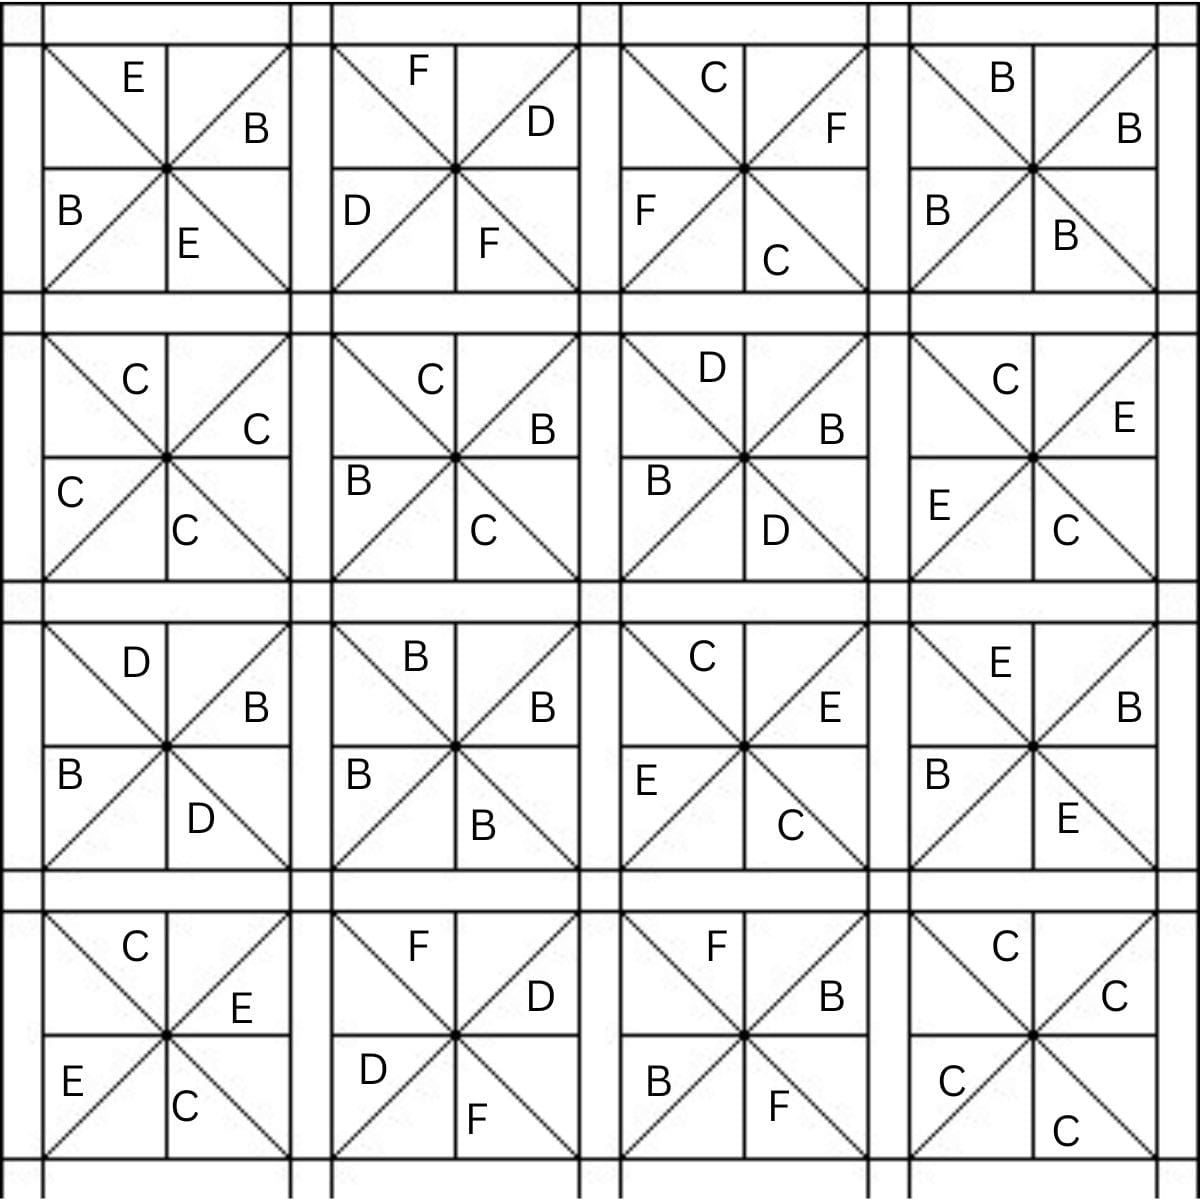
Use these squares to make 16 pinwheel blocks, trimmed to 6 ½ x 6 ½ inches.
B/B = 2, B/C = 1, B/D = 2, B/E = 2, B/F = 1
C/C = 2, C/E = 3, C/F = 1
D/F = 2
White sashing is placed between the pinwheel quilt blocks.
Vertical sashing pieces used between the pinwheel quilt blocks and on the ends. 20 pieces, 1 ½ x 6 ½ inches.
Horizontal sashing the width of the quilt blocks 5 strips, 1 ½ x 29 ½ inches.
Three Borders
First Border in White Fabric
Horizontal bottom and top 2 strips cut 1 ½ x 31 ½ inches and 2 vertical sides cut 1 ½ x 29 1/2 inches.
Second Border in Grey Fabric
Horizontal bottom and top cut 2 strips 2 x 34 1/2 inches and vertical sides cut 2 strips 2 x 31 ½ inches.
Third Border in White Fabric
Horizontal bottom and top Cut 2 strips 2 1/2 x 38 ½ inches and cut 2 strips vertical sides 2 ½ x 34 ½ inches.

Throw Size Details
Size
52 X 52 inches
Materials Needed
Three fat quarter packs of 5 different fabric colors for the pinwheel blocks or ½ yard of fabric in 5 colors.
3 yards white fabric for the pinwheel blocks, sashing around the blocks, and the first and third border around the baby quilt.
¾ yard of grey fabric pieced together for the second border.
Backing Fabric 56 x 56 inches.
Batting 56 x 56 inches.
Binding. Join leftover fabric from the fat quarters. 2 ½ X 228 inches.
Fabric Measurements
For the Pinwheel quilt blocks I used 5 different pastel colors of fabric paired with white fabric.
A = White Fabric 72 squares, 4 ½ x 4 ½ inches
B = Green/Teal Stripe Fabric 21 squares, 4 ½ x 4 ½ inches
C = Grey Fabric 25 squares, 4 ½ x 4 ½ inches
D = Dark Peach Fabric 8 squares, 4 ½ x 4 ½ inches
E = Blue/Peach Animal Print Fabric 10 squares, 4 ½ x 4 ½ inches
F = White Animal Print Fabric 8 squares, 4 ½ x 4 ½ inches
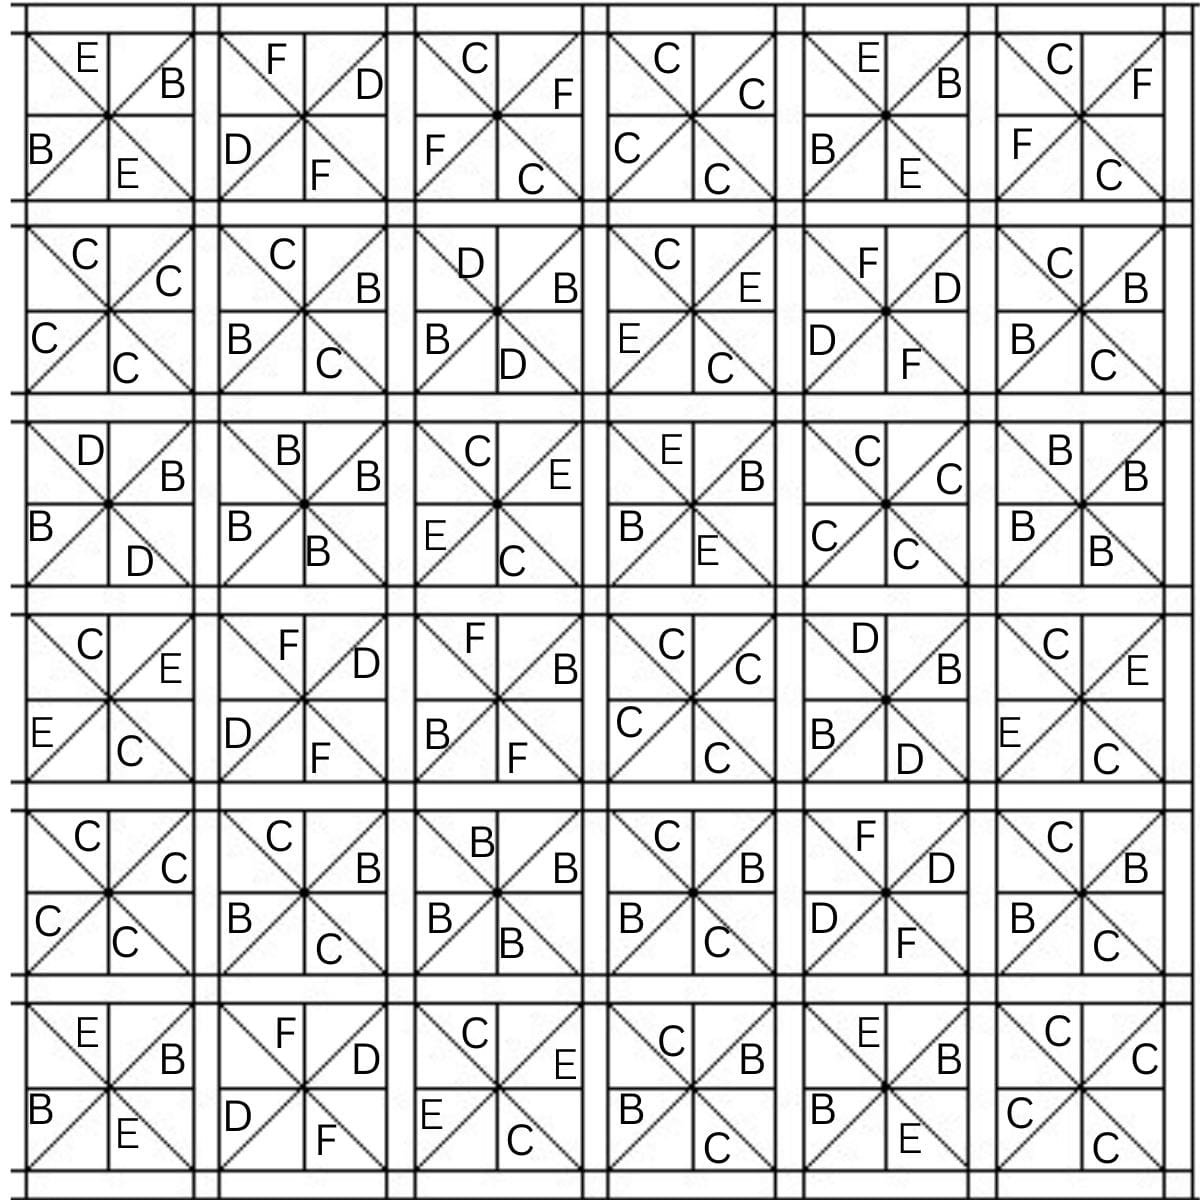
Use these squares to make 36 pinwheel blocks, trimmed to 6 ½ x 6 ½ inches.
B/B = 3, B/C = 6, B/D = 3, B/E = 5, B/F = 1
C/C = 6, C/E = 5, C/F = 2
D/F = 5
White sashing is placed between the pinwheel quilt blocks.
Vertical sashing pieces used between the pinwheel quilt blocks and on the ends. 42 pieces, 1 ½ x 6 ½ inches.
Horizontal sashing the width of the quilt blocks 7 strips, 1 ½ x 43 ½ inches.
Three Borders
First Border in White Fabric
Horizontal bottom and top 2 strips cut 1 ½ x 45 ½ inch and 2 vertical sides cut 1 ½ x 43 1/2 inches.
Second Border in Grey Fabric
Horizontal bottom and top cut 2 strips 2 x 48 1/2 inches and vertical sides cut 2 strips 2 x 45 ½ inches.
Third Border in White Fabric
Horizontal bottom and top Cut 2 strips 2 1/2 x 52 ½ inches and cut 2 strips vertical sides 2 ½ x 48 ½ inches.
Twin Quilt Details
Size
66 X 80 inches
Materials Needed
Five fat quarter packs of 5 different fabric colors for the pinwheel blocks or 1 ½ yards of fabric in 5 colors.
4 1/2 yards white fabric for the pinwheel blocks, sashing around the blocks, and the first and third border around the baby quilt.
1 yard of grey fabric pieced together for the second border.
Backing Fabric 70 x 84 inches.
Batting 70 x 84 inches.
Binding. Join leftover fabric from the fat quarters. 2 ½ X 312 inches.
Fabric Measurements
For the Pinwheel quilt blocks I used 5 different pastel colors of fabric paired with white fabric.
A = White Fabric 160 squares, 4 ½ x 4 ½ inches
B = Green/Teal Stripe Fabric 57 squares, 4 ½ x 4 ½ inches
C = Grey Fabric 50 squares, 4 ½ x 4 ½ inches
D = Dark Peach Fabric 15 squares, 4 ½ x 4 ½ inches
E = Blue/Peach Animal Print Fabric 15 squares, 4 ½ x 4 ½ inches
F = White Animal Print Fabric 23 squares, 4 ½ x 4 ½ inches
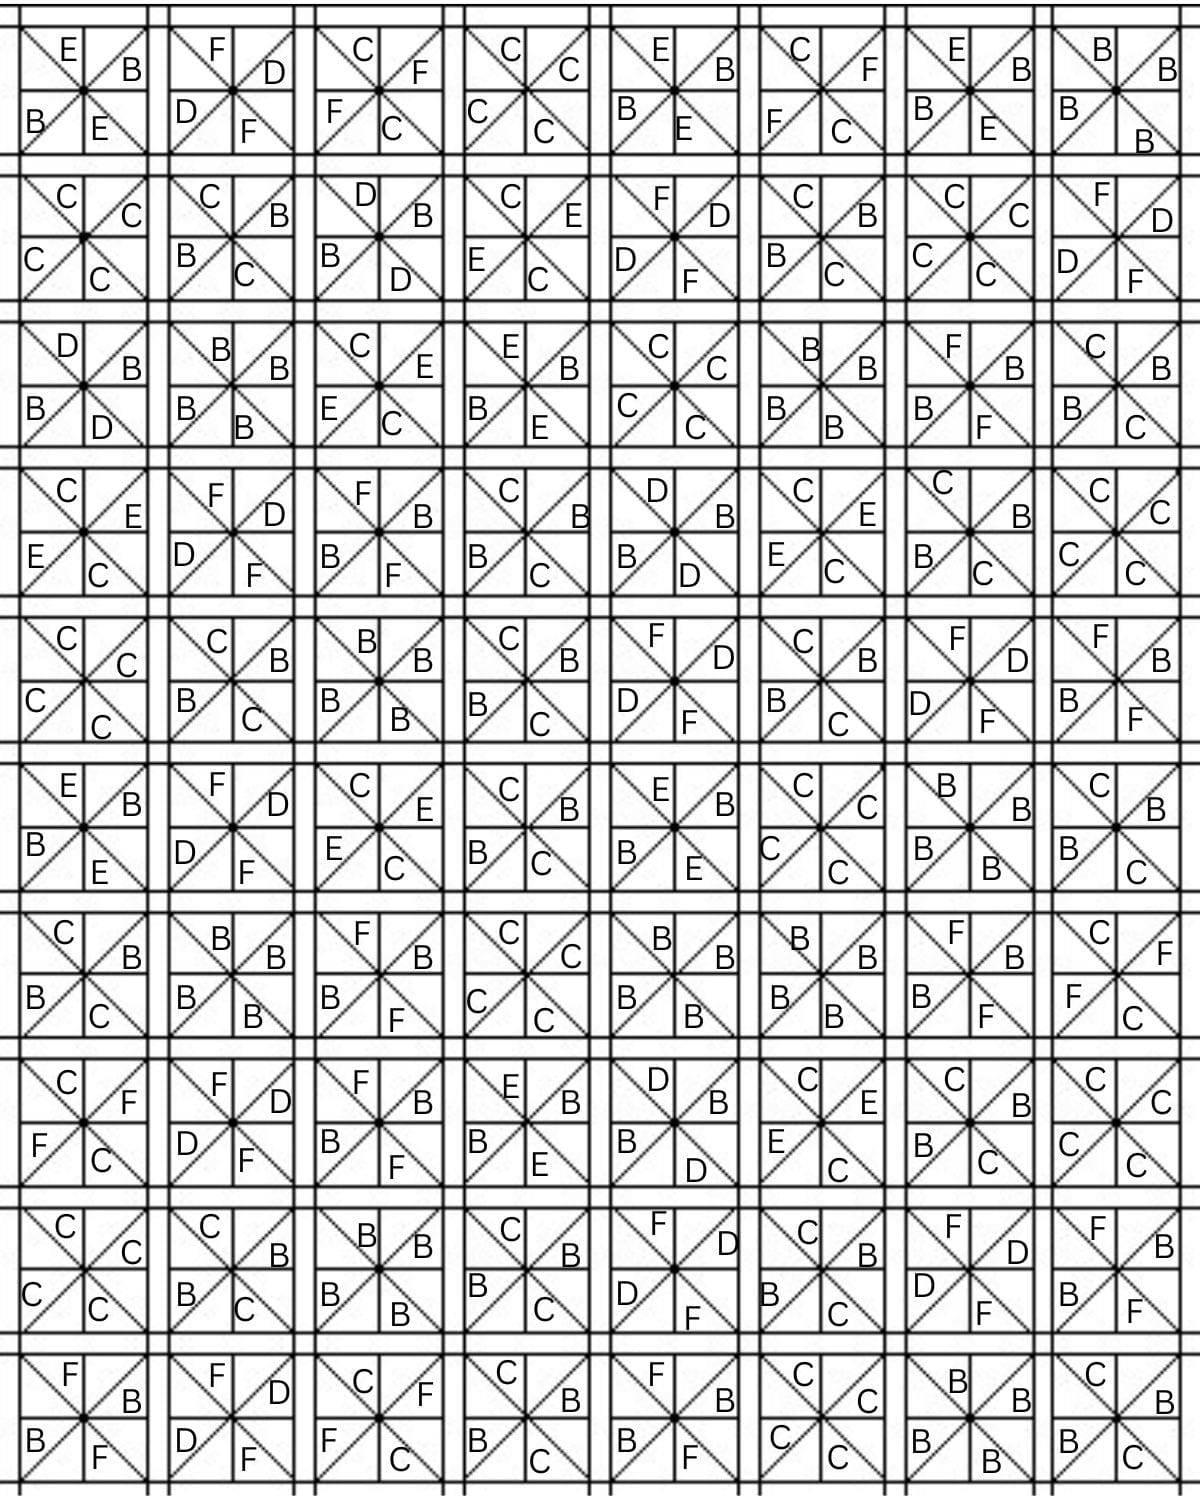
Use these squares to make 80 pinwheel blocks, trimmed to 6 ½ x 6 ½ inches.
B/B = 9, B/C = 17, B/D = 4, B/E = 7, B/F = 10
C/C = 11, C/E = 6, C/F = 5
D/F = 11
White sashing is placed between the pinwheel quilt blocks.
Vertical sashing pieces used between the pinwheel quilt blocks and on the ends. 90 pieces, 1 ½ x 6 ½ inches.
Horizontal sashing the width of the quilt blocks 11 strips, 1 ½ x 57 ½ inches.
Three Borders
First Border in White Fabric
Horizontal bottom and top 2 strips cut 1 ½ x 59 ½ inches and 2 vertical sides cut 1 ½ x 71 1/2 inches.
Second Border in Grey Fabric
Horizontal bottom and top cut 2 strips 2 x 62 ½ inches and vertical sides cut 2 strips 2 x 73 ½ inches.
Third Border in White Fabric
Horizontal bottom and top Cut 2 strips 2 1/2 x 66 ½ inches and cut 2 strips vertical sides 2 ½ x 76 ½ inches.
Make the Half Square Triangles
Cut fabric Squares
Refer to your quilt pattern for the triangle square size and number of units required. Each pair of squares makes two finished half square triangle units.
Mark Squares
Starting with the white squares of fabric, place the ruler diagonally on the back side of the white square. Use a pencil to draw a diagonal line from one corner to the opposite corner.
Sewing Squares and Create Half Square Triangles
Place the white square on top of a colored square with the right sides together matching the edges all the way around. Secure with straight pins.
Sew a scant 1/4-inch seam allowances on each side of the marked line.
Separate Triangles. Align a ruler alongside of the marked center line and using a rotary cutter, cut through both layers of the squares along the center line.
Press and Trim the Squares
Press the seams to the darker fabric or if you prefer, you can press the seams open.
Using your square quilting ruler and rotary cutter, trim the triangle square.
Align the ruler so that its diagonal line is lined up exactly with the diagonal line between fabrics.
You will be trimming the square on all 4 sides.
Your square should measure 3 ½-inches x 3 ½-inches.
Complete this process of making the half square triangle squares until all the colored squares and white squares have been joined.
Make the Pinwheel Quilt Blocks
Make the number of pinwheel quilt blocks in the colors indicated in the materials section.
The Pinwheel Quilt Block is a simple four-patch quilt block made from four half square triangles (HST).
Begin by laying out the four half square triangle units to form pinwheels. Making sure that they are pointing in the correct direction.
Sew together the top two blocks using a quarter inch seam Allowance.
Press the seams to the right.
Sew the bottom two blocks together using a quarter inch seam allowance.
Press the seams to the left.
Next align the top and bottom block sets so that the middle seam nests together. This allows the points to line up nicely.
Sew the top to the bottom, using a quarter inch seam allowance.
Press the seam open.
If necessary, trim your block to 6 ½ X 6 ½ inches.
That’s it, you have a beautiful pinwheel quilt block ready to use in your pattern.

Quilt Top Sewing Directions
Layout the quilt blocks according to the quilt top diagram.
Vertical Sashing
Use the 1 ½ x 6 ½ inch strips (Vertical sashing between the squares) and the 6 ½ X 6 ½ inch pinwheel quilt blocks.
With right sides together using ¼-inch seams, sew a 1 ½ x 6 ½ inch strip onto the left and right side of the top left HST square.
Using a ¼-inch seam allowance. Attach the next pinwheel quilt block to the right side of the sashing.
Next, add a sashing to the right side of the quilt block just sewn on using the ¼-inch seam allowance.
Continue sewing the sashing and the pinwheel quilt blocks until all the rows are sewn together.
Once the rows are sewn together, press the seams open or to one side.
To nest the seams as needed, it is a good practice to press the seams in opposite directions every other row.
Horizontal Sashing
Sew the Horizontal sashing between the rows. The size is indicated based on the quilt size you are working on.
With right sides together using ¼-inch seams, sew a sashing piece onto the top and bottom of the top row.
Next, add another row onto the bottom sashing strip.
Continue alternating between sashing strips and pinwheel quilt block strips until all the rows are sewn together with a sashing strip between each row.
Make sure to sew a sashing piece onto the bottom row as well.
Press the seams open or to one side.
At this point, all squares should be joined with the sashing in between the squares and round the outside.
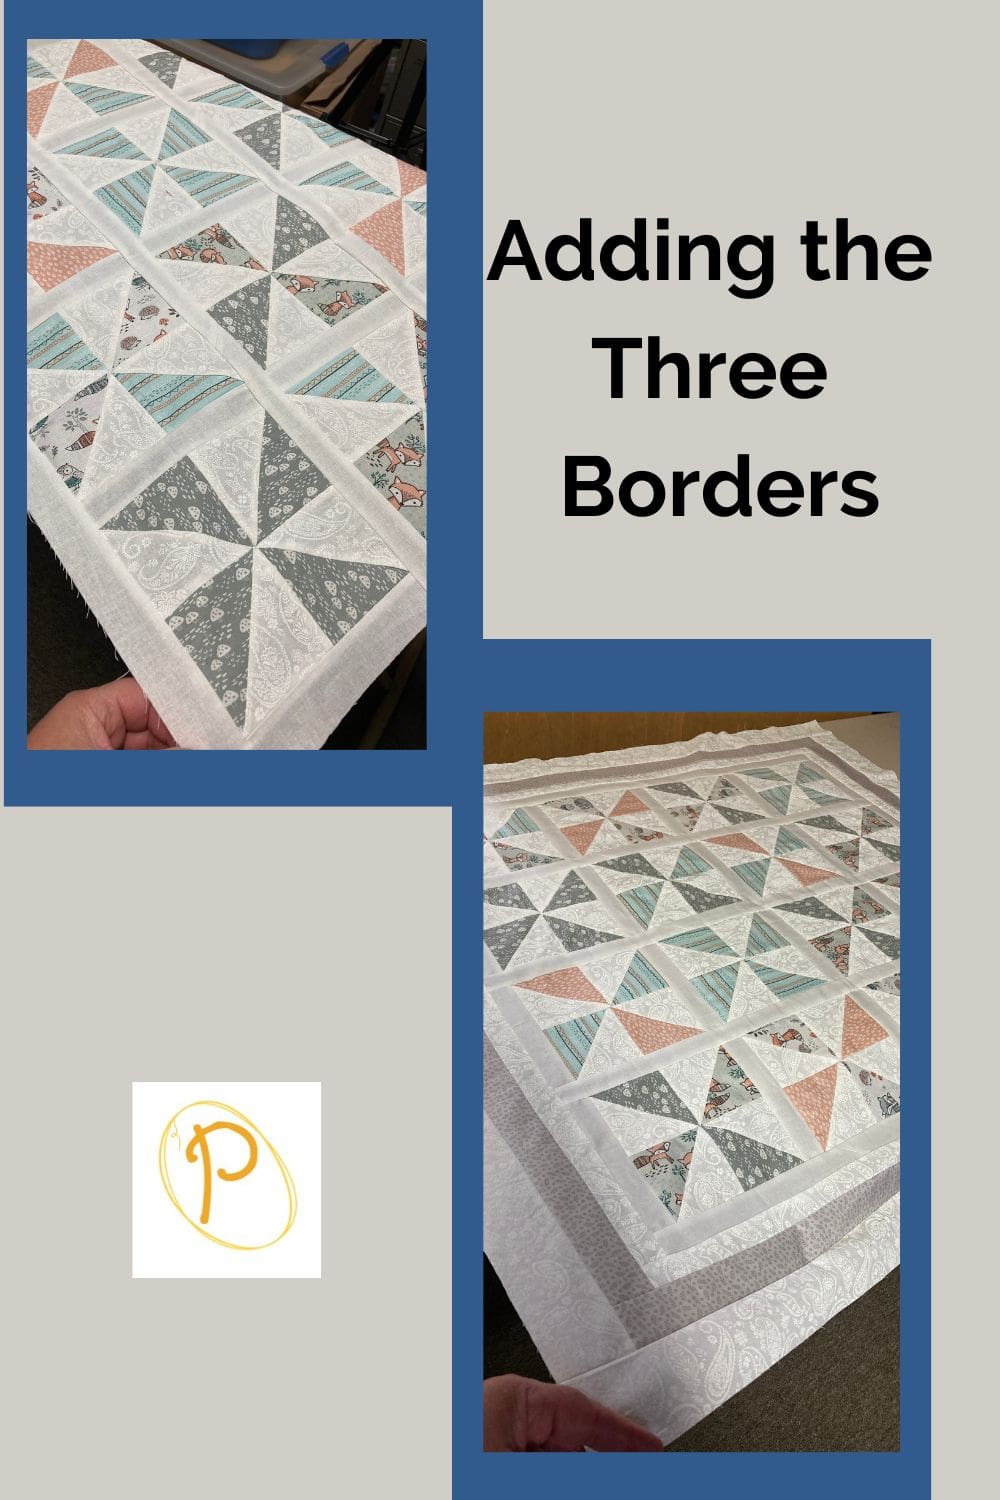
Adding the Three Borders
You will be using the sashing strips in white in the size indicated in the materials section of the size of quilt you are working on.
First Border in White, Second Border in Light Grey, Third Border in White
For each border follow the instructions below.
Vertical Sashing Pieces on the Sides
Using the 2 vertical pieces of sashing, pin on the sides of the quilt top with the right sides together. Using ¼-inch seam allowance, sew 1 sashing strip to each side of the quilt.
Press all seams to the outside or open.
Horizontal Sashing Pieces on the Top and Bottom
Using the 2 horizontal pieces of sashing, pin on the top and bottom of the quilt top with the right sides together. Using ¼-inch seam allowance, sew 1 sashing strip to each side of the quilt.
Press all seams to the outside or open.
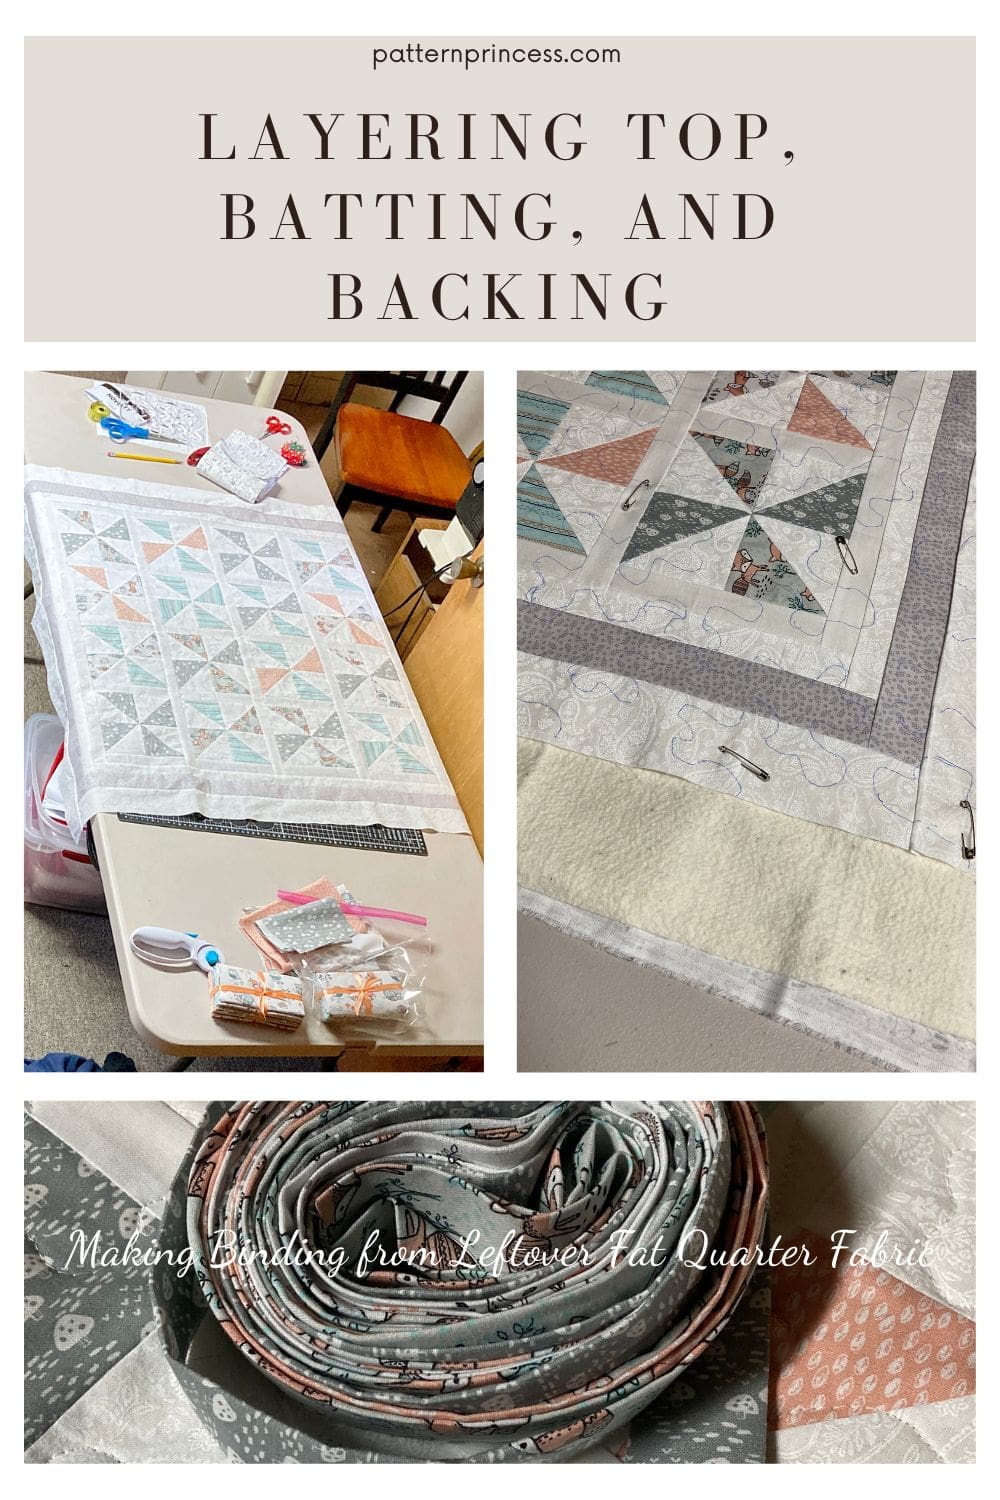
Layer the Top, Batting, and Back
Sandwich the quilt backing fabric, batting, and the quilt top.
The backing fabric and the batting should be a few inches larger all the way around than the quilt top. This makes sure that there is backing and batting covering the entire quilt top fabric. If you cut it too close and there is any slippage, you might end up with an edge that does not have the bottom part of the quilt sandwich.
Begin by placing the backing fabric on a flat solid surface, right side down facing out. Smooth out any wrinkles. Use painters’ tape to secure the edges of the fabric down. This will help hold it in place and reduce the chance of a wrinkle developing as you place the next two layers.
Next, center the batting on top of the backing fabric smoothing out any wrinkles.
Finally, place the quilt top on the batting, centering it with the right side up. Smooth out any wrinkles.
Baste the Quilt Together
Once you have the top fabric all smoothed out, use large safety pins to baste all three layers together. Use a good quality 1 ½” stainless steel pin for this.
Put a pin in each corner and around the entire quilt about every 5-6 inches or so through all three layers. This holds things in place, so they don’t move around while you are sewing the layers together using a quilting design of your choice.
How to Trim the Batting and Backing Fabric Before Binding
To trim the batting and backing, use a large cutting mat, a longer ruler, and a rotary cutter.
Lay the quilt flat. Place the ruler along the edge of the quilt and use it as a guide to run your rotary cutter against to trim the quilt batting and backing to the size of the quilt top. Do this on all four sides.
Sew the Binding to the Quilt
First, prepare the binding strips. I used the leftover grey fat quarters to make my quilt binding.
Make the binding 2 ½ x by the length indicated in the materials section for the quilt size you are working on.
You can find a tutorial for making binding on the website.
Once the strips are sewn together, fold in half lengthwise with wrong sides together and press.
Pin the raw edge of the binding onto raw edge of the quilt top. I generally start in the middle of a side. Leave approximately a 3” tail hanging.
Note: This hanging part will be used to sew to the other end of the binding strip when you have finished sewing all four sides of the binding onto the quilt.
Sew the binding onto all four sides of the easy quilt making sure to miter the corners and join the binding.
Sewing the Binding to the Quilt Back
You can use your sewing machine to sew the binding on the back of the quilt. However, I often hand-stitch the folded edge onto the back of the quilt.
Once all the sides and corners are stitched, you are done.
It is ready to use or give as a gift or use.

You can find Victoria crocheting, quilting, and creating recipes. She has cooked in restaurants for over 20 years, including many larger parties. She learned to crochet when she was just 11 years old and has been crocheting ever since; over 50 years now. Over 40 years ago, she loved her first class in sewing and continues to hone her skills in quilting. Many have enjoyed the handmade gifts over the years. In her professional career, she has worked in management in a wide variety of businesses including higher education as a dean of a division. All the while attending college part-time to achieve her doctorate in higher education with an emphasis in e-learning.