Last updated on July 4th, 2024 at 11:35 pm
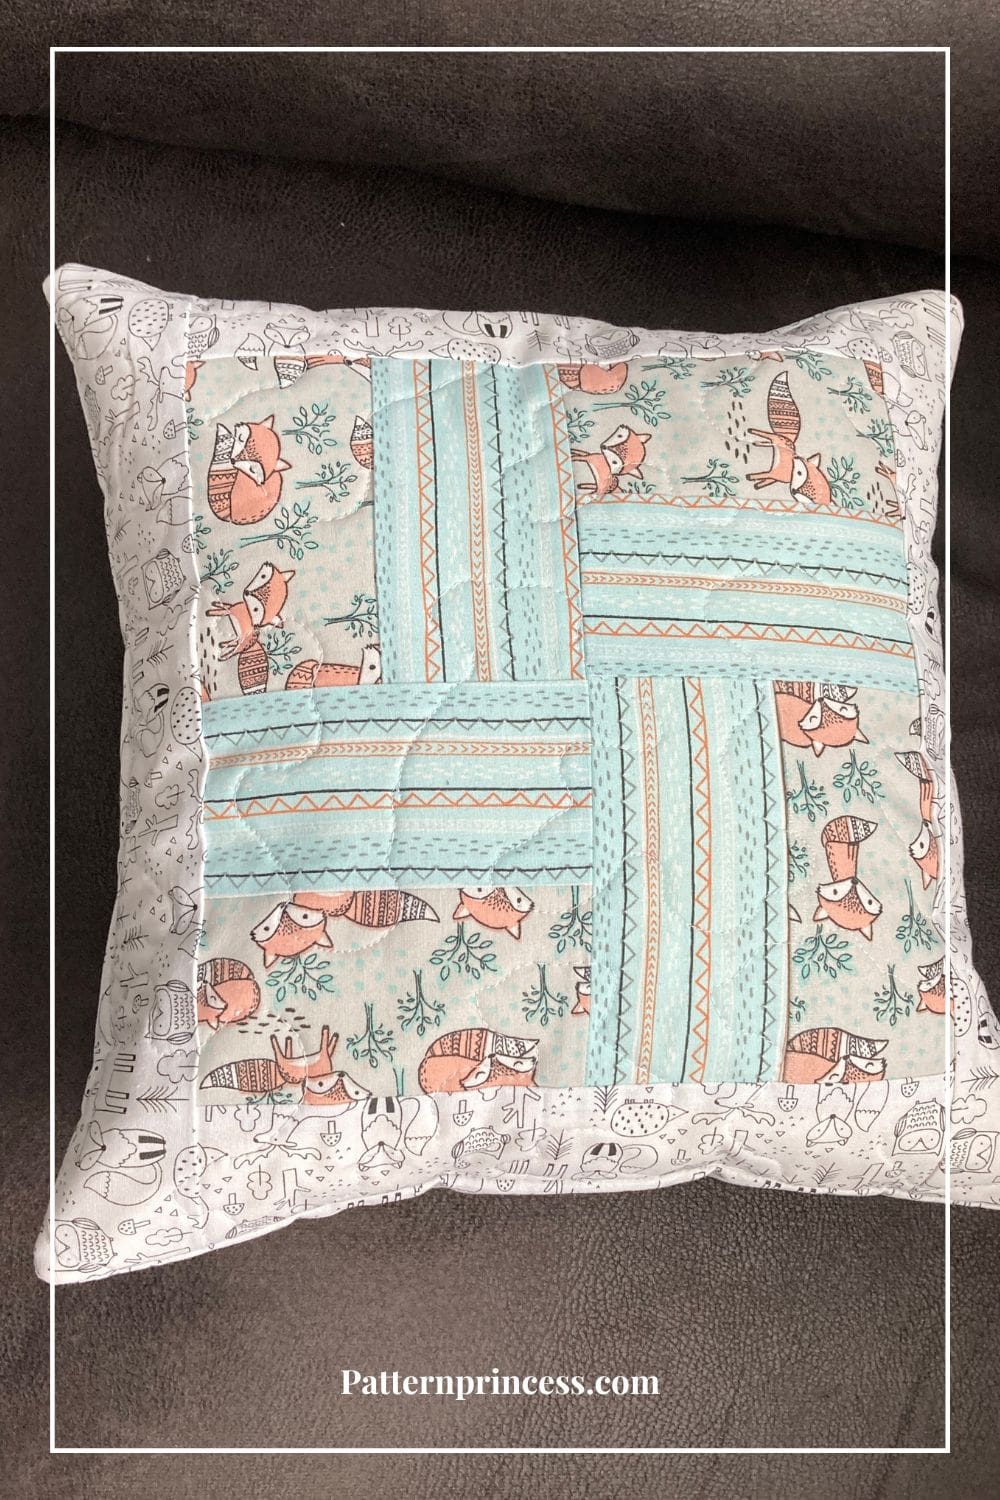
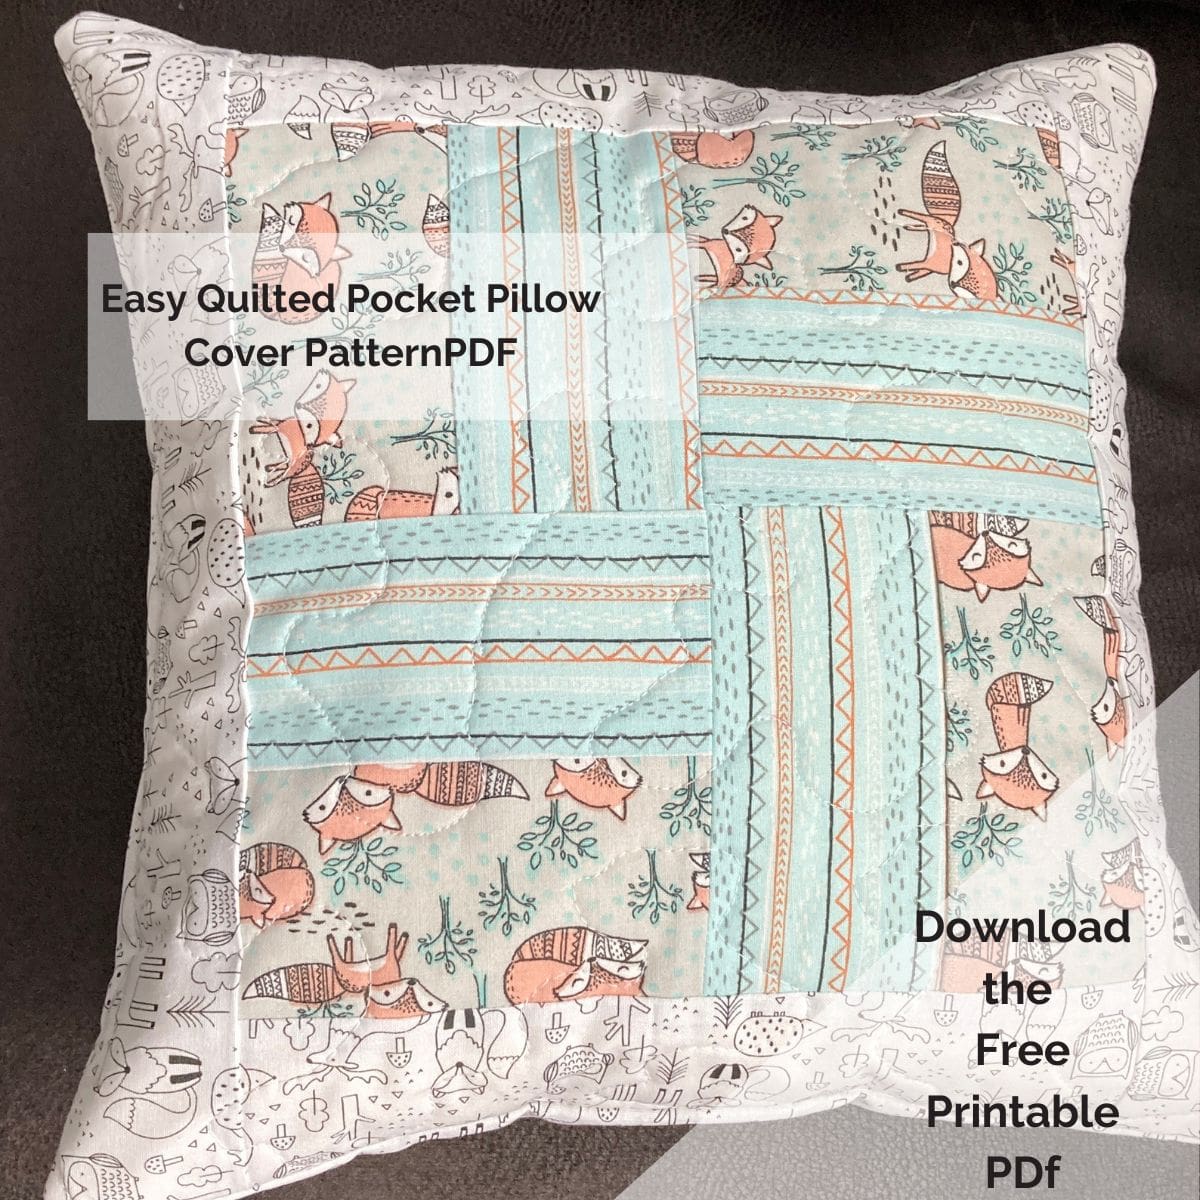
This super easy quilted pocket pillow cover takes is some basic sewing knowledge. Flawlessly combine different colors and patterns with this interesting, personalized look that will wow family and friends alike.
Create an item perfect for gifting that will be cherished by friends and family alike. Plus, use leftover fabric scraps to customize your own unique design. Making this sewing project a great way to stash bust some materials in your sewing room.
Pocket pillow cover for a 12-inch x 12-inch pillow insert.
Post contains affiliate links, and we earn commissions if you shop through the links on this page. For more information, please read the disclosure section under the About Us page.
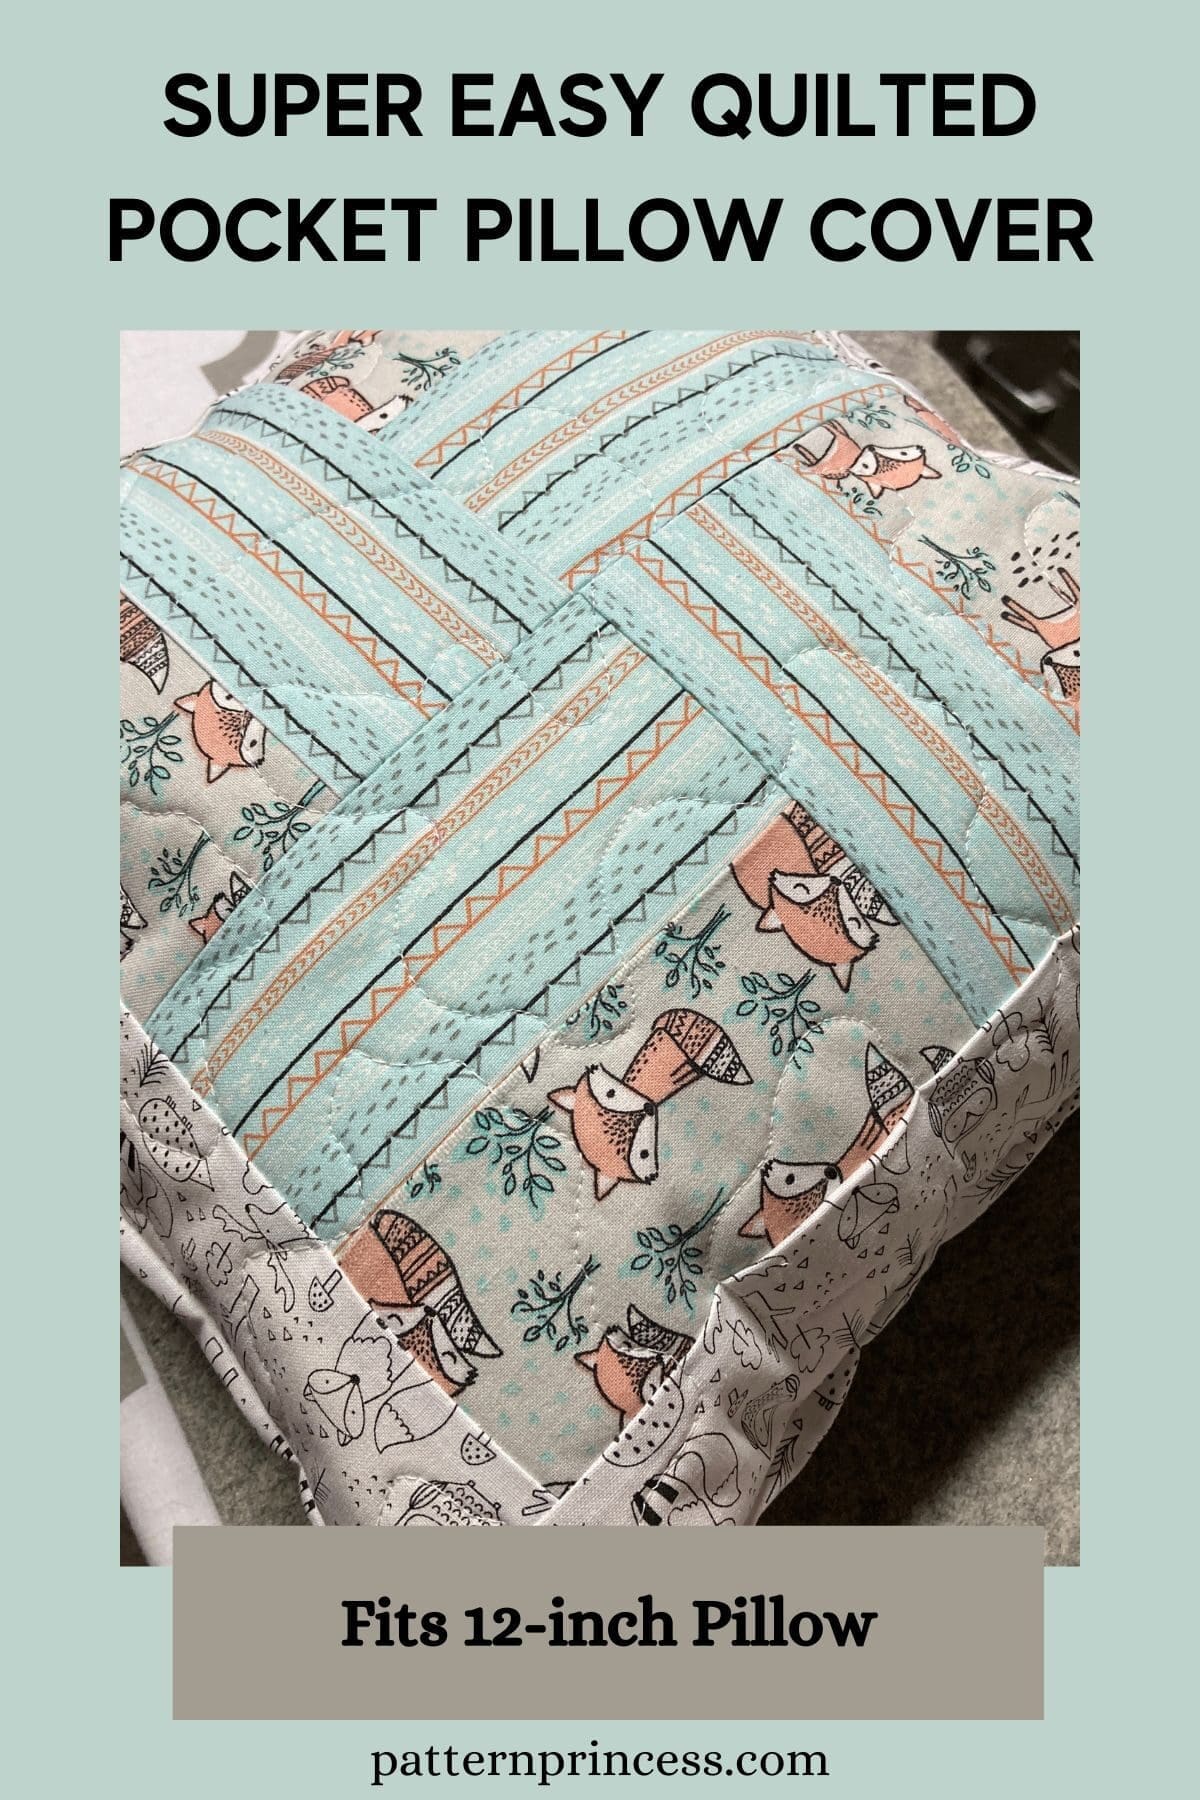
Baby Pillow Covering
Today, I made this as a baby pillow covering to match two baby blankets I made using this fabric. All the fabric used was leftover from those two blankets and another one. Additionally, the batting was leftover too.
This is a great pattern for using up your fabric stash. And, when I gift this 12-inch pillow with a handmade quilted baby blanket, the recipient is sure to treasure it.
Actually, I know this particular recipient treasured it as it was for my first grandbaby. He is too young to really use the blanket or the pillow; however, my daughter loved the set.
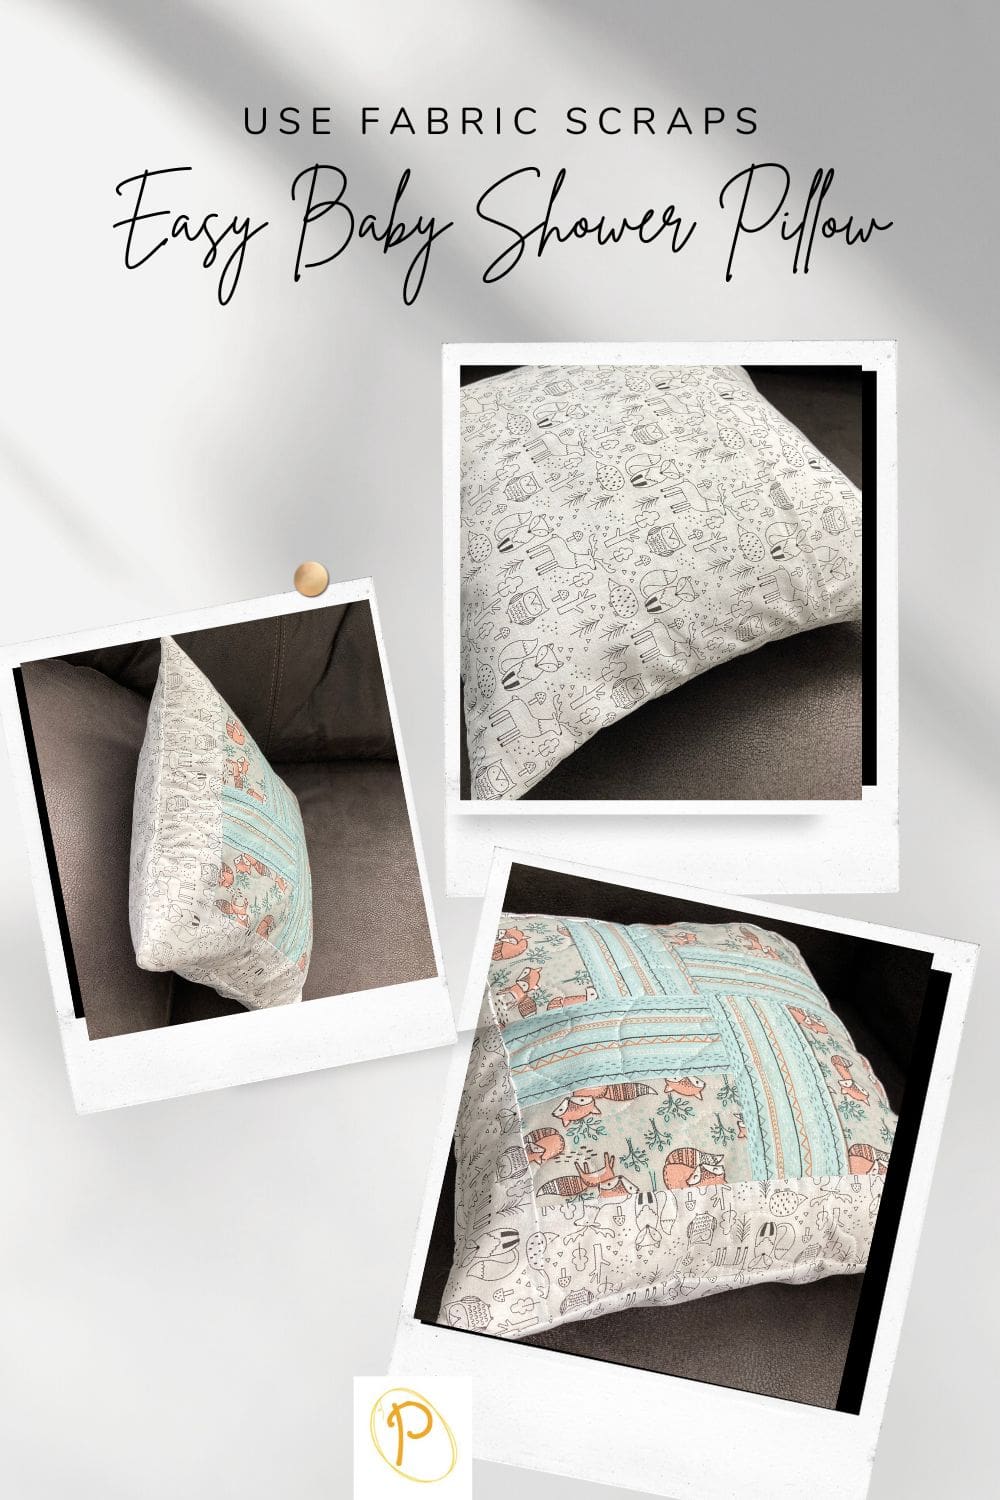
No Binding Needed for This Sewn Pillow Cover
This simple sewing pattern for a pillow cover does not use a binding. The technique used to sew all the pieces together allows you to just turn it inside out once all the sewing is done.
Lay the quilted pillow top face up and the two baking fabrics face down with the raw edges matching. Sew all the way around the square. Snip the corners close to the stitching. Turn the fabric inside out and your pillow is ready for you to insert your pillow form.
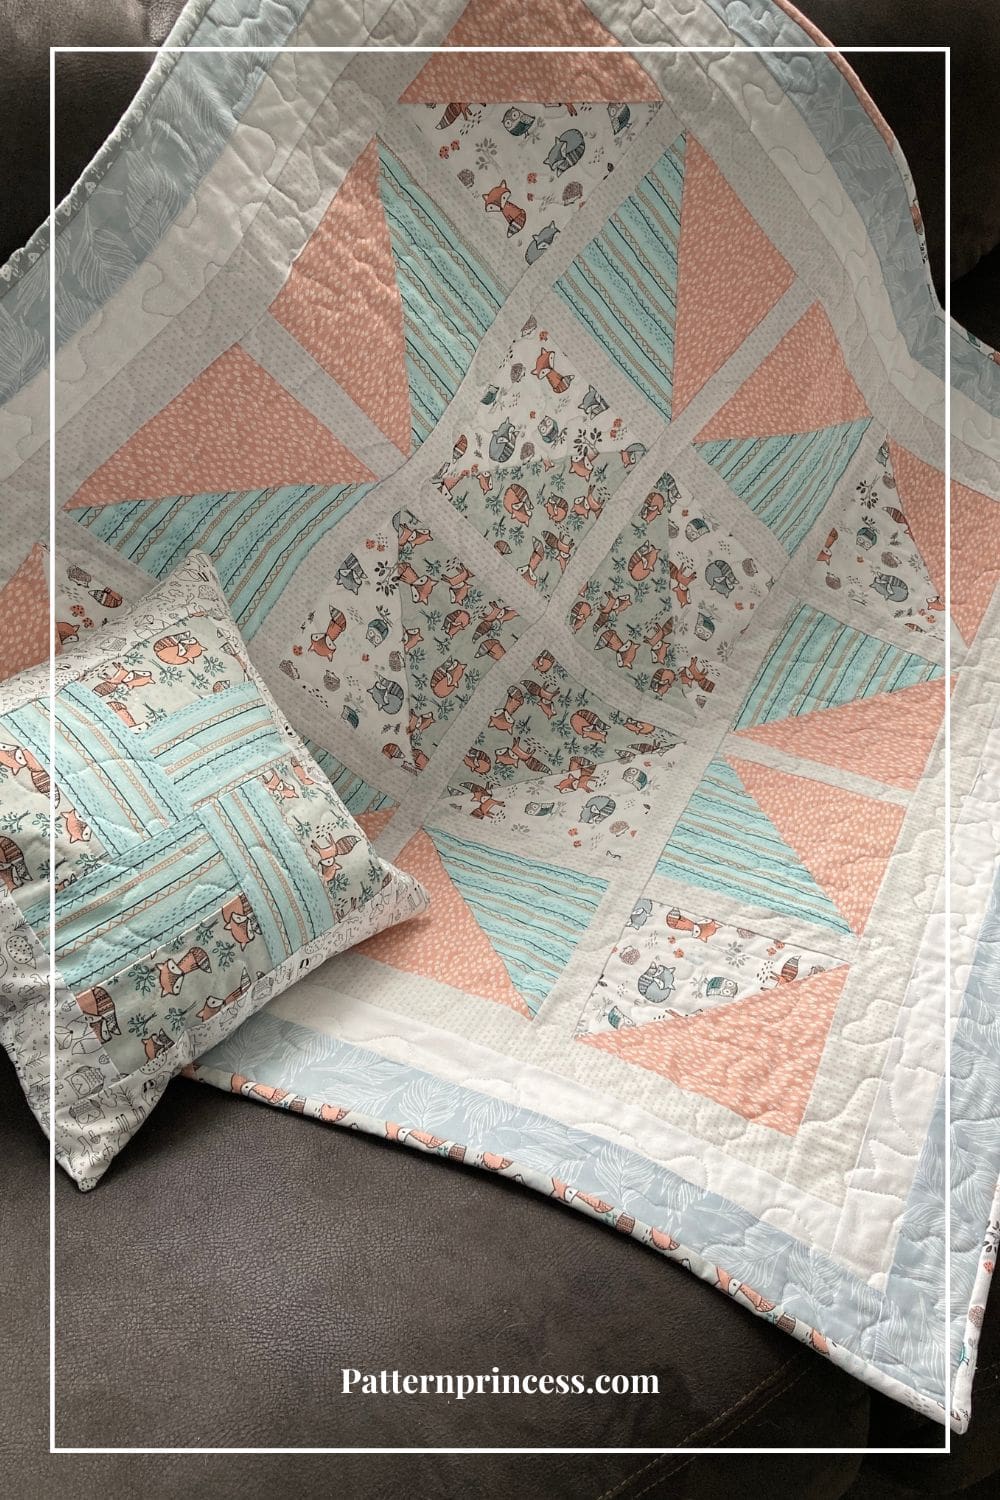
Sweet Dreams Baby Quilt with Pocket Pillow Cover
Purchase a few fat quarter sets and you will have plenty leftover to make a pretty matching pillow cover. I like to make the easy pocket pillow covers as they can be removed, laundered and replaced. Change them as the seasons change throughout the year.
Here is the free sewing pattern for the Sweet Dreams Baby Quilt.
How Do you Make a Pocket Pillow Cover?
Quilting can be an intimidating craft, but we have the perfect project that will not only look great in any room in your house, but it is also surprisingly simple.
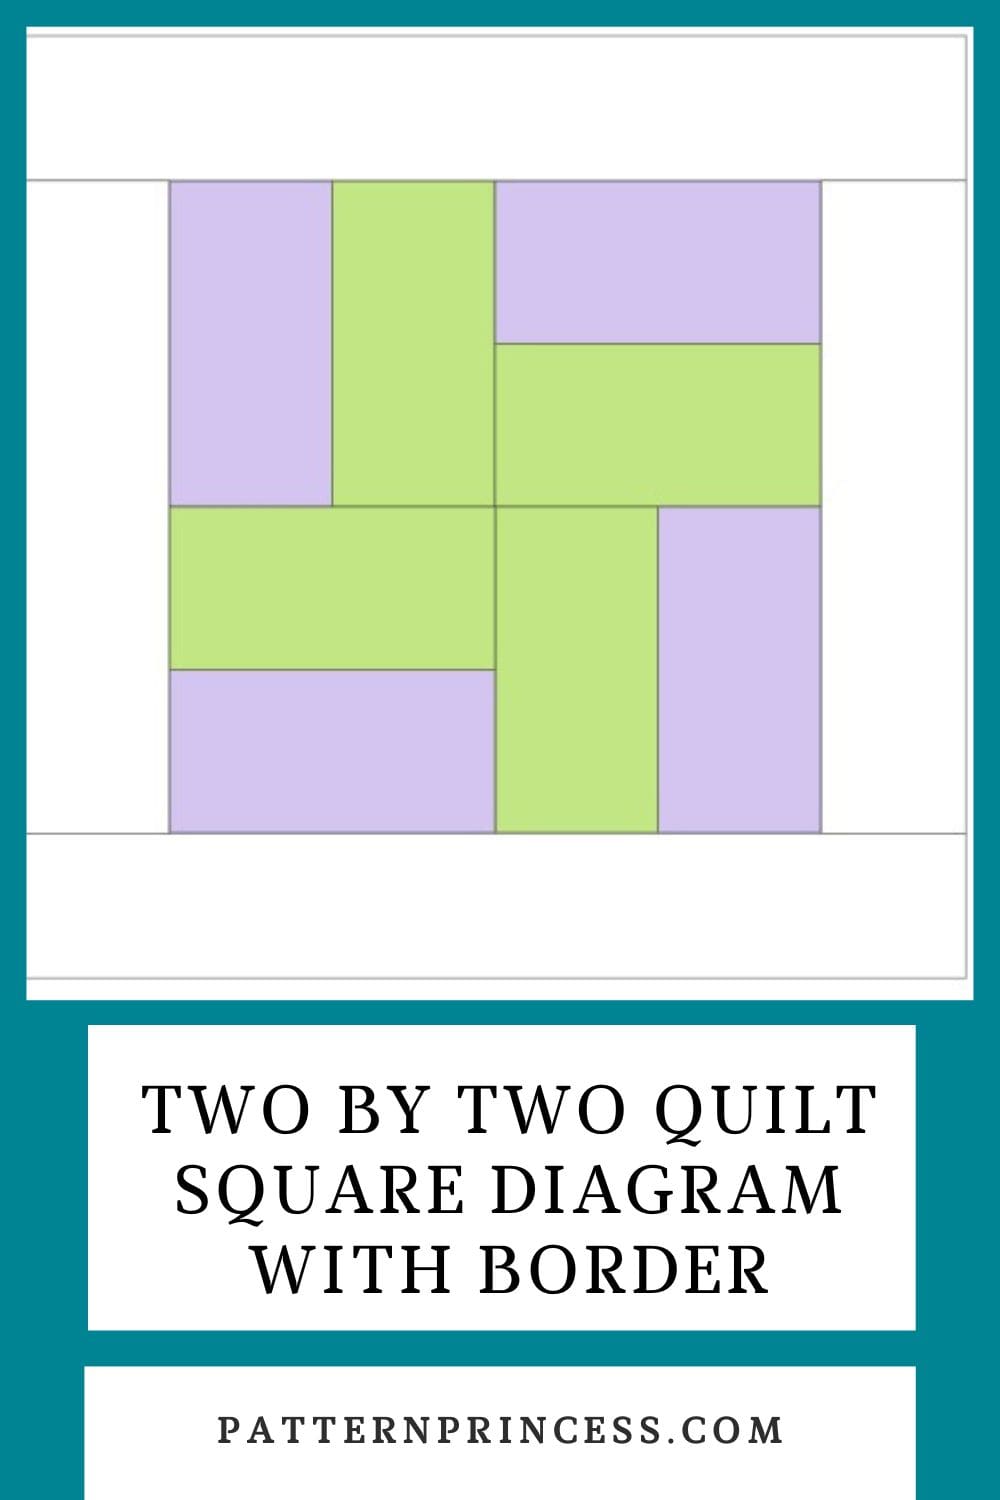
The center quilt square is perfect for a beginner and experienced quilter alike. The square is called two by two. Use 8 rectangles of fabric to create a four patch square. Sew those four squares together to create your center block.
Add a sashing border around the block, then quilt the pillow top using leftover fabric for the backing and if you have it, leftover batting for the middle of the quilt sandwich.
Quilt the square with straight lines, wavy lines, or a meandering stitch for ease. However, you can use any quilting shape that you desire.
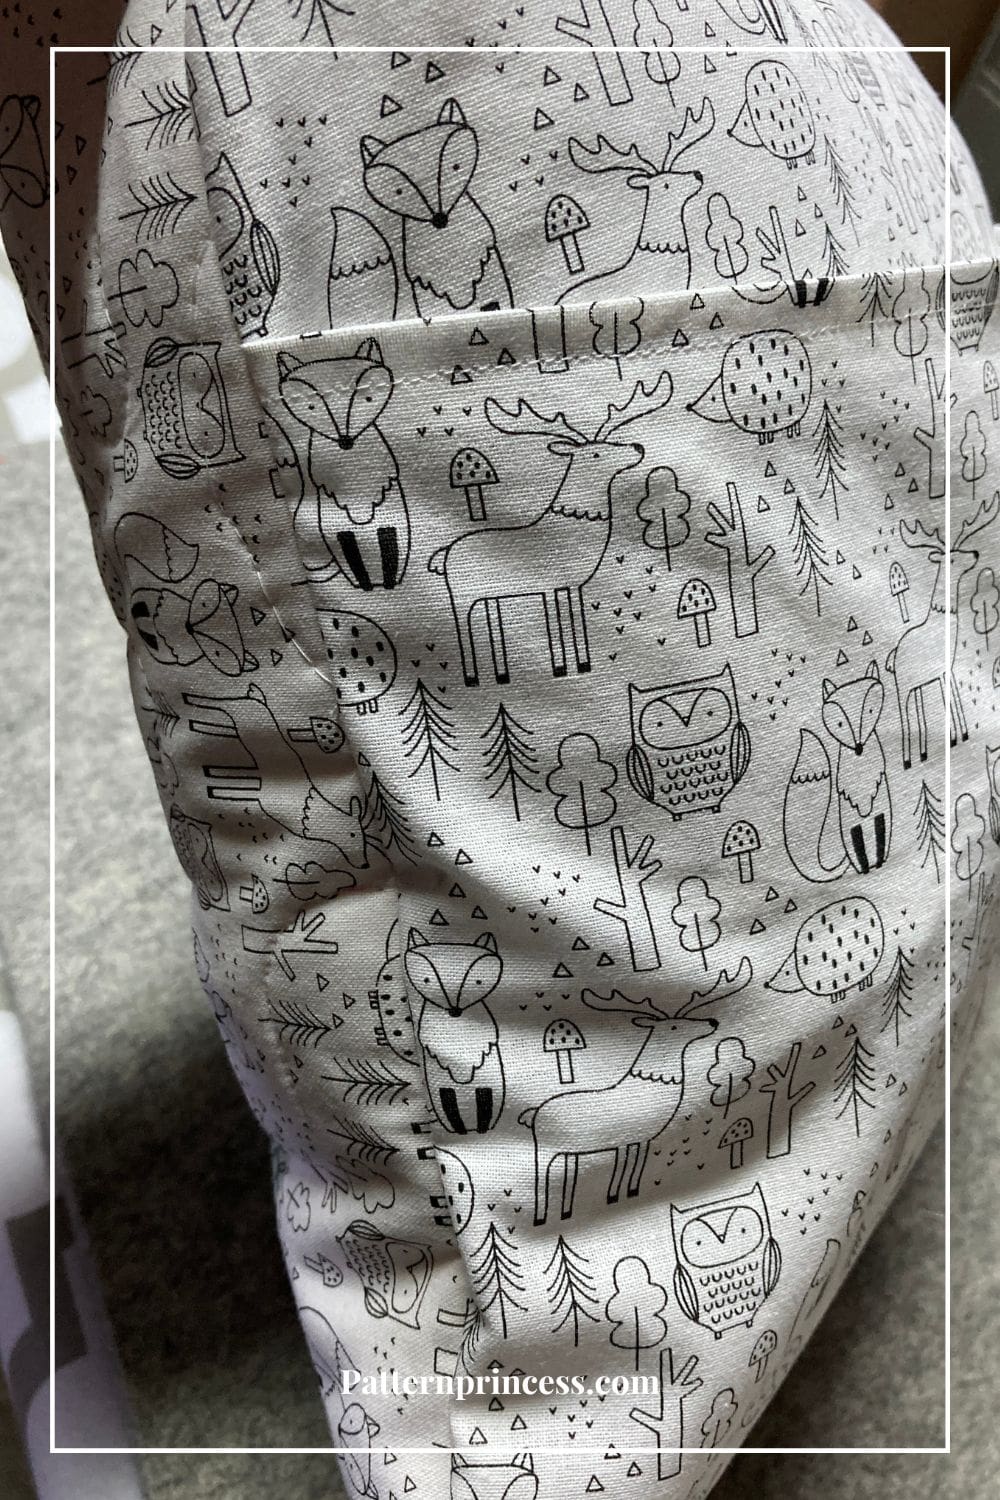
There are two fabric pieces used for the back of the pillow. Each one has an edge turned over and sewn so there are no raw edges.
Lastly, the back pieces of fabric are sewn to the quilted top and the pillow is turned inside out.
It’s ready for your pillow insert.
Directions: Super Easy Quilted Pocket Pillow Cover
Skill Level
This quilt block is perfect for a beginner.
You should be comfortable with sewing squares together. Measuring and using a rotary cutter. Nesting seams together and pressing seams.
Finished Size
The finished size of the pillow cover will be approximately 12 ½-icnhes x 12 ½-inches.
Pocket pillow cover for a 12-inch x 12-inch pillow insert.
Materials
Two-by-Two Quilt Block. Eight Rectangles Fabric, the same size 5-inches X 2 ¾-inches. It is recommended to use at least two different fabrics for a nice contrast.
Sashing.
- Cut 2 pieces, 9-inches x 2-inches.
- Cut 2 pieces, 13-inches x 2-inches.
Backing and Batting for quilted pillow top. Cut 1 piece 15-inces X 15-inches each. (I used three pieces of white fabric leftover from another quilt pattern. I sewed them together, pressed the seams open and cut to the 15” x 15” size).
Back of Pillow Fabric. Cut 2 pieces, 9.5-inches X 13 inches.
Thread
Equipment/Tools
Rotary Cutter
Quilting Ruler
Cutting Mat
Rotating Cutting Mat
Iron
Ironing Board or Pressing Mat
Pins
Sewing Machine
Pattern Notes
This pattern is for a 12-inch pillow form. I like to have my pillow cover slightly larger so it is easy to get the pillow in and out of the cover as you switch out your covers for laundering or just switching them out for the season.
Use a ¼-inch seam allowance. I recommend using a special presser foot with a ¼-inch guide if you have one for your machine. This will help you get uniform seams, and matching seams.
Nest your seams. This means that the seams of each row are aligned, and the pieces fit together almost like the pieces of a puzzle.
Right Sides Together. Sew fabric together with right sides together. Unless otherwise noted.
You can find the quilt block diagram layout on the How to Make a Two-by-Two Quilt Block tutorial.
Start with the Quilt Block Instructions
Begin with Eight Rectangles Fabric, the same size 5-inches X 2 ¾-inches. At least two contrasting colors work nicely for this sewing pattern.
Sew the Four Patch Squares
Join two of the rectangles horizontally, one of each color, with right sides together. Sew a ¼-inch seam allowance.
Press seams to the darker side.
Repeat three more times.
You should now have four squares measuring ready to sew into a four patch design.
Sewing the Four Patches Together
Using ¼-inch seam allowance, with right sides together, sew the top two squares together, press the seams to the right. Next, sew the bottom two squares together, press the seams to the left.
Sew the top row and the bottom row together making sure to nest the seams aligning your seams.
Press the seam open or to one side.
If necessary, trim your block to the square size specified in the quilt pattern you are working on.
That’s it, you have a beautiful two-by-two quilt block ready to use in your pillow covering.
Adding the Sashing Border
Place a 9-inches x 2-inches sashing on each side of the two-by-two quilt square. With the right sides together sew together using ¼-inch seam allowance. Press seams to the outside.
Place a 13-inches x 2-inches sashing on the top and bottom of the quilt square. With the right sides together sew together using ¼-inch seam allowance. Press seams to the outside.
Quilting the Pillow Top
Follow the directions below to quilt the pillow top to the 15” square piece of batting and the 15” square piece of backing fabric.
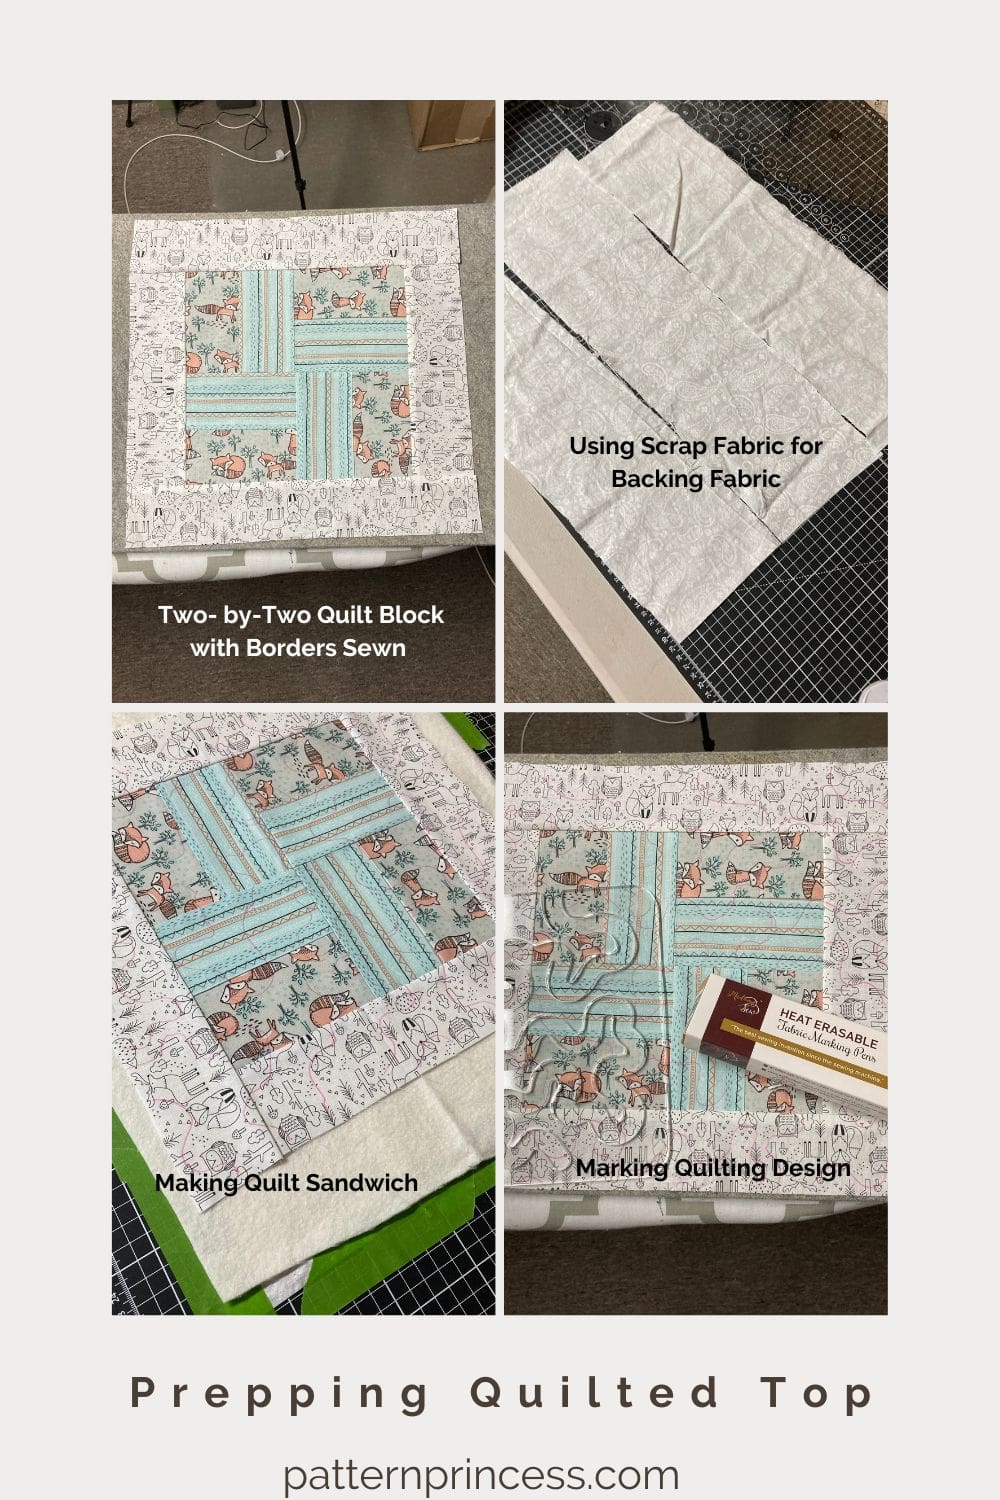
Layering the Top, Batting, and Back
I refer to layering the quilt as “sandwiching” the pieces. You need to sandwich the top fabric and back fabric with the batting in the middle.
Tape the Backing Down
On a hard surface such as a table or floor, use painter’s tape to tape down the backing fabric. The right side of the backing fabric should be facing out.
As you tape the back down, make sure the fabric is smooth. Run your hands over the fabric to smoother out the wrinkles before taping all four sides down.
Add the Batting
Next, lay the batting on top of the taped-down backing fabric. Again, smooth with your hands to make sure all the wrinkles are removed. This also helps adhere the batting to the backing fabric and keeps it from slipping as you add your top.
Place the Quilt Top
Finally, center the quilted pillow top over the batting and the backing fabric. The right side should be facing up.
You will notice that the batting and the backing fabric are extending approximately 2-inches beyond the quilt top fabric.
Baste the Layers Together
I used safety pins placed about every 4 or 5 inches to baste the layers together. However, you can use a glue spray baste your quilt layers together too if you wish. However, I find with this small of a project, I have no problem with the fabrics moving much; therefore, I just pin without using any adhesive.
Pro Tip. As you bast using your chosen method, make sure all wrinkles are smoothed out. Adjust basting if needed to remove any wrinkles.
Sewing the Quilt Layers Together: Quilting
You can use whatever free-motion stitch you’d like or use a straight stitch to quilt in the ditches or along the seams.
If you free-motion quilt, use a darning foot and make sure that the feed dogs are down or covered up on your sewing machine.
If using a straight stitch to machine quilt a walking foot does a wonderful job to help ease all of the layers through without any wrinkles or bunching of fabric.
Pro Tip. I am not very good at free-motion quilting. I am still gaining skills in this area. So, I use templates and heat erase markers to draw on my quilting design. Then I can easily follow this doing free-motion quilting techniques. When done, I use my iron to remove any markings.
Trim the Batting and Back
Trim the batting and quilt back to the edge of the quilt top. I use a ruler and a rotary cutter to accomplish this task. Work carefully, so you don’t cut into your quilted project.
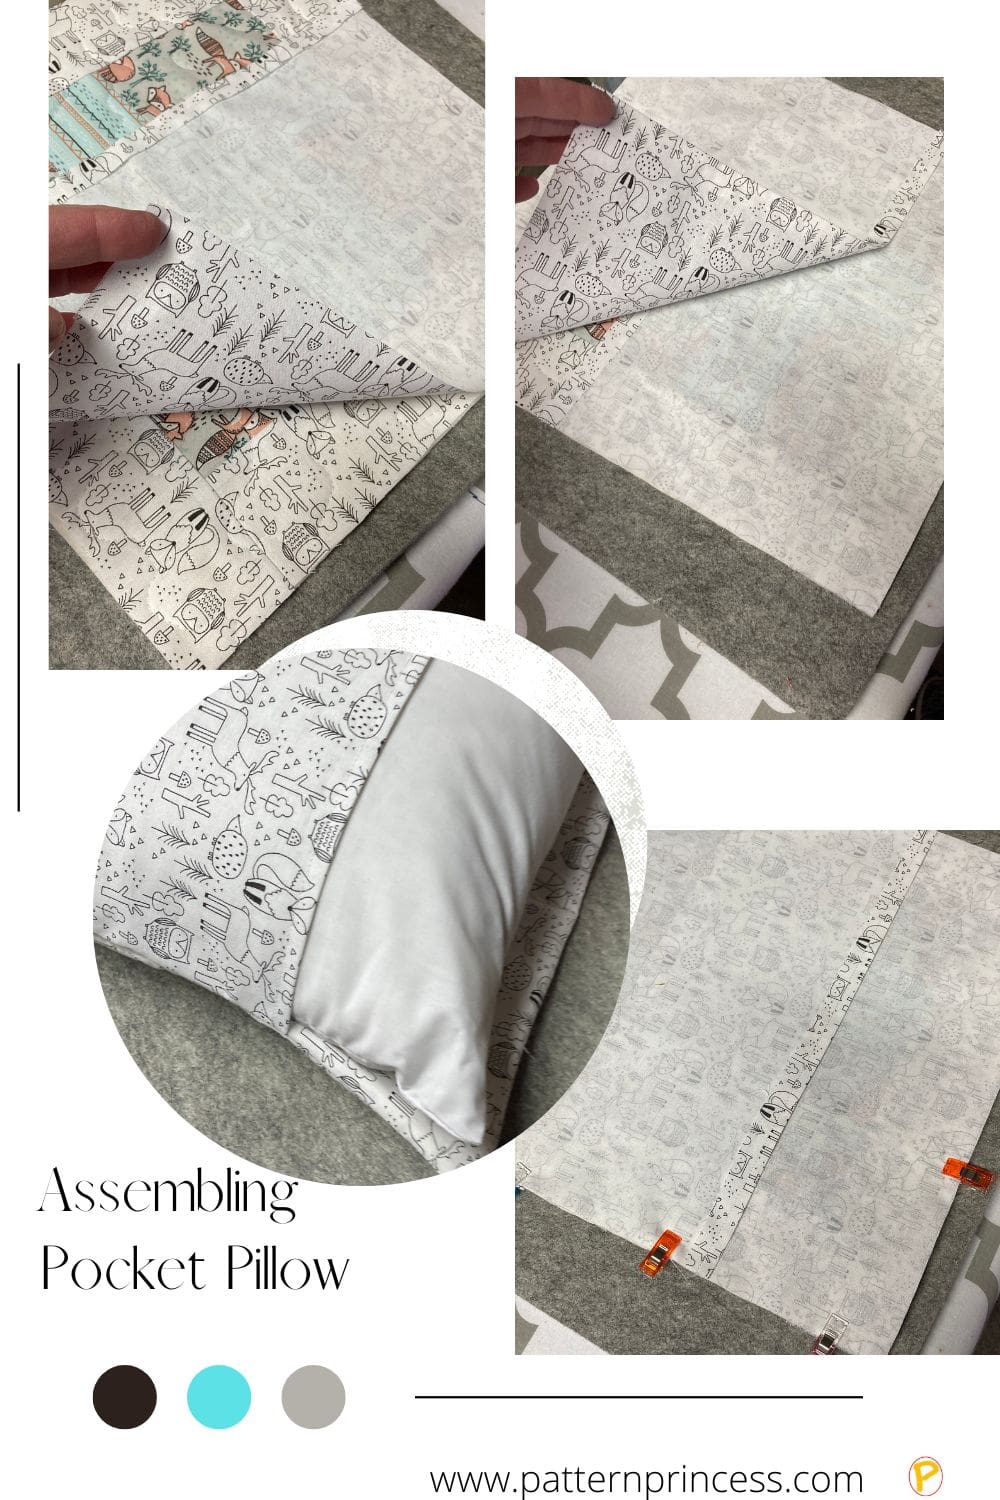
Assemble the Pillow Top
Once you’ve quilted the pillow top, sew the back pieces on to make it into an envelope pillow cover.
For each of the 2 – 9.5-inches X 13 inch units, fold one side under ¼-inch and press. Fold under 14-inch again, press, and stitch down. This creates a finished edge on one side of each of the two backing fabrics.
Place the quilted quilt top on a flat surface with the right side facing up. Next place the unhemmed side of each of the two backing fabrics along the opposite edges of the quilted pillow top. The hemmed edges of the backing fabric units should be overlapping in the center.
Pin or place clips all-round the edge and stitch ¼” around all the outside edges to sew the backing fabrics in place, removing pins and clips as you sew up to them.
Trim corners to the sewing line. Turn the pillow right side out.
Use a tube turner, or wooden skewer, or a closed scissors end to push the corners right side out.
Insert the pillow cover inside the quilted pocket pillow cover.
That’s it. Enjoy your pillow.
Get other Free PDF Patterns on our Site.

You can find Victoria crocheting, quilting, and creating recipes. She has cooked in restaurants for over 20 years, including many larger parties. She learned to crochet when she was just 11 years old and has been crocheting ever since; over 50 years now. Over 40 years ago, she loved her first class in sewing and continues to hone her skills in quilting. Many have enjoyed the handmade gifts over the years. In her professional career, she has worked in management in a wide variety of businesses including higher education as a dean of a division. All the while attending college part-time to achieve her doctorate in higher education with an emphasis in e-learning.