Last updated on July 4th, 2024 at 11:34 pm
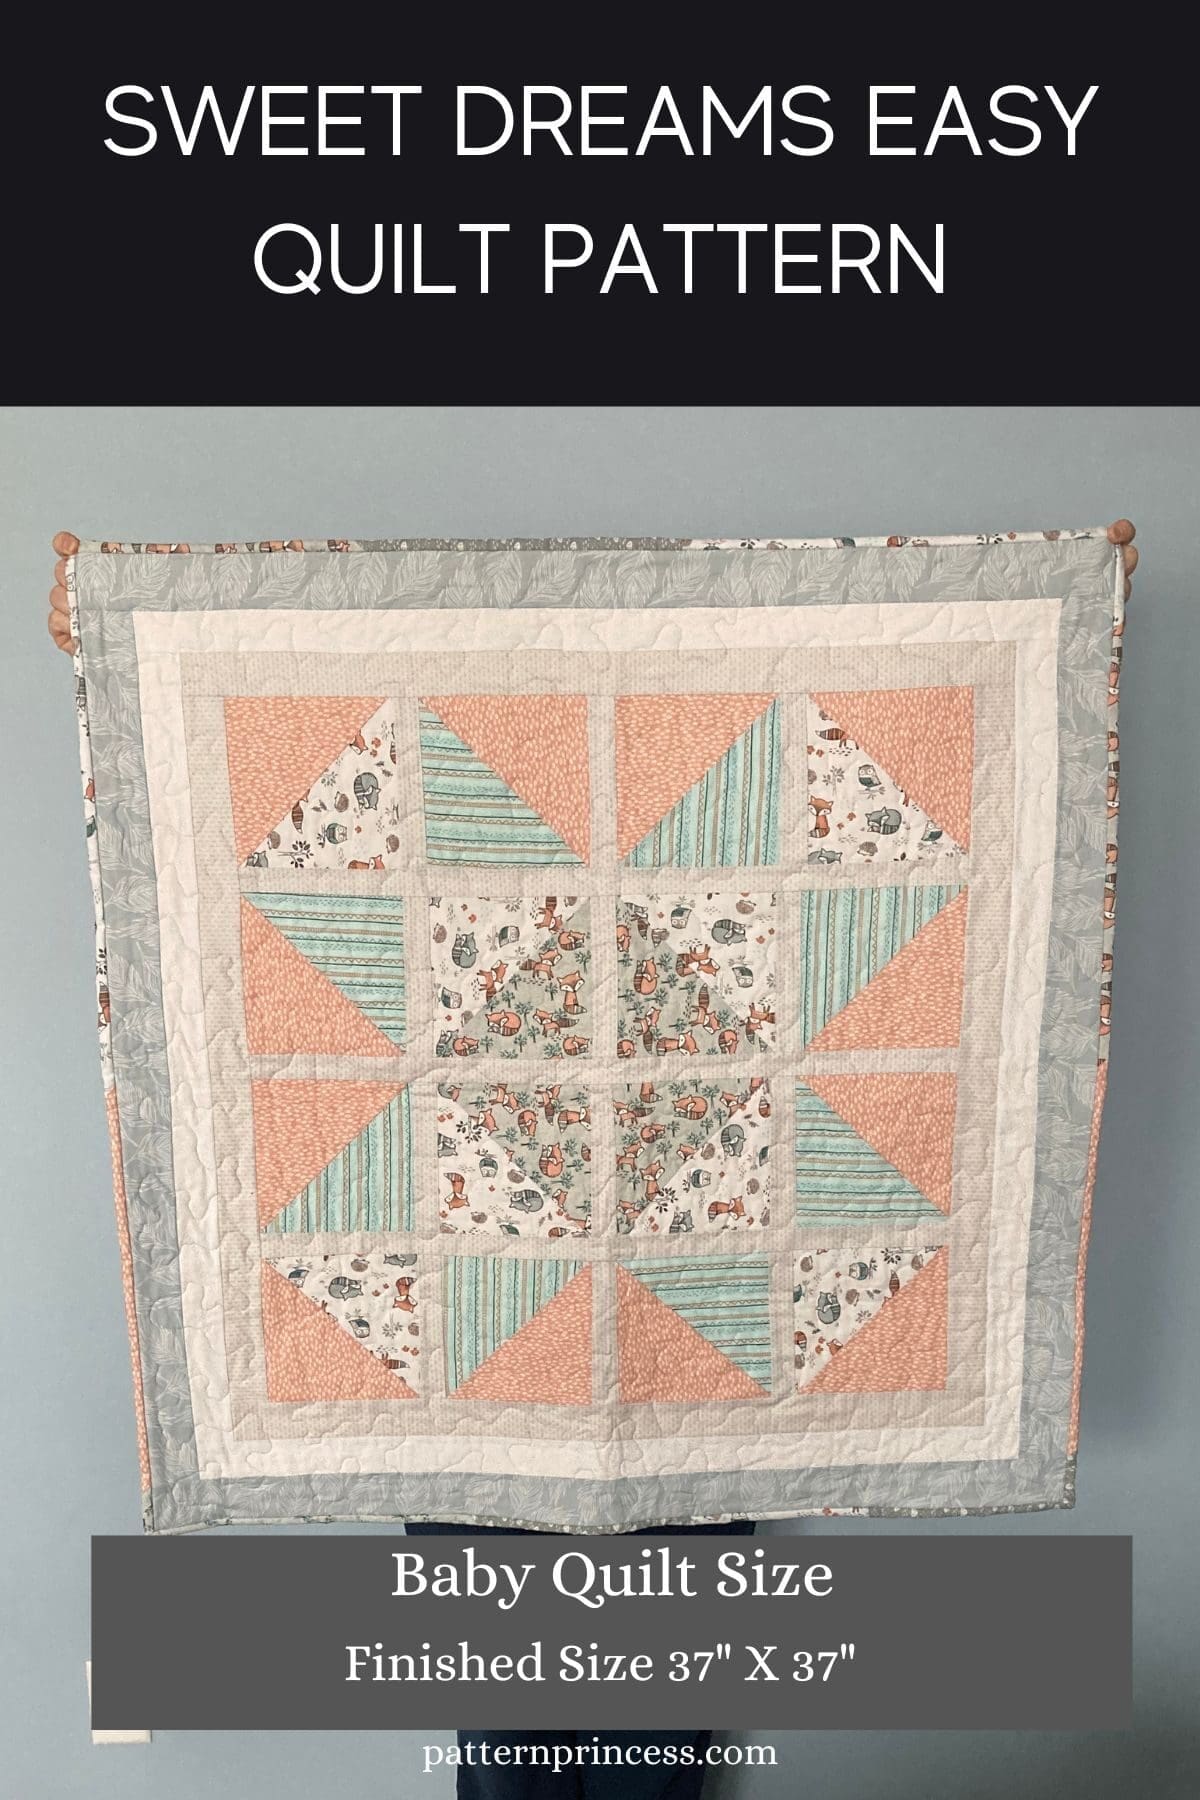
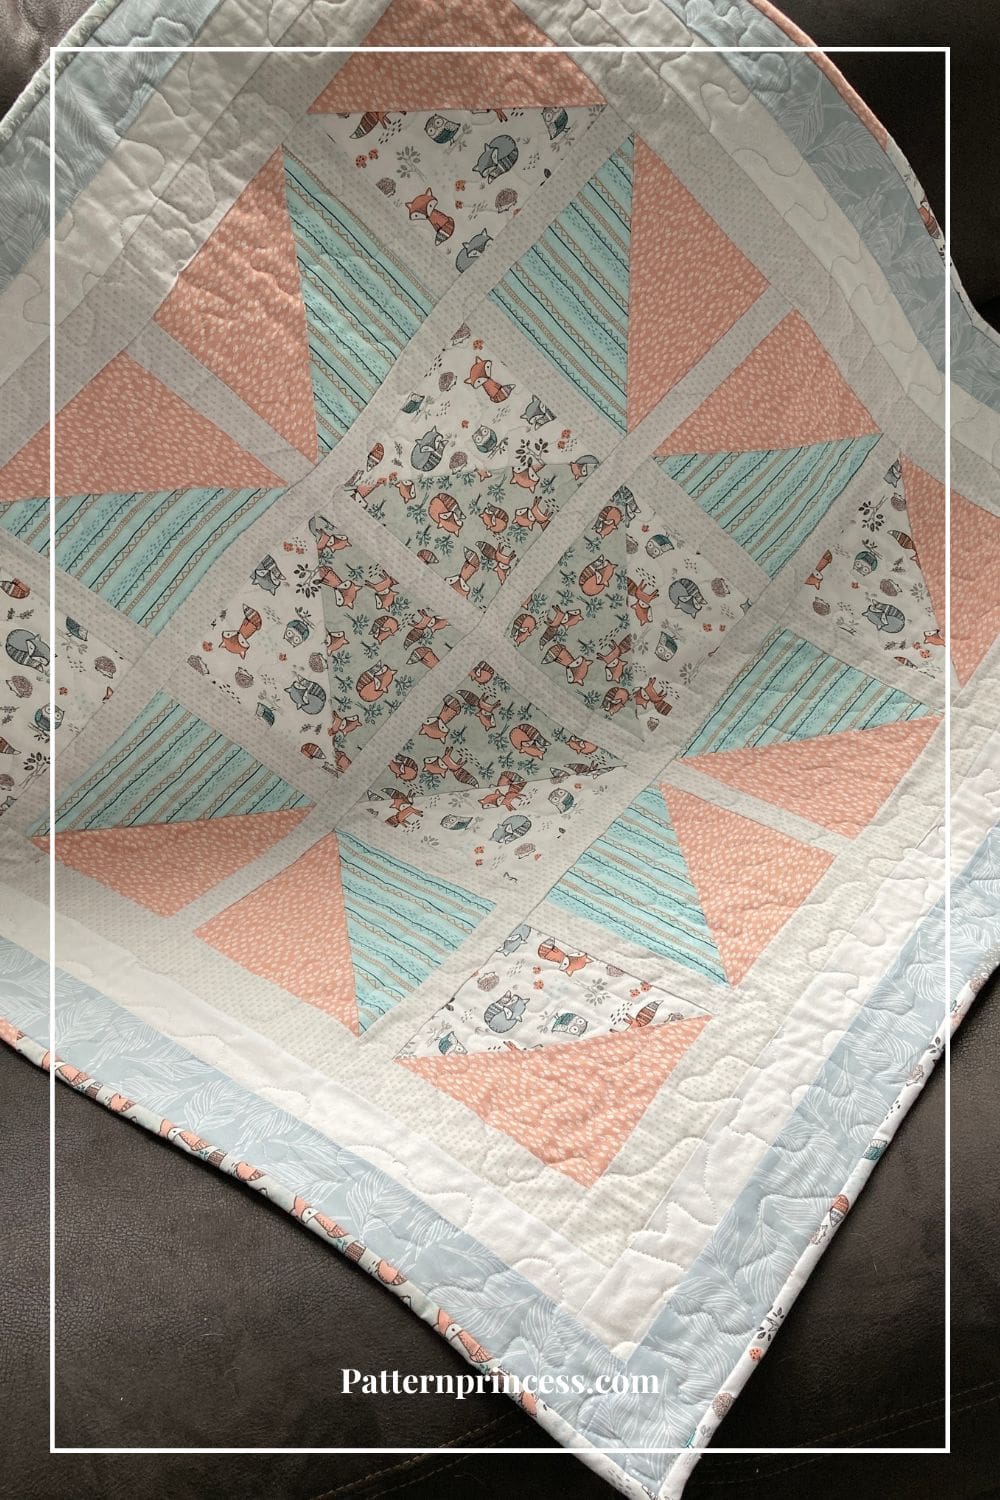
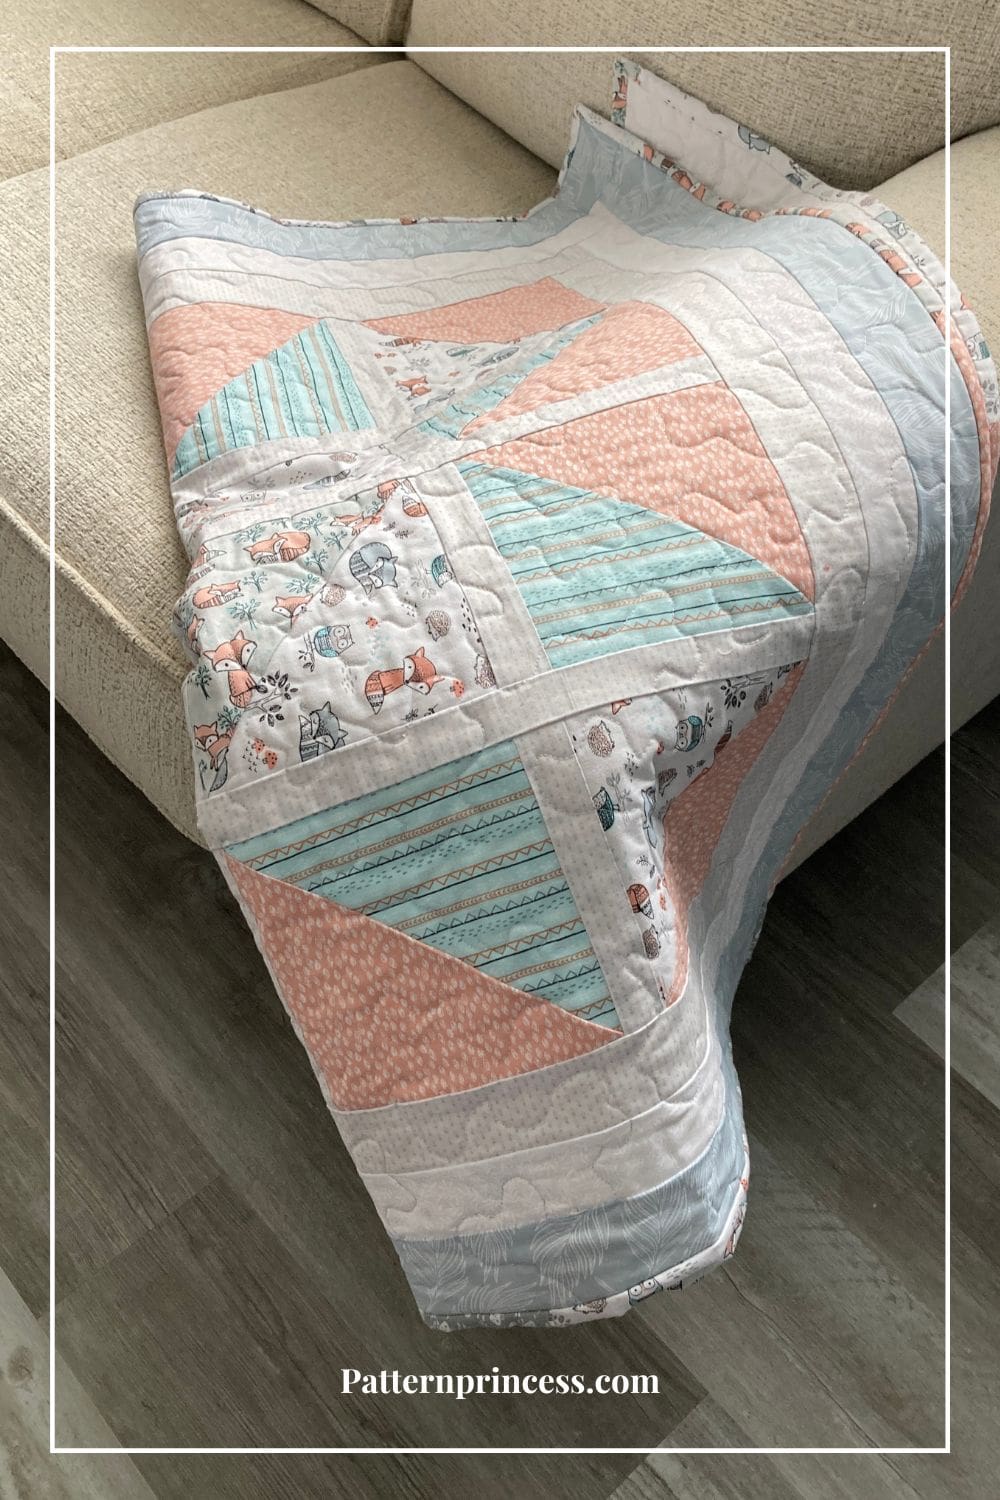
The Sweet Dreams Easy Quilt Pattern is the perfect project for quilters of all levels. This charming quilt features a classic half square triangle design that is easy to create and adds a lovely touch to any bedroom, especially a baby’s nursery.
With its soft and soothing color palette, this quilt is gender neutral. It is sure to bring sweet dreams to anyone who snuggles up under it.
So, gather your fabric and let’s get started on creating a cozy and beautiful quilt that will be cherished for years to come.
Post contains affiliate links, and we earn commissions if you shop through the links on this page. For more information, please read the disclosure section under the About Us page.
Use Your Fat Quarters for this Baby Blanket Pattern
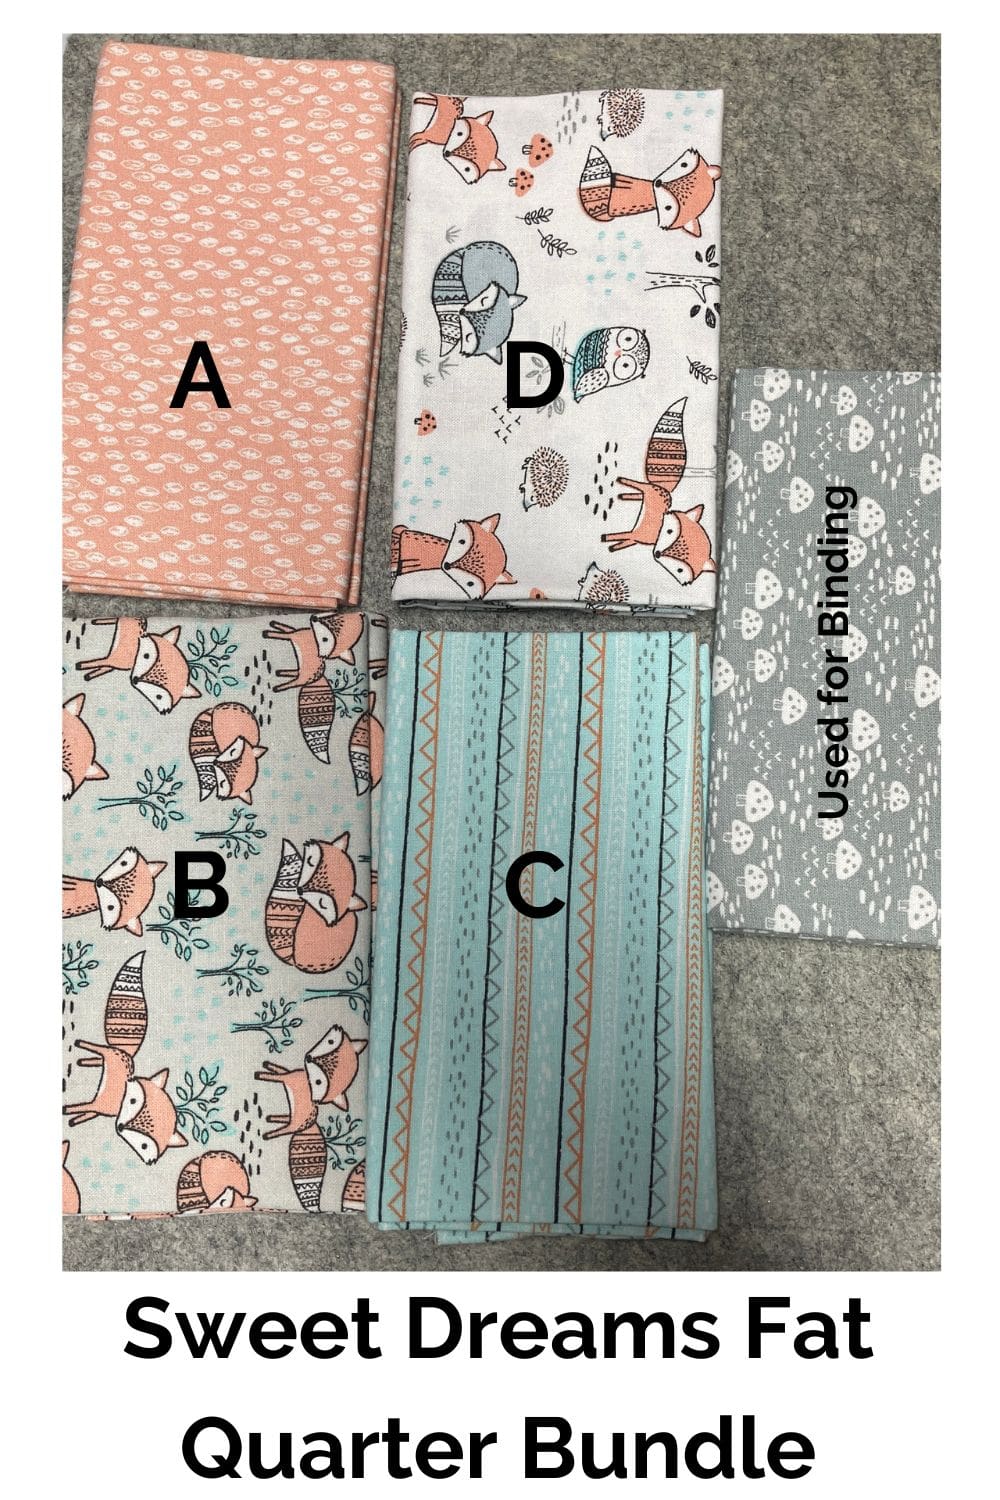
This baby quilt pattern uses just five fat quarters for the half square triangles. The sashing between the squares creates another visual element. The quilt top is finished off with three accent borders.
I was walking past a few fat quarter bundles at my local fabric store and the playful animal theme paired with the lovely colors caught my eye. While I was not sure of the design at the time, I am quite pleased with how this turned out.

March is National Quilt Month!
We have partnered with favequilts and included this baby quilt in their month-long quilt celebration.
Celebrate National Quilt Month 2024 and visit favequilts to discover a new tutorial this month!
Sometimes, we have different free patterns available for download. Head on over to our free PDF printables page. It is a good idea to sign up for the newsletter, so you are notified when the free downloads are uploaded.
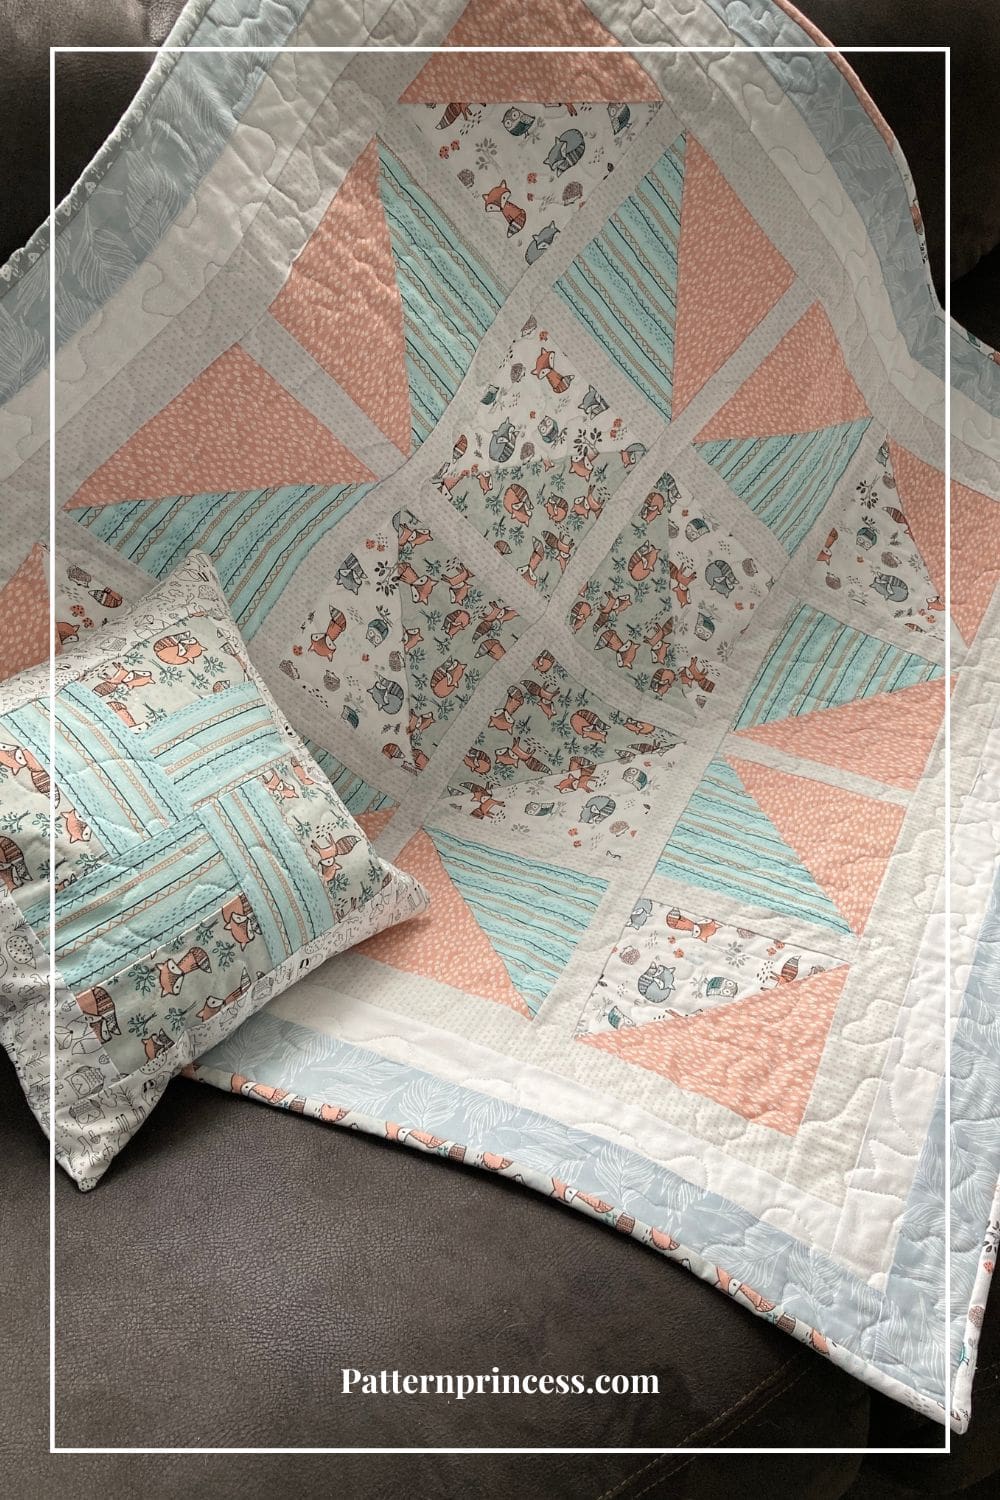
Sweet Dreams Baby Quilt with Pocket Pillow Cover
Purchase a few fat quarter sets and you will have plenty leftover to make a pretty matching pillow cover. I like to make the easy pocket pillow covers as they can be removed, laundered and replaced. Change them as the seasons change throughout the year.
Here is the free sewing pattern for the Super Easy Quilted Pocket Pillow Cover. They really do make such a pretty set.
Baby Shower Gift
This blanket is now stashed away waiting for its recipient to be born. I made a pocket pillow with leftover fabric. The pairing makes such a lovely gift.
Directions: Gender Neutral Sweet Dreams Easy Quilt Pattern
Skill Level
This pattern is easy to make.
Finished Size
Size 37 inches X 37 inches
Fabric Requirements
I created the quilt using a fat quarter bundle along with fabric pieces I had in my stash for the sashing. Choose a coordinating fabric for the binding and for the backing.
Fat Quarters
You will need a total of 16 7 1/2 x 7 ½ inch squares for this pattern.
A = Peach Fabric 2 fat quarters. Cut 6, 7 1/2 x 7 ½ inch squares.
B = Blue Fox 1 fat quarter. Cut 2, 7 1/2 x 7 ½ inch squares.
C = Blue Stripe 1 fat quarter. Cut 4, 7 1/2 x 7 ½ inch squares.
D = White Fox 1 fat quarter. Cut 4, 7 1/2 x 7 ½ inch squares.
Sashing Fabric
Light Grey Sashing 1 yard.
Cut 12, 1 ½ x 6 ½ inch strips. (Vertical sashing between the squares).
Cut 3, 1 ½ x 27 ½ inch strips. (Horizontal sashing between the rows).
Light Grey Border Fabric – First Border
Cut 2, 2 x 27 ½ inch strips. (Vertical sashing on the sides).
Cut 2, 2 x 30 ½ inch strips. (Horizontal sashing on the top and bottom).
White Border Fabric ½ yard – Second Border
Cut 2, 2 x 30 ½ inch strips. (Vertical sashing on the sides).
Cut 2, 2 x 34 inch strips. (Horizontal sashing on the top and bottom).
Mint Green Border Fabric ½ yard – Third Border
Cut 2, 2 1/2 x 34 inch strips. (Vertical sashing on the sides).
Cut 2, 2 1/2 x 38 inch strips. (Horizontal sashing on the top and bottom).
Backing Fabric
1 ½ yards of coordinating fabric.
Binding Fabric
1/2 yard. I used leftover fabric from the fat quarters to make this binding.
Make the binding 2 ½ x 172 inches long.
Batting
1 ½ yards. Cotton batting (like Warm & Natural) to make this quilt.
Thread
Equipment/Tools
Rotary Cutter
Quilting Ruler
Cutting Mat
Rotating Cutting Mat
Iron
Ironing Board or Pressing Mat
Pins
Clips
Sewing Machine
Pattern Notes for the Sweet Dreams Baby Quilt
Use a ¼-inch seam allowance. I recommend using a special presser foot with a ¼-inch guide if you have one for your machine. This will help you get uniform seams, and matching seams.
Nest your seams. This means that the seams of each row are aligned, and the pieces fit together almost like the pieces of a puzzle.
Right Sides Together. Sew fabric together with right sides together. Unless otherwise noted.
The directions for this quilt are for rotary cutting, machine piecing, machine quilting, and the binding is hand-stitched to the quilt back.
Accurate cutting and sewing enhances your final product. Pin your pieces together before sewing them to ensure proper seam alignment.
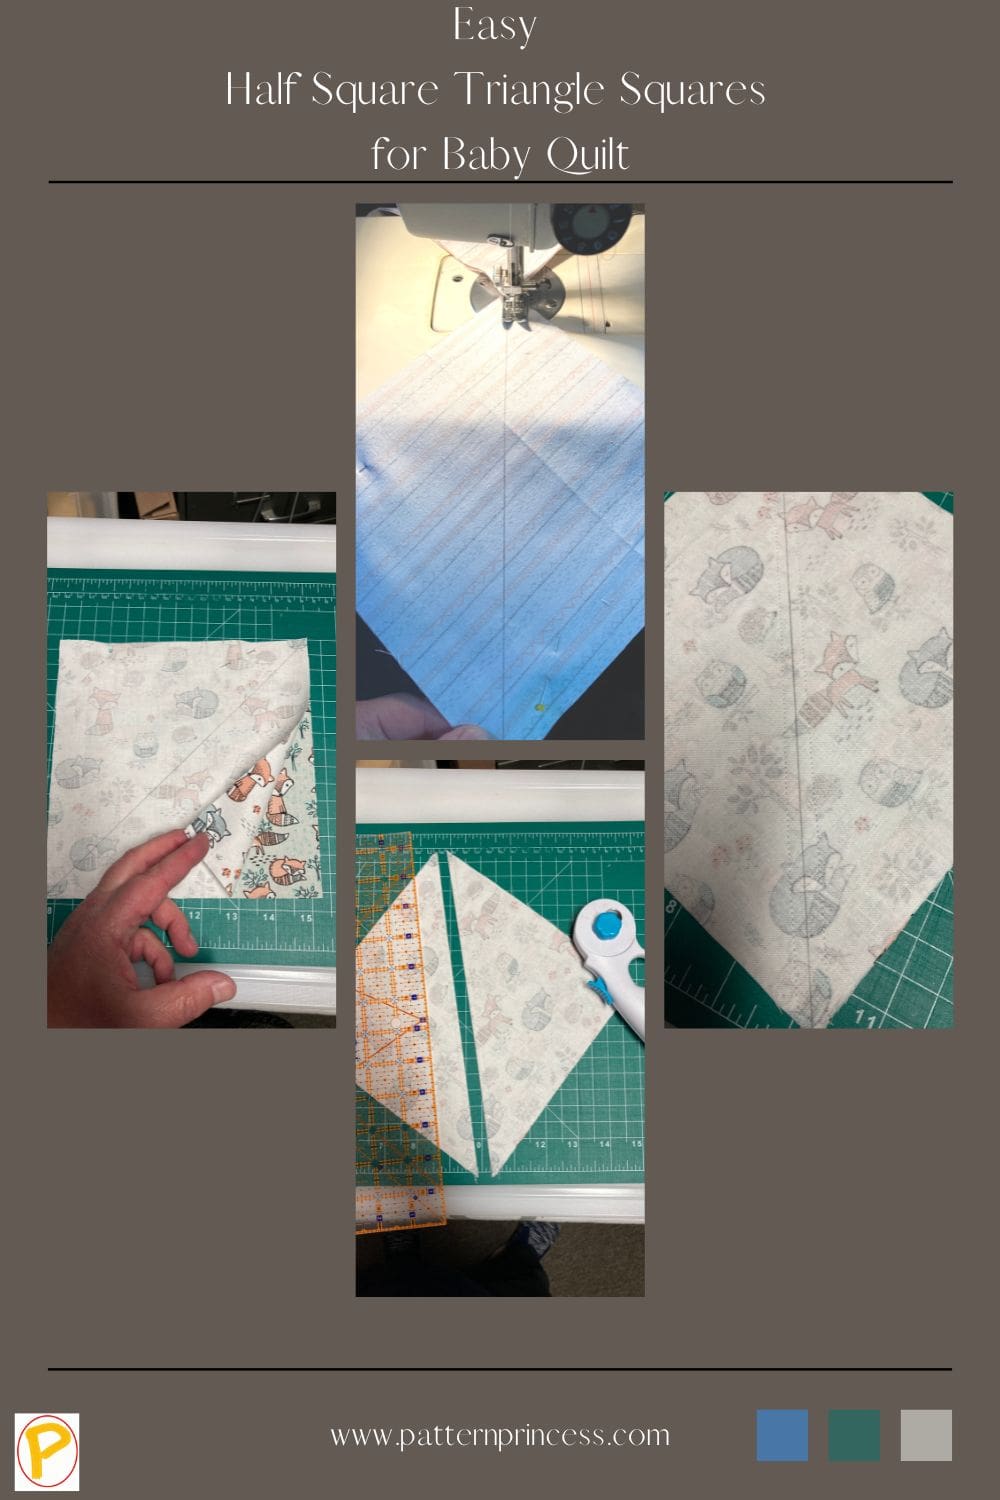
Begin with the Half Square Triangles (HST)
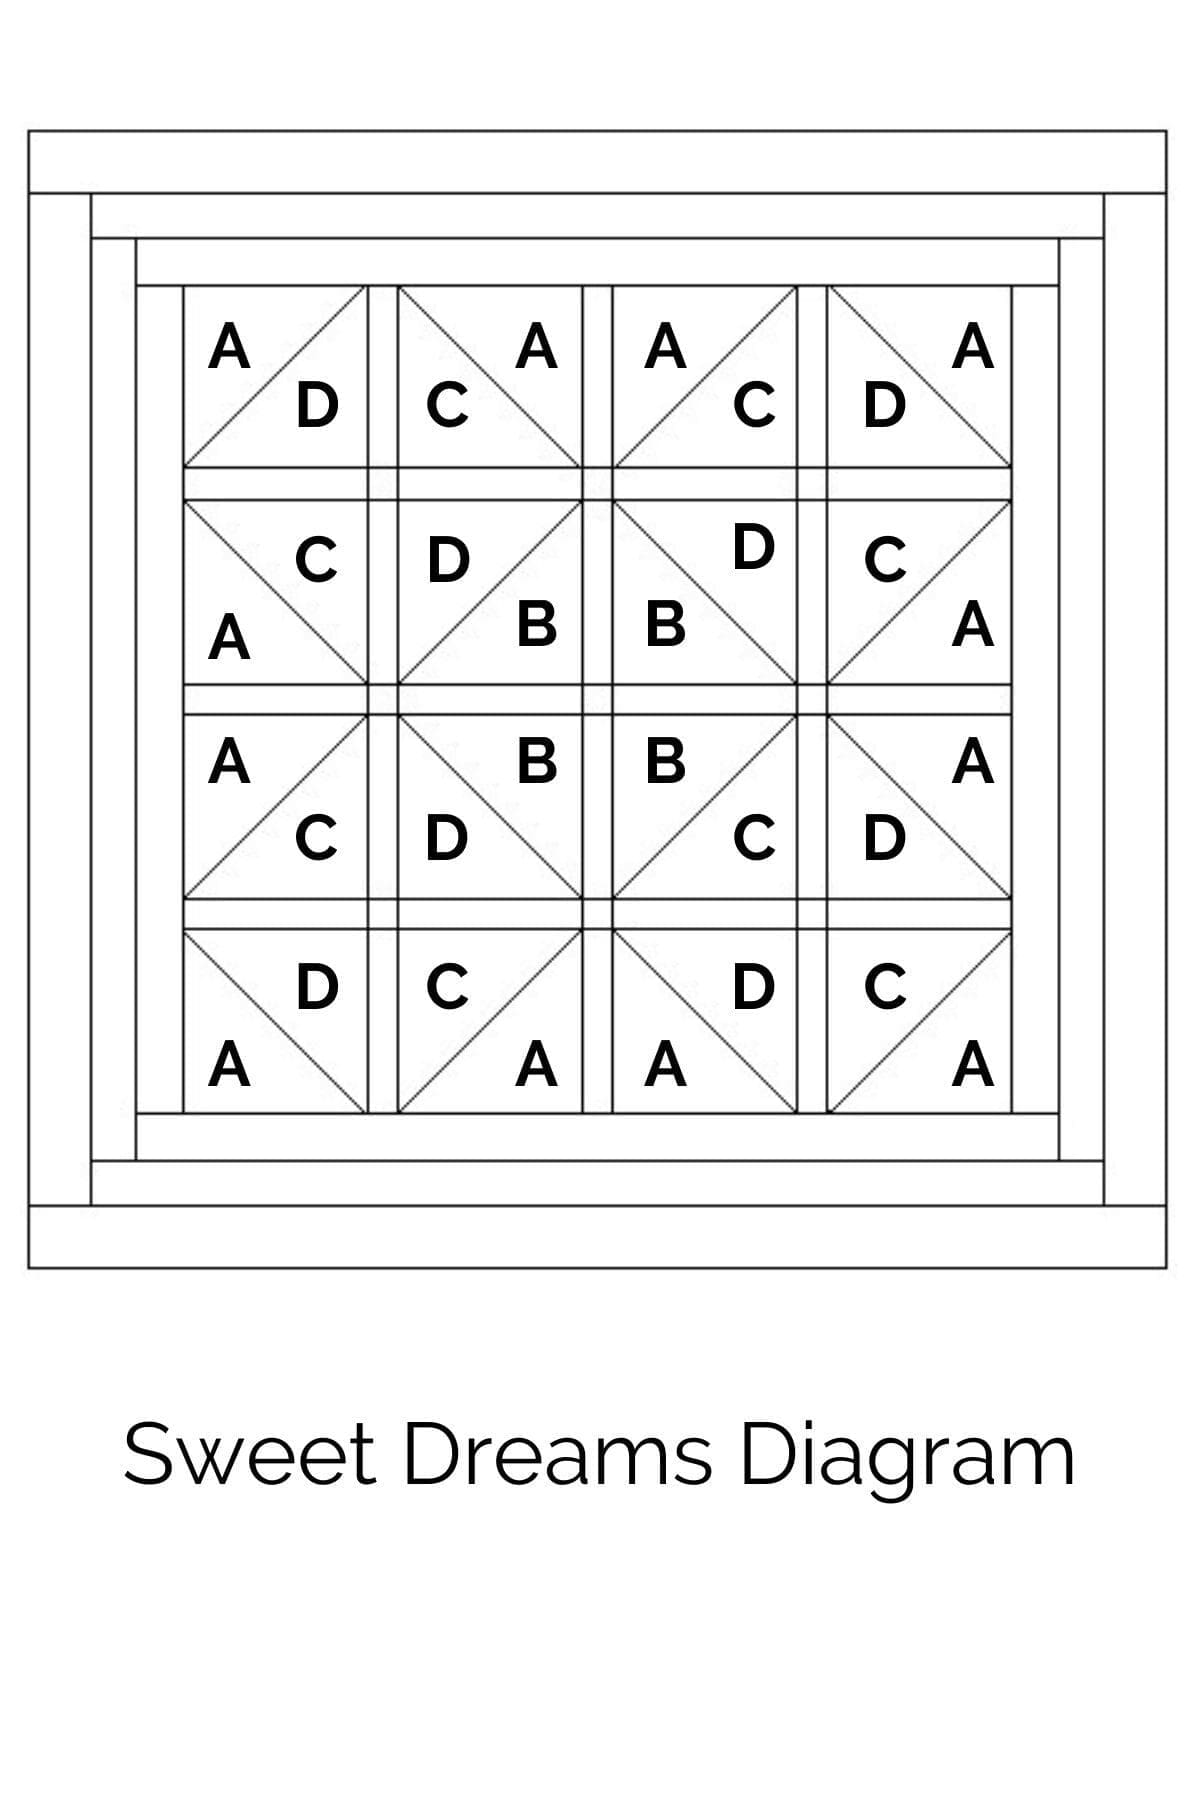
For this pattern you’ll need to make 16 half square triangles (HST) using the following squares.
Peach Fabric 2 fat quarters. Cut 6, 7 1/2 x 7 ½ inch squares.
Blue Fox 1 fat quarter. Cut 2, 7 1/2 x 7 ½ inch squares.
Blue Stripe 1 fat quarter. Cut 4, 7 1/2 x 7 ½ inch squares.
White Fox 1 fat quarter. Cut 4, 7 1/2 x 7 ½ inch squares.
Make two HST at a time using the following square color combinations.
2 Peach and 2 White Fox. This results in 4 HST squares.
2 White Fox and 2 Blue Fox. This results in 4 HST squares.
4 Peach and 4 Blue Stripe. This results in 8 HST squares.
You can find more details on how to make a half square triangle.
When joining two squares, the result will be 2 half square triangle squares.
With a pencil or water-soluble marking pen and a ruler, draw a diagonal line on the wrong side of the lighter color fabric square.
Next place the other fabric square on top with the right sides together and the diagonal line facing up.
Sew 1/4″ along both sides of the line. Cut the two blocks apart along the diagonal line you drew.
Press the seam open or to the darker fabric side.
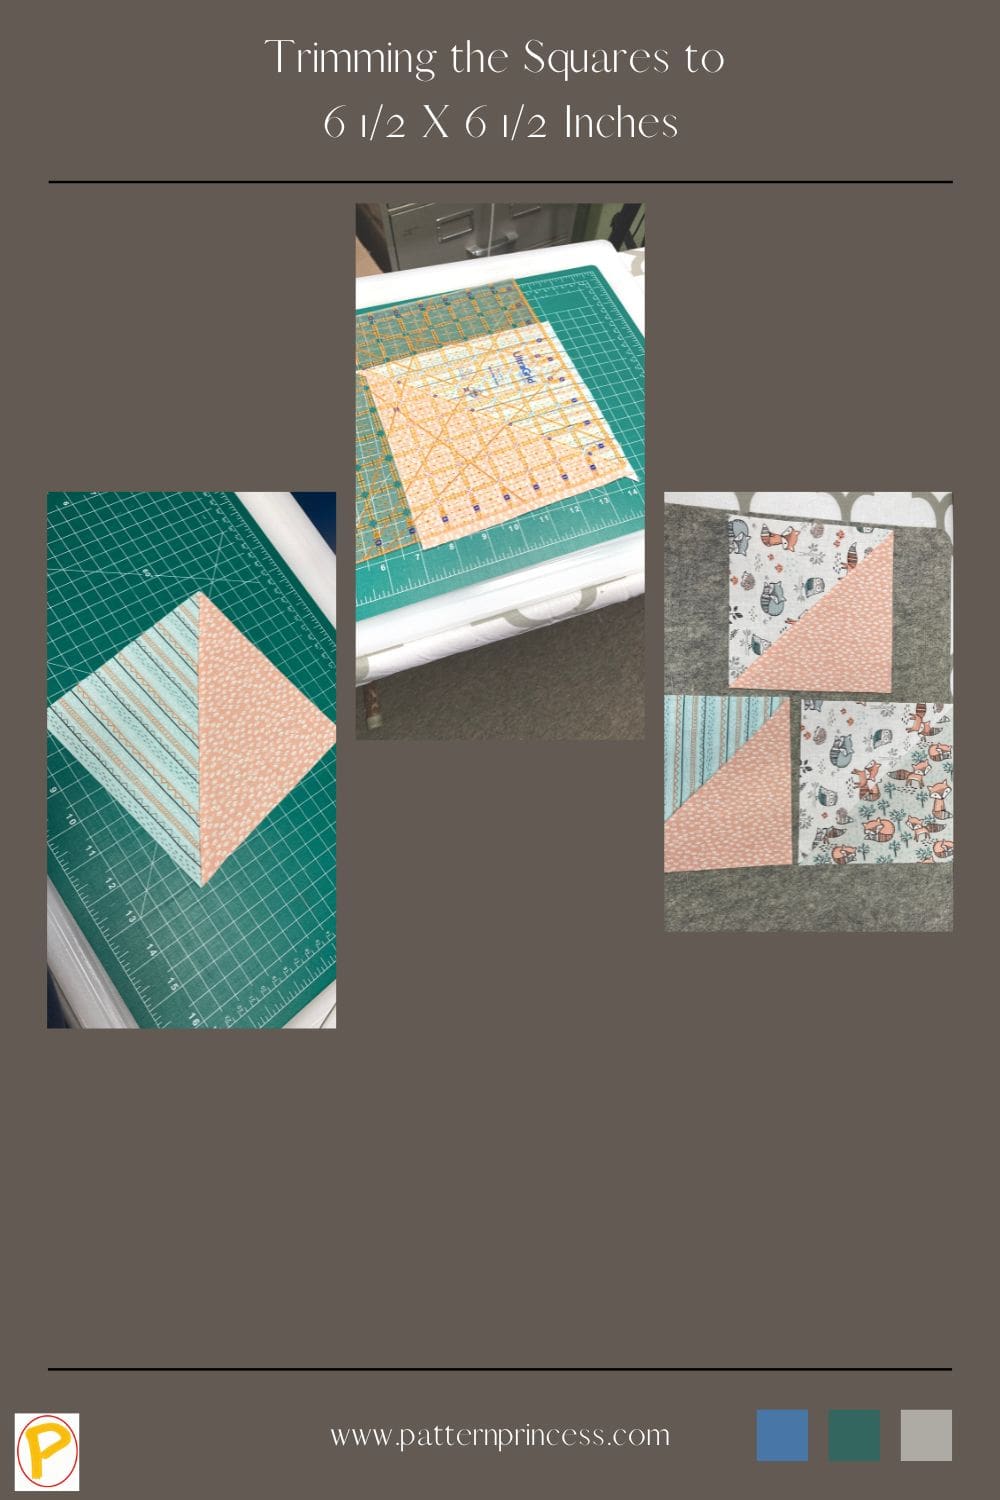
Trim blocks to 6 ½ x 6 ½ inches.
Repeat this process until all 16 half square triangles are complete.
Layout the quilt blocks according to the quilt top diagram.
Vertical Sashing
For this, you will be using the Light Grey Sashing.
Cut 12, 1 ½ x 6 ½ inch strips. (Vertical sashing between the squares).
With right sides together using ¼-inch seams, sew a 1 ½ x 6 ½ inch strip onto the right side of the top left HST square. This square should be the peach fabric and white foxes.
Repeat for the next two squares in the top row.
Next Sew the last square onto the opposite side of the sashing. Then sew the next two squares onto the opposite sides of the sashing.
At this point, the entire first row should be sewn together with the vertical sashing between each square.
Press the seams open or to one side.
Repeat this process for the next three rows.
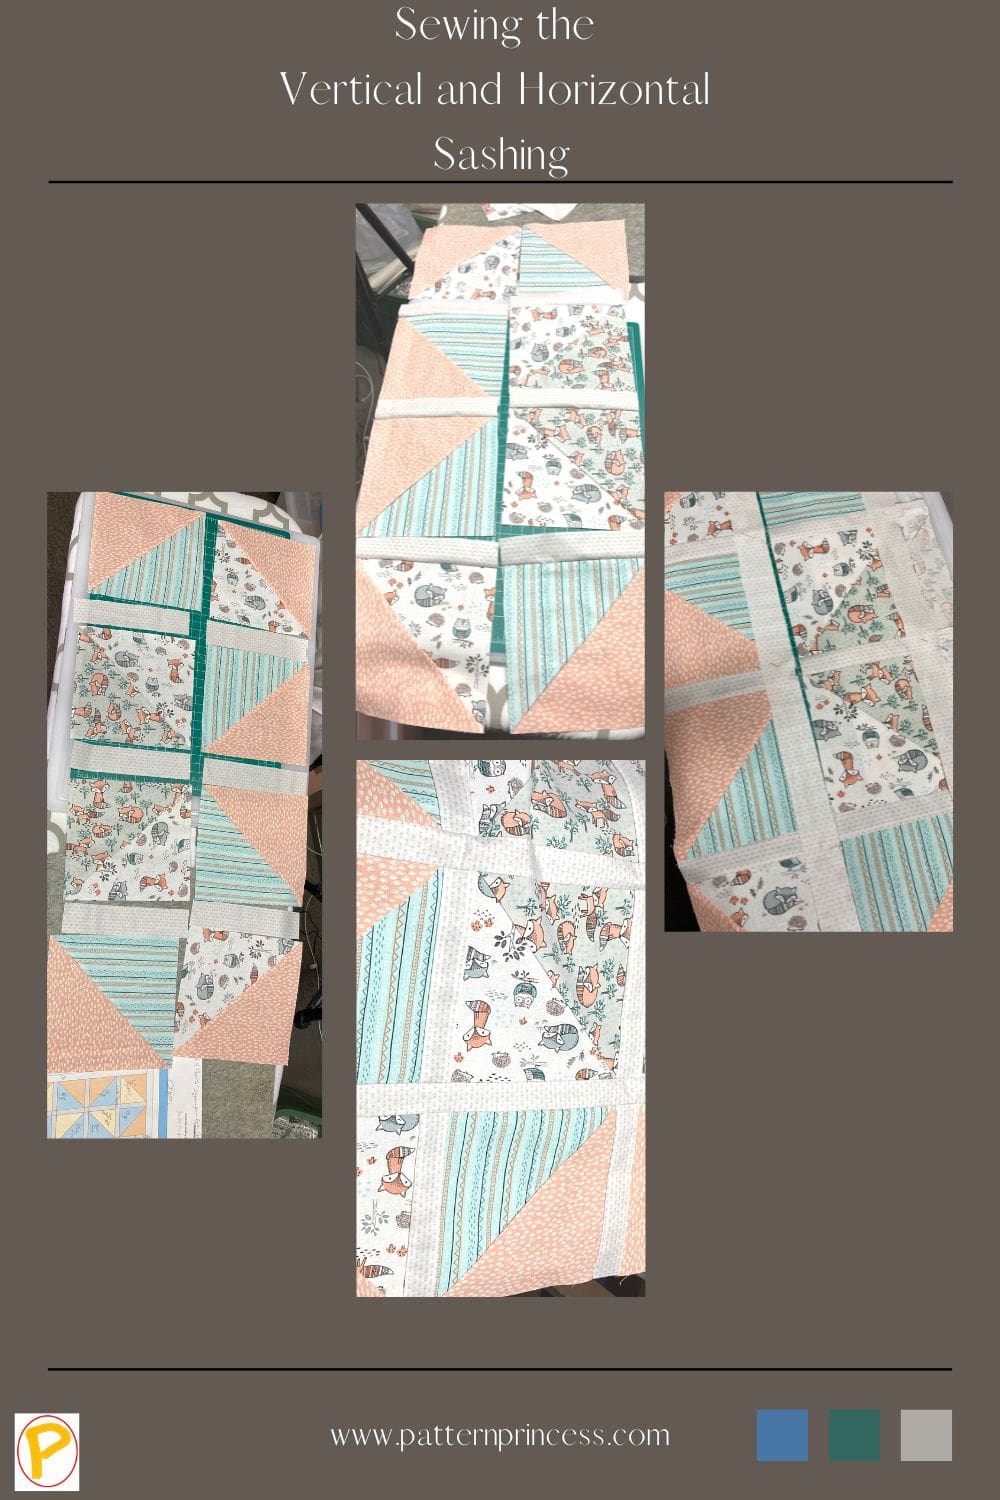
Horizontal Sashing
For this, you will be using the Light Grey Sashing.
Cut 3, 1 ½ x 27 ½ inch strips. (Horizontal sashing between the rows).
With right sides together using ¼-inch seams, sew a sashing piece onto the top row. Sew the second row onto the other side of the sashing.
Next, add another piece of sashing onto the second row, then sew the third row to the sashing.
Sew the sashing to the other side of the third row. Finally, sew the fourth row to the opposite side of the sashing.
Press the seams open or to one side.
At this point, all 16 half square triangle squares should be joined with the sashing in between the squares.
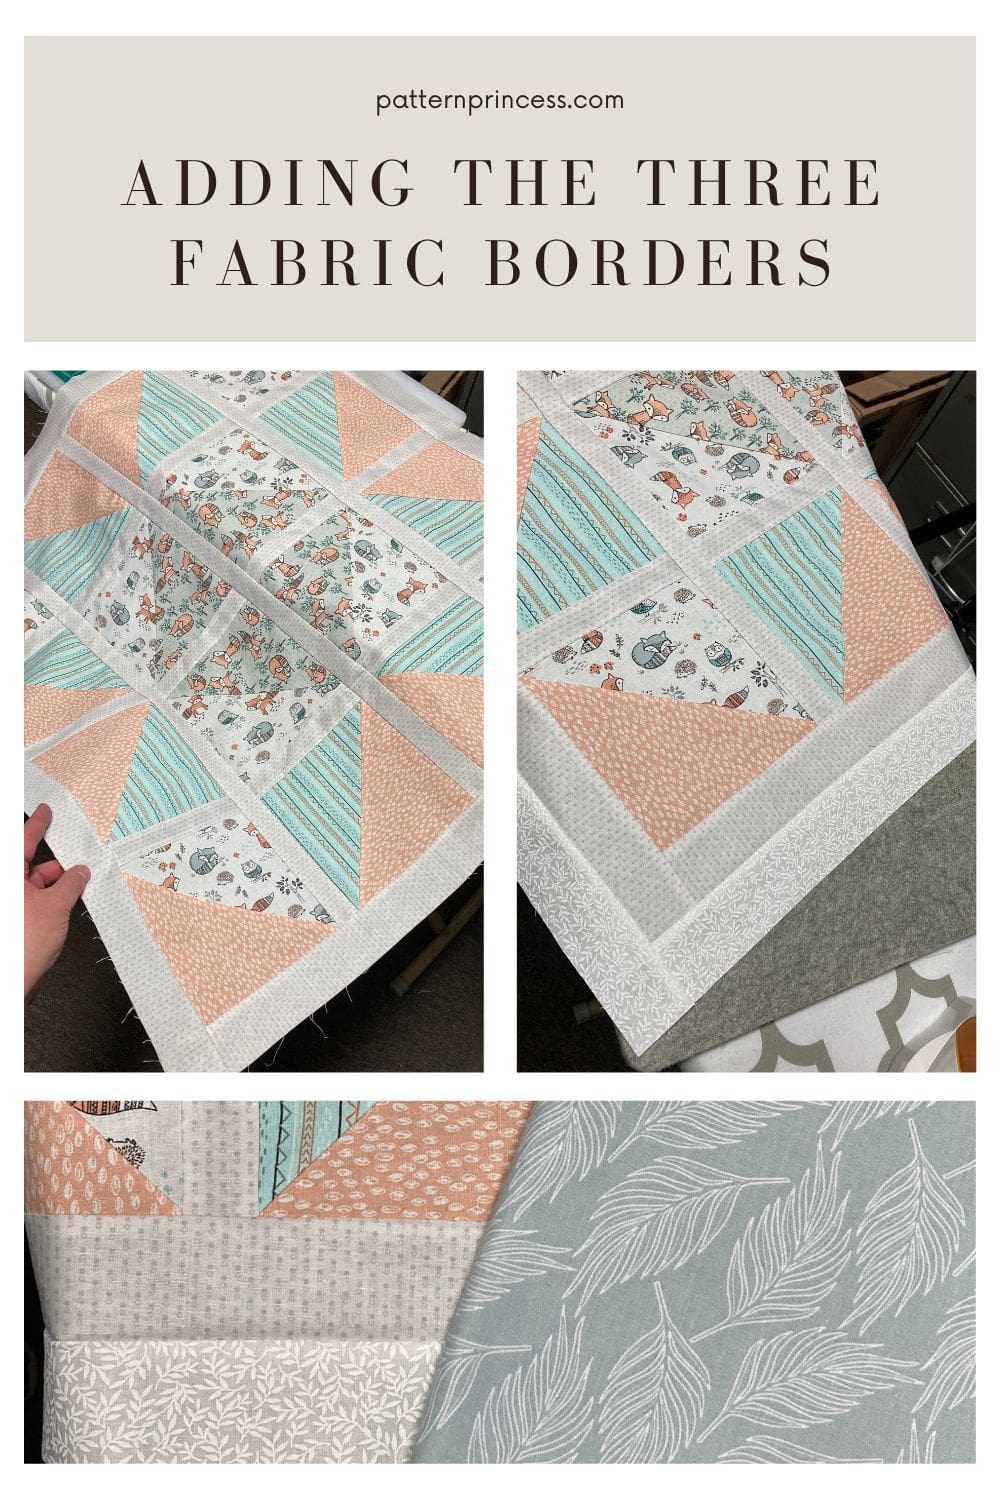
Adding the Three Borders
First Border in Light Grey
You will be using the following sashing strips in light grey.
Cut 2, 2 x 27 ½ inch strips. (Vertical sashing on the sides).
Cut 2, 2 x 30 ½ inch strips. (Horizontal sashing on the top and bottom).
Vertical Sashing Pieces on the Sides
Using the 2, 2 x 27 ½ inch pieces of sashing, pin on the sides of the quilt top with the right sides together. Using ¼-inch seam allowance, sew 1 sashing strip to each side of the baby quilt.
Press all seams to the outside or open.
Horizontal Sashing Pieces on the Top and Bottom
Using the 2, 2 x 30 ½ inch pieces of sashing, pin on the top and bottom of the quilt top with the right sides together. Using ¼-inch seam allowance, sew 1 sashing strip to each side of the baby quilt.
Press all seams to the outside or open.
Second Border in White
You will be using the following sashing strips in white.
Cut 2, 2 x 30 ½ inch strips. (Vertical sashing on the sides).
Cut 2, 2 x 34 inch strips. (Horizontal sashing on the top and bottom).
Vertical Sashing Pieces on the Sides
Using the 2, 2 x 30 ½ inch pieces of sashing, pin on the sides of the quilt top with the right sides together. Using ¼-inch seam allowance, sew 1 sashing strip to each side of the baby quilt.
Press all seams to the outside or open.
Horizontal Sashing Pieces on the Top and Bottom
Using the 2, 2 x 34 inch pieces of sashing, pin on the top and bottom of the quilt top with the right sides together. Using ¼-inch seam allowance, sew 1 sashing strip to each side of the baby quilt.
Press all seams to the outside or open.
Third Border Fabric in Mint Green
You will be using the following sashing strips in mint green.
Cut 2, 2 1/2 x 34 inch strips. (Vertical sashing on the sides).
Cut 2, 2 1/2 x 38 inch strips. (Horizontal sashing on the top and bottom).
Vertical Sashing Pieces on the Sides
Using the 2, 2 1/2 x 34 inch pieces of sashing, pin on the sides of the quilt top with the right sides together. Using ¼-inch seam allowance, sew 1 sashing strip to each side of the baby quilt.
Press all seams to the outside or open.
Horizontal Sashing Pieces on the Top and Bottom
Using the 2, 2 1/2 x 38 inch pieces of sashing, pin on the top and bottom of the quilt top with the right sides together. Using ¼-inch seam allowance, sew 1 sashing strip to each side of the baby quilt.
This one should really be 37 ½, but I cut mine a little longer just for extra assurance that I would have a piece long enough. Then I trimmed the end as needed.
Press all seams to the outside or open.

Layer the Top, Batting, and Back
Sandwich the baby quilt backing fabric, batting, and the quilt top. For a smaller quilt like this, it is much easier to achieve.
The backing fabric and the batting should be a few inches larger all the way around than the quilt top. This makes sure that there is backing and batting covering the entire quilt top fabric. If you cut it too close and there is any slippage, you might end up with an edge that does not have the bottom part of the quilt sandwich.
Therefore, the two bottom layers of the quilt (the back and the batting) are extending about 2 inches all around the outside edges of the quilt top.
Begin by placing the backing fabric on a flat solid surface, right side down facing out. Smooth out any wrinkles. Use painters’ tape to secure the edges of the fabric down. This will help hold it in place and reduce the chance of a wrinkle developing as you place the next two layers.
Next, center the batting on top of the backing fabric smoothing out any wrinkles.
Finally, place the quilt top on the batting, centering it with the right side up. Smooth out any wrinkles.
Baste the Quilt Together
Once you have the top fabric all smoothed out, use large safety pins to baste all three layers together. Use a good quality 1 ½” stainless steel pin for this.
Put a pin in each corner and around the entire quilt about every 5-6 inches or so through all three layers. This holds things in place, so they don’t move around while you are sewing the layers together using a quilting design of your choice.
Quilting the Sweet Dreams Easy Quilt
To be honest, I am not very good at quilting by freehand. Therefore, I use a plastic template and heat erasable marker to draw the sewing lines on ahead of time. This makes it so much easier to quilt and when I am done, the marker lines disappear with the heat of an iron.
How to Trim the Batting and Backing Fabric Before Binding
To trim the batting and backing, use a large cutting mat, a longer ruler, and a rotary cutter.
Lay the quilt flat. Place the ruler along the edge of the quilt and use it as a guide to run your rotary cutter against to trim the quilt batting and backing to the size of the quilt top. Do this on all four sides.
Sew the Binding to the Baby Quilt
First, prepare the binding strips. I used the leftover grey fat quarter from the packet of 5 that I did not use for the quilt top. Additionally, I used the rest of the fat quarter fabric from the baby quilt top.
Make the binding 2 ½ x 172 inches long.
Once the strips are sewn together, fold in half lengthwise with wrong sides together and press.
Pin the raw edge of the binding onto raw edge of the quilt top. I generally start in the middle of a side. Leave approximately a 3” tail hanging.
Note: This hanging part will be used to sew to the other end of the binding strip when you have finished sewing all four sides of the binding onto the quilt.
Sew the binding onto all four sides of the easy quilt making sure to miter the corners.
How to Miter Corners
As you are sewing on your binding, stop sewing ¼ inch from the corner, turn the quilt and sew off the corner. You may want to mark this spot with a pin ahead of time or a pencil. Cut the thread making sure NOT to cut the quilt or the binding.
Remove the quilt from the sewing machine and fold the binding strip up straight so it is vertical from the side you were just sewing on.
Next, fold the binding strip back down on itself and align it to the edge of the side of the quilt you just sewed and the edge of the quilt you are going to sew next.
Continue sewing the binding on the quilt edge.
Repeat this process until all four sides and corners have the binding sewn on. When you are on the last side of the quilt close to where you started with the binding it is time to connect the ends of the binding.
Joining the Binding
If you know how to join the binding to make a continuous strip, go ahead and do that process. To be honest, I have tried many times and have yet to master this.
Here is what I do.
Stop stitching a few inches away from where you started. Overlap the starting and ending binding about 2 inches. Cut the ending binding at this point.
Fold the end of one of the binding strips over about 1 inch. Then tuck the raw edge of the other binding inside. Continue stitching until you meet up with the starting point.
Hand-Stitch the Binding to the Quilt Back
The last part of making a quilt is to hand-stitch the folded edge onto the back of the quilt.
I like to use a few small clips to hold the binding as I sew. Continue moving them along just ahead of where you are sewing.
When you get to the corners, fold the edges over to miter the corner on the back side of the baby quilt.
I sew a few stitches right into the corner to help hold the binding in place.
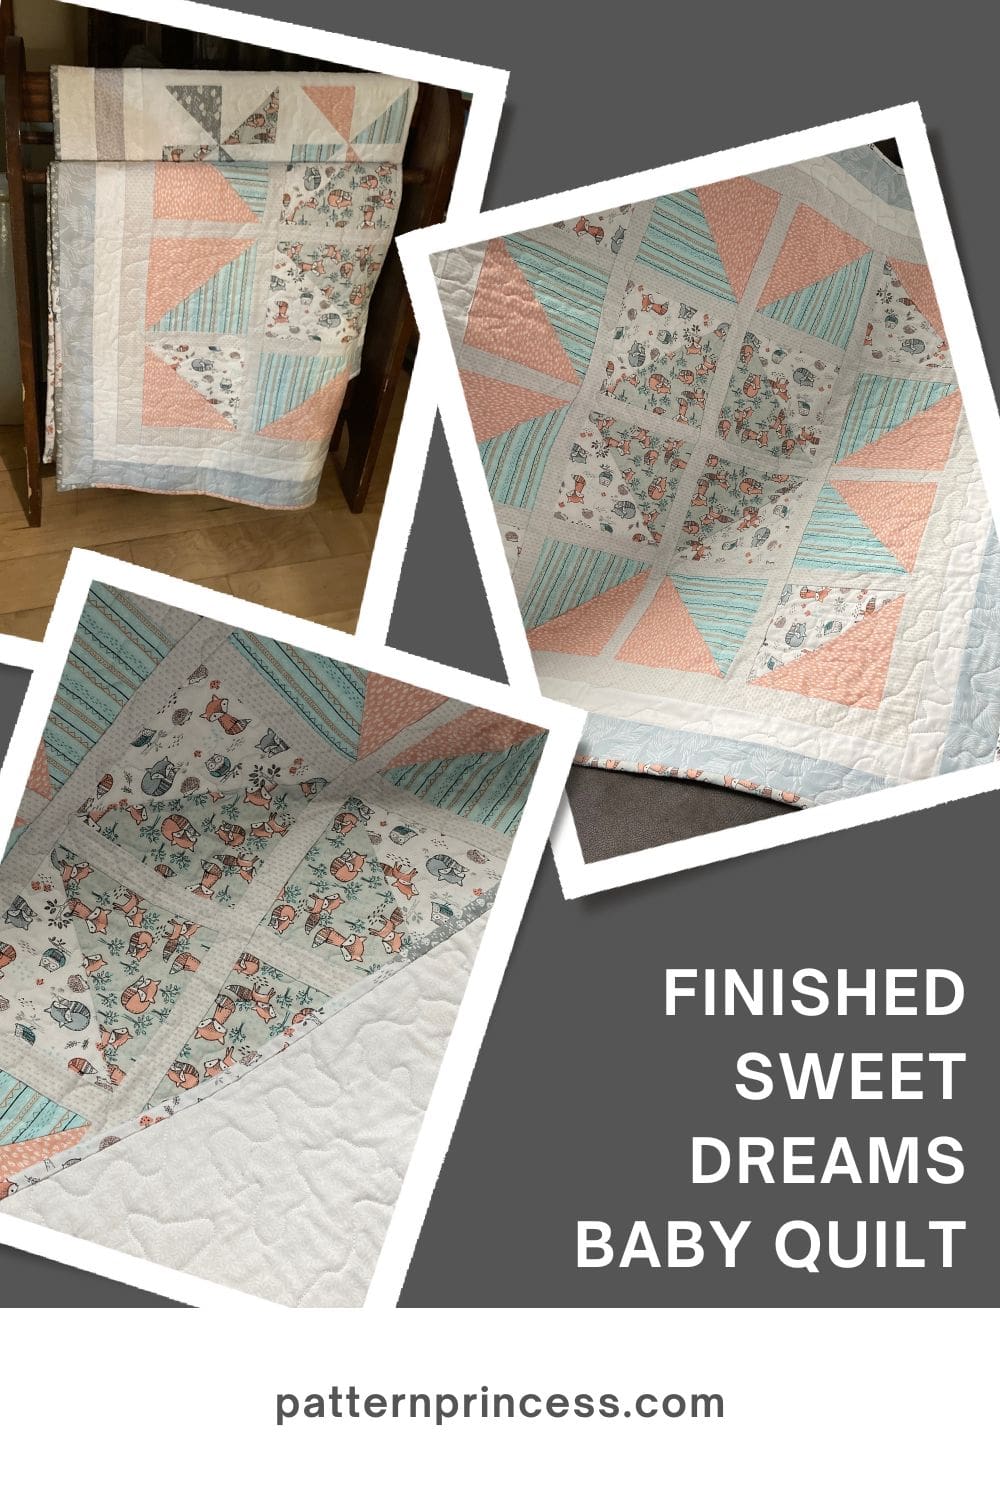
Sweet Dreams Easy Quilt Pattern Finished
Once all the sides and corners are stitched, you are done.
It is ready to use or give as a gift or use. Here are a few other free quilting patterns to help inspire your next sewing project.
Excellent pattern. I really enjoyed following it and making the quilt.
Catherine, a Verified Etsy Buyer

You can find Victoria crocheting, quilting, and creating recipes. She has cooked in restaurants for over 20 years, including many larger parties. She learned to crochet when she was just 11 years old and has been crocheting ever since; over 50 years now. Over 40 years ago, she loved her first class in sewing and continues to hone her skills in quilting. Many have enjoyed the handmade gifts over the years. In her professional career, she has worked in management in a wide variety of businesses including higher education as a dean of a division. All the while attending college part-time to achieve her doctorate in higher education with an emphasis in e-learning.