Last updated on April 4th, 2026 at 10:10 pm
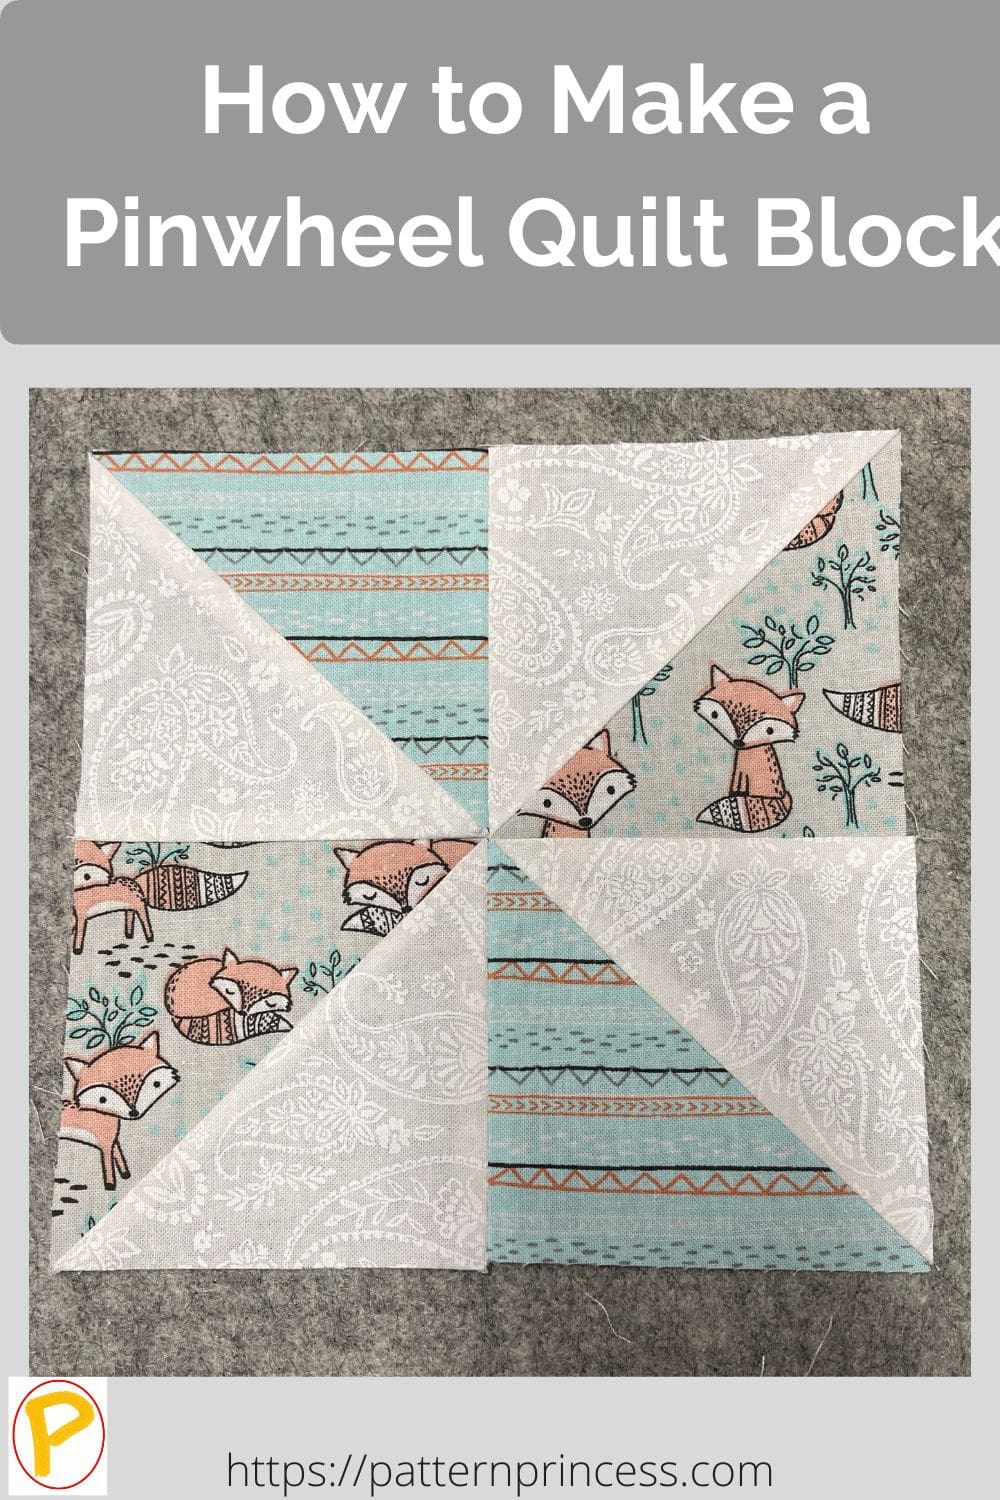
Learn how to make a pinwheel quilt block. It is a basic quilt block made from two squares of fabric in the same color or two different colors. It’s a fast and easy classic quilt block that is perfect for beginners.
Pinwheel quilt blocks are one of the most popular quilt block patterns. They’re simple to make and can be used in a variety of different quilts. Once you’ve mastered this block, you’ll be able to create all sorts of amazing quilts. It’s an easy way to add visual appeal to so many projects.
One frustration that many quilters have with pinwheel blocks is getting all of those points to match in the middle. What’s the best way to achieve perfect points? The secret to accurate piecing is marking your sewing lines on your cut fabric pieces. Marking sewing lines accurately leads to excellent quilt blocks.
I like starting with half square triangles that a a bit larger. That way, if one gets a little wonky it can be fixed during the trimming process. When you start your pinwheel block with half square triangles that are measured, sewn, and trimmed accurately, you’ll end up with a beautiful pinwheel block.
Directions: How to Make a Pinwheel Quilt Block
Skill Level
Easy
Materials
- Fabric
- Thread
Equipment / Tools
- Pencil
- Scissors
- Quilting Ruler
- Rotary Cutter
- Straight pins
- Iron
- Ironing board with a pad
- Sewing machine
Finished Pinwheel Block Sizes Chart
Using the 2‑at‑a‑time Half Square Triangle method
| Finished pinwheel block | Unfinished pinwheel block | Finished HST | Unfinished HST | Starting HST squares | Oversized Starting HST Squares |
| 4″ | 4½″ | 2″ | 2½″ | 3⅜″ | 3½” |
| 6″ | 6½″ | 3″ | 3½″ | 4⅜″ | 4½” |
| 8″ | 8½″ | 4″ | 4½″ | 5⅜″ | 5½” |
| 10″ | 10½″ | 5″ | 5½″ | 6⅜″ | 6½” |
| 12″ | 12½″ | 6″ | 6½″ | 7⅜″ | 7½” |
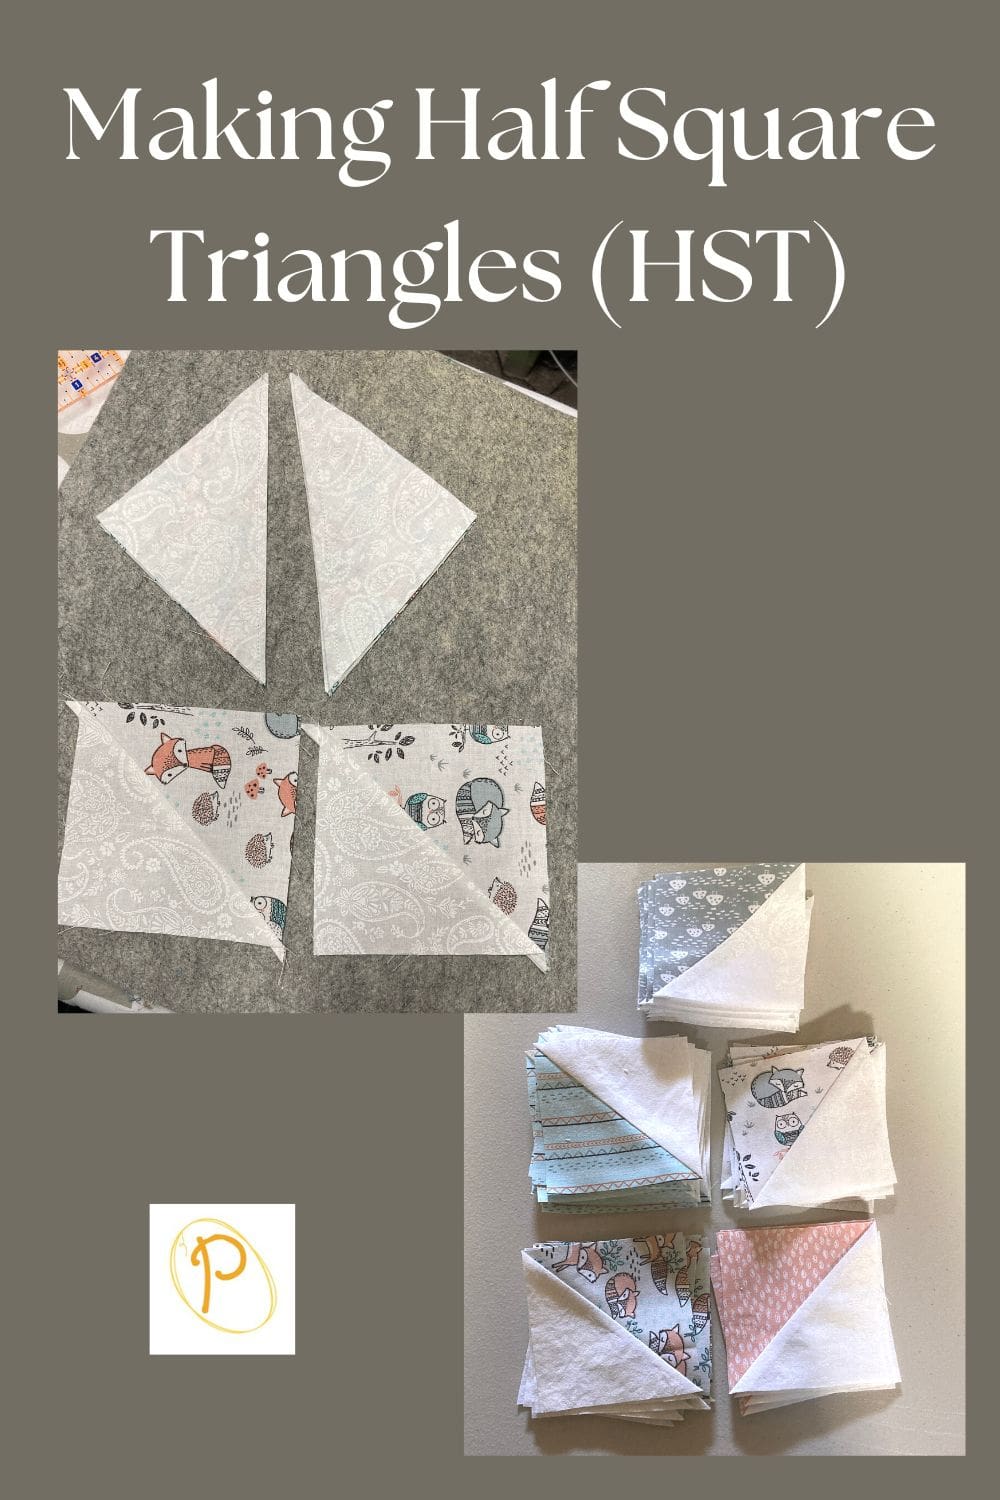
Making Half Square Triangles
This tutorial will show you how to make a pinwheel quilt block using simple techniques. The Pinwheel Quilt Block is a simple four-patch quilt block made from four half square triangles (HST).
Each half square triangle is made using two colors of fabric squares. You will need 4 half square triangles.
Here is a tutorial for the half square triangles.
Instructions
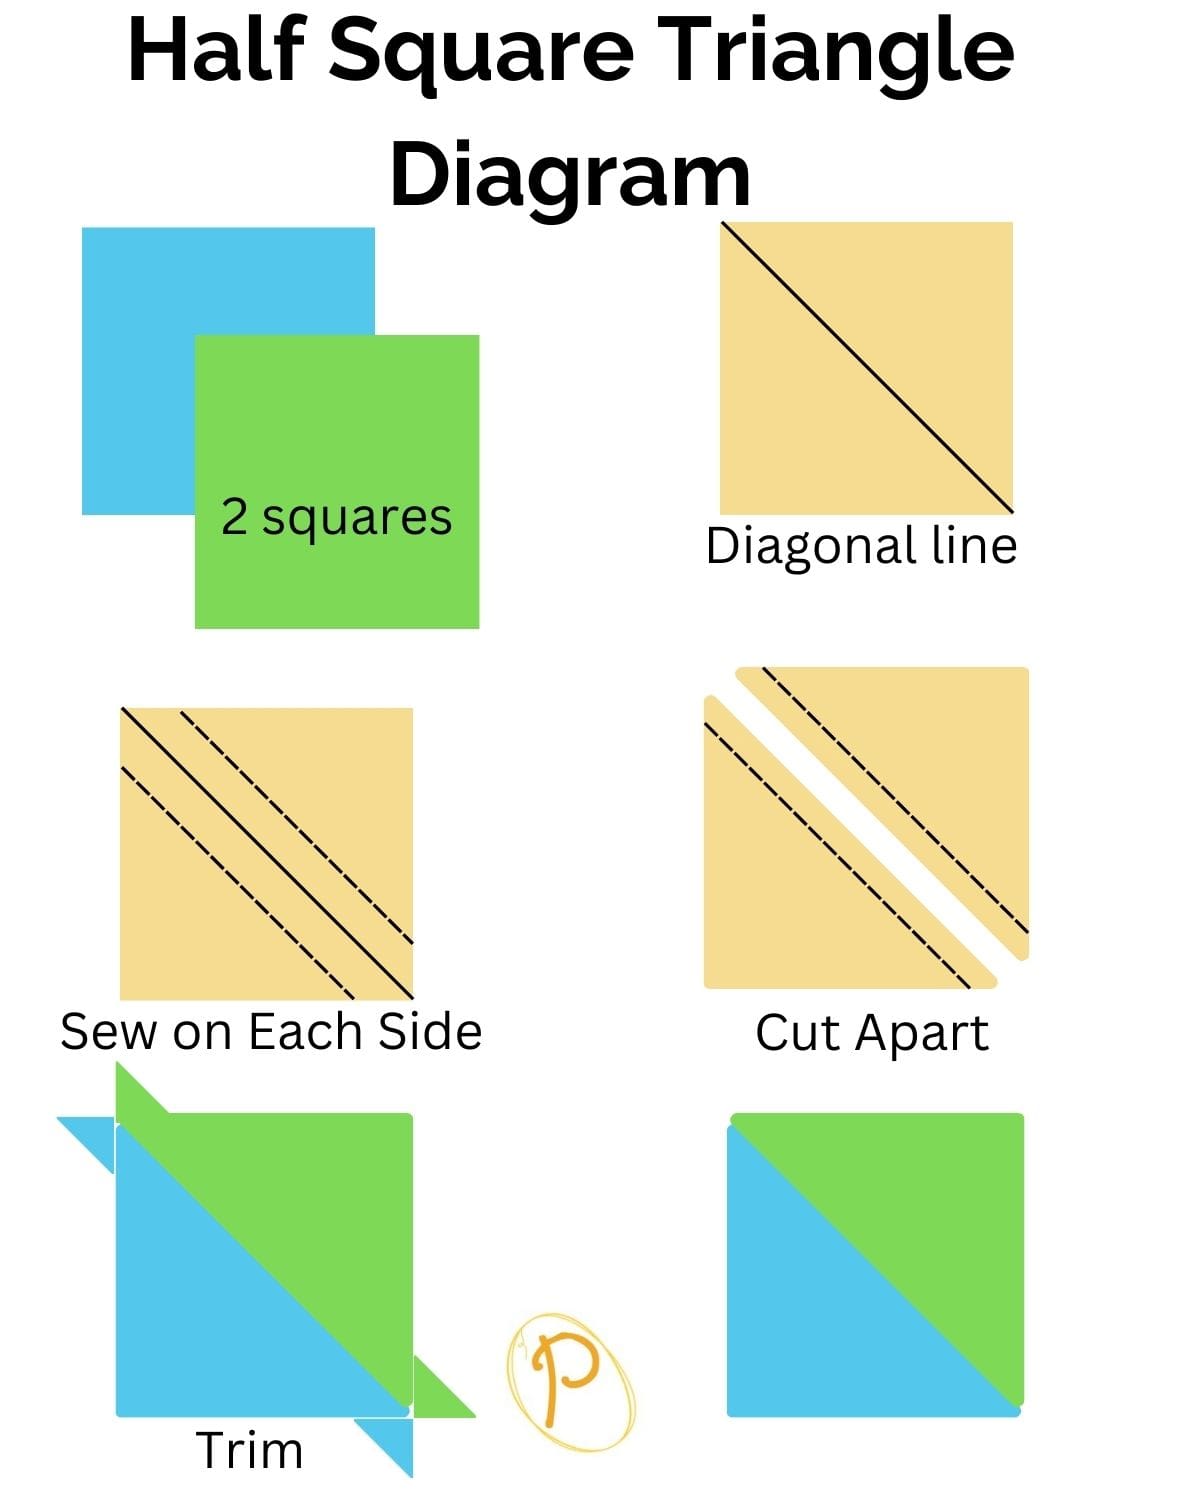
Cut fabric the Squares. Refer to your quilt pattern for the square size and number of units required. Every two squares make two finished HST units.
Next, Mark the Squares. Starting with equal size squares of fabric, place the ruler diagonally on the back side of the lightest square. Use a pencil to draw a diagonal line from one corner to the opposite corner.
Place the lighter square on top of the darker square with the right sides together matching the edges all the way around. Secure with straight pins.
Sew a scant 1/4-inch seam allowances on each side of the marked line.
Separate Triangles by cutting along the diagonal seams alone the center line using a rotary cutter. You now have two half-square triangles.
Press seams to one side toward the darker fabric or open, trim the square.
Laying out the Classic Pinwheel Quilt Block
So, you have your 4 half square triangles sewn, pressed, and trimmed. Now it’s time to lay them out and sew them together to create your pinwheel blocks.
Begin by laying out the four half square triangle units to form pinwheels. Making sure that they are pointing in the correct direction.
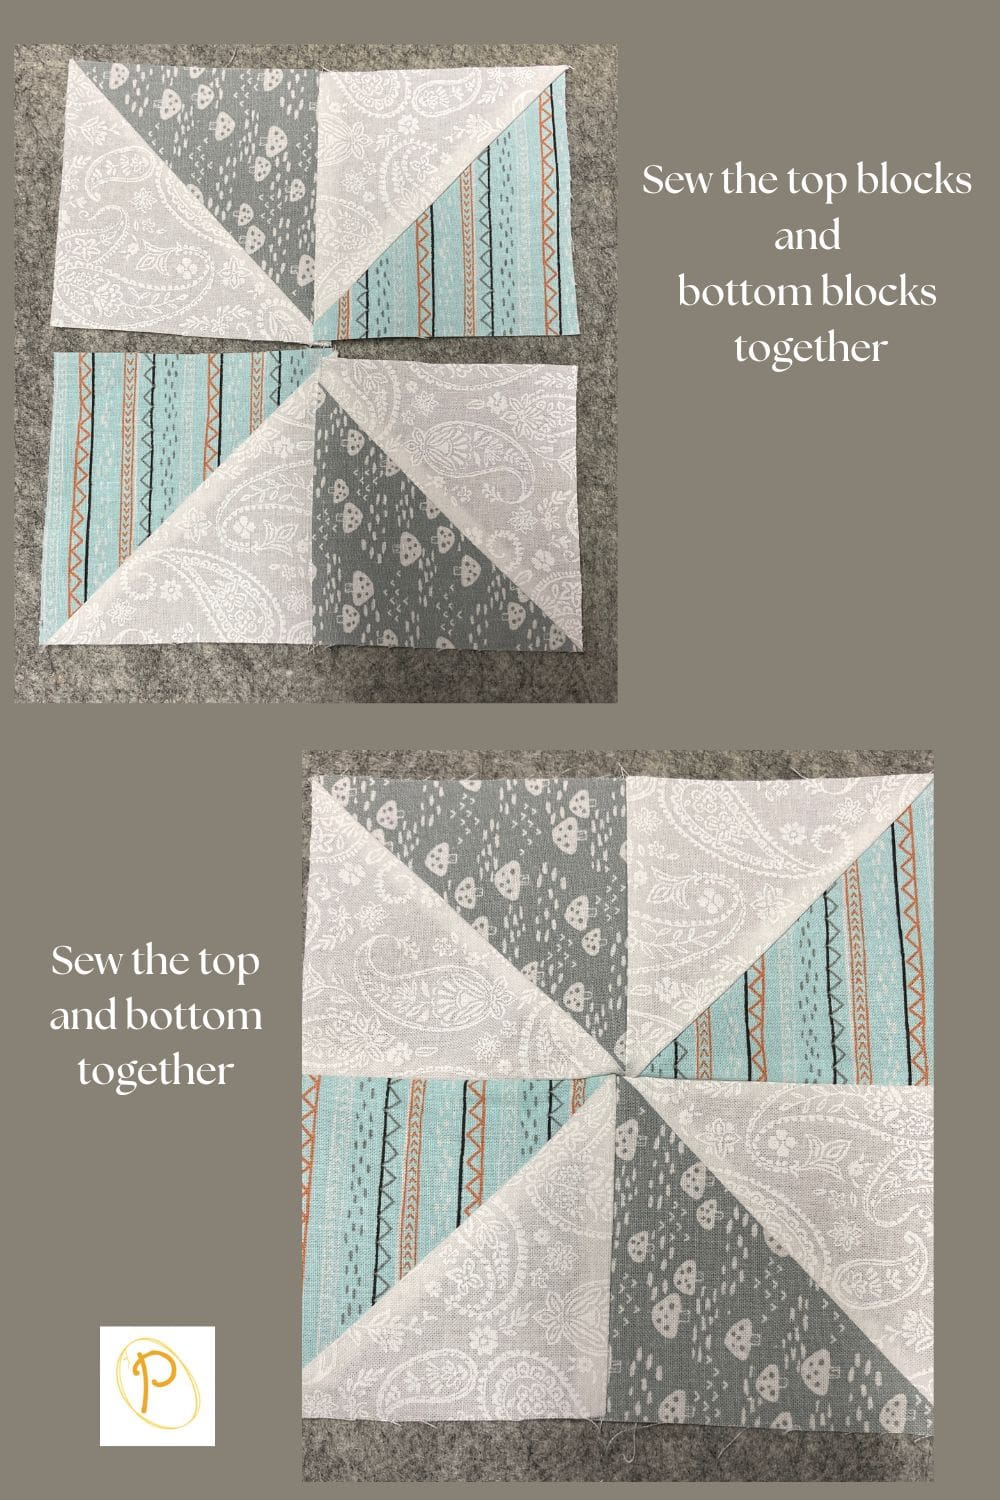
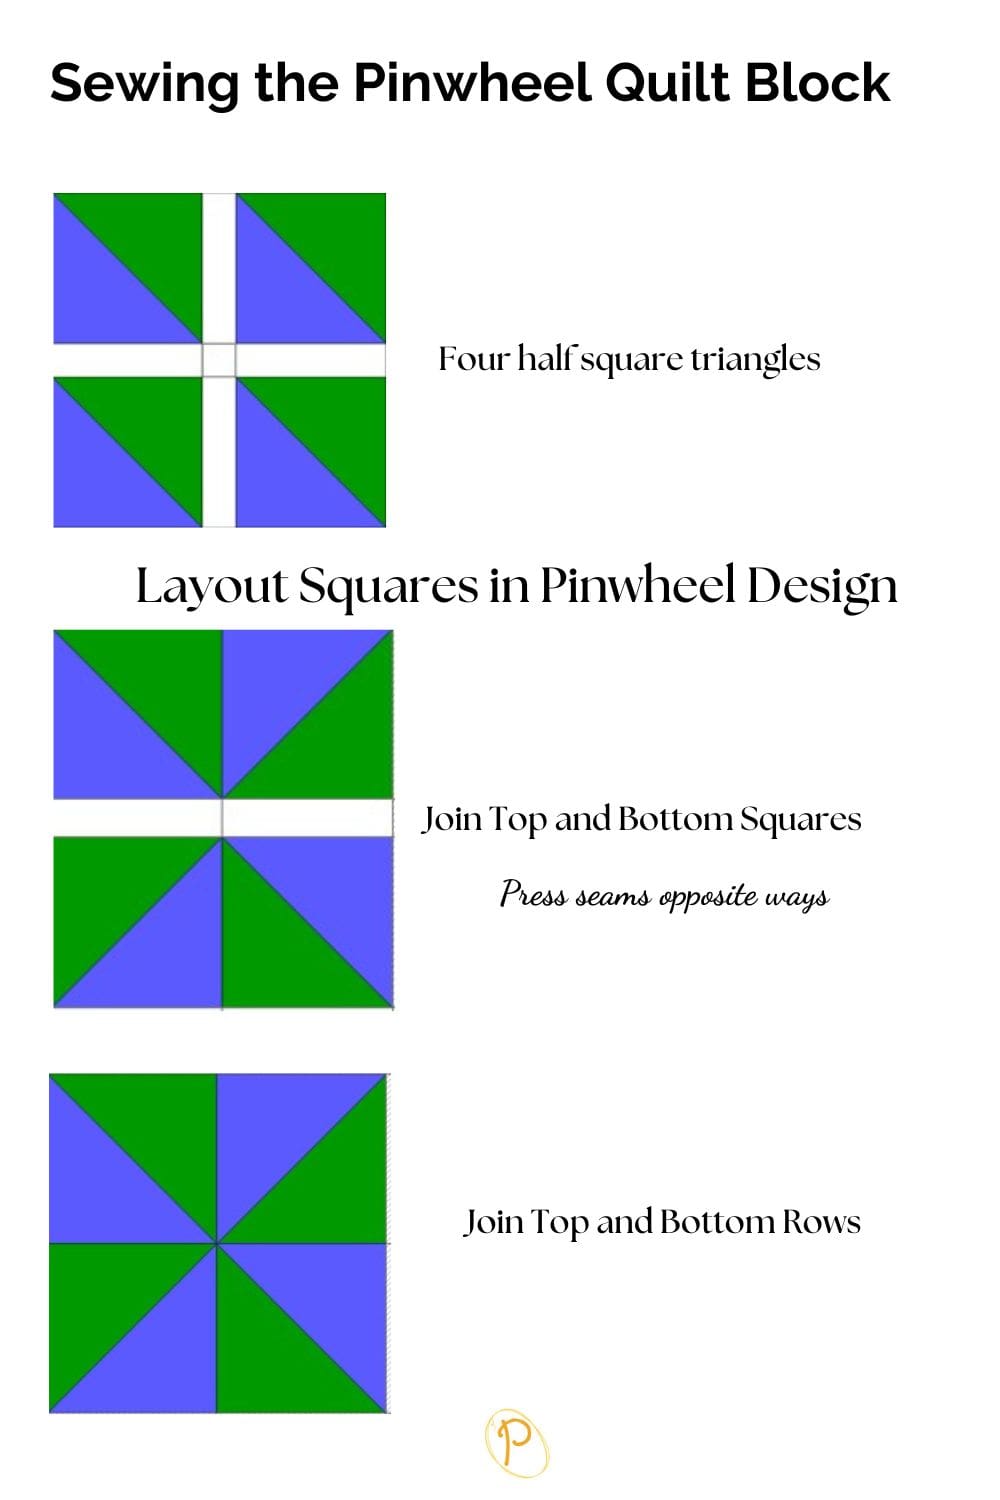
Pinwheel Block Assembly
Sew together the top two blocks using a quarter inch seam Allowance.
Press the seams to the right.
Sew the bottom two blocks together using a quarter inch seam allowance.
Press the seams to the left.
Next align the top and bottom block sets so that the middle seam nests together. This allows the points to line up nicely.
Sew the top to the bottom, using a quarter inch seam allowance.
Press the seam open.
If necessary, trim your block to the square size specified in the quilt pattern you are working on.
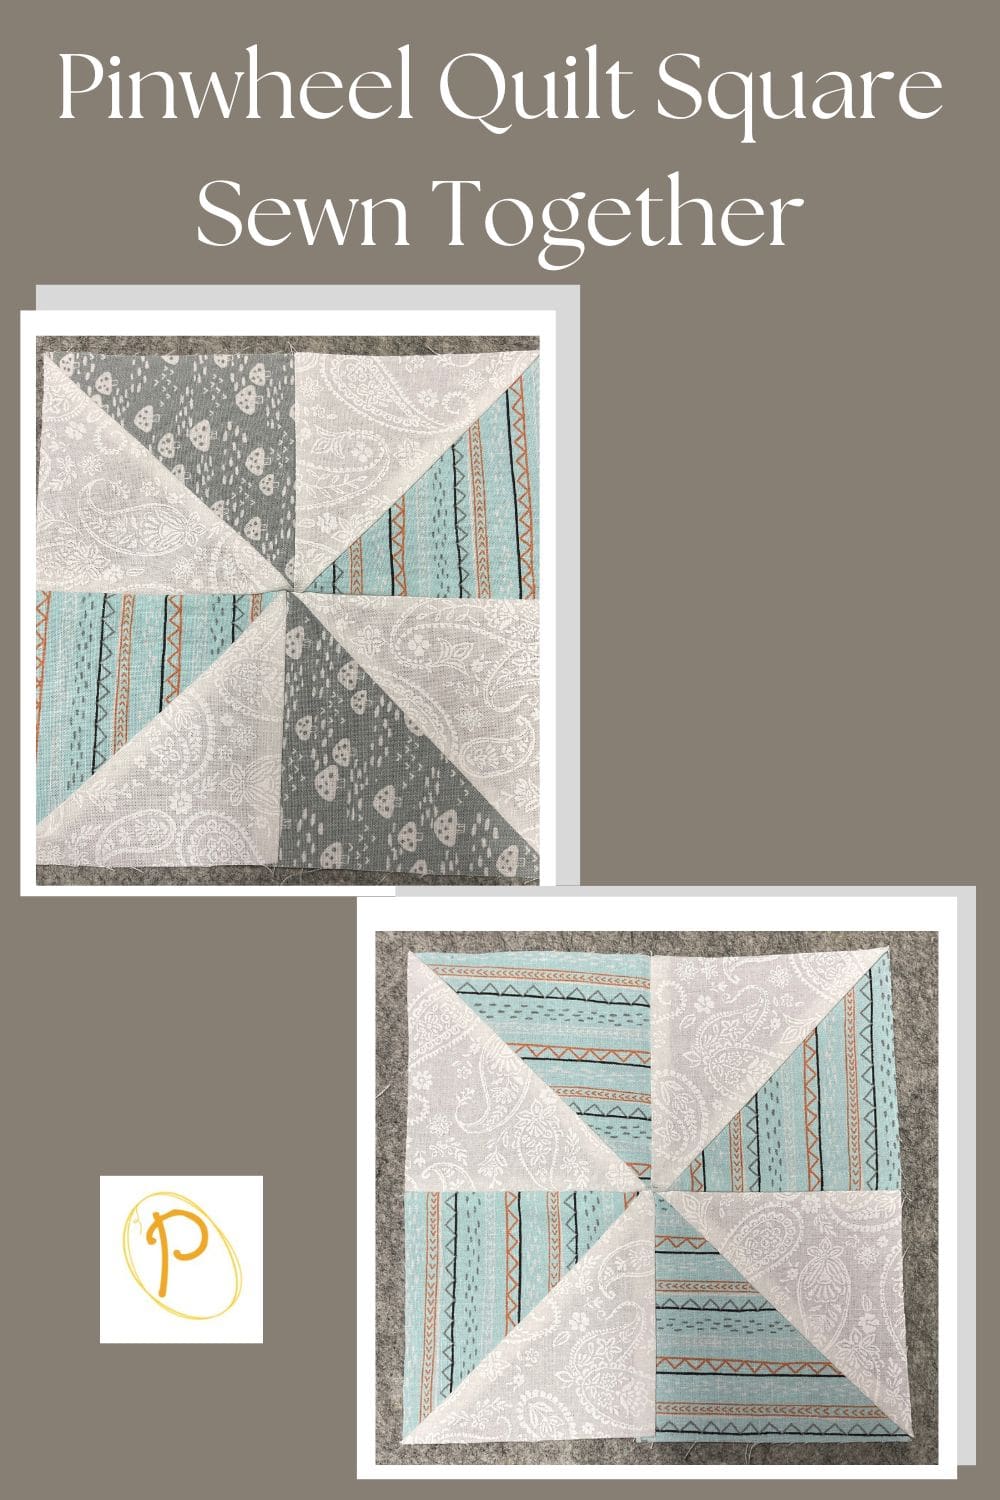
That’s it, you have a beautiful pinwheel quilt block ready to use in your pattern.
Here is a diagram to help visualize the steps in creating an easy pinwheel block.
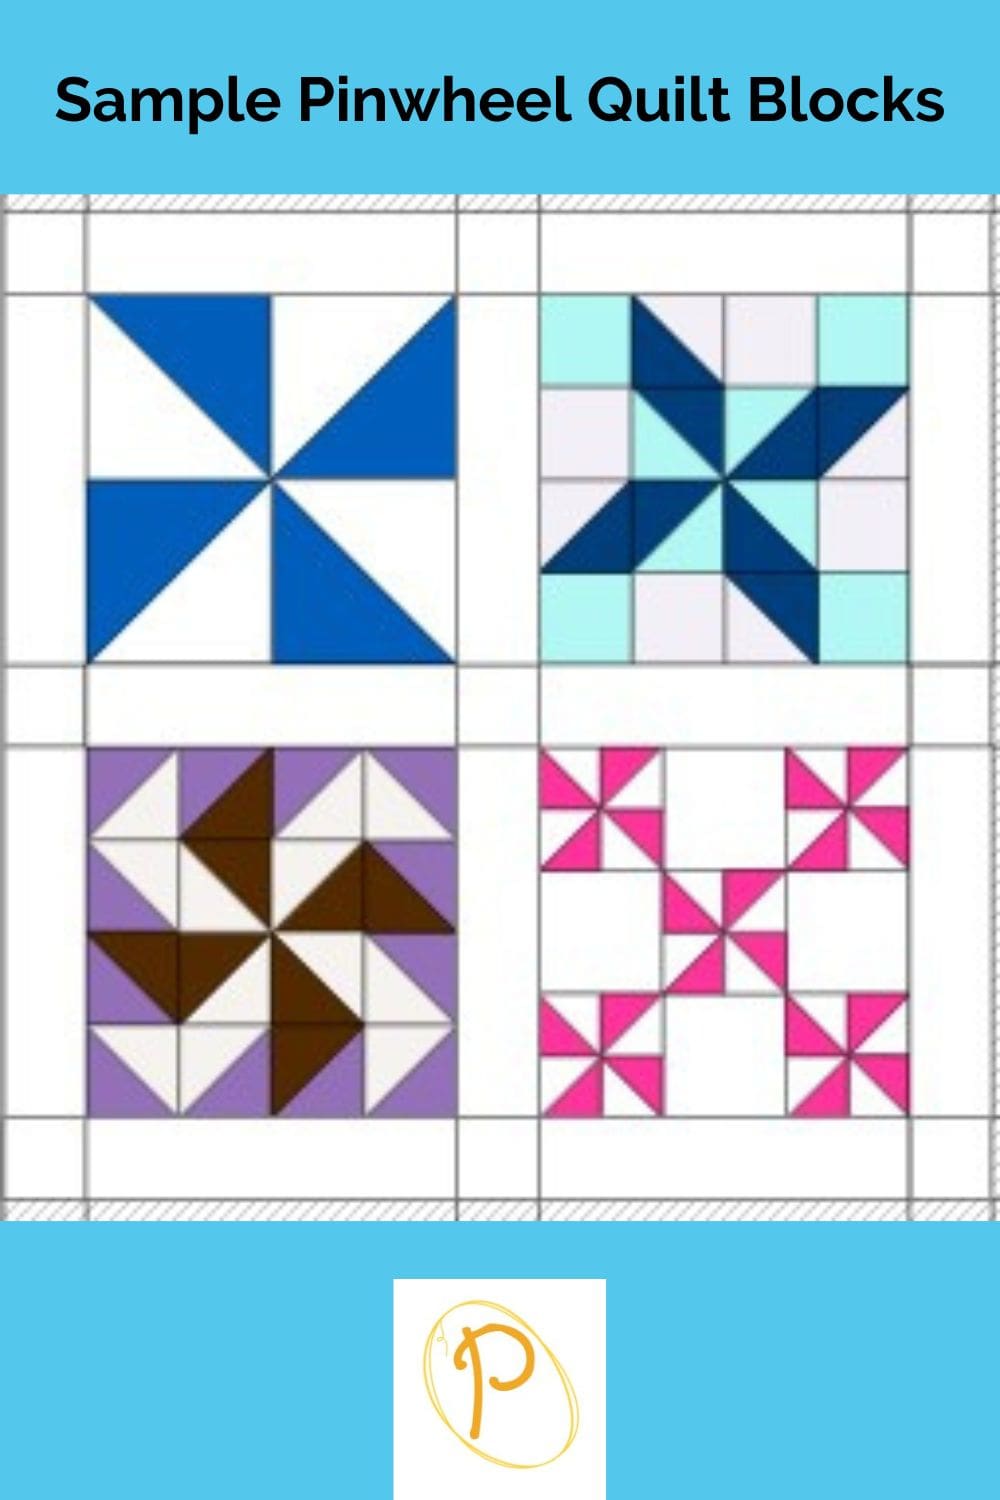
Once you learn how to sew this fun quilt block, the possibilities are just endless. Here are a few easy quilt block patterns to start with.
What Can Pinwheel Quilt Blocks Be Used For?
Pinwheel quilt blocks are incredibly versatile and can be used in various ways to create stunning quilt designs. Here are some popular uses:
Quilt Tops: The most common use for pinwheel blocks is to create quilt tops. By arranging multiple pinwheel blocks together, you can form captivating patterns that range from simple and traditional to complex and modern.
Borders and Sashing: Use these blocks as borders or sashing between other quilt blocks. Their dynamic design adds visual interest and can help tie together different elements of the quilt top.
Mini Quilts and Wall Hangings: Use smaller versions to create mini quilts or wall hangings. These projects are perfect for practicing new techniques or showcasing a particular fabric collection.
Pillows and Cushions: Sew Individual pinwheel blocks together to make decorative throw pillows or cushion covers. This is a great way to add a touch of handmade charm to your home decor.
Table Runners and Placemats: Create coordinating table runners and placemats using pinwheel blocks. These items make wonderful gifts and add a stylish touch to any dining table.
Bags and Totes, Clothing and Accessories
Incorporate pinwheel blocks into the design of bags, totes, or pouches for a unique and eye-catching accessory. And for the adventurous sewer, incorporate into clothing and accessories such as skirts, scarves, or headbands, adding a playful and whimsical touch to your wardrobe.
With their versatility and timeless charm, pinwheel quilt blocks offer endless possibilities for creative expression in quilting and sewing projects.
I hope you’ve enjoyed making this simple quilt block. Now that you know how to make this classic pinwheel block, you can use it in the free patterns below.

You can find Victoria crocheting, quilting, and creating recipes. She has cooked in restaurants for over 20 years, including many larger parties. She learned to crochet when she was just 11 years old and has been crocheting ever since; over 50 years now. Over 40 years ago, she loved her first class in sewing and continues to hone her skills in quilting. Many have enjoyed the handmade gifts over the years. In her professional career, she has worked in management in a wide variety of businesses including higher education as a dean of a division. All the while attending college part-time to achieve her doctorate in higher education with an emphasis in e-learning.