Last updated on July 4th, 2024 at 11:31 pm
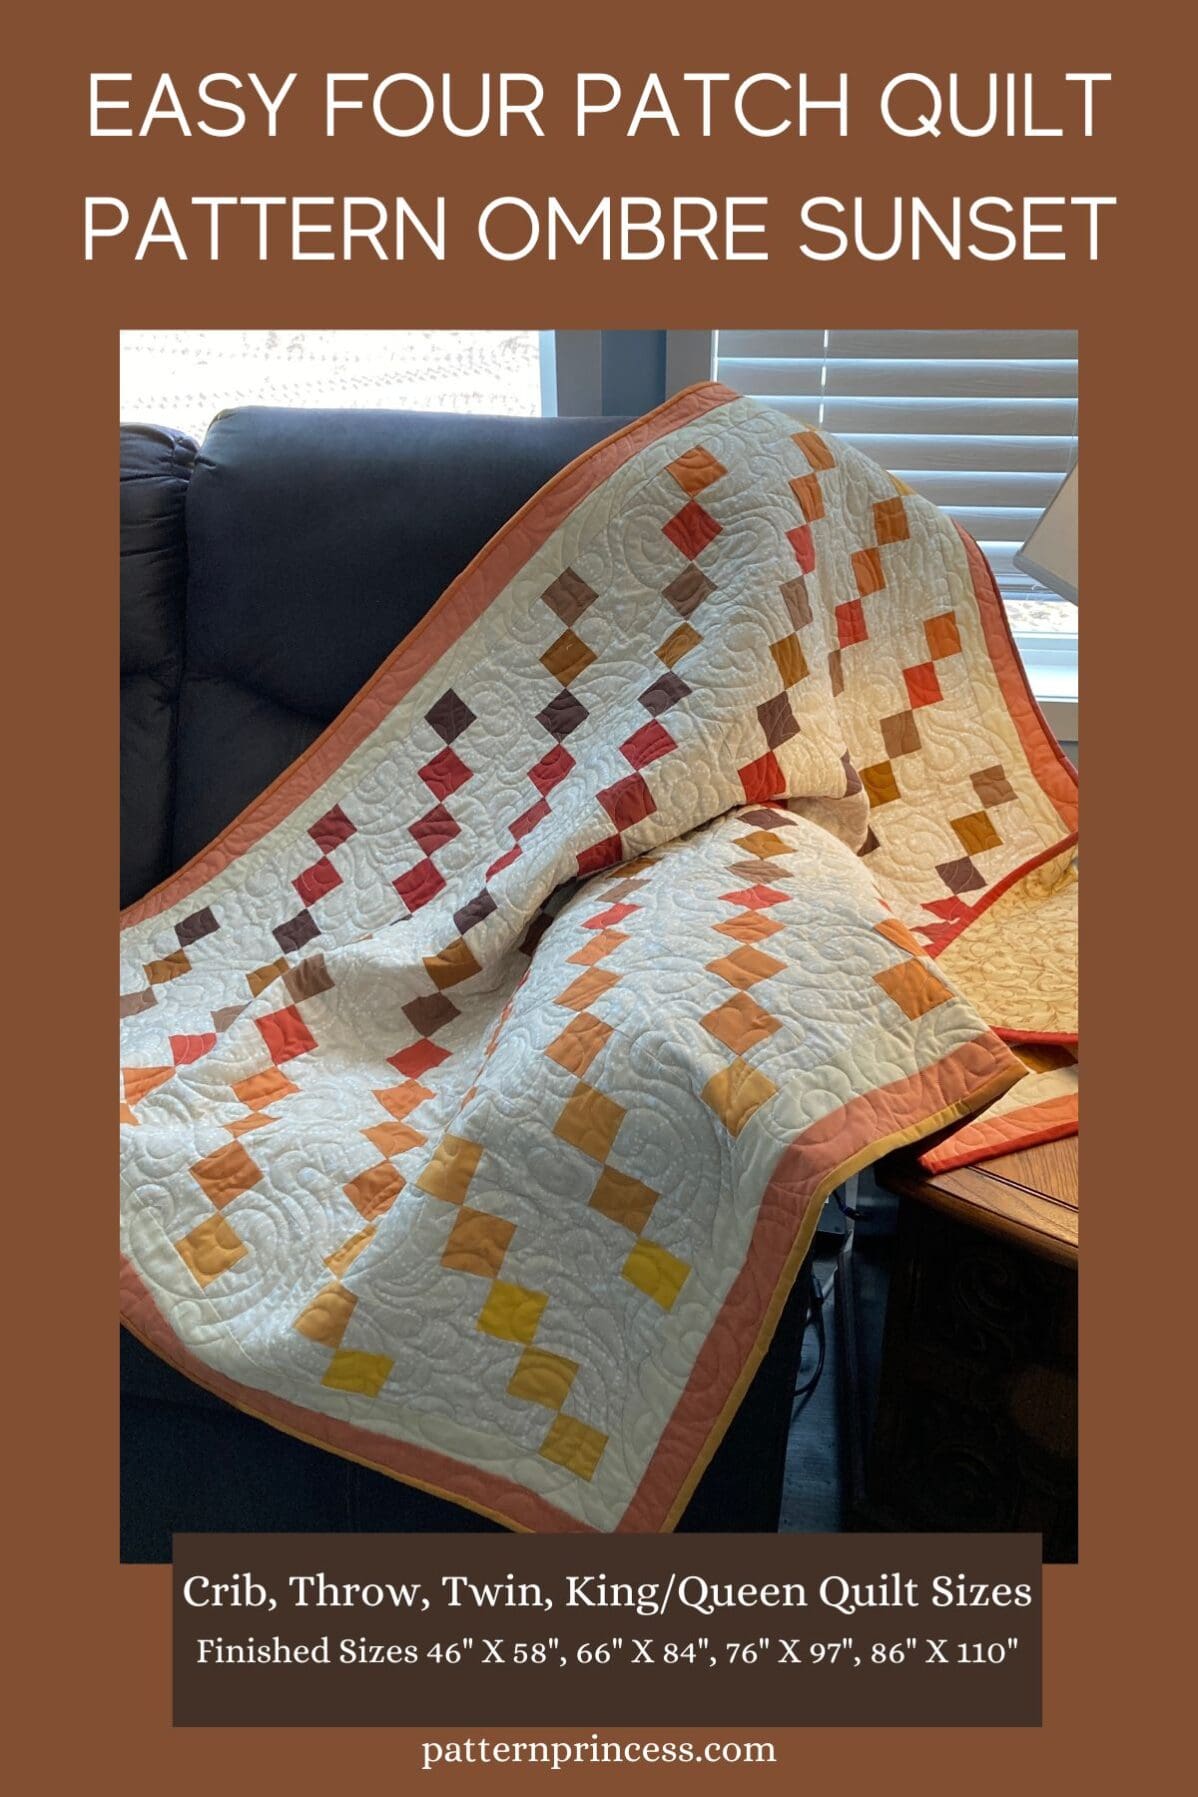
I love a four patch quilt, and this is a very simple patchwork quilt to make. It would be a good quilt for a confident beginner to make.
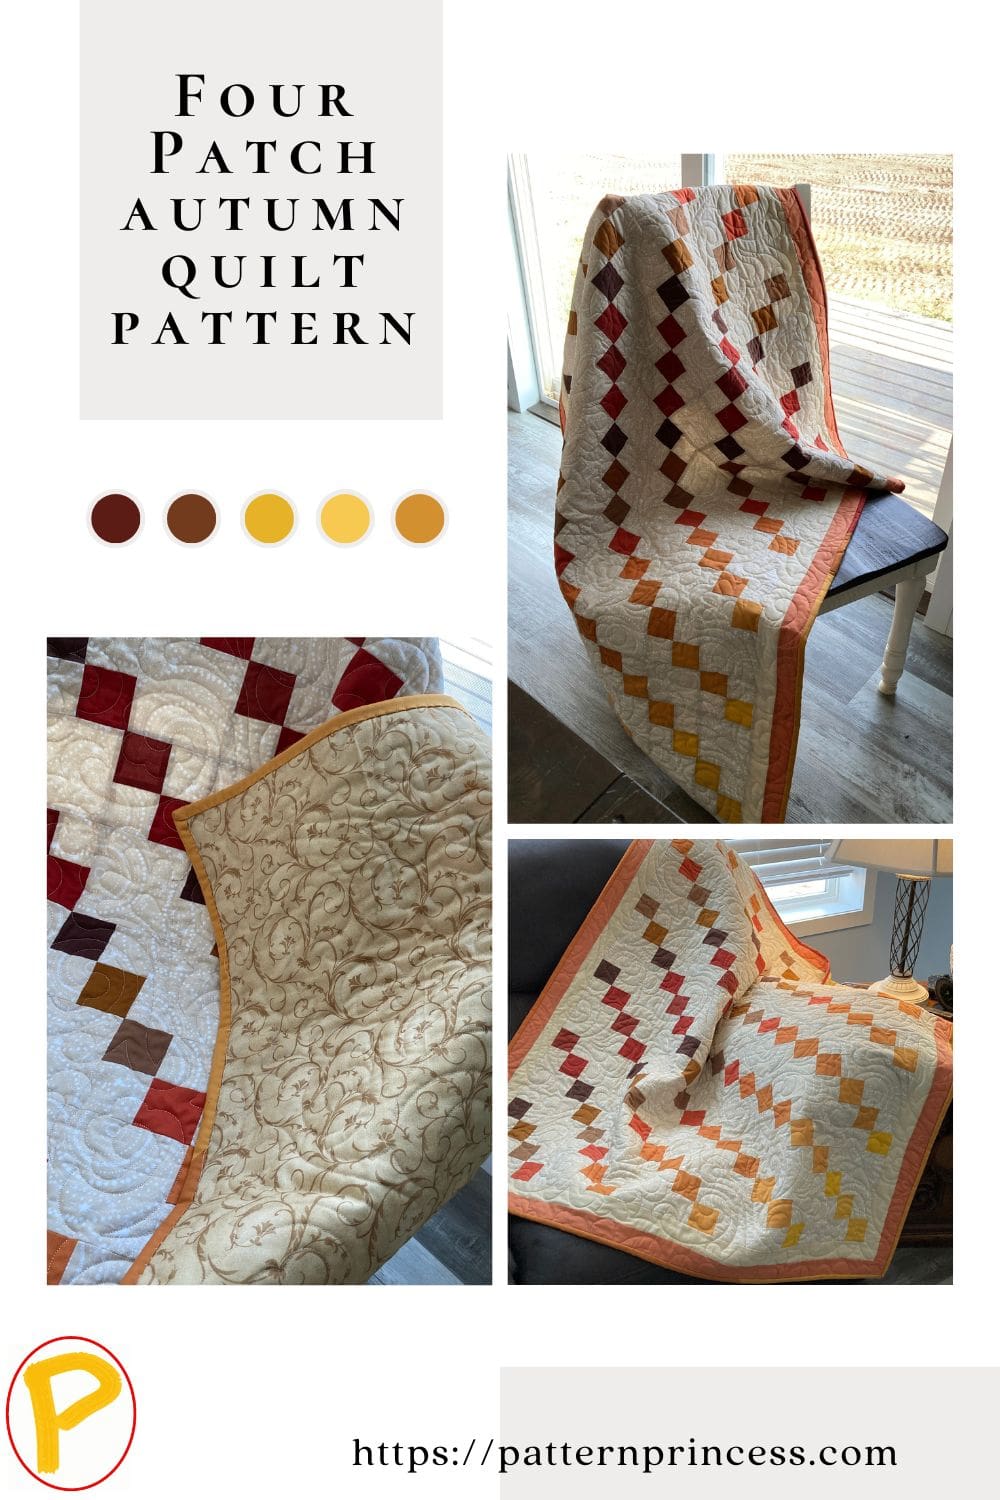
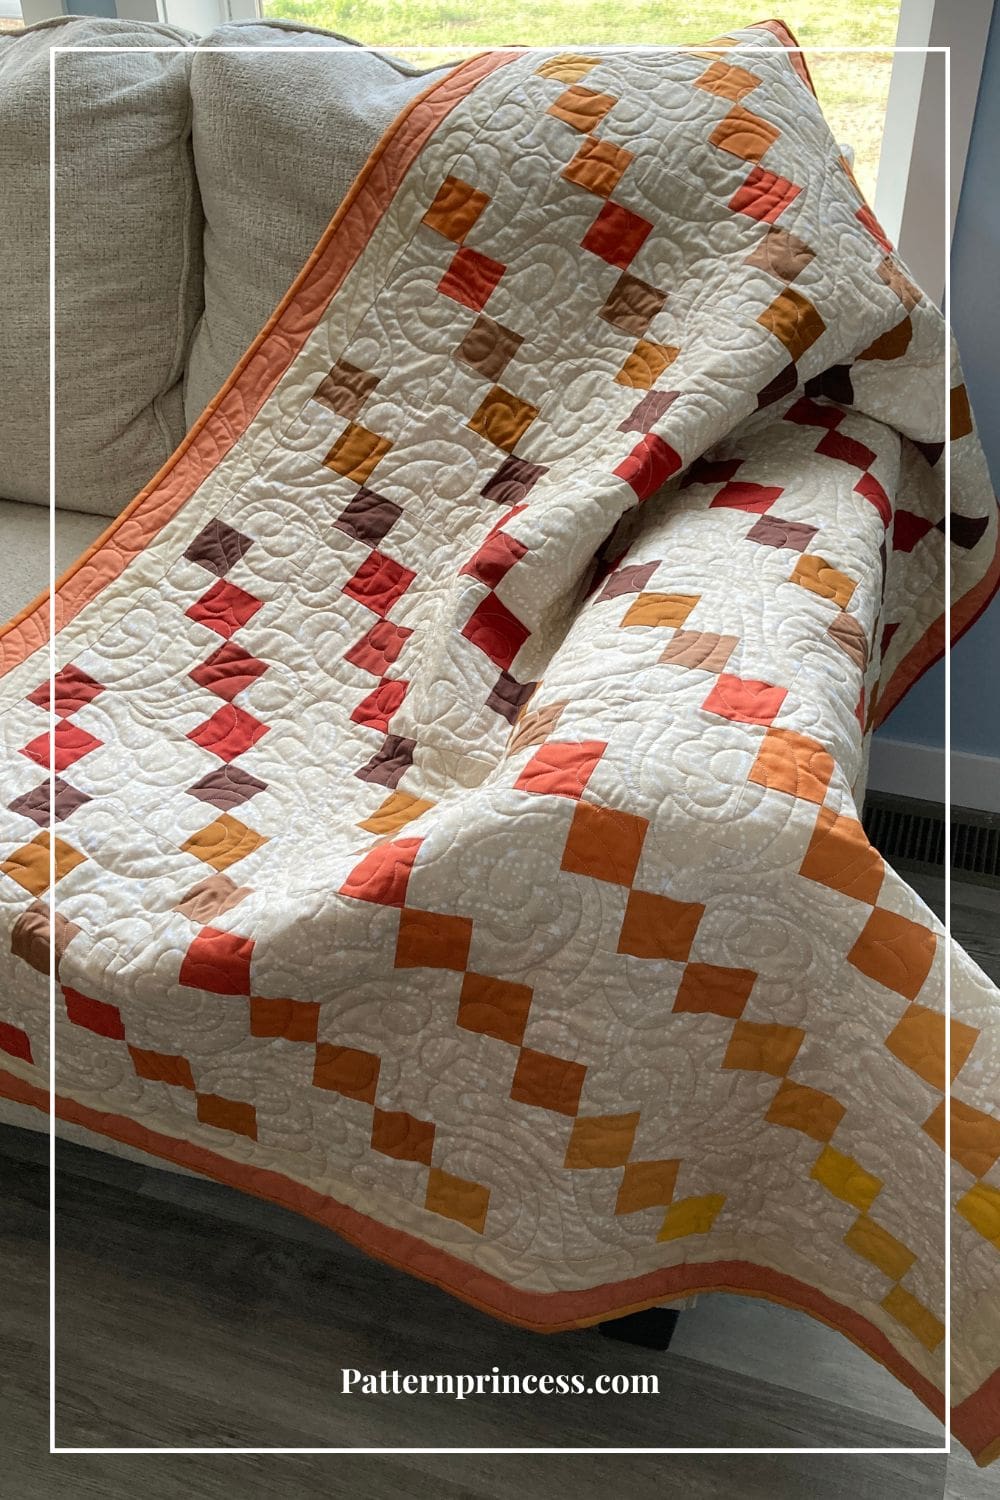
Today, I made this in an ombre sunset color scheme. However, the choice of fabrics is up to you, and there are so many variations you could make.
You could use a pretty floral four patch with plain white contrasting squares for a perfect spring and summer quilt.
Embrace the Serenity of the Setting Sun: Introducing the Easy Four Patch Quilt Pattern Ombre Sunset
As the radiant sun gently dips below the horizon, casting a breathtaking tapestry of vibrant hues across the sky, we find ourselves captivated by the tranquil beauty of a sunset.
It’s a sight that stirs our souls, reminding us to pause and appreciate the simple pleasures in life. What better way to capture the essence of this awe-inspiring moment than by creating a quilt that mirrors the gentle transition of colors, creating an Ombre Sunset masterpiece?
Post contains affiliate links, and we earn commissions if you shop through the links on this page. For more information, please read the disclosure section under the About Us page.
Four Patch Quilt Pattern
With its simplicity and versatility, the Four Patch quilt block pattern is paired with a solid block. Offering a solid foundation for showcasing the enchanting gradient of colors found in an ombre sunset. From warm oranges and fiery reds to, this pattern allows you to effortlessly blend these shades together, resulting in a quilt that radiates tranquility and warmth.
Whether you’re a seasoned quilter or just starting your stitching journey, the Easy Four Patch Quilt Pattern Ombre Sunset is a delightful project that encourages creative exploration. Discover the joy of selecting fabrics that evoke the essence of twilight and bring a sense of serenity to your home.
They are such a cute, and versatile quilt block. Once you start using four patch quilt blocks, you’ll come up with all kinds of ways you’ll want to include them in your quilts.
March is National Quilt Month!
We have partnered with favequilts and included this quilt in their month-long quilt celebration.
Celebrate National Quilt Month 2024 and visit favequilts to discover a new tutorial this month!
Sometimes, we have different free patterns available for download. Head on over to our free PDF printables page. It is a good idea to sign up for the newsletter, so you are notified when the free downloads are uploaded.
Make Four Different Sizes of Quilts
This pattern is suitable for confident beginners, so even if you have never made a quilt before, you can make this pattern. However, the variety of fabric colors makes it a bit more difficult to keep track of things. This blanket was a joy to make as long as I stayed organized.
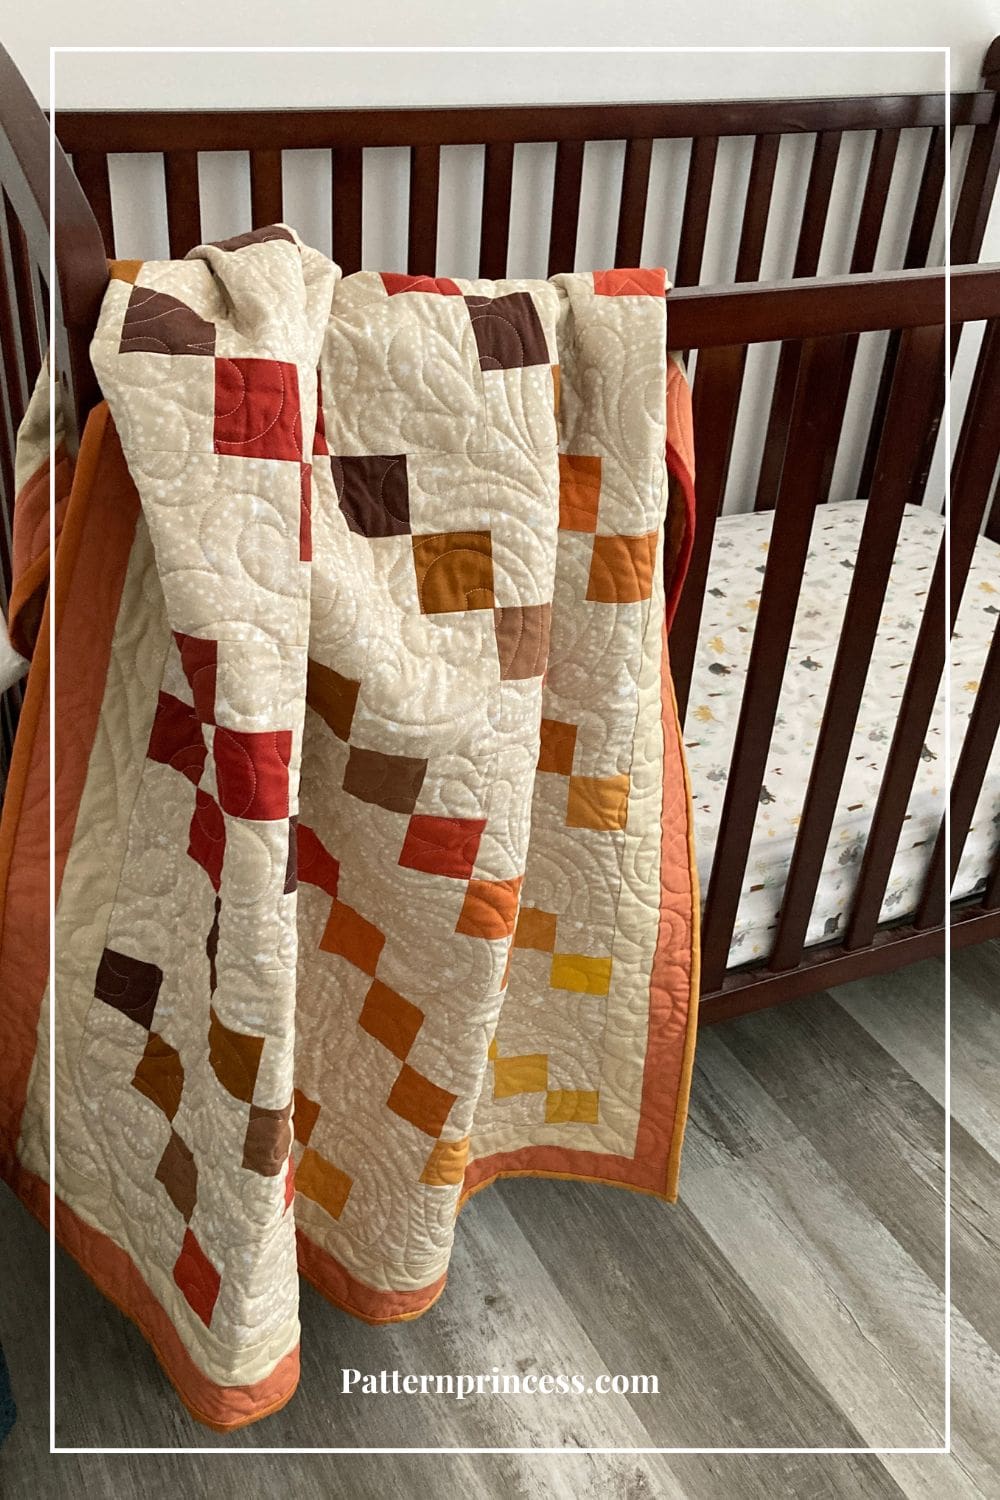
- Crib Size Quilt 46 X 58 inches, shown
- Throw Size Quilt 66 X 84 inches
- Twin Size Quilt 76 X 97 inches
- Queen/KING Size Quilt 86 X 110 inches
Learn How to Make an Easy Four Patch Quilt Block
The size of the four patch quilt blocks determined the length and width of the strips. There is a chart in the link above showing a few measurements of common sized blocks for you to follow when making your four patch quilt square.
Directions: Easy Four Patch Quilt Pattern Ombre Sunset
Quilting Skill Level
Easy – Confident Beginner
Finished Quilt Measurements
- Crib Size Quilt 46” X 58” (pictured). Uses 4-inch finished size blocks.
- Throw Size Quilt 66” X 84”. Uses 6-inch finished size blocks.
- Twin Size Quilt 76” X 97”. Uses 7-inch finished size blocks.
- Queen/KING Size Quilt 86” X 110”. Uses 8-inch finished size blocks.
Quilt Blocks
- Crib Size Quilt 46” X 58”. 4 1/2″ X 4 1/2″ unfinished, 4″ X 4″ finished.
- Throw Size Quilt 66” X 84”. 6 1/2″ X 6 1/2″ unfinished, 6″ X 6″ finished.
- Twin Size Quilt 76” X 97”. 7 1/2″ X 7 1/2″ unfinished, 7″ X 7″ finished.
- Queen/KING Size Quilt 86” X 110”. 8 1/2″ X 8 1/2″ unfinished, 8″ X 8″ finished.
To Make the Four Patch Quilt Blocks
- Crib Size Quilt 46” X 58”. 2 1/2″ X 2 1/2″ square units.
- Throw Size Quilt 66” X 84”. 3 1/2″ X 3 1/2″ square units.
- Twin Size Quilt 76” X 97”. 4″ X 4″ square units.
- Queen/KING Size Quilt 86” X 110”. 4 1/2″ X 4 1/2″ square units.
Tan border
- Crib Size Quilt 46” X 58”. Sides 2 X 52 ½ inches. Top and Bottom 2 x 43 ½ inches.
- Throw Size Quilt 66” X 84”. Sides 2 X 78 ½ inches. Top and Bottom 2 x 63 ½ inches.
- Twin Size Quilt 76” X 97”. Sides 2 X 91 ½ inches. Top and Bottom 2 x 73 ½ inches.
- Queen/KING Size Quilt 86” X 110”. Sides 2 X 10⁴ ½ inches. Top and Bottom 2 x 83 ½ inches.
Burnt Orange Border
- Crib Size Quilt 46” X 58”. Sides 2 X 55 ½ inches. Top and Bottom 2 x 46 ½ inches.
- Throw Size Quilt 66” X 84”. Sides 2 X 81 ½ inches. Top and Bottom 2 x 66 ½ inches.
- Twin Size Quilt 76” X 97”. Sides 2 X 94 ½ inches. Top and Bottom 2 x 76 ½ inches.
- Queen/KING Size Quilt 86” X 110”. Sides 2 X 10⁷ ½ inches. Top and Bottom 2 x 86 ½ inches.
Backing Fabric
- Crib Size Quilt 46” X 58”. A piece 50” X 62”.
- Throw Size Quilt 66” X 84”. A piece 70” X 88”.
- Twin Size Quilt 76” X 97”. A piece 80” X 101”.
- Queen/KING Size Quilt 86” X 110”. A piece 90” X 114”.
Batting
- Crib Size Quilt 46” X 58”. A piece 50” X 62”.
- Throw Size Quilt 66” X 84”. A piece 70” X 88”.
- Twin Size Quilt 76” X 97”. A piece 80” X 101”.
- Queen/KING Size Quilt 86” X 110”. A piece 90” X 114”.
Binding
- Crib Size Quilt 46” X 58”. 2 ½” x 226” of binding.
- Throw Size Quilt 66” X 84”. 2 ½” X 318” of binding.
- Twin Size Quilt 76” X 97”. 2 ½” X 364” of binding.
- Queen/KING Size Quilt 86” X 110”. 2 ½” X 410 of binding.
Pattern Notes
Choose any contrasting or complimenting colors of fabric.
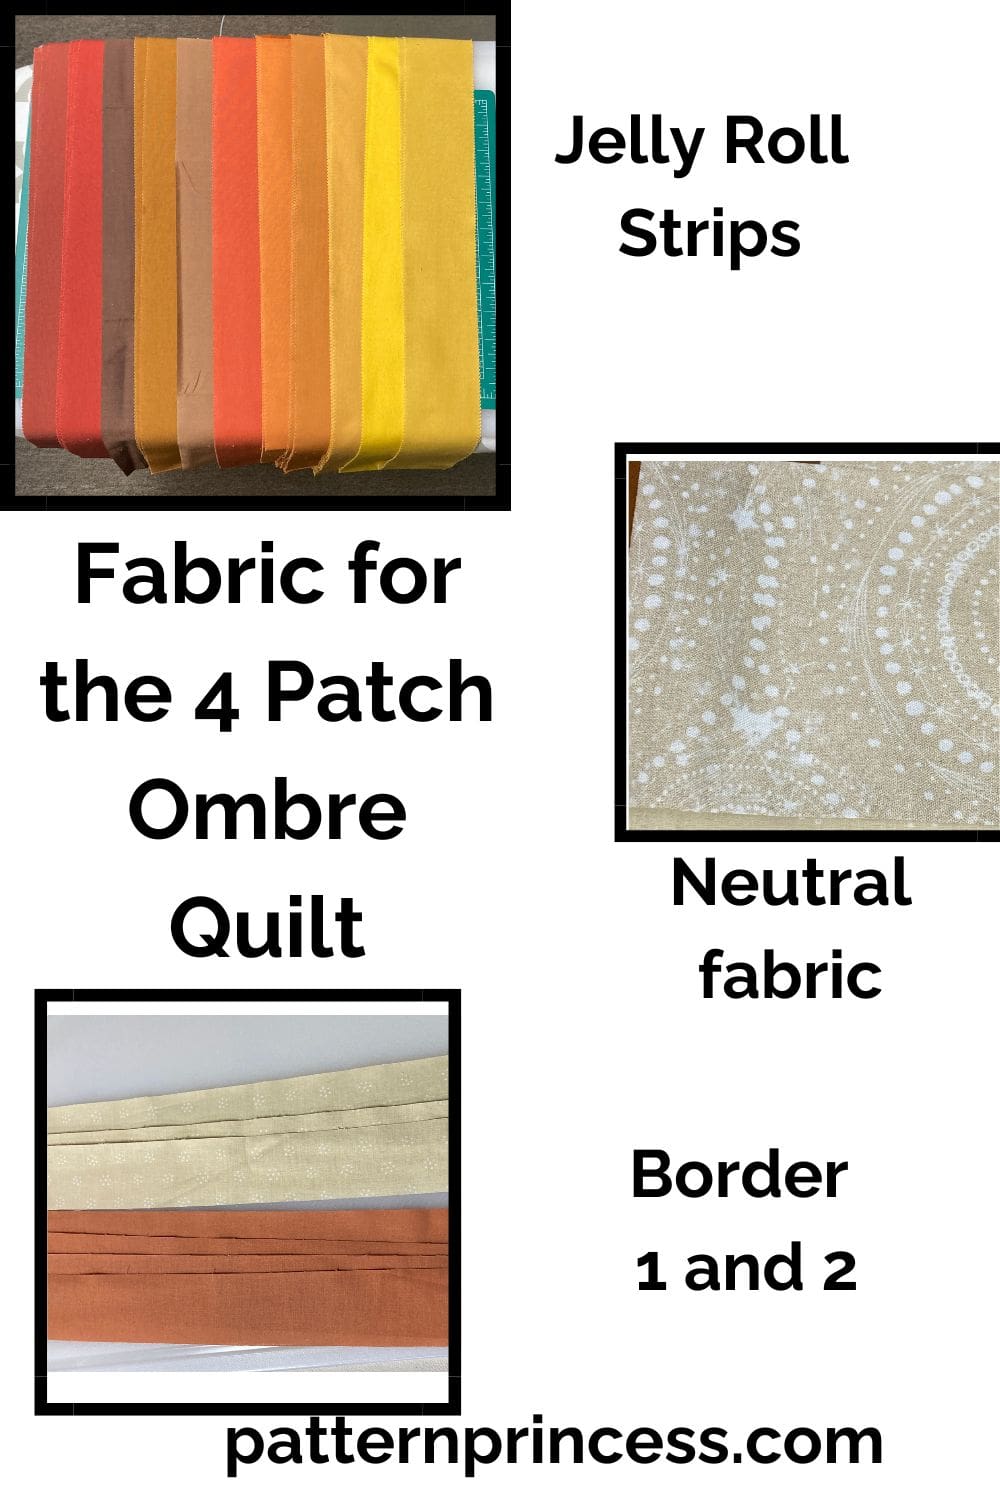
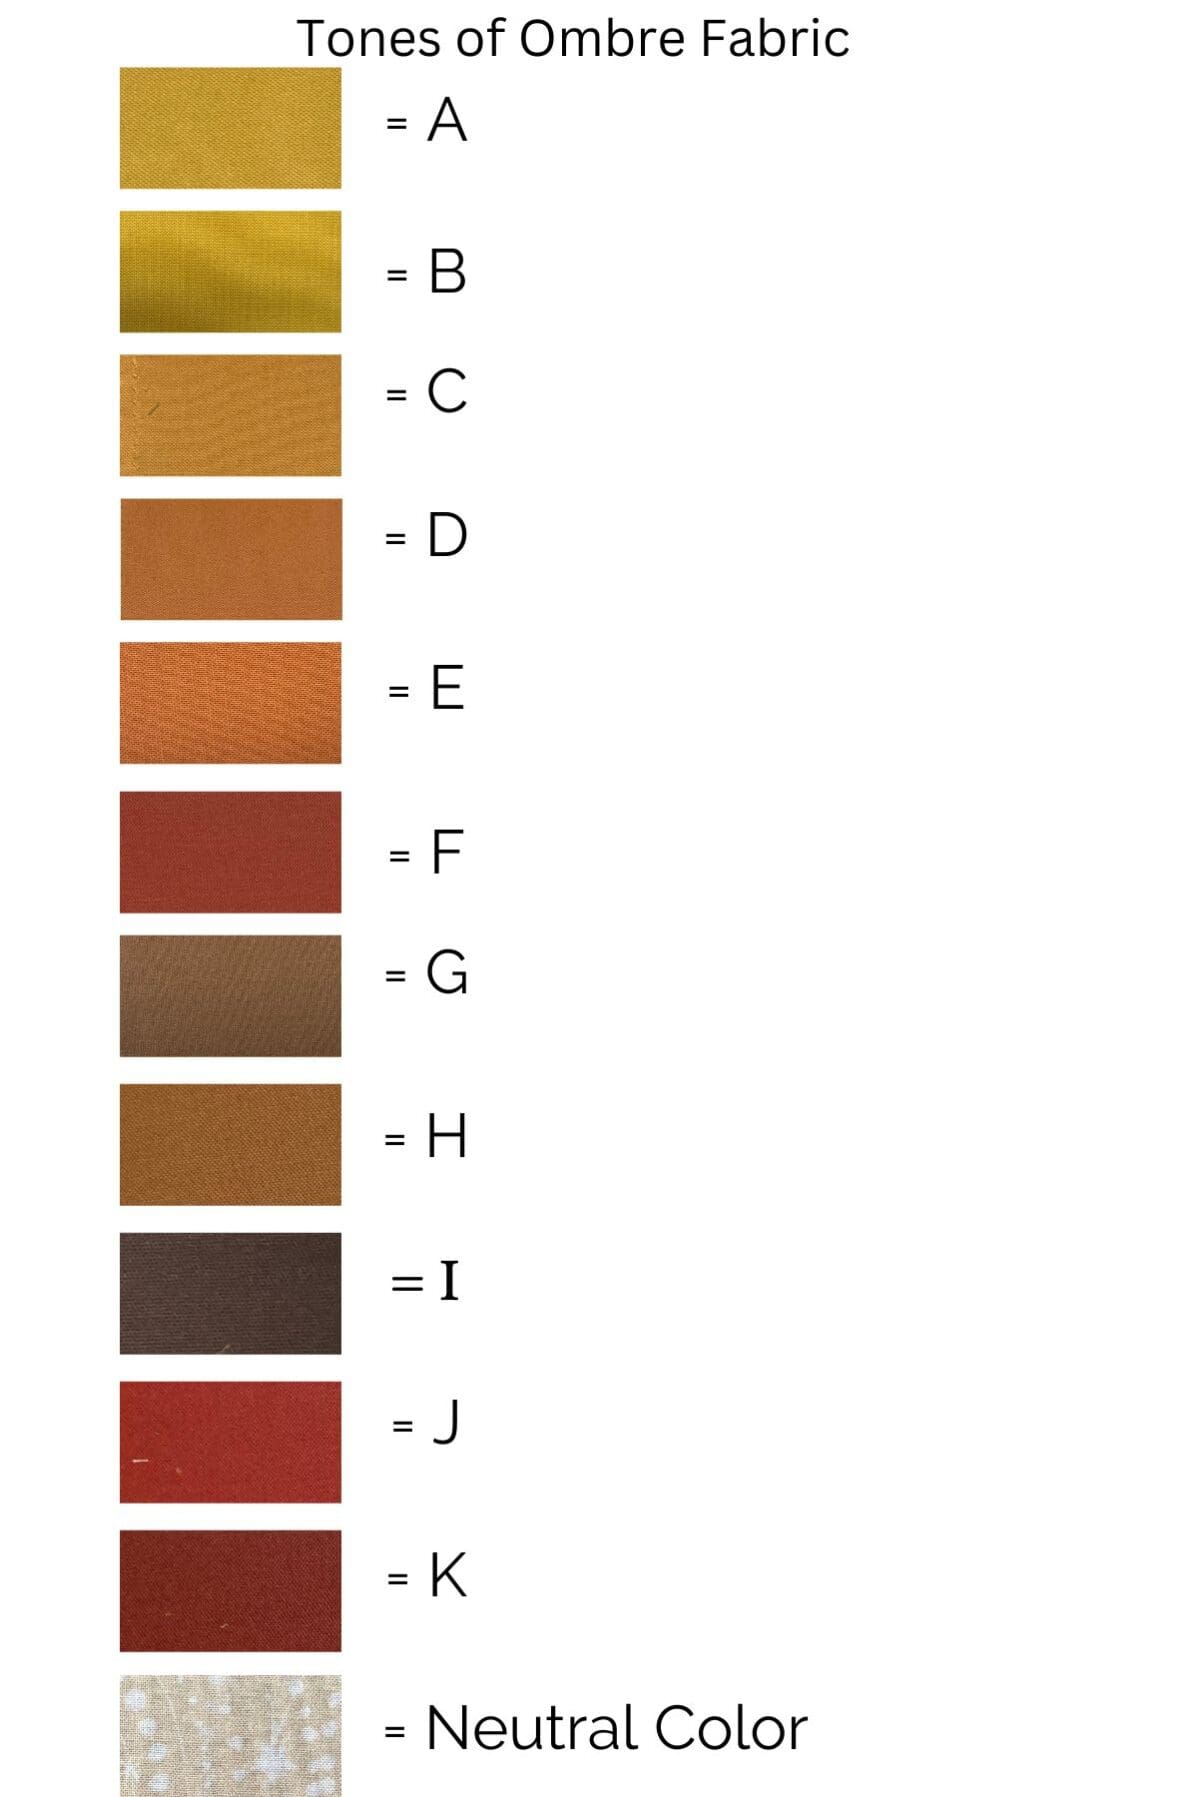
For my quilt I used part of a jelly roll in yellow, orange, brown, and red colors. There are 11 colors plus the cream fabric color used throughout the quilt.
All sewing in this tutorial uses ¼” seam allowance.
All fabric is sewn right sides together unless otherwise noted.
When planning the fabric, you can either use the jelly rolls, full widths of fabric, or even fat quarter widths. The longer the width of fabric (WOF), the more two patch rectangles you’ll get.
The quilt shown is the Crib Size Quilt 46 X 58 inches, shown. Uses 4-inch finished blocks. However, if you plan on making one of the larger sizes, just use the chart provided in the tutorial link above for making your four patch blocks.
I’m making easy four patch quilt blocks that will measure 4 ½” x 4 ½” unfinished in the tutorial below. These blocks will measure 4” x 4” once they’re finished and sewn into the quilt. For the larger quilt sizes, the layout of the quilt is the same, the squares are larger. (6″ X 6″ finished, 7″ X 7″ finished, 8″ X 8″ finished).
This easy four patch quilt block uses a strip piecing method. When you want to make a lot of four patch blocks, this method will save you a ton of time.
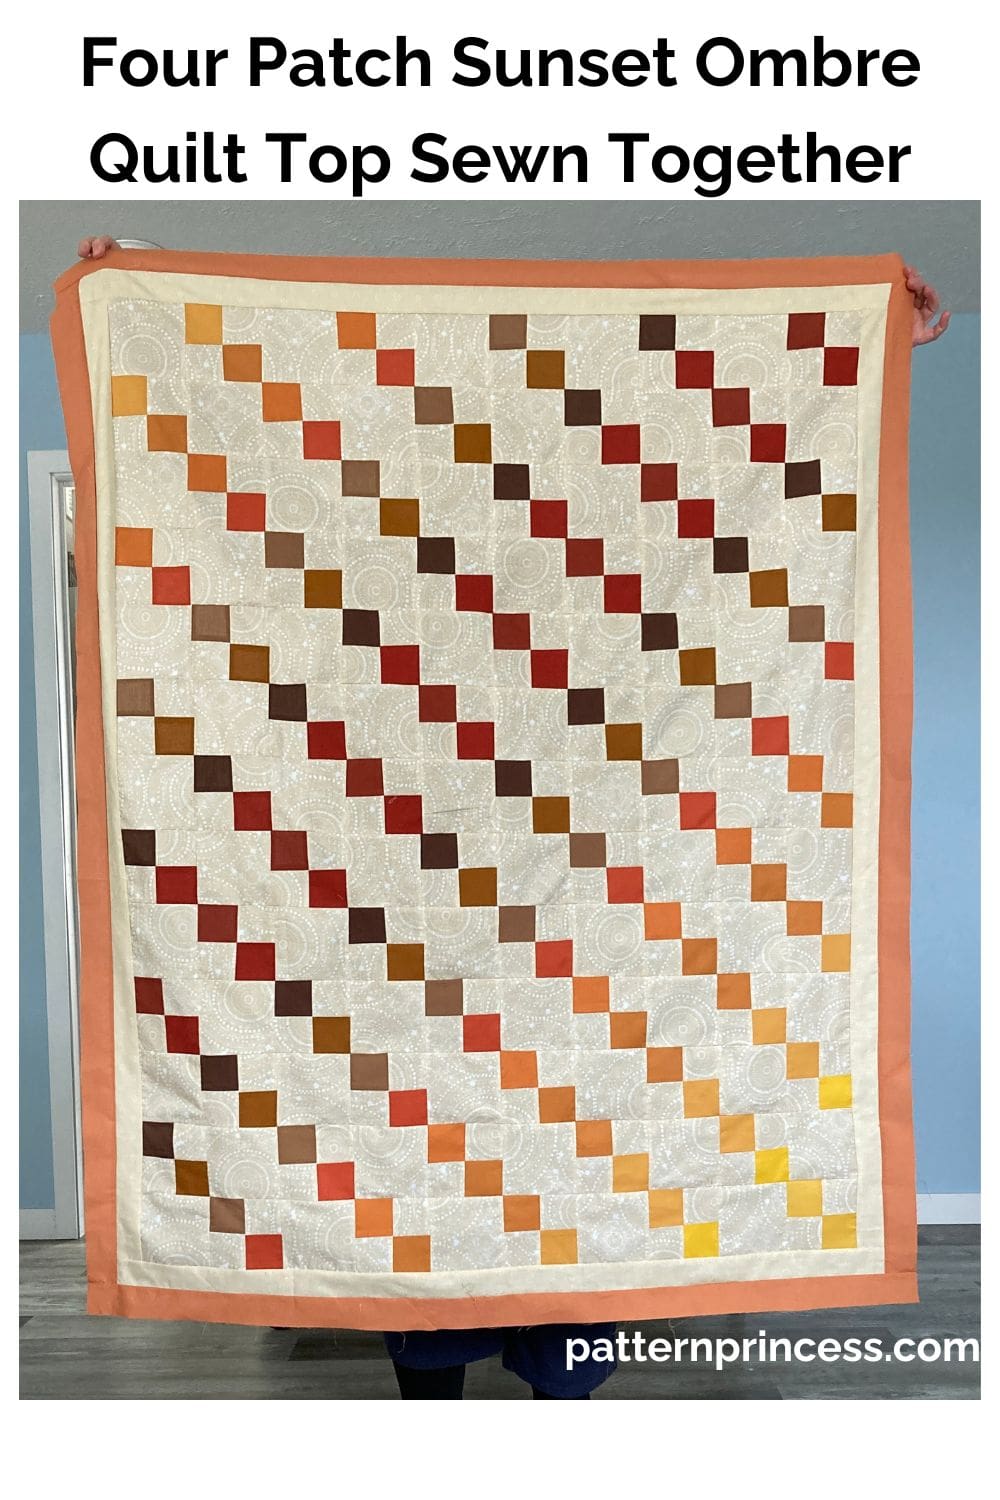
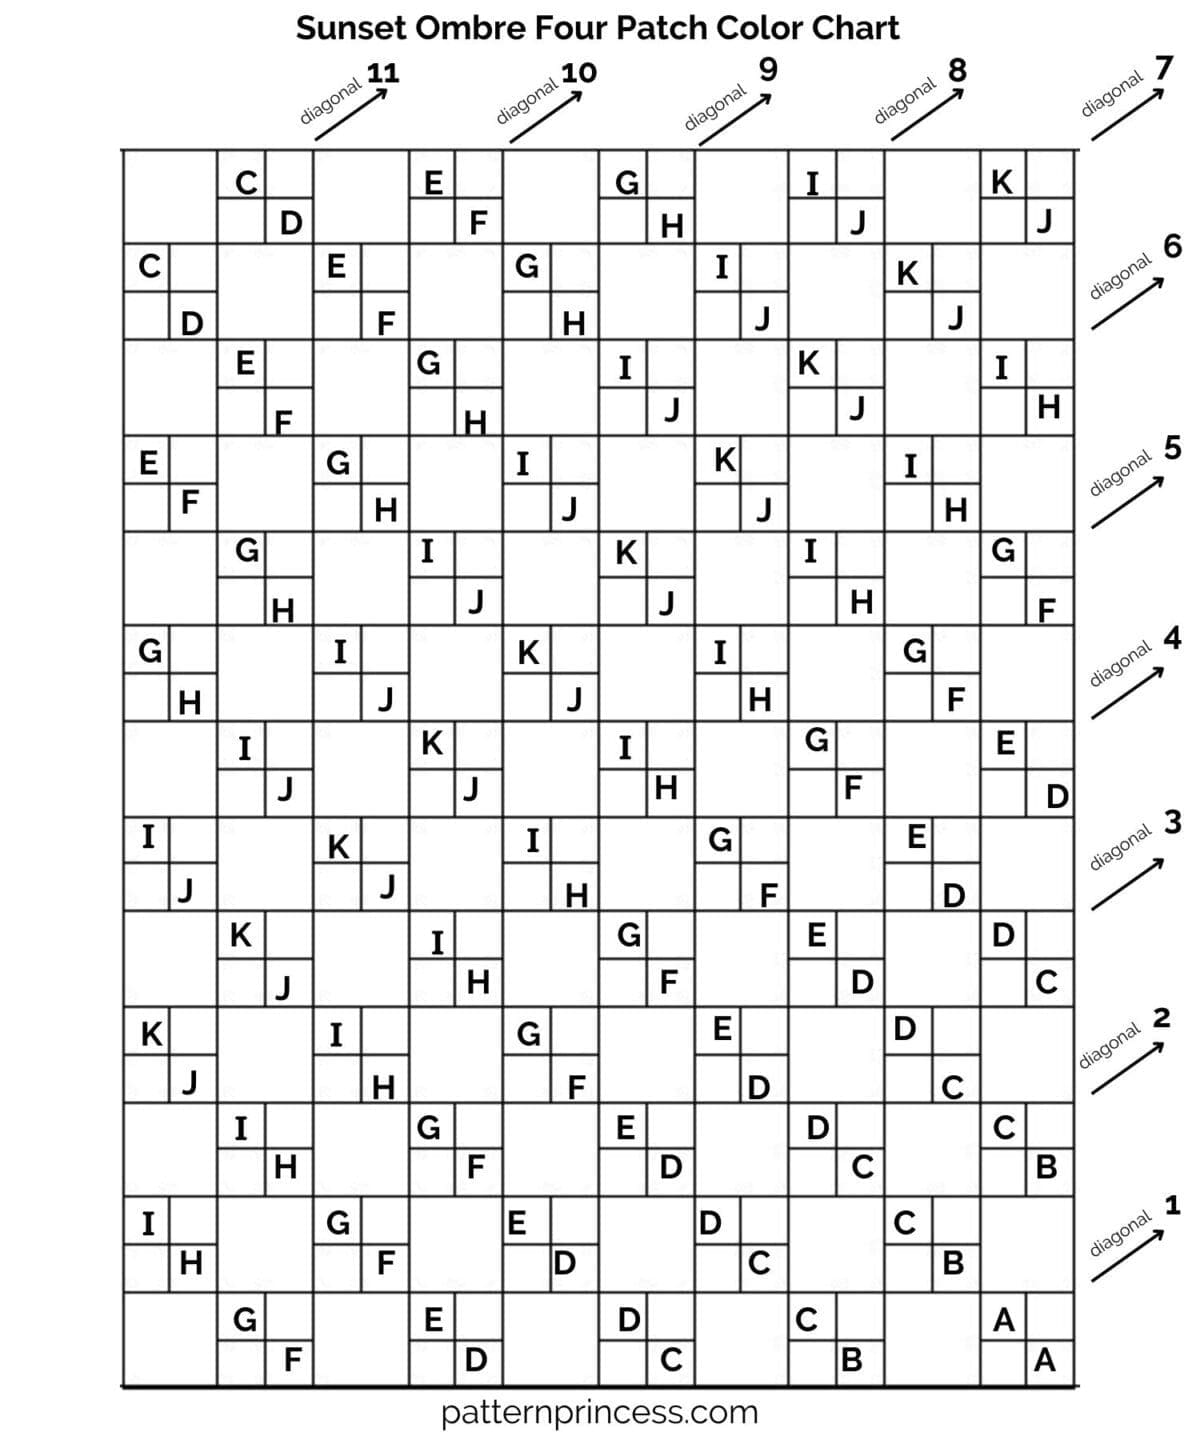
The quilt is 10 blocks horizontal, and 13 blocks vertical.
The color squares of the four patches align in diagonal lines throughout the blanket.
Each border is 1.5 inches finished size. The length of the border will change based on the overall size of the quilt.
General Cutting and Sewing
The directions for this quilt are for rotary cutting, machine piecing, machine quilting, and the binding is hand-stitched to the quilt back.
Accurate cutting and sewing enhances your final product. Pin your pieces together before sewing them to ensure proper seam alignment.
Materials and Equipment/Tools
The fabric requirements for the quilt tip, backing, binding, and the batting needed are noted by each quilt size below.
However, all the quilts will use the following materials and tools to complete.
- Thread
- Rotary Cutter
- Quilting Ruler
- Cutting Mat
- Rotating Cutting Mat
- Iron
- Ironing Board or Pressing Mat
- Pins
- Clips
- Sewing Machine
- My Favorite Quilting Supplies
Quilt Details
Size
Crib Size Quilt 46” X 58” (pictured). Uses 4-inch finished size blocks.
Remember to change the block size to your desired quilt size. See the chart provided.
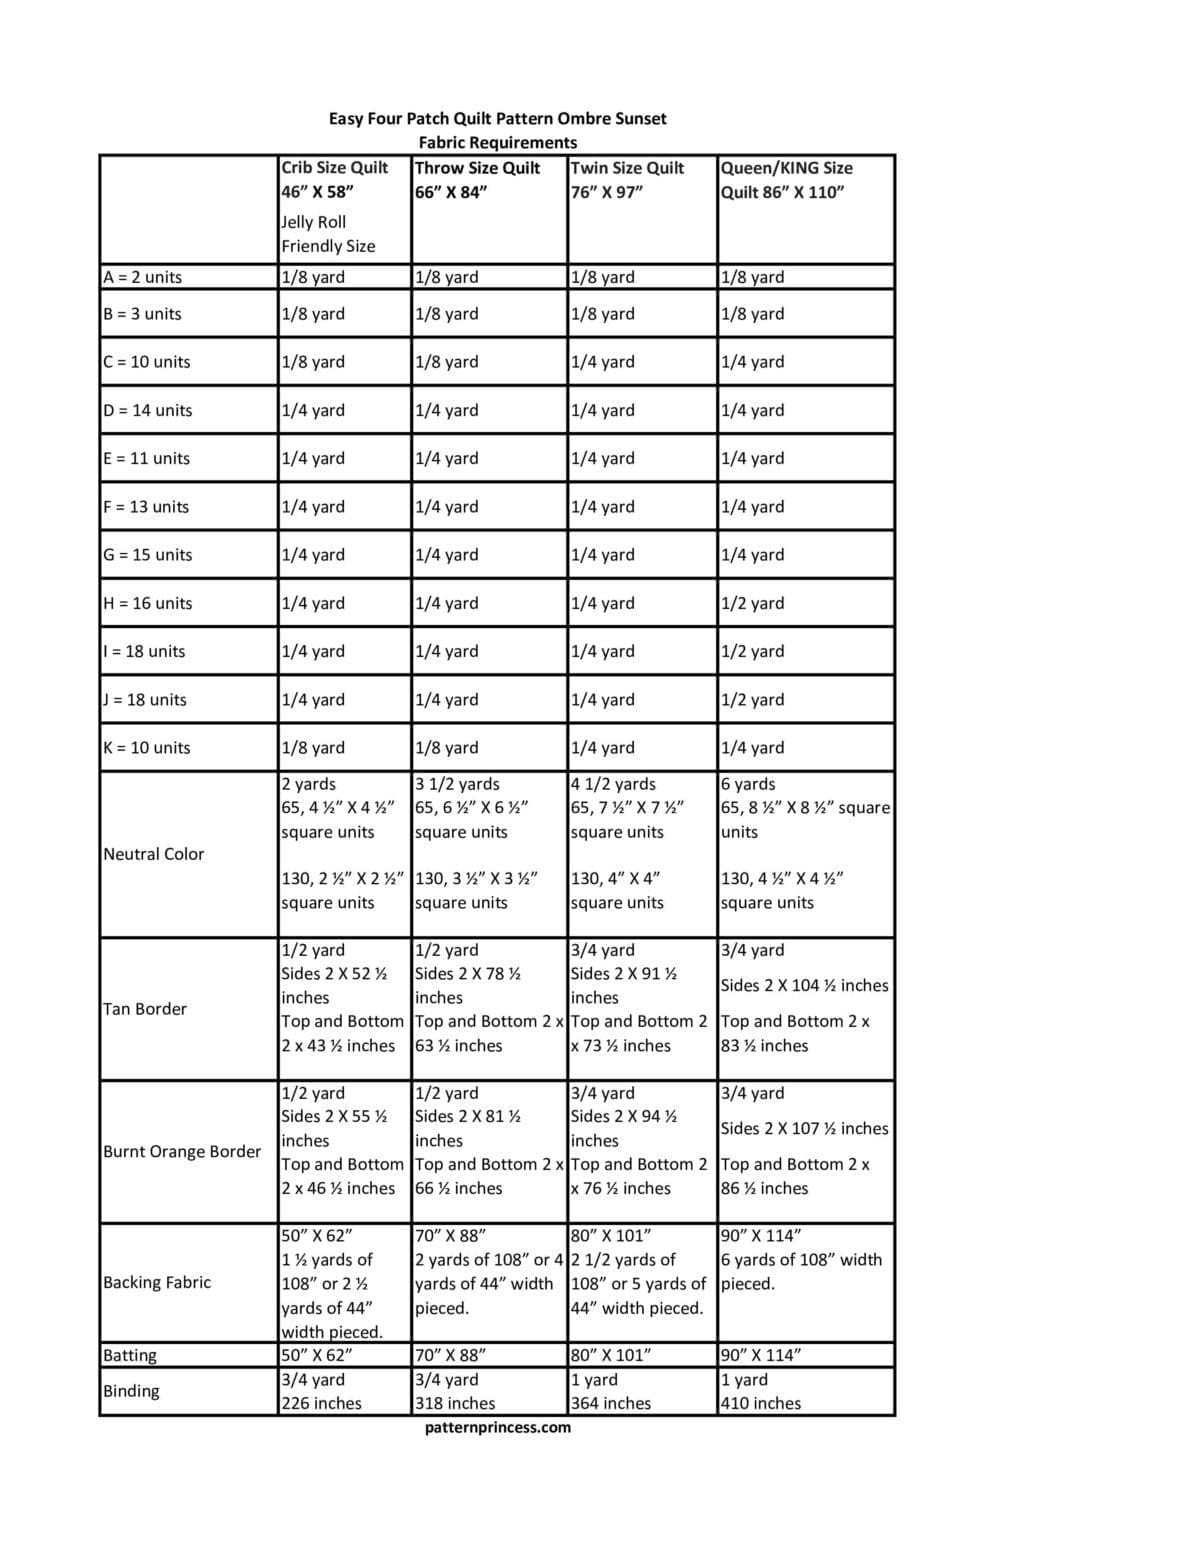
Fabric Requirements
The following fabric requirements take into consideration the longer pieces needed for the borders. You can use less yardage if you piece your borders. With the sizes listed, you will be able to get a long solid piece to sew on.
Neutral Color Fabric 2 yards
Tan Border Fabric ½ yard
Orange Border Fabric ½ yard
Reminder. The number of squares are the same for all quilts. They just use different size squares.
Make sure to look at the chart above for the fabric yardage.
130 Total Squares
65, 4 ½” X 4 ½” square units in the Neutral Fabric Color
65 four patch squares
130, 2 ½” X 2 ½” square units to make the 65 four patch 4 ½” X 4 ½” square units (You can use the strip piecing method to make your four patches). Neutral Fabric Color 130 square units
- A = 1/8 yard. 2 square units
- B = 1/8 yard. 3 square units
- C = 1/8 yard. 10 square units
- D = 1/4 yard. 14 square units
- E = 1/4 yard. 11 square units
- F = 1/4 yard. 13 square units
- G = 1/4 yard. 15 square units
- H = 1/4 yard. 16 square units
- I = 1/4 yard. 18 square units
- J = 1/4 yard. 18 square units
- K = 1/8 yard. 10 square units
Two Borders
The first one is a Tan color.
Sides Vertical borders 2 X 52 ½ inches
Top and Bottom Horizontal borders 2 x 43 ½ inches
The second one is an Orange color.
Sides Vertical borders 2 X 55 ½ inches
Top and Bottom Horizontal borders 2 x 46 ½ inches
Backing Fabric
1 ½ yards of coordinating fabric in 108” width or 2 ½ yards at the 44” width.
Cutting directions. 50″ x 62”
Batting
2 ½ yards. Cotton batting.
Cutting directions. 50″ x 62”
Binding Fabric
3/4 yard. I used leftover strips of the jelly roll fabric to make this binding.
Make the binding 2 ½ x 226 inches long.
Quilt Top Sewing Directions: Easy Four Patch Quilt Pattern Ombre Sunset
Begin by making 65 Cream colored squares 4 ½ X4 ½ inches. Set these aside.
Next Make the four patch squares.
To do this, I used the strip piecing method.
We will make four patches for each diagonal row. Pro Tip. Make sure to label each stack of four patches with the diagonal row and fabric color letter. This will help keep things organized. When you start sewing the rows together, you’ll be assured of having the correct colors where they should be.
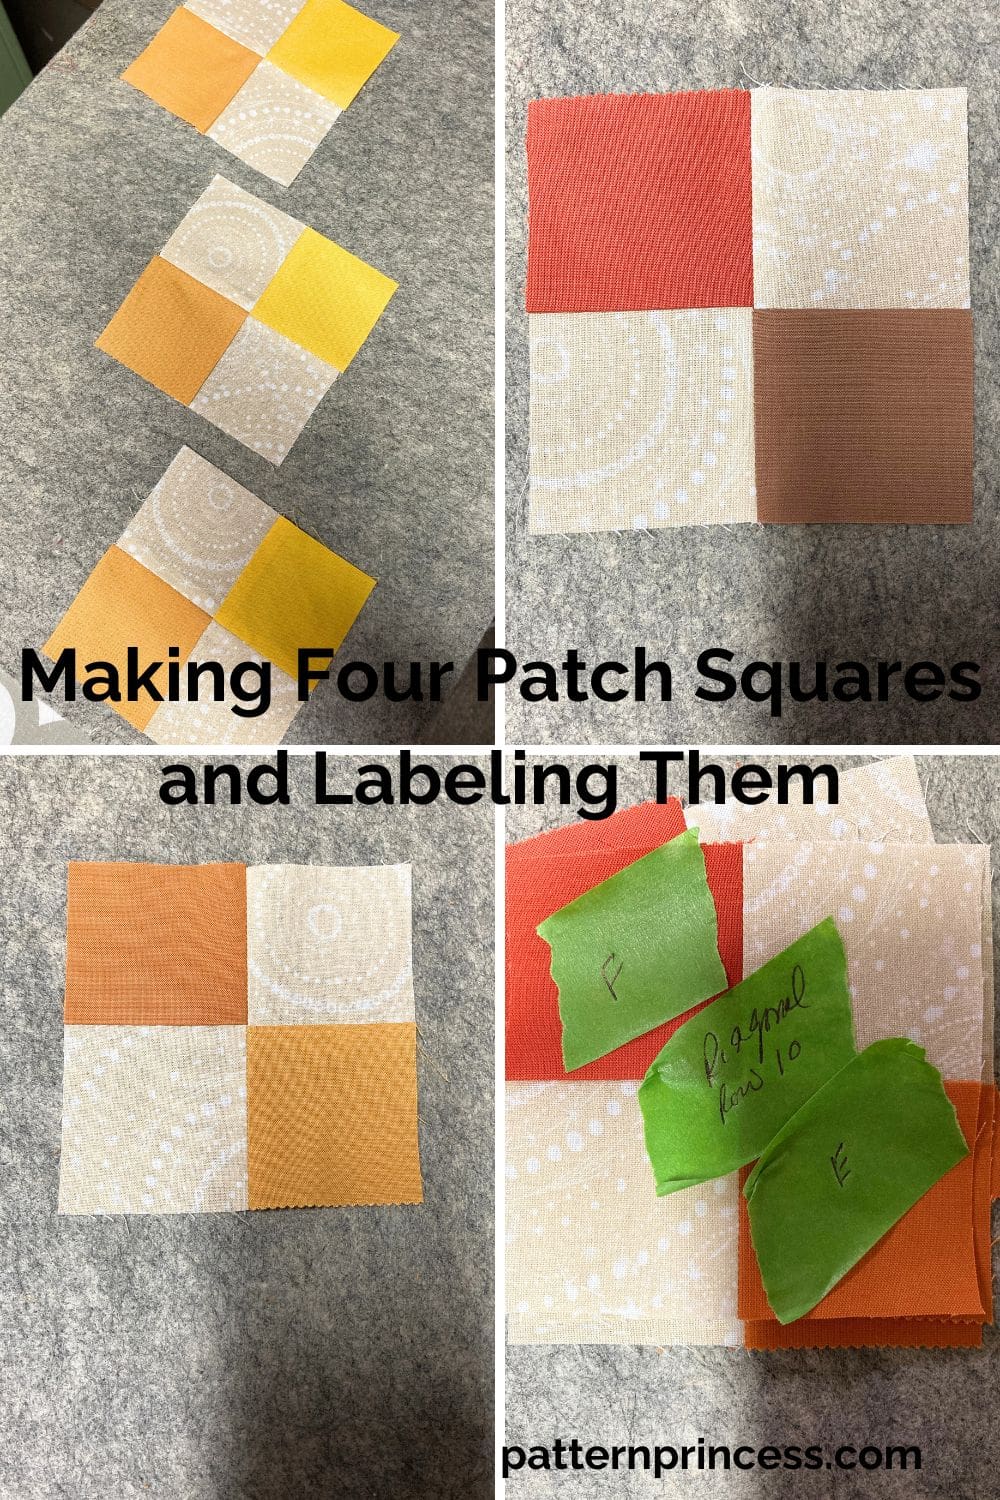
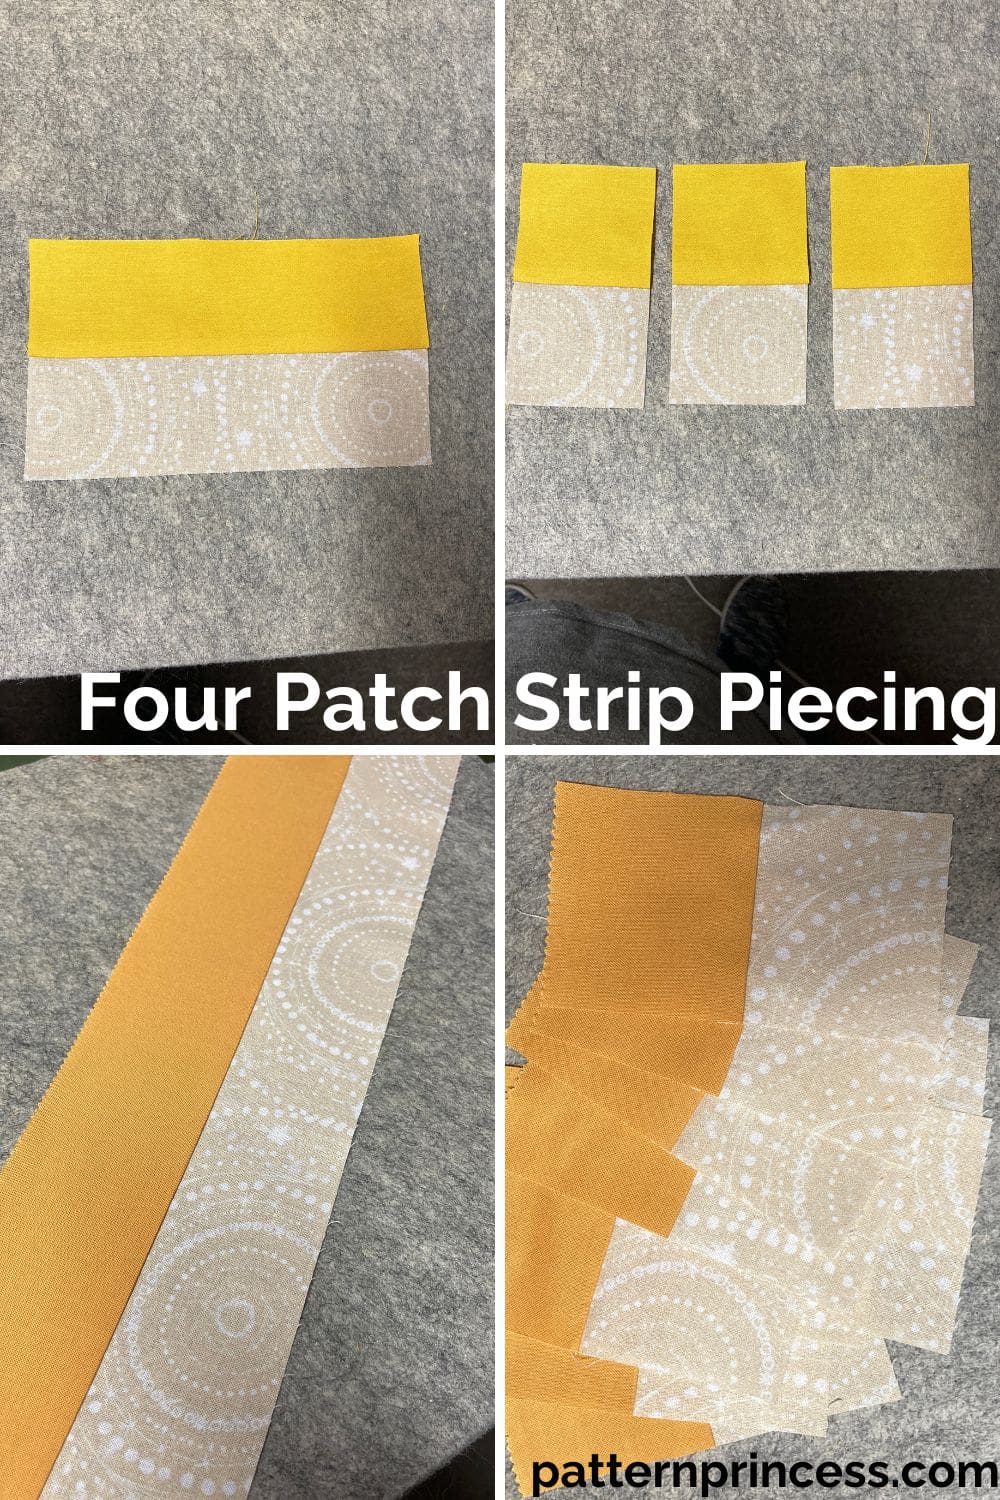
How to Make a Four Patch Using the Strip Piecing Method.
Sew the rectangular strips together with right sides together along one side the length of the rectangle. (One colored strip of fabric and one neutral color of fabric). Press the seam to the darker fabric, or open if you prefer. Using your quilting ruler, cut the strips into the 2 ½” X 4 ½” inch sections.
Next, line up 2 two patch rectangles with the center seams nested together and the colors facing the opposite directions.
Pin at the center to hold in place. Using the ¼” seam allowance, sew the rectangles together, removing the pin as you sew up to it.
Press the four patch block open.
The four patch block is now ready to sew into your pattern.
You can find more details on making a four patch quilt block on the website.
Diagonal 1
Fabric color A cut a 2 ½” X 5” strip.
Neutral fabric color cut a 2 ½” X 5” strip.
Sew the strips together, press the seam, and cut into 2 units. Sew into 1 four patch. Label diagonal row 1, color A. Set aside.
Diagonal 2
Fabric color B cut a 2 ½” X 7 1/2” strip.
Neutral fabric color cut a 2 ½” X 7 1/2” strip.
Sew the strips together, press the seam, and cut into 3 units.
Fabric color C cut a 2 ½” X 25” strip.
Neutral fabric color cut a 2 ½” X 25” strip.
Sew the strips together, press the seam, and cut into 10 units. (Use 3 of these units for diagonal 2. The other 7 units will be used in diagonal rows 3 and 11. Label the leftover units with the color C and set them aside).
Make 3 four patch squares for diagonal 2 by joining a B and C unit together to form a four patch.
Label diagonal row 2, color B and C. Set aside.
Diagonal 3
Fabric color C already made in previous step.
Neutral fabric color already made in previous step.
Fabric color D cut a 2 ½” X 35” strip.
Neutral fabric color cut a 2 ½” X 35” strip.
Sew the strips together, press the seam, and cut into 14 units. (Use 5 of these units for diagonal 3. The other 9 units will be used in diagonal rows 4 and 11. Label the leftover units with the color D and set them aside).
Make 5 four patch squares for diagonal 3 by joining a C and D unit together to form a four patch.
Label diagonal row 3, color C and D. Set aside.
Diagonal 4
Fabric color D already made in previous step.
Neutral fabric color already made in previous step.
Fabric color E cut a 2 ½” X 27 1/2” strip.
Neutral fabric color cut a 2 ½” X 27 1/2” strip.
Sew the strips together, press the seam, and cut into 11 units. (Use 7 of these units for diagonal 4. The other 4 units will be used in diagonal row 10. Label the leftover units with the color E and set them aside).
Make 7 four patch squares for diagonal 4 by joining a D and E unit together to form a four patch.
Label diagonal row 4, color D and E. Set aside.
Diagonal 5
Fabric color F cut a 2 ½” X 32 1/2” strip.
Neutral fabric color cut a 2 ½” X 32 1/2” strip.
Sew the strips together, press the seam, and cut into 13 units. (Use 9 of these units for diagonal 5. The other 4 units will be used in diagonal row 10. Label the leftover units with the color F and set them aside).
Fabric color G cut a 2 ½” X 37 1/2” strip.
Neutral fabric color cut a 2 ½” X 37 1/2” strip.
Sew the strips together, press the seam, and cut into 15 units. (Use 9 of these units for diagonal 5. The other 6 units will be used in diagonal row 9. Label the leftover units with the color G and set them aside).
Make 9 four patch squares for diagonal 5 by joining a F and G unit together to form a four patch.
Label diagonal row 5, color F and G. Set aside.
Diagonal 6
Fabric color H cut a 2 ½” X 40” strip.
Neutral fabric color cut a 2 ½” X 40” strip.
Sew the strips together, press the seam, and cut into 16 units. (Use 10 of these units for diagonal 6. The other 6 units will be used in diagonal row 9. Label the leftover units with the color H and set them aside).
Fabric color I cut a 2 ½” X 40” strip.
Neutral fabric color cut a 2 ½” X 45” strip.
Sew the strips together, press the seam, and cut into 18 units. (Use 10 of these units for diagonal 6. The other 8 units will be used in diagonal row 8. Label the leftover units with the color I and set them aside).
Make 10 four patch squares for diagonal 6 by joining a H and I unit together to form a four patch.
Label diagonal row 6, color H and I. Set aside.
Diagonal 7
Fabric color J cut a 2 ½” X 45” strip.
Neutral fabric color cut a 2 ½” X 45” strip.
Sew the strips together, press the seam, and cut into 18 units. (Use 10 of these units for diagonal 7. The other 8 units will be used in diagonal row 8. Label the leftover units with the color J and set them aside).
Fabric color K cut a 2 ½” X 25” strip.
Neutral fabric color cut a 2 ½” X 25” strip.
Sew the strips together, press the seam, and cut into 10 units.
Make 10 four patch squares for diagonal 7 by joining a J and K unit together to form a four patch.
Label diagonal row 7, color J and K. Set aside.
Diagonal 8
Fabric colors I and J. Units previously made.
Make 8 four patch squares for diagonal 8 by joining a I and J unit together to form a four patch.
Label diagonal row 8, color I and J. Set aside.
Diagonal 9
Fabric colors G and H. Units previously made.
Make 6 four patch squares for diagonal 9 by joining a G and H unit together to form a four patch.
Label diagonal row 9, color G and H. Set aside.
Diagonal 10
Fabric colors E and F. Units previously made.
Make 4 four patch squares for diagonal 10 by joining a E and F unit together to form a four patch.
Label diagonal row 10, color E and F. Set aside.
Diagonal 11
Fabric colors C and D. Units previously made.
Make 2 four patch squares for diagonal 11 by joining a C and D together to form a four patch.
Label diagonal row 11, color C and D. Set aside.
Whew! That was a lot!
Now we are ready to layout the rows and sew them together.
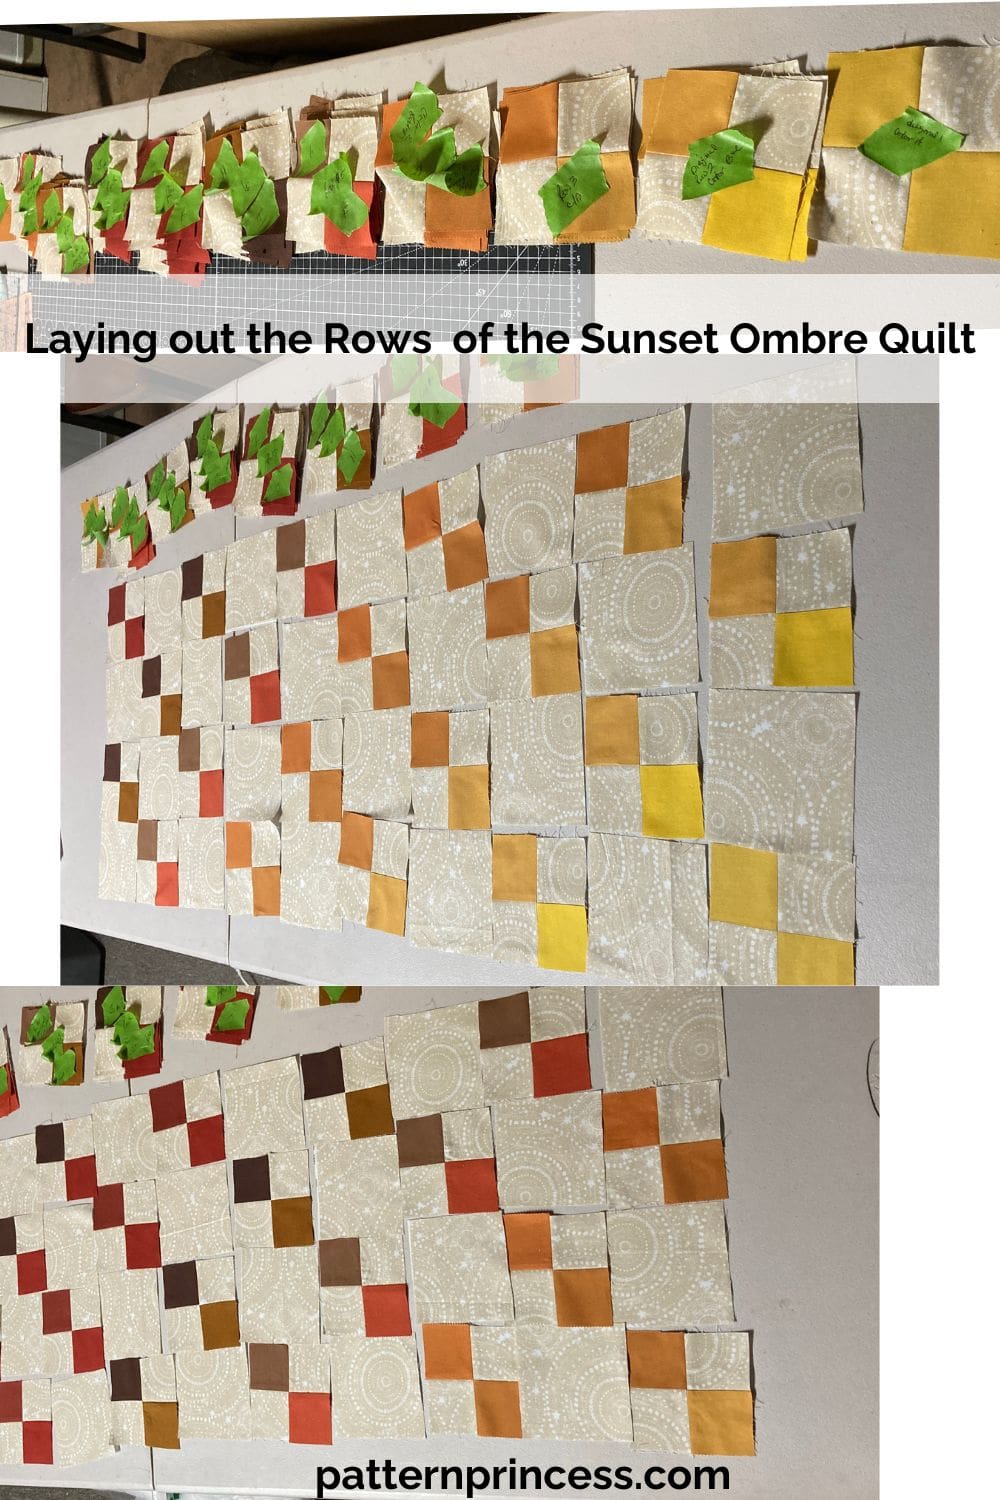
Quilt Top Sewing Directions
Sewing the Rows Together
Trim all squares and four patches as needed to 4 ½” X 4 ½”. Use the diagram to lay out the squares for row 1 at the bottom of the quilt.
Alternate a neutral color square between the four patches across the row.
For example, starting in the lower right corner working your way left, begin with the A four patch.
Next is a neutral color square. Then a B and C four patch. Followed by a neutral square, followed by a C and D four patch.
Then a neutral color square, and a D and E four patch, neutral square, F and G four patch, and finally a neutral square.
Sew each square together with the right sides together using ¼” seam allowance. Press the seams to one side or open. Pro Tip. Press the first row seams one way and the next row the other way. Continue alternating which way you press the seams. This helps you nest the seams later when you sew one row to the next.
Set this row aside. (You may want to label this as row 1).
Row 2 begins with a neutral color square followed by a B and C four patch, and so on.
Continue using the chart to lay out the rest of the rows, sewing them together, pressing the seams, and labeling the rows.
Joining the Rows
When all 13 rows are sewn together, begin joining the rows together. Place row 2 on top of row 1 with the right sides together. Align and nest the seams securing with a pin.
Sew together using ¼” seam allowance removing the pins as you sew up to them.
Continue sewing the rows together making sure to align and nest the seams. Press the seams to one side or open.
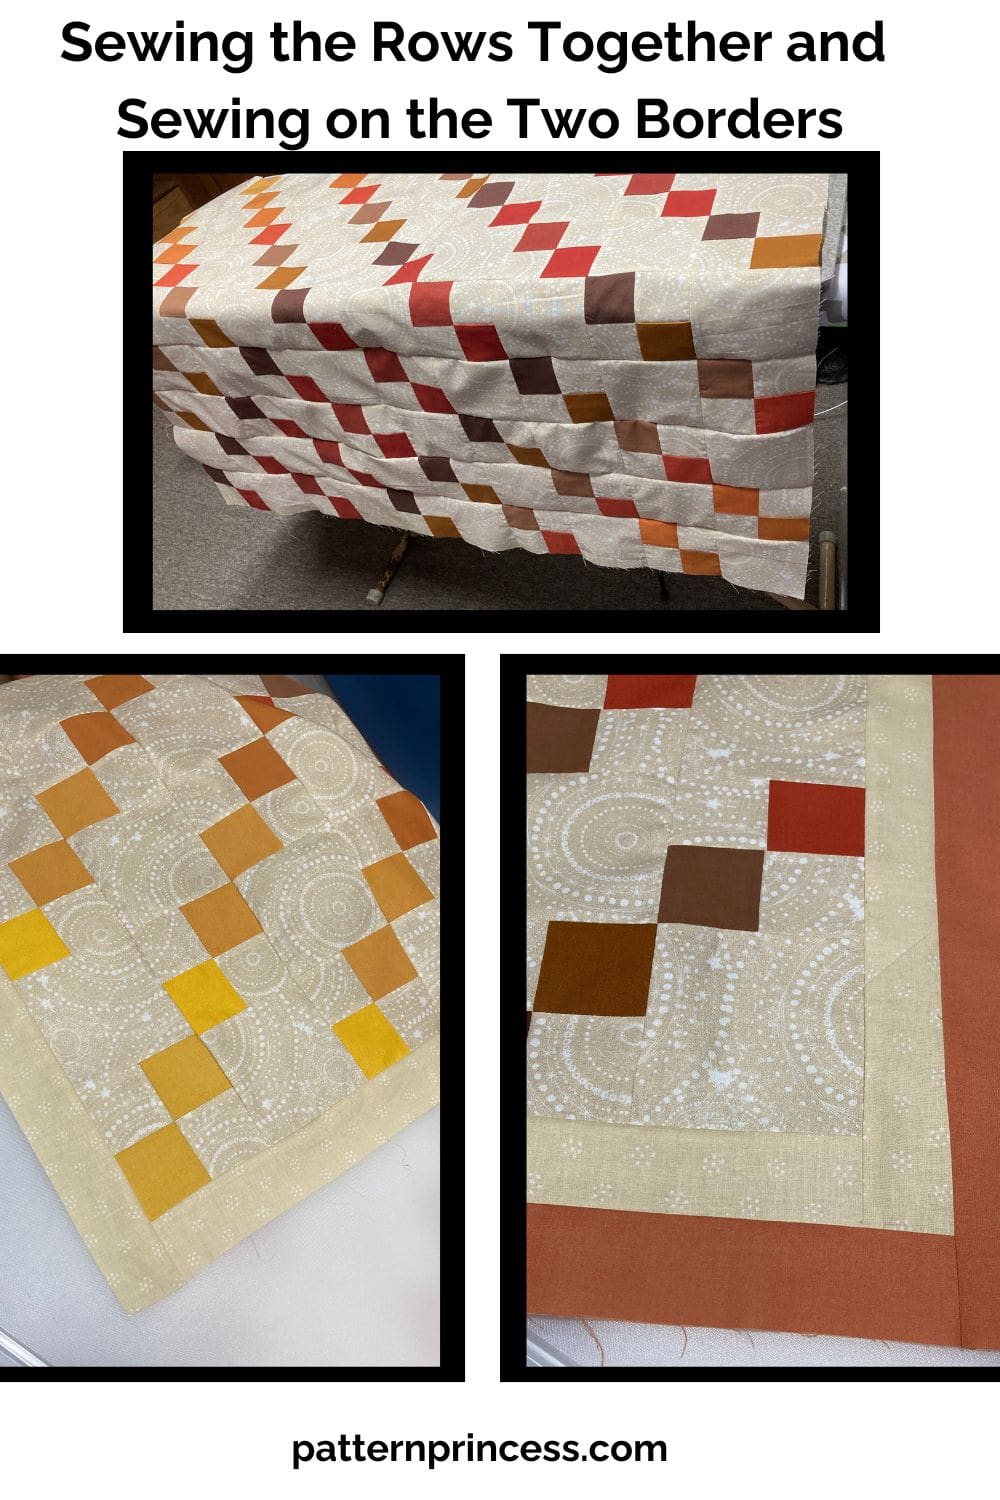
Two Borders
First Border in Tan Fabric
Horizontal bottom and top 2 strips cut 2 x 43 ½ inches and 2 vertical sides cut 2 X 52 ½ inches.
Vertical Sashing Pieces on the Sides
Using the 2 vertical pieces of sashing, pin on the sides of the quilt top with the right sides together. Using ¼-inch seam allowance, sew 1 sashing strip to each side of the quilt.
Press all seams to the outside or open.
Horizontal Sashing Pieces on the Top and Bottom
Using the 2 horizontal pieces of sashing, pin on the top and bottom of the quilt top with the right sides together. Using ¼-inch seam allowance, sew 1 sashing strip to each side of the quilt.
Second Border in Burnt Orange Fabric
Horizontal bottom and top cut 2 strips 2 x 46 ½ inches and vertical sides cut 2 strips 2 X 55 ½ inches.
Repeat the process of adding the borders as you did with the first one.
Layer the Top, Batting, and Back
Sandwich the quilt backing fabric, batting, and the quilt top.
The backing fabric and the batting should be a few inches larger all the way around than the quilt top. This makes sure that there is backing and batting covering the entire quilt top fabric. If you cut it too close and there is any slippage, you might end up with an edge that does not have the bottom part of the quilt sandwich.
Begin by placing the backing fabric on a flat solid surface, right side down facing out. Smooth out any wrinkles. Use painters’ tape to secure the edges of the fabric down. This will help hold it in place and reduce the chance of a wrinkle developing as you place the next two layers.
Next, center the batting on top of the backing fabric smoothing out any wrinkles.
Finally, place the quilt top on the batting, centering it with the right side up. Smooth out any wrinkles.
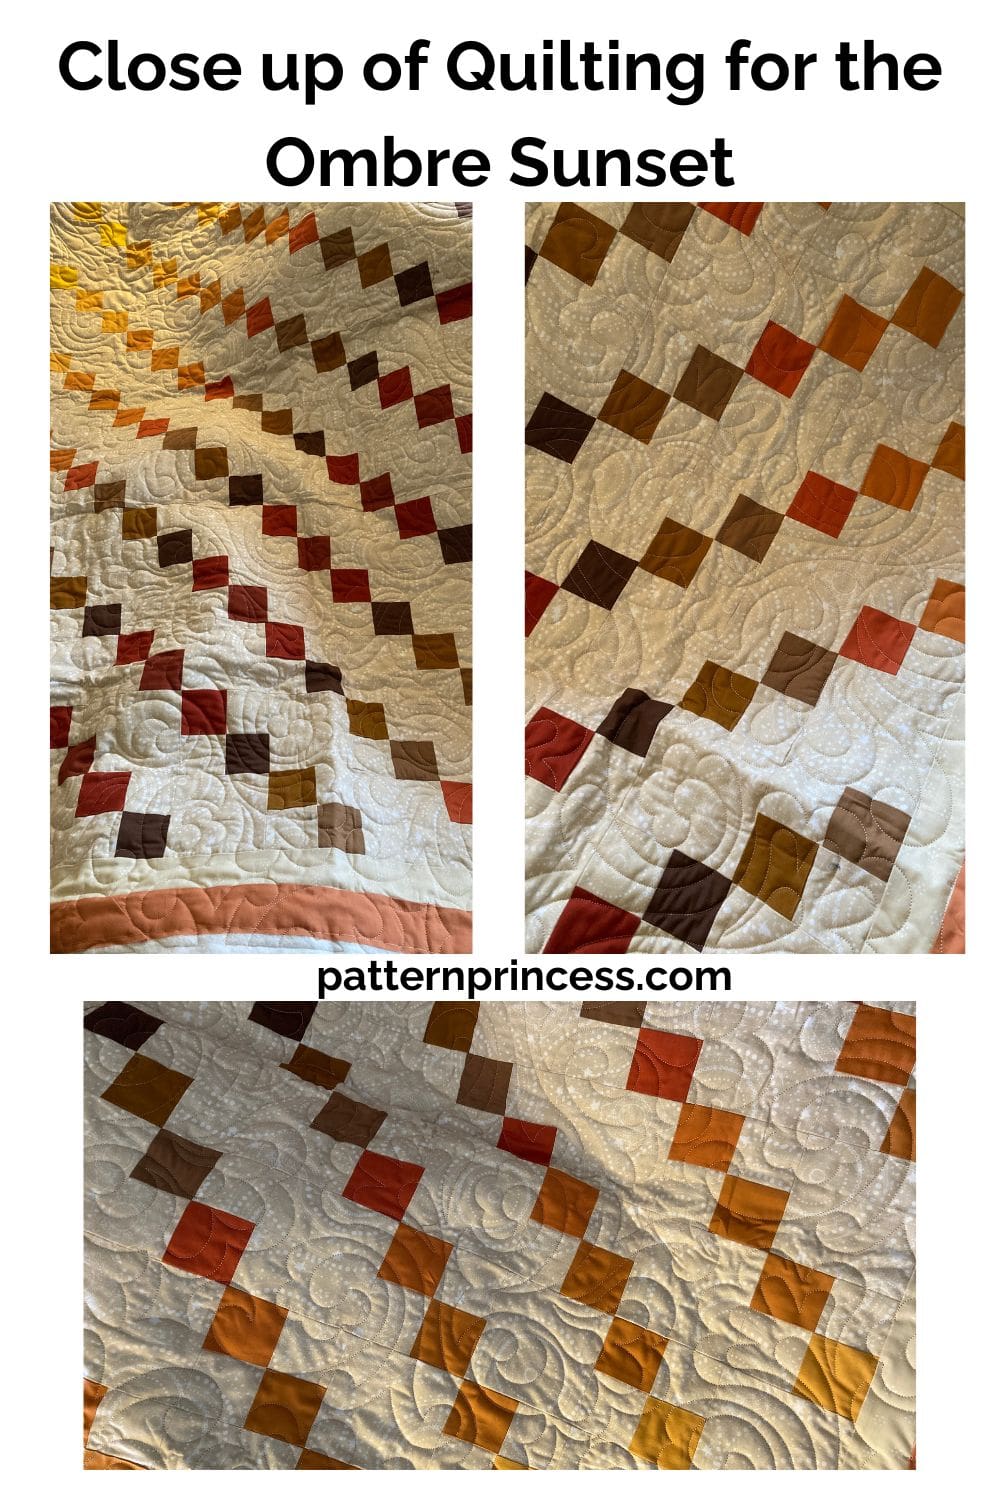
Baste the Quilt Together and Quilt the Layers Together
Once you have the top fabric all smoothed out, baste all three layers together using large safety pins. Use a good quality 1 ½” stainless steel pin for this.
Put a pin in each corner and around the entire quilt about every 5-6 inches or so through all three layers.
This holds things in place, so they don’t move around while you are sewing the layers together using a quilting design of your choice.

How to Trim the Batting and Backing Fabric Before Binding
Once the layers are quilted together in your desired design, it is time to trim the batting and backing. For this, I use a large cutting mat, a longer ruler, and a rotary cutter.
Lay the quilt flat. Place the ruler along the edge of the quilt and use it as a guide to run your rotary cutter against to trim the quilt batting and backing to the size of the quilt top. Do this on all four sides.
Sew the Binding to the Quilt
First, prepare the binding strips. I used the leftover jelly roll strips to make my quilt binding.
Make the binding 2 ½ x by the length indicated in the materials section for the quilt size you are working on.
You can find a tutorial for making binding on the website.
Once the strips are sewn together, fold in half lengthwise with wrong sides together and press.
Pin the raw edge of the binding onto raw edge of the quilt top. I generally start in the middle of a side leaving approximately a 3” tail hanging.
Note: This hanging part will be used to sew to the other end of the binding strip when you have finished sewing all four sides of the binding onto the quilt.
Sew the binding onto all four sides of the easy quilt making sure to miter the corners and join the binding. Pro Tip. I find that a walking foot works nicely for this and helps all the layers slide under the sewing foot easier. Less bunching of fabric.
Sewing the Binding to the Quilt Back
You can use your sewing machine to sew the binding on the back of the quilt. However, I often hand-stitch the folded edge onto the back of the quilt.
Once all the sides and corners are stitched, you are done.
It is ready to use or give as a gift or use.

You can find Victoria crocheting, quilting, and creating recipes. She has cooked in restaurants for over 20 years, including many larger parties. She learned to crochet when she was just 11 years old and has been crocheting ever since; over 50 years now. Over 40 years ago, she loved her first class in sewing and continues to hone her skills in quilting. Many have enjoyed the handmade gifts over the years. In her professional career, she has worked in management in a wide variety of businesses including higher education as a dean of a division. All the while attending college part-time to achieve her doctorate in higher education with an emphasis in e-learning.