Last updated on July 4th, 2024 at 11:31 pm
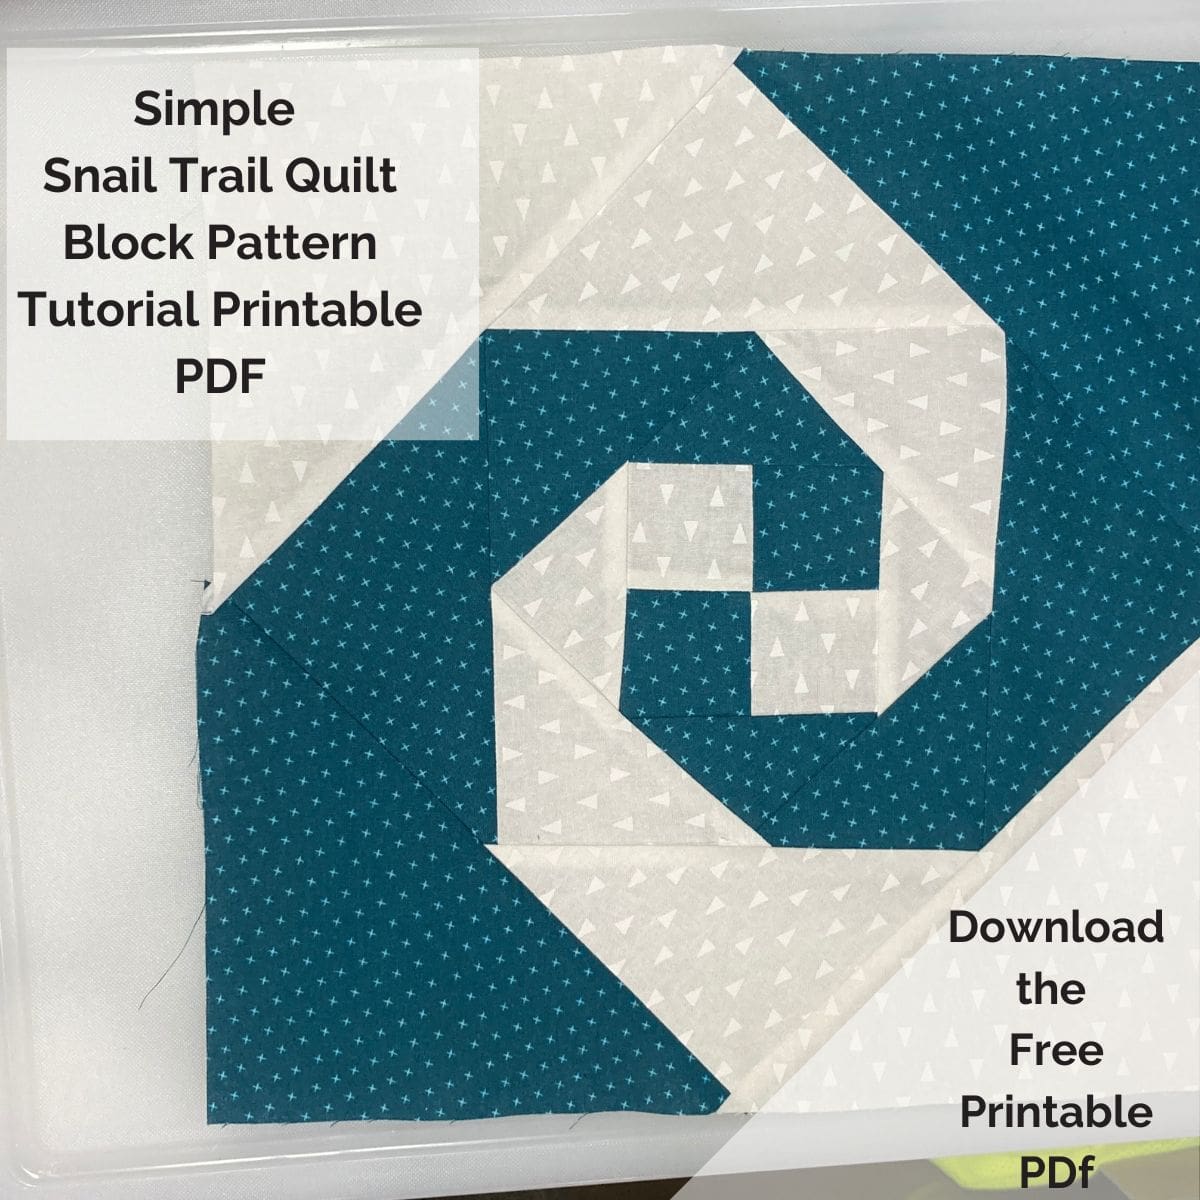
Today, we’re thrilled to present a delightful quilt block pattern that is sure to captivate both novice and seasoned quilters alike—the enchanting “Snail Trail Quilt Block.”
Welcome to our cozy little corner of the quilting world, where creativity and craftsmanship blend seamlessly to bring you the mesmerizing beauty of quilts.
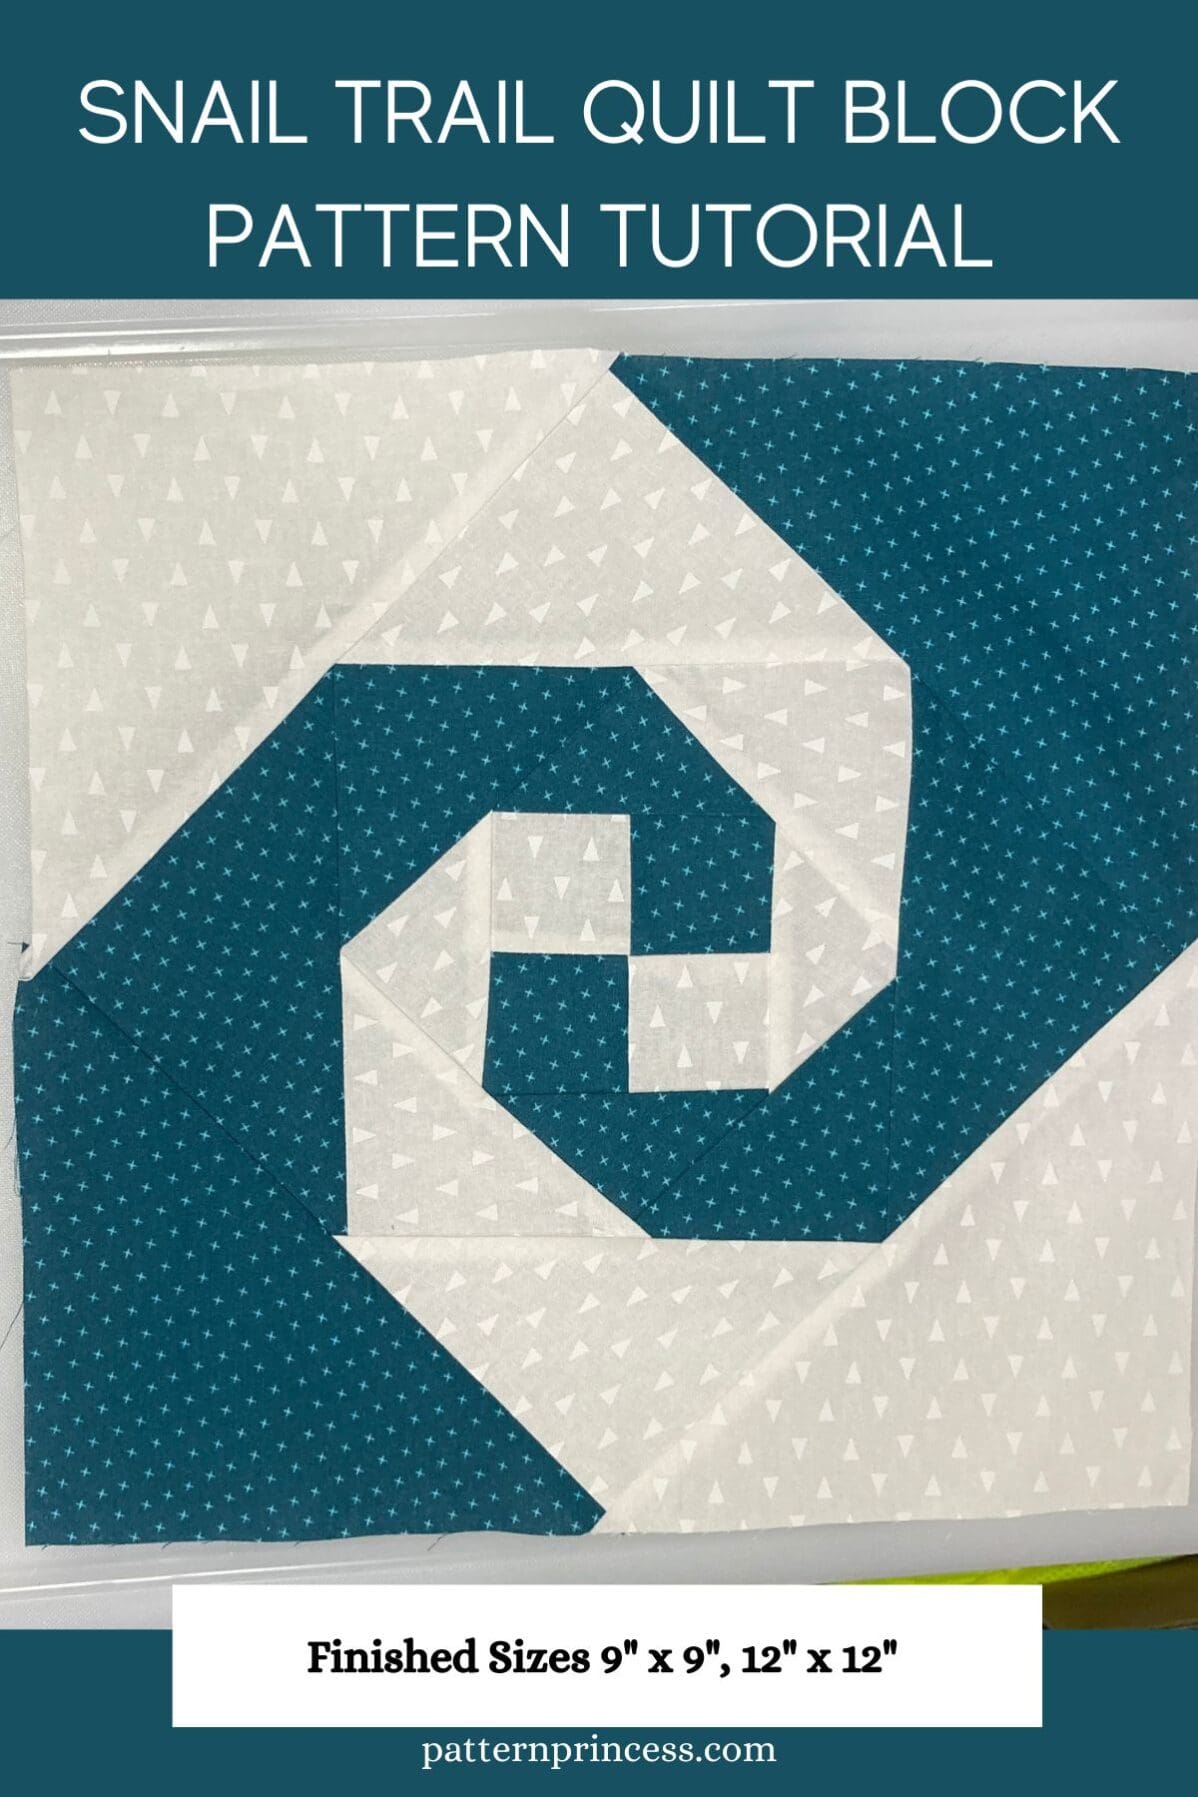
Just like a curious snail leaving behind its elegant trail, this exquisite quilt block pattern follows a meandering path of colors and shapes that come together to form a mesmerizing design. The Snail Trail pattern has been a favorite among quilters for generations, admired for its versatility and timeless appeal.
Whether you’re a beginner eager to learn the ropes or an experienced quilter seeking a fresh challenge, our free pattern for a step-by-step guide will walk you through the process.
Post contains affiliate links, and we earn commissions if you shop through the links on this page. For more information, please read the disclosure section under the About Us page.
Uses for this Charming Snail’s Trail Quilt Block
If you want to just practice or make one, the 9-inch makes a lovely hot pad, and the 12-inch block is perfect for a trivet. I even used the 12-inch to make a chair cushion.
Make more of them one to create a warm and inviting quilt for your home or a thoughtful gift for a loved one.
Fabric Colors for this Swirly Quilt Block
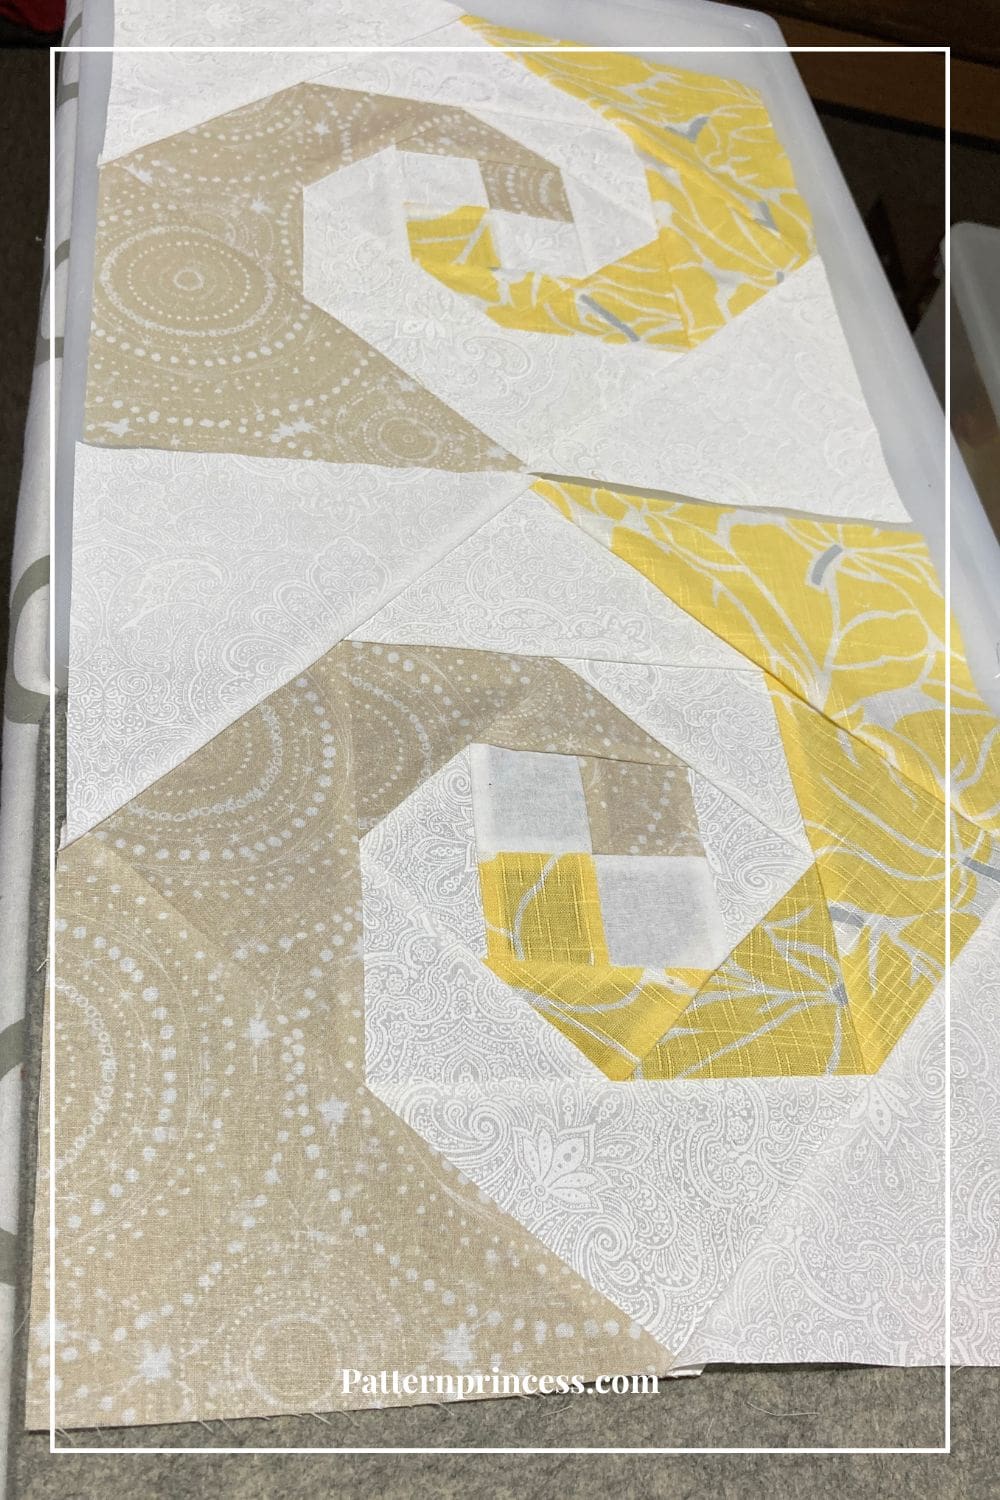
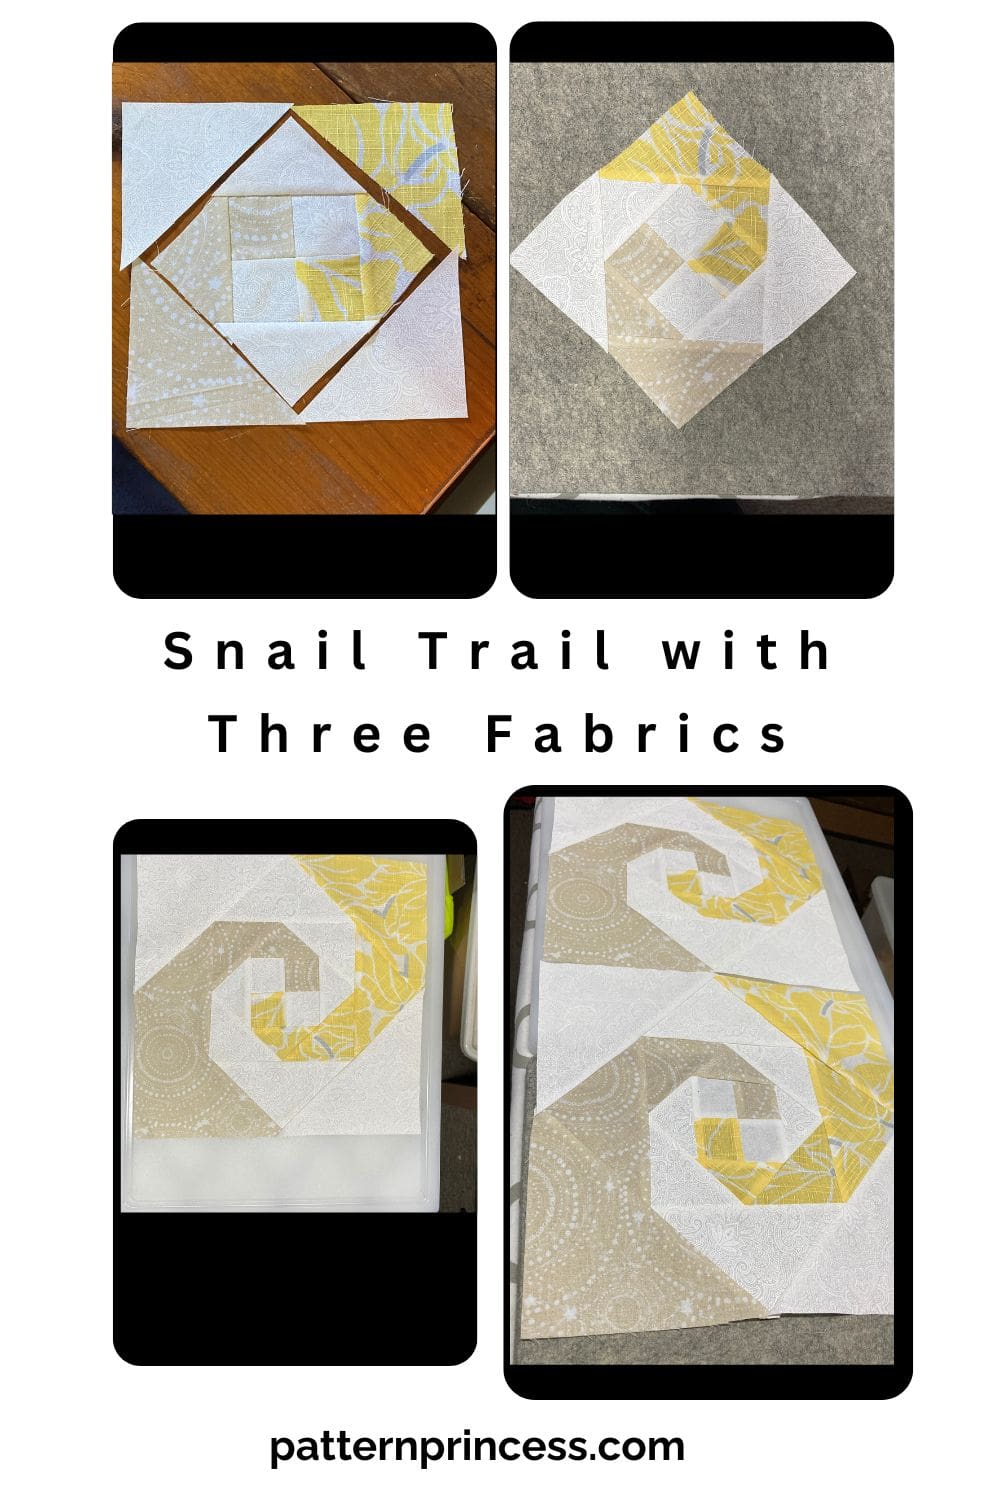
This pattern is written for using just two colors. However, it looks great in three colors too. When placing the triangles, just make sure that the same colors are placed together around the four patch. When using two or three colors, the contrasting colors will always be opposite each other. While the other two colors will be opposite each other.
When using four colors for this square, place one triangle on each side. Making sure to turn the block 90 degrees with each round.
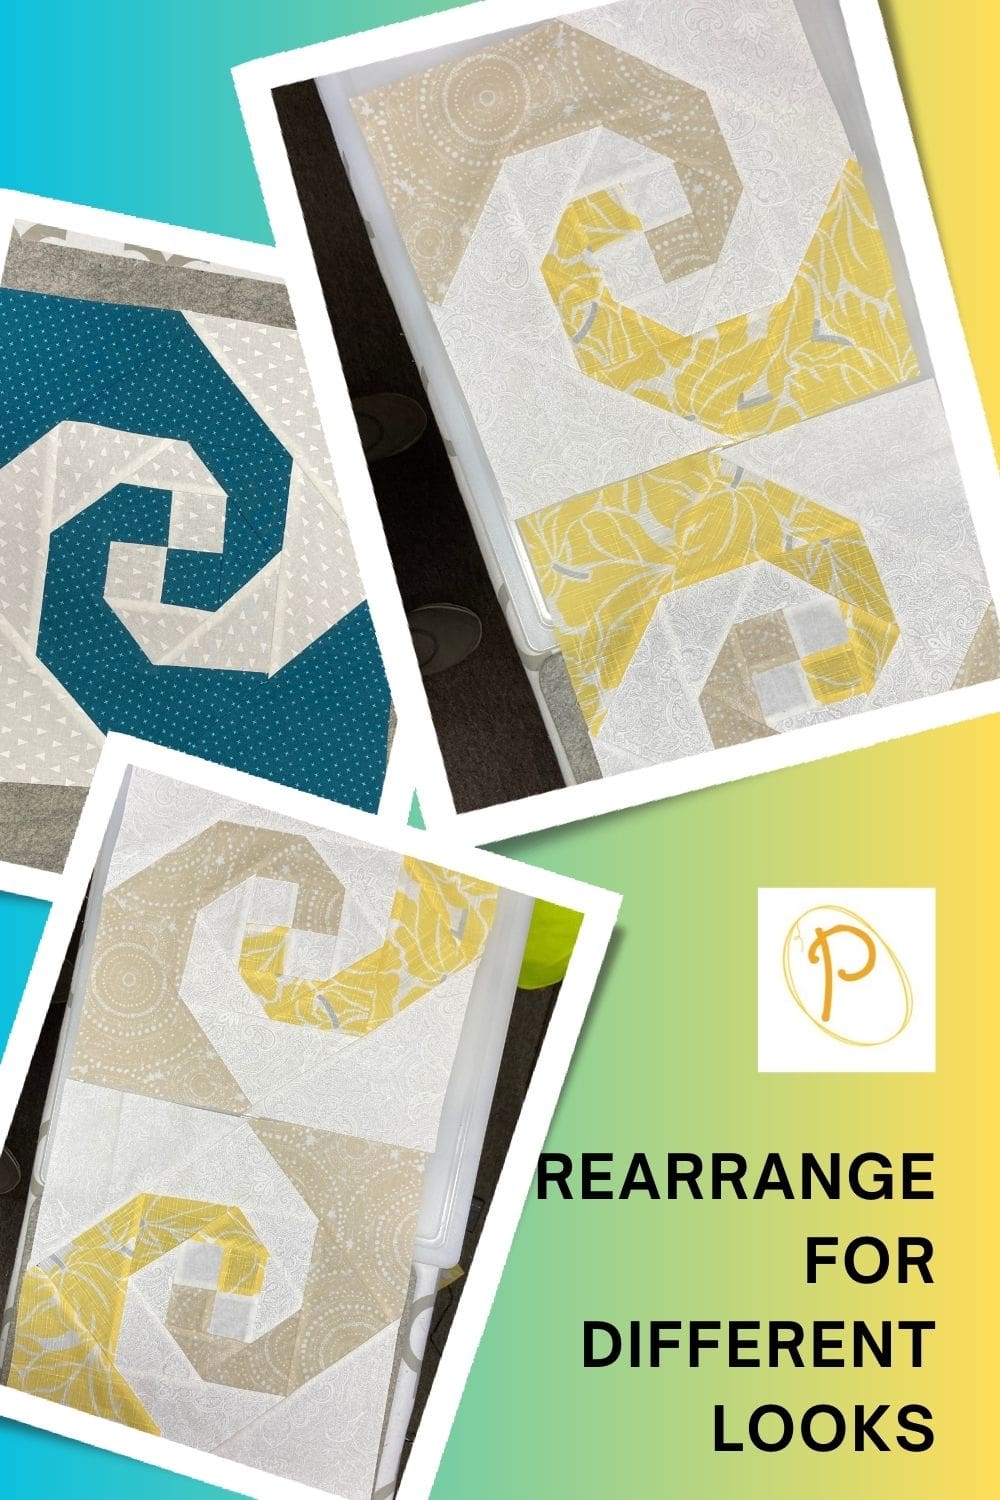
After making all your squares, play with the layout as you will end up with very different looking projects. They may look difficult, but a four patch is great for a beginner. Adding the triangles can be challenging if you have never done this before. Once you get the first round completed, it becomes quite easy for the next rounds.
Directions: Snail Trail Quilt Block Pattern Tutorial
Quilting Skill Level
Easy – Confident Beginner
Finished Block Measurements
12-inch Snail’s Trail Quilt Block. 12 1/2 -inch unfinished
9-inch Snail’s Trail Quilt Block. 9 ½-inch unfinished
Materials
1/4 yard each of two fabrics, or two fat quarters. The Snail Trail pattern is a traditional block that adds swirls of movement to your quilt top. Make it in two, three, or four fabrics.
Thread
Equipment and Tools
- Rotary Cutter
- Quilting Ruler
- Cutting Mat
- Rotating Cutting Mat
- Iron
- Ironing Board or Pressing Mat
- Pins
- Clips
- Sewing Machine
- Disappearing fabric marker
- My Favorite Quilting Supplies
Pattern Notes
For the larger triangles, mark the center of each diagonal and line it up carefully to keep your block square.
Double check the placement of each round of triangles before stitching to keep the trail going in a spiral. Refer to the diagram for directions.
The directions note the 12-inch block. However, when making the 9-inch block use the sizes noted.
The outside corners of the triangles will extend slightly beyond the outside edges of the Four-Patch unit. Trim after each round.
Use a ¼-inch seam allowance. I recommend using a special presser foot with a ¼-inch guide if you have one for your machine. This will help you get uniform seams, and matching seams.
Right Sides Together. Sew fabric together with right sides together. Unless otherwise noted.
The directions for this quilt are for rotary cutting, machine piecing, machine quilting, and the binding is hand-stitched to the quilt back.
Accurate cutting and sewing enhances your final product. Pin or clip your pieces together before sewing them to ensure proper seam alignment.
The pattern is written for using just two fabric colors. However, you can make this using two, three, or four different colors.
Fabric Cutting Directions:
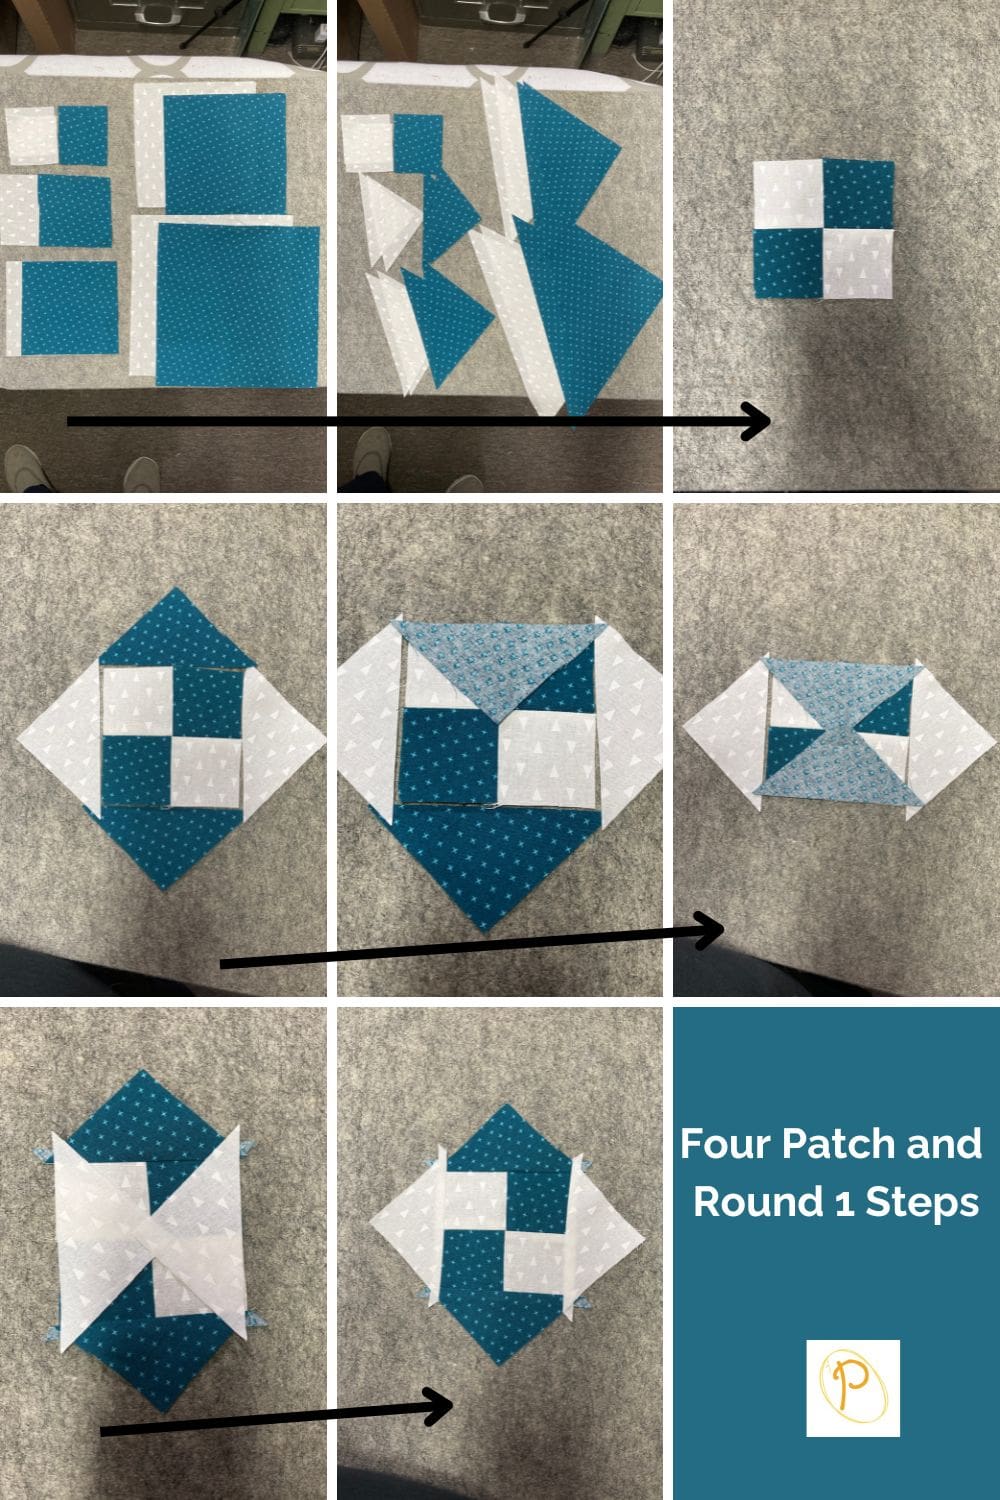
Before starting to make the block, cut the following from EACH of your two fabrics:
Fabric pieces for 12 x 12 inch finished size
- 2, 2” X 2″ squares
- 1, 3” X 3” square
- 1, 3 7/8″ X 3 7/8” square
- 1, 5 1/8” X 5 1/8” square
- 1, 6 7/8 X 6 7/8” square
12 ½ X 12 ½ inches unfinished size
Fabric pieces for 9 x 9 inch finished size
- 2, 1 5/8” X 1 5/8” squares
- 1, 2 ½” X 2 ½” square
- 1, 3 1/8” X 3 1/8” square
- 1, 4 1/16” X 4 1/16” square
- 1, 5 3/8” X 5 3/8” square
9 1/2 by 9 1/2 inches unfinished size
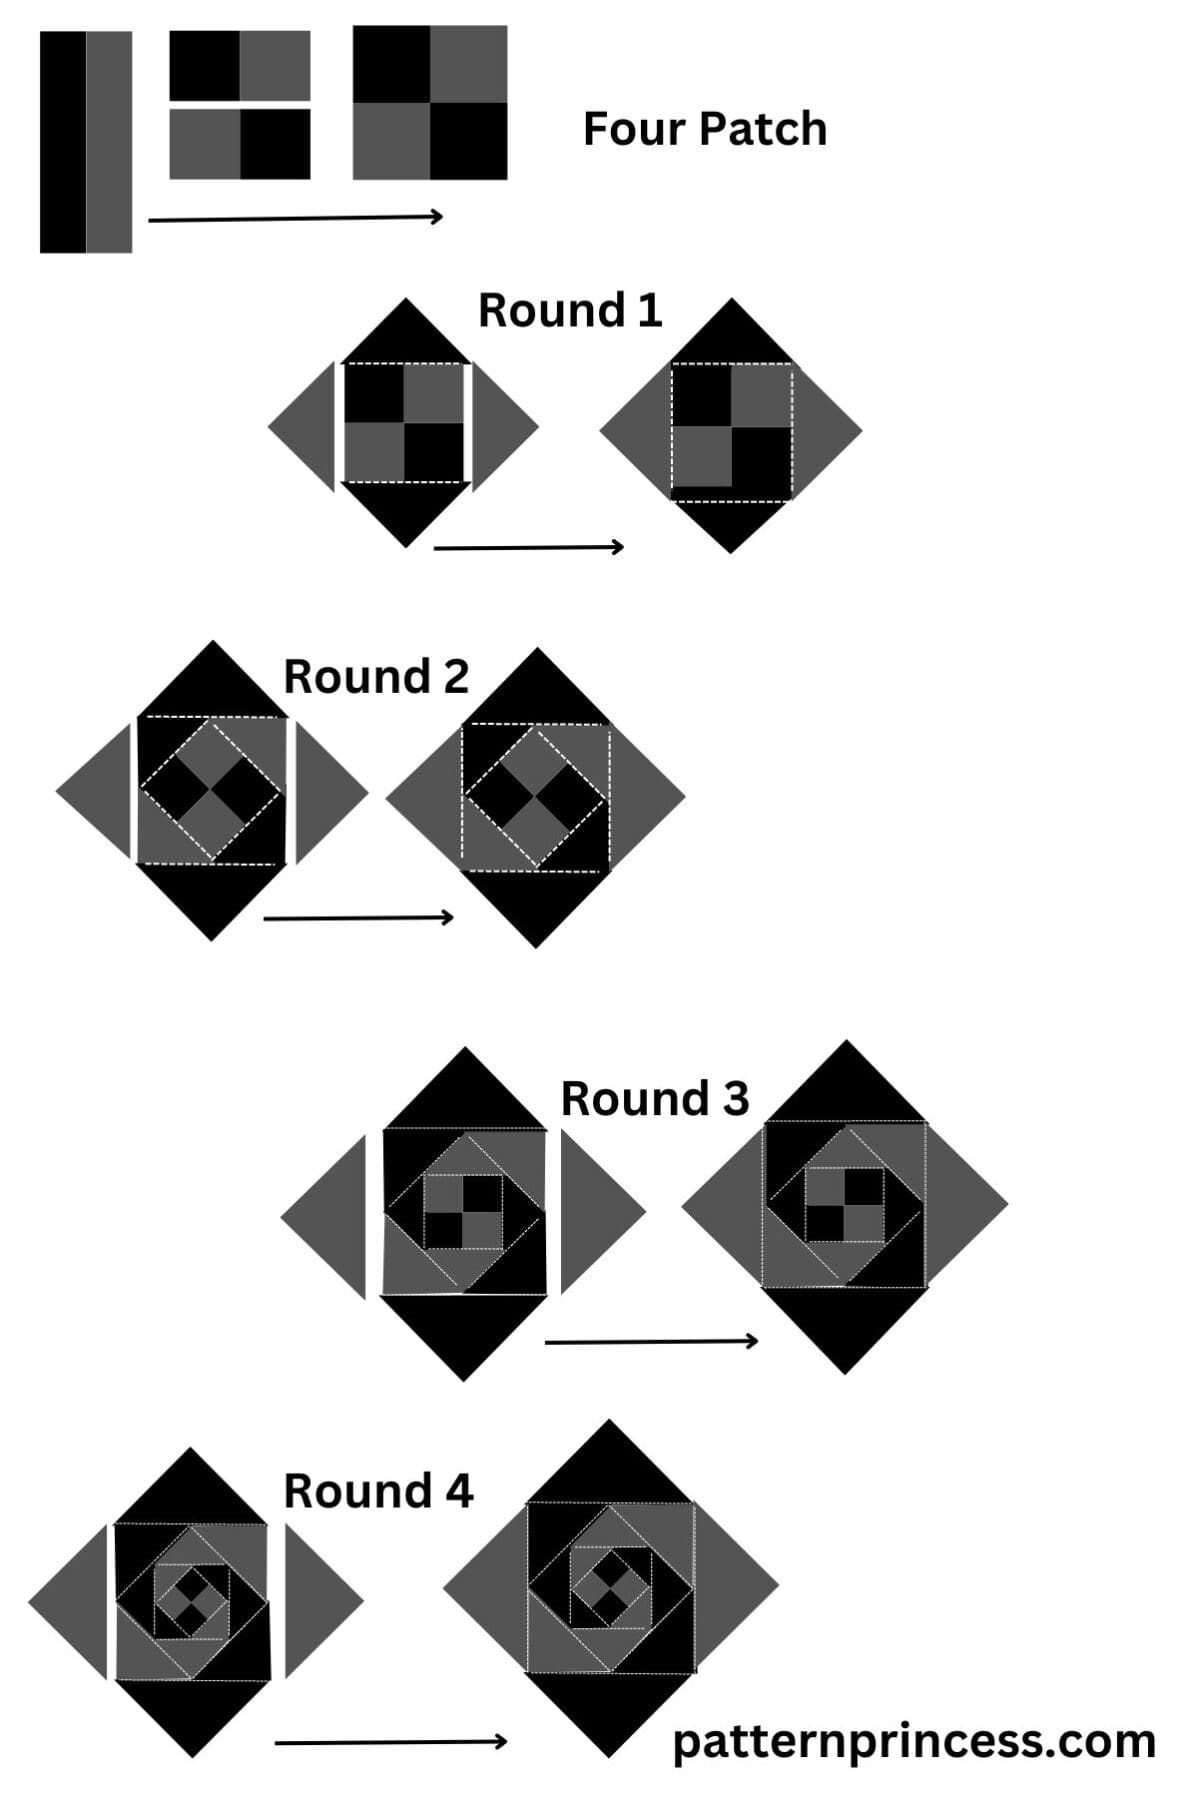
Begin Quilt Block Pattern
- Refer to the diagram for directions.
- The directions note the 12-inch block. However, when making the 9-inch block use the sizes noted above.
- The outside corners of the triangles will extend slightly beyond the outside edges of the Four-Patch unit. Trim after each round.
If you are making a few squares, start with a longer strip of each color. For this pattern, we will discuss the directions for just one square.
Starting with 2-inch squares, using a ¼” seam allowance. Sew a darker fabric to a lighter fabric with the right sides together. You now have 2 units. Press the seam allowances toward the darker squares.
Repeat the process for the other dark and light 2″ X 2″ squares.
Line up the two units of squares so the colors are opposite to form a four patch block. Sew them right sides together with a 1/4″ seam allowance, nesting the center seams. Press the seam open.
Round 1
Take the 3″ squares and cut them diagonally into two triangles each.
Use the diagram for the fabric color placement for the triangles.
Using the Dark Fabric. Line up the first triangle with the center, right sides together. You’ll want the cut diagonal edge to be along one side of the four patch on the outer edge. The corner point should be lined up with the center seam of the four patch.
Sew with a 1/4″ seam allowance. Press the seams allowances toward the triangles.
(Note: Before sewing the triangles to the Four-Patch unit, be sure to correctly position the pieces. The outside corners of the triangles will extend slightly beyond the outside edges of the Four-Patch unit. Trim the ears after this round.)
Repeat the steps for the other Dark Fabric color triangle.
Next, Join the two Light Fabric triangles to the two remaining edges of the Four-Patch unit. Press the seam allowances toward the triangles.
Trim up the edges before going to the next round.
Subsequent Rounds:
If you are an experienced quilter, I will summarize the next rounds. If you are a newer quilter, keep reading through each round making sure to refer to the diagram and photos.
For each of the next three rounds, continue adding the dark fabric and light fabric triangles to the Four-Patch unit for rounds 2-4. Work from the smallest triangles to the largest triangles, until you’ve completed the block assembly.
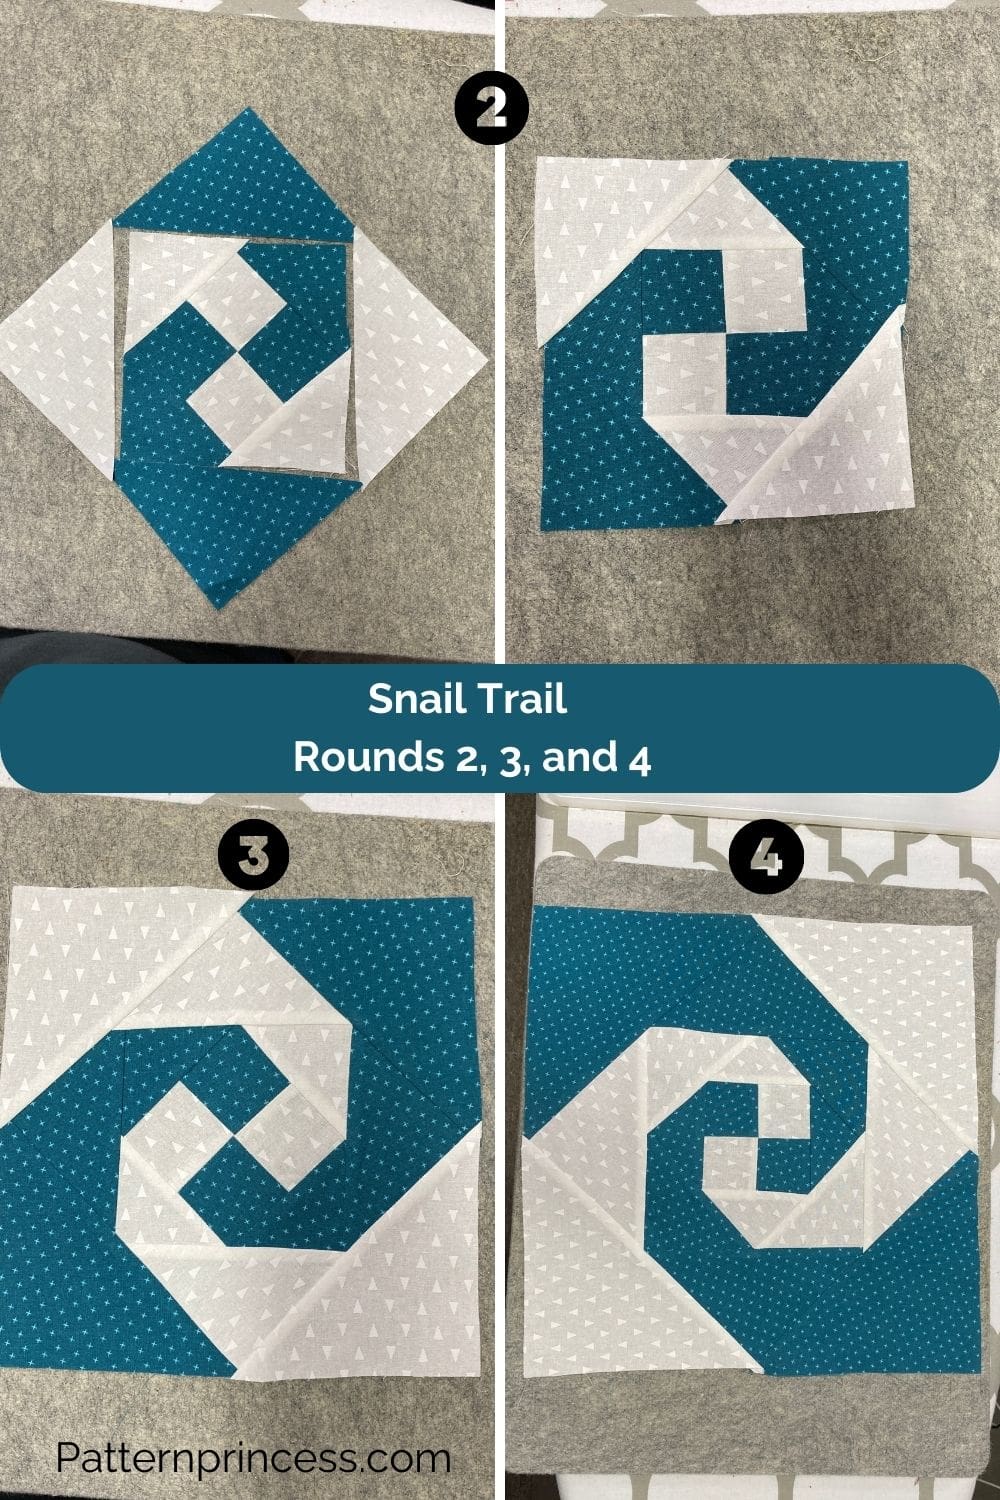
Round 2
Take the 3 7/8″ X 3 7/8” squares cut them diagonally into two triangles each.
Use the diagram for the fabric color placement for the triangles.
Using the Dark Fabric. Line up the first triangle with the center, right sides together. You’ll want the cut diagonal edge to be along one side of the four patch on the outer edge. The corner point should be lined up with the center seam of the four patch.
Sew with a 1/4″ seam allowance. Press the seams allowances toward the triangles.
(Note: Before sewing the triangles to the Four-Patch unit, be sure to correctly position the pieces. The outside corners of the triangles will extend slightly beyond the outside edges of the Four-Patch unit. Trim the ears after this round.)
Repeat the steps for the other Dark Fabric color triangle.
Next, Join the two Light Fabric triangles to the two remaining edges of the Four-Patch unit. Press the seam allowances toward the triangles.
Trim up the edges before going to the next round.
Round 3
For this and subsequent rounds, mark the center of the diagonal line on the wrong side of each triangle. I like to use an iron away marking pen that disappears with heat. A small mark within the seam allowance is enough of a guide. Use the marked line to center the diagonal edge with the previous round of triangles.
Take the 5 1/8” X 5 1/8” squares cut them diagonally into two triangles each.
Use the diagram for the fabric color placement for the triangles.
Using the Dark Fabric. Line up the first triangle with the center, right sides together. You’ll want the cut diagonal edge to be along one side of the four patch on the outer edge. The corner point should be lined up with the center seam of the four patch.
Sew with a 1/4″ seam allowance. Press the seams allowances toward the triangles.
(Note: Before sewing the triangles to the Four-Patch unit, be sure to correctly position the pieces. The outside corners of the triangles will extend slightly beyond the outside edges of the Four-Patch unit. Trim the ears after this round.)
Repeat the steps for the other Dark Fabric color triangle.
Next, Join the two Light Fabric triangles to the two remaining edges of the Four-Patch unit. Press the seam allowances toward the triangles.
Trim up the edges before going to the next round.
Round 4
Take the 6 7/8 X 6 7/8” squares cut them diagonally into two triangles each.
Use the diagram for the fabric color placement for the triangles.
Using the Dark Fabric. Line up the first triangle with the center, right sides together. You’ll want the cut diagonal edge to be along one side of the four patch on the outer edge. The corner point should be lined up with the center seam of the four patch.
Sew with a 1/4″ seam allowance. Press the seams allowances toward the triangles.
(Note: Before sewing the triangles to the Four-Patch unit, be sure to correctly position the pieces. The outside corners of the triangles will extend slightly beyond the outside edges of the Four-Patch unit. Trim the ears after this round.)
Repeat the steps for the other Dark Fabric color triangle.
Next, Join the two Light Fabric triangles to the two remaining edges of the Four-Patch unit. Press the seam allowances toward the triangles.
Trim up the edges before going to the next round.
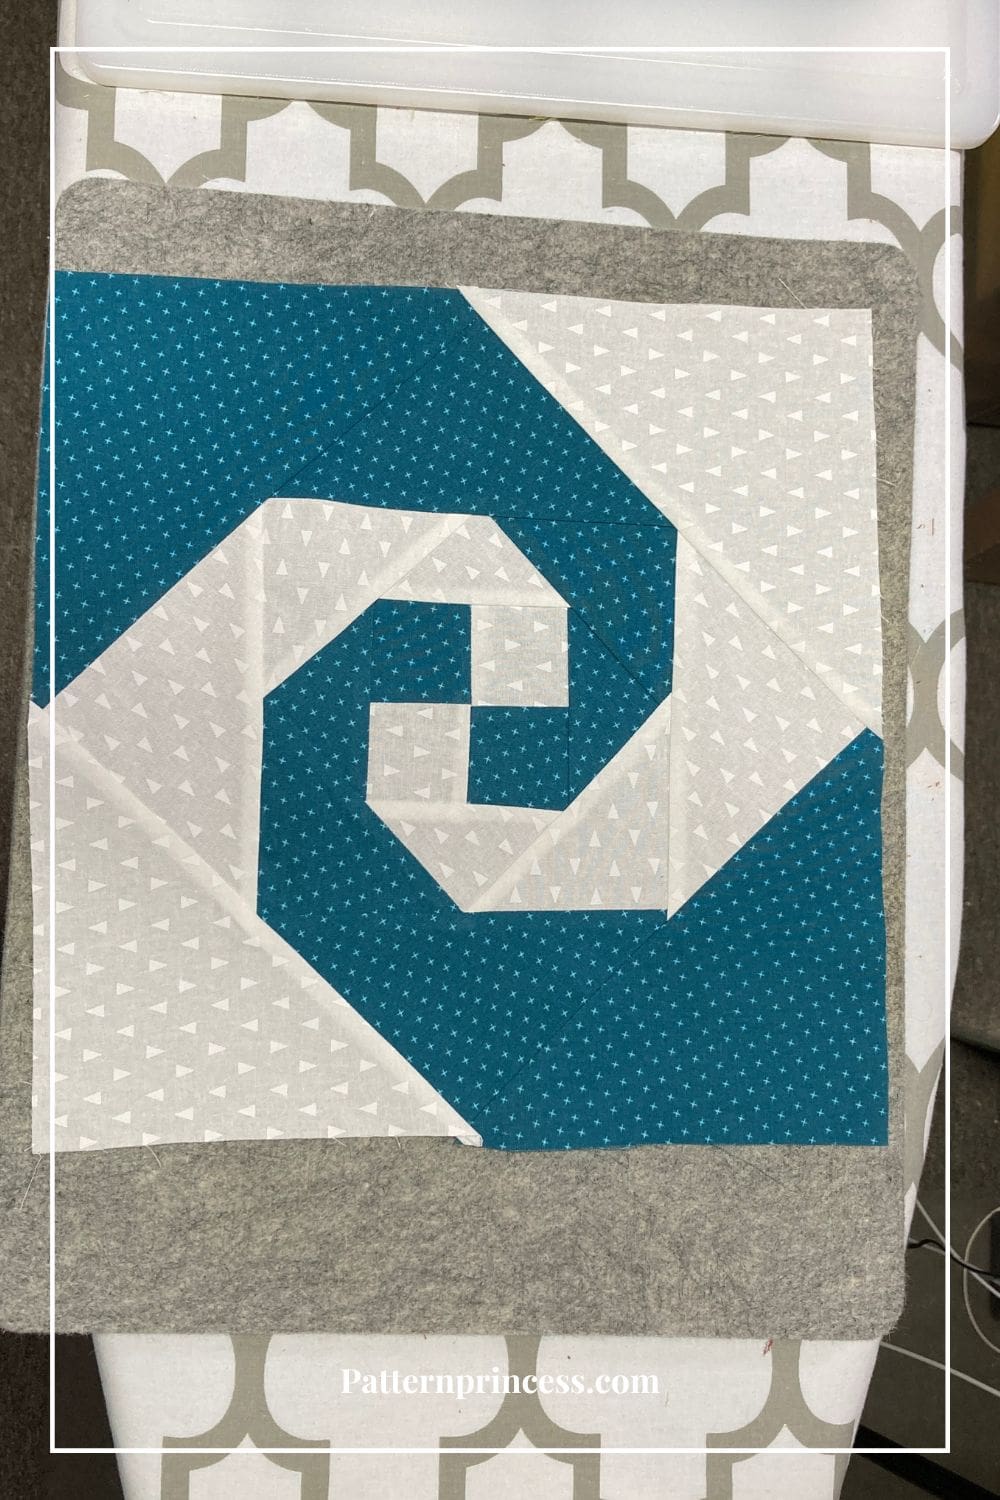
Give the entire block a good press. The Snail’s Trail Quilt Block is done.
If you like free quilt patterns, we have a few for you to start making right now.
Free Quilt Patterns
Get other Free PDF Patterns on our Site.

You can find Victoria crocheting, quilting, and creating recipes. She has cooked in restaurants for over 20 years, including many larger parties. She learned to crochet when she was just 11 years old and has been crocheting ever since; over 50 years now. Over 40 years ago, she loved her first class in sewing and continues to hone her skills in quilting. Many have enjoyed the handmade gifts over the years. In her professional career, she has worked in management in a wide variety of businesses including higher education as a dean of a division. All the while attending college part-time to achieve her doctorate in higher education with an emphasis in e-learning.