Last updated on July 4th, 2024 at 11:31 pm
How to Sew Quilted Potholder with this tutorial pattern. When it comes to adding a touch of warmth and personality to your kitchen, few things are as charming and practical as homemade quilted hot pads.
These delightful kitchen essentials not only protect your hands and surfaces from sizzling pots and pans but also offer a canvas for your creativity to shine.
Whether you’re a seasoned sewing enthusiast or a beginner eager to explore the world of crafting, our step-by-step tutorial pattern is here to guide you through the process with ease.
Bring your kitchen to life with a touch of handmade charm. Whether you’re looking to brighten up your cooking space or create thoughtful gifts, our quilted simple potholder tutorial pattern has you covered.
It is a beautiful way to protect your kitchen counters and dining table from hot dishes.
Post contains affiliate links, and we earn commissions if you shop through the links on this page. For more information, please read the disclosure section under the About Us page.
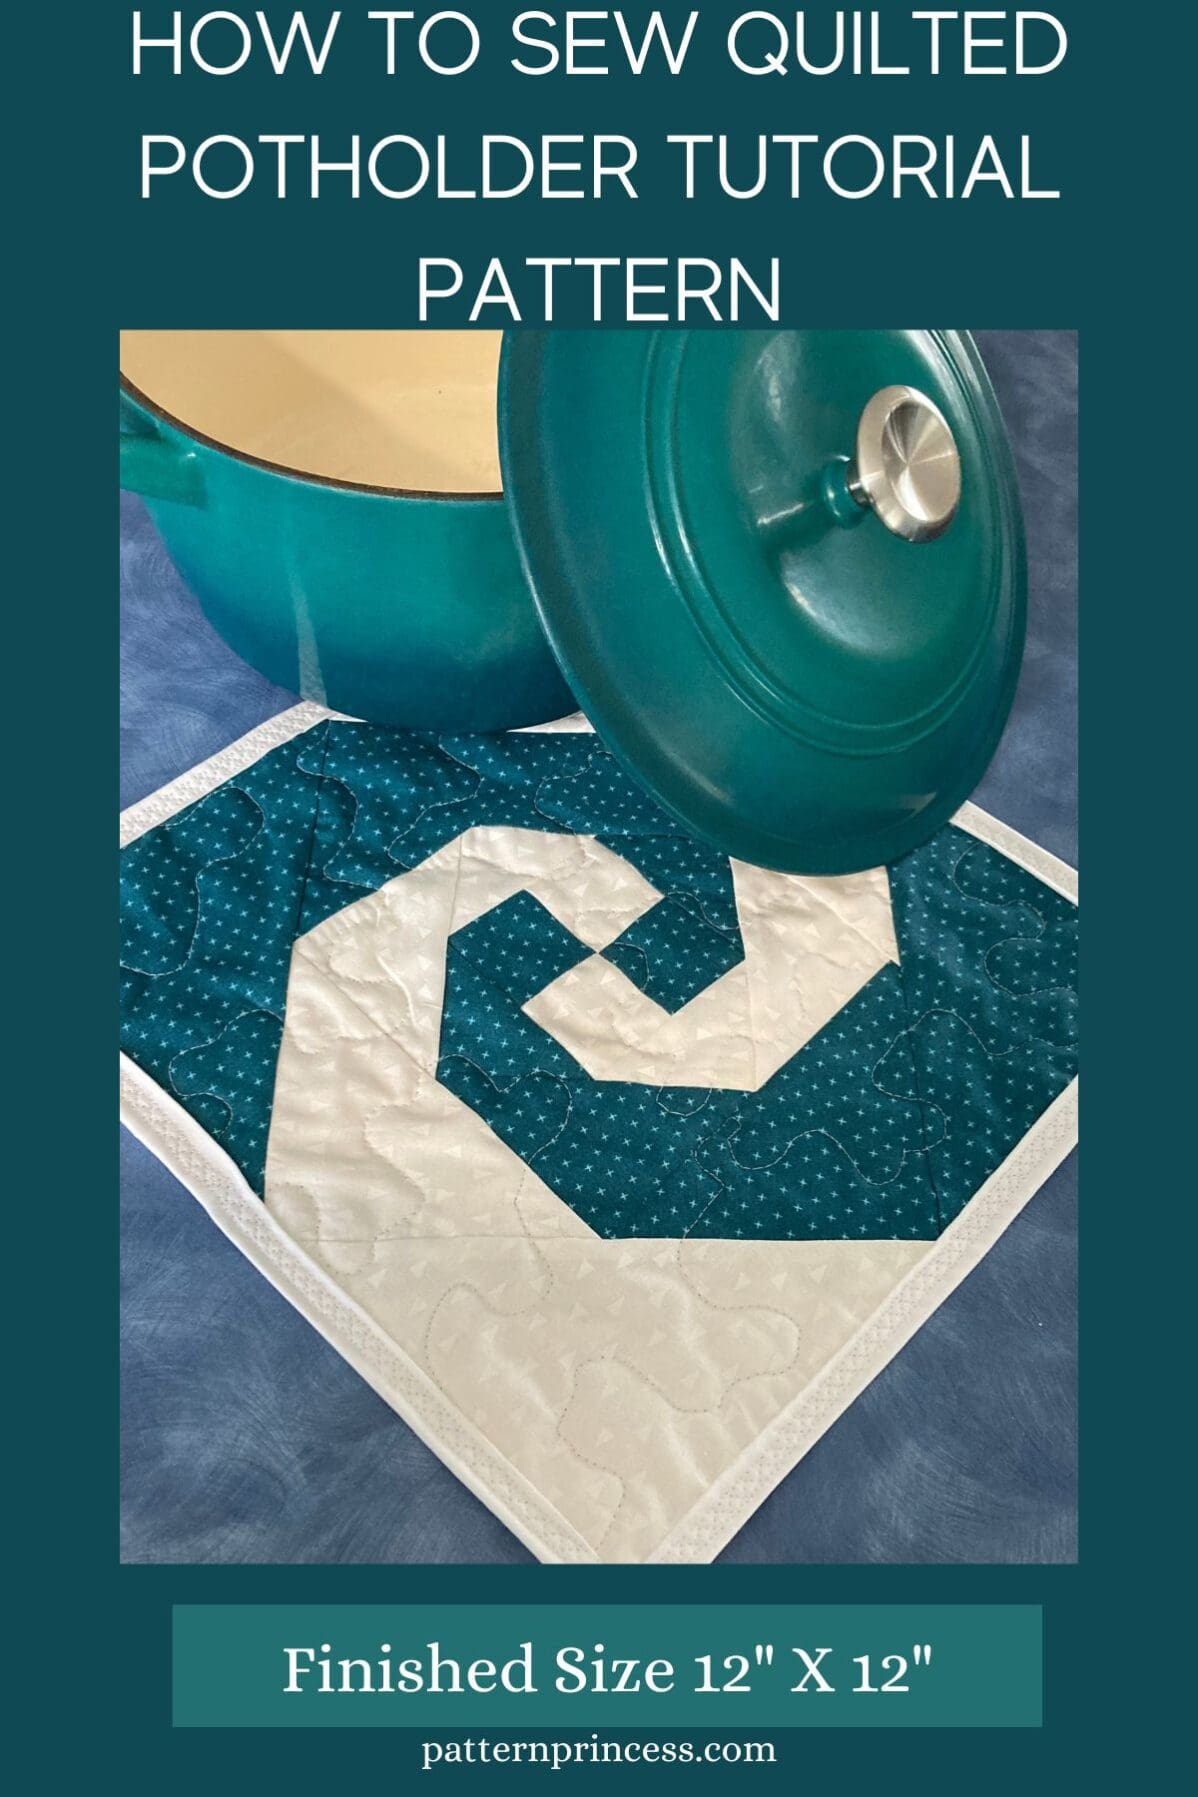
Vintage Hot Pad for Kitchen Counter Sewing Pattern
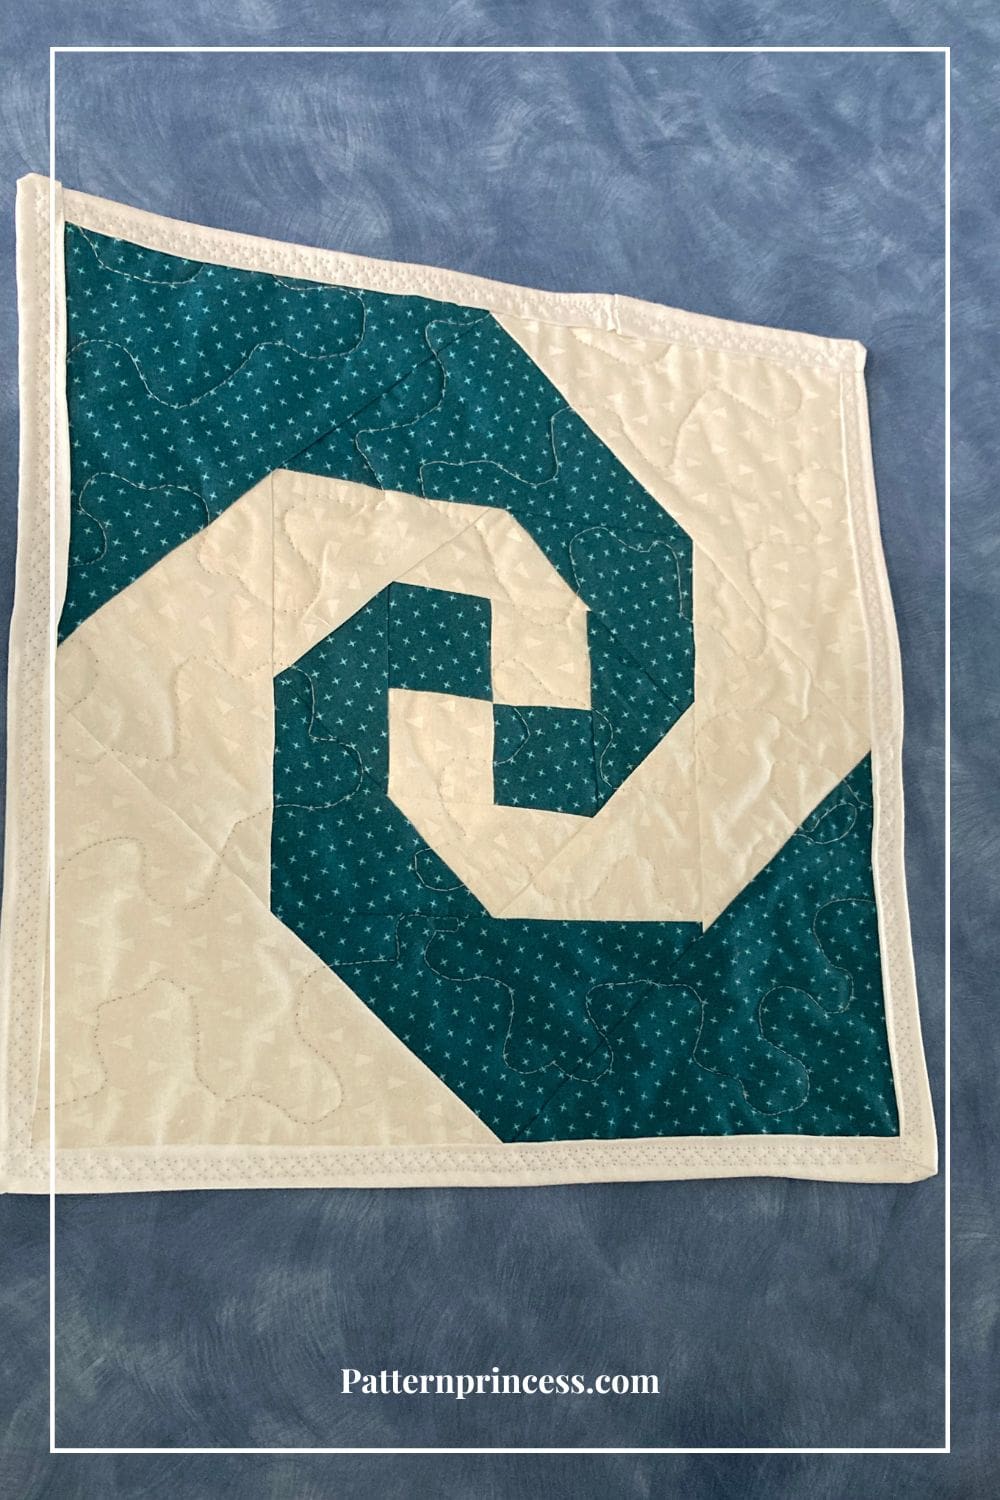
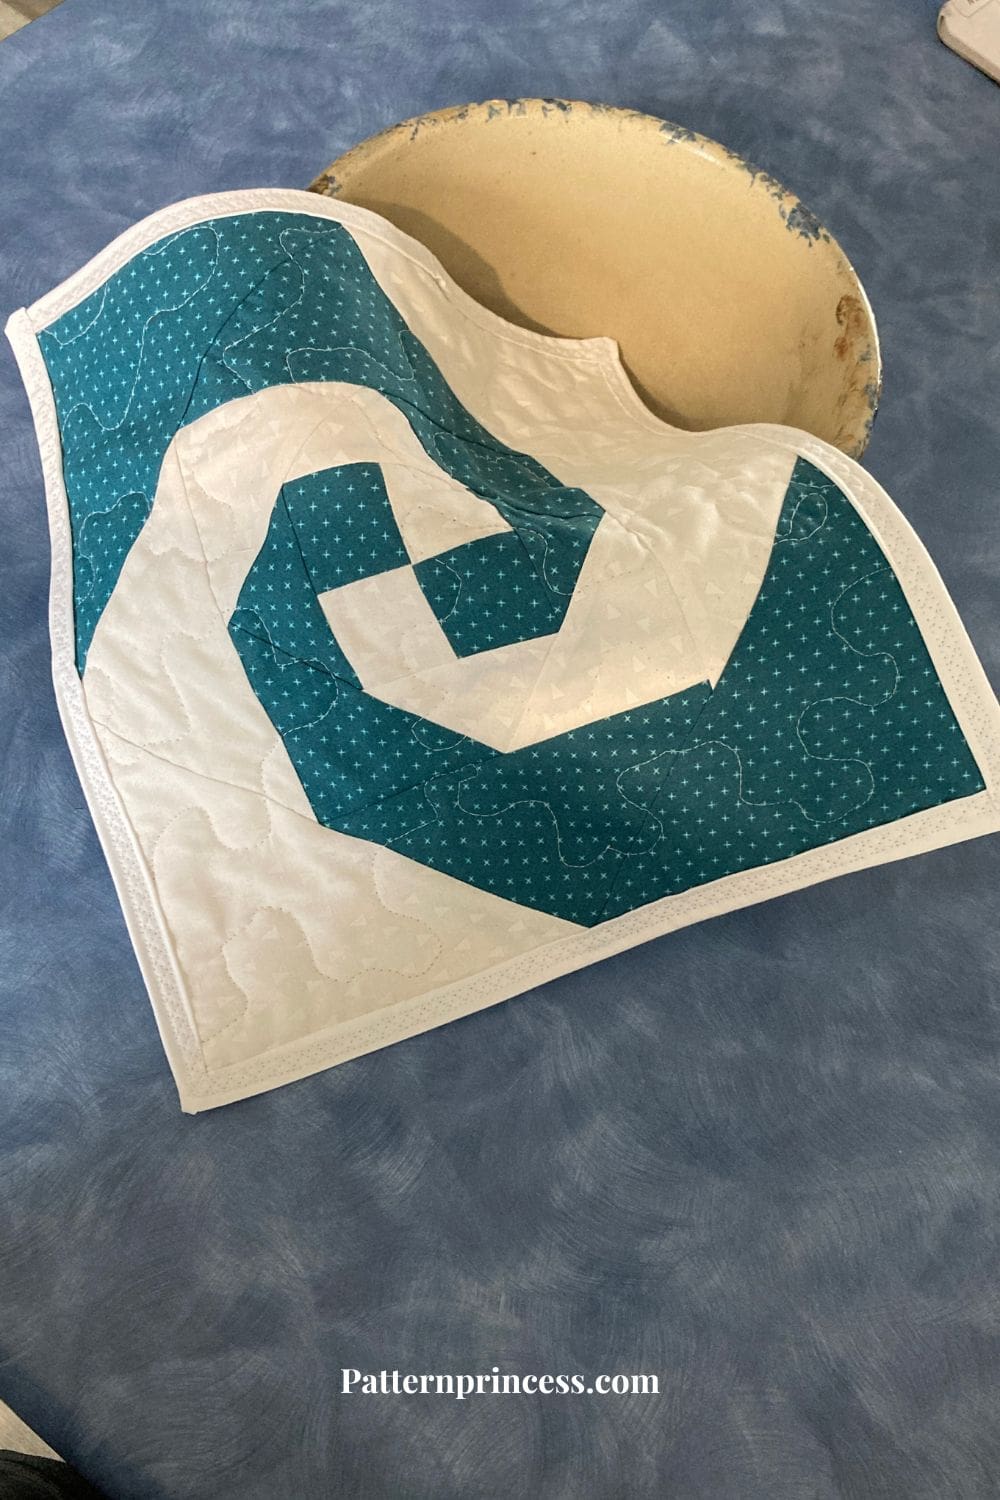
The pattern used for the top of this hot pad is a vintage design. Let me introduce the snail trail quilt block. Today, this is done in a 12 X 12 inch block. However, you can make this in any size you prefer.
There is a step-by-step tutorial for a 9 X 9 inch and 12 X 12 inch Snail Trail Quilt Block Pattern Tutorial.
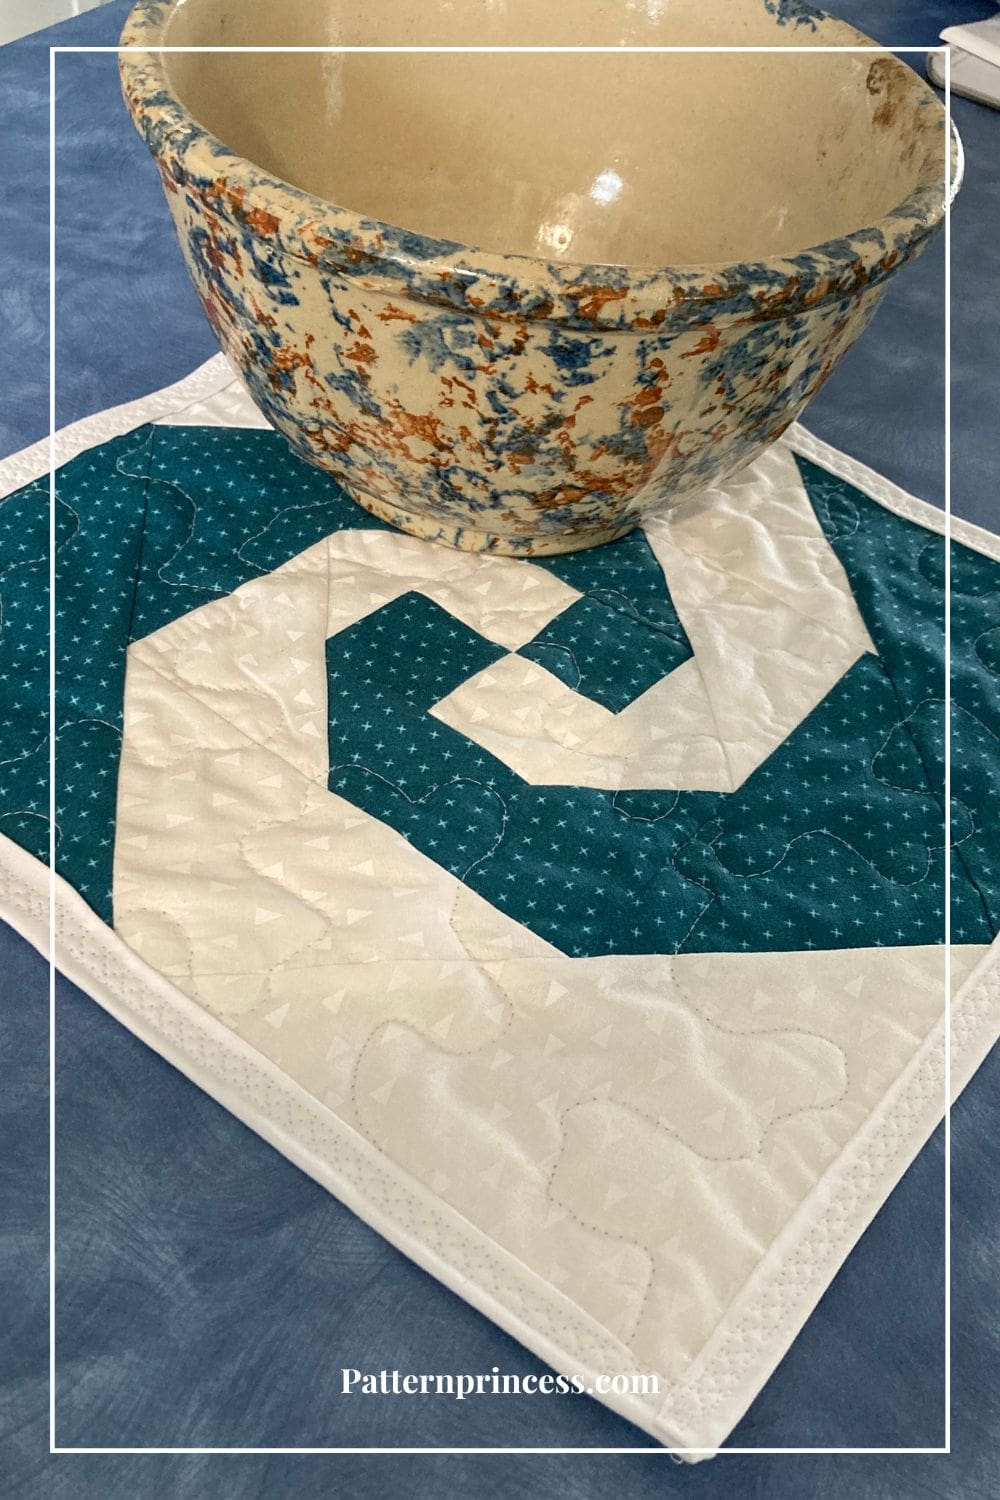
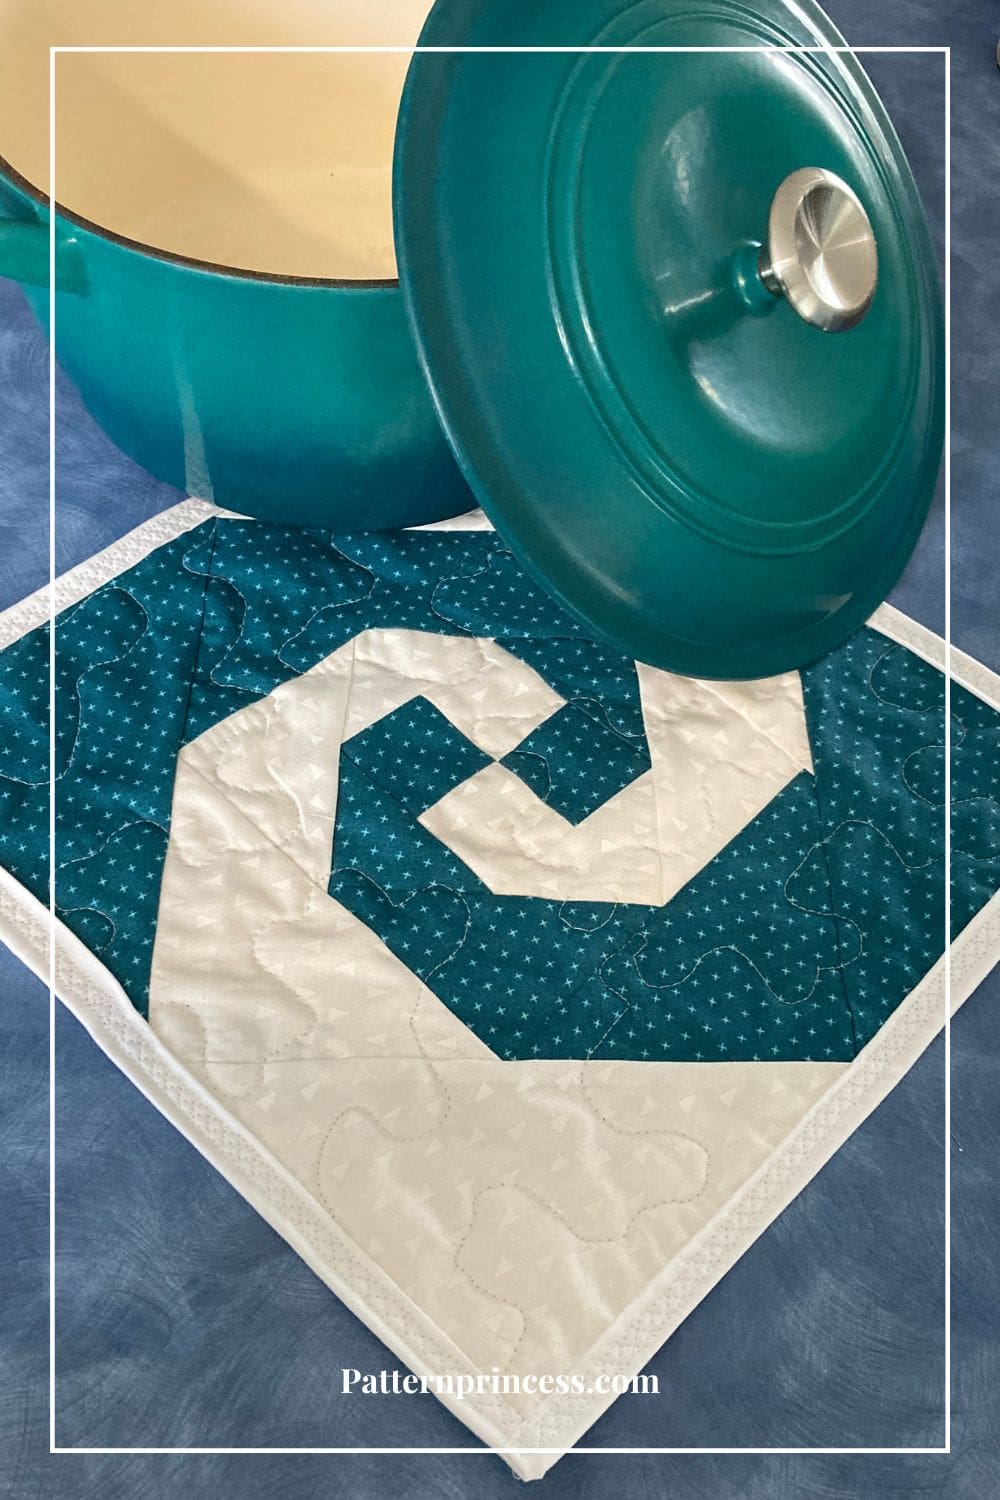
I like the oversize potholder as it fits nicely under my Dutch oven or a cast iron pan. It does a great job of protecting my kitchen counter while adding a touch of vintage charm.
However, by working this pattern in just two colors; white and teal, it really pops with modern color.
Make a few in two, three, or four colors. The beauty of quilted potholders lies not only in their ability to add a personal touch to your kitchen but also in the joy of gifting handmade creations to friends and loved ones. With a bit of time and effort, you’ll soon find yourself with a collection of delightful potholders that are as unique as you are.
It’s an easy project and a great way to use fabric scraps.
What is the best fabric for hot pads?
The best fabric for hot pads is one that is not only heat-resistant but also durable, easy to clean, and safe to use in high-temperature settings. Here are some fabric options that are commonly used for making hot pads:
100% Cotton Fabric:
Natural cotton fabric is a popular choice for hot pads. It is heat-resistant, soft, and generally safe to use in contact with food. Look for thick and tightly woven cotton fabric to provide better insulation and protection against heat.
Quilted Fabric:
Quilting cotton that has been pre-quilted with heat-resistant quilt batting can be an excellent option. The quilting adds both a decorative element and helps improve heat resistance.
Heat-Resistant Fabric:
There are specially designed heat-resistant fabrics available that are made to withstand high temperatures. These fabrics often have a layer of heat-resistant material such as silicone or a metallic coating that enhances their ability to protect against heat.
Canvas or Duck Cloth:
These heavyweight cotton fabrics are sturdy and durable. They can provide good heat protection and are often used for the outer layers of hot pads to add durability.
Linen:
Linen is a natural fiber that has heat-resistant properties. It’s also known for its durability and moisture-wicking abilities, making it a good choice for hot pads.
Insulated Fabric:
Some fabrics are designed with built-in insulation layers that provide added heat resistance. These fabrics often combine layers of heat-resistant materials to enhance their performance.
Double-Layered Fabric:
You can use a combination of two layers of heat-resistant fabric to increase insulation and protection. This approach can provide a good balance between heat resistance and flexibility.
Denim:
Denim is a sturdy and thick fabric that can be a good choice for hot pads, especially when used in combination with other heat-resistant materials.
When choosing fabric for hot pads, make sure to avoid synthetic fabrics that might melt or release harmful fumes when exposed to high temperatures.
It’s also important to consider the overall thickness and feel of the fabric, as you want your hot pads to be comfortable to handle while still providing effective heat protection.
What kind of batting for hot pads?
When it comes to making hot pads or potholders, choosing the right batting helps to ensure heat resistance and protection. The batting serves as the insulating layer that prevents heat from passing through and reaching your hands or surfaces. Here are a few options to consider:
Insul-Bright:
This is a popular choice for hot pads and potholders. It’s a heat-resistant batting that reflects heat back to its source, making it great for protecting against hot pots and pans. Insul-Bright consists of metalized polyester fibers and is often used in combination with other types of batting for added insulation.
Thermal Batting:
There are various types of thermal batting available that are specifically designed to provide heat resistance. These battings usually have a layer of heat-reflective material like Mylar, which helps to keep the heat from penetrating through the fabric layers.
Cotton Batting with a Layer of Insul-Bright:
Some crafters prefer to use a combination of natural cotton batting and a layer of Insul-Bright. This combination offers both the heat resistance of the Insul-Bright and the natural feel of cotton batting. This option can provide a good balance between insulation and comfort.
Quilted Layers:
You can also achieve heat resistance by using multiple layers of regular cotton batting and quilting them together with a dense stitch pattern. The quilting stitches help trap air between the layers, creating an insulating effect.
Double-Layered Fabric:
Instead of using special batting, you can create hot pads by using two layers of thick, heat-resistant fabric. Make sure the fabrics you choose are designed to withstand high temperatures, such as certain types of heavy cotton or linen.
Pre-Made Hot Pad Batting:
Some fabric stores offer pre-cut and pre-packaged batting specifically designed for making hot pads and potholders. These products are convenient and can save you time in the cutting and preparation process.
Thicker batting might provide more insulation but could make the finished hot pad less flexible. Ultimately, the choice depends on your preferences for insulation, flexibility, and the overall look and feel of the finished product.
Directions: How to Sew Quilted Potholder Tutorial Pattern
Quilting Skill Level
Easy – Confident Beginner
Finished Block Measurements
12-inch Snail’s Trail Quilt Block. 12 1/2 -inch unfinished
Materials
1/4 yard each of two fabrics, or two fat quarters. The Snail Trail pattern is a traditional block that adds swirls of movement to your quilt top. Make it in two, three, or four fabrics.
Batting 14” X 14” square
Backing Fabric 14” X 14” square
Binding 2 ½” X 63” strip. Use two pieces of a jelly roll joined together or cut your own strips 2 ½” long and join them together.
Thread
Equipment and Tools
- Rotary Cutter
- Quilting Ruler
- Cutting Mat
- Rotating Cutting Mat
- Iron
- Ironing Board or Pressing Mat
- Pins, or quilt basting spray
- Clips
- Sewing Machine
- Disappearing fabric marker
- My Favorite Quilting Supplies
Quilted Potholder Pattern Notes
For the larger triangles, mark the center of each diagonal and line it up carefully to keep your block square.
Double check the placement of each round of triangles before stitching to keep the trail going in a spiral. Refer to the diagram for directions.
The outside corners of the triangles will extend slightly beyond the outside edges of the Four-Patch unit. Trim after each round.
Use a ¼-inch seam allowance. I recommend using a special presser foot with a ¼-inch guide if you have one for your machine. This will help you get uniform seams, and matching seams.
Right Sides Together. Sew fabric together with right sides together. Unless otherwise noted.
The directions for this quilt are for rotary cutting, machine piecing, machine quilting, and sewing on the binding.
Accurate cutting and sewing enhances your final product. Pin or clip your pieces together before sewing them to ensure proper seam alignment.
The pattern is written for using just two fabric colors. However, you can make this using two, three, or four different colors.
The outside corners of the triangles will extend slightly beyond the outside edges of the Four-Patch unit. Trim after each round.
Fabric Cutting Directions:
Before starting to make the block, cut the following from EACH of your two fabrics:
Fabric pieces for 12 x 12 inch finished size. 12 ½ X 12 ½ inches unfinished size
- 2 white and 2 teal fabric, 2” X 2″ squares
- 1 white and 1 teal, 3” X 3” square
- 1 white and 1 teal, 3 7/8″ X 3 7/8” square
- 1 white and 1 teal, 5 1/8” X 5 1/8” square
- 1 white and 1 teal, 6 7/8 X 6 7/8” square
Begin Quilt Block Pattern
- Refer to the diagram for directions.
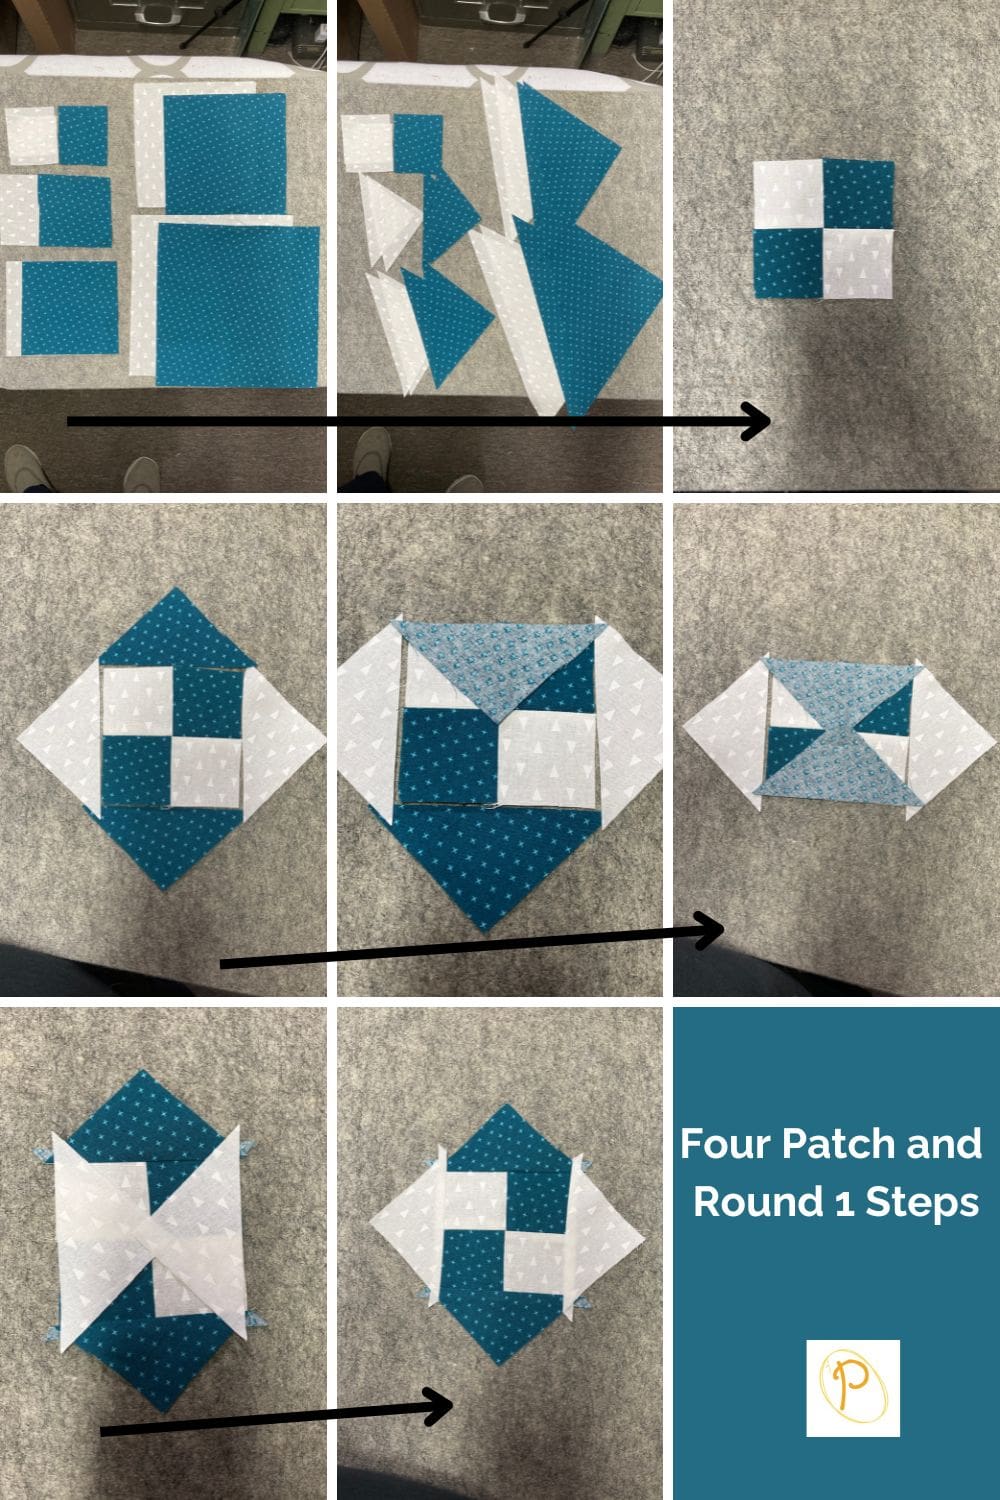
The first step is to Start with the Four Patch Square in the Middle.
Starting with the 2-inch squares, using a ¼” seam allowance. Sew a teal fabric to a white fabric with the right sides together. You now have 2 units. Press the seam allowances toward the teal squares.
Repeat the process for the other teal and white square.
Line up the two units of squares so the colors are opposite to form a four patch block. Sew them right sides together with a 1/4″ seam allowance, nesting the center seams. Press the seam open.
Round 1
Take the 3″ squares and cut them diagonally into two triangles each using a ruler as a straight edge.
Use the diagram for the fabric color placement for the triangles.
Using the teal color. Line up the first triangle with the center, right sides together. You’ll want the cut diagonal edge to be along one side of the four patch on the outer edge. The corner point should be lined up with the center seam of the four patch.
Sew with a 1/4″ seam allowance. Press the seams allowances toward the triangles.
Repeat the steps for the other teal color triangle.
Next, Join the two white color triangles to the two remaining edges of the Four-Patch unit. Press the seam allowances toward the triangles.
Trim up the edges before going to the next round.
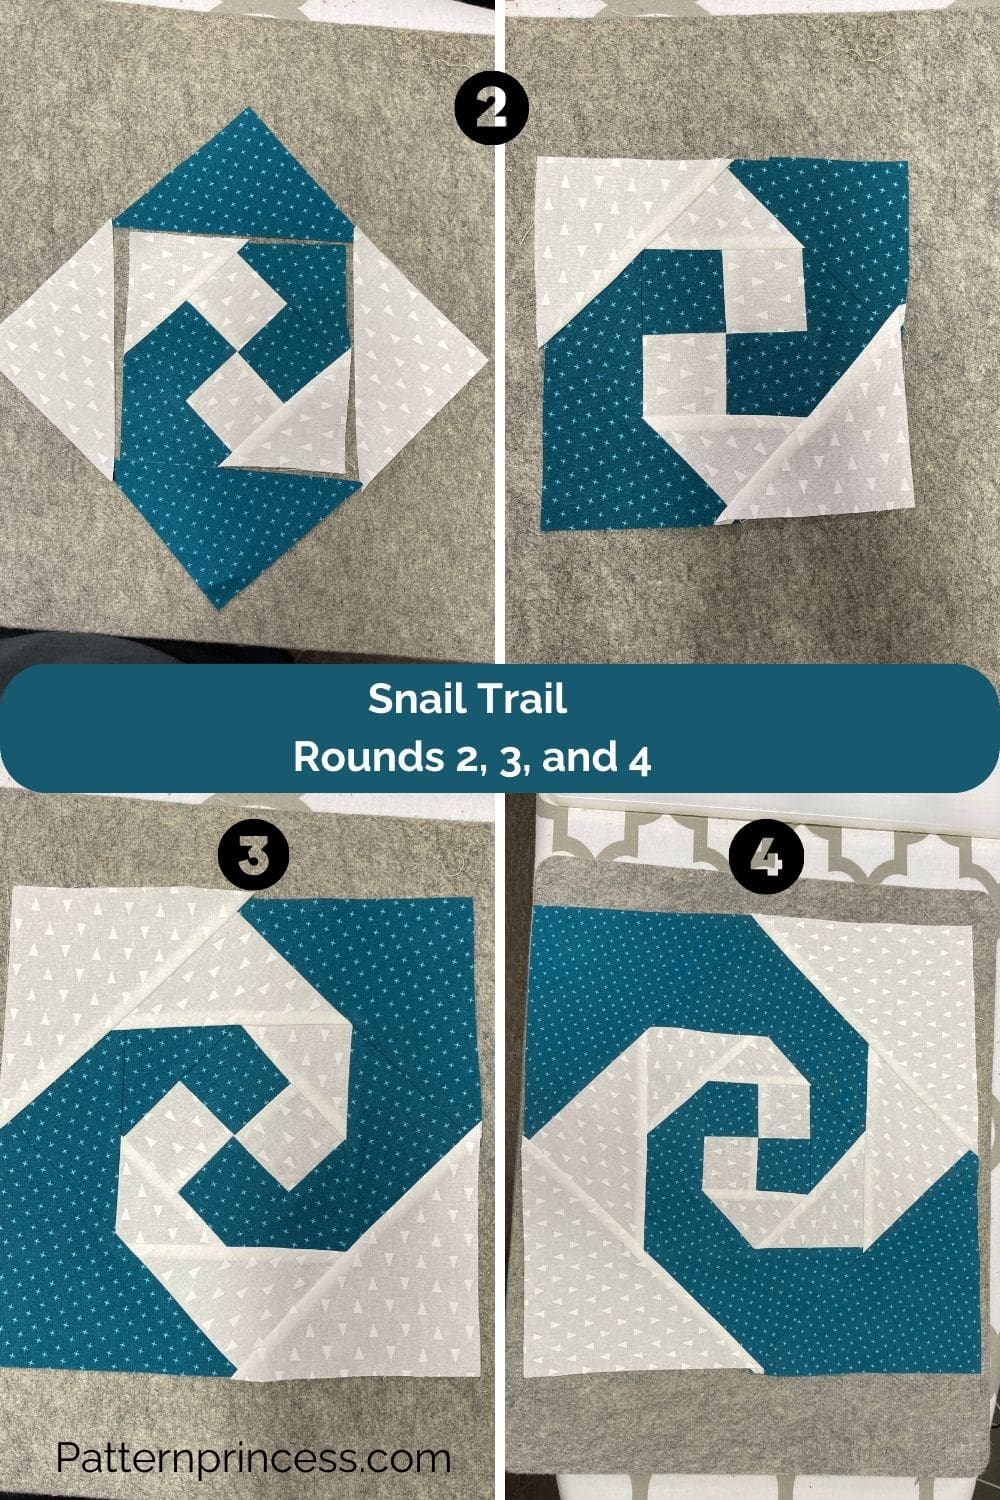
Round 2
Take the 3 7/8″ X 3 7/8” squares cut them diagonally into two triangles each.
Use the diagram for the fabric color placement for the triangles.
Using the teal color. Line up the first triangle with the center, right sides together. You’ll want the cut diagonal edge to be along one side of the four patch on the outer edge. The corner point should be lined up with the center seam of the four patch.
Sew with a 1/4″ seam allowance. Press the seams allowances toward the triangles.
Repeat the steps for the other triangle color triangle.
Next, join the two white color triangles to the two remaining edges of the Four-Patch unit. Press the seam allowances toward the triangles.
Trim up the edges before going to the next round.
Round 3
Take the 5 1/8” X 5 1/8” squares cut them diagonally into two triangles each.
For this and subsequent rounds, mark the center of the diagonal line on the wrong side of each triangle. I like to use a marking pen that disappears with the heat of an iron. A small mark within the seam allowance is enough of a guide. Use the marked line to center the diagonal edge with the previous round of triangles.
Use the diagram for the fabric color placement for the triangles.
Using the teal color. Line up the first triangle with the center, right sides together.
Sew with a 1/4″ seam allowance. Press the seams allowances toward the triangles.
Repeat the steps for the other teal color triangle.
Next, Join the two white color triangles to the two remaining edges of the Four-Patch unit. Press the seam allowances toward the triangles.
Trim up the edges before going to the next round.
Round 4
Take the 6 7/8 X 6 7/8” squares cut them diagonally into two triangles each.
Use the diagram for the fabric color placement for the triangles.
Using the teal color. Line up the first triangle with the center, right sides together.
Sew with a 1/4″ seam allowance. Press the seams allowances toward the triangles.
Repeat the steps for the other teal triangle.
Next, Join the two white triangles to the two remaining edges. Press the seam allowances out toward the triangles.
Trim the edges.
Give the entire block a good press.
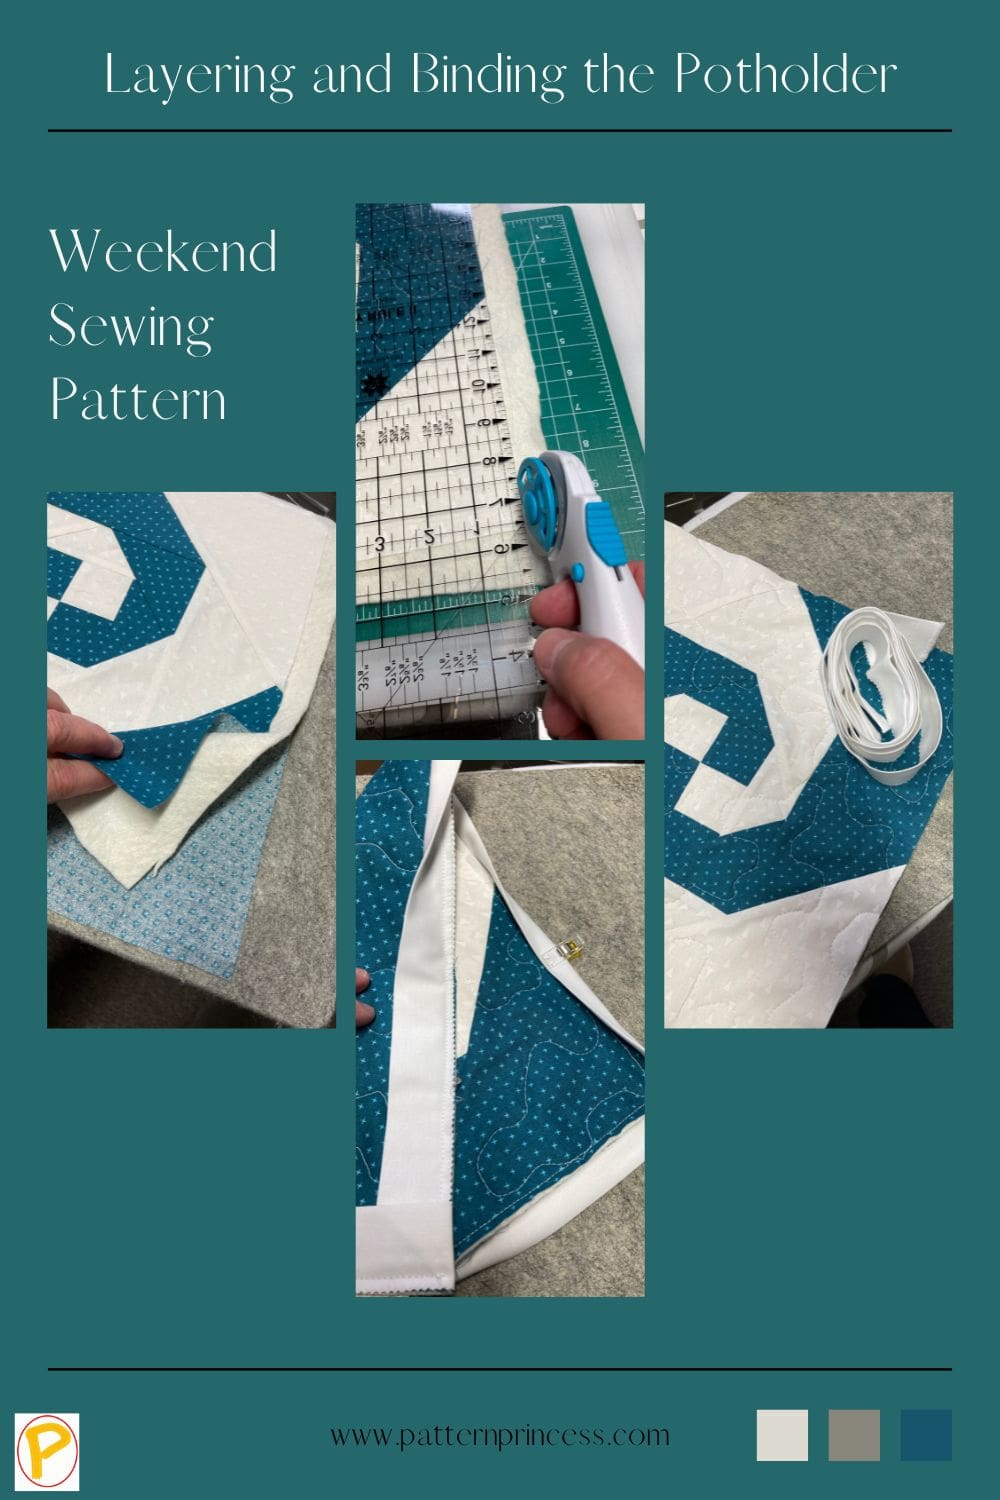
Prepare the Backing, Binding, and Batting
Once the fabric top is complete, the next step is to put the layers together; the top, middle, and bottom.
Backing. Fabric requirement is just a 14” X 14” square of fabric that coordinates with the colors of the Potholder top design.
Binding. You will need 2 ½” X 65” of binding. Plan for approximately 1/8 of a yard. To make your own binding. Cut 2 strips of fabric 2 1/2” X 40”. Another option is to join two jelly roll strips. Trim the ends of each strip at opposite 45-degree angles.
Take the binding strips and sew them together aligning the 45-degree ends. Press the seams open.
Fold the binding strip in half with the wrong sides together and press.
Batting. A 14” X 14” square. Use a thin cotton batting such as warm and natural.
Pin the Layers Together
Now it is time to join the backing fabric on the bottom, the batting in the middle, and the decorative fabric on the top.
On a large surface, place the backing fabric face down. Use masking tape or painter’s tape to tape the backing fabric down. Making sure to smooth out any wrinkles, yet not stretching the fabric.
Next lay the batting over the backing fabric. Again, smooth out any wrinkles.
Finally, place the quilted potholder top fabric with the right side up. Center the top fabric in the middle of the two bottom layers making sure that a few inches extend out beyond the potholder square on all sides.
Once all three layers are in place, make sure to smooth out any wrinkles. Use basting spray or stainless-steel safety pins to baste the quilt layers together. Place one pin every about every 5 inches.
Quilting the Layers Together
Once you choose whatever quilting lines you wish. Set up your sewing machine for quilting by using a darning foot and dropping the feed dogs on the sewing machine. This will allow you to free motion quilt your design.

Sew Binding onto the Potholder
Adding a binding to the edges of the potholder encases the raw edges and keeps them from raveling.
Since I will be using a decorative stitch on the top edge of the binding, I joined the binding to the back of the potholder first. Pin the raw edge of the binding onto the back fabric edge.
I generally start in the middle of the side. Leave approximately a 5” tail hanging. This hanging part will be used to sew to the other end of the binding strip when you have finished sewing all four sides of the Potholder.
Sew the binding onto all four sides of the table runner quilt making sure to miter the corners. Pro tip. To help the fabric glide through the sewing machine, use a walking foot.
Miter the Corners
To miter the corners, stop 1/4 inch from the corner. Use a ruler and pencil to make the location on the binding. Once you reach the 1/4 inch mark, turn your square and just sew a few stitches right off the corner. Trim your thread, not the binding strip though.
Folding the Mitered Corner
Fold the binding strip away from the direction you were just sewing at a 45° angle. Then fold the binding strip back down upon itself and match it to the edge of the square that you just sewed making sure that aligns with the raw edge of the next side that you will be sewing.
Begin stitching at the edge using the same 1/4 inch seam allowance. Repeat this process for the next 3 corners.
Connecting the Binding Ends
Stop stitching approximately 4” from the side where you started. Complete a few backstitches and snip the thread (but not the binding). Remove the quilt from the sewing machine so you can join the two tails of the binding.
To join the tails so there is a continuous strip of binding to finish sewing down on the quilt edge.
Measure the amount of binding that is needed to finish the quilt edge, plus 1/4″. Cut a straight line on each of the binding edges the making sure to correctly measure the amount that is needed yet. With the right sides together, sew the ends together with a 1/4” seam allowance. Now you can continue to sew the binding onto the quilt.
Attaching the Binding to the Front of the Potholder
Fold the binding over the top edge and use clips or pins to hold in place making sure to miter the corners. Use a decorative stitch to sew the top of the folded edge of the binding strip to the edge of the potholder.
These new potholders are fun to make and they are great gifts for anytime of the year.

You can find Victoria crocheting, quilting, and creating recipes. She has cooked in restaurants for over 20 years, including many larger parties. She learned to crochet when she was just 11 years old and has been crocheting ever since; over 50 years now. Over 40 years ago, she loved her first class in sewing and continues to hone her skills in quilting. Many have enjoyed the handmade gifts over the years. In her professional career, she has worked in management in a wide variety of businesses including higher education as a dean of a division. All the while attending college part-time to achieve her doctorate in higher education with an emphasis in e-learning.