Last updated on July 4th, 2024 at 11:31 pm
Among the plethora of quilt designs, the Log Cabin quilt block stands as an enduring symbol of tradition, warmth, and innovation. With its geometric precision and captivating arrangement of fabric, this pattern weaves together a tapestry of history and artistry, making it a beloved choice for quilters of all skill levels.
Timeless and Cherished Quilt Block
Whether you’re a seasoned quilter or a passionate newcomer to the world of quilting, this tutorial will guide you through the steps of crafting a flawless Log Cabin block that exudes both elegance and sentiment.
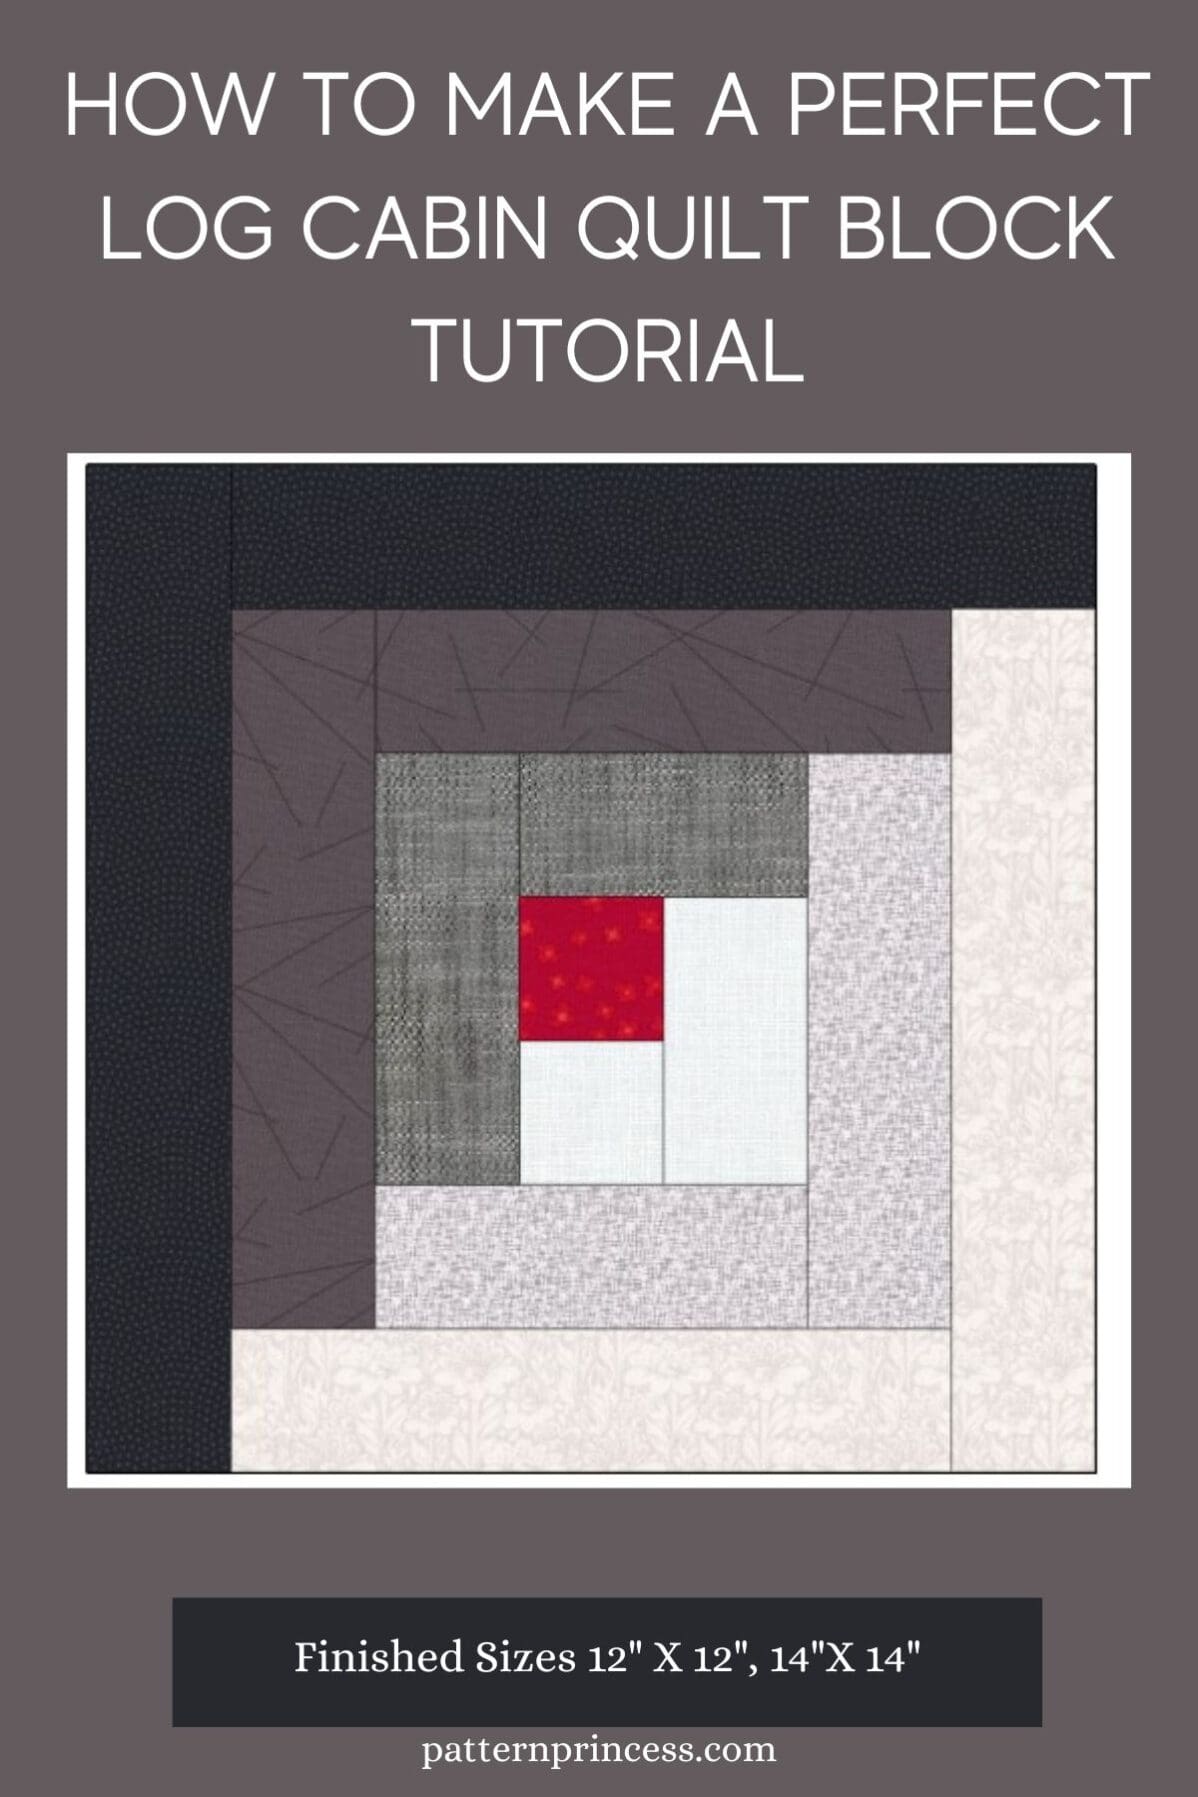
It is square blocks that use a simple construction. Using a light strip and dark strip in different sizes worked around a center square. This center square symbolizes the hearth of the home.
Post contains affiliate links, and we earn commissions if you shop through the links on this page. For more information, please read the disclosure section under the About Us page.
Traditional Log Cabin Quilt Block
In this tutorial, we’ll delve into the heart of the Log Cabin design, exploring its origins, significance, and the creative flexibility it offers.
We’ll give you ideas on contrasting lighter fabrics and dark fabrics. Laying out the pattern for unique looks in your sewing projects. We have provided a few photos to help you visualize these ideas.
There are photo step-by-step tutorials to help with your success in making this beautiful traditional log cabin block.
Finally, we’ll provide you with ideas on sewing projects to use this lovely time tested square in.
How wide are the strips for a log cabin quilt?
This pattern is perfect for jelly rolls as it uses 2 1/2 inch strips to make big blocks that finish at 10, 12, or 14 inches. It’s also a great way to use up fabric scraps. If you can find fabric scraps that can be trimmed to 2 ½” by 2 ½” up to 14 1/2 “, you can make classic log cabin blocks using patchwork strips.
What size pattern for log cabin quilt?
The size of a Log Cabin quilt block pattern can vary depending on your preferences and the overall size you want your finished quilt to be. However, a common starting point is to create a 12-inch finished block, which means that the block itself will measure 12 inches on each side after it’s sewn into the quilt. This size is versatile and widely used in quilting because it allows you to easily combine blocks to create a balanced and visually appealing quilt layout.
Here’s a breakdown of the typical sizes of strips used in a 12-inch finished Log Cabin block:
Center Square: 2.5 inches
Rounds (strips added around the center square):
First round: 2.5 inches
Subsequent rounds: Each strip added to the previous round is also 2.5 inches wide.
By following this strip width progression, you’ll create a Log Cabin block that grows outward in concentric rounds, giving you the classic design with a gradient effect.
You can always adjust the strip widths to create larger or smaller blocks. Just make sure to maintain the proportions between the strips for a balanced appearance.
If you’re aiming for a different finished block size, you can adjust the strip widths accordingly. For instance, if you want a 6-inch finished block, you could start with a 1.25-inch center square and continue with 1.25-inch-wide strips for each round.
Ultimately, the size of your Log Cabin quilt block depends on your personal preferences and the design you have in mind for your quilt.
What is the tradition of the log cabin quilt?
The Log Cabin quilt pattern holds a rich tradition and history within the quilting world. It is often considered one of the most iconic and enduring designs, symbolizing warmth, comfort, and the interconnectedness of generations.
The tradition carries both practical and symbolic significance, making it a beloved choice for quilters across cultures and time periods.
Historical Roots
The origins can be traced back to the 19th century in North America, particularly in the United States. The pattern’s name and design are inspired by the log cabins that early American settlers constructed as they established their homes on the frontier.
The design was a way for quilters to pay homage to the log cabins that represented shelter, resilience, and the pioneering spirit.
Symbolism
A Log Cabin quilt holds a profound symbolism that goes beyond its visual appeal.
The arrangement of light and dark fabric strips represents the contrast between the sunny and shaded sides of a log cabin.
Additionally, the center square, often referred to as the “hearth,” symbolizes the heart of the home. As strips are added in concentric rounds, the pattern signifies the growth of the cabin over time as the family or community prospered.
Quilting Community
Quilting has long been a communal activity, with friends, families, and neighbors coming together to create quilts for practical use, as well as for special occasions like weddings and births.
Simplicity makes it an accessible choice for quilters of varying skill levels, and the repetitive piecing process allowed for conversation and bonding during quilting bees.
Variations and Adaptations
Throughout the years, the Log Cabin quilt pattern has evolved and taken on various adaptations.
Quilters have experimented with color placement, strip width, and arrange in different ways to create a wide range of visual effects. The versatility of the pattern has led to interpretations that range from traditional and rustic to modern and vibrant.
Legacy and Continuation
The tradition of creating this quilt has persisted over generations, with quilters passing down their knowledge and techniques to ensure the pattern’s survival.
This pattern’s popularity has transcended over time, and even today, quilters pay homage to the historical and symbolic aspects of the Log Cabin design while infusing it with contemporary creativity.
In essence, the tradition of this quilt block speaks to the enduring power of storytelling through fabric and thread.
It encapsulates the spirit of resourcefulness, community, and the interconnectedness of the past and present, making it a cherished emblem in the tapestry of quilting history.
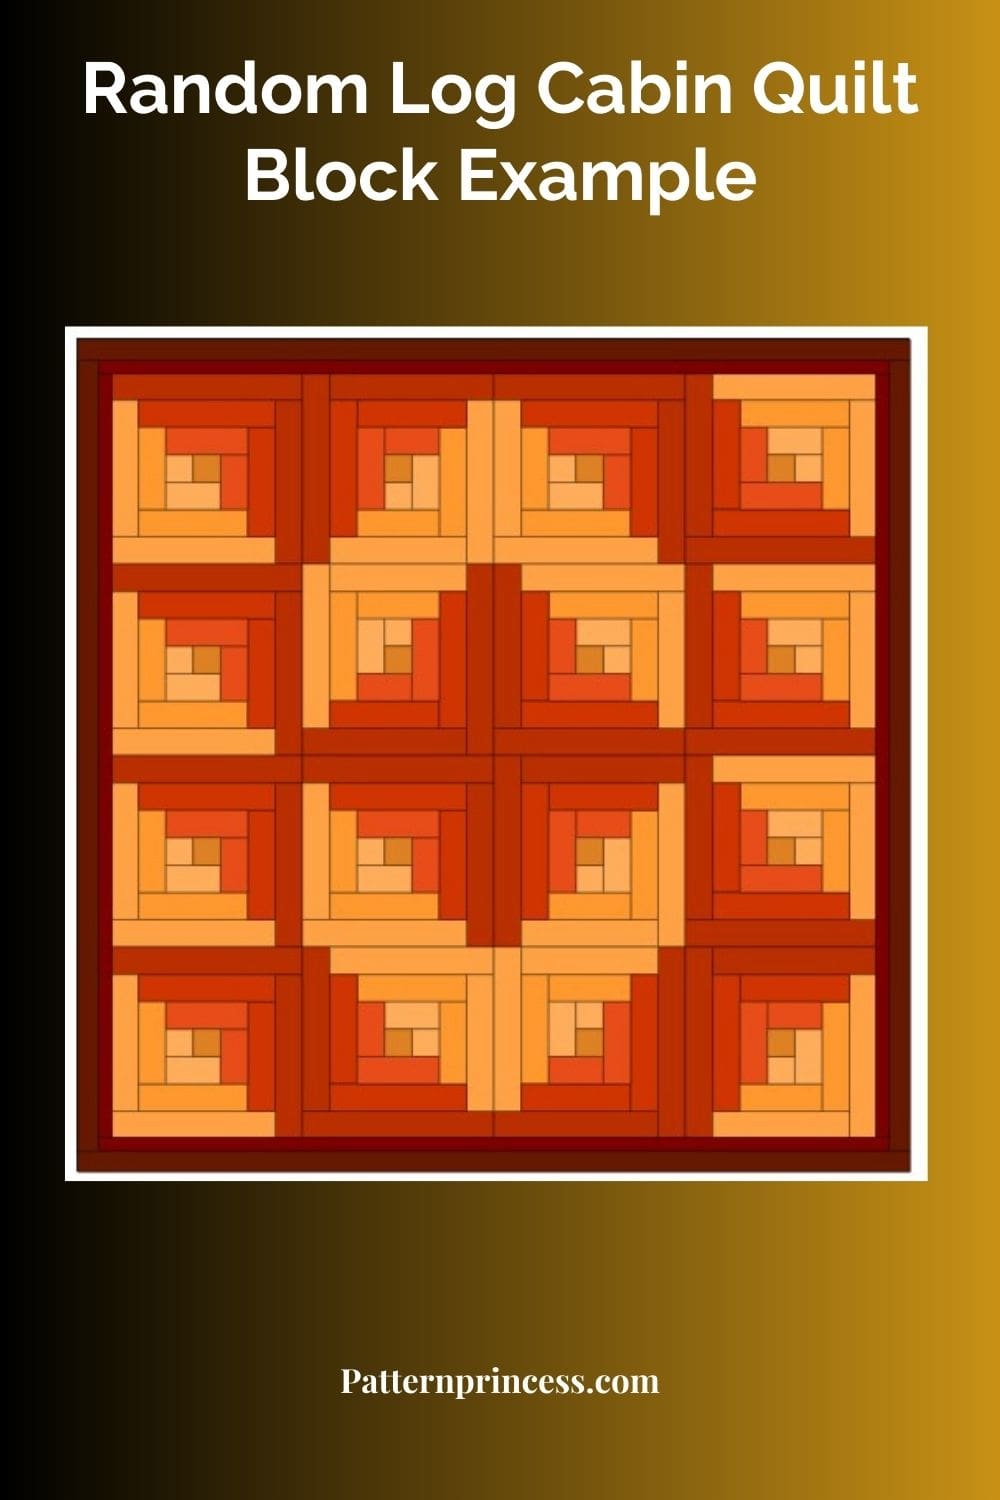
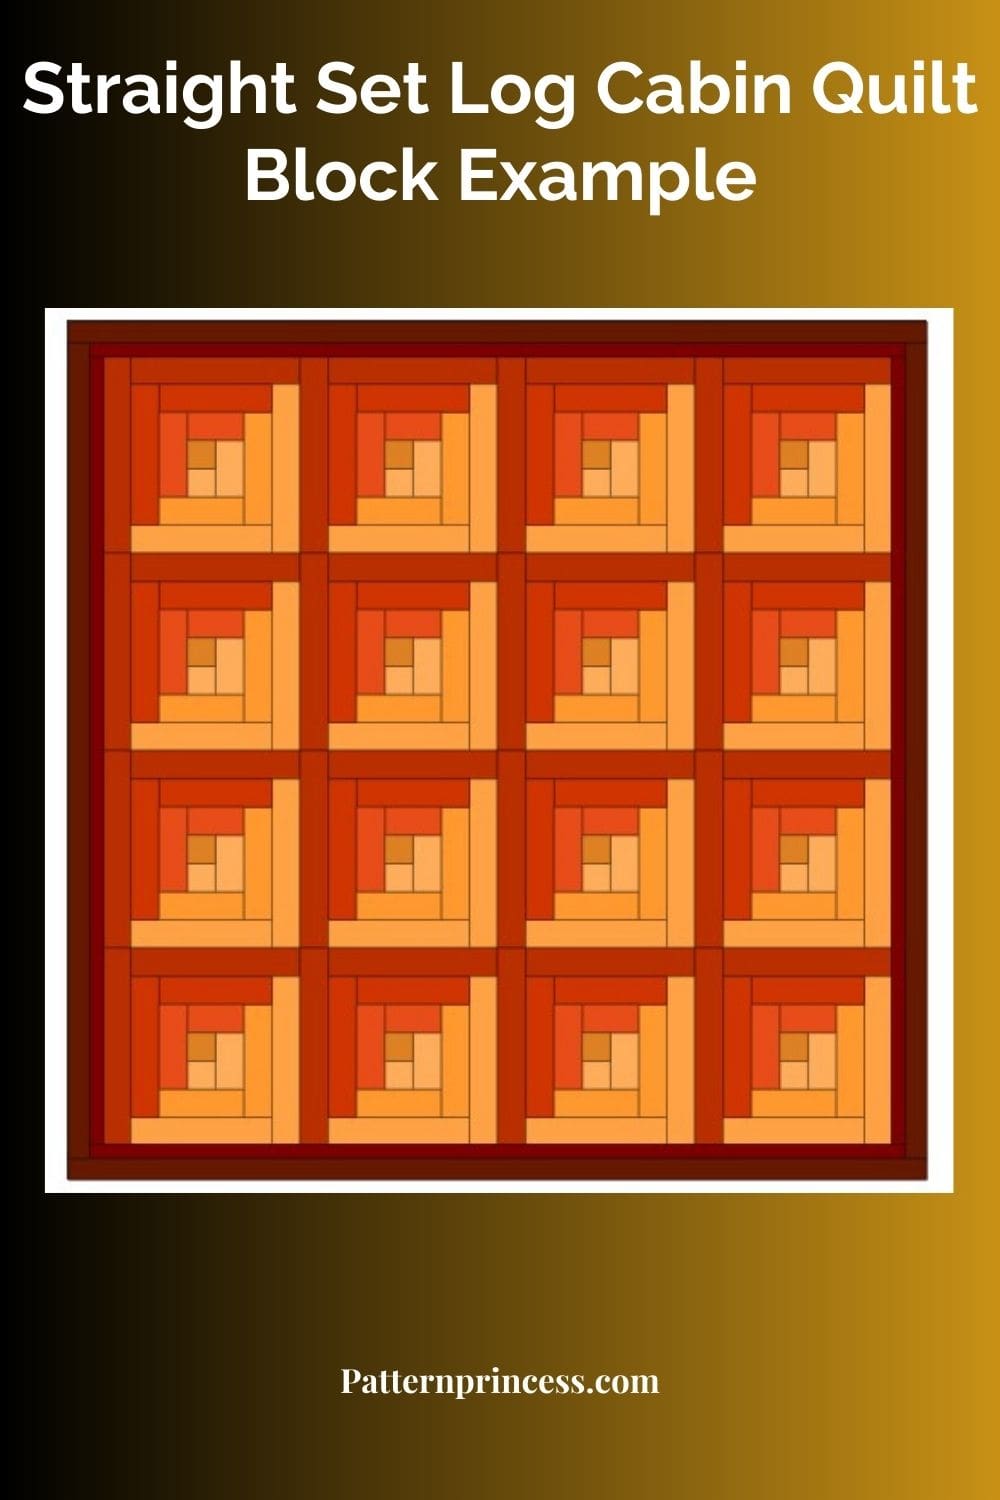
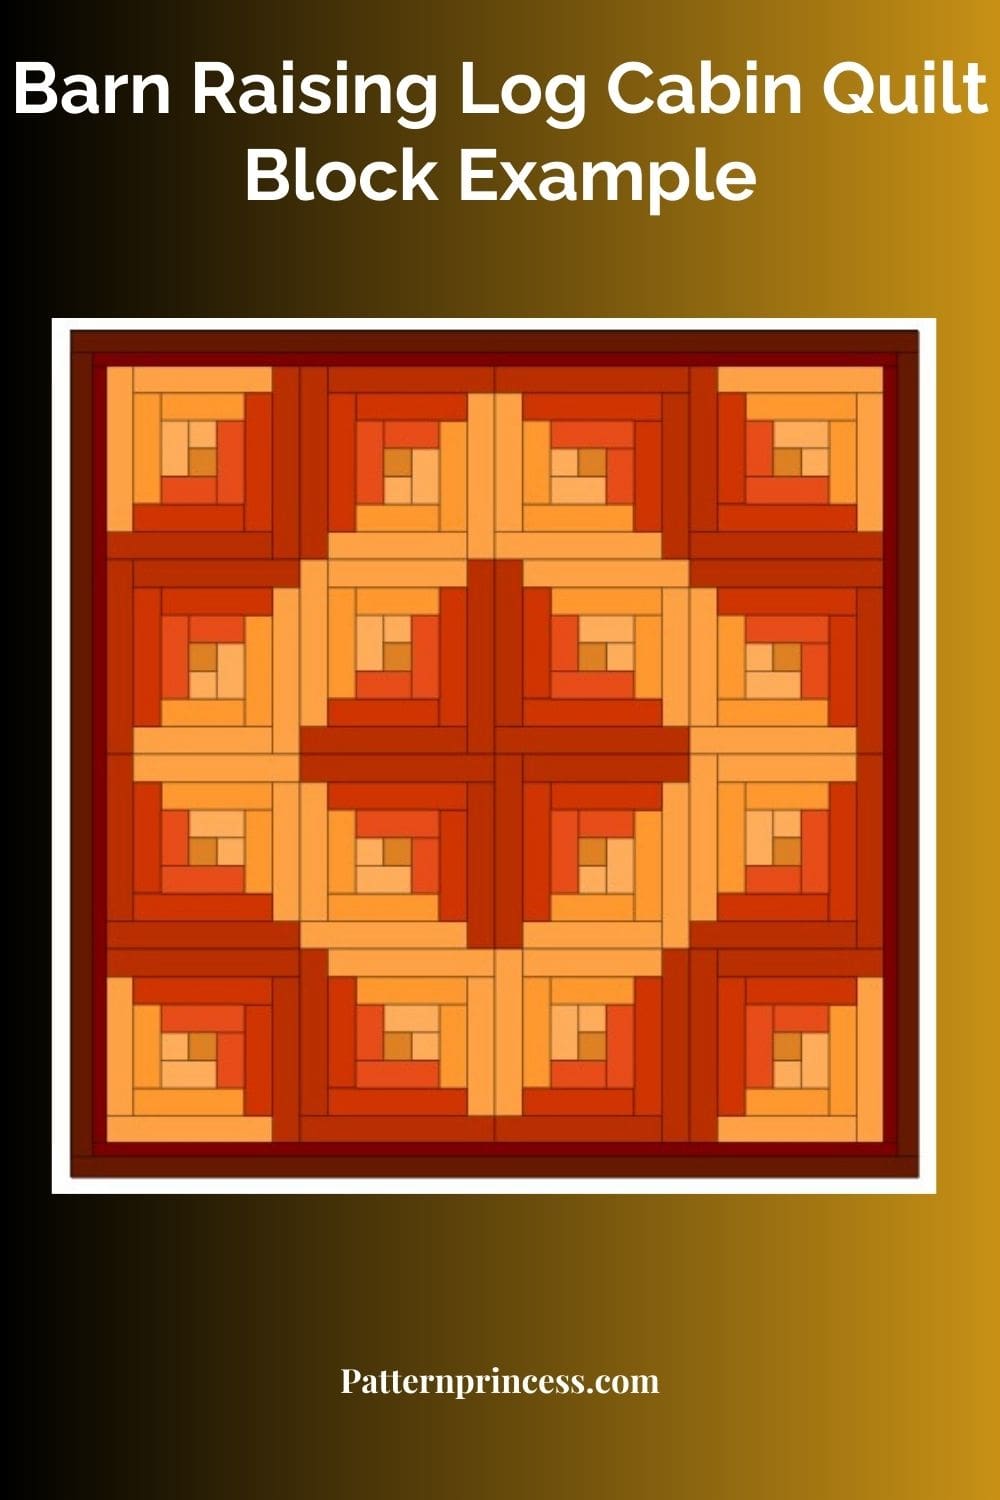
How do you arrange log cabin quilt blocks?
Arranging Log Cabin quilt blocks can be a creative and exciting process that allows you to play with colors, patterns, and layout designs to achieve the look you desire for your quilt.
There are several arrangement options to consider, each offering a unique visual impact. Here are some popular ways to arrange them.
Straight Line Set
This is the most common arrangement, where Log Cabin blocks are placed side by side in a grid pattern. The blocks all face the same direction, creating a sense of continuity. You can choose to alternate between light and dark-centered blocks or create a gradient effect by arranging blocks with changing color sequences.
Barn Raising
In this arrangement, Log Cabin blocks are grouped in diagonal rows that intersect at a central point, resembling the way barn-raising was done in historical log cabin construction. This layout can give a dynamic and striking appearance to your quilt.
Medallion
A Medallion layout places a larger, often differently designed, block at the center of the quilt, surrounded by Log Cabin blocks or other coordinating blocks. This arrangement creates a focal point and adds complexity to the overall design.
On-Point
Instead of placing blocks in a straight horizontal and vertical grid, On-Point arranges blocks diagonally, with the corners of each block pointing toward the quilt’s center. This layout adds movement and energy to the quilt and allows for creative use of borders.
Sashing and Borders
Incorporating sashing (strips of fabric between blocks) and borders can enhance the visual impact of your Log Cabin quilt. Sashing can help separate blocks and provide a structured look, while borders can frame the entire quilt and tie the design together.
Random or Controlled Chaos
For a playful and modern twist, you can arrange Log Cabin blocks in a seemingly random order. This controlled chaos can result in an eclectic and vibrant quilt.
When arranging your Log Cabin quilt blocks, consider using design software, quilt design apps, or even physical sketches to visualize the different layouts. Experiment with color placement, block rotation, and layout variations to find the arrangement that resonates with your creative vision.
Today the block remains a favorite among quilters. Perhaps because it can be constructed in an almost endless number of ways.
There’s no right or wrong way to arrange your blocks; it’s all about expressing your unique style and creating a quilt that speaks to you.
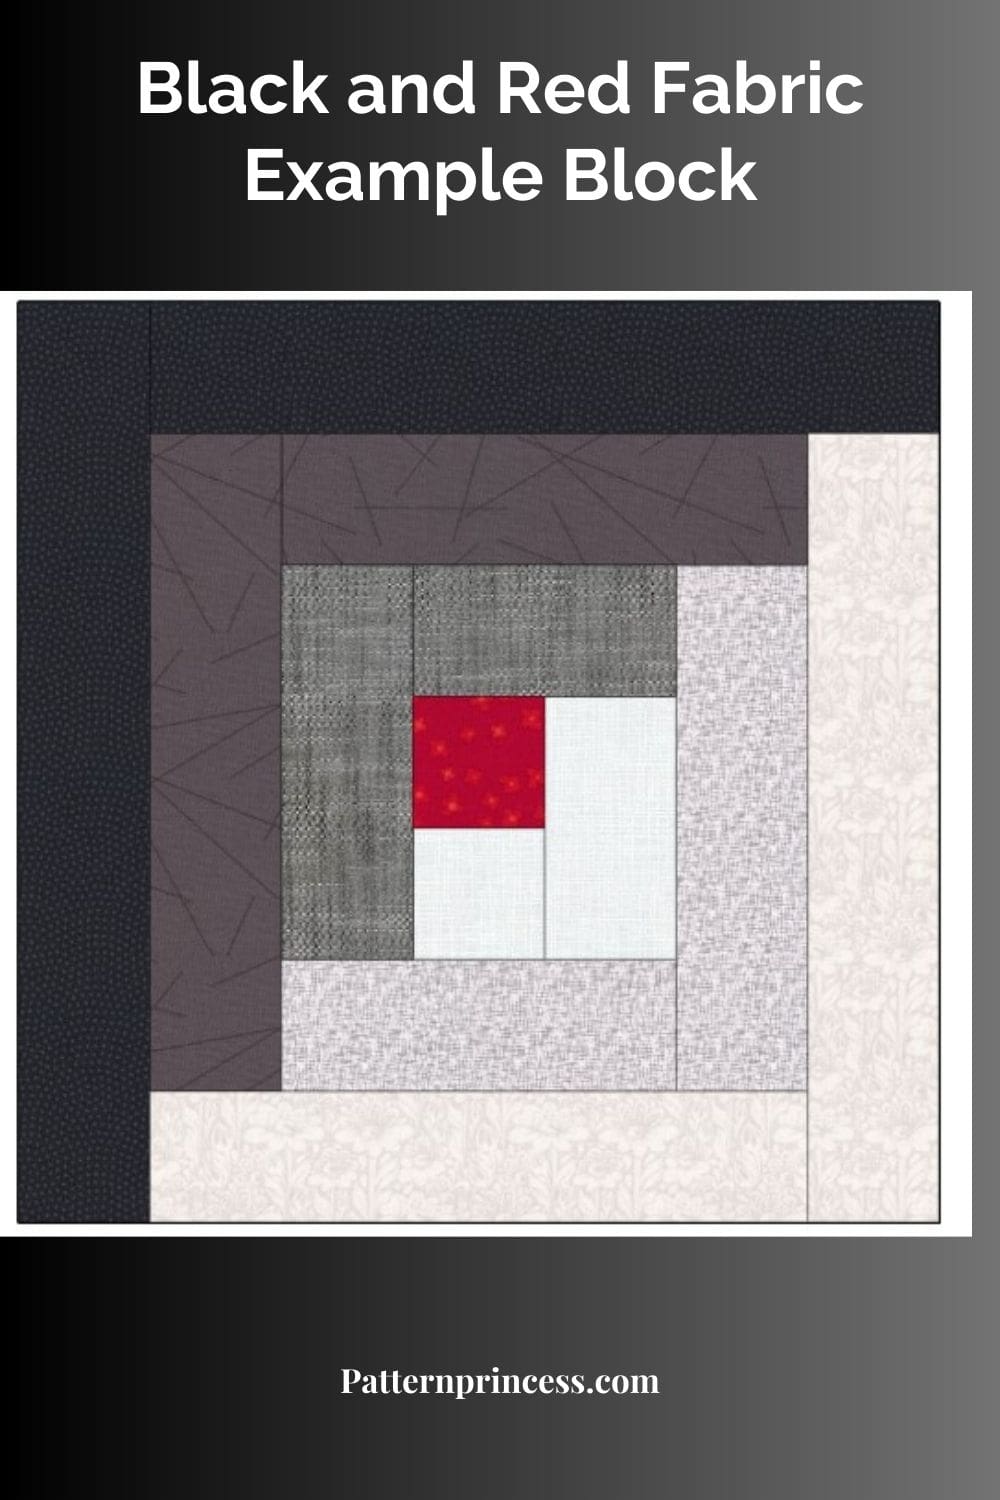
What Color Combinations Work Well for the Log Cabin Quilt Block?
This is a great pattern to dig into your fabric stash and pull out colors that appeal to you.
Color combinations are limited only by your imagination, but some color schemes are particularly appealing and have stood the test of time. Here are a few classic and modern color combinations that work well.
Traditional Red and White
A classic choice, red and white Log Cabin blocks evoke a sense of vintage charm and Americana. The deep reds combined with crisp whites create a strong contrast that highlights the block’s design.
Earthy Tones
Using warm earthy tones like browns, tans, greens, and rusts can give your Log Cabin quilt a cozy and rustic feel, reminiscent of log cabins in natural settings.
Cool Blues and Whites
Combining various shades of blue with white can create a serene and calming effect, ideal for a quilt that exudes tranquility.
Sunset Hues
Think of warm yellows, oranges, and reds inspired by a sunset. This combination can create a dynamic and visually striking quilt that captures the beauty of the changing sky.
High-Contrast Black and White
Opting for a high-contrast color scheme with black and white can result in a modern and graphic look, emphasizing the block’s structure.
Rainbow Spectrum
If you’re looking for a vibrant and playful quilt, consider using a rainbow spectrum of colors. Each round of the block can feature a different color, creating a lively and energetic design.
Monochromatic Gradient
Choose a single color and use shades and tints of that color to create a gradient effect as you move from the center to the outer rounds of the block. This can add depth and dimension to your quilt.
Modern Neutrals
Using neutral colors like grays, blacks, whites, and creams can result in a sophisticated and contemporary quilt design.
Pastel Palette
Soft pastel colors, such as pinks, blues, and lavenders, can create a delicate and charming quilt, perfect for nurseries or springtime projects.
Contrasting Complementary Colors
Experiment with complementary color pairs like blue and orange, red and green, or yellow and purple. These combinations can create a visually striking and balanced quilt.
The choice of color combinations depends on your personal preferences, the intended mood of the quilt, and the overall aesthetic you want to achieve. You can also mix and match different color schemes to create a unique and eclectic quilt that reflects your creative style.
Jelly Roll Pack Friendly Pattern
Perfect use of jelly roll packs. They are already cut into 2 1/2 inch strips. It makes this sewing project quick as you really could sew each strip as indicated by the diagram. Then trim any extra length off.
However, we have the length for each strip indicated. This helps especially when you want to prep ahead of time and quickly sew this block together.

How to Make a Perfect Log Cabin Quilt Block
Skill Level
Easy pattern. This one is great for a beginner quilter as there are no points to line up. Just start by sewing two squares together and start adding strips to the sides.
Quilt Block Name
Log Cabin Quilt Block
Finished Block Size
14 inches, 14 ½ inches unfinished.
The size can be adjusted by adding less rounds of the strips.
Equipment and Tools
- Rotary Cutter
- Quilting Ruler
- Cutting Mat
- Rotating Cutting Mat
- Iron
- Ironing Board or Pressing Mat
- Pins
- Clips
- Sewing Machine
- Disappearing fabric marker
- My Favorite Quilting Supplies
**Download This Chart and the Free Pattern Details. Link after the written pattern.**
Pattern Notes
All seams are 1/4 inch unless otherwise noted.
Add the strips working counter-clockwise.
For the sake of this tutorial, I’m showing you exact measurements, but I recommend adding a little extra length to your strips when cutting them. Once attached, trim away the excess after adding each strip to the block.
A time saving technique is to use the add-and-trim method. This is a quick way to attach longer strips. Instead of trimming the fabric strips into exact sizes, or nearly exact. You simply add a new strip to the block and trim away the excess after sewing the strip on.
General Fabric Requirements for Each Quilt Block
In addition to your usual quilting supplies here are the fabric requirements.
Make Log Cabin Blocks
Step 1
Start by cutting the fabric into 2 1/2 inch strips to make the log cabin blocks.
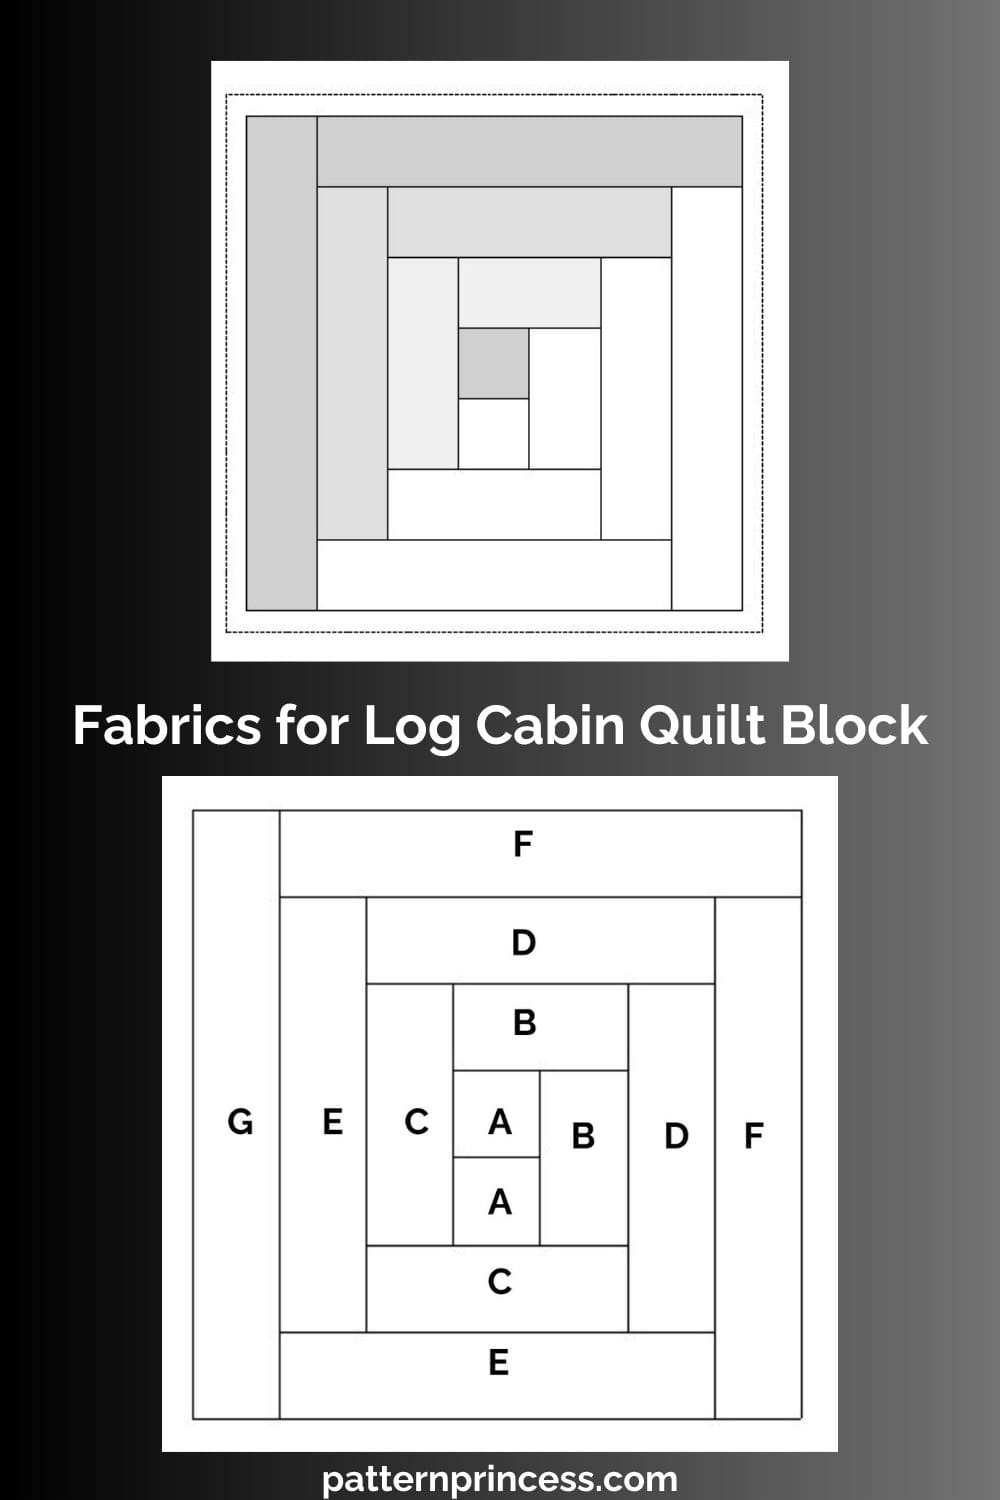
Exact Measurements for a 14-inch finished block.
Fabric A: 2 ½ X 2 ½ inches. Two of these, one in a light color and one in a dark color. (Center square and piece 1).
Fabric B: 4 ½ X 2 ½ inches. Two of these, one in a light color and one in a dark color. (Pieces 2 and 3).
Fabric C: 6 ½ X 2 ½ inches. Two of these, one in a light color and one in a dark color. (Pieces 4 and 5).
Fabric D: 8 ½ X 2 ½ inches. Two of these, one in a light color and one in a dark color. (Pieces 6 and 7).
Fabric E: 10 ½ X 2 ½ inches. Two of these, one in a light color and one in a dark color. (Pieces 8 and 9).
Fabric F: 12 ½ X 2 ½ inches. Two of these, one in a light color and one in a dark color. (Pieces 10 and 11).
Fabric G: 14 ½ X 2 ½ inches. One strip in dark color (Piece 12).
Exact Measurements for a 12″ block.
2 ½” Square. Quantity 2, Center Square and Piece 1
2 ½” X 4 ½” Strip. Quantity 2, 1 light and 1 dark fabric. Pieces 2 and 3
2 ½” X 6 ½” Strip. Quantity 2, 1 light and 1 dark fabric. Pieces 4 and 5
2 ½” X 8 ½” Strip. Quantity 2, 1 light and 1 dark fabric. Pieces 6 and 7
2 ½” X 10 ½” Strip. Quantity 2, 1 light and 1 dark fabric. Pieces 8 and 9
2 ½” X 12 ½” Strip. Quantity 1, 1 light fabric. Piece 10
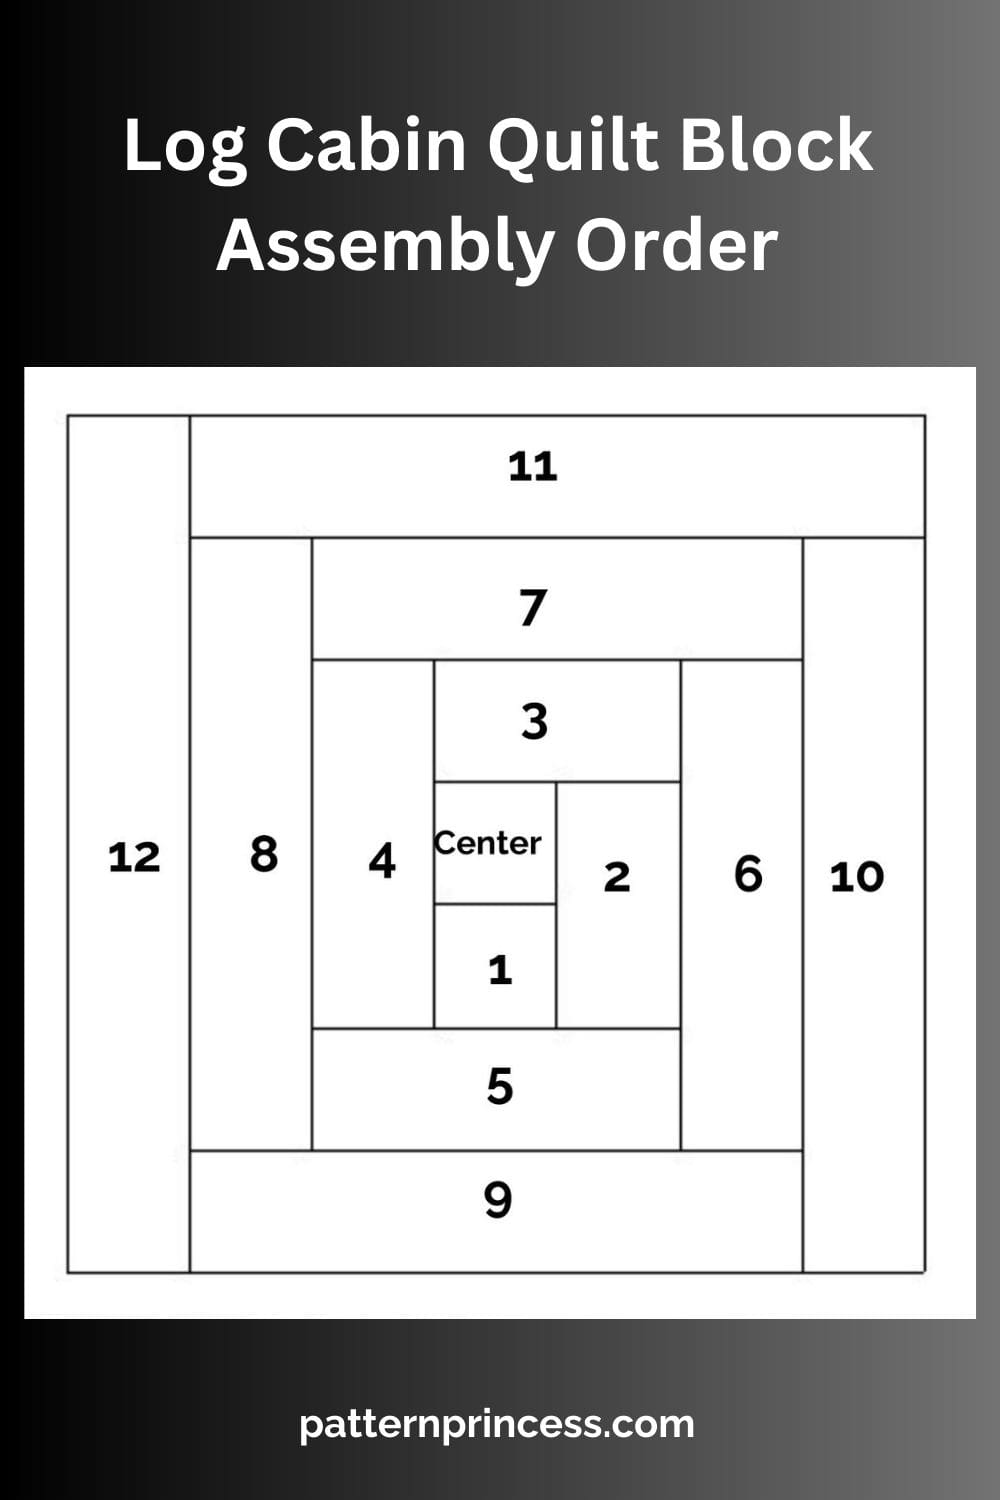
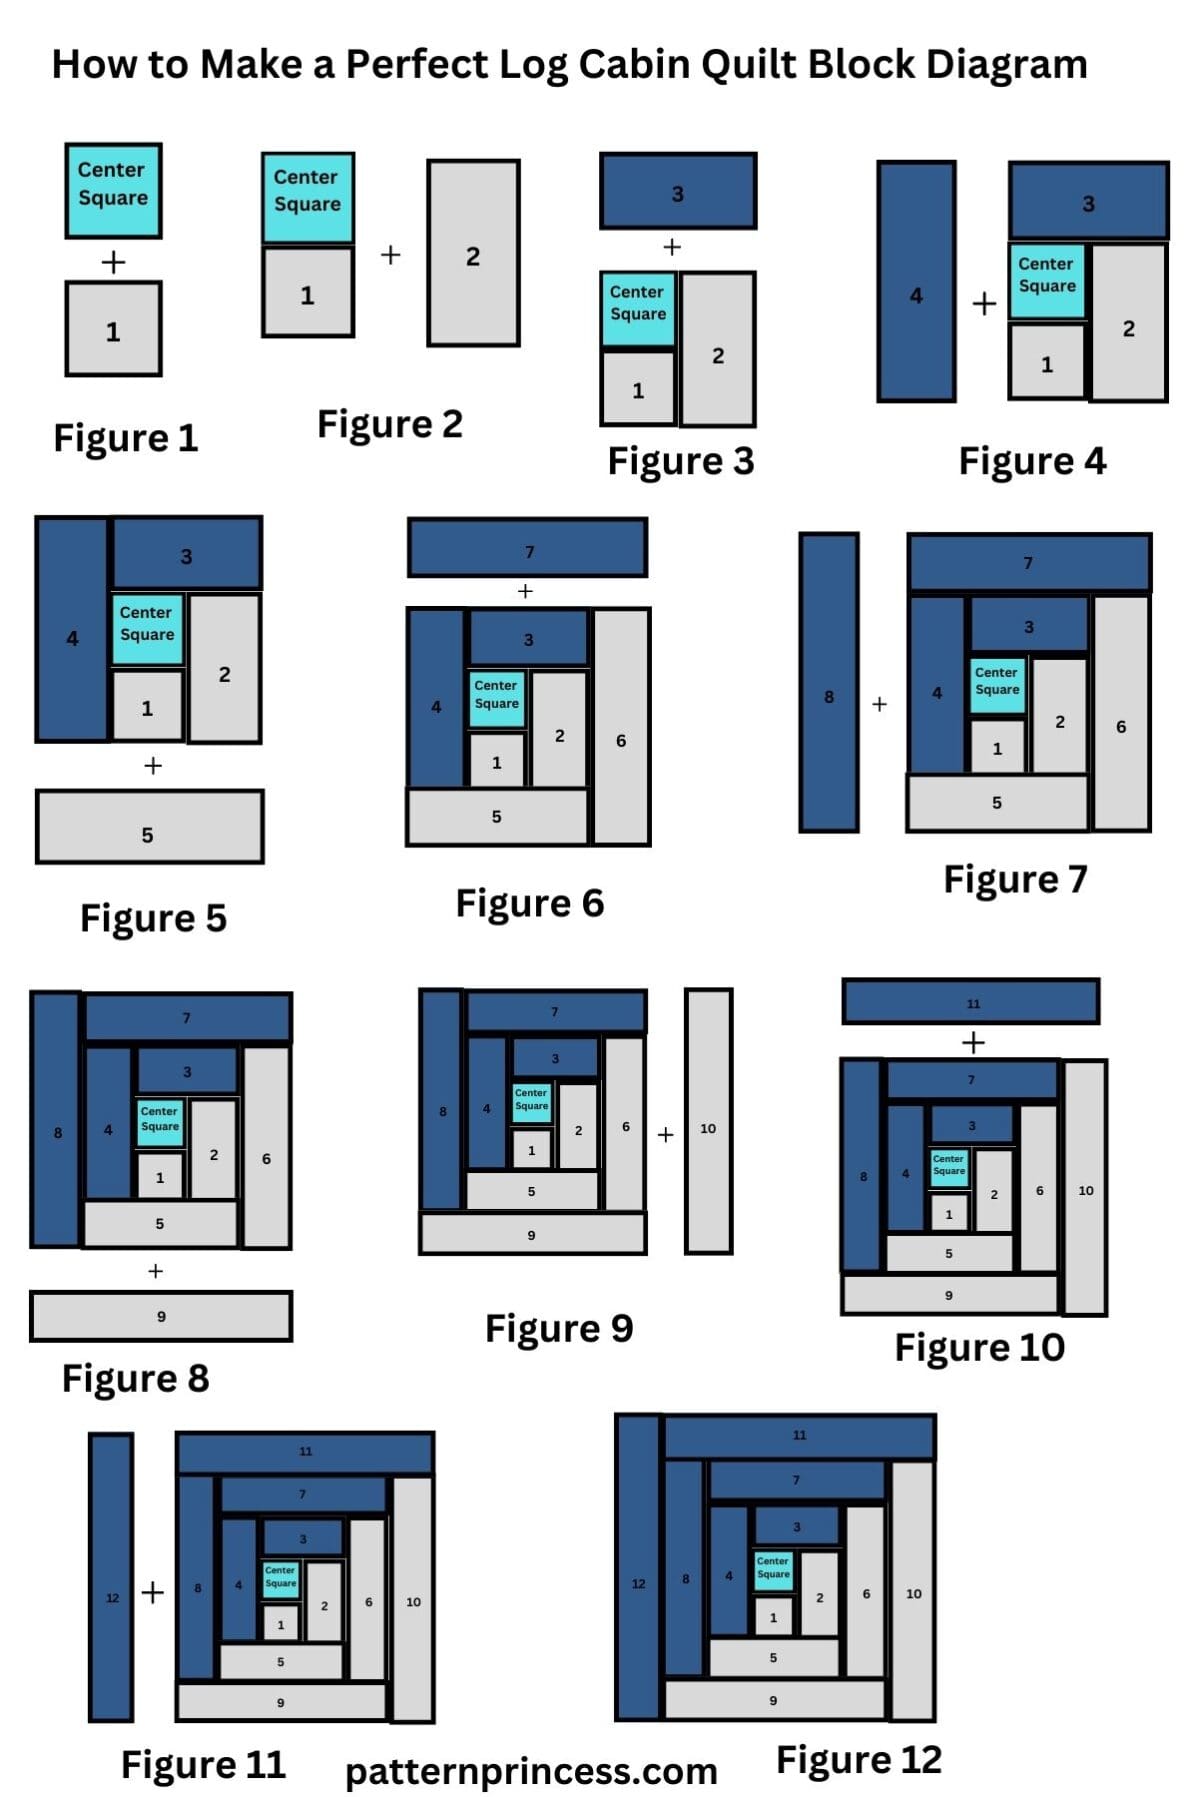
Step 2: Log Cabin Block Assembly
Once all the fabric lengths are cut from the 2.5 inch strips, begin sewing them together.
To speed up the process of adding strips around the center square and building the quilt block, lay out the strips for the logs on a table next to your sewing machine. Print the assembly diagrams to help you keep the pieces in order.
Place the Center Square and the 2 1/2” Piece 1 square Right Sides Together (RST) and sew a ¼” seam along one side.
Press seam allowance away from the center.
Working counterclockwise select the lighter fabric 2 ½” X 4 ½” rectangle, Piece 2. Place it right side together according to Figure 2 on the Assembly Diagram; note placement.
Trim as needed. Press seam allowance to the outside.
Continue with Piece 3, the darker fabric 2 ½” X 4 ½” rectangle. Place it right side together according to Figure 3 on the Assembly Diagram.
Trim as needed. Press seam allowance to the outside.
Continue repeating these steps. Adding logs in order as outlined in the diagrams.
Trim any strip hanging over the edge as needed as you continue turning the block and adding the light and dark strips in an alternating pattern.
Square your block if needed once all the strips have been added.
How to Use the Log Cabin Quilt Block?
The Log Cabin quilt block is incredibly versatile and can be used to create a wide range of items beyond a traditional beautiful quilt.
Its geometric design and symbolic significance make it suitable for various projects, each adding a touch of warmth and creativity to your space. Here are some creative ways to use this square.
Quilts
Of course, making your first log cabin quilt can be done even if you are a beginner quilter. The most common use is in creating quilts. Whether you’re making a throw quilt, bed quilt, or wall hanging, arranging in different layouts can result in stunning and visually captivating quilts.
Pillows
Sewing them blocks into pillow covers is a fantastic way to add a cozy and decorative touch to your living room or bedroom.
Table Runners
Designing a table runner adding an elegant touch to your dining area. Consider using colors that match your décor or complement the changing seasons.
Potholders and Trivets
Transform blocks into potholders or trivets for your kitchen. Quilted potholders not only protect your hands but also add a stylish element to your cooking space.
Wall Hangings
Create eye-catching wall hangings by arranging the squares in unique layouts. This is a great opportunity to experiment with color combinations and design variations.
Tote Bags
Incorporate into the design of tote bags for a functional and fashionable accessory. These bags can serve as everyday carryalls or special occasion purses.
Coasters
Miniature Log Cabin blocks make adorable coasters. Stitch a few together, add a backing, and you have charming coasters that protect your furniture in style.
Baby Quilt
Craft a soft and cozy baby blanket. The symbolism of the block’s design can make it a thoughtful and meaningful gift for new parents.
Seat Cushions
Use these squares to create custom seat cushions for dining chairs or outdoor furniture. This adds comfort and personality to your seating.
Quilted Clothing
Incorporate into your sewing projects to create unique quilted clothing items like vests, jackets, skirts, or even accessories like scarves.
Gifts
Handmade Log Cabin items make thoughtful gifts for special occasions. Whether it’s a personalized mug rug, a wall hanging with sentimental fabrics, or a lap quilt for a loved one, the Log Cabin design adds a personal touch.
Memory Quilts
Use to craft memory quilts by incorporating fabric from meaningful clothing or textiles. Each block can tell a story, creating a quilt rich in sentiment.
The Log Cabin quilt block’s adaptability makes it suitable for both practical and decorative projects.
It can be tailored to fit your style and preferences, allowing you to infuse your creations with creativity, tradition, and personal significance.
Other Free Patterns
You can find other sewing ideas including your next free quilt pattern on our website. Here are a few ideas to get you started.
Find Other Free Pattern PDF Downloads too.

You can find Victoria crocheting, quilting, and creating recipes. She has cooked in restaurants for over 20 years, including many larger parties. She learned to crochet when she was just 11 years old and has been crocheting ever since; over 50 years now. Over 40 years ago, she loved her first class in sewing and continues to hone her skills in quilting. Many have enjoyed the handmade gifts over the years. In her professional career, she has worked in management in a wide variety of businesses including higher education as a dean of a division. All the while attending college part-time to achieve her doctorate in higher education with an emphasis in e-learning.
Is there a way to make a 16″ log cabin block? I want to make a duvet cover and with 16″ blocks I will have the size I need for the pattern I want to make.
Hi Barbara,
16 inch log cabin quilt block.
Start with a center square 4 ½ X 4 ½ inches
Next add a 2 ½ X 4 ½ inch strip.
For the strips below, you will make 2. One lighter fabric and one darker fabric. Now start adding the strips around.
• 2 ½ X 6 ½ inches
• 2 ½ X 8 ½ inches
• 2 ½ X 10 ½ inches
• 2 ½ X 12 ½ inches
• 2 ½ X 14 ½ inches
Cut 1 lighter strip and finish with this size 2 ½ X 16 ½ inches
If I did my measurements correctly, this should come out for you.
Vicky
How do i get the free log cabin quilt pattern please? I can’t find it.
Hi Ruth,
So far, I only have the free log cabin quilt block available. I have the blocks sewn together now for a quilt, but need some time to finish it and write up the quilt pattern.
Vicky