Last updated on July 4th, 2024 at 11:31 pm
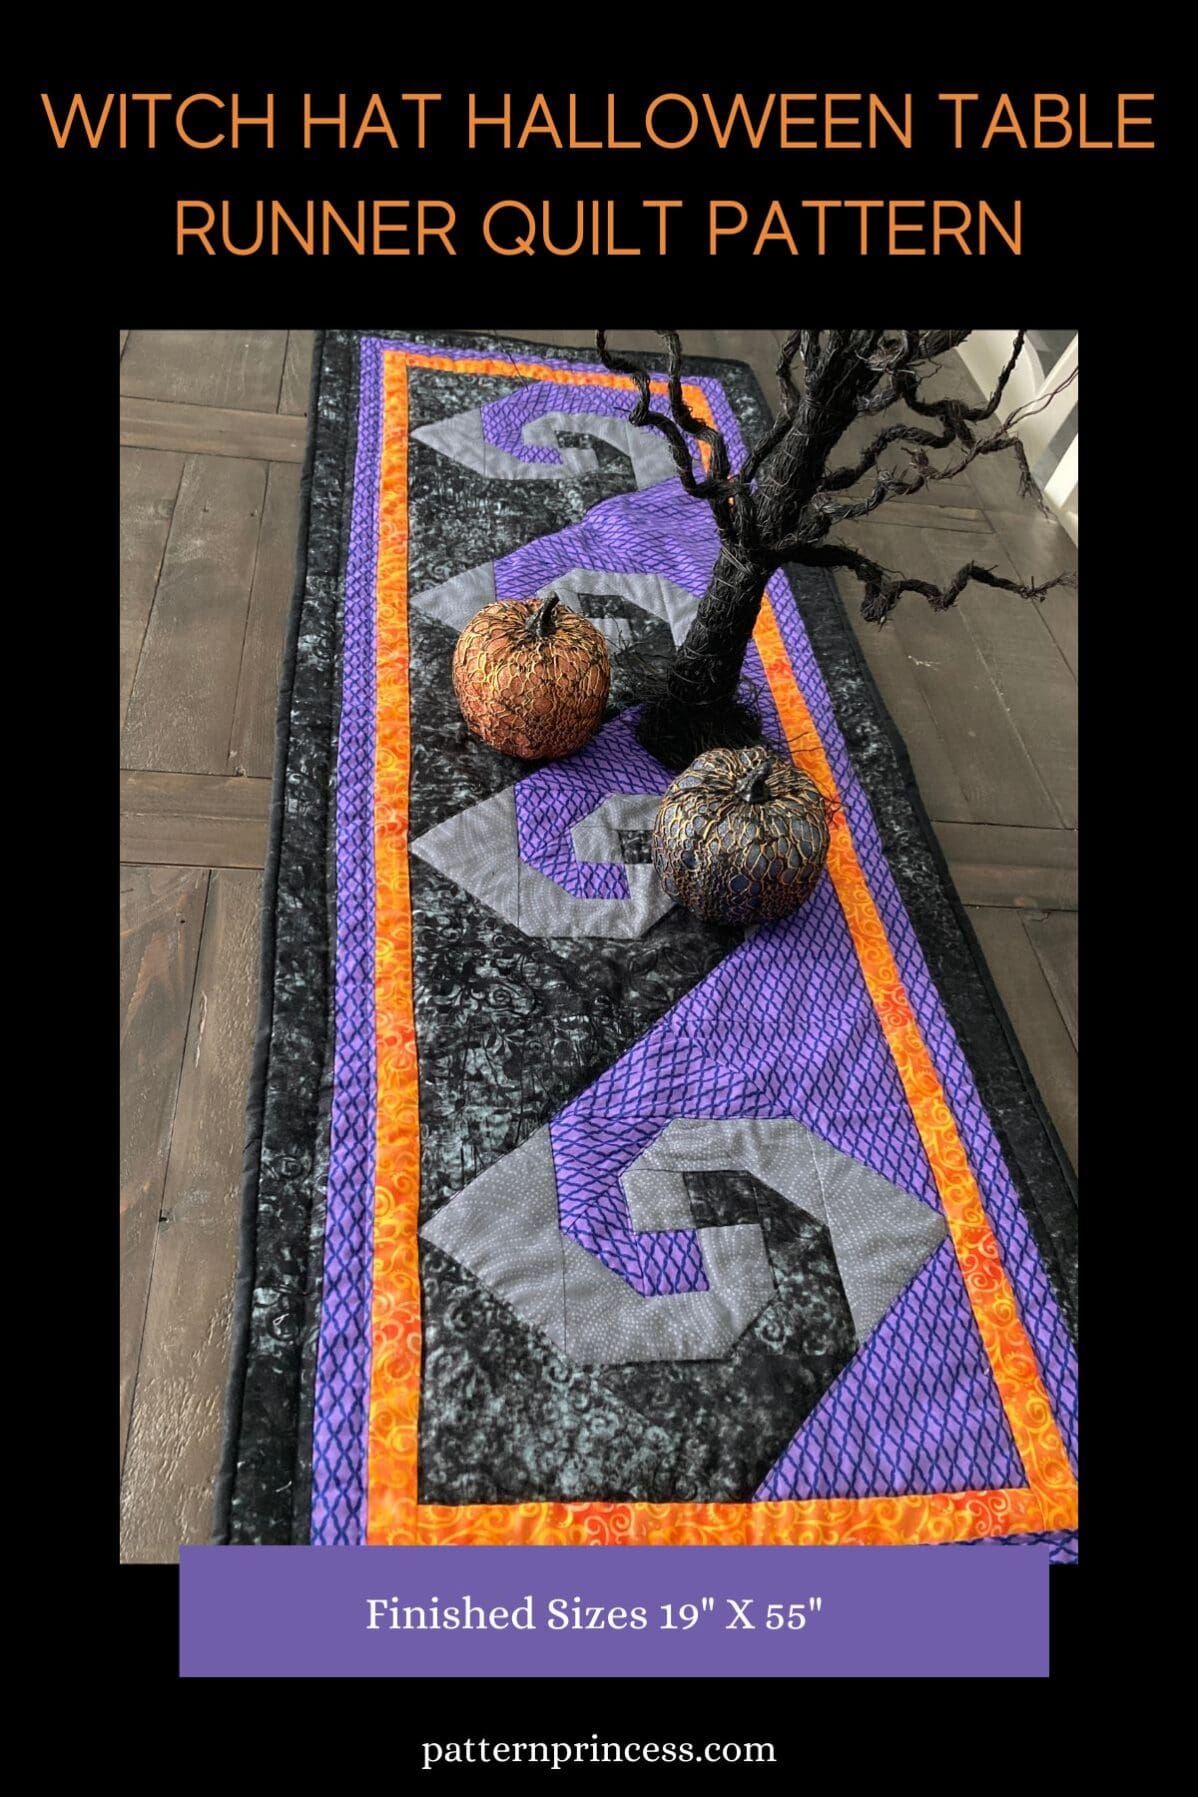
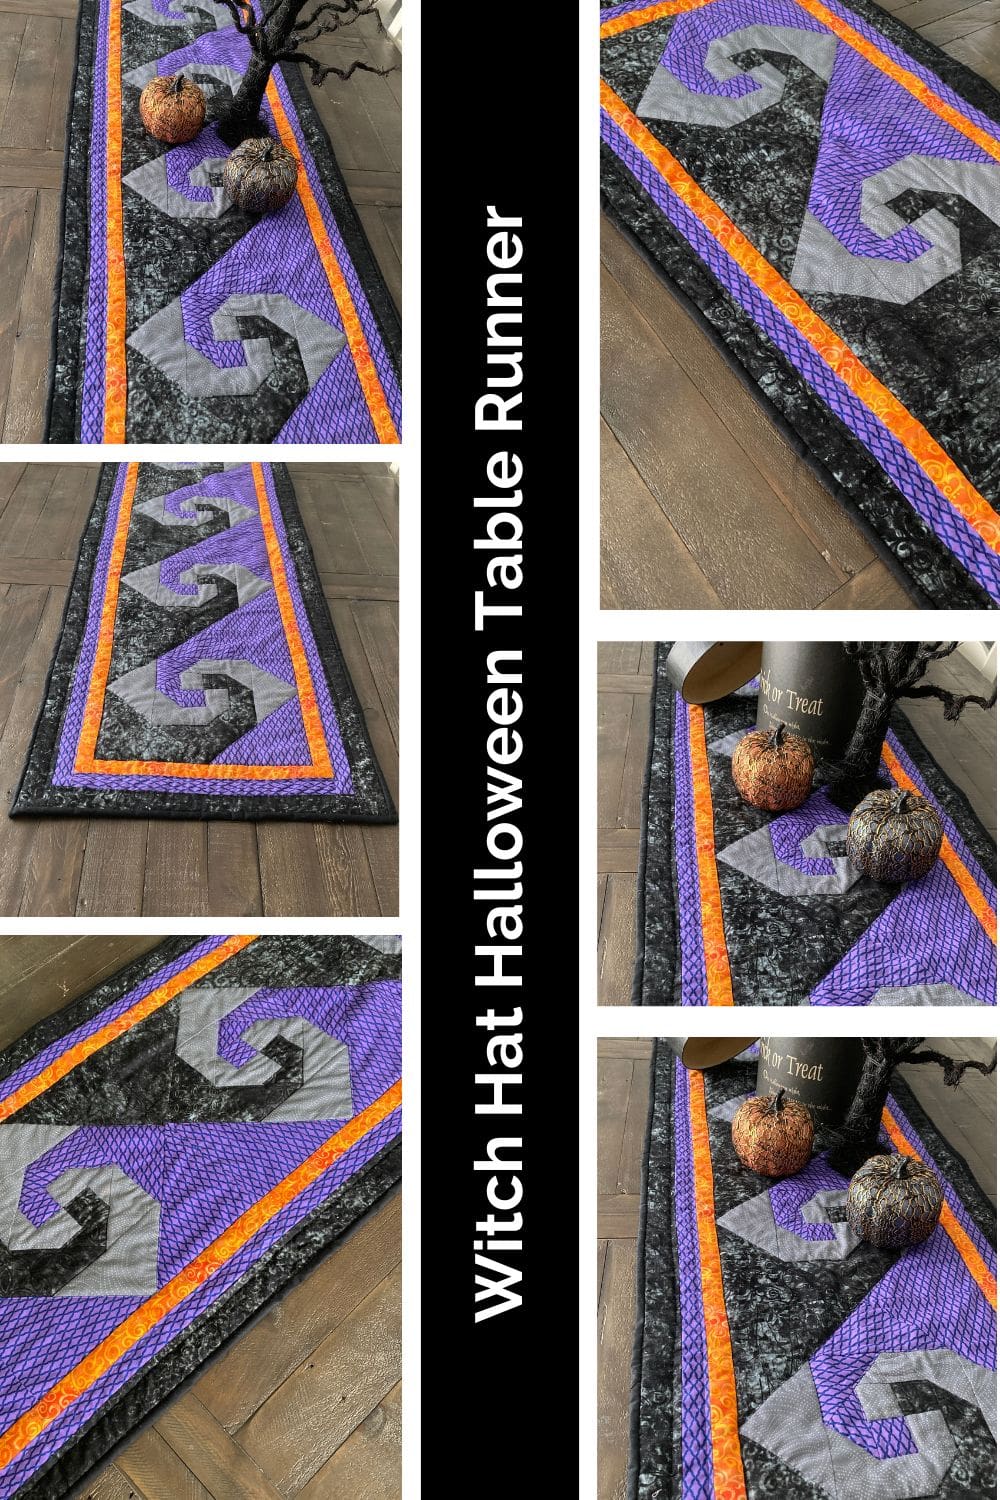
Introducing our enchanting Witch Hat Halloween Table Runner Quilt Pattern! Delightfully spooky and perfect for adding a touch of whimsy to your Halloween décor, this handmade table runner is truly a must-have for the season.
Featuring intricately designed witch hat motifs, this quilt pattern is both stylish and festive. Made with love and attention to detail, our table runner is a charming addition to any haunted gathering or fall-themed celebration.
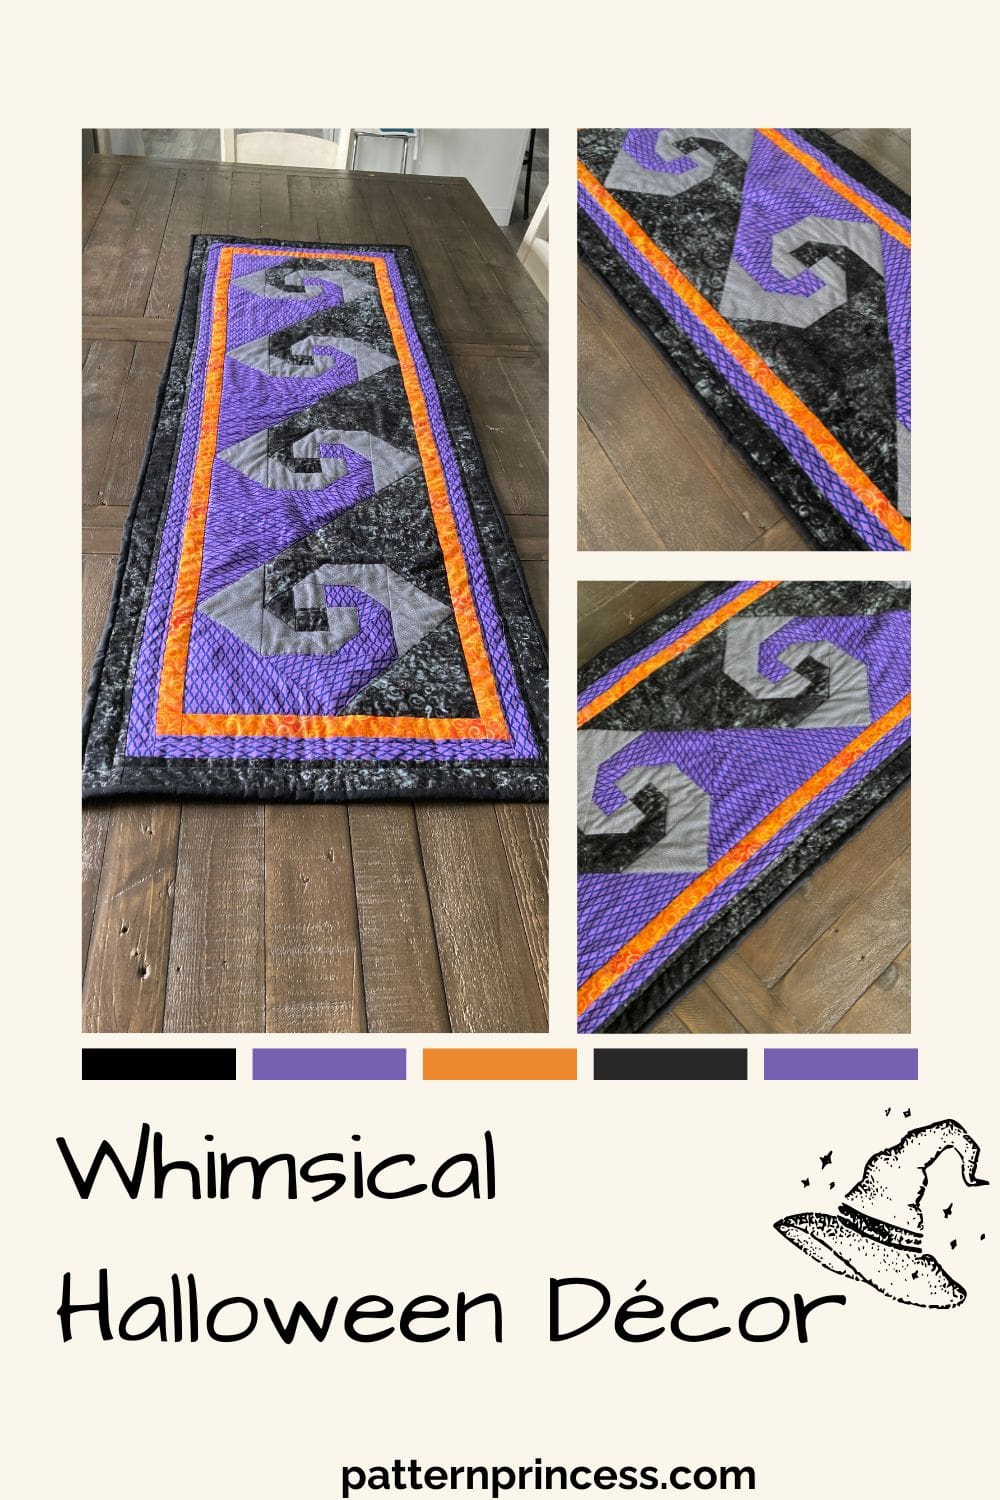
Whimsical Halloween Décor
This Halloween-inspired quilt pattern is sure to impress your guests and set the eerie ambiance. Transform your tabletop into a bewitching display with our Witch Hat Halloween Table Runner Quilt Pattern and make a lasting impression this Halloween season.
Post contains affiliate links, and we earn commissions if you shop through the links on this page. For more information, please read the disclosure section under the About Us page.
Spooky Witch Hat Halloween: Hauntingly Beautiful Décor
Add a bewitching Hocus Pocus touch to your Halloween décor with this Witch Hat Halloween Pattern.
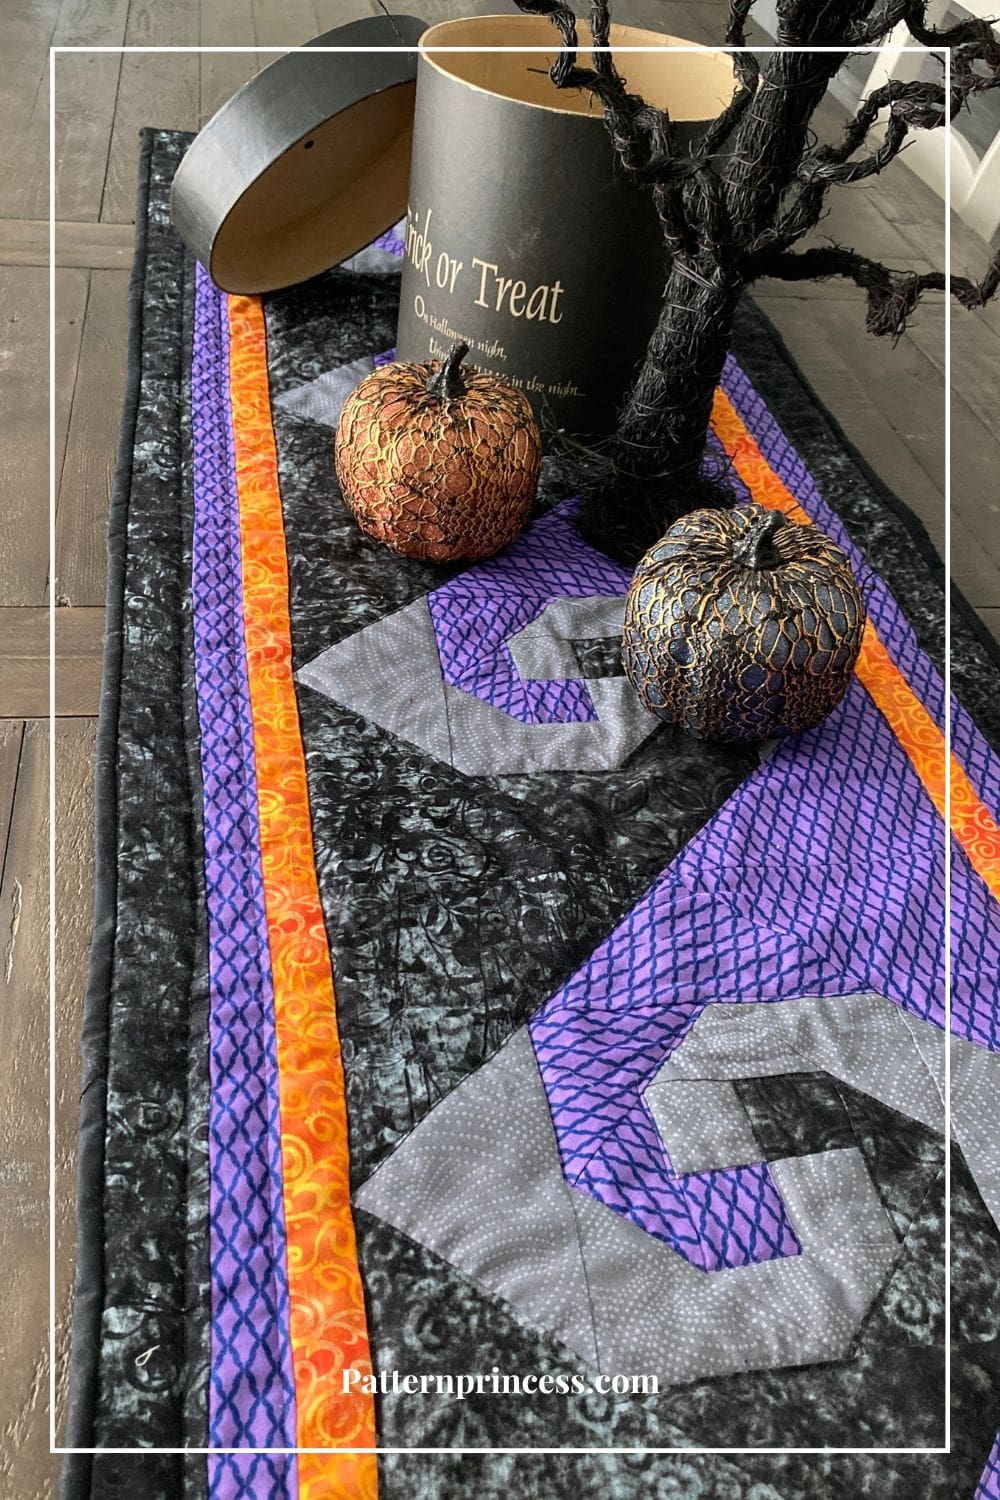
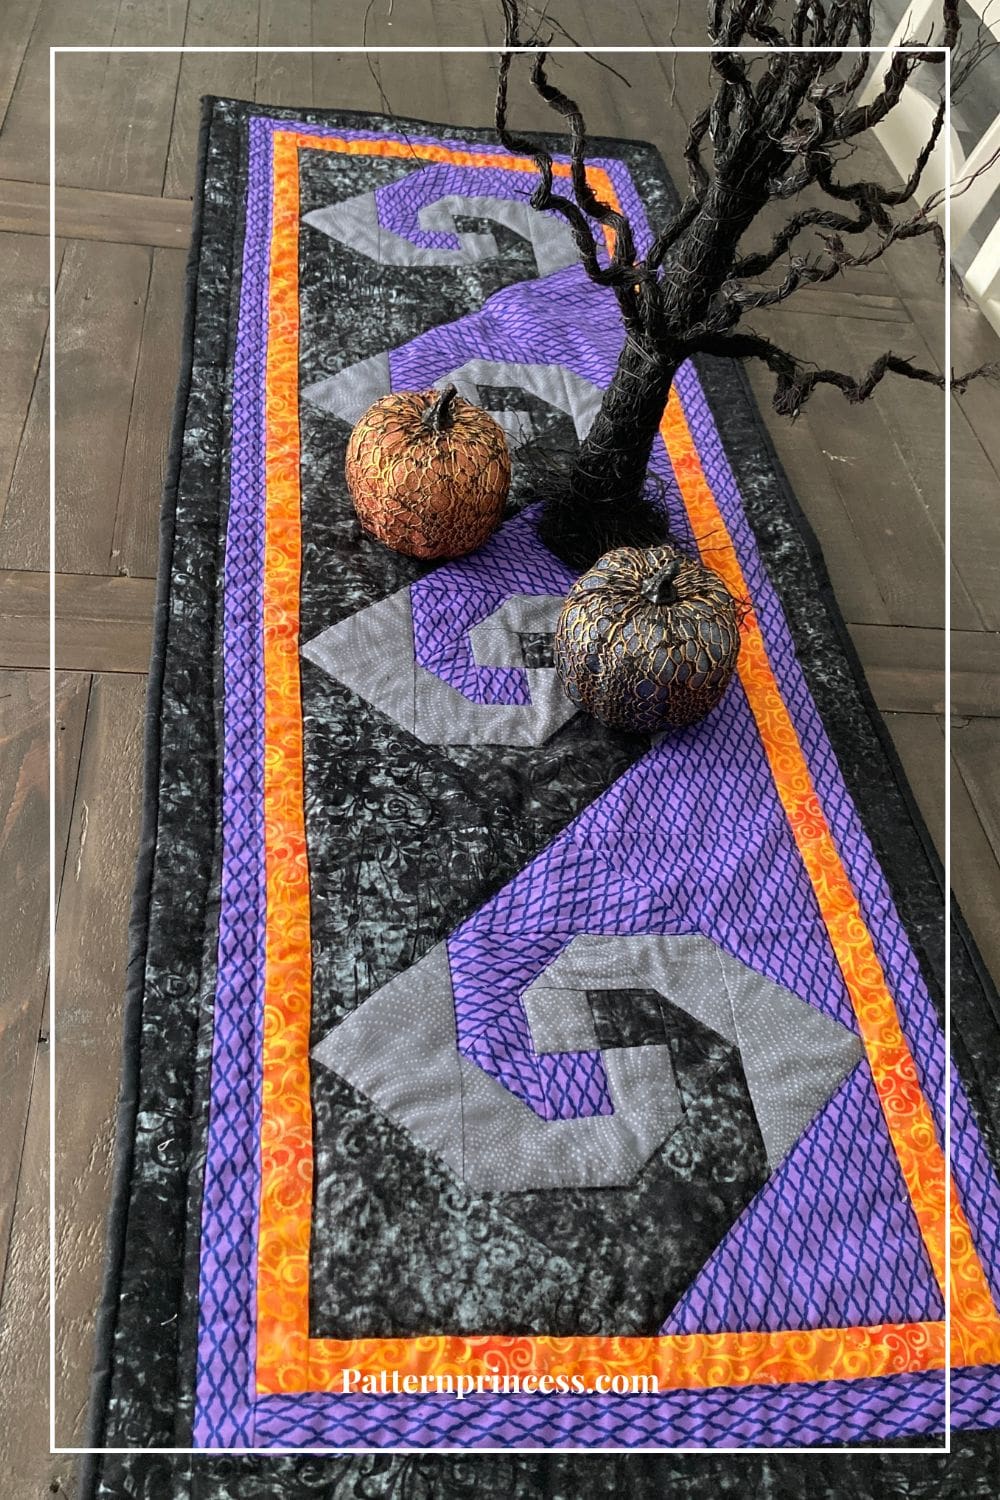
This stunning table runner is perfect for adding spooky charm to your Halloween décor. The table runner pattern showcases enchanting witch hats. It is a unique and eye-catching addition to your table decor.
You will notice black witch’s hats on one side and if you look closely on the other side, there are purple witch’s hats. It is a mirror image.
Perfect DIY Project for Spooktacular Halloween Décor
If you look closely at the table runner, you will notice witch’s hats on both the top and bottom. One side is black, while the other is in purple. They are a mirror image of each other adding to the spookiness of this Fall décor.
This quilt block is a vintage style pattern as it uses the Snail Trail Quilt Block Pattern.
The Snail Trail quilt block is a spiral block that starts small and continues growing as you add more parts to the block. The Snail Trail quilt pattern is a traditional block that adds lots of movement to your quilt top.
You can find the full tutorial on how to make the snail train quilt block in both the 12-inch block and 9-inch block size.
Additionally, I used just two fabrics to make this lovely quilted potholder.
As I continued to play with this fun and whimsical quilt block and fabric colors, I designed this adorable Witch Hat Halloween Table Runner Quilt Pattern for my daughter’s farmhouse style table. We love it on there and she has so many table décor ideas for styling throughout the season.
While you can make this quilt block in two to four fabric colors, I used just three today to create this specific look. Also, the last round I changed up the colors to make the crooked hat design come together in this table topper.
It just takes four rounds to complete this fun quilt block.
Let’s get on with the pattern.
Directions: Witch Hat Halloween Table Runner Quilt Pattern
Quilting Skill Level
Easy – Confident Beginner
Finished Table Runner Measurements
19 X 55 inches finished.
Quilt Pattern Uses 4 finished size 12-inch Snail’s Trail Quilt Blocks. 12 1/2 -inch unfinished. Along with 3 Borders.
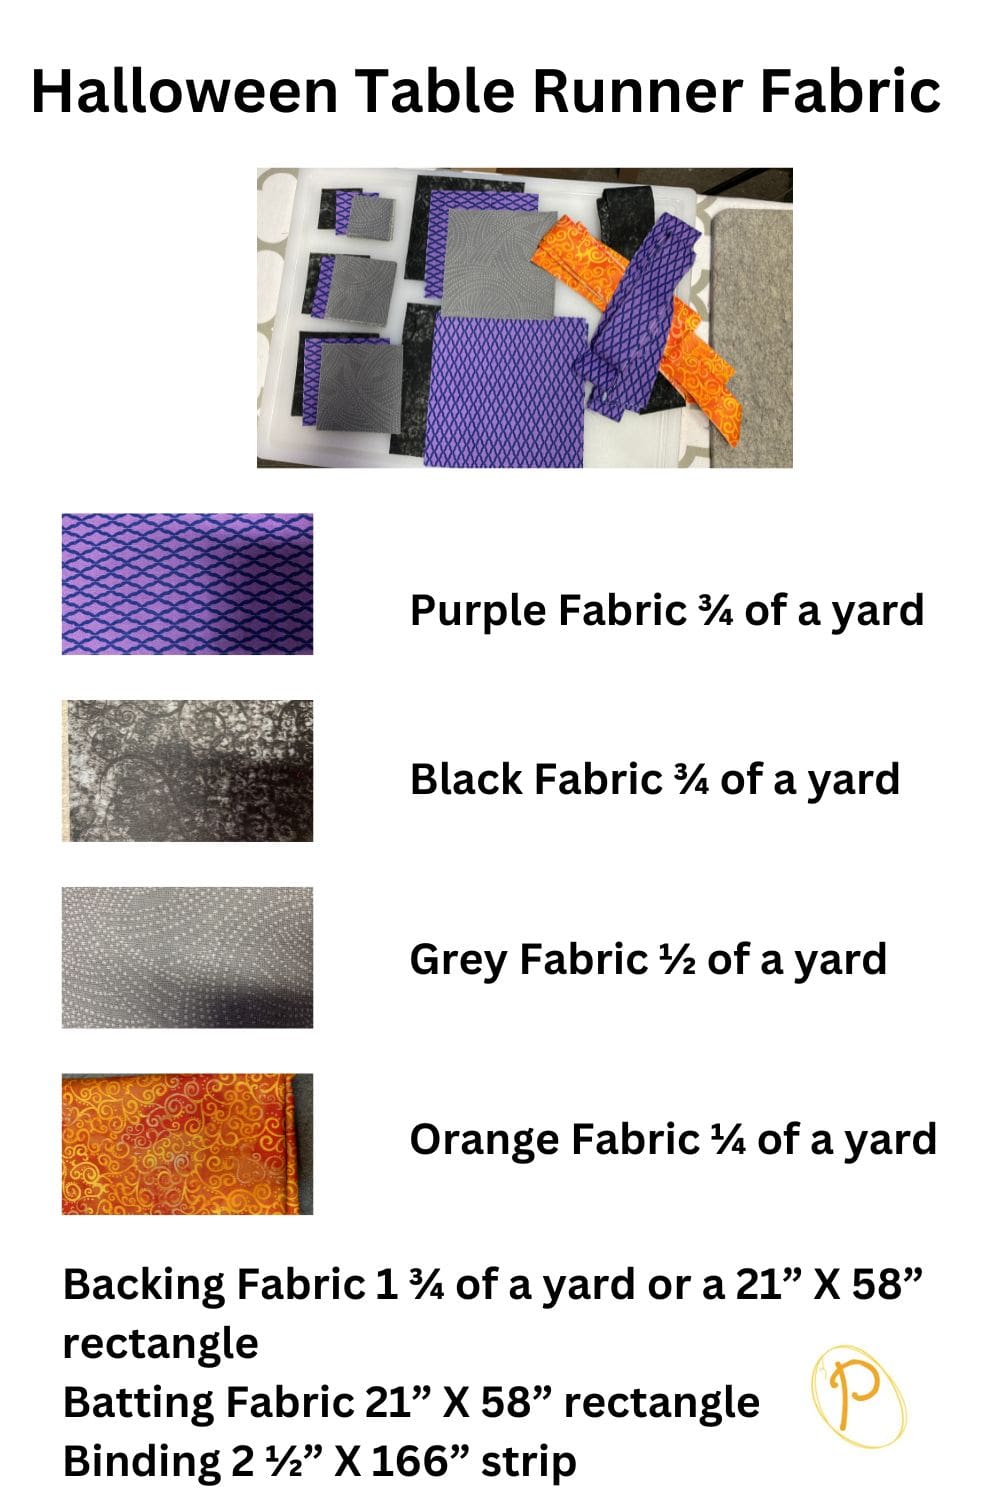
Materials
Black Fabric ¾ of a yard
Purple Fabric ¾ of a yard
Grey Fabric ½ of a yard
Orange Fabric ¼ of a yard
**The fabric estimates assume that the long strips are pieced using 42-44” wide fabric.
Backing Fabric 1 ¾ of a yard or a 21” X 58” rectangle
Batting Fabric 21” X 58” rectangle
Binding 2 ½” X 166” strip
I used 4 ½ black jelly roll strips joined; however, you can cut your own 2 ½” strips and join them to make the binding.
Thread
Equipment and Tools
- Rotary Cutter
- Quilting Ruler
- Cutting Mat
- Rotating Cutting Mat
- Iron
- Ironing Board or Pressing Mat
- Pins
- Clips
- Sewing Machine
- Disappearing fabric marker
- My Favorite Quilting Supplies
Halloween Table Runner Pattern Notes
For the larger triangles, mark the center of each diagonal and line it up carefully to keep your block square.
Double check the placement of each round of triangles before stitching to keep the trail going in a spiral. Refer to the diagram for directions.
Trim the outside corners of the triangles after each round as they will extend slightly beyond the outside edges of the square.
Use a ¼-inch seam allowance.
Right Sides Together. Sew fabric together with right sides together. Unless otherwise noted.
The directions for this quilt are for rotary cutting, machine piecing, machine quilting, and hand sewing on the binding to the backing fabric.
Accurate cutting and sewing enhances your final product. Pin or clip your pieces together before sewing them to ensure proper seam alignment.
The pattern is written using three fabric colors. However, you can make this using two, three, or four different colors.
Begin by Making the Snail Trail Quilt Blocks
Fabric Cutting Directions:
You will need 4, 12” X 12” finished quilt blocks for this project. (12 1/2” X 12 1/2” unfinished)
Before starting to make the table runner, cut the following from the fabrics:
- 2” X 2” square, cut 4 black, 4 purple, 8 grey.
- 3” X 3” square, cut 2 black, 2 purple, 4 grey.
- 3 7/8” X 3 7/8” square, cut 2 black, 2 purple, 4 grey.
- 5 1/8” X 5 1/8” square, cut 2 black, 2 purple, 4 grey.
- 6 7/8” X 6 7/8” square, cut 4 black and 4 purple.
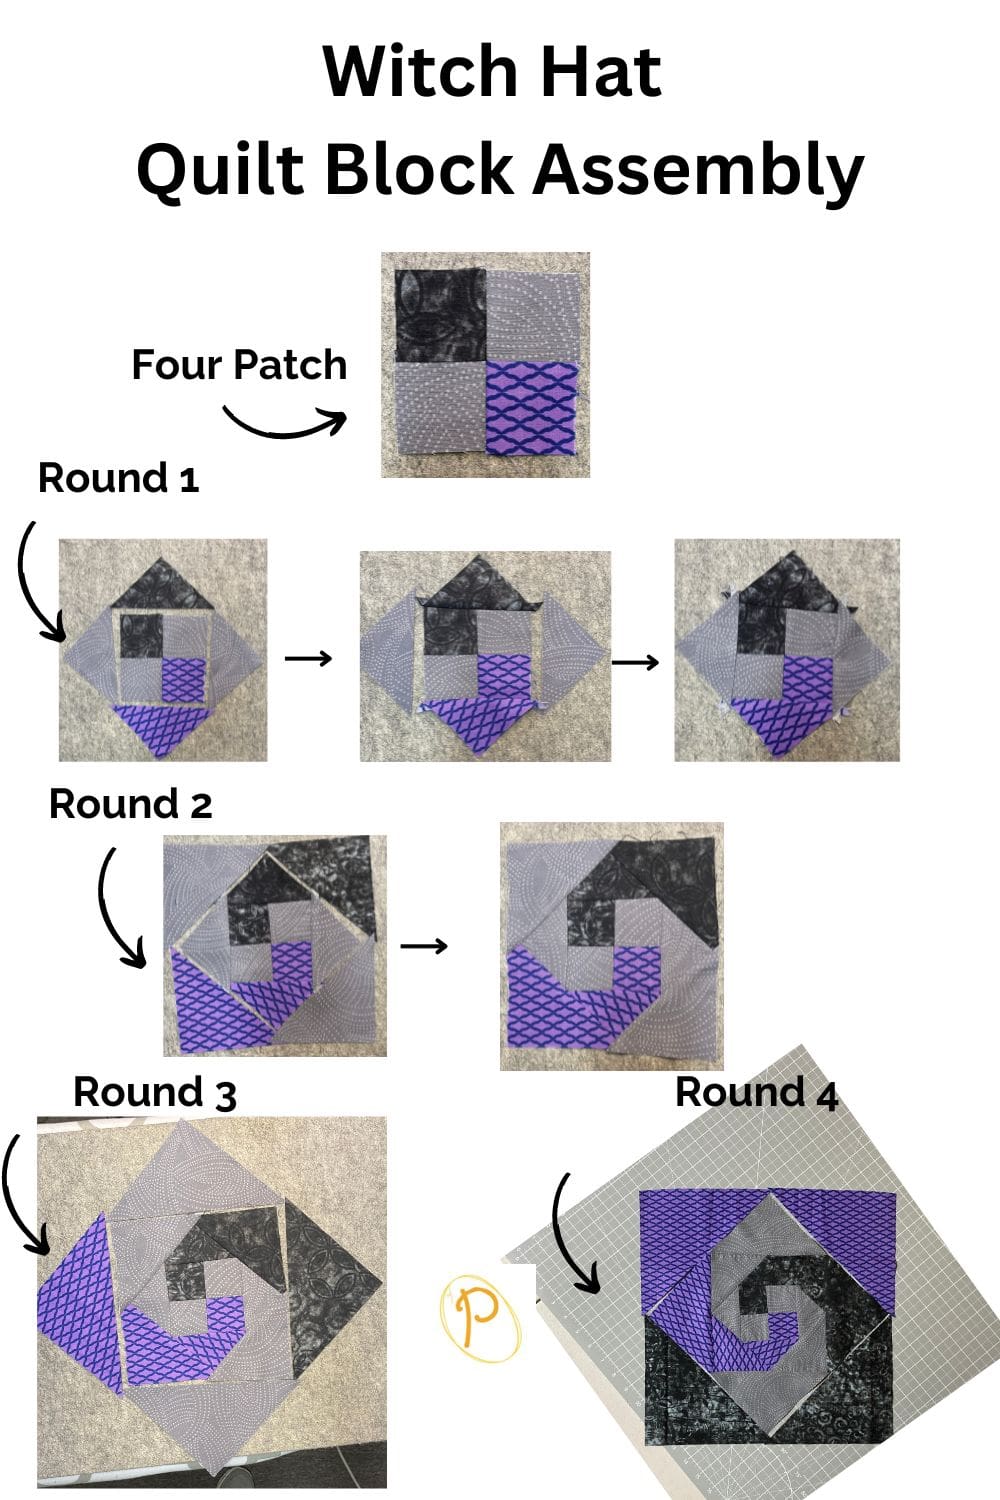
Begin Quilt Block Pattern
- Refer to the diagram for directions.
- Work all four quilt blocks the same.
Start with the Four Patch Square in the Middle.
Starting with the 2-inch squares, using a ¼” seam allowance. Sew a black fabric to a grey fabric with the right sides together. You now have 2 units. Press the seam allowances toward the black squares.
Repeat this process for the next three black and grey 2” X 2” squares.
Next join the purple and grey 2” X 2” squares together.
Press the seam allowances to the purple or black squares.
You should have 4, 2 patches of black and grey and 4, 2 patches of purple and grey complete.
Next make the four patches for all 4 quilt blocks.
Line up the two units of squares so the colors are opposite to form a four patch block. One black and grey and one purple and grey. Sew them right sides together with a 1/4″ seam allowance, nesting the center seams. Press the seam open.
Complete this process for the next 3 quilt blocks.
Round 1
Take the 3″ squares and cut them diagonally into two triangles each.
Use the diagram for the fabric color placement for the triangles.
Using the black color. Line up the first triangle with the center, right sides together on the side with the black square in the top left and the grey square in the top right as shown in the diagram.
You’ll want the cut diagonal edge to be along one side of the four patch on the outer edge. The corner point should be lined up with the center seam of the four patch.
Sew with a 1/4″ seam allowance. Press the seams allowances toward the triangles.
On the opposite side of the four patch, add the purple triangle right sides together, making sure that the corner point is lined up with the center seam of the four patch. The cut diagonal edge should be along the side of the four patch.
Sew with a 1/4″ seam allowance. Press the seams allowances toward the triangles.
Next add the two grey triangles on each side with the right sides together. Again, the corner point should line up with the center seam of the four patch. The cut diagonal edge should be along the side of the four patch.
Sew with a 1/4″ seam allowance. Press the seams allowances toward the triangles.
Complete this process for the next 3 quilt blocks.
Trim up the edges before going to the next round.
Round 2
Take the 3 7/8″ X 3 7/8” squares cut them diagonally into two triangles each.
Use the diagram for the fabric color placement for the triangles.
Pro Tip. As you continue to work around the four patch, to help with placement of the triangles, keep the four patch in the original placement with the black square in the top left and the grey square in the top right. The lower left will be grey and lower right is the purple patch.
Using the black color. Line up the first triangle with the center, right sides together on the upper right side. The side where the black triangle is on the top and the grey triangle is on the right as shown in the diagram.
Again, the cut diagonal edge is along the side of the square outer edge and the corner point will line up with the center seam.
Sew with a 1/4″ seam allowance. Press the seams allowances toward the triangles.
On the opposite side of the square, add the purple triangle right sides together, making sure that the corner point is lined up with the center seam of the four patch. The cut diagonal edge should be along the side of the four patch.
Sew with a 1/4″ seam allowance. Press the seams allowances toward the triangles.
Next add the two grey triangles on each side with the right sides together. Again, the corner point should line up with the center seam of the four patch. The cut diagonal edge should be along the side of the four patch.
Sew with a 1/4″ seam allowance. Press the seams allowances toward the triangles.
Complete this process for the next 3 quilt blocks.
Trim up the edges before going to the next round.
Round 3
Take the 5 1/8″ X 5 1/8” squares cut them diagonally into two triangles each.
Pro Tip. For this and subsequent rounds, mark the center of the diagonal line on the wrong side of each triangle. I like to use a marking pen that disappears with the heat of an iron. A small mark within the seam allowance is enough of a guide. Use the marked line to center the diagonal edge with the previous round of triangles.
Use the diagram for the fabric color placement for the triangles.
Using the black color. Line up the first triangle with the center, right sides together on the right side. The side where the black triangle is on the top right and the grey triangle is on the lower right as shown in the diagram.
Sew with a 1/4″ seam allowance. Press the seams allowances toward the triangles.
On the opposite side of the four patch, add the purple triangle right sides together, making sure that the dot is lined up with the center.
Sew with a 1/4″ seam allowance. Press the seams allowances toward the triangles.
Next add the two grey triangles on the top and bottom with the right sides together.
Sew with a 1/4″ seam allowance. Press the seams allowances toward the triangles.
Complete this process for the next 3 quilt blocks.
Trim up the edges before going to the next round.
Round 4
This is the last round, and you will only be adding black and purple triangles.
Take the 6 7/8 X 6 7/8” squares cut them diagonally into two triangles each.
Use the diagram for the fabric color placement for the triangles.
Using the black color. Line up the first triangle on the bottom right side with the right sides together.
Sew with a 1/4″ seam allowance. Press the seams allowances toward the triangles.
Place the next black triangle on the bottom left side. Repeat the steps for sewing and pressing.
Next, place a purple triangle on the top right side. Repeat the steps for sewing and pressing.
Last, place a purple triangle on the top left side. Repeat the steps for sewing and pressing.
Trim the edges.
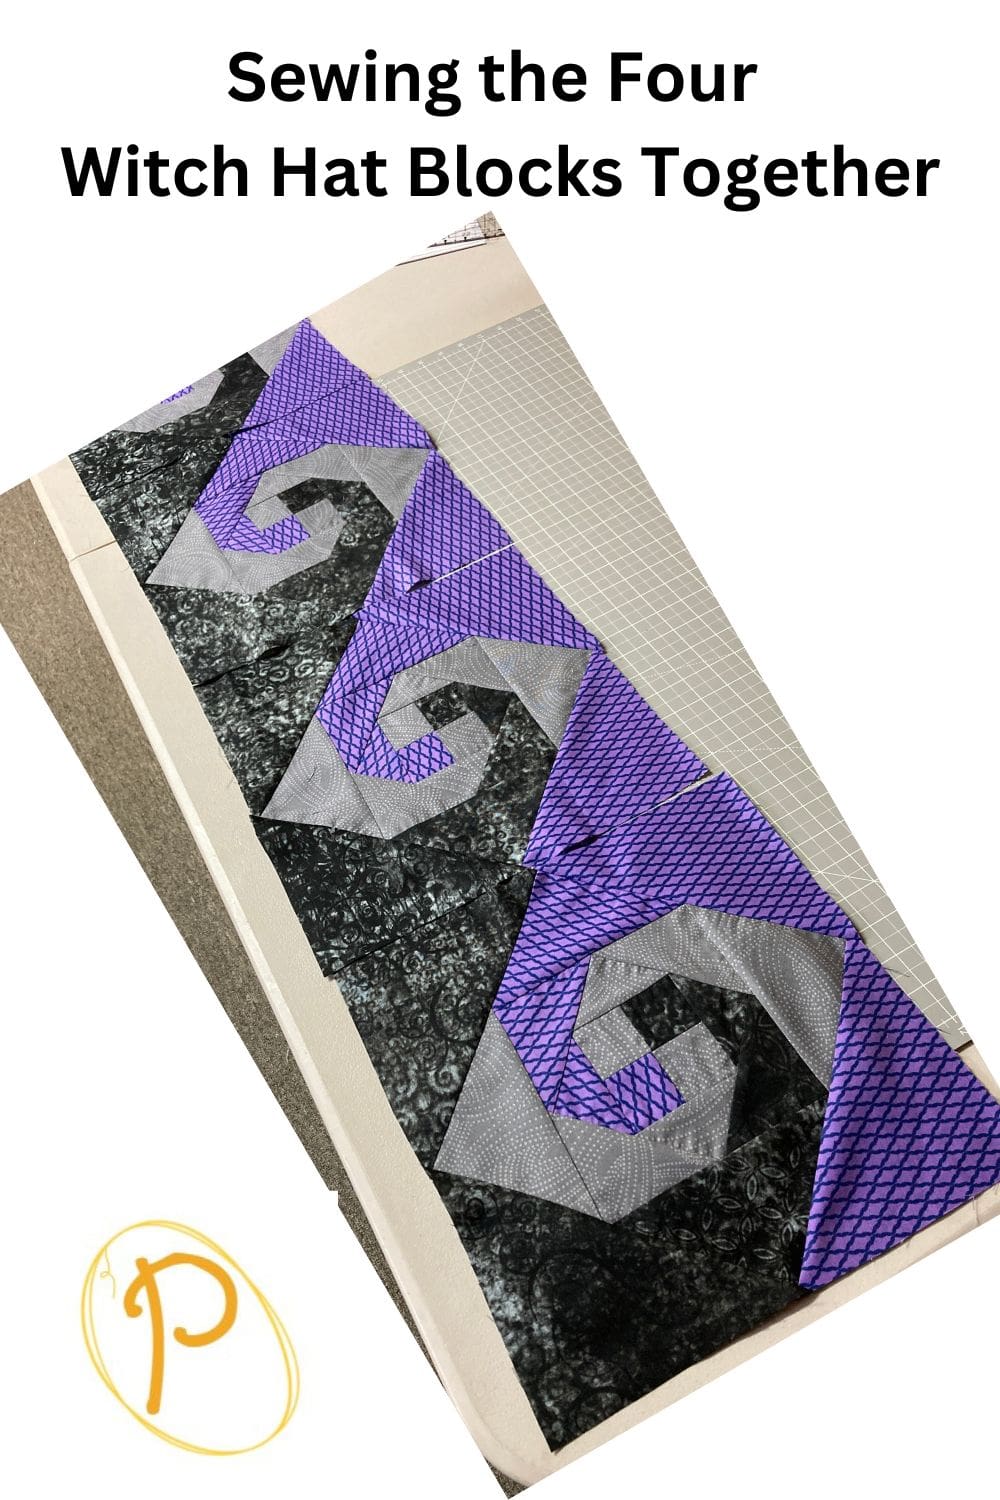
Sewing the Four Witch Hat Blocks Together
Place all blocks facing the same direction. You should see the witch hats take shape as you align the squares.
Sew each square together with the right sides together using ¼” seam allowance. Press the seams to one side or open.
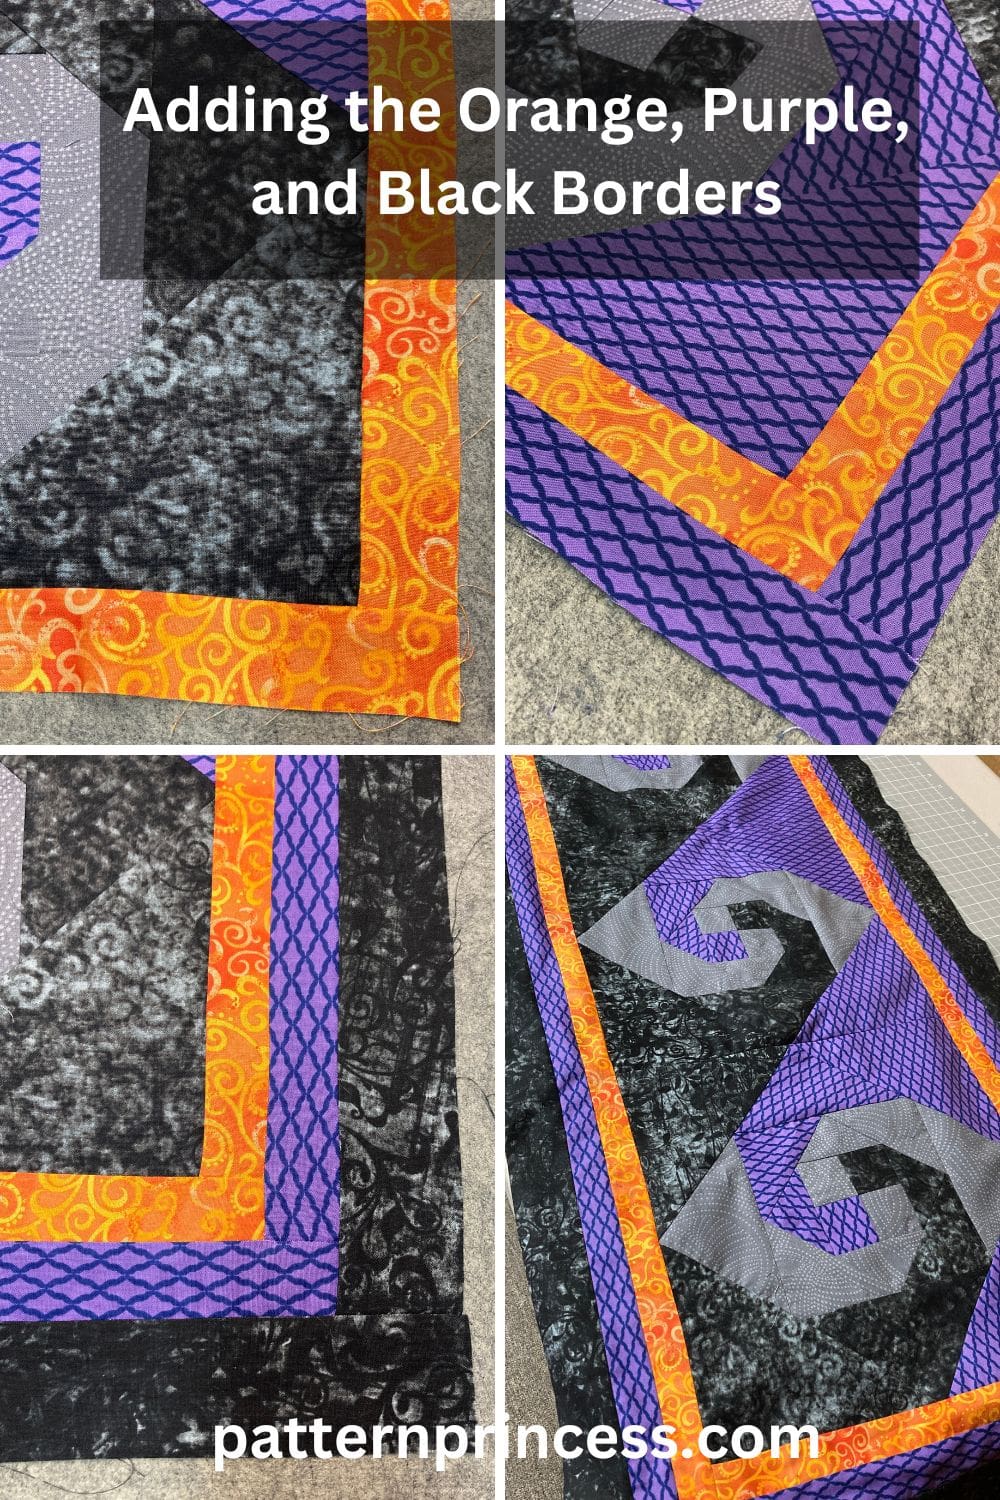
Three Borders to Complete the Table Runner Quilt Top
Orange Fabric – Border 1
Cut the sashing pieces. For the horizontal top and bottom cut 2 strips 1 ½ x 50 ½ inches. Or piece strips to make it 50 ½ inches long. For the 2 vertical sides, cut 1 ½ X 12 ½ inch strips.
Orange Vertical Sashing Pieces on the Sides
Using the 2 vertical side pieces of sashing, pin on the sides of the quilt top with the right sides together. Using ¼-inch seam allowance, sew 1 sashing strip to each side of the quilt.
Press all seams to the outside or open.
Horizontal Sashing Pieces on the Top and Bottom
Using the 2 horizontal pieces of sashing, pin on the top and bottom of the quilt top with the right sides together. Using ¼-inch seam allowance, sew 1 sashing strip to each side of the quilt.
Purple Fabric – Border 2
Cut the sashing pieces. For the horizontal top and bottom cut 2 strips 2 x 53 ½ inches. Or piece strips to make it 53 ½ inches long. For the 2 vertical sides, cut 2 X 14 ½ inch strips.
Purple Vertical Sashing Pieces on the Sides
Using the 2 vertical side pieces of sashing, pin on the sides of the quilt top with the right sides together. Using ¼-inch seam allowance, sew 1 sashing strip to each side of the quilt.
Press all seams to the outside or open.
Horizontal Sashing Pieces on the Top and Bottom
Using the 2 horizontal pieces of sashing, pin on the top and bottom of the quilt top with the right sides together. Using ¼-inch seam allowance, sew 1 sashing strip to each side of the quilt.
Black Fabric – Border 3
Cut the sashing pieces. For the horizontal top and bottom cut 2 strips 1 ½ x 55 ½ inches. Or piece strips to make it 55 ½ inches long. For the 2 vertical sides, cut 1 ½ X 17 ½ inch strips.
Black Vertical Sashing Pieces on the Sides
Using the 2 vertical side pieces of sashing, pin on the sides of the quilt top with the right sides together. Using ¼-inch seam allowance, sew 1 sashing strip to each side of the quilt.
Press all seams to the outside or open.
Horizontal Sashing Pieces on the Top and Bottom
Using the 2 horizontal pieces of sashing, pin on the top and bottom of the quilt top with the right sides together. Using ¼-inch seam allowance, sew 1 sashing strip to each side of the quilt.
Layering the Backing Fabric, Batting, and Table Runner Top Fabric
Now it’s time to make what is known as the “quilt sandwich”. It is the process of layering the backing fabric, batting, and the top motif we just made.
Materials for the Witch Hat Halloween Table Runner Backing and Batting
Backing Fabric 1 ¾ of a yard or a 21” X 58” rectangle
Batting Fabric 21” X 58” rectangle
The backing fabric and the batting should be a few inches larger all the way around than the quilt top. This makes sure that there is backing and batting covering the entire quilt top fabric. If you cut it too close and there is any slippage, you might end up with an edge that does not have the bottom part of the quilt sandwich.
Lay the backing fabric on a flat solid surface with the right side down facing out. Smooth out any wrinkles. Use painters’ tape or masking tape to secure the edges of the fabric down. This will help hold it in place and reduce the chance of a wrinkle developing as you place the next two layers.
Next, center the batting on top of the backing fabric smoothing out any wrinkles.
Finally, place the table runner top on the batting, centering it with the right side up. Smooth out any wrinkles.
Pinning the Layers Together
Once you have the top fabric all smoothed out, baste all three layers together using large safety pins. Use a good quality 1 ½” stainless steel pin for this.
Put a pin in each corner and around the entire quilt about every 5-6 inches or so through all three layers.
This holds things in place, so they don’t move around while you are sewing the layers together using a quilting design of your choice.
I sewed along each seam with the same color thread as the fabric as I sewed each section.
How to Trim the Batting and Backing Fabric Before Binding
Once the layers are quilted together in your desired design, it is time to trim the batting and backing. For this, I use a large cutting mat, a longer ruler, and a rotary cutter.
Lay the table runner quilt flat. Place the ruler along the edge of the quilt and use it as a guide to run your rotary cutter against it to trim the batting and backing fabric to the size of the top fabric. Do this on all four sides.

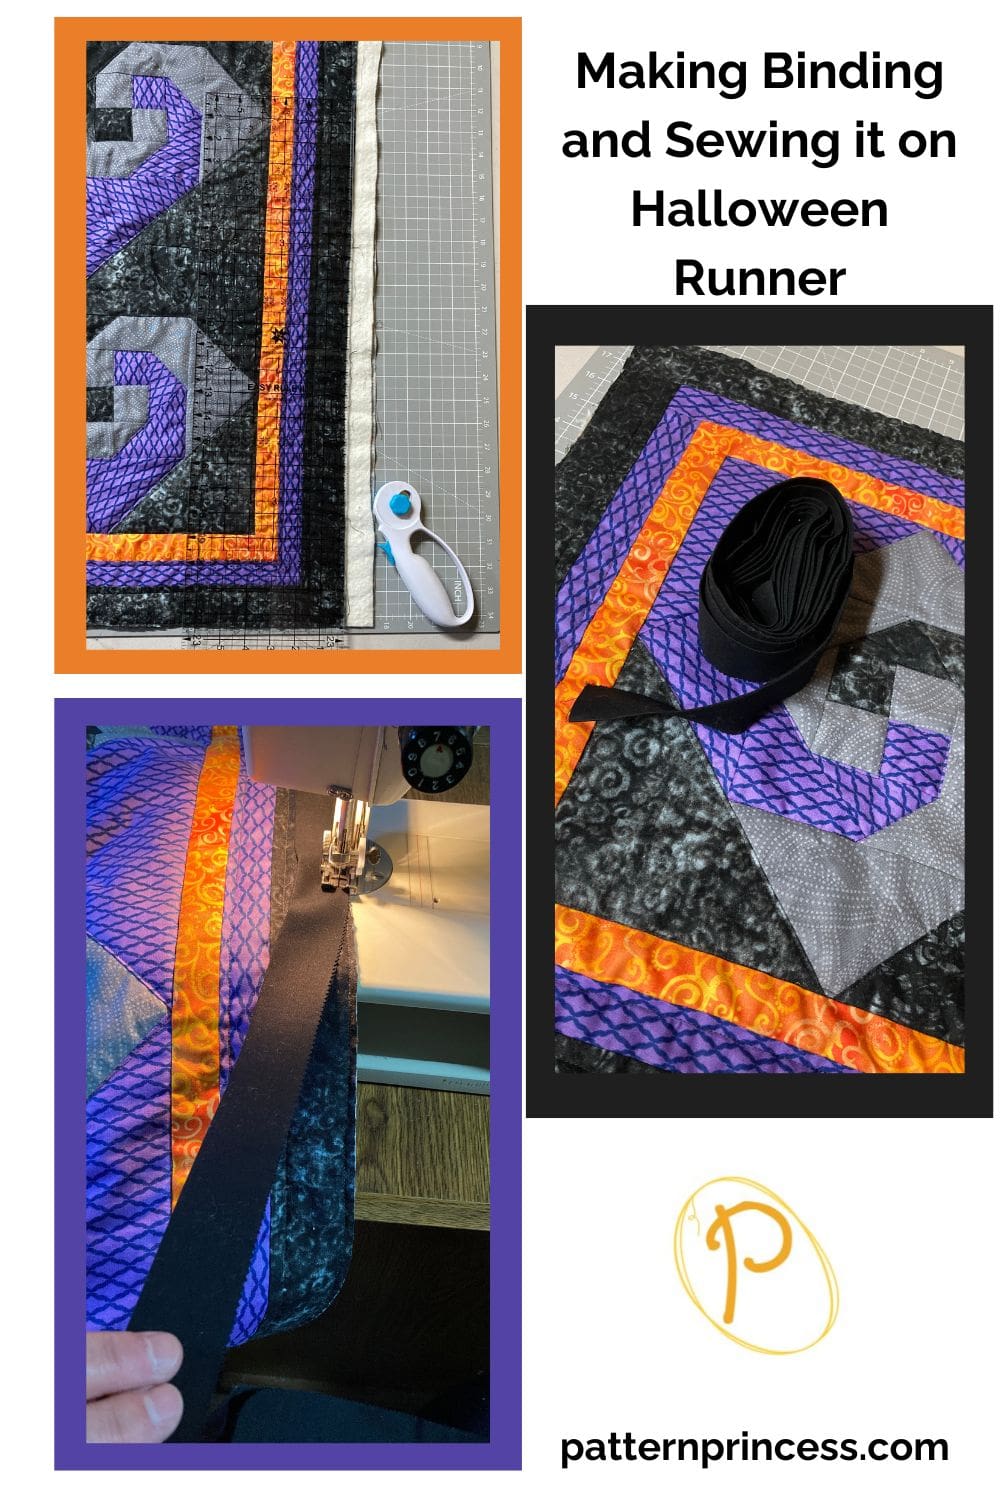
Sew the Binding to the Quilt
Start by preparing the binding strip. I used the leftover jelly roll strips to make my quilt binding.
Make the binding 2 ½ x 166 inches. This will give a bit of extra length for mitering your corners and joining the ends.
If you are unsure of how to join the strips for binding. You can find a tutorial for making binding on the website.
Once the strips are sewn together, fold in half lengthwise with wrong sides together and press.
Pin the raw edge of the binding onto raw edge of the quilt top. I generally start in the middle of a side leaving approximately a 3” tail hanging.
Note: This hanging part will be used to sew to the other end of the binding strip when you have finished sewing all four sides of the binding onto the quilt.
Sew the binding onto all four sides of the easy quilt making sure to miter the corners and join the binding.
I use a walking foot for this as it helps all the layers slide under the sewing foot without the fabric bunching.
You can use your sewing machine to sew the binding on the back of the quilt. However, I often hand-stitch the folded edge onto the back of the quilt.
Once all the sides and corners are stitched, you are done.
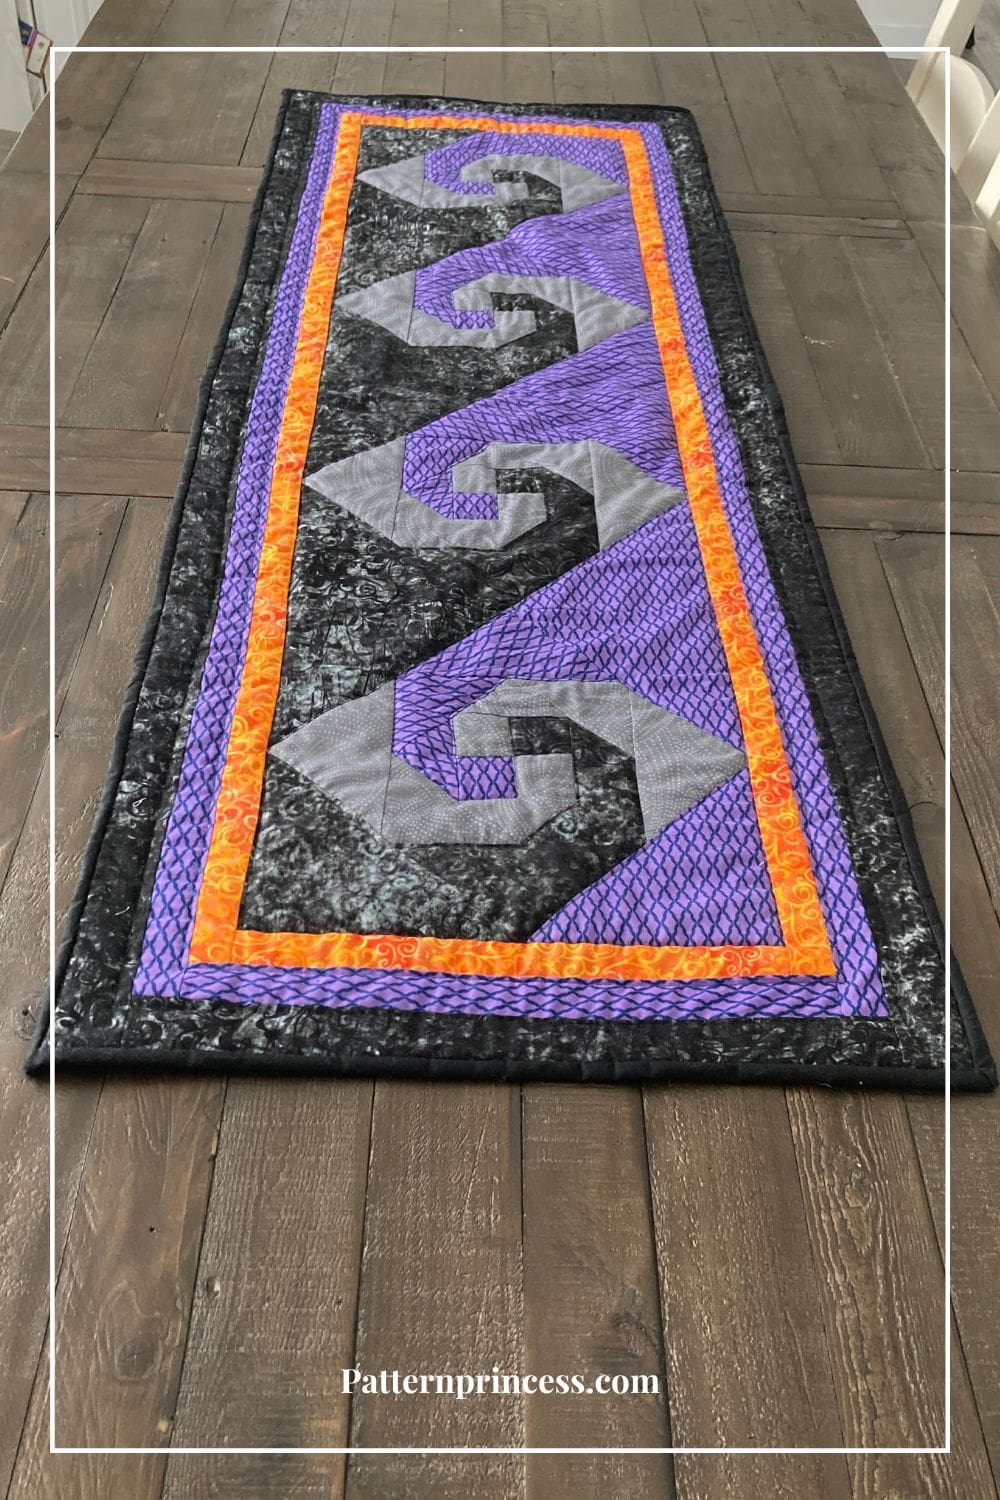
It is ready to use or give as a gift or use.
You may like these other free quilt patterns.

You can find Victoria crocheting, quilting, and creating recipes. She has cooked in restaurants for over 20 years, including many larger parties. She learned to crochet when she was just 11 years old and has been crocheting ever since; over 50 years now. Over 40 years ago, she loved her first class in sewing and continues to hone her skills in quilting. Many have enjoyed the handmade gifts over the years. In her professional career, she has worked in management in a wide variety of businesses including higher education as a dean of a division. All the while attending college part-time to achieve her doctorate in higher education with an emphasis in e-learning.