Last updated on March 27th, 2026 at 09:12 pm
If you’ve been itching to add some texture and elasticity to your crochet projects, the Half Double Crochet Ribbing Stitch is here to be your new best friend. The Knit-Look is popular among crocheters, especially those who don’t knit.
We can use crochet techniques to mimic knitting. However, this is quite easy to achieve. Whether you’re a beginner looking for a fun new technique or a seasoned crocheter seeking a quick and satisfying project, you’re in the right place.
This half double crochet project is just what you need if you prefer a straightforward project with minimal fuss and detailed instructions.

Post contains affiliate links, and we earn commissions if you shop through the links on this page. For more information, please read the disclosure section under the About Us page.
What is Ribbing Used for?
Primarily, ribbing is used to provide flexibility and elasticity to the fabric, making it an ideal choice for items that need to stretch and conform to the body, such as clothing and accessories. It’s not only functional but can also add a visually appealing texture to your projects.
Typically, it’s thought of for sleeves, bottoms of sweaters and necklines in knitting. Yet, it creates a fantastic stitch for creating cozy scarves, snuggly hats, stretchy cuffs, and more.
When used on Cuffs and Collars, ribbing creates cuffs on sweaters, cardigans, and sleeves, as well as collars. It provides a snug fit and helps to retain the shape of the garment.
Add it to the hems on sweaters, skirts, and dresses give a polished and finished look to the bottom edge while allowing for some stretching.
Use it on edges to prevent rolling at the edges of scarves, blankets, and shawls.
When crocheting socks, it helps them stay up on the leg while remaining comfortable.
Often, you will see ribbing used as the body of the hat for beanies and other hats, mittens, and gloves. It creates a stretchy band that fits securely on the head and around the wrist to keep the cold air out and the warmth in.
Lastly, ribbing can be used to make a whole project such as a scarf, hat, or blanket for a wonderful squishy textured pattern.
The Easiest Method for Crocheting Ribbing
In this tutorial, we’ll break down the Half Double Crochet Stitch Ribbing step-by-step.
Most crochet tutorials for ribbing call for slip stitches. For me, the slip stitch is okay for smaller projects like hats and gloves. I find it rather tedious. When it comes to a scarf and blanket, I want to make more progress with each row.
I tried a few different ways to create this look with a stitch pattern that was easy to work and still looked great.
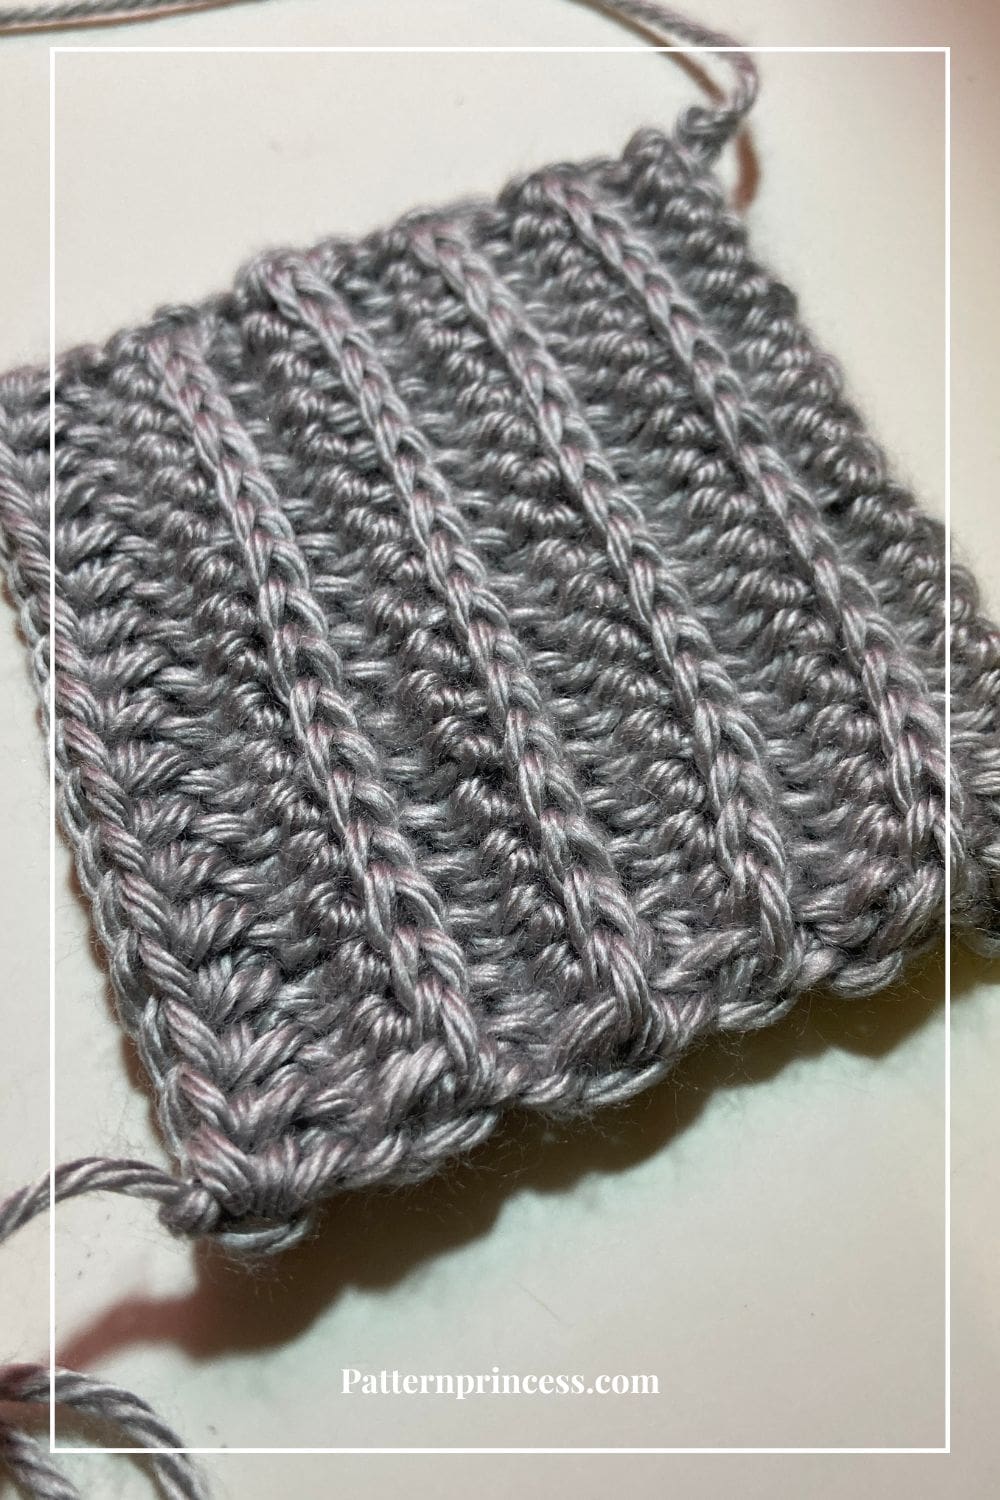
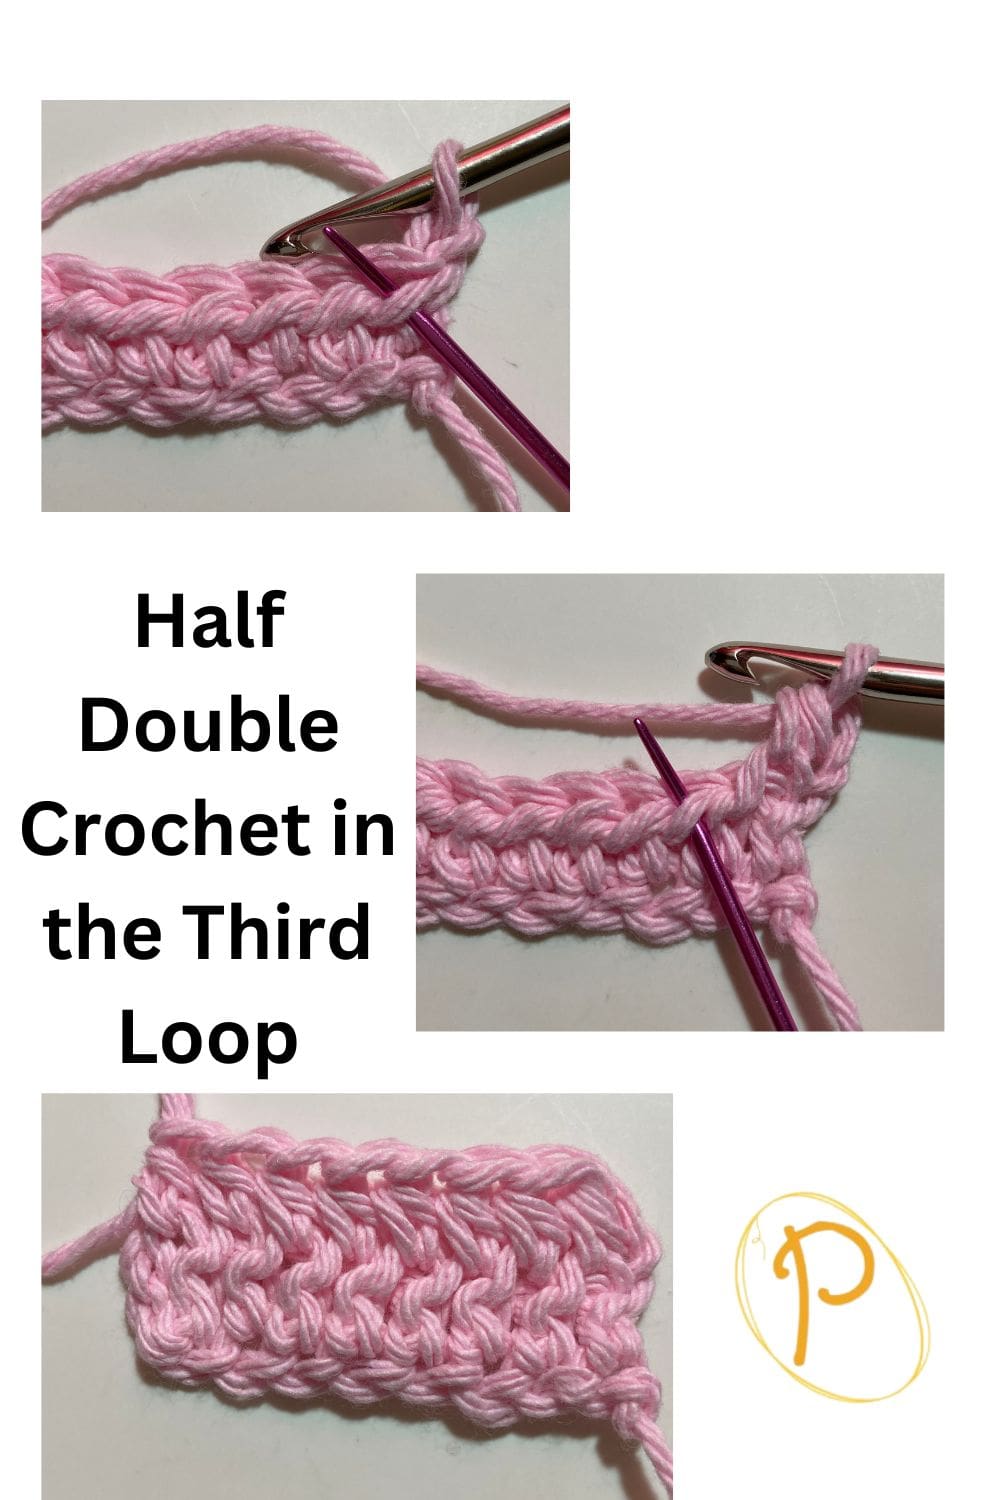
Therefore, this pattern uses the classic stitch. However, there is one little change in where the hook is placed. Rather than inserting the hook in the top of the stitch where the two loops are, insert the hook I in the third loop. As a result, this creates a wonderful, ribbed texture for your crochet project.
Having a repeating stitch throughout a crochet pattern is a wonderful way to create something beautiful with ease.
Photo Tutorial and YouTube Video Tutorials
Below the written pattern, near the bottom of the post, you will find the links to video tutorials for both a left hand and right hand crocheter. Additionally, there are step by step photo tutorials to help you work the stitch pattern.
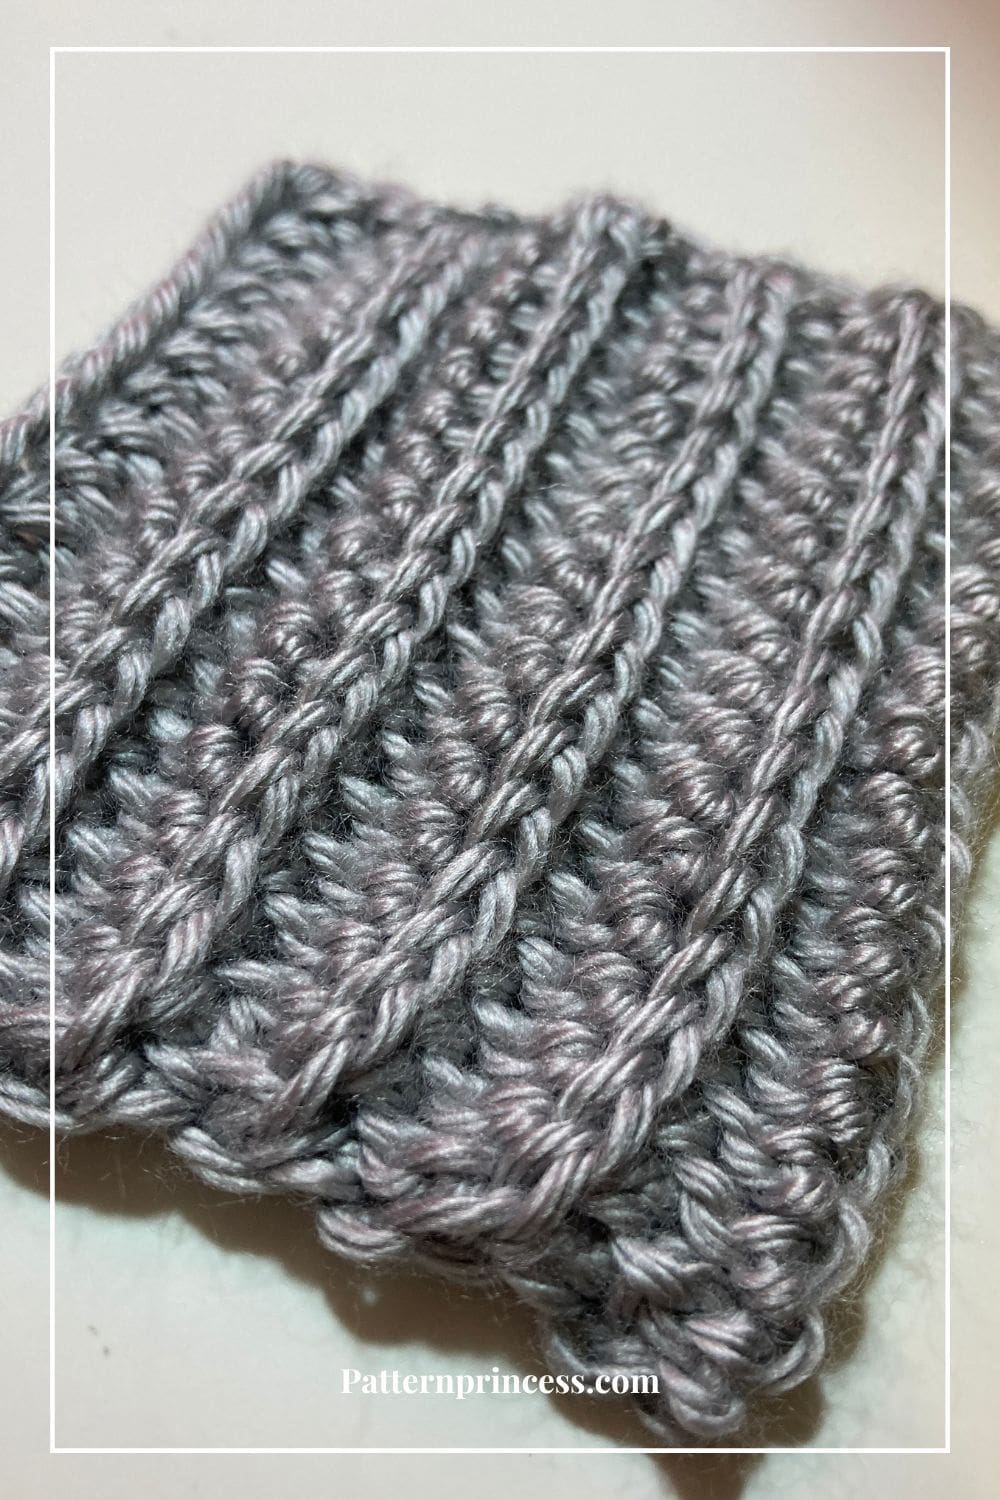
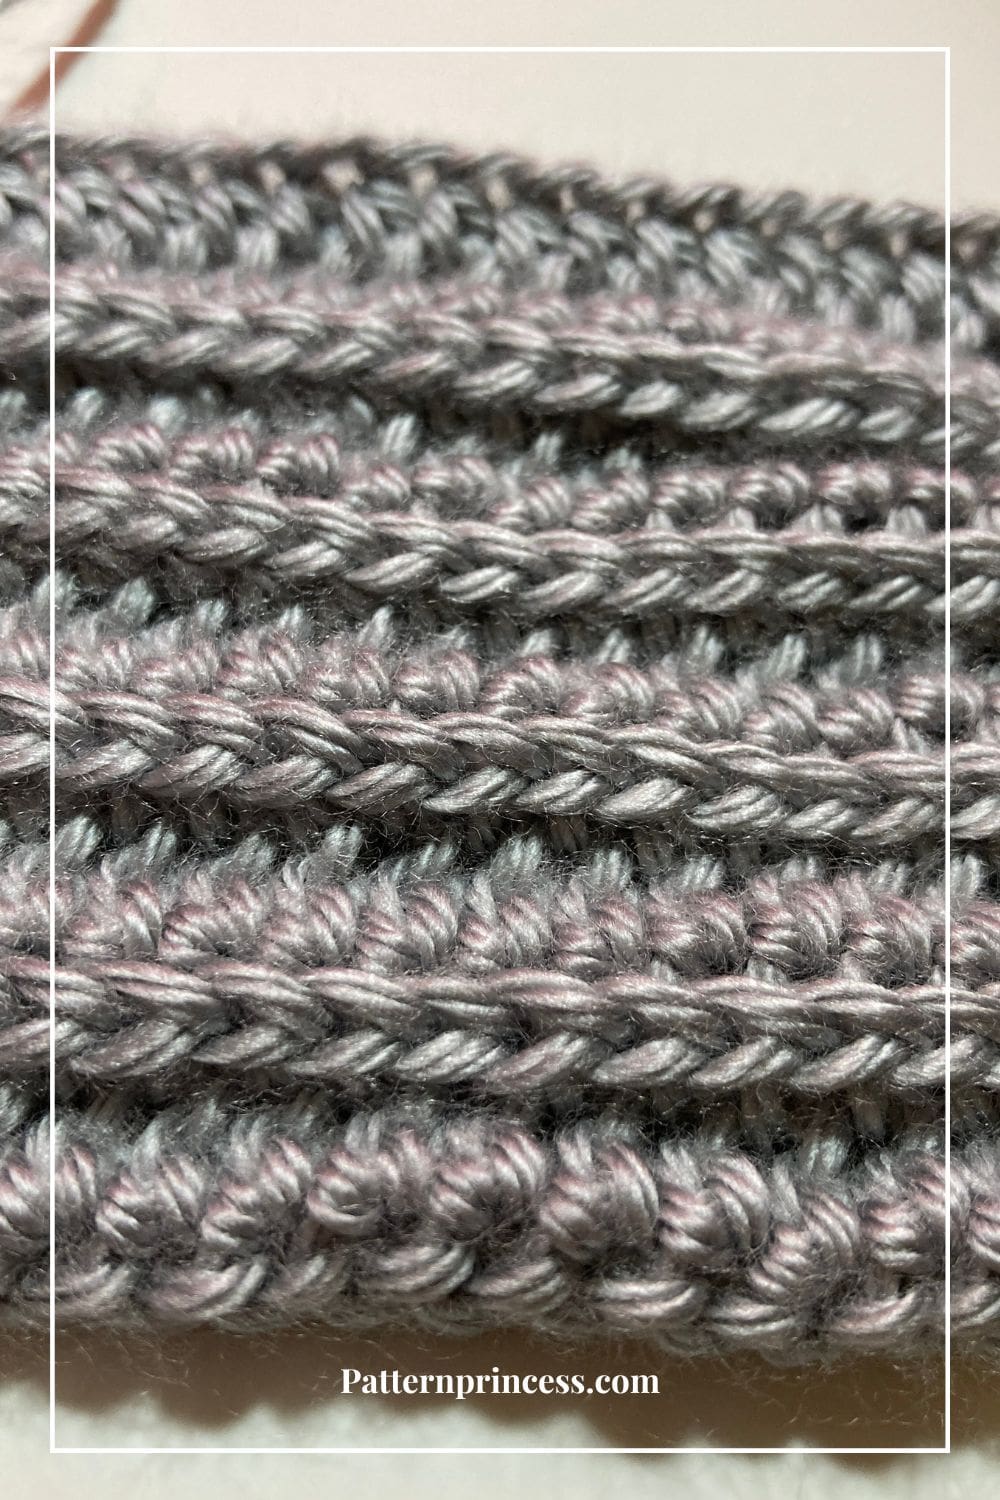
What is the half double crochet ribbing stitch?
The result is a fabric with alternating raised and recessed lines that give a ribbed appearance.
It’s a simple yet effective way to add texture and elasticity to your crochet projects, and it’s particularly great for items that require a snug fit or a bit of stretch. So, whether you’re making a warm beanie or stylish cuffs, the Half Double Crochet Ribbing Stitch is a handy addition to your crochet skill set.
How to Make Crochet Look Like Knitting with the Half Double Crochet Rib Stitch
Use the Half Double Crochet Rib Stitch to give your crocheted projects a beautiful, knitted look. There are quite a few crochet techniques that I have tried to get the crocheted fabric to mimic knitting. This by far is my favorite method.
The beauty of this pattern, if you know how to work the half double crochet, we only change where we work the stitches.
If you have crocheted before, you are familiar with where to insert the hook into the two loops on the top of each stitch. The strand that is closest to you is the front loop and the one farthest from you is known as the back loop. Most often, you insert the hook into one loop or both of the top loops to work your stitches.
However, when working the half double crochet stitch, instead we will be working in the third loop. It’s a great way to create both vertical ribbing and horizontal ribbing. You are forming the ribbing as you work, so be thinking about that when you decide on your foundation chain.
What is the Third Loop?
In half double crochet, this third loop is a slightly diagonal strand of yarn that runs across the back of the loop. When your work is turned, it will be in the front of the stitch.
Different types of crochet ribbing. There are other basic crochet stitches that can be used for the ribbed knit look.You can work in the third loop area for the double crochet and treble crochet, but I don’t think it looks quite as nice as the half double crochet does. Further, when crocheting the single crochet, it doesn’t have a third loop to work into.
Achieving the Knit Look
By working the half double crochet into the third loop all the way across our rows, we get a unique effect. The tops of the stitches are bent slightly forward. It is the top loops of the stitches that create what looks like knit rows.
Reversible Crochet Pattern. Since each row is worked the same, the pattern also looks the same no matter which side is facing you.
The thing we have to remember is that when we work this stitch to make it look like knitting, we need to turn the rows sideways. For instance, if you were making a stretchy band for a beanie, you wouldn’t work this stitch in rows around hat brims as it would end up with horizontal ribbing. Rather, you would work the rows sideways, or top to bottom. This will have the ribbing effect be vertical rather than horizontal.
Do you need to finish your project quickly? Pick a medium yarn weight or larger. It’s a great wat to achieve a soft and squishy fabric.
Directions: Easy Half Double Crochet Ribbing Stitch Tutorial
Skill Level
Advanced Beginner. While the half double crochet stitch is quite easy to work, the stitch is crocheted into the third loop which could be challenging for an absolute beginner.
Gauge
It depends on what yarn and crochet hook you choose.
Size
Chain any number of stitches. It can be odd or even.
The size will be dependent on the project you choose to make, your beginning chain stitches and the rows worked.
Materials
Yarn. A worsted weight yarn works nicely with this. However, it can really be worked in any type of yearn. But, if this is your first time, I would opt for the medium weight.
Crochet Hook Size that works well with the yarn used.
Yarn Needle
Scissors
Abbreviations
CH = Chain
HDC = Half Double Crochet
ST – Stitch
STs = Stitches
[ ] = Repeat Between
Pattern Notes
Pattern is written in US terms.
Turn at the end of each row.
The CH 1 at the beginning of the row does not count as a stitch.
Until you are familiar with stitch placement, it will help to count the stitches in the row to make sure that you are not missing stitches.
All stitches except for the end of the row are worked in the third loop.
The last stitch of the row should always be placed in the top of the previous row stitch. This helps keep the rows even.
Working in the back bump of the chain creates a neater edge.
Watch the video below for a step-by-step demonstration on how to work this stitch.
The foundation row is done the same way as for a classic half double crochet stitch.
Crochet Stitches Used
Half Double Crochet (HDC)
Yarn over, insert the hook through both top loops of the next stitch and pull up a loop. Yarn over and pull through all three loops on the hook. For height, this is between the single crochet stitches and double crochet stitches.
HOW TO CROCHET THE HALF DOUBLE CROCHET STITCH video tutorial
You can find lots of other free patterns for beginner crochet stitch tutorials.
If you are ready to expand your skills, we have a growing number of crochet patterns detailing crochet stitches for you to try.
Begin
Chain any number of stitches. It can be odd or even.
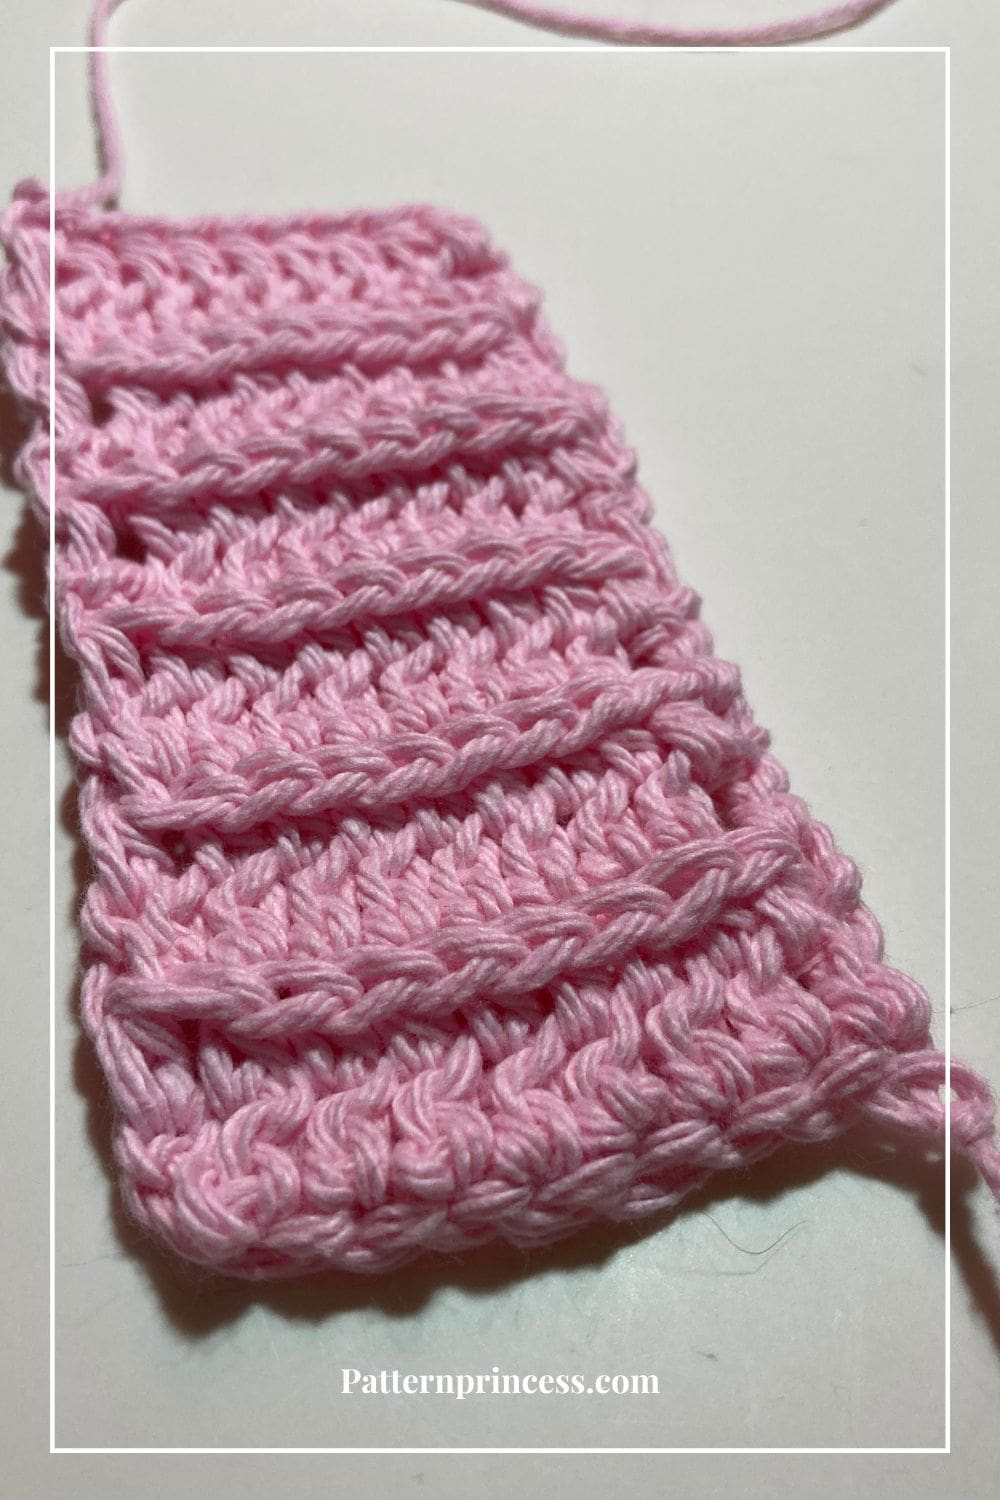
For this practice swatch, I used several different starting chains on the swatches for you to see how the stitches look when worked in longer rows and shorter rows.
Chain your desired number of stitches.
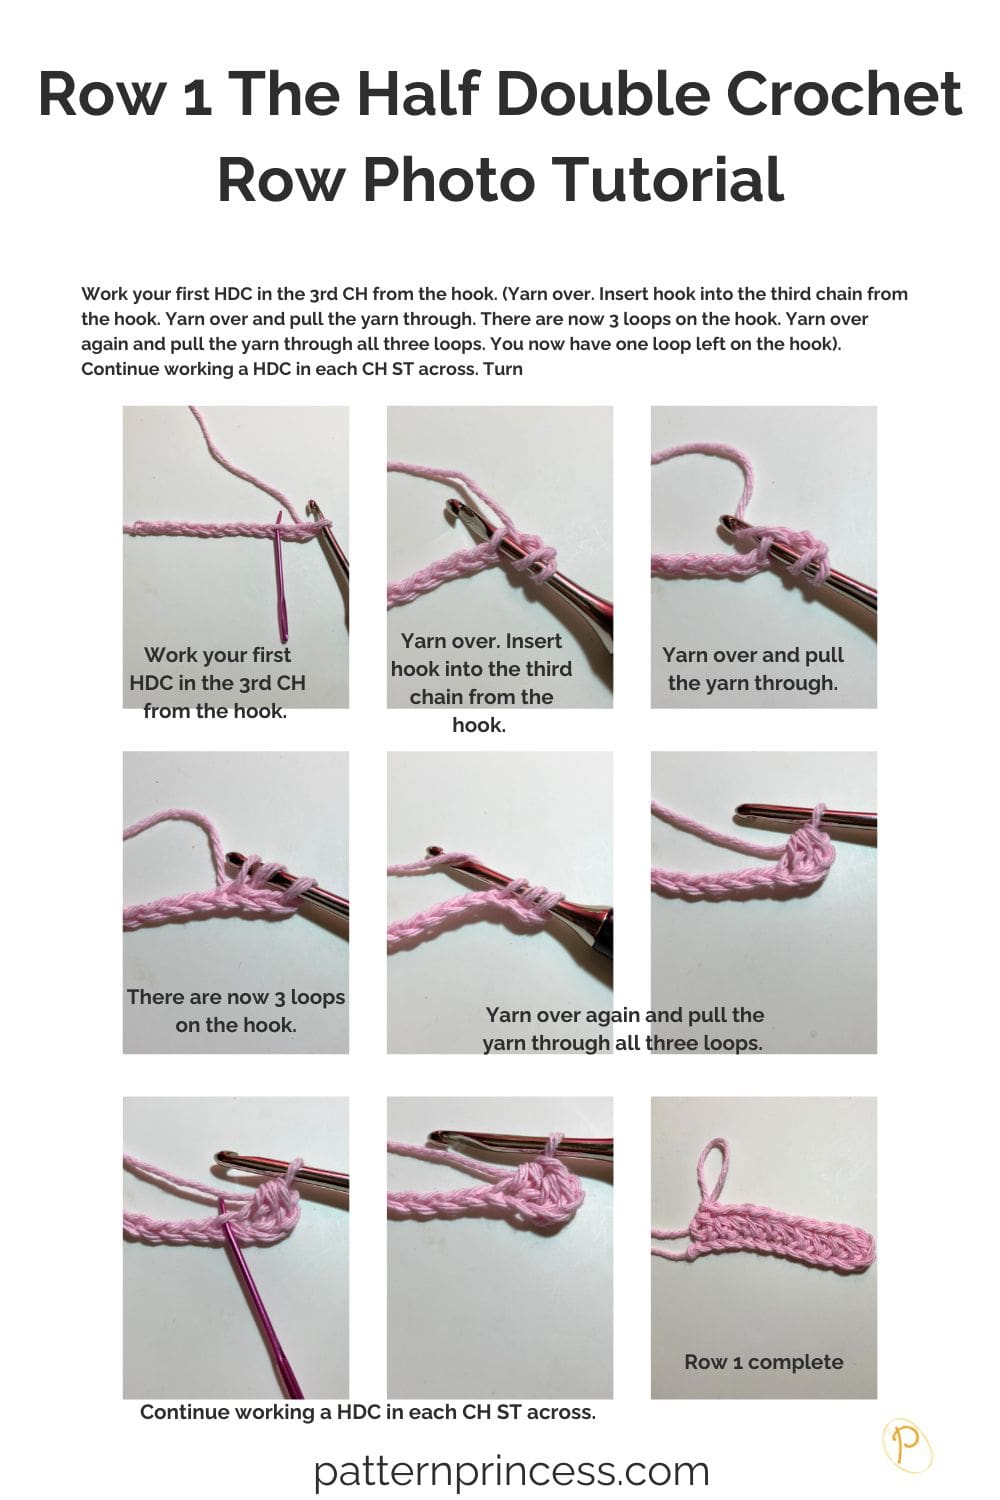
Row 1
Work your first HDC in the 3rd CH from the hook. (Yarn over. Insert hook into the third chain from the hook. Yarn over and pull the yarn through. There are now 3loops on the hook. Yarn over again and pull the yarn through all three loops. You now have one loop left on the hook). Continue working a HDC in each CH ST across. Turn

Row 2
CH 1 (Does Not Count as a ST). Work a HDC into the front third loop and in each front third loop stitch across. End with a HDC in the top stitch of the CH STs skipped in the first row. Turn
Row 3 and Beyond
CH 1 (Does Not Count as a ST). Work a HDC into the front 3rd loop and in each front third loop stitch across. End with a HDC in the in the top of the first stitch of the previous row. Turn
Continue to repeat row 3 until your desired size.
Finishing
Once you have reached your desired number of rows, pull the yarn through the last stitch. Cut the yarn leaving a 10-12 inch yarn tail. Using your yarn needle, weave the yarn back and forth between the stitches of the same color yarn. At least 3-5 times. Trim off any excess yarn.
Find our other Free PDF Patterns available for download.
Easy Half Double Crochet Ribbing Stitch Tutorial
Equipment
- Crochet Hook Size that works well with the yarn used.
- Yarn Needle
- Scissors:
Materials
- Yarn. A worsted weight yarn works nicely with this. However it can really be worked in any type of yearn. But, if this is your first time, I would opt for the medium weight.
Instructions
Begin
- Chain any number of stitches. It can be odd or even.
- For this practice swatch, I used several different starting chains for you to see how the stitches look when worked in longer rows and shorter rows.
- Chain your desired number of stitches.
Row 1
- Work your first HDC in the 3rd CH from the hook. (Yarn over. Insert hook into the third chain from the hook. Yarn over and pull the yarn through. There are now 3 loops on the hook. Yarn over again and pull the yarn through all three loops. You now have one loop left on the hook). Continue working a HDC in each CH ST across. Turn
Row 2
- CH 1 (Does Not Count as a ST). Work a HDC into the front third loop and in each front third loop stitch across. End with a HDC in the top stitch of the CH STs skipped in the first row. Turn
Row 3 and Beyond
- CH 1 (Does Not Count as a ST). Work a HDC into the front 3rd loop and in each front third loop stitch across. End with a HDC in the in the top of the first stitch of the previous row. Turn
- Continue to repeat row 3 until your desired size.
Finishing
- Once you have reached your desired number of rows, pull the yarn through the last stitch. Cut the yarn leaving a 10-12 inch yarn tail. Using your yarn needle, weave the yarn back and forth between the stitches of the same color yarn. At least 3-5 times. Trim off any excess yarn.
Notes
Skill Level
Advanced Beginner. While the half double crochet stitch is quite easy to work, the stitch is crocheted into the third loop which could be challenging for an absolute beginner.Gauge
It depends on what yarn and crochet hook you choose.Size
Chain any number of stitches. It can be odd or even. The size will be dependent on the project you choose to make, your beginning chain stitches, and the rows worked.Abbreviations
CH = ChainHDC = Half Double Crochet
ST – Stitch
STs = Stitches
[ ] = Repeat Between
Pattern Notes
Pattern is written in US terms. Turn at the end of each row. The CH 1 at the beginning of the row does not count as a stitch. Until you are familiar with stitch placement, it will help to count the stitches in the row to make sure that you are not missing stitches. All stitches except for the end of the row are worked in the third loop. The last stitch of the row should always be placed in the top of the previous row stitch. This helps keep the rows even. Working in the back bump of the chain creates a neater edge. Watch the video below for a step-by-step demonstration on how to work this stitch. The foundation row is done the same way as for a classic half double crochet stitch.Crochet Stitches Used
Half Double Crochet (HDC) Yarn over, insert the hook through both top loops of the next stitch and pull up a loop. Yarn over and pull through all three loops on the hook. For height, this is between the single crochet stitches and double crochet stitches.Crochet YouTube Video Tutorials for the Ribbed Stitch

You can find Victoria crocheting, quilting, and creating recipes. She has cooked in restaurants for over 20 years, including many larger parties. She learned to crochet when she was just 11 years old and has been crocheting ever since; over 50 years now. Over 40 years ago, she loved her first class in sewing and continues to hone her skills in quilting. Many have enjoyed the handmade gifts over the years. In her professional career, she has worked in management in a wide variety of businesses including higher education as a dean of a division. All the while attending college part-time to achieve her doctorate in higher education with an emphasis in e-learning.