Last updated on June 13th, 2026 at 10:05 am
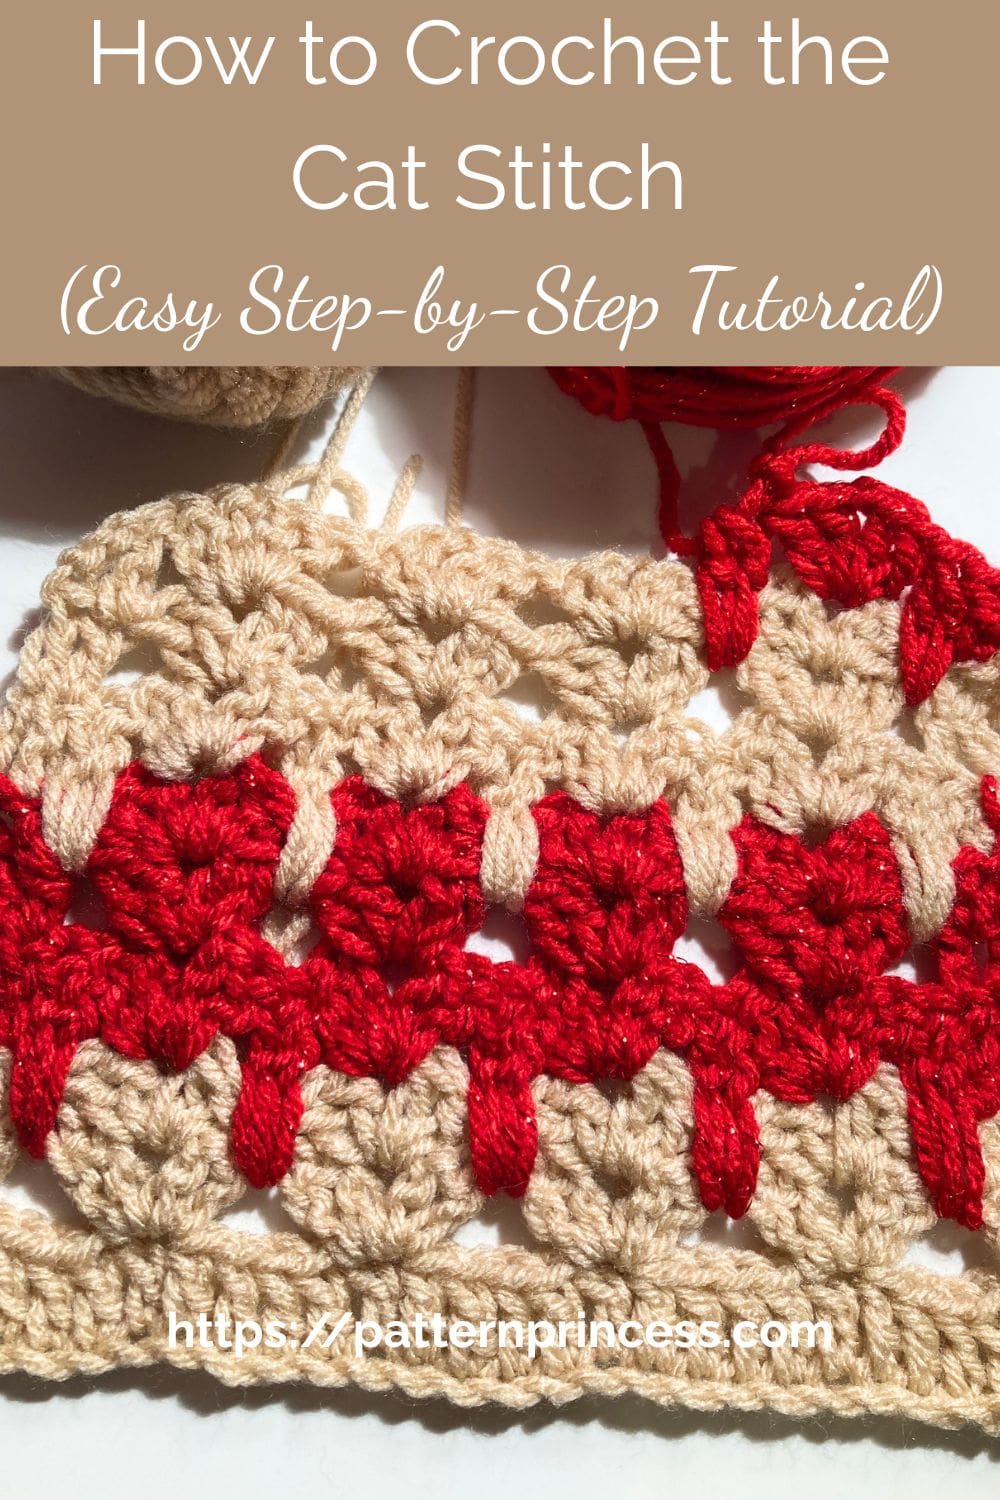
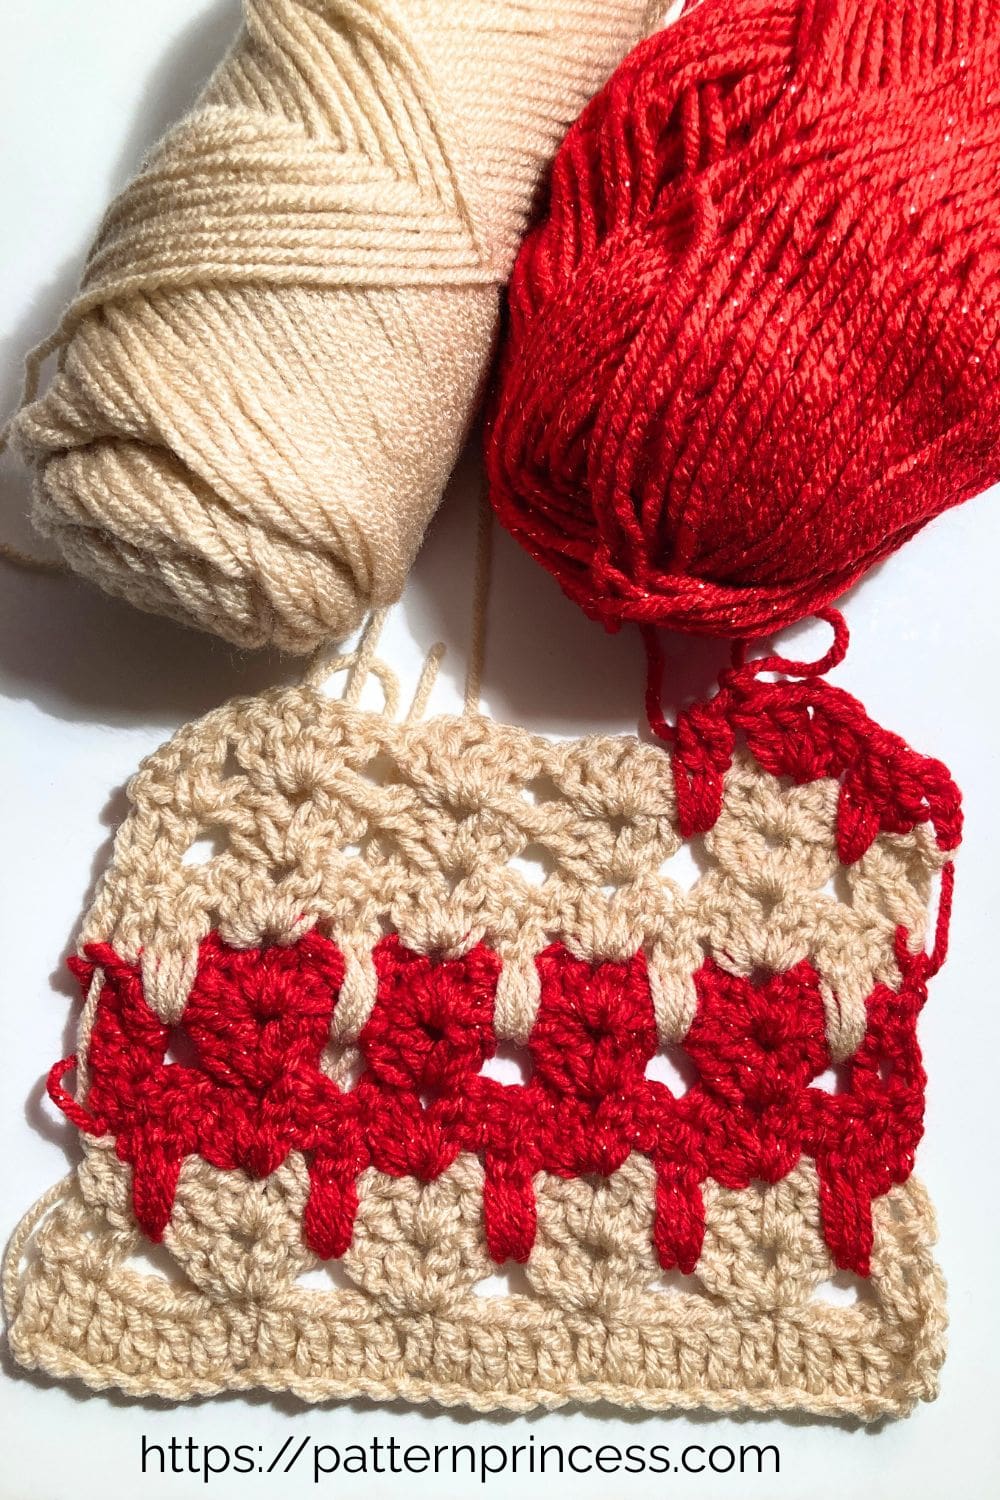
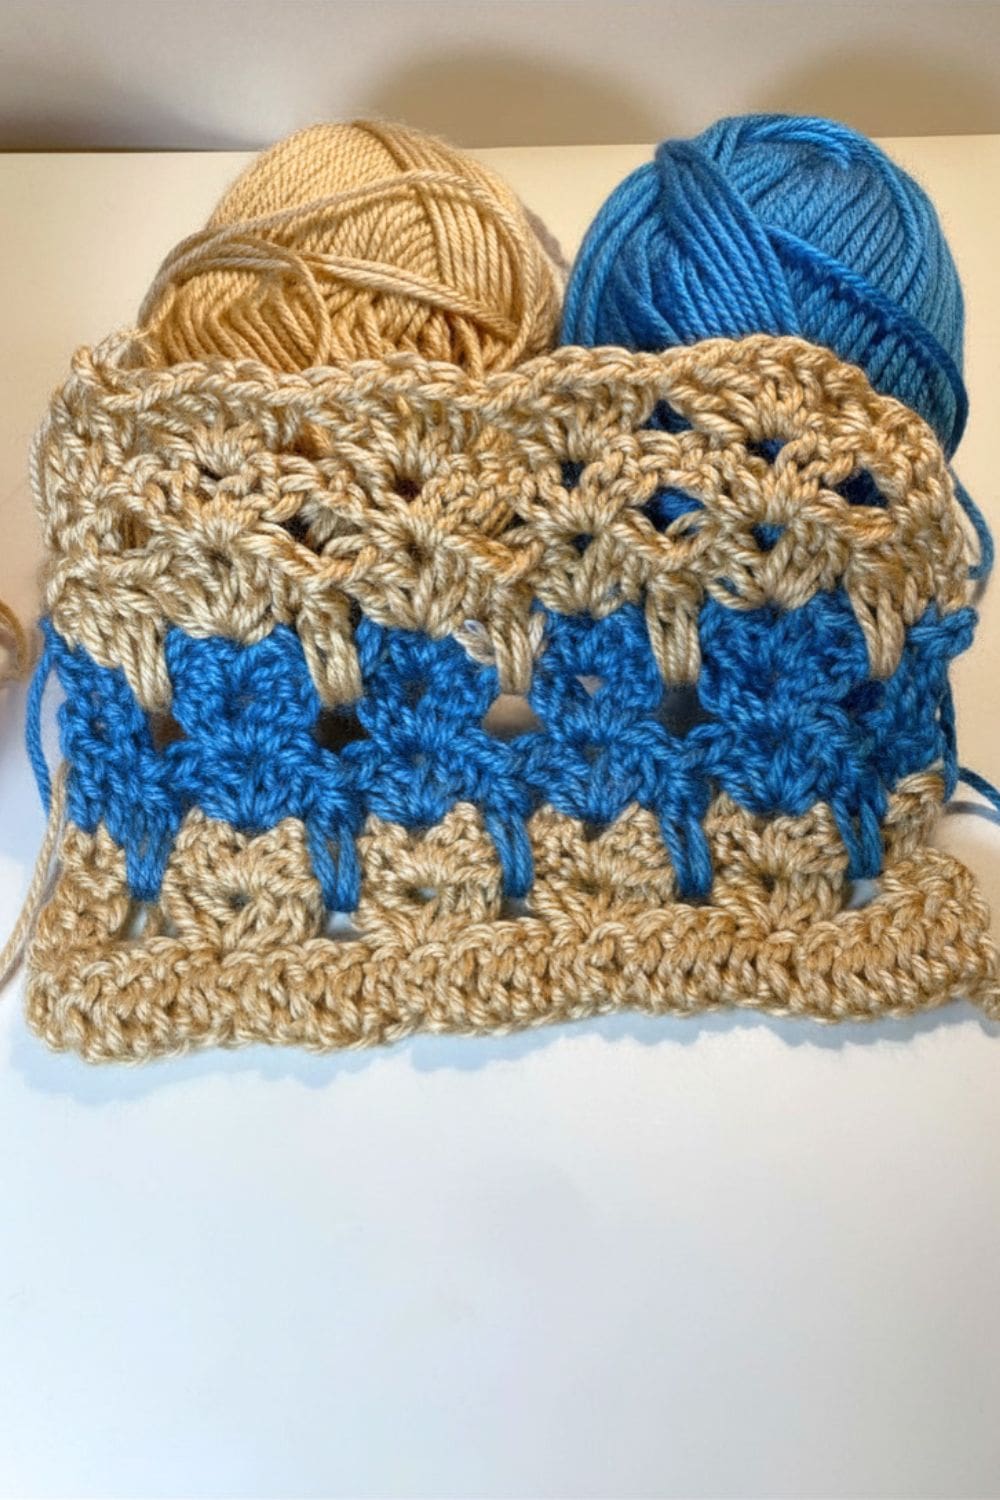
If you love adding a little personality to your crochet projects, the crochet cat stitch is such a fun and charming design to learn. The first time I worked this stitch, I couldn’t stop smiling—those tiny cat faces peeking out of the fabric are just too cute. It’s the kind of stitch that turns a simple project into something special, whether you’re making a dishcloth, scarf, or even a baby blanket.
The best part? While it looks detailed, this stitch uses basic crochet stitches and a simple repeat, making it a great way to build your skills while creating something unique.
What Is the Crochet Cat Stitch?
The crochet cat stitch is a textured stitch pattern that creates rows of little cat faces using a combination of double crochet and chain stitches. By spacing your stitches just right, the “ears” and “faces” naturally form within the pattern.
This is a great stitch if you:
- Want a playful and eye-catching design
- Enjoy textured crochet patterns
- Are comfortable with basic stitches
Why You’ll Love This Stitch
- Adds personality to simple projects
- Works up quickly once you learn the repeat
- Great conversation starter at craft fairs
- Perfect for cat lovers and handmade gifts
Best Yarn Types for the Crochet Cat Stitch
Smooth, Medium-Weight Yarn. The cat stitch relies on stitch definition. Smooth yarn lets those little ears, faces, and paws pop instead of getting lost.
Great options:
- Acrylic (budget-friendly, easy care)
- Cotton (especially for dishcloths)
- Cotton blends (soft but still defined)
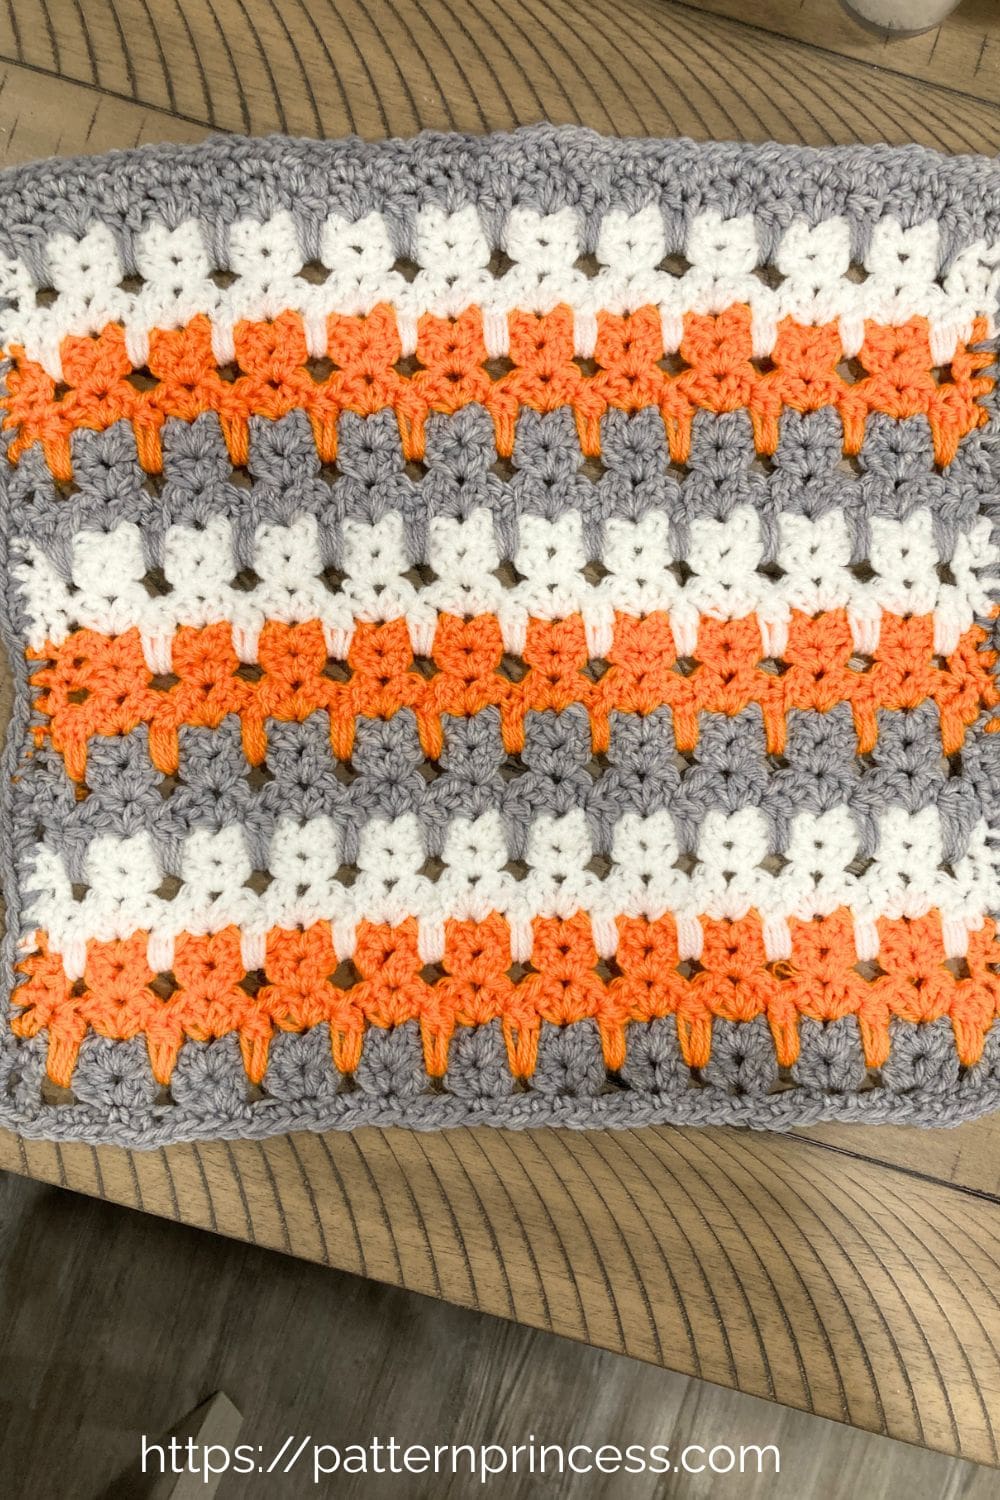
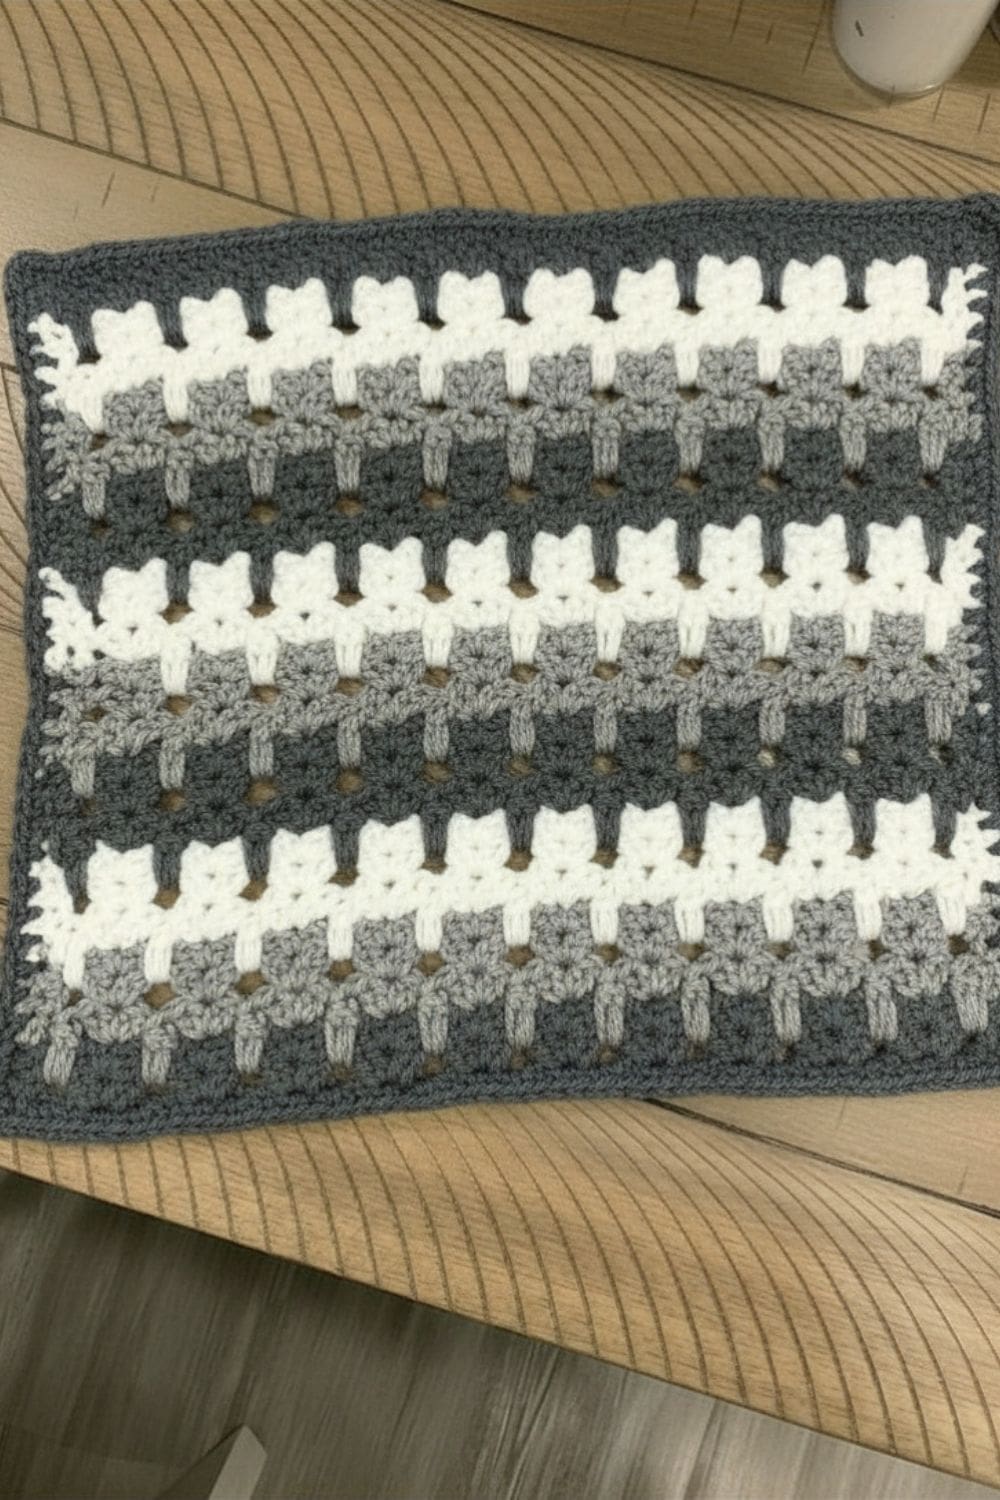
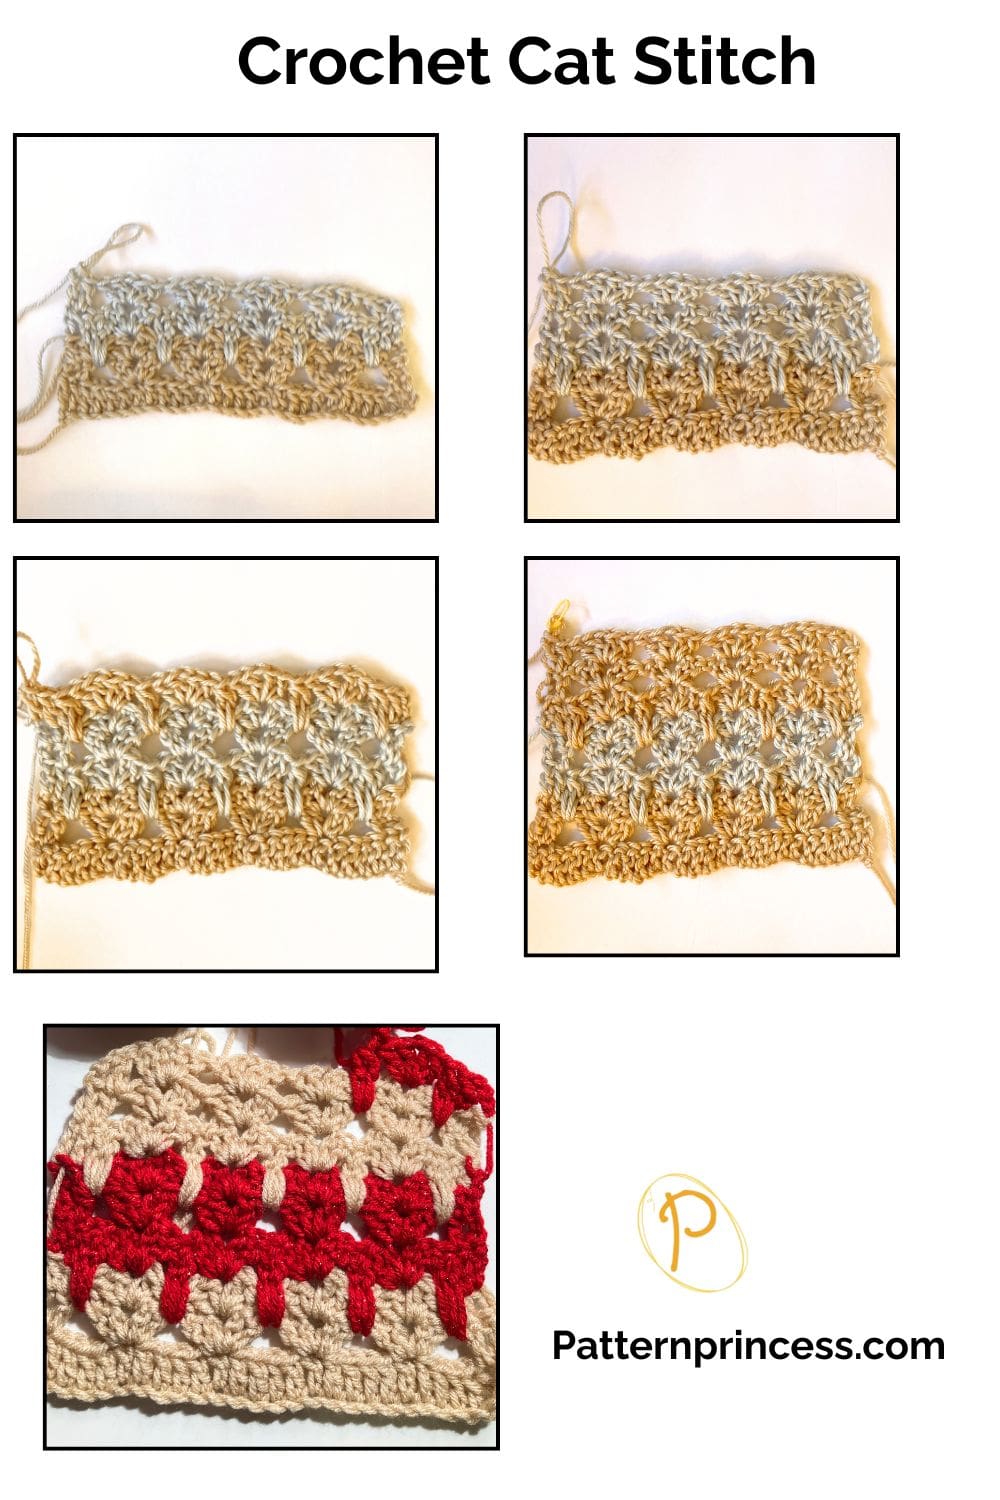
Color Combination Ideas
Since you’re changing colors every 4th row, you’re essentially creating striped cat rows, which is fantastic for visual interest.
High-Contrast Combos (Best for Showing the Cat Shape)
The contrast makes the cats pop instantly.
Examples:
- Cream + charcoal
- Light gray + navy
- Beige + dark brown
- White + bright variegated yarn
- Black + bright variegated yarn
If you prefer a softer neutral look, we would suggest these color combinations.
- Cream, taupe, and soft gray
- Sage green + off-white
- Dusty blue + beige
Here are some playful color options.
Examples:
- Pastels (baby items)
- Bright rainbow stripes (kids projects)
- Pink + white + gray
Have fun trying out different color combinations for this fun and playful crochet stitch.
See how we paired this stitch with a black yarn and a brightly colored variegated yarn in our Galaxy Cat Stitch Throw Blanket.
The crochet cat stitch is one of those patterns that instantly brings joy to your work. It’s simple enough to relax into, but unique enough to make your projects stand out. Whether you’re crocheting for your home, your family, or your handmade shop, this stitch is sure to become a favorite.
Get Your Ad Free Printable PDF in our Etsy Shop
Directions: How to Crochet the Cat Stitch Crochet pattern
Skill Level
Intermediate Crocheter
You should be comfortable with the double crochet stitch, yarn color changes, and working stitches two rows below.
Gauge
The gauge will depend on the yarn weight and crochet hook used.
Finished Size
The size will depend on the number foundation chain stitches and rows completed.
Varying the Size
To adjust the width, simply adjust your chains by any multiple of 5. To make the project longer or shorter, simply crochet more or fewer rows.
Materials
Yarn. For my samples I used number 4 medium weight yarns.
Ideally, you’ll want to use at least 2 yarn colors for the cat stitch to stand out.
For this pattern we’ll refer to Color A and Color B.
Crochet Hook. I used a size I 5.5mm crochet hook for the medium weight yarn.
Hook size can vary depending on your yarn, but I recommend:
- Going up a hook size if your stitches feel tight.
- Going down a hook size if your stitches look loose.
Scissors
Yarn Needle
Measuring Tape
Stitch Abbreviations (US Terms)
- CH = Chain
- DC = Double Crochet
- DCCL = Double Crochet Cluster
- SK = Skip
- SP = Space
- ST = Stitch
- STs = Stitches
- SS = Shell Stitch
- YO = Yarn Over
- [ ] = Repeat Between
Crochet Stitches
Chain Stitch (CH ST). Begin the chain stitch by making a slip knot on the crochet hook. Leave about a 5-inch tail on the yarn. This will be weaved in later.
Next snug up the yarn loop that is on the crochet hook; while it should be firm, it should also be loose enough to slide on the hook with ease.
Keeping the loop on the hook, insert the hook in the chain stitch, wrap the yarn over the crochet hook from back to front. Draw the yarn through the loop. (The first chain stitch is complete).
Double Crochet (DC). Yarn over, insert hook through both loops and pull up a loop. Next, yarn over and pull through two loops on the hook. Lastly, yarn over again and pull through the last two loops on the hook.
Double Crochet Cluster. Yarn over insert the hook into the space and pull up a loop. Yarn over and pull through two loops. There should be two loops on the hook.
Next, yarn over, insert the hook into the same space and pull up a loop. Yarn over and pull through two loops. (There should be 3 loops on the hook).
Finally, yarn over and pull through all three loops on the hook.
Shell Stitch (SS). A shell stitch is a term for a special crochet stitch that consists of a set of (2 double crochet, chain 1, 2 double crochet). All worked into one stitch or space.
Pattern Notes
This pattern is written in U.S. Crochet Terms.
The pattern repeats rows 4-6 changing yarn colors at the beginning of each row 4 repeat.
Chain 3 at the beginning of the row counts as a double crochet.
For this pattern we will be working an extended double crochet cluster where the stitches are worked between the shell stitches two rows below.
How to Make Your Color Changes Shine. You’ll be working a 3-row repeat (Rows 4–6) and changing color every repeat.
- Each color shows one full “cat row set”
- The cats will appear stacked in color blocks
- This creates a subtle striped effect without breaking the pattern
You can find the photo tutorials by the written pattern.
Video Tutorials of the cat stitch are located after the written pattern.
Carrying Yarn Up the Side
Since you’re changing colors every fourth row in the sequence, you can save time and avoid a pile of yarn tails by carrying your yarn up the side instead of cutting it each time.
To do this, simply drop the unused color at the end of the row and pick it back up when you need it again, gently pulling it up along the edge as you work.
Be careful not to pull too tightly—keep the carried yarn relaxed so your edges don’t pucker. This technique works best when the color is reused within a few rows, like in this pattern. When you’re finished, you can easily hide the carried strands along the edge with a border, giving your project a clean, polished look without all the extra weaving in.
Begin Cat Stitch Pattern
Using yarn color A.
Place a slip knot on your crochet hook.
Chain any number of stitches in a multiple of 5.
The sample size is 30 stitches
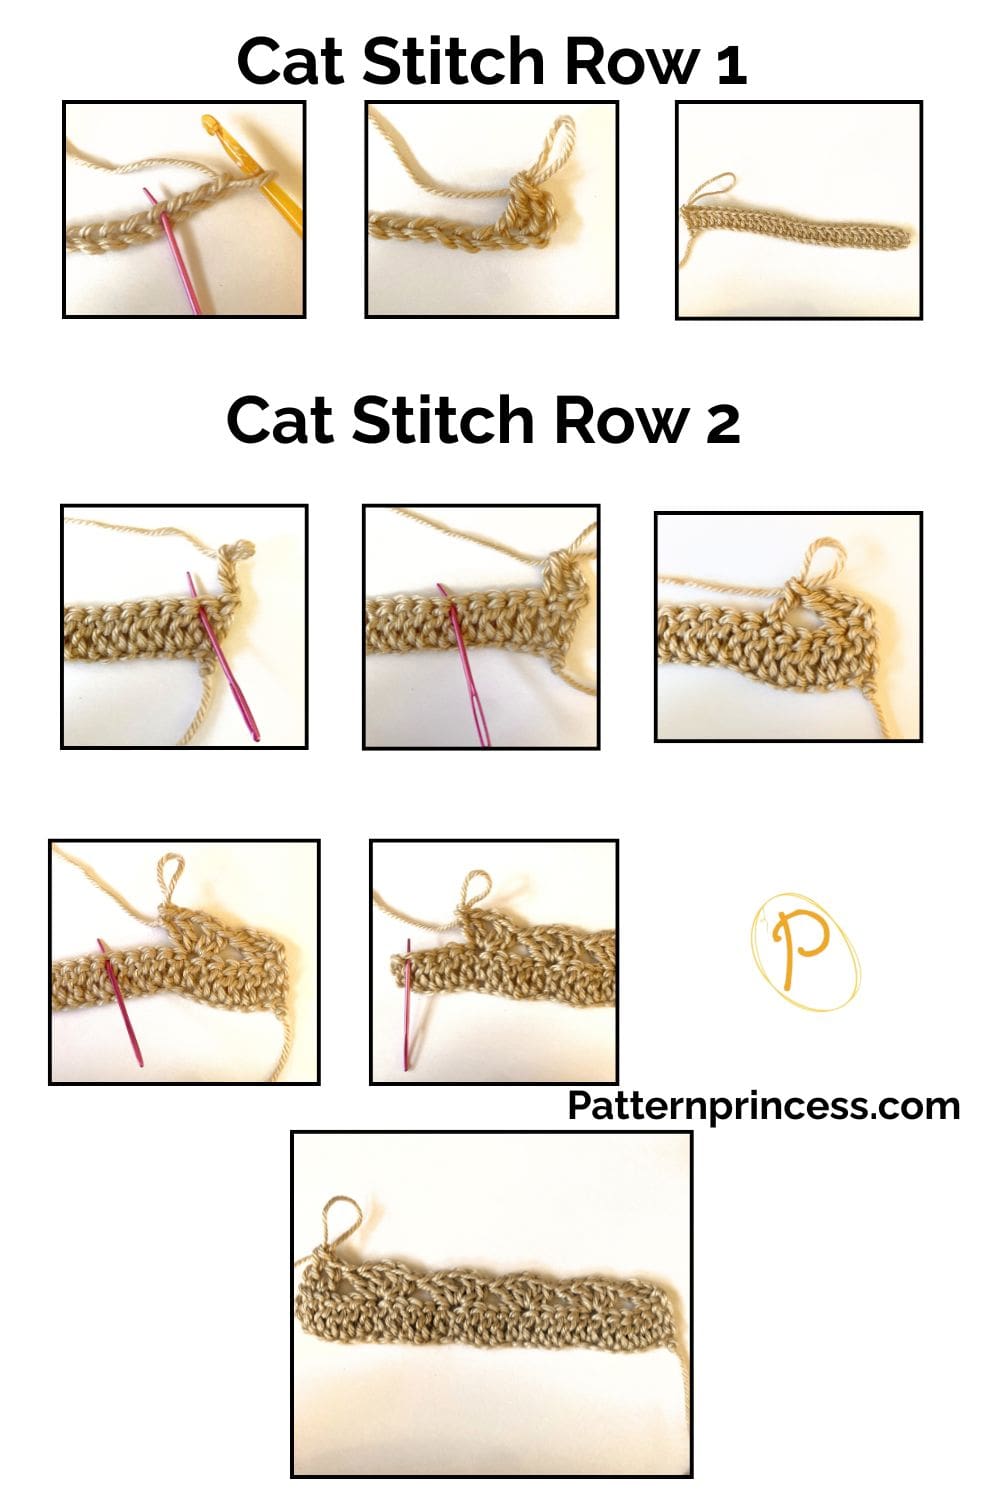
Row 1
Continue using yarn color A
DC in the 4th CH from the hook and in each ST across. Turn (28 STs)
Row 2
Continue using yarn color A
CH 3 (Counts as a DC). DC in the next ST. [SK 4 CH STs. In the next ST work a SS (2DC, CH 1, 2DC)]. Repeat between [ ] across. When there are 6 STs left SK 4 CH STs and work 1 DC in the last 2 STs. Turn (28 STs).
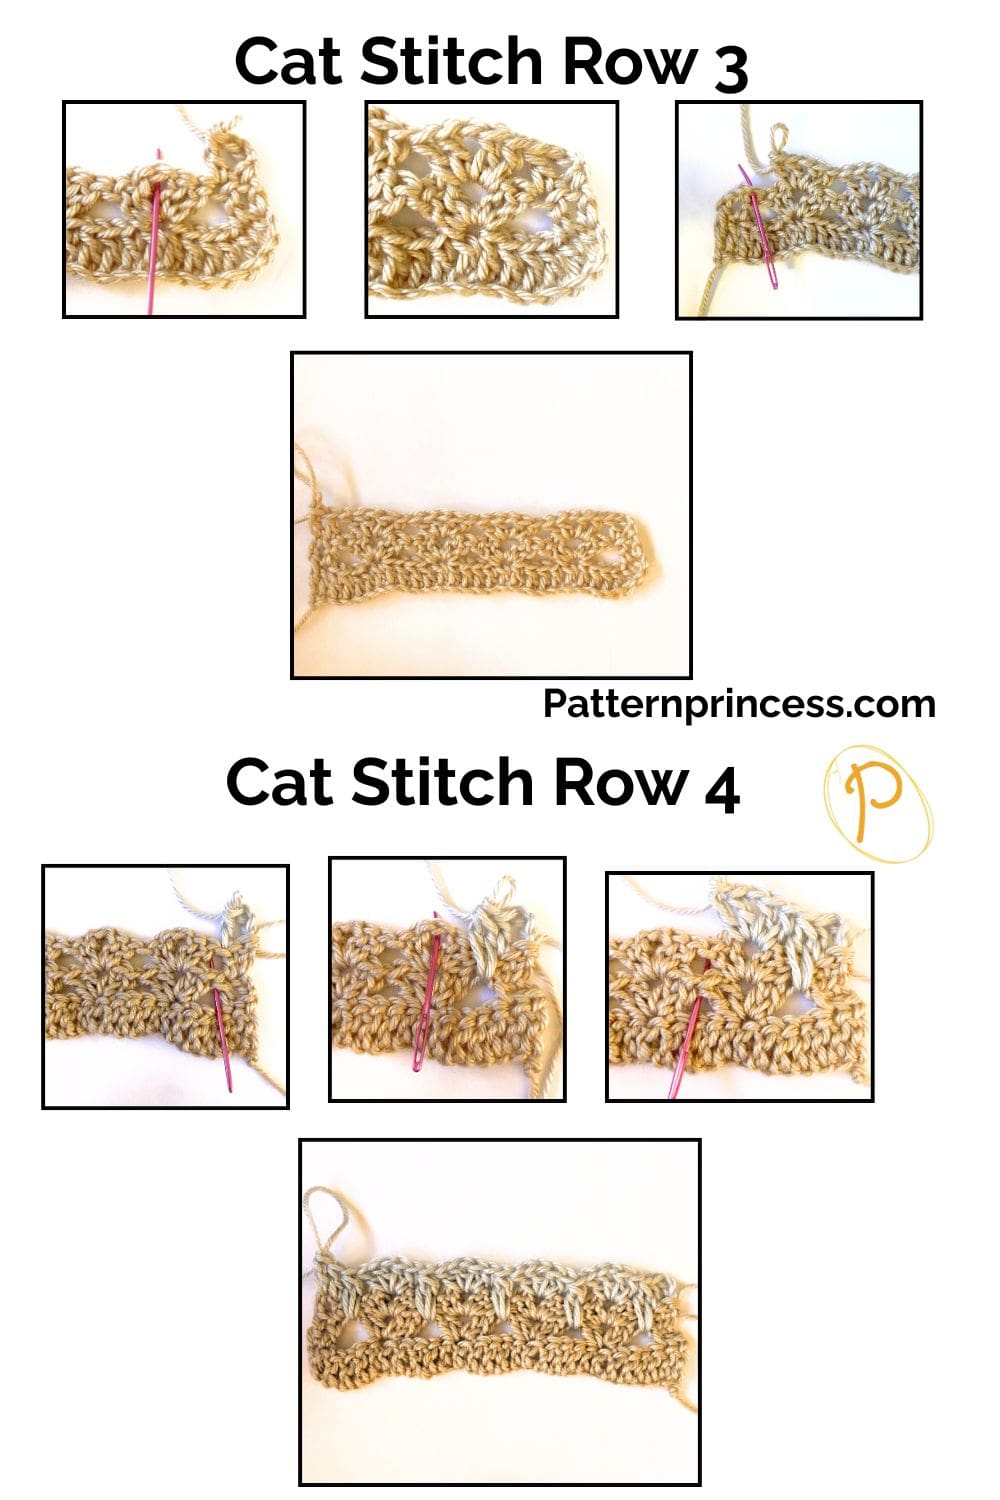
Row 3
Continue using yarn color A
CH 3 (Counts as a DC). DC in the next ST. [SK to the CH SP in the middle of the SS. Work a SS (2DC, CH 1, 2DC)]. Repeat between [ ] across. Finish the row with 1 DC in the last 2 STs. Turn (28 STs).
Row 4
Change to yarn color B. This row begins the cat stitch. It’s also the first row of the repeat.
CH 3 (Counts as a DC). DC in the next ST. [Between the two shell stitches two rows below, work an extended double crochet cluster. SK to the CH SP in the middle of the SS. Work a SS (2 DC, CH 1, 2DC). Between the two shell stitches two rows below, work an extended double crochet cluster]. Repeat between [ ] across. Finish the row with 1 DC in the last 2 STs. Turn (28 STs).
Row 5
Continue using yarn color B.
CH 3 (Counts as a DC). DC in the next ST. [SK to the CH SP in the middle of the SS. Work a SS (2DC, CH 1, 2DC)]. Repeat between [ ] across. Finish the row with 1 DC in the last 2 STs. Turn (28 STs).
Row 6
Continue using yarn color B.
CH 3 (Counts as a DC). DC in the next ST. [SK to the CH SP in the middle of the SS. Work a SS (2DC, CH 1, 2DC)]. Repeat between [ ] across. Finish the row with 1 DC in the last 2 STs. Turn (28 STs).
Rows 7 and Beyond
Continue repeating rows 4-6 changing yarn color for each repeat.
Carrying yarn up the side
When row 6 is complete, add a stitch marker. Go to the other side and pick up yarn color A. Crochet the row and you’ll end up by yarn color B. Remove the stitch marker from yarn color B. Slip the loop around the loop of yarn color A. Snug up the yarn. Continue crocheting the next two rows.
When it is time to switch colors, bring yarn color B through the loop of yarn color A. Make sure that the yarn laying against the side of the project isn’t too loose or tight. Continue with the pattern.
Finishing
After you work the last ST, cut off the yarn leaving about a 12-inch long tail. Pull the yarn tail through the last loop on the hook.
Thread the yarn needle with the yarn tails and weave them through the crochet stitches back and forth until the yarn feels secure. Snip off the excess yarn.
Video Tutorials on our You Tube Channel
Right Hand Cat Stitch Video Tutorial
Left Hand Cat Stitch Video Tutorial
Will the Carried Yarn Show?
If you’re using very contrasting colors (like black and white), you may see a tiny bit of color along the edge. This is easy to hide later with a simple crochet border.

You can find Victoria crocheting, quilting, and creating recipes. She has cooked in restaurants for over 20 years, including many larger parties. She learned to crochet when she was just 11 years old and has been crocheting ever since; over 50 years now. Over 40 years ago, she loved her first class in sewing and continues to hone her skills in quilting. Many have enjoyed the handmade gifts over the years. In her professional career, she has worked in management in a wide variety of businesses including higher education as a dean of a division. All the while attending college part-time to achieve her doctorate in higher education with an emphasis in e-learning.
Hello I love this pattern I have never seen it before. I started crocheting around 15. Still conti ue to this day at 64. I would really love to make this. How do I get the pattern
Hello,
Glad to hear you’ve found a new stitch after crocheting so many years. I am not sure what you mean…how to get the pattern. The cat stitch pattern is detailed on this blog post.
Vicky