Last updated on July 4th, 2024 at 11:19 pm
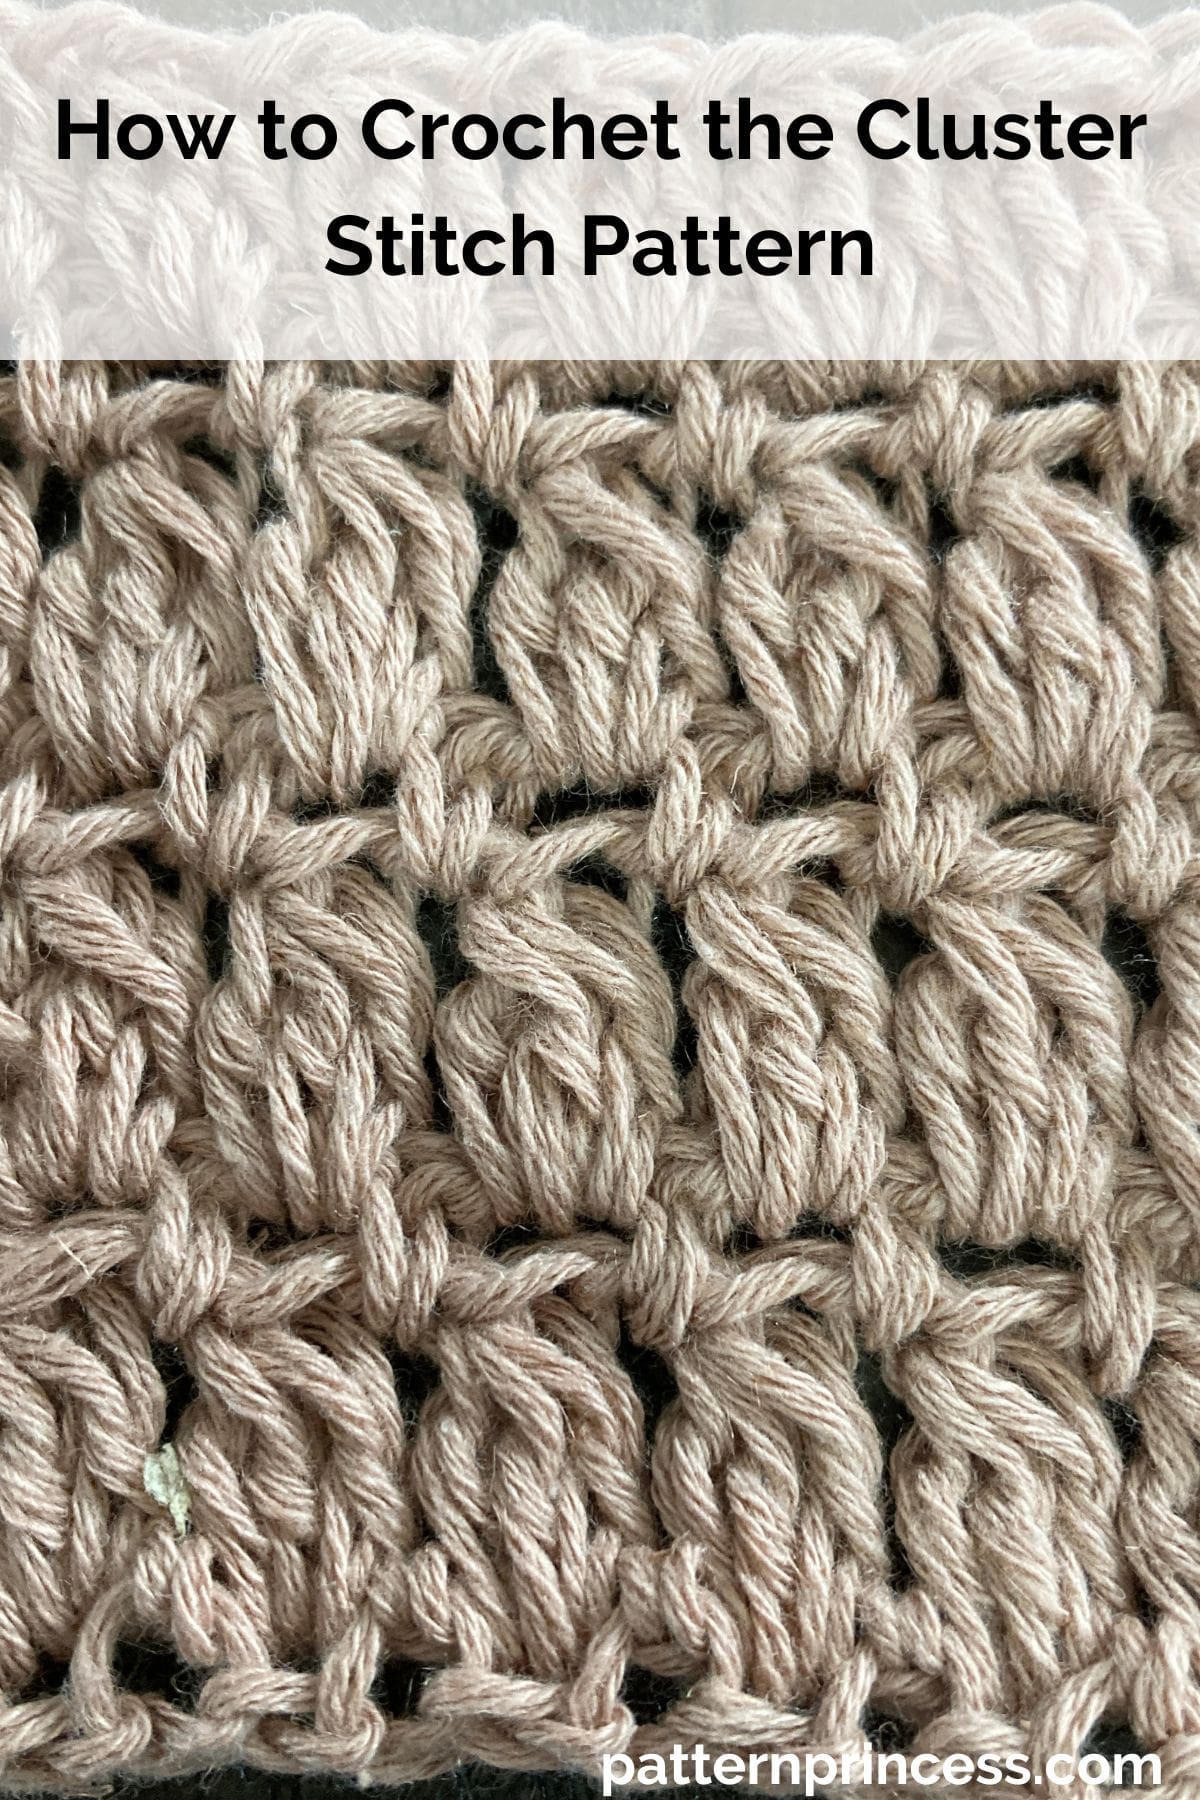
Crocheting the Cluster Stitch is a delightful way to add texture and depth to your projects. Whether you’re creating cozy blankets, scarves, or even dishcloths, this stitch pattern is versatile and visually appealing.
This crochet stitch has been on my to do list for a while now. I have had the yarn picked out and sitting in my yarn storage for over a year. Do you have crochet projects just waiting to be started? I do. My planned list is so long.
I am making a blanket pattern using worsted weight yarn in three different colors. And I am keeping things simple by carrying the yarn up the sides. As soon as this is done, it will be posted for you to make your own personal use.
Easy Crochet Stitch
This is one of those patterns where once you get past the first few rows, you barely have to worry about stitch counts. In one row you are working in the chain stitches between the single crochet stitch. The other row, you are working in the chain stitches between the double crochet cluster stitch.
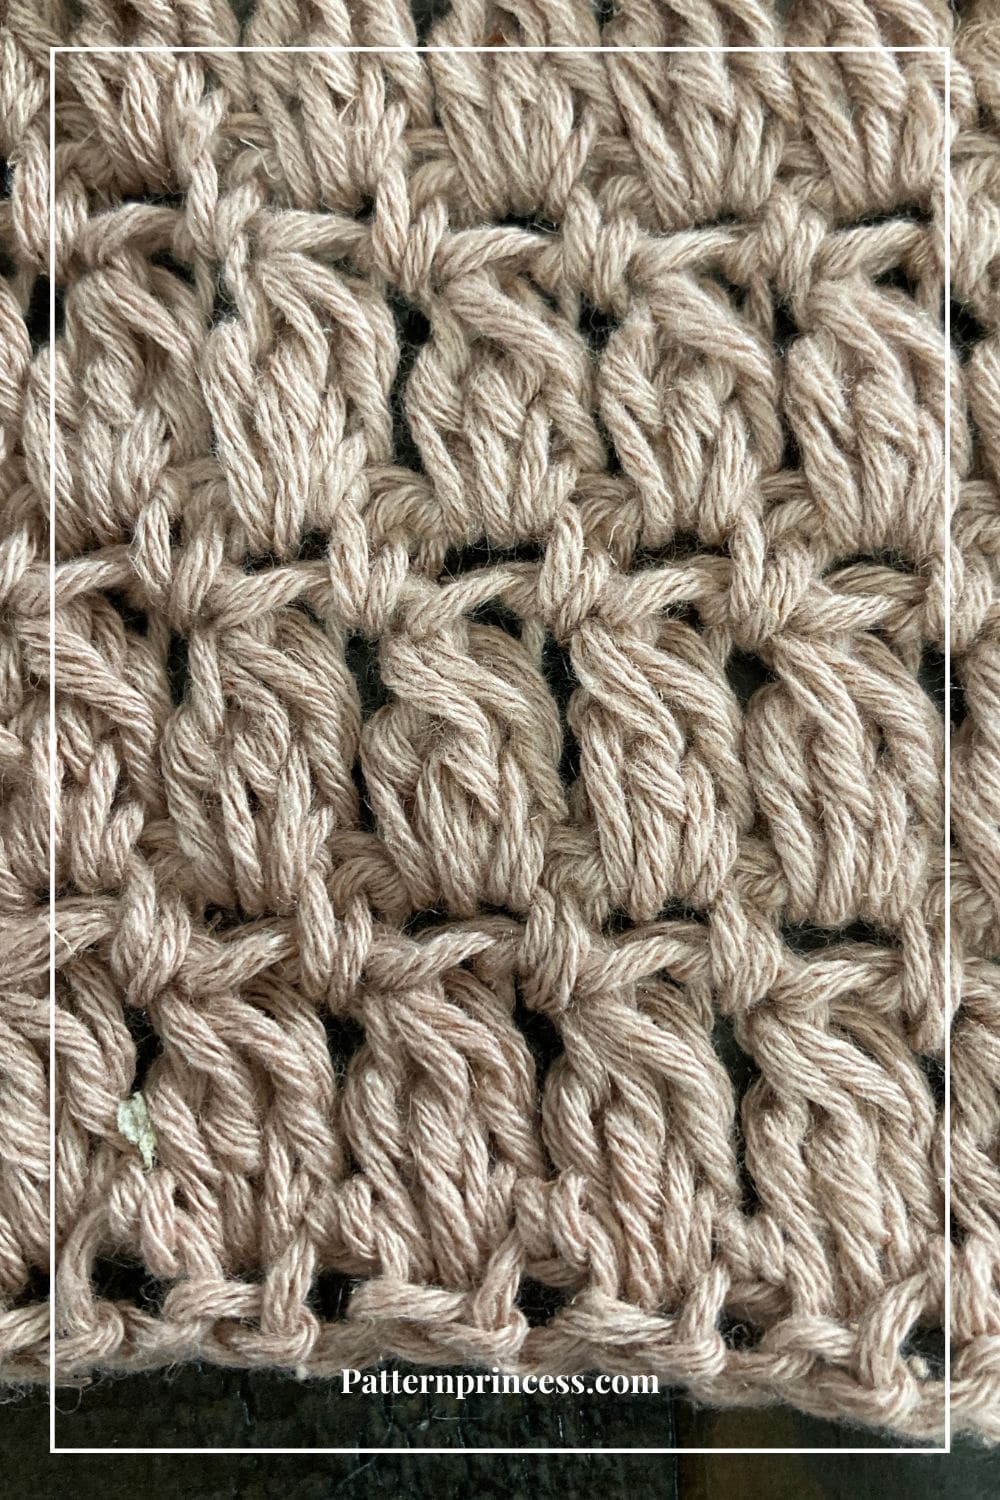
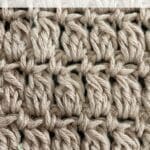
It’s relatively easy to work the cluster stitch as it is like a puff stitch and bobble stitch consisting of double crochet stitches. This one is like working a three double crochet together.
Reversible Crochet Pattern
This is a lovely stitch with lots of beautiful texture and it looks just as nice on the wrong side. A plus with this pattern is that it’s reversible.
Finishing Crochet Projects vs Starting Crochet Projects
I know some crocheters have a hard time finishing. For me, it’s having so many things planned that I can’t get to them all. As a crochet designer, it takes time to write up the free patterns for you folks. However, I love sharing the joy to get from crocheting with others, so I don’t mind.
Today, I’m finally getting around to learning the cluster stitch and crocheting a blanket with the three yarn colors I have been saving. I love learning new stitches.
I think this would look really pretty for a baby blanket. We might need to make more in different colors.
Let’s dive into the steps for crocheting the Cluster Stitch:
Get Your Ad Free Pattern Printable PDF in our Etsy Shop
Directions: How to Crochet the Cluster Stitch
Skill level
Confident Beginner
You should be able to crochet the single crochet, chain stitch, and double crochet.
Size
For the sample shown in the video, I used 12 chain stitches.
Use any even number of stitches for your foundation chain. The foundation chain length will determine the width of your project.
Gauge
This will depend on the yarn and crochet hook you choose for your project.
Abbreviations
CH = Chain
Cluster Stitch (DC3Tog) = Cluster Stitch or Double Crochet Three Together
DC = Double Crochet
SK = Skip
SP = Space
ST = Stitch
STs = Stitches
[ ] = Repeat Between
Materials Needed
- Yarn (any type) and a corresponding crochet hook. For the tutorial, I used a medium weight yarn Caron Simply Soft with a Size I 5.5 mm Hook. Note, the yarn calls for a Size 5.0 mm Crochet Hook. However, you may use any hook and yarn combination you choose.
- Scissors
- Tapestry Needle
Pattern Notes
Pattern starts with an even number of stitches.
Written in US crochet terms.
Rows 2 and 3 stitches are worked in the chain spaces.
Chain 1 turning chain does not count as a stitch.
Chain 3 turning chains count as a double crochet.
Don’t forget to check out the free video tutorial linked below!
Special Stitches
Cluster Stitch or Double Crochet Three Together (DC3Tog) in the same stitch.
- Step 1. Yarn over, insert hook into next stitch and pull up a loop. There will be three loops on the crochet hook. Yarn over, pull through two loops on the hook. There should now be just two loops left on the hook.
- Step 2. Yarn over and insert the hook into the same stitch and pull up a loop. There will be four loops on the hook. Yarn over, pull through two loops. There should now be just three loops on the hook.
- Step 3. Repeat the steps one more time. Yarn over and insert the hook into the same stitch and pull up a loop. There will be five loops on the hook. Yarn over, pull through two loops. There should now be just four loops on the hook.
- Final Step. Lastly yarn over and pull through the remaining four loops.
Instructions
Begin
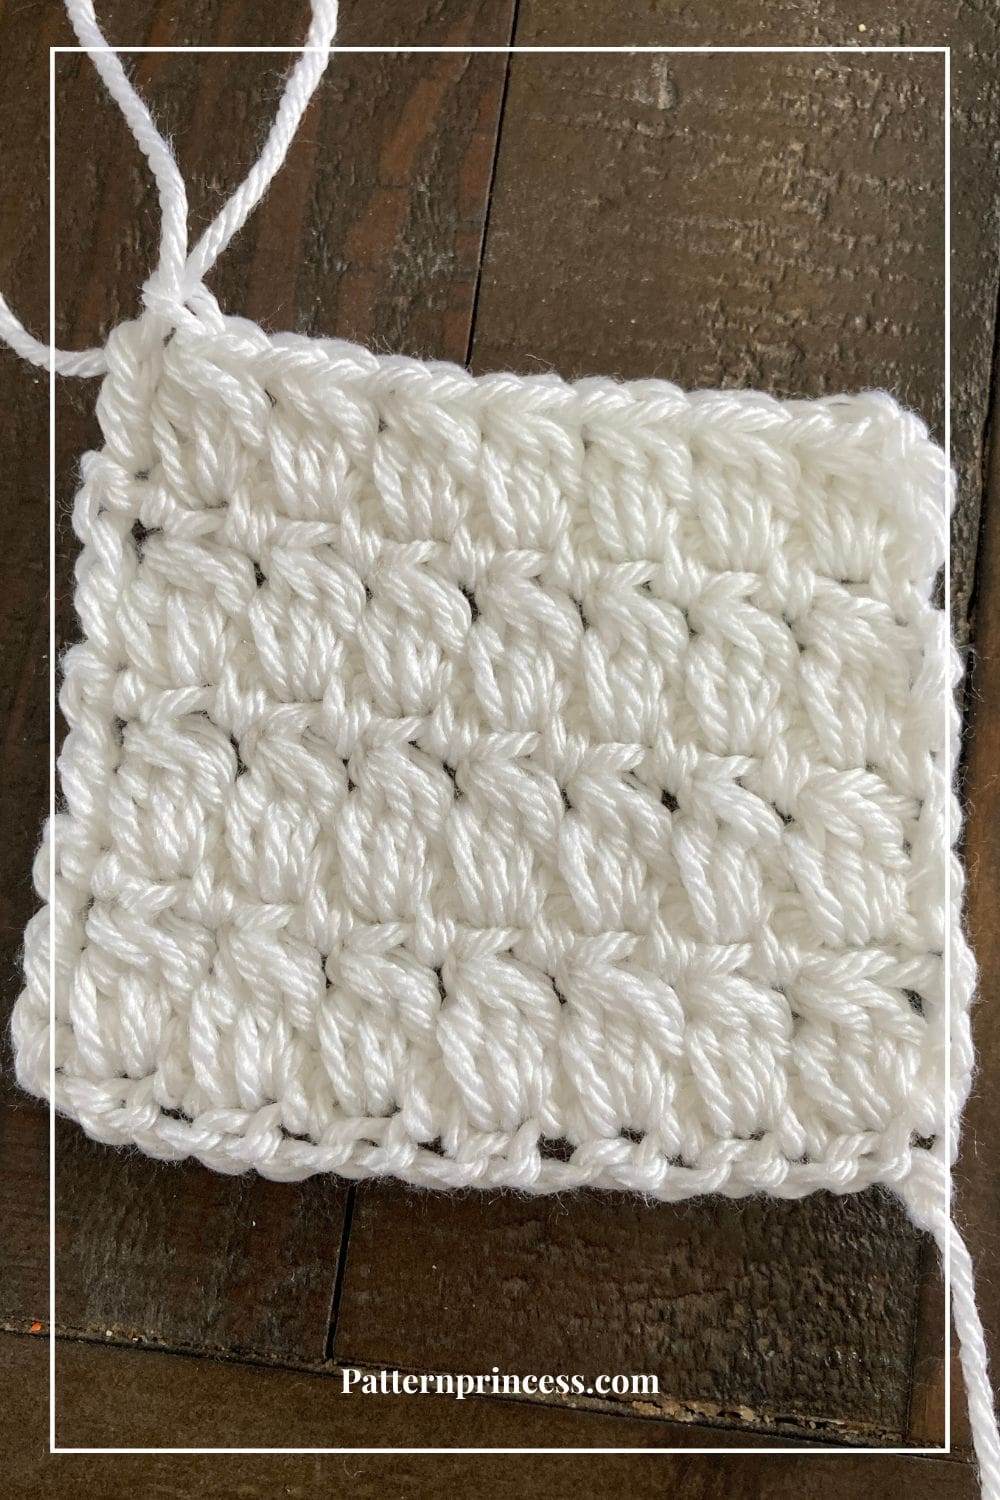
To begin, make a slip knot and then chain your desired number of chains. Even Number of Stitches. The sample in the video is 12 chain stitches.

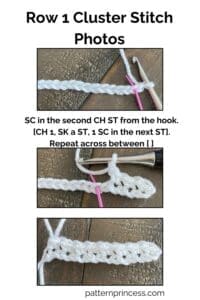
Row 1
SC in the second CH ST from the hook. [CH 1, SK a ST, 1 SC in the next ST]. Repeat across between [ ] until you reach the last 2 STs. Then work a CH 1, SK 1, SC in the final ST. Turn
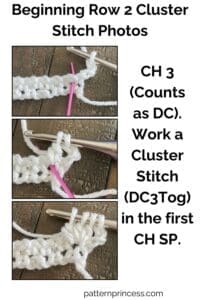
Row 2
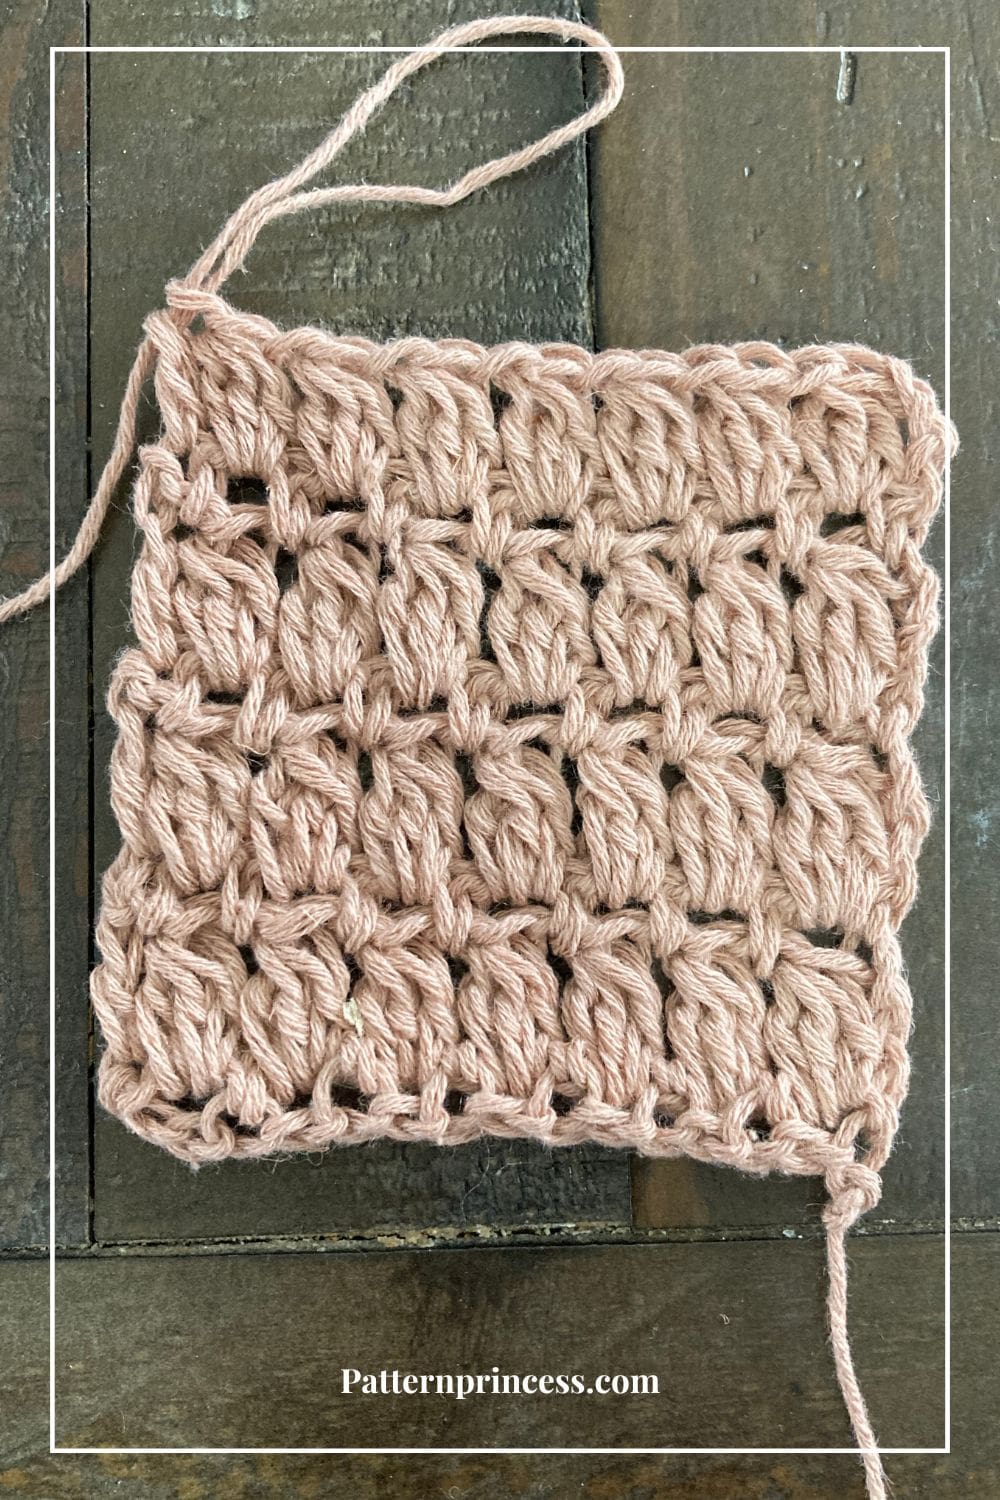
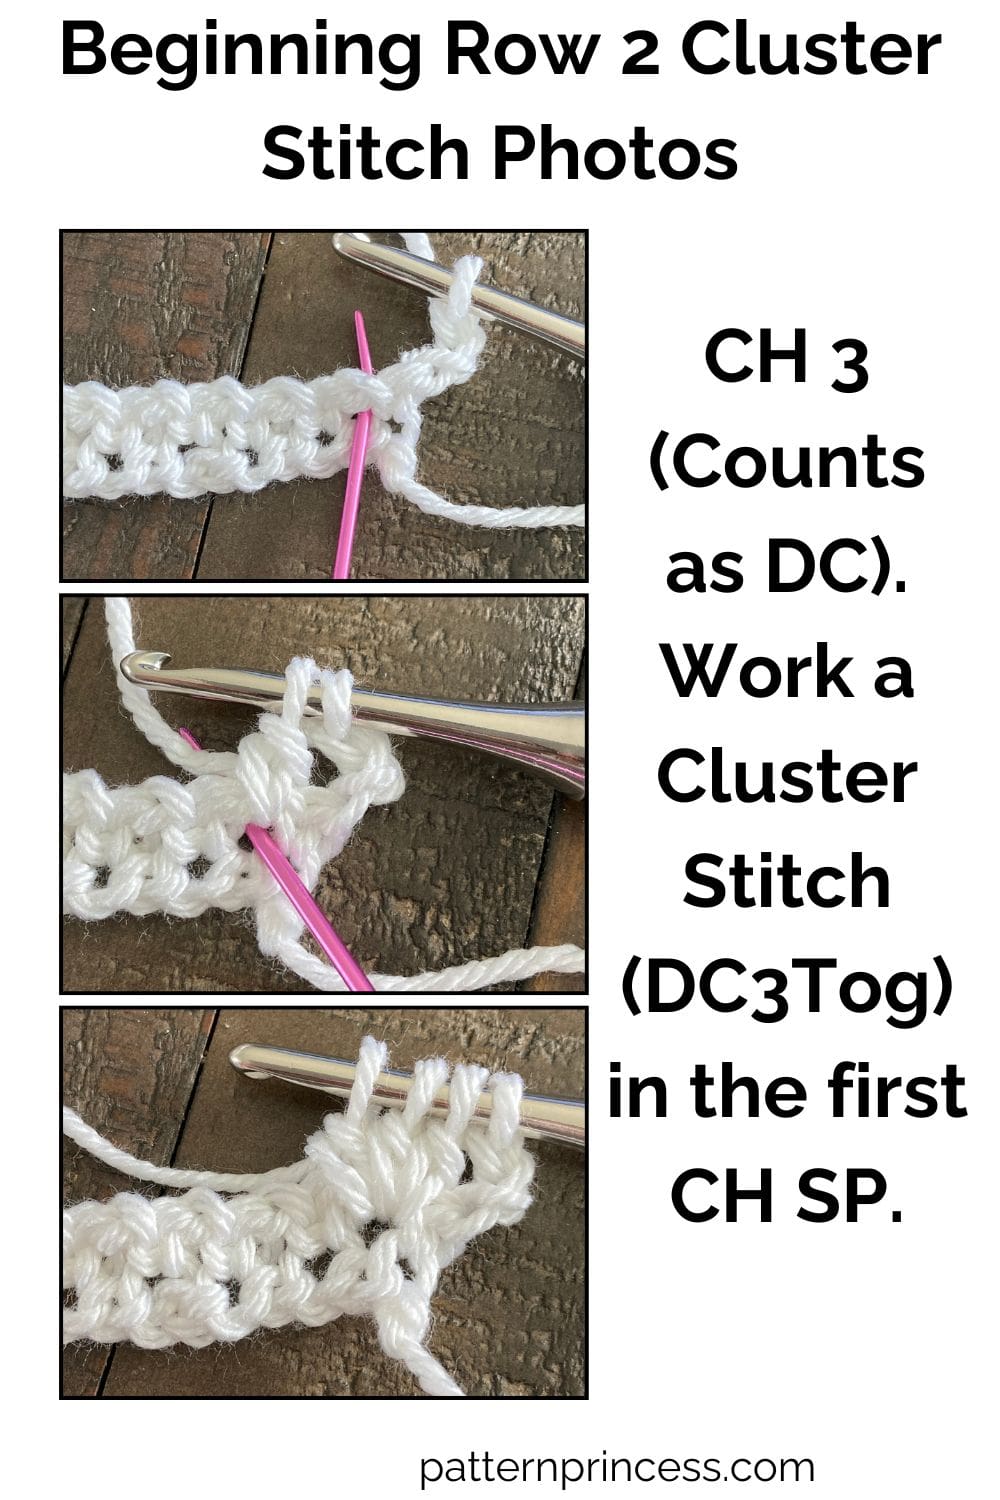
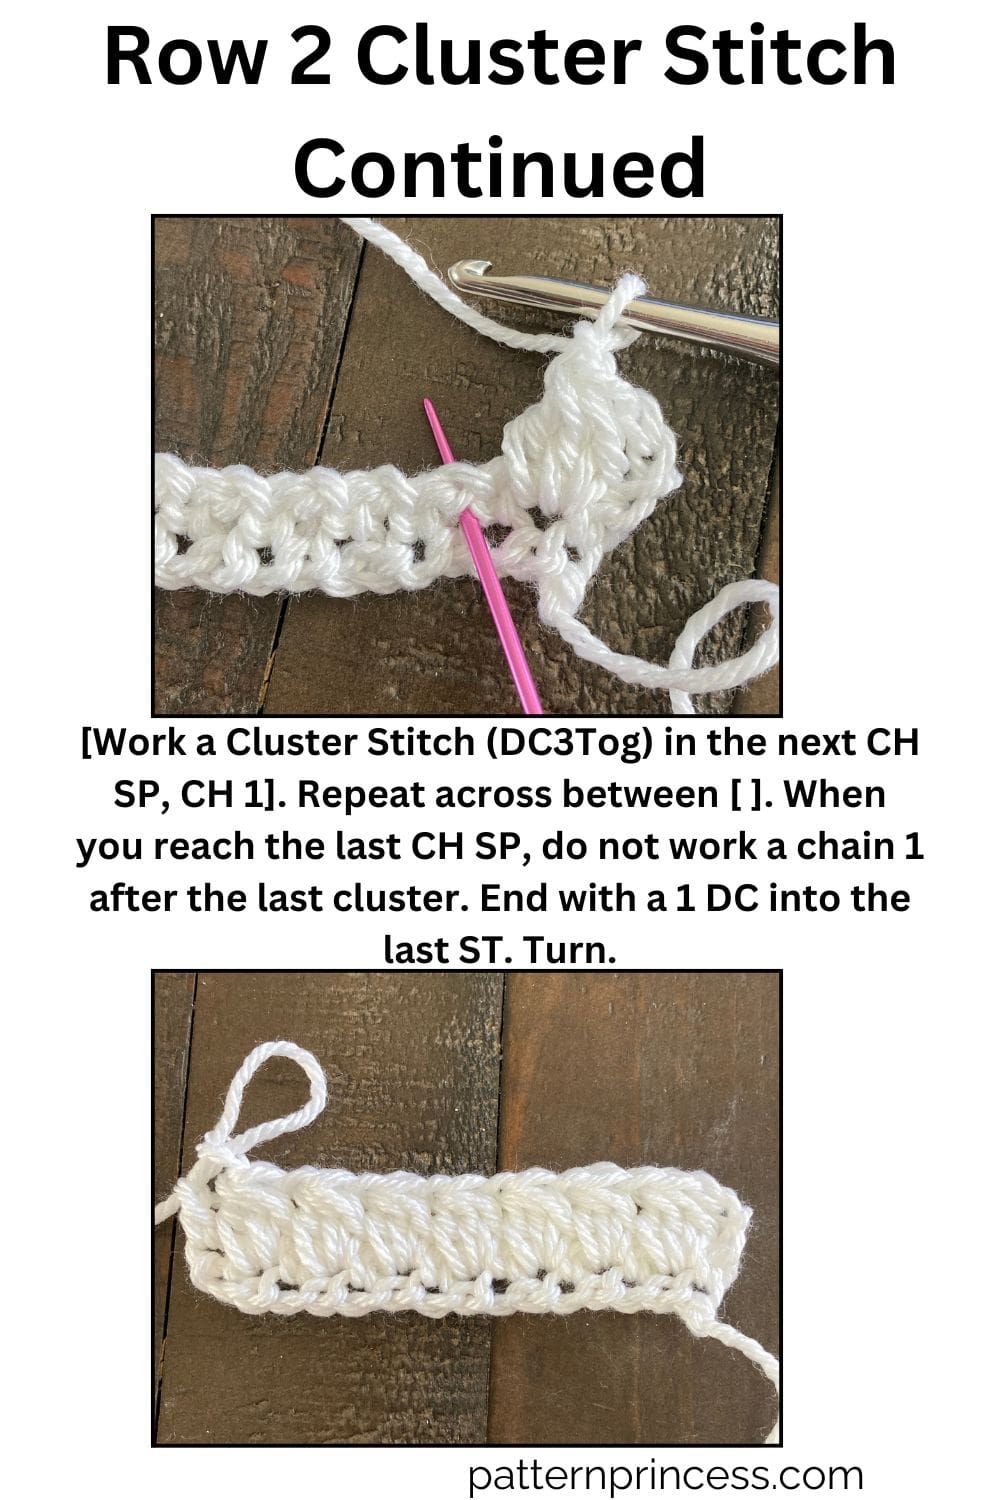
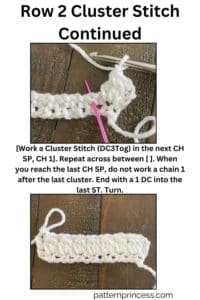
CH 3 (Counts as DC). Work a Cluster Stitch (DC3Tog) in the first CH SP. CH 1. [Work a Cluster Stitch (DC3Tog) in the next CH SP, CH 1]. Repeat across between [ ]. When you reach the last CH SP, do not work a chain 1 after the last cluster. End with a 1 DC into the last ST. Turn.
Row 3
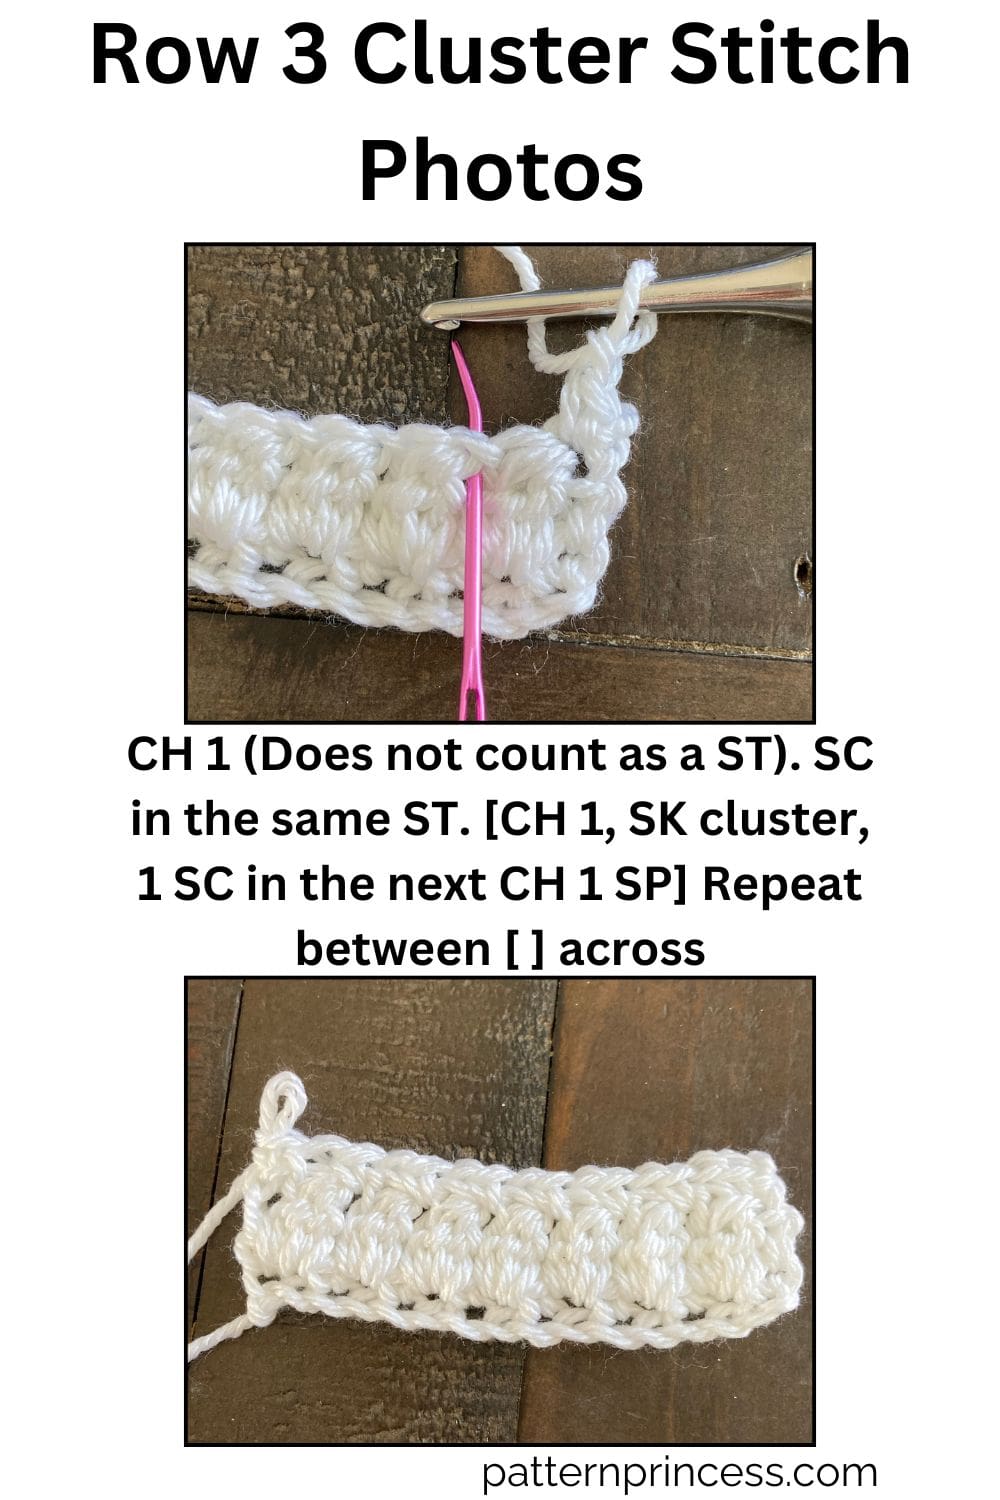
CH 1 (Does not count as a ST). SC in the same ST. [CH 1, SK cluster, 1 SC in the next CH 1 SP] Repeat between [ ] across to the last CH SP. End with a CH 1 and SC in the final ST. Turn
Repeat Rows 2 and 3
Continue to repeat rows 2 and 3 until your desired length.
Finishing
Cut the yarn leaving about a 10-to-12-inch length. Pull yarn through the last stitch. Using a tapestry needle. Weave the yarn back and forth through the stitches at least 3-5 times. Cut off the excess yarn.
Video Tutorial:
If you prefer visual guidance, check out this video tutorial.
Carrying the yarn up the side using different colors video.
How to Crochet the Cluster Stitch Pattern
Equipment
- Crochet Hook:
- Crochet Hook Size that works well with the yarn used.
Materials
- Yarn any type and a corresponding crochet hook. For the tutorial, I used a medium weight yarn Caron Simply Soft with a Size I 5.5 mm Hook. Note, the yarn calls for a Size 5.0 mm Crochet Hook. However, you may use any hook and yarn combination you choose.
- Scissors
- Tapestry Needle
Instructions
Step-by-Step Instructions:
- Chain an Even Number of Stitches:Yarn, Scissors
- To begin, make a slip knot and then chain your desired number of chains. Even number of stitches. The foundation chain length will determine the width of your project.
Row 1:
- In the first row work your first stitch, a single crochet (sc) in the second chain stitch from the hook.

- Chain 1, skip a stitch, and single crochet in the next stitch. Repeat this pattern across the row until you reach the last two stitches.
- Chain 1, single crochet in the final stitch and turn.
Row 2:
- Chain 3 (this counts as your first double crochet).
- Work a Cluster Stitch (DC3Tog) in the first chain space. Chain 1.
- Repeat this pattern [Cluster Stitch (DC3Tog), Chain 1], creating a cluster in each chain space across the row.
- Until you reach the last chain space. Do not work a chain 1 after the last cluster. End with a 1 double crochet into the last stitch and turn.
Row 3:
- Chain 1 (does not count as a stitch). Single crochet in the same stitch. [Chain 1, skip a cluster, 1 single crochet in the next Chain 1 space]. Repeat this pattern to the last chain 1 space.
- Chain 1, single crochet in the final stitch and turn.

Rows 4 and Beyond:
- Repeat Rows 2 and 3:
- Continue alternating between Row 2 (cluster stitches) and Row 3 (single crochet and chain) until your project reaches the desired length.
Finishing:
- Cut the yarn leaving about a 10-to-12-inch length. Pull the yarn through the last stitch. Using a tapestry needle. Weave the yarn back and forth through the stitches at least 3-5 times. Cut off the excess yarn.Tapestry Needle
Notes
Video Tutorial:
If you prefer visual guidance, check out this video tutorial. Right hand tutorial Left hand tutorial Carrying the yarn up the side using different colors video. Right hand video Left hand videoWe hope you enjoyed this free crochet pattern. Here are a few more for you to explore for your next crochet project.

You can find Victoria crocheting, quilting, and creating recipes. She has cooked in restaurants for over 20 years, including many larger parties. She learned to crochet when she was just 11 years old and has been crocheting ever since; over 50 years now. Over 40 years ago, she loved her first class in sewing and continues to hone her skills in quilting. Many have enjoyed the handmade gifts over the years. In her professional career, she has worked in management in a wide variety of businesses including higher education as a dean of a division. All the while attending college part-time to achieve her doctorate in higher education with an emphasis in e-learning.
Your blankets are amazing! Do you have the pattern for the blanket you were making in the tutorial on how to do the clusters?
Thank you so much Gladys. I do have the pattern on the blanket that uses this stitch. I have attached the link here. https://patternprincess.com/easy-crochet-blanket-pattern-beautiful-stripes/
Vicky