Last updated on March 27th, 2026 at 09:43 am
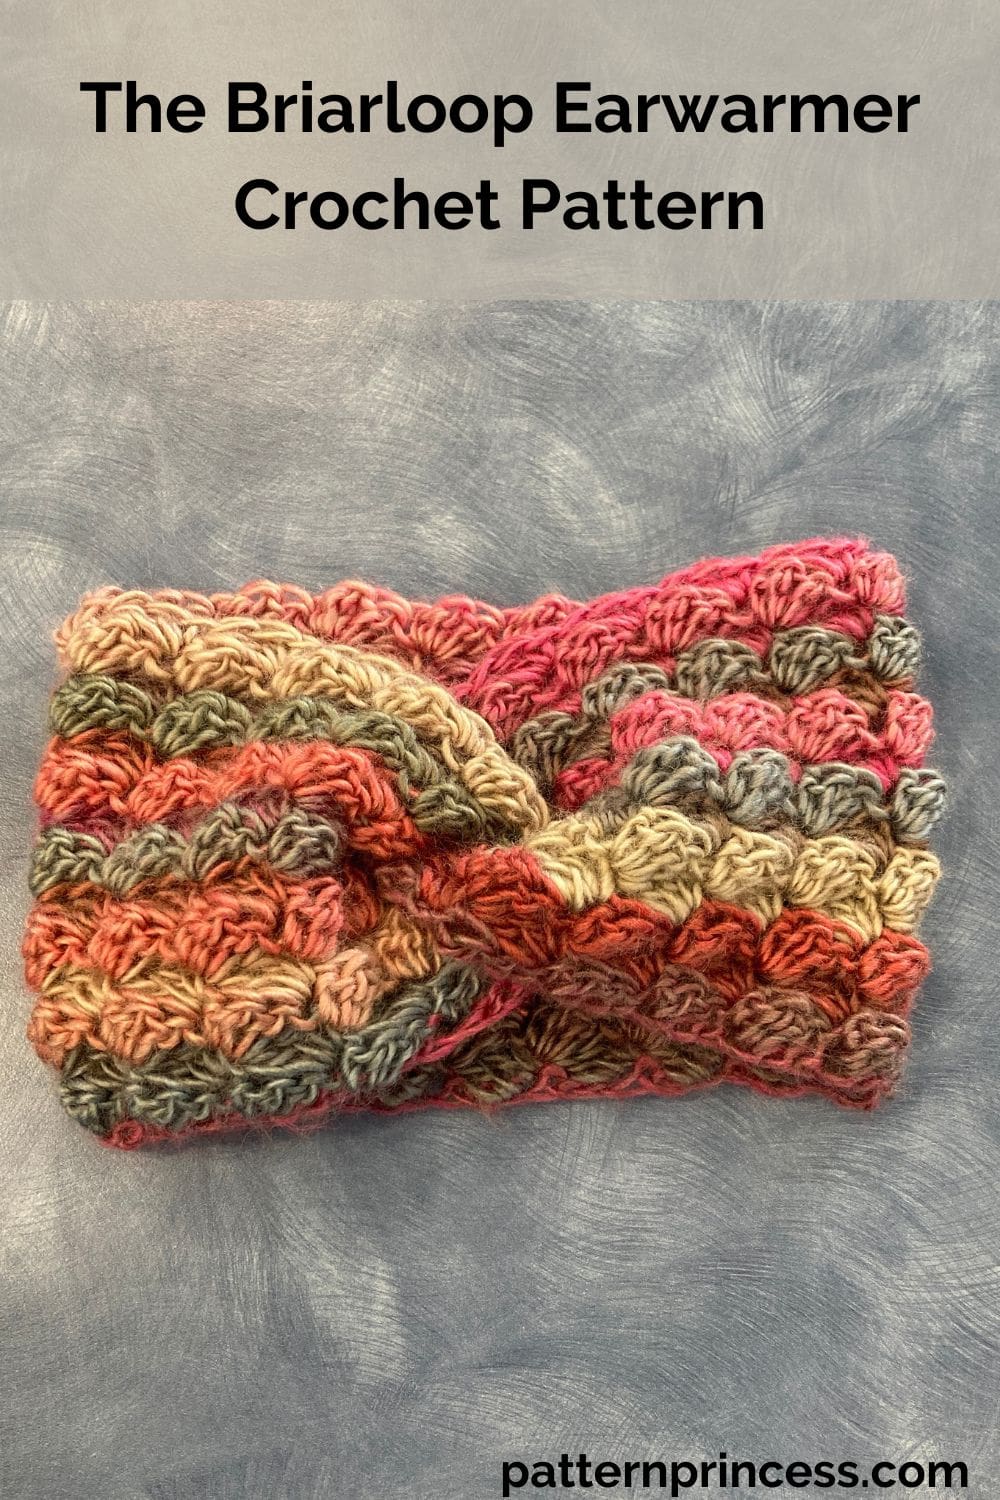
Introducing the Briarloop Earwarmer. This crochet pattern combines a timeless charming headband with a cozy twist-front design. It’s full of gorgeous texture and it works up quickly and easily. It works up quickly and quite easily and looks great in solids, stripes, variegated, the list is endless.
It’s not just stylish but incredibly versatile. Its cozy design makes it ideal for chilly mornings, outdoor walks, or even as an indoor accessory when you want to keep your hair in place. Plus, its quick construction makes it a favorite for last-minute gifts or bulk crafting.
Make this in under an hour!
Crocheters of all skill levels can enjoy making the Briarloop. The blanket stitch used in this pattern is simple to master and creates a polished, professional finish. If you’re new to crochet, this pattern offers a great way to practice while achieving a stunning result.
Medium Weight Yarn
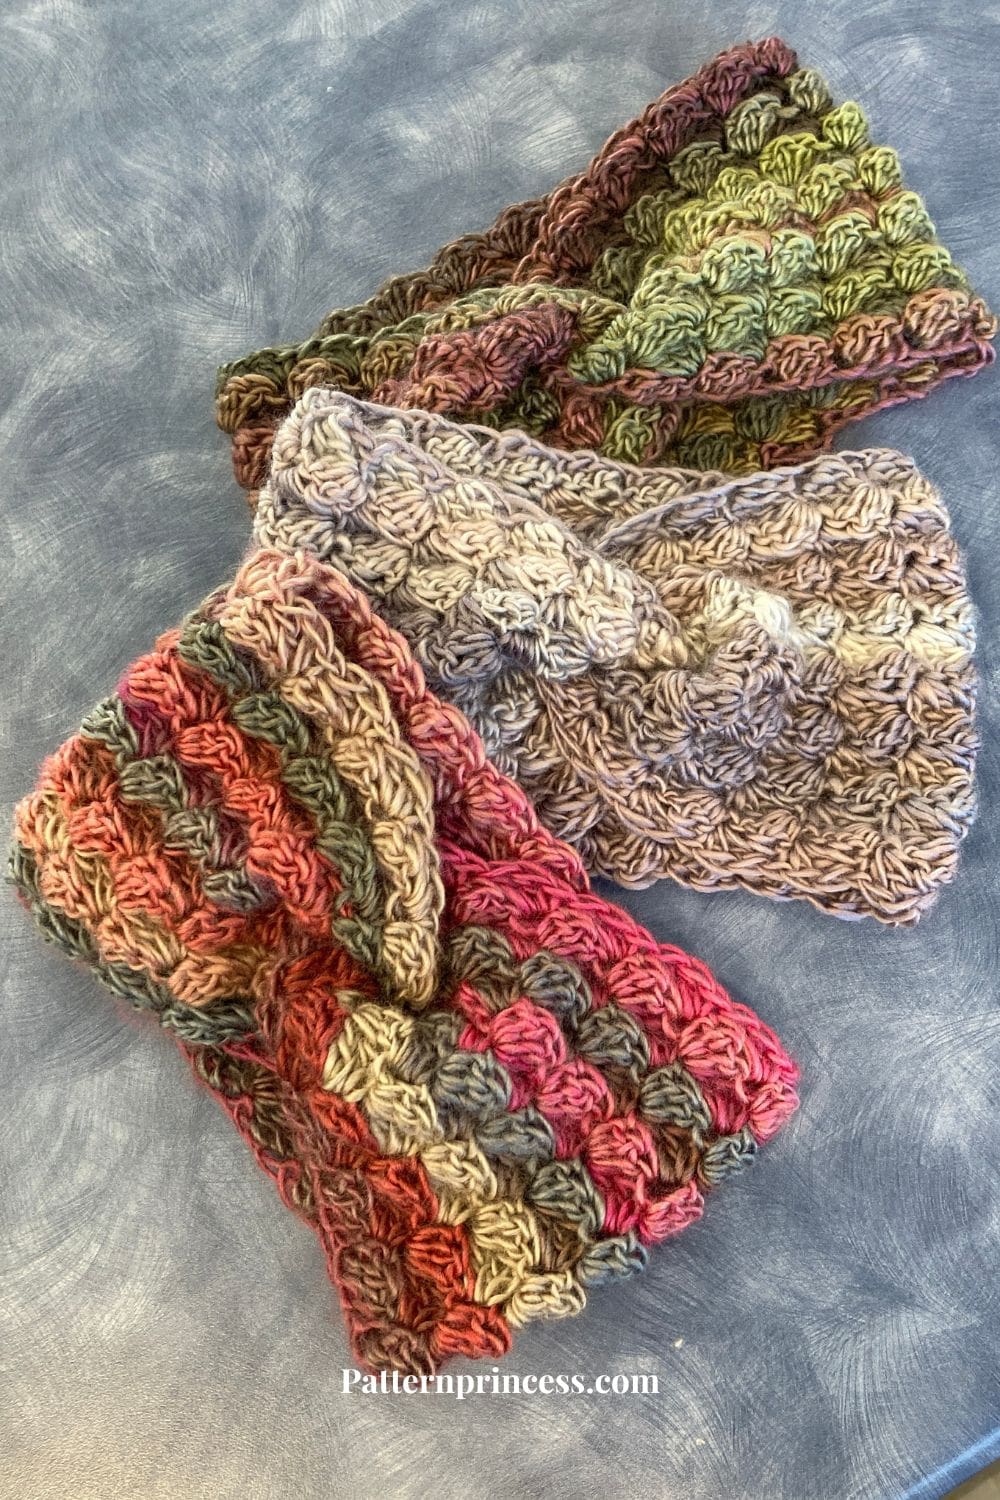
The Briarloop Earwarmer shines with a variety of yarns! Use soft acrylic for an affordable, washable option, wool blends for extra warmth, or even a touch of sparkle yarn to add some glam. With endless possibilities in color and texture, it’s the perfect project for using up yarn scraps or experimenting with new fibers. Whether you choose solids, stripes, or variegated yarn, the possibilities are endless. Every version looks stunning.
Beautiful Headband
A beautiful pattern whether you’re crafting for a gift or making something special for yourself, this pattern is a delight to create and wear. A delightful and popular craft shop or craft fair crochet project.
As the weather cools down, this crochet headband is a must-have accessory. It’s lightweight enough to fit in your bag yet warm enough to keep your ears cozy on frosty days.
Construction Details
The Briarloop Earwarmer is as simple to make as it is beautiful. The pattern is worked flat as a rectangle, making it beginner-friendly while still producing a polished, professional result.
Once the rectangle is completed, the ends are joined with an easy technique that creates the signature twisted front. This clever construction adds a stylish detail that elevates the earwarmer’s overall look.
Custom Sizing Options
Whether you’re making an earwarmer for a child, teen, or adult, this pattern has you covered. The directions include multiple sizing options so you can create a perfect fit for anyone.
Need a snug fit for brisk winter walks or a slightly looser style for a cozy indoor accessory? This pattern is easy to customize to your preference.
Get Your Ad Free Printable PDF in our Etsy Shop.
Directions: The Briarloop Earwarmer
Skill Level
Beginner Friendly – Easy
Gauge
14 Stitches and 11 rows every 4 inches.
Size
5” X 20” long laying flat before joining. An average adult head size.
This headband is slightly stretchy. The length will stretch 1-2 inches.
Changing the Size
The length of the earwarmer can be changed using multiples of 3. The width can be changed by adding or decreasing rows.
Measure as You Go. If you’re unsure about sizing, measure around the head so you know how big around you need it. If you are not sure of what size to make it. I have a standard head size chart to help you.
You can make this with a different yarn rather than a medium weight. Just make sure you measure your beginning chain stitches to get the length and measure the width of the rows for the length.
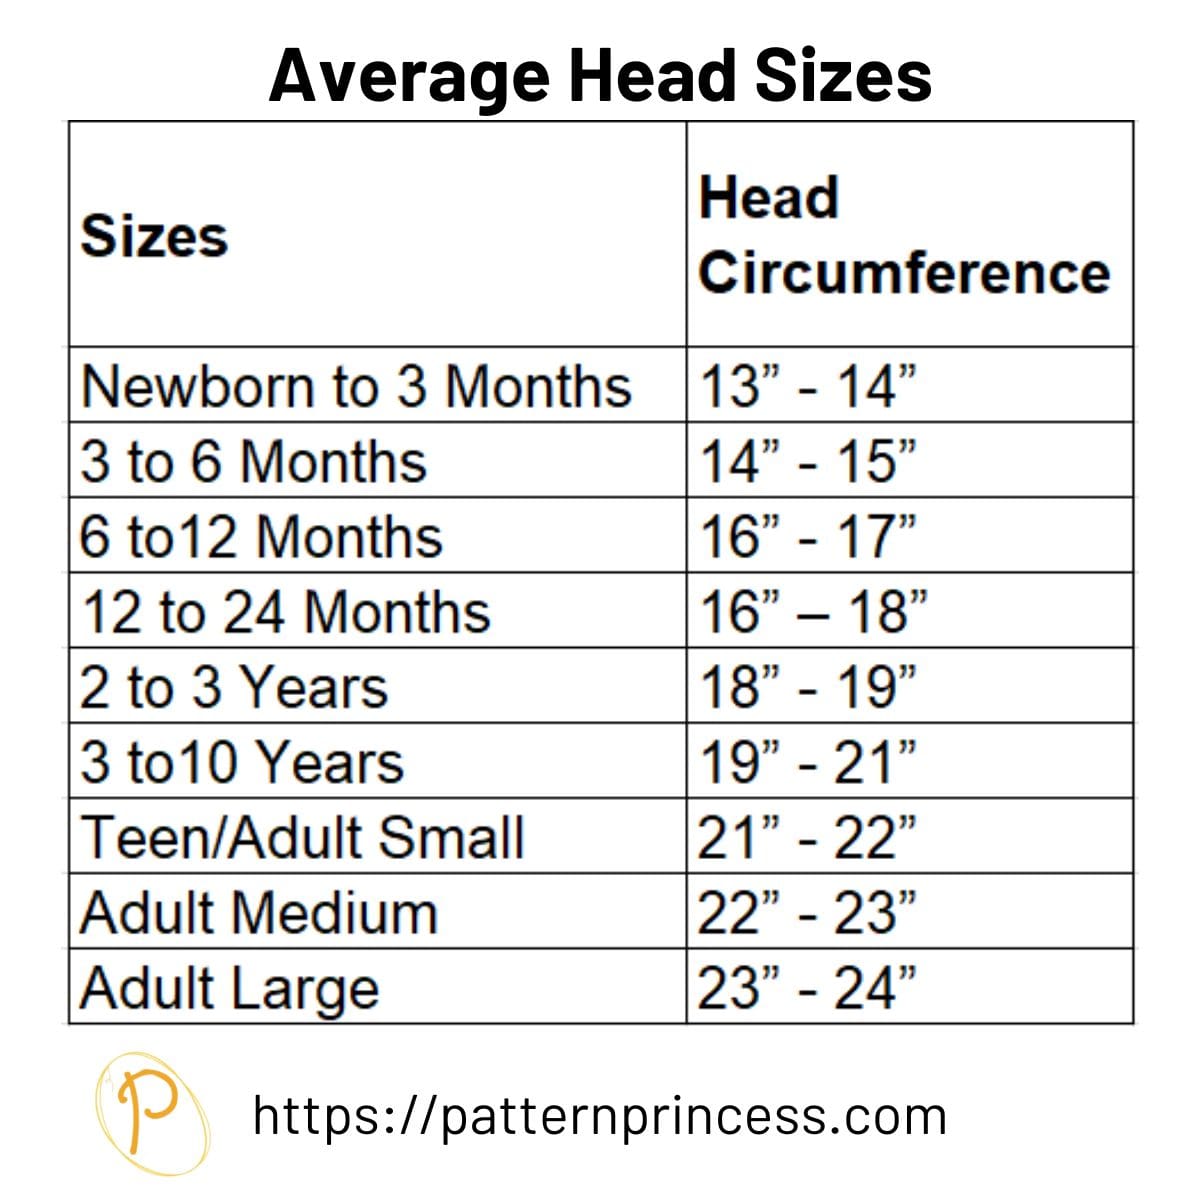
Here are my suggested sizes for the average head circumference sizes above.
- Newborn to 3 months = 6” around X 11” long. Laying flat 3” X 11”
- 3 to 6 months = 6” around X 12” long. Laying flat 3” X 12”
- 6 to 12 months = 6” around X 13” long. Laying flat 3” X 13”
- 12 to 24 months = 6.5” around X 14” long. Laying flat 3” X 14”
- 2 to 3 years = 6.5” around X 15” long. Laying flat 3” X 16”
- 3 to 10 years = 8” around X 15.5” long. Laying flat 4” X 17”
- Teen/Adult Small = 9” around X 17” long. Laying flat 4” or 5” X 18”
- Medium Adult = 9” around X 18” long. Laying flat 5” X 19”
- Large Adult = 9” around X 19” long. Laying flat 5” X 20”
Abbreviations
- CH = Chain
- DC = Double Crochet
- SC = Single Crochet
- SK = Skip
- ST = Stitch
- STs = Stitches
- [ ] = Repeat Between
Materials
150 yards of any medium weight yarn.
I made the earwarmer in various Red Heart Unforgettable yarn colors. Heirloom, Echo, and Pearly.
Each skein was a leftover partial skein from other projects. What a pretty way to use up those random yarn scraps.
Crochet Hook Size I 5.5 mm
Tapestry Needle
Scissors
Tape Measure
Faux Leather Tag (optional)
Make sure to check out our savings center for the latest deals.
Stitches
Chain (CH)
Begin the chain stitch by making a slip knot on the crochet hook. Leave about a 5-inch tail on the yarn. This will be weaved in later.
Next snug up the yarn loop that is on the crochet hook; while it should be firm, it should also be loose enough to slide on the hook with ease.
Keeping the loop on the hook, insert the hook in the stitch, wrap the yarn over the crochet hook from back to front. Draw the yarn through the loop. Yarn over again and draw the yarn through both loops that are currently on the hook. (The first chain stitch is complete).
HOW TO CROCHET THE CHAIN STITCH video tutorial
Double Crochet (DC)
Yarn over, insert the hook through both loops and pull up a loop. Next, yarn over and pull through two loops on the hook. Lastly, yarn over again and pull through the last two loops on the hook.
HOW TO CROCHET THE DOUBLE CROCHET STITCH video tutorial
Single Crochet (SC)
Insert the hook, pull up a loop. Yarn over and pull through the two loops on the hook.
HOW TO CROCHET THE SINGLE CROCHET STITCH video tutorial
Pattern Notes
Pattern is written in US crochet terminology.
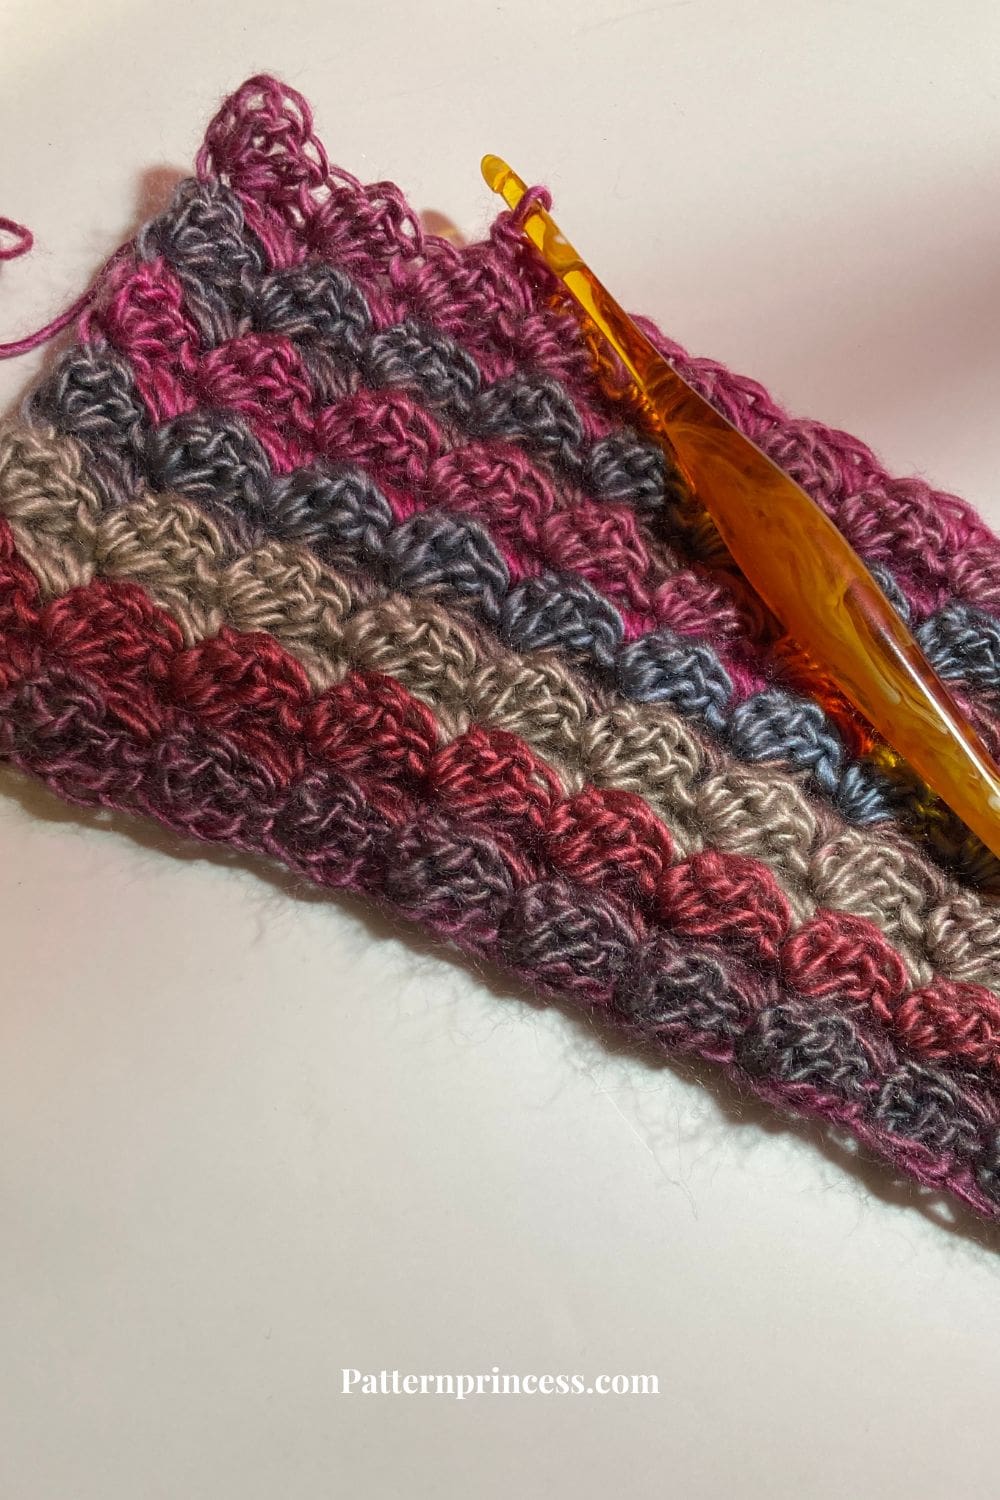
Measure the headband rather than count the rows. This way, you can use any leftover yarn you happen to have.
You can find You Tube Video step-by-step tutorials for both left hand and right hand crocheters below the written pattern for the blanket stitch.
Turn after each row.
Since this pattern is reversible, there isn’t a right side and wrong side.
Begin Crochet Pattern
Pattern is written for a medium adult head.
Medium Adult = 5” X 20” laying flat before joining.
Start by making a slip knot and adding the loop on the hook.
Work enough chains using multiples of 3 to make 20 inches in length.
I worked 69 CH STs for my earwarmer.
However, here are some suggested starting chains for using a medium weight yarn.
- Ch 57 for 16”
- CH 60 for 17”
- CH 63 for 18”
- CH 66 for 19”
- CH 69 for 20”
- CH 72 for 21”
- CH 73 for 22”
Row 1
2 DC in the 3rd CH from the hook, [SK 2 CH, in the next CH, SC and 2 DC]. Repeat from [ ] across until the last 3 CH. SK 2 STs and end with SC in last ST. Turn.
Row 2
CH 2, 2DC in Same ST. [SK 2 DC, in the next ST Work SC and 2 DC in SC in ST]. Repeat until the last 3 STs, end with a SC in the last ST. Turn
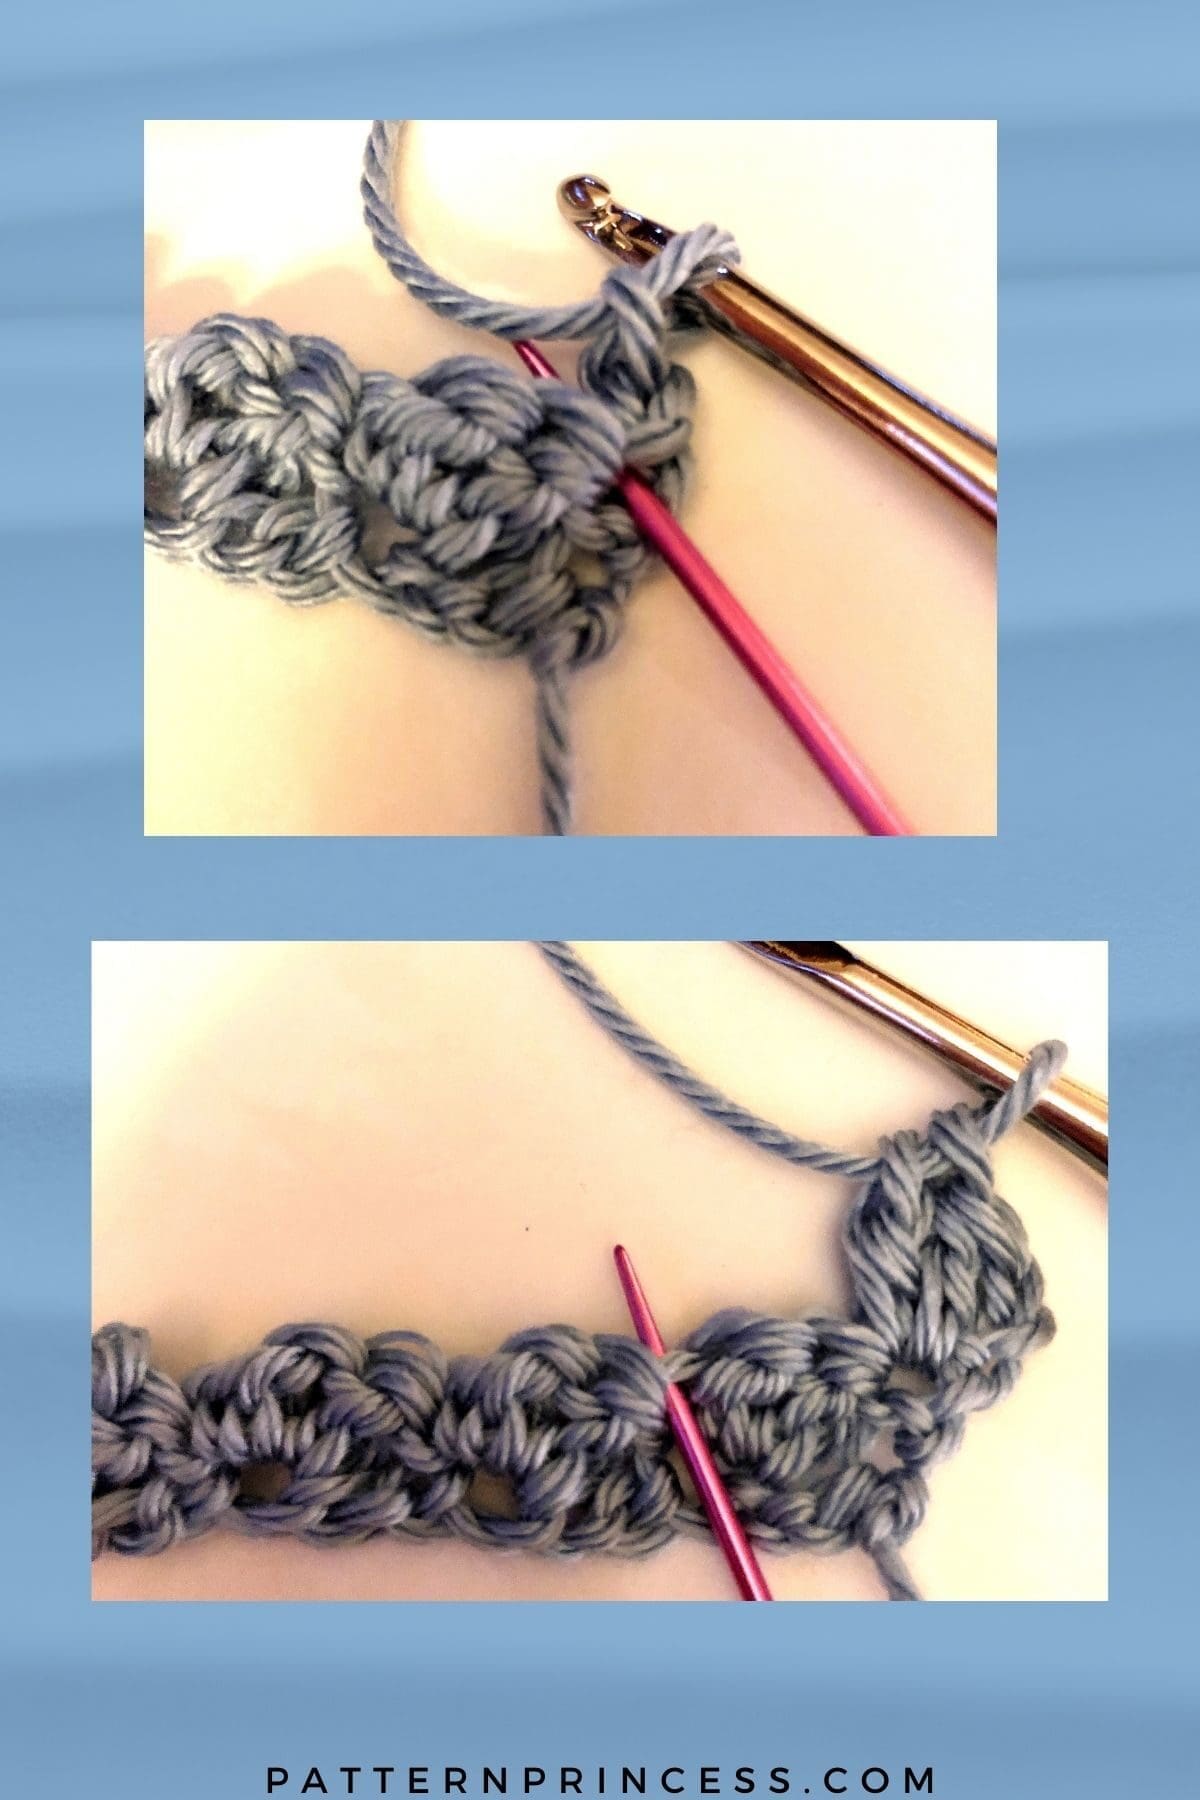
Rows 3 and Beyond
Repeat Row 2.
You can make this as wide as you like, I worked this pattern 14 rows. Which made mine 5 inches wide.
Here are suggested rows for the other sizes.
- 3 inches = 9 rows
- 4 inches = 11 rows
- 5 inches = 14 rows
When you’re done, leave a long tail. About 15-20 inches. You will be using this to sew the ends together.
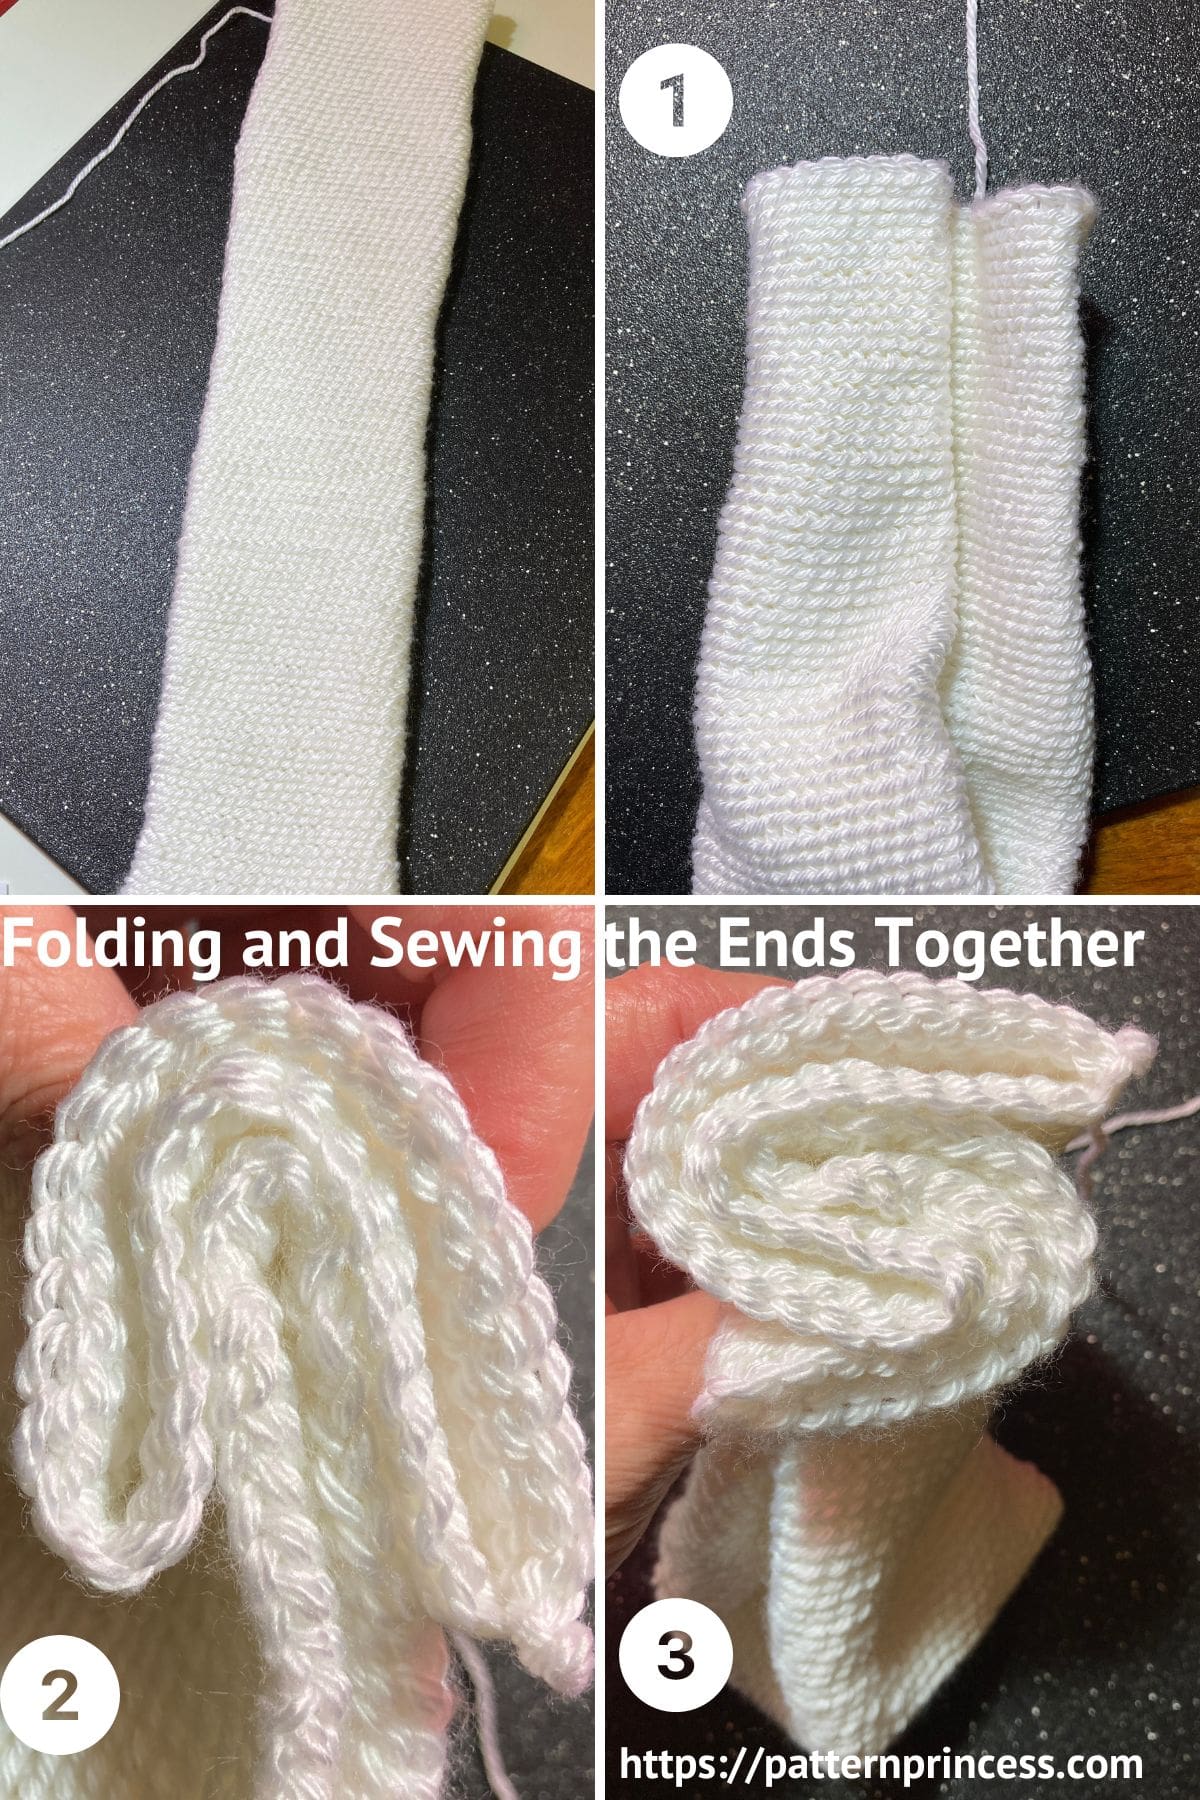
This photo is of a different headband, but it shows how to fold the ends together for seaming.
Final Steps
Seaming Instructions: Folding and Sewing the Ends Together
- Fold the band in half matching the ends together.
- Fold the ends in half matching one end to the center of the other band.
- The other band fold over the other side to the front.
- Use the long yarn tail and yarn needle to sew the ends together. Starting on one end, insert the hook through all four layers and pull out the other side. Moving the needle over a little, insert it back through the layers and out the other side. Continue working back and forth like this until you get to the other end.
When done, weave in the yarn ends and cut off the excess yarn.
Enjoy your beautiful twisted headband.

Step-By-Step Photos of the Blanket Stitch
Here are the photos to help with understanding these easy crochet stitches.
First Row
Work 2 double crochet stitches in the third chain from the hook. (The two chain stitches skipped will count as a double crochet).
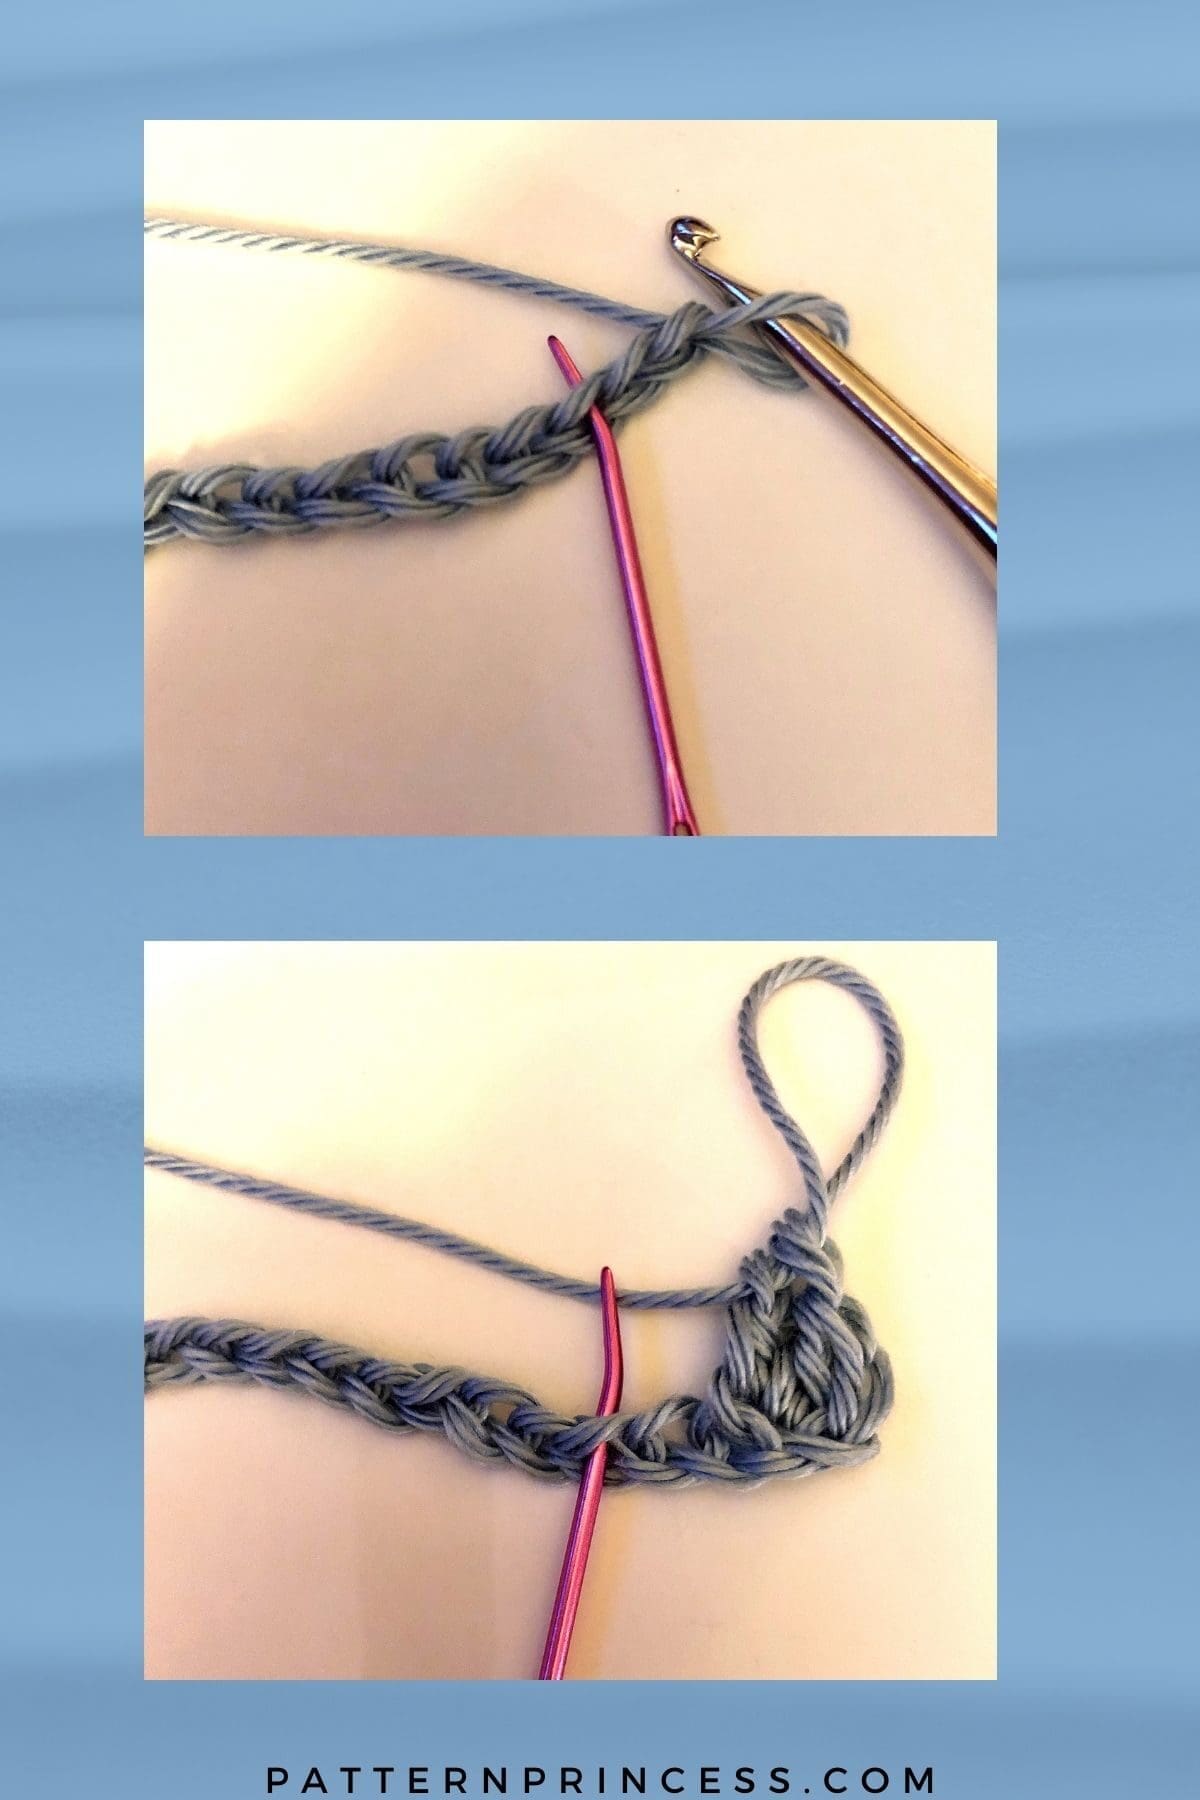
[Skip two chains. In the next chain stitch work one single crochet and two double crochet stitches].
Repeat between [ ] to the end of the row.
When there are three chains remaining, skip two of them, and place one single crochet in the very last chain stitch.
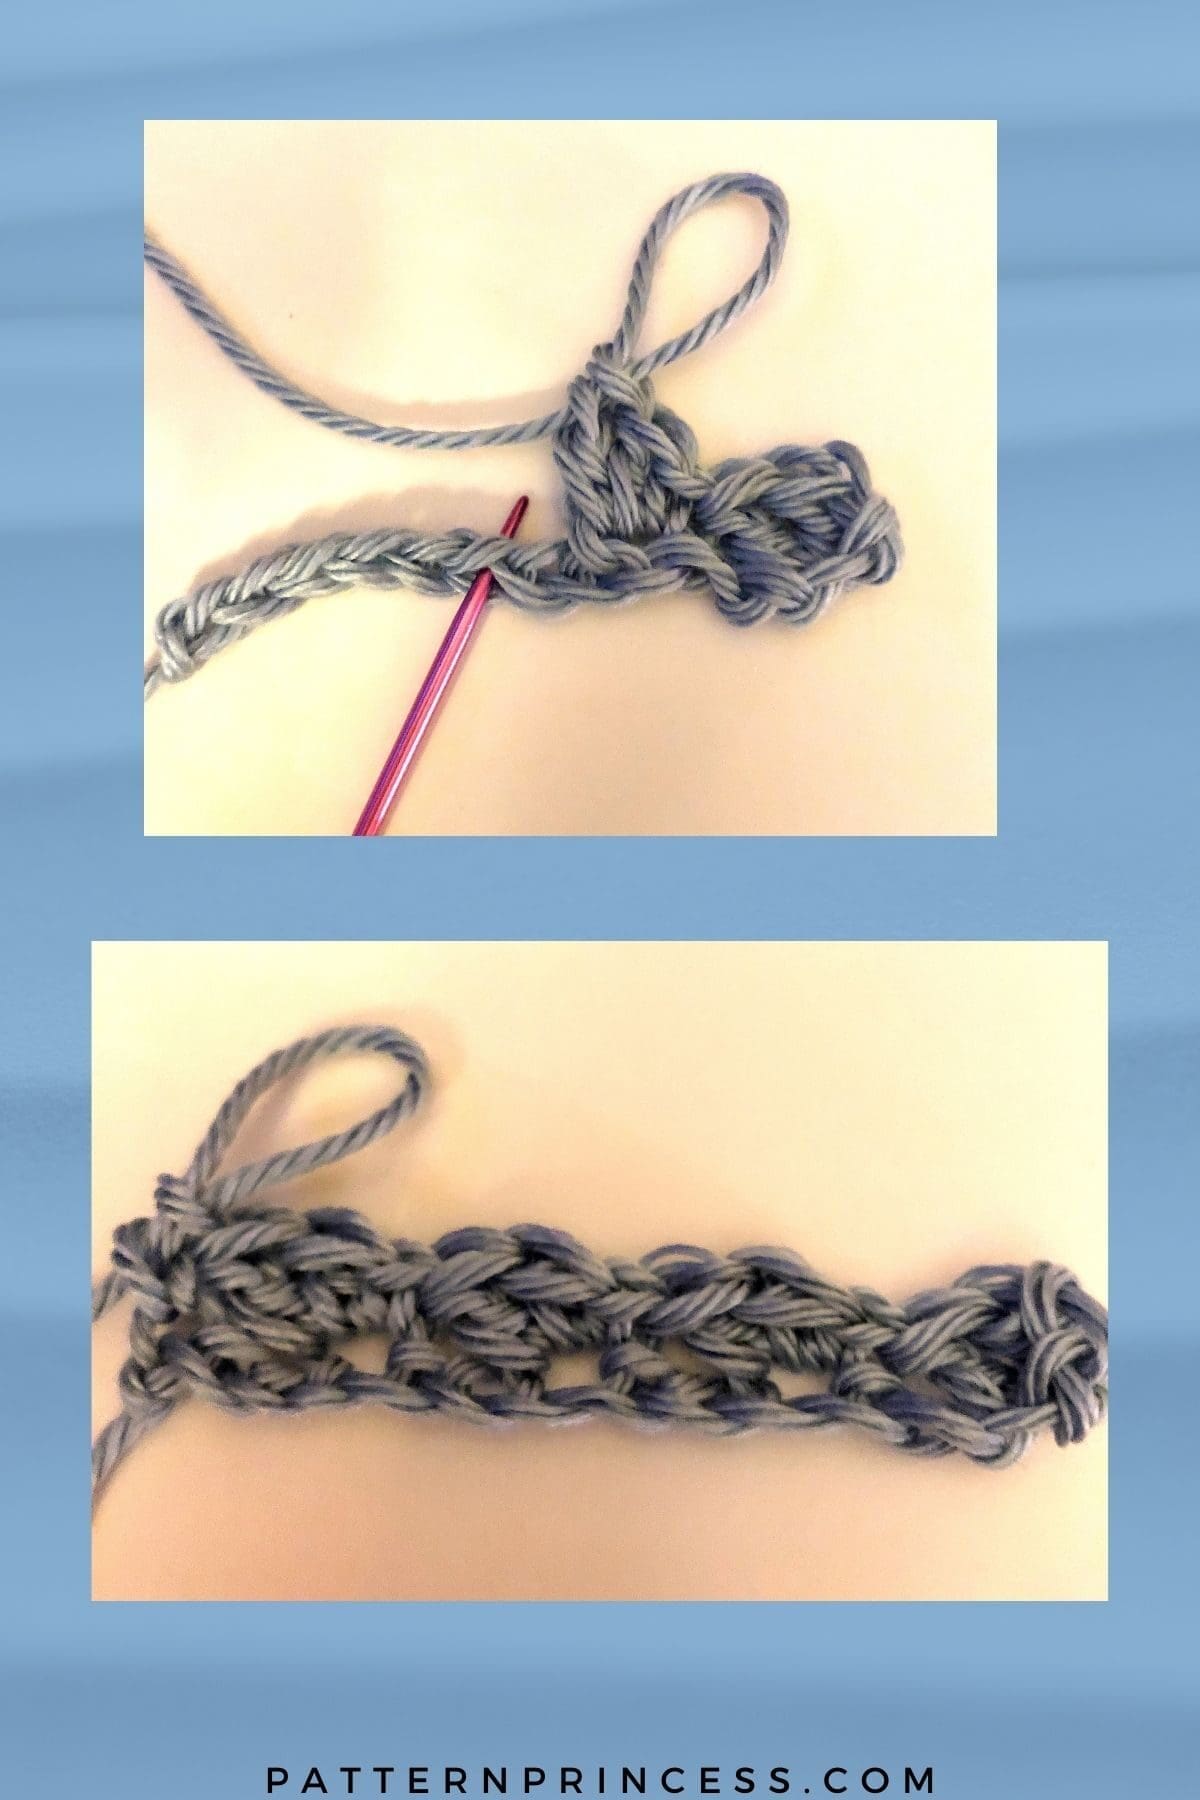
Second Row
Chain two. Work two double crochet stitches in the first stitch. [Skip the next two stitches. In the next stitch (the single crochet from the previous row), work a single crochet and two double crochet stitches].
Repeat between [ ] to the end of row.
At the end, skip the last two stitches and place one single crochet in the top chain of the last double crochet.
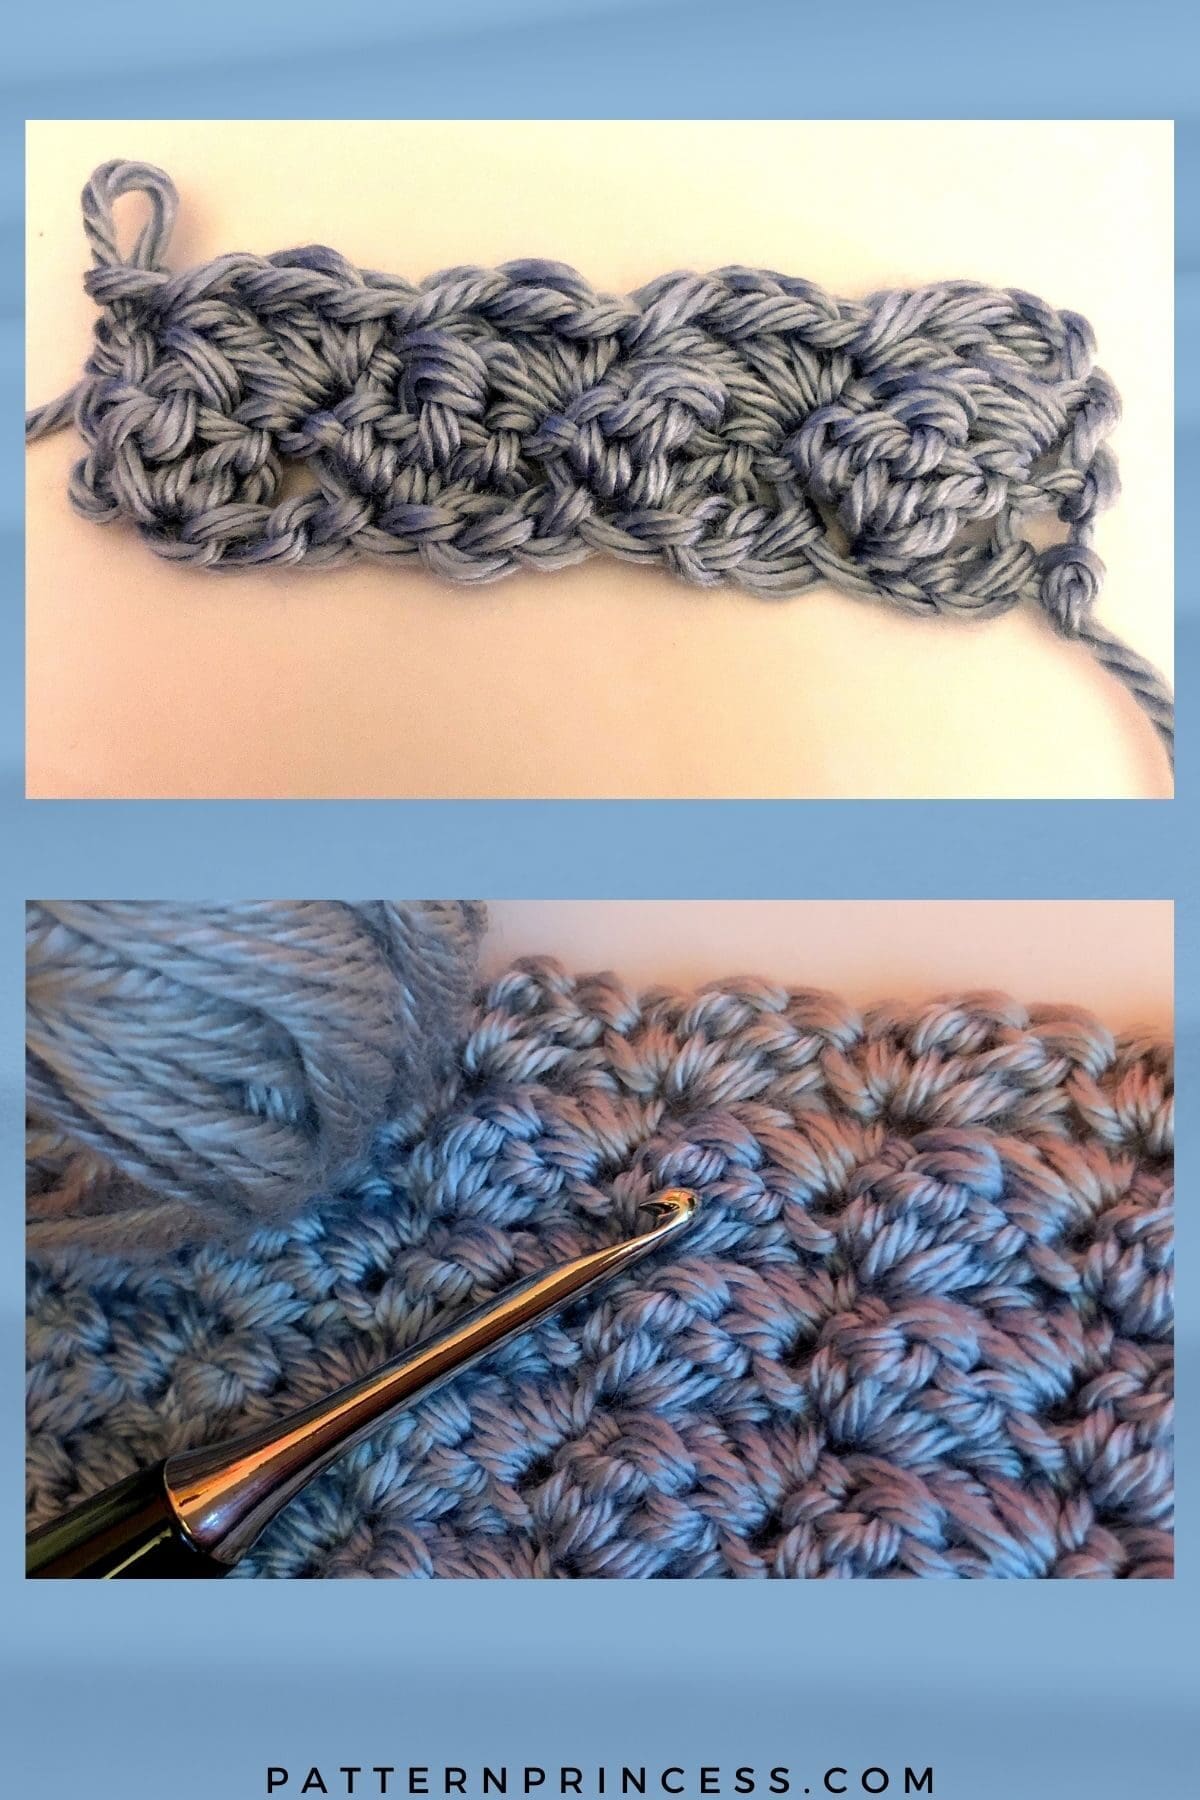
Row Three and Beyond
Continue to repeat row 2 throughout your pattern.
YouTube Video Tutorials
How to Crochet the Blanket Stitch
Briarloop Earwarmer
Crocheting the earwarmer and joining the ends.
We have a few more free patterns for you to inspire your next project.

You can find Victoria crocheting, quilting, and creating recipes. She has cooked in restaurants for over 20 years, including many larger parties. She learned to crochet when she was just 11 years old and has been crocheting ever since; over 50 years now. Over 40 years ago, she loved her first class in sewing and continues to hone her skills in quilting. Many have enjoyed the handmade gifts over the years. In her professional career, she has worked in management in a wide variety of businesses including higher education as a dean of a division. All the while attending college part-time to achieve her doctorate in higher education with an emphasis in e-learning.