Last updated on March 27th, 2026 at 09:09 am
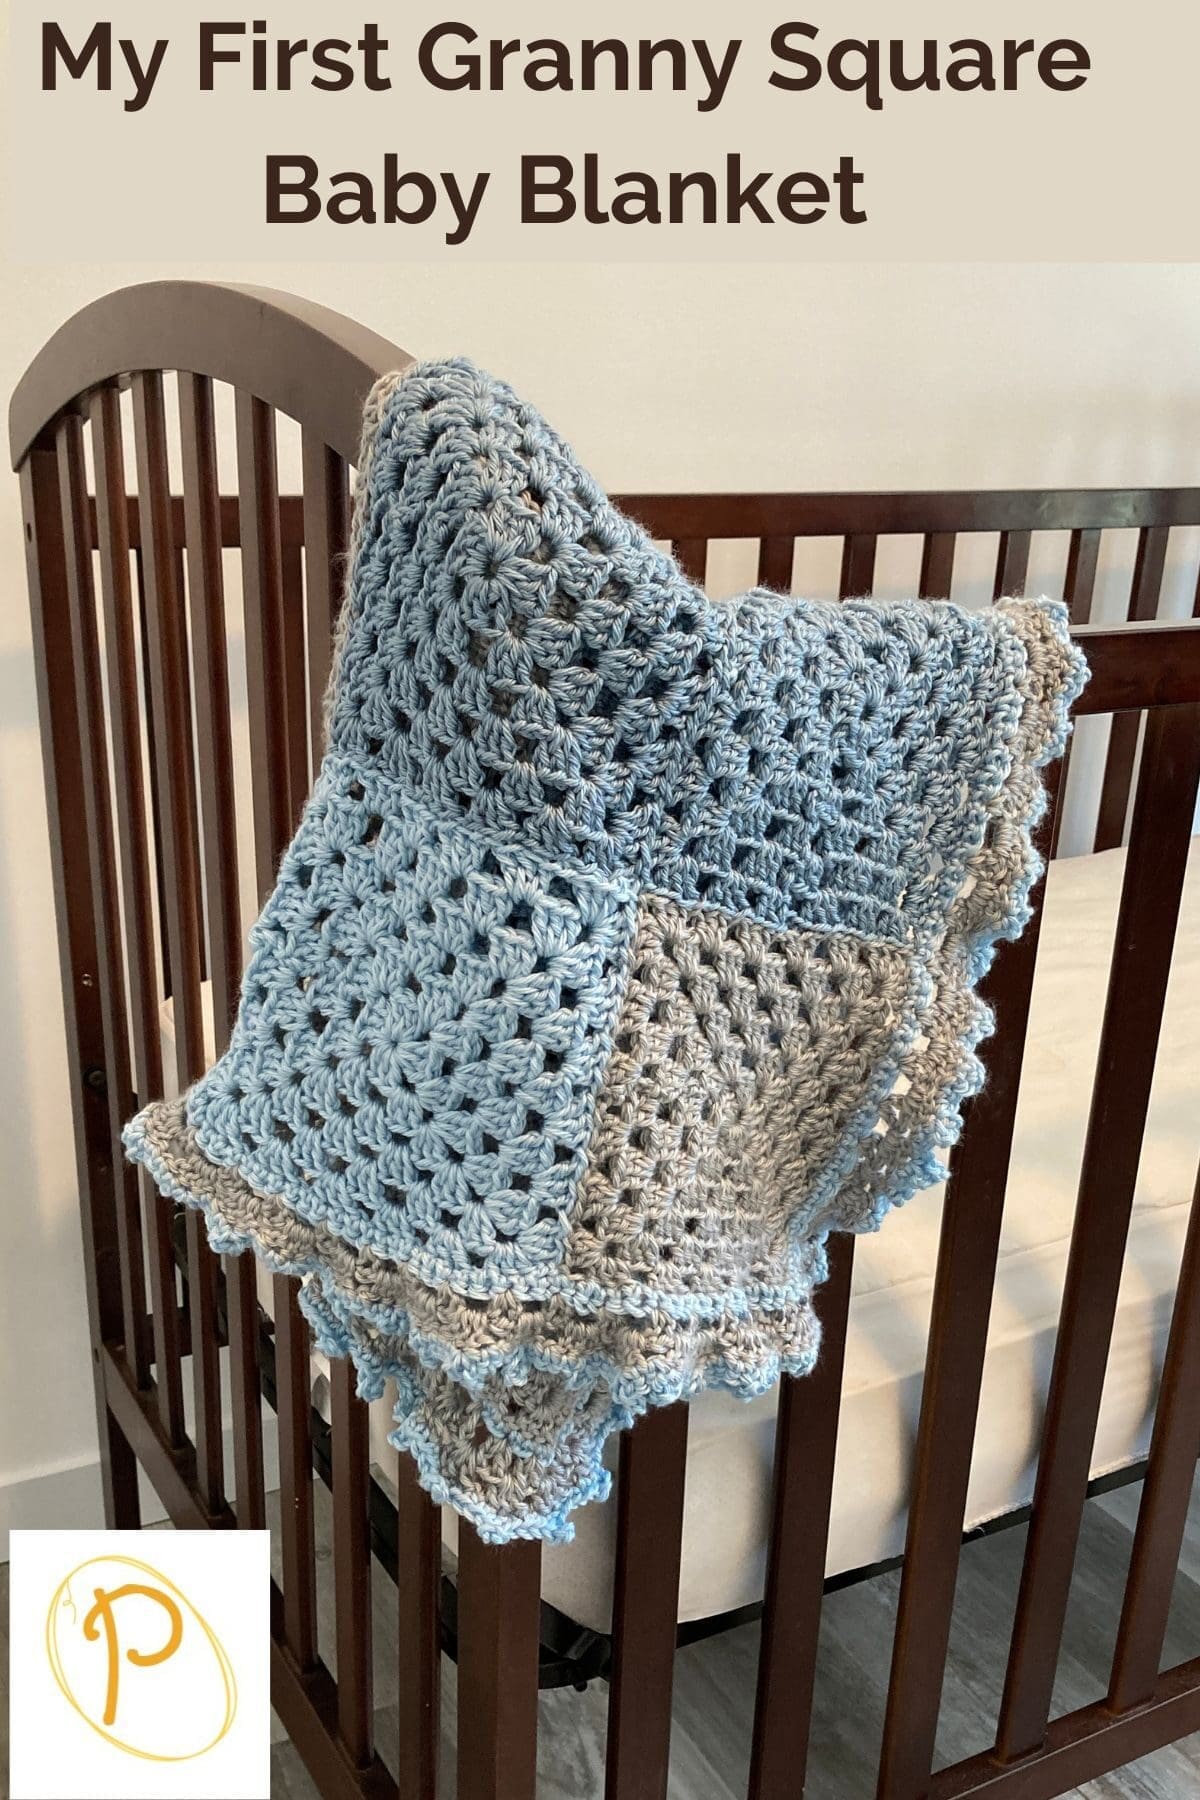
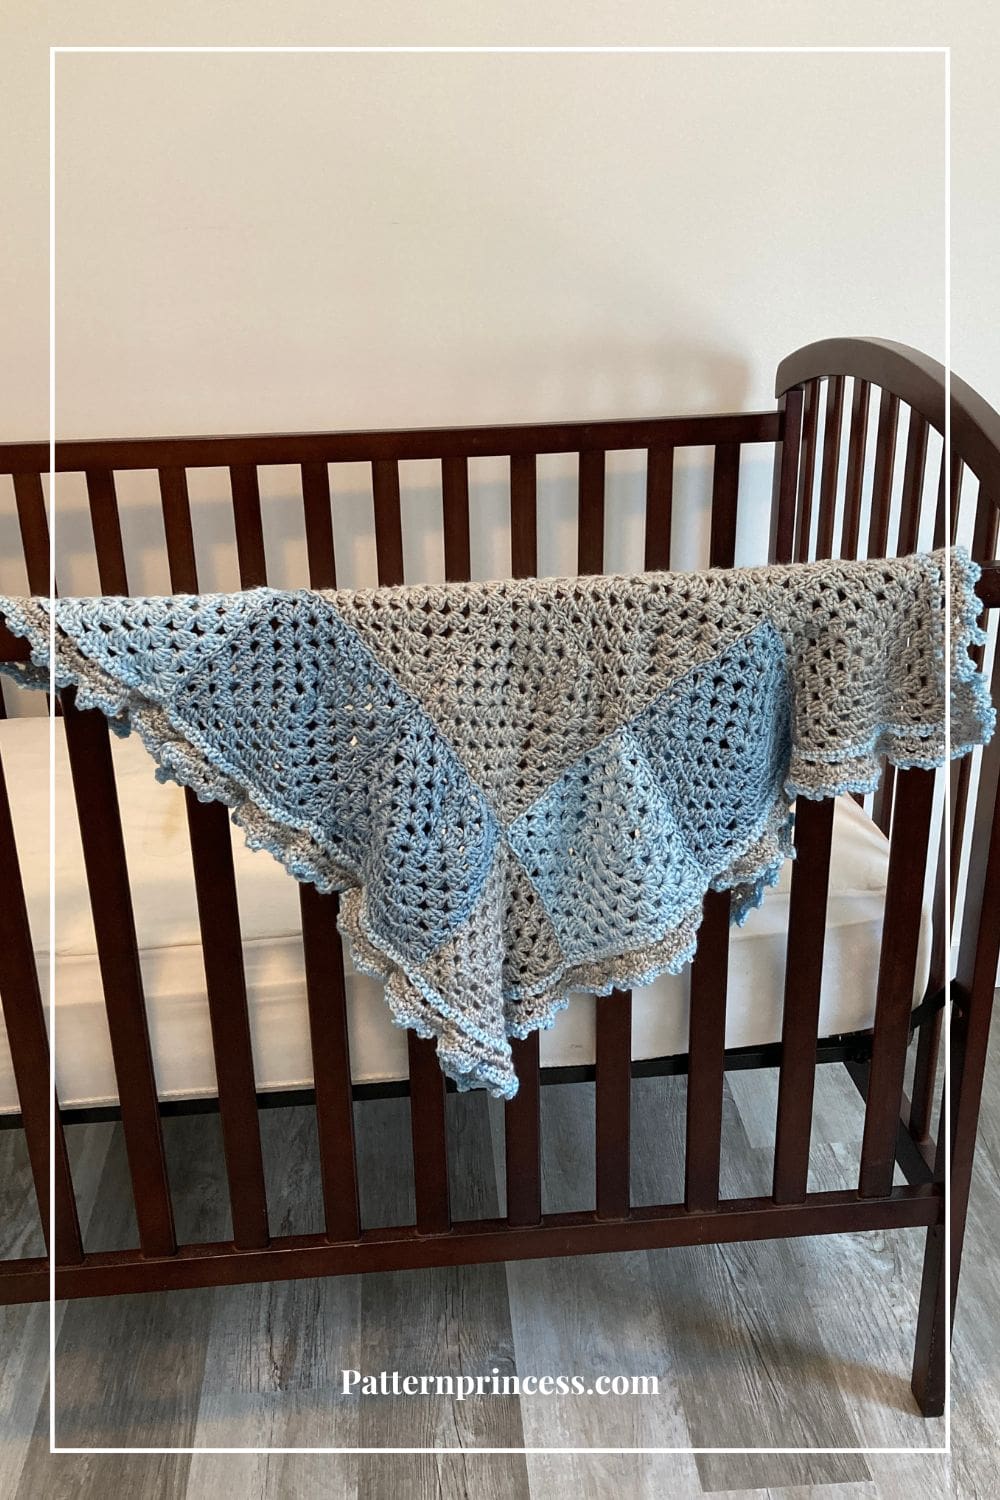
I’m so excited to finally be finishing my very first granny square baby blanket! This has been a project I’ve wanted to do for a while now. My mom has been crocheting for years and she has attempted to get me going a few times. I am all thumbs with the yarn.
Crochet is one of those timeless hobbies that people do, and I wanted to be able to enjoy this craft as much as she does. She has taught me how to hand sew and sew fabric with our old Pfaff Sewing Machine. I was in 4-H and showed clothing that I made. My friend and I even made it to the Wisconsin State Fair as a representative for our 4-H county in the clothing review. Of course, my mom went as our chaperone. Those are good memories, and I am so glad she took the time to teach us.
Now she has finally achieved getting me going with crochet!
Post contains affiliate links, and we earn commissions if you shop through the links on this page. For more information, please read the disclosure section under the About Us page.
Starting With the Classic Granny Square
Now that I am due with my first baby, I really wanted to make a baby blanket for my little one. My mom suggested the granny square stitch and printed off the granny square tutorial for me.
She sat with me for the first square. It felt amazing to be able to finally complete even the smallest thing. I just had to double check I did things correctly for the second square. It was so exciting to finally start getting the hang of this time-tested yarn craft!
Three Colors of Yarn
My mom gave me three skeins of yarn in feathered grey, light country blue and a soft blue. All the yarn is a Caron Simply Soft. Here’s the deal, we don’t know the gender of the baby yet. Oh well, if I have a girl, I will have to add a pink ribbon.
Various Sizes in the Squares
Full disclosure. I am not sure if it is because I am a very new crocheter or the yarn itself felt like a slightly different thickness, but the squares are not all the same size. I crocheted the same number of stitches and rounds for each granny square. However, they range in size from 6-inches to 6 1/2-inches.
Therefore, I wanted to make more of a checkerboard design in sewing them together using the three colors. I was afraid of now much I would have to stretch the 6-inch square to meet up with the larger square. The feathered grey squares were the largest, so I tried to keep those together.
It all worked out just fine though.
Joining the Granny Squares
For this baby blanket, I used the invisible join to join the granny squares. I watched my mom’s video a few times and got the hang of it quickly.
Crochet Border
For the Crochet Border, I sort of followed the Blushing Ruffle Granny Square pattern. However, my baby blanket uses just 4 rounds, where my mom’s pattern uses 6 rounds for the crochet border.
Directions: My First Granny Square Baby Blanket
Skill Level
This pattern is perfect for a beginner. If you can work the chain stitch, single crochet, and double crochet, you can crochet this pattern.
Gauge
12 Double Crochet per 4 inches. However, gauge is not critical in this crochet pattern.
Size
30-inches X 30-inches
As I mentioned earlier, the sizes of the squares were not uniform either because I am a Newby or because the thickness of the yarn itself. They range in size from 6-inches to 6 ½-inches.
Materials
Feathered Grey Caron Simply Soft. 2 skeins or 500 yards. There is over half of the second skein of yarn left over.
Light Country Blue Caron Simply Soft. 1 skein or 315 yards.
Soft Blue Caron Simply Soft. 1 Skein or 315 yards.
If you are not able to find the yarns locally, you can find it here.
Size H crochet hook
Scissors
Yarn needle
Abbreviations
CH = Chain
DC = Double Crochet
SC = Single Crochet
SL ST = Slip Stitch
SP = Space
ST = Stitch
STs = Stitches
YO = Yarn Over
[ ] repeat between
Special Stitches
How to complete the Picot Stitch. Most picot stitches call for a CH 3, I wanted this one a bit taller, so I did a CH 4 and inserted my hook back into the first CH, and worked a SL ST (YO, Pull through the loops on the hook).
How to complete the V-Stitch. In this pattern the V-Stitch is used for the crochet border. The V-Stitch is worked (DC, CH 1, DC).
Granny Cluster, or shell: A granny cluster is a term for a special crochet stitch that consists of a set of 3 double crochets, all worked into one stitch or space. The clusters are then separated from one another with chain stitches.
Granny Square Colors
I used 16 crochet squares for this pattern. 8 of the feathered grey, 3 of the soft blue, and 5 of the light country blue yarn.
Directions
Begin this pattern is to CH 4 and SL ST into the first CH to form a circle.
An Alternative way to begin. Begin by making a Magic Circle. Directions for the magic circle can be found here. This is a detailed step-by-step tutorial on making the magic circle.
Round 1:
For this round, you will be working inside the magic circle.
Chain 3 (Counts as DC of this round and throughout the entire pattern). Continuing working in the ring, work 2 DC. Then chain 3. 3 DC, CH 3, 3DC, CH3, 3DC, CH3 and join into the top CH of the beginning CH 3. This join completes the first round. (You should have 4 clusters of 3 DC with 4 areas of CH 3 between)
Round 2:
CH 4 (This will count as your first DC plus a 1 CH). Then in the first CH 3 SP work, [3 DC, 3 CH, 3 DC and CH 1]. Continue the stitch pattern between the [ ] until the last CH 3 SP. In the last CH 3 SP, work the 3 DC, 3 CH, then work only 2 DC and join with a SL into the 3rd chain of the beginning CH STs. This join will complete the round. (You should have 8 shells, 4 chain 3 spaces, and 4 CH 1 spaces).
Round 3:
CH 3 (Counts as a DC), Insert the hook into the CH 1 SP from the previous row, (Should be right where the previous row ended). YO and work a DC, Insert hook again and work another DC. (This completes your first 3 DC in the round). CH 1. [In the corner CH 3 SP work (3 DC, 3 CH, 3 DC. and CH 1)]. In the next CH 1 SP work 3 DC and 1 CH]. Repeat between [ ] 3 more times until all 4 sides are complete. After the last DC in the CH 3 space CH 1 and SL ST into the top ST of the first DC of this round. (You should have 12 shells and 12 spaces after the completion of this round).
Round 4-6:
Repeat rounds 2 and 3.
Finishing Each Square:
Pull the yarn through the last ST. Using the yarn needle, weave the yarn back and forth through the crochet stitches until a bit snug. Cut off excess.
Join the Squares
Here is a quick video showing how I did the invisible join. Step-by-step instructions on how to join granny squares using the invisible joining method. Learn how to easily achieve that look of evenly joined granny squares in your next project.
Watch this video on YouTube.
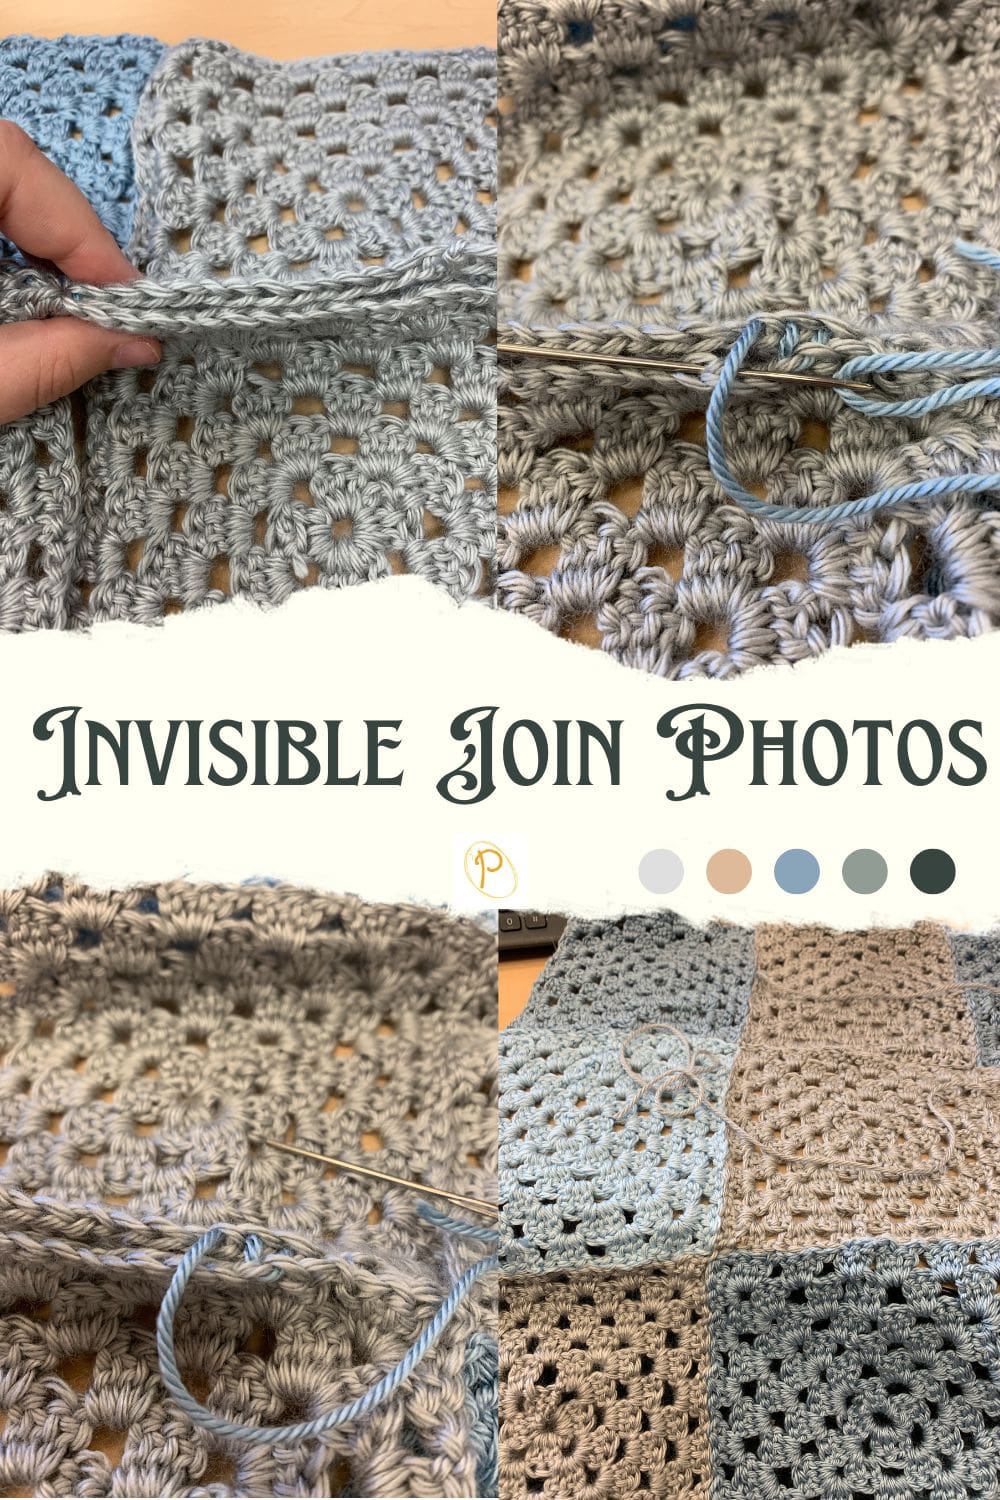
Written Directions for How to complete the Invisible Join for Granny Squares
However, if you would rather read the written directions, I will do my best to write out clear directions below if you learn better that way.
I used one of the colors that I was currently joining. Use a piece of yarn that is about 10 inches longer than two sides of the square. In order words approximately 16-20 inches long. Thread a yarn needle or sometimes called a tapestry needle.
Begin by holding the wrong sides together. Line up the corners. Start in a corner of one of the squares.
Look for the first horizontal thread inside the chain in the corner stitch. Insert the yarn needle and pull the yarn through leaving approximately a 5-inch tail. (You will need to weave this in later. Make sure to weave it into the color you used so it will not be noticeable).
Starting in the horizontal thread inside the chain in the corner stitch, insert the yarn needle and pull the yarn through. (don’t snug up the yarn just yet).
In the opposite square and insert the yarn needle into the next horizontal yarn piece in the next stitch.
Come back to the first square and insert the yarn needle into the next horizontal yarn piece in the next stitch.
Continue for 2 or 3 more horizontal yarn stitches.
Then holding the starting yarn stitch in the corner, pull the yarn snug.
Your granny squares will be snug and invisibly joined for the stitches that you have worked.
Continue moving back and forth between the two squares and weaving the yarn through the horizontal stitches.
Every 3 or 4 stitches, pull the yarn snug.
Weave in the Yarn Ends
Before working on the crochet border, I took the time to weave in all the yarn pieces using the yarn needle.
Crochet Border
Round 1:
Using the Soft Blue yarn
CH 1 (Counts as SC) SC in each ST all the way around. End with SL ST into the first CH 1 ST. Note: make sure when completing the SC in the CH Spaces you go through the top loops or at least the back loop so some of the grey from the previous row shows through.
Round 2:
Change to the Feathered Grey yarn
CH 4 (Counts as DC, CH 1), DC in the same ST. [SK 2 STs, (DC, CH 1, DC) in the next ST]. Repeat between [ ] around. In the corners work (DC, CH 1, DC, SK 1) 3 times. Join with a SL ST into the 3rd CH of the initial CH 4.
Round 3:
Continue with the Feathered Grey yarn
SL St into the CH 1 SP of the previous row. CH 3 (Counts as DC) and 2 DC in the Same SP, CH 1. [Move to the next CH SP, work 3 DC, CH 1]. Repeat around between [ ]. End the round with a CH 1 and join with a SL ST into the top CH of the initial CH 3.
Round 4:
Picot Stitch. In this round, you will complete a Picot Stitch in the middle ST of the 3 DC in the previous row with SC in the other stitches. Picot Stitch. CH 4 and insert hook into the first CH and SL ST. (YO, Pull through the loops on the hook).
Change to Soft Blue yarn
CH 1 (Counts as SC). In the next ST SC, work a Picot ST, then [SC in each ST until you reach the middle DC of the next set of 3 DC’s. Complete a Picot ST]. Repeat between [ ] around. End with a SL ST into the first CH SP.
Finishing
Weave in the yarn ends and remove the excess.

You can find Victoria crocheting, quilting, and creating recipes. She has cooked in restaurants for over 20 years, including many larger parties. She learned to crochet when she was just 11 years old and has been crocheting ever since; over 50 years now. Over 40 years ago, she loved her first class in sewing and continues to hone her skills in quilting. Many have enjoyed the handmade gifts over the years. In her professional career, she has worked in management in a wide variety of businesses including higher education as a dean of a division. All the while attending college part-time to achieve her doctorate in higher education with an emphasis in e-learning.