Last updated on July 4th, 2024 at 11:37 pm
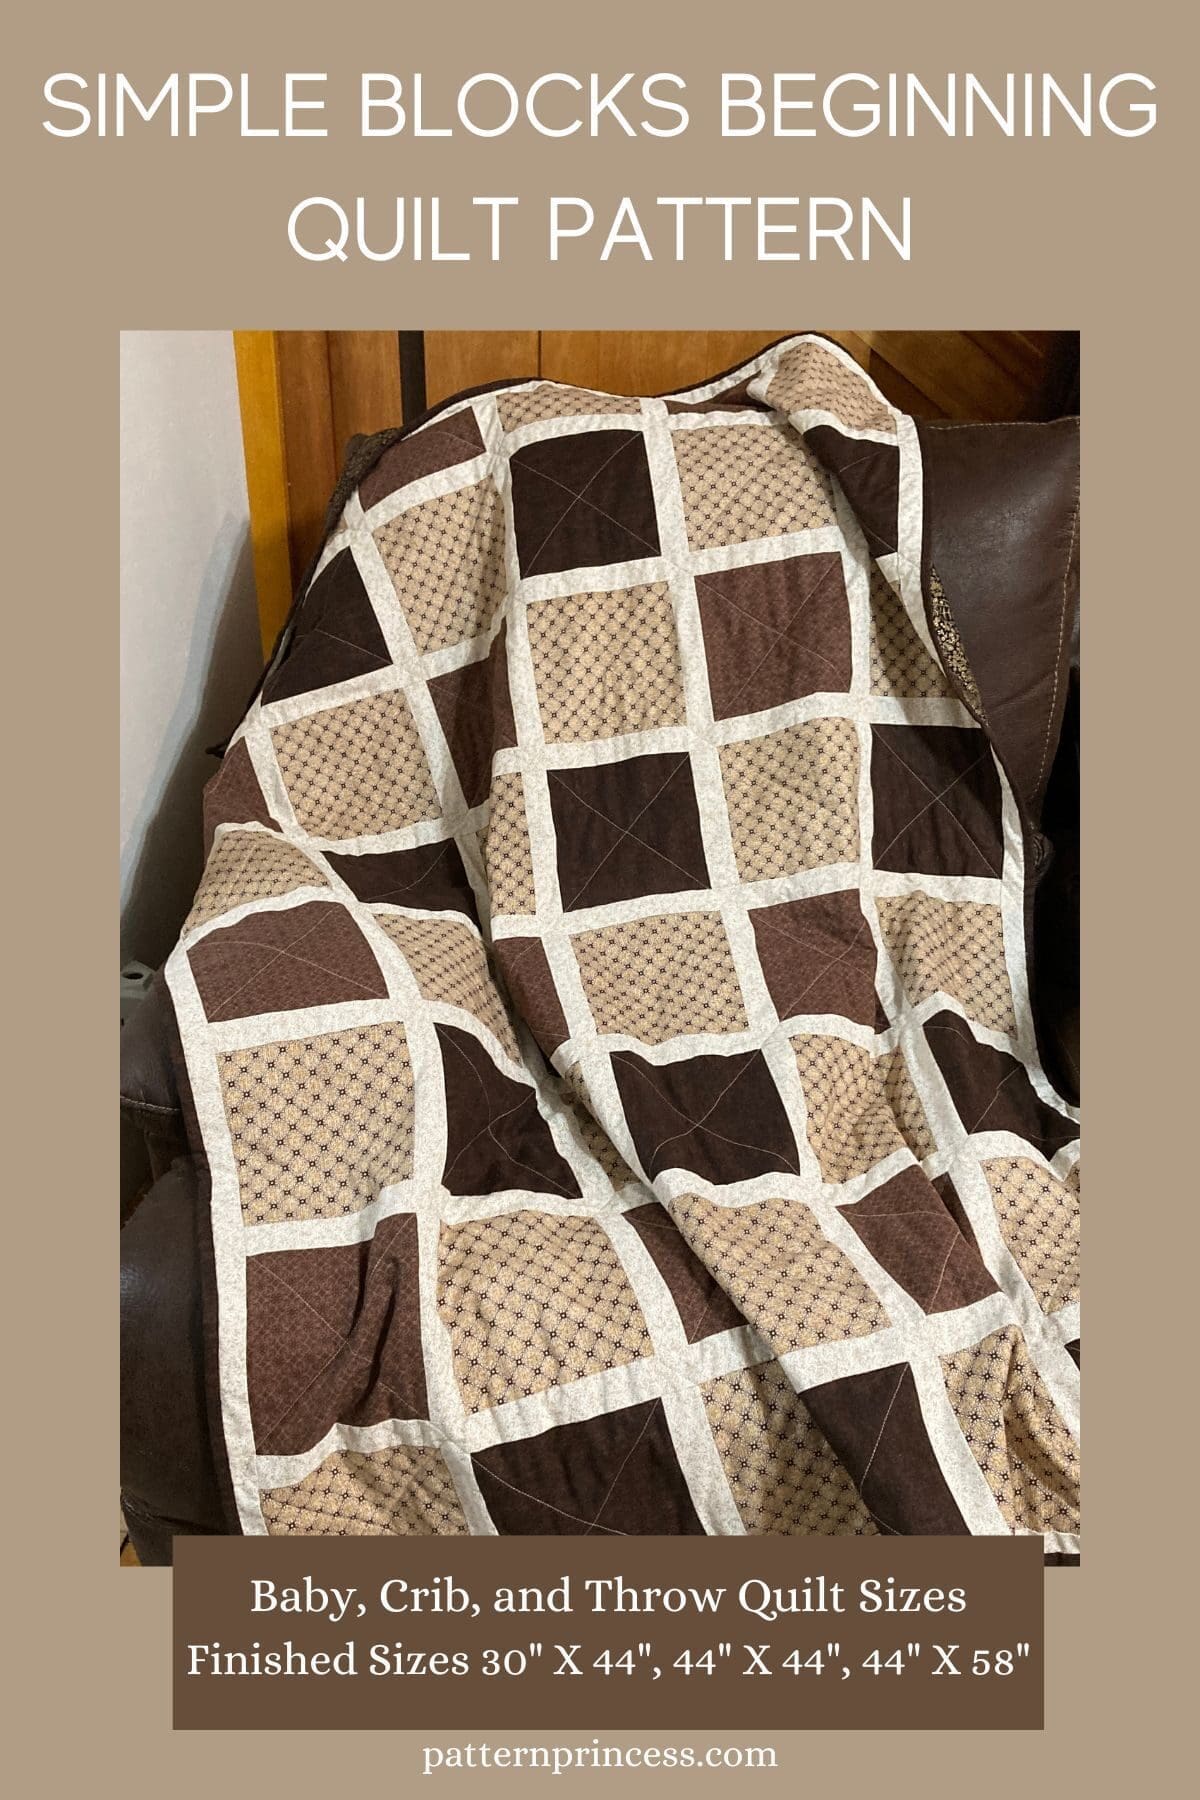
If you’re new to quilting, this simple blocks beginning quilt pattern is a great way to get acquainted with the process. This tutorial features solid squares with sashing that’s perfect for beginners. With just a few basic steps, you’ll be on your way to creating your very own quilt.
There is something incredibly satisfying about starting a quilt project with simple blocks. Whether you’re a beginner quilter or an experienced one, these blocks are perfect for testing out or experimenting with color and fabric choices.
Post contains affiliate links, and we earn commissions if you shop through the links on this page. For more information, please read the disclosure section under the About Us page.
Beginner Wedding Gift Quilt Pattern
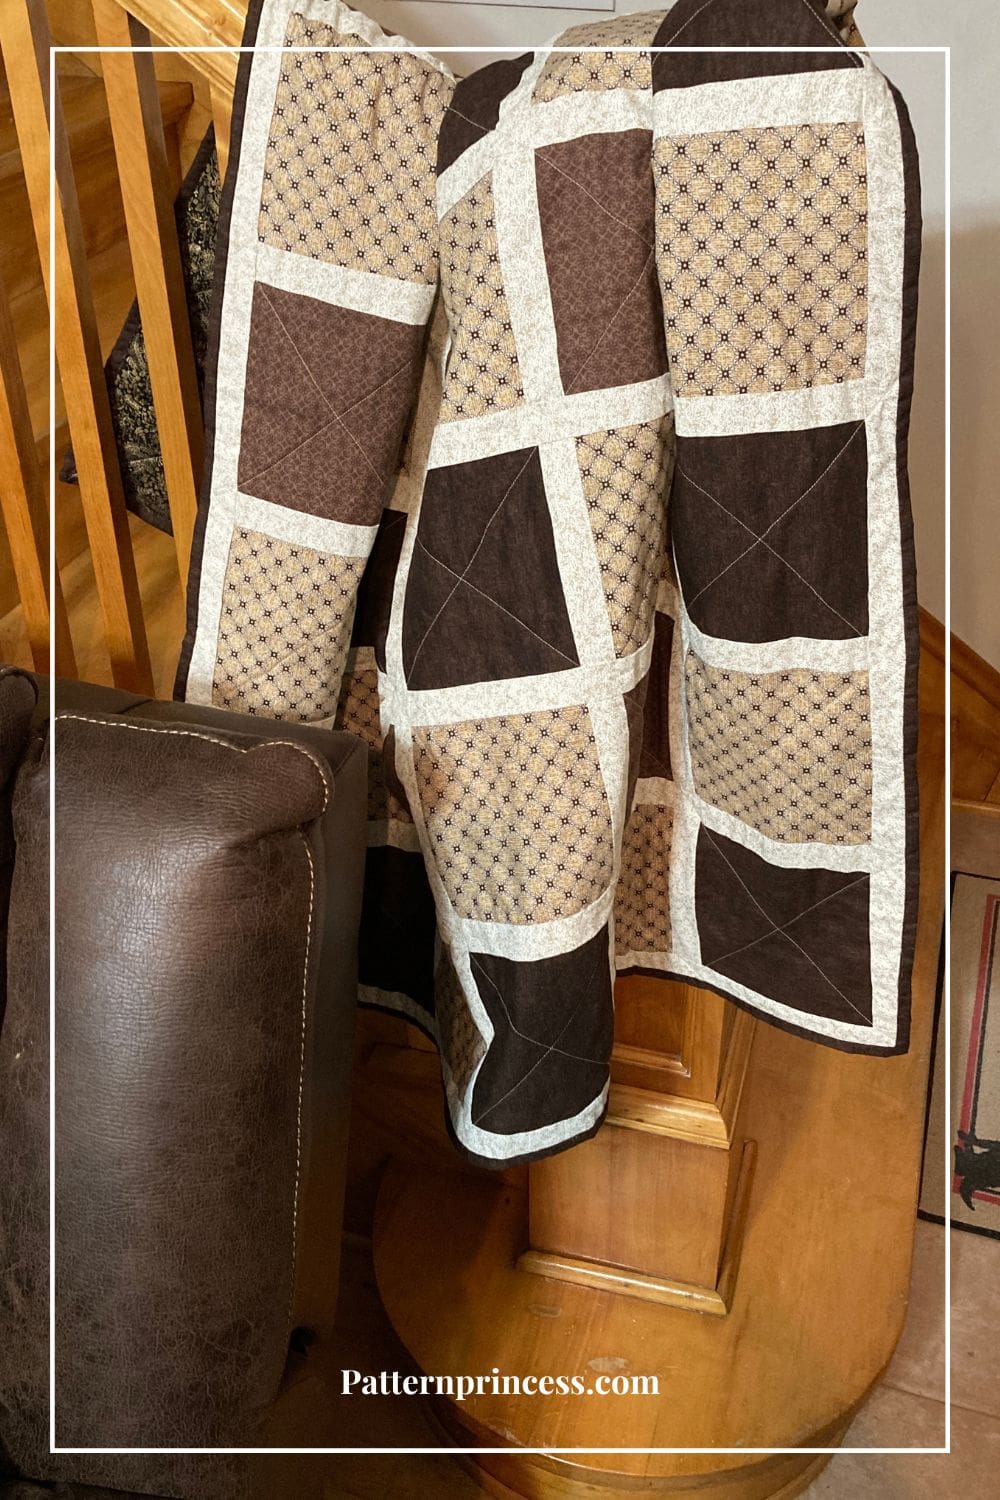
Today, I made this quilt in shades of brown; however, it will look great in a variety of colors and prints. You just need a main print, two coordinating fabrics, and a sashing fabric to make this fun quilt.
My sister-in-law recently married, and she asked for a blanket in shades of brown. My daughter and I went fabric shopping, and this is what we came up with. If you notice the quilt backing is a bit fancier with the gold tones.
It’s a great beginner pattern, since there are no triangles to cut and sew, just large and small squares with sashing strips. So, if you’re looking for a quick and easy quilt project, give these blocks a try.
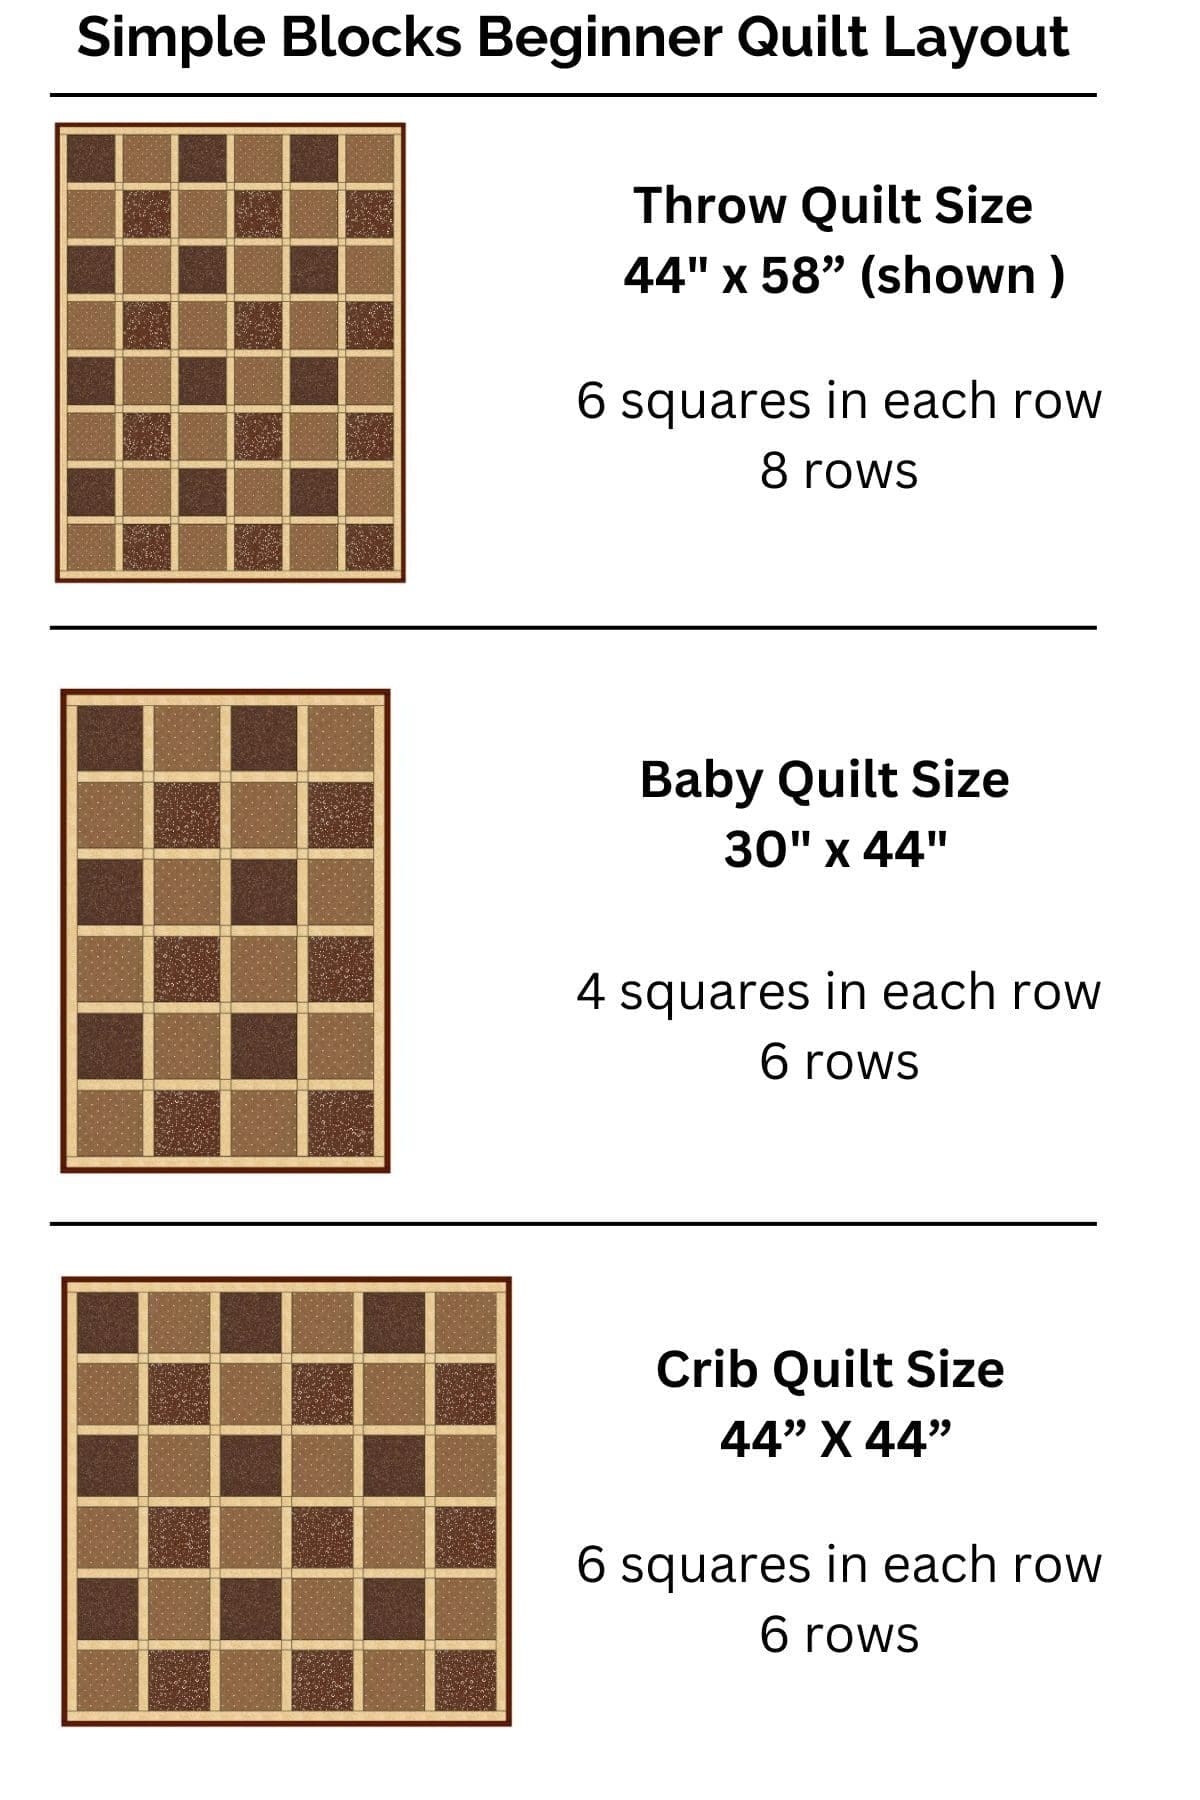
This pattern features instructions for three different sizes, so you can make a quick baby quilt or a crib size quilt or a larger throw quilt.
What’s the Easiest Quilt Pattern for a Beginner?
A simple patchwork quilt One of the easiest quilts for a beginner to make. A square patchwork quilt is made from fabric squares that are sewn together in a simple grid pattern.
Start with a precut fabric bundle such as a “charm pack” or a “layer cake” or cut your own squares.
Strip quilts are very easy to make as well. They are created by sewing long strips of fabric together then cutting those strips into squares. Again, using a precut fabric bundle like a “jelly roll” makes this even easier. However, you can also cut your own long strips too.
Directions: Simple Blocks Beginning Quilt Pattern
Skill Level
Easy
Finished Sizes
Baby Quilt Size – 30″ x 44″
Crib Quilt Size – 43” X 43”
Throw Quilt Size – 44″ x 58” (shown)
Materials and Supplies Requirements
Fabric Requirements
Quilt top fabrics uses 3 fabrics for the squares and a lighter fabric for the sashing.
One main fabric used for the main print and two coordinating fabrics for the coordinating fabrics.
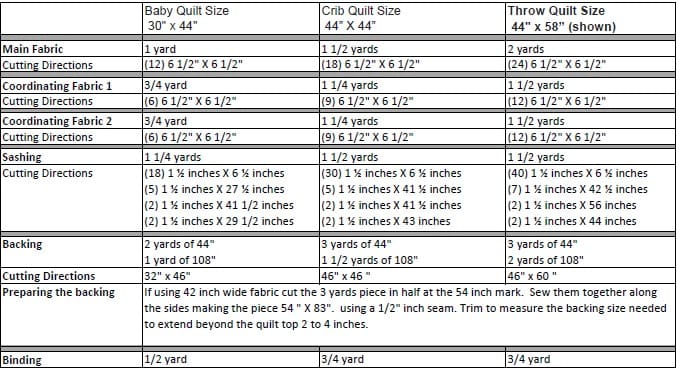
Main Print Fabric. 2 yards
Coordinating Fabric 1. 1 ½ yards of each color.
Coordinating Fabric 2. 1 ½ yards of each color.
Sashing fabric 1 ½ yards. Choose solids or fabrics with subtle blending.
Backing fabric 3 yards, 46 inches x 60 inches. If using 42 inch wide fabric cut the 3 yards piece in half at the 54 inch mark. Sew them together along the sides making the piece 54 ” X 83″. using a 1/2″ inch seam. Trim to measure the backing size needed to extend beyond the quilt top 2 to 4 inches.
Binding fabric ¾ yard, 240 inches X 2 ½ inches wide of binding fabric.
Batting
You’ll need a piece trimmed to 46 inches x 60 inches of thin cotton batting like Warm & Natural to make this quilt.
Cutting Directions
You will need a total of 48 Squares 6 ½ inches X 6 ½ inches.
Main Print Fabric. Cut 24 squares, 6 ½ inches X 6 ½ inches
Coordinating Fabric 1. Cut 12 squares, 6 ½ inches X 6 ½ inches
Coordinating Fabric 2. Cut 12 squares, 6 ½ inches X 6 ½ inches
Sashing fabric
- Cut 40, 1 ½ inches X 6 ½ inches.
- Cut 7, 1 ½ inches X 42 ½ inches.
- Cut 2, 1 ½ inches X 56 inches.
- Cut 2, 1 ½ inches X 44 inches.
Simple Blocks Beginning Quilt Pattern
Fabric Requirements
Essential Supplies for the Beginning Quilter
- Cutting Mat
- Iron
- Ironing Board
- Painters Tape
- Pins
- Quilting Ruler
- Rotary Cutter
- Safety Pins; 1 ½ inch stainless steel
- Scissors
- Sewing Needle
- Thread
- My favorite quilting supplies
Pattern Notes
The directions for this easy beginner quilt pattern are for rotary cutting, machine piecing, machine quilting, and the binding is machine sewn to the front and hand-stitched to the quilt back.
Use a ¼” seam allowance.
All seams can be pressed to the darker fabric or open.
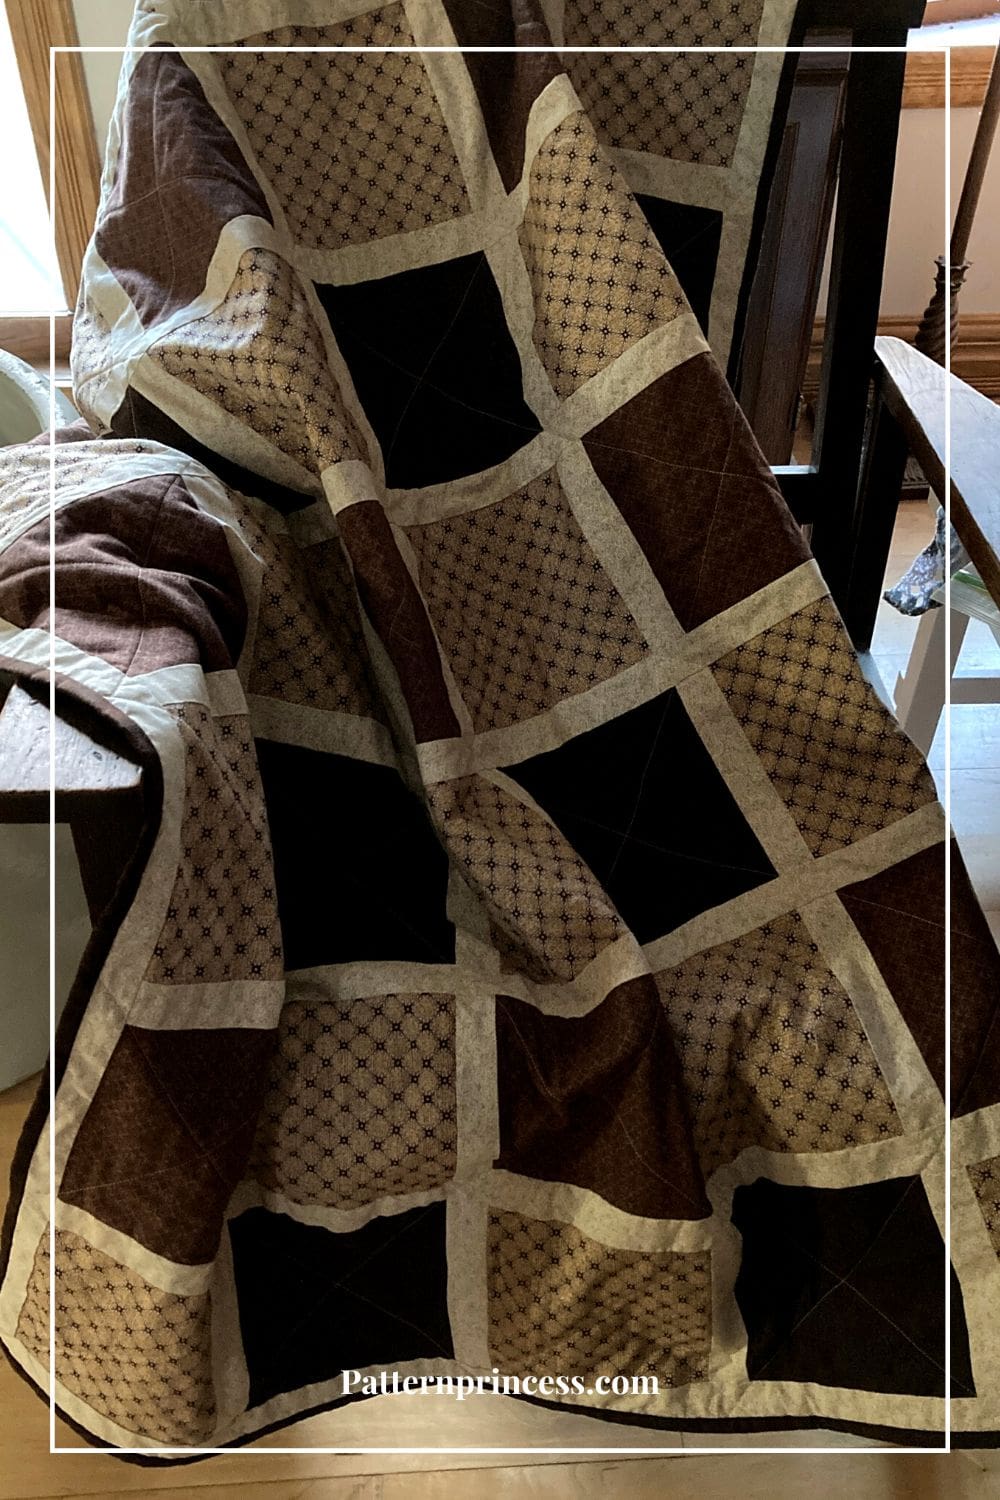
Use the Photo provided to assist with the layout of the blanket for the three different sizes. The directions are for the blanket shown.
Quilt Pattern Directions
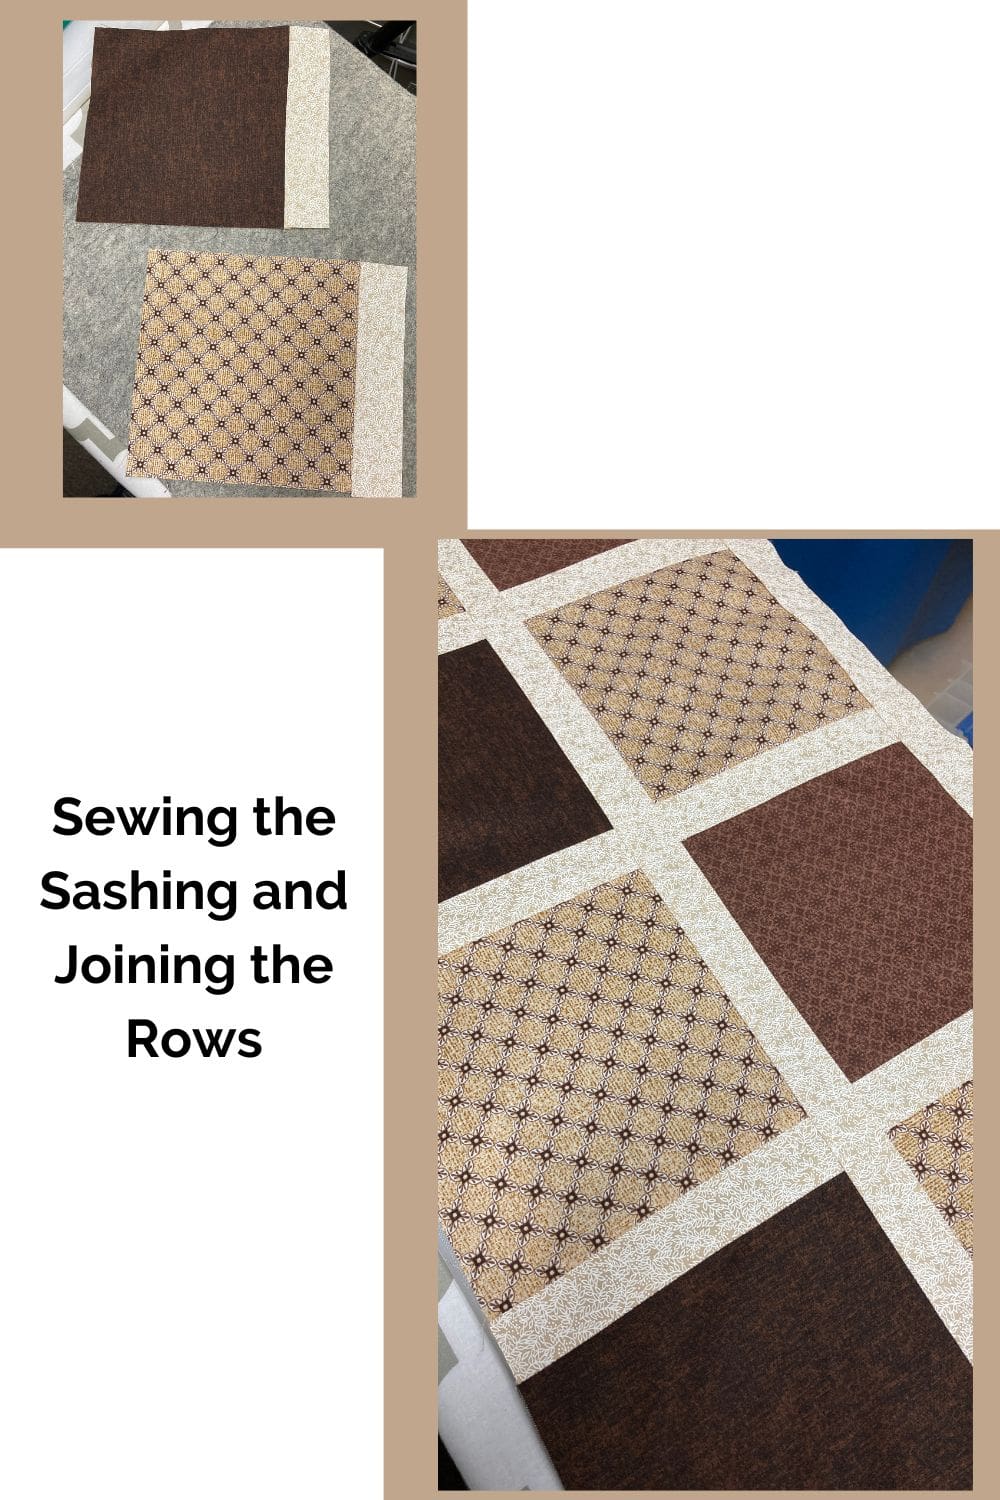
Use the photo to help with fabric placement while sewing the sections together. Lay out the squares and sashing, sew them together into rows and then sew the rows together into the quilt top.
Starting with the top row as number 1 and working down, the odd numbered rows will be the same and the even numbered rows will be the same.
Sew the squares and sashing together using ¼ inch seam allowance with the right sides together.
Rows 1, 3, 5, 7.
Begin the row with a darker coordinating fabric square, then a sashing strip, next the main print fabric, next a sashing. Repeat this 2 more times except on the last main print fabric of the row do not add the sashing yet. That will be added in a long strip later. All seams can be pressed to the darker fabric or open.
Rows 2, 4, 6, 8.
Begin the row with the main print fabric square, then a sashing strip, next the medium coordinating fabric square, then a sashing strip. Repeat this 2 more times except on the last medium print fabric of the row do not add the sashing yet. That will be added in a long strip later. All seams can be pressed to the darker fabric or open.
Horizontal Sashing
Now that the rows are sewn together it is time to add the horizontal sashing between the rows and sew the rows together. Again, you will be using ¼ inch seam allowance with the right sides together.
Using the 7, 1 ½” X 42 ½” strips, place them between the rows making sure to align the vertical sashing from the rows above and below the sashing strip. Sew the sashing to one row, then the next row.
Vertical Sashing on the Sides
You should have all 8 rows sewn together.
Using the 2, 1 ½” X 56” strips, place them on the right and left side of the quilt top and sew together using ¼ inch seam allowance with the right sides together. Press the seams to the outside or open.
Horizontal Sashing on the Top and Bottom
Using the 2, 1 ½” X 44” strips, place them on the top and bottom of the quilt top right sides together. Sew together using ¼ inch seam allowance. Press the seams to the outside or open.
Layer the Top, Batting, and Back
Sandwich the back, batting, and top.
Begin by placing the backing fabric on a flat solid surface, right side down facing out. Smooth out any wrinkles. You may want to use painters’ tape to secure the edges of the fabric down. This will help hold it in place and reduce the chance of a wrinkle developing as you place on the next two layers.
Next, place the batting on top of the backing fabric smoothing out any wrinkles.
Finally, place the quilt top on the batting, centering it with the right side up. Smooth out any wrinkles.
Note: you will notice that the two bottom layers of the quilt (the back and the batting) are extending about 2 inches all around the outside edges of the quilt top.
Baste the Quilt Together
Once you have the top fabric all smoothed out, use large safety pins to baste all three layers together. I like to use 1 ½” stainless pins.
Put a pin in each corner and around the entire quilt about every 5-6 inches or so through all three layers. This holds things in place, so they don’t move around while you are quilting the layers together.
Quilting the Simple Blocks Beginning Quilt
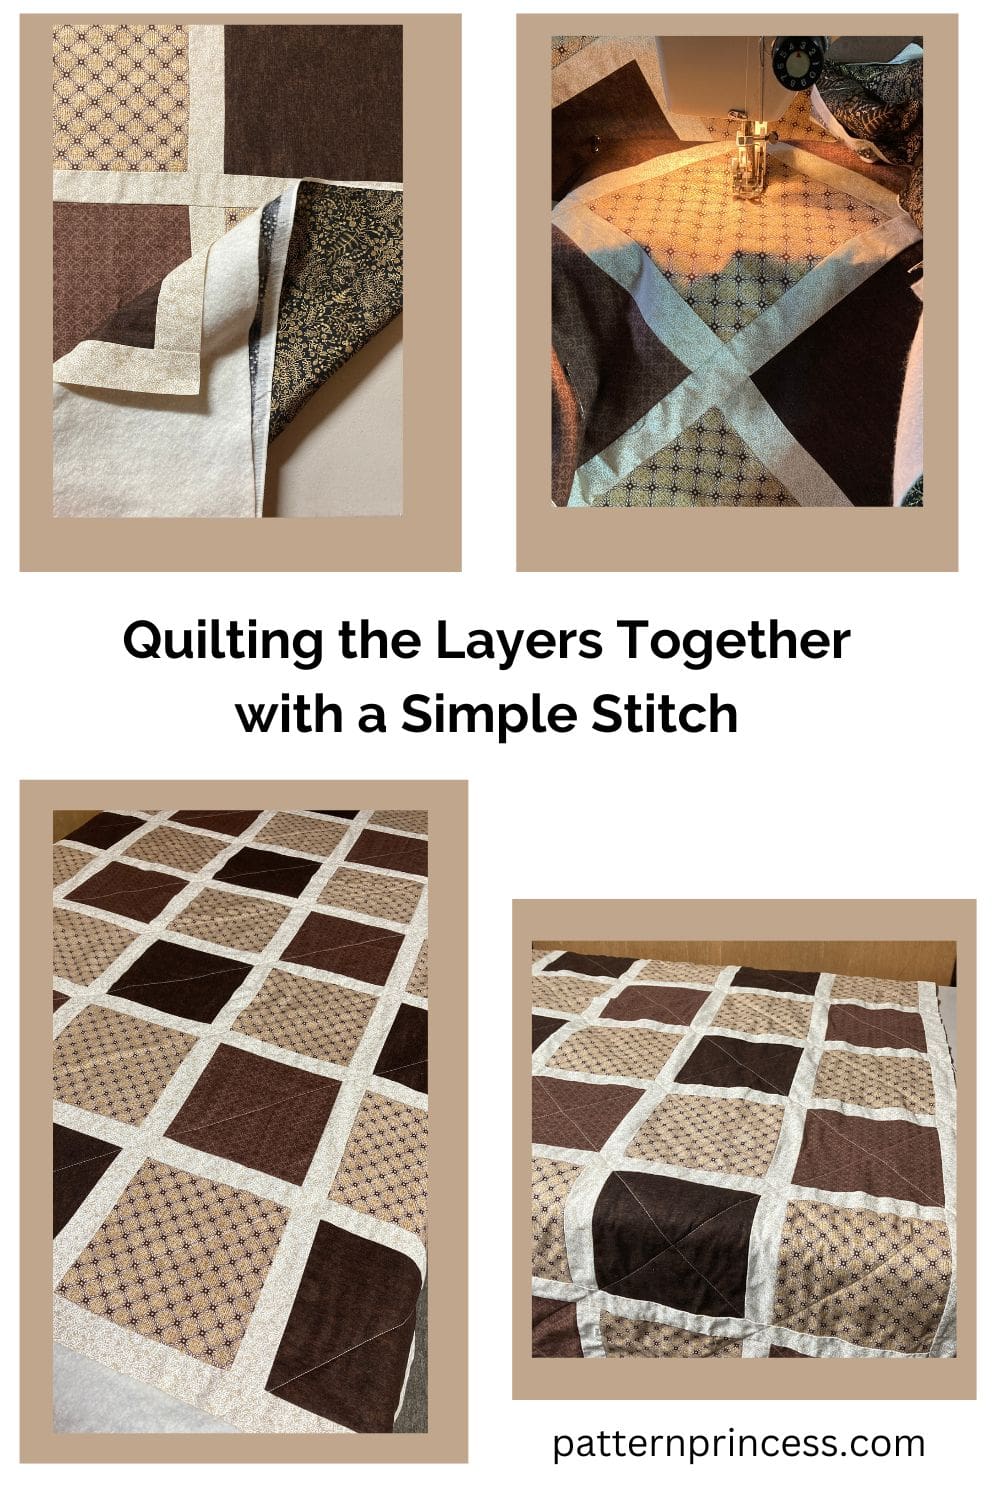
To highlight the simple lines in this quilt and to keep this easy, I used my walking foot and sewed from one side to the other diagonally through all three layers.
I used the squares to help me keep my sewing lines straight. Starting in one corner, sew from the edge of the quilt through the square and to the other edge of the quilt. Move to the next diagonal set of squares and repeat until all the diagonal lines one way have been sewn through the squares.
Next start on the opposite corner from where you started sewing and sew the diagonal lines through the squares on all the diagonal rows.
You should be able to see an “X” sewn through each square.
However, you could do any type of free motion quilting design on this project.
How to Trim the Batting and Backing Fabric Before Binding
I have seen patterns detail trimming the quilts all the way from exactly on the edge of the quilt to ¼ inch. I have found that I like to trim the batting and backing fabric to about 1/8 inch of the outside edge of the quilt top.
By having a little extra batting and backing fabric beyond the quilt top, the binding seems to help the binding lay a bit better all the way around the quilt once it is sewn on.
However, during the construction of the quilt, some of the blocks may end up with edged that have pulled in a bit. If this is the case, it is best to trim the quilt exactly on the edge. Therefore, look over your whole quilt and evaluate each block to determine if you can trim a bit outside the edge or not.
To trim the batting and backing, use a longer ruler and a rotary cutter on a large cutting mat. Lay the quilt flat. Place the ruler along the edge of the quilt and use it as a guide to use your rotary cutter to trim your quilt batting and backing. Do this on all four sides.
Sew the Binding to the Quilt
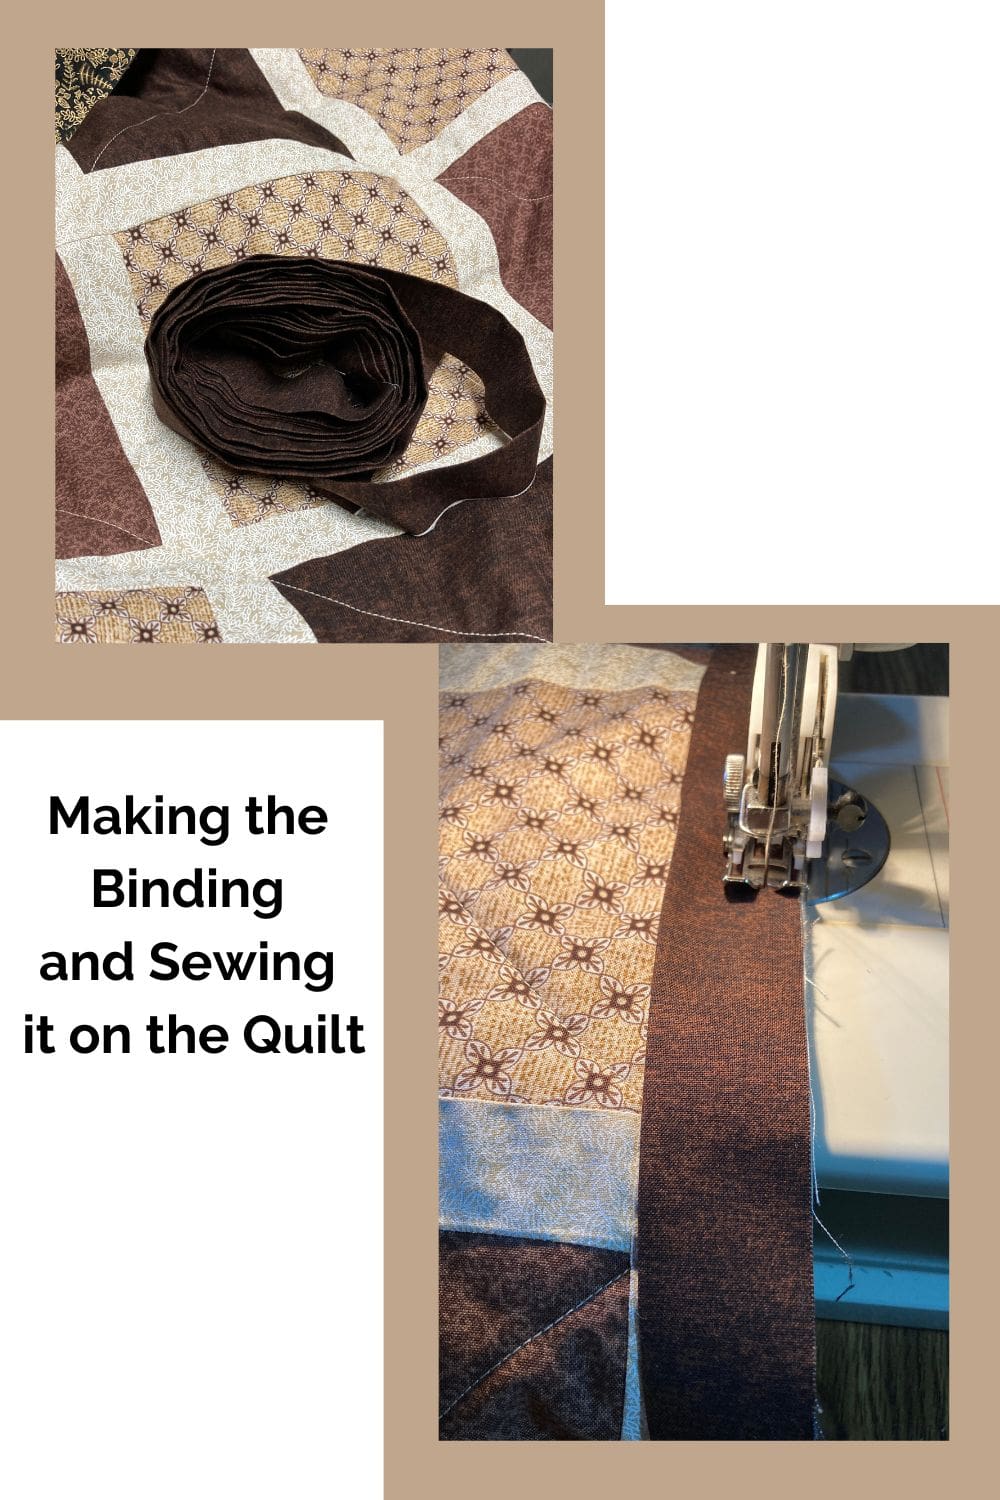
Once the strips are sewn together, fold in half lengthwise with wrong sides together and press.
First, prepare the binding strips. I used three of the jelly roll cake pieces and sewed them together for my binding. I have a tutorial on how to make your own binding if this is new to you.
Pin the raw edge of the binding onto raw edge of the quilt top. I generally start in the middle of a side. Leave approximately a 3” tail hanging.
Note: This hanging part will be used to sew to the other end of the binding strip when you have finished sewing all four sides of the binding onto the quilt.
Sew the binding onto all four sides of the quilt making sure to miter the corners.
How to Miter Corners
As you are sewing on your binding, stop sewing ¼ inch from the corner. You may want to mark this spot with a pin ahead of time. Back stitch a few stitches and cut the thread making sure NOT to cut the quilt or the binding.
Remove the quilt from the sewing machine and fold the binding strip up straight so it is vertical from the side you were just sewing on.
Next, fold the binding strip back down on itself and align it to the edge of the side of the quilt you just sewed and the edge of the quilt you are going to sew next.
Continue sewing the binding on the quilt edge.
Repeat this process until all four sides and corners have the binding sewn on. When you are on the last side of the quilt close to where you started with the binding it is time to connect the ends of the binding.
If you know how to join the binding to make a continuous strip, go ahead and do that process. To be honest, I have tried many times and have yet to master this.
There are many ways to join binding. Please use the method that works for you. Here is what I do.
Stop stitching a few inches away from where you started. Overlap the starting and ending binding about 2 inches. Cut the ending binding at this point.
Fold the end of one of the binding strips over about 1 inch. Then tuck the raw edge of the other binding inside. Continue stitching until you meet up with the starting point.
Hand-Stitch the Binding to the Quilt Back
The last part of making a quilt is to hand-stitch the folded edge onto the back of the quilt.
I like to use a few small clips to hold the binding as I sew. Continue moving them along just ahead of where you are sewing.
When you get to the corners, turn them right side out and miter the corner.
I sew right into the corners to help hold the binding in place.
Once all the sides and corners are stitched, you are done.
It is ready to use or give as a gift or use.

You can find Victoria crocheting, quilting, and creating recipes. She has cooked in restaurants for over 20 years, including many larger parties. She learned to crochet when she was just 11 years old and has been crocheting ever since; over 50 years now. Over 40 years ago, she loved her first class in sewing and continues to hone her skills in quilting. Many have enjoyed the handmade gifts over the years. In her professional career, she has worked in management in a wide variety of businesses including higher education as a dean of a division. All the while attending college part-time to achieve her doctorate in higher education with an emphasis in e-learning.
