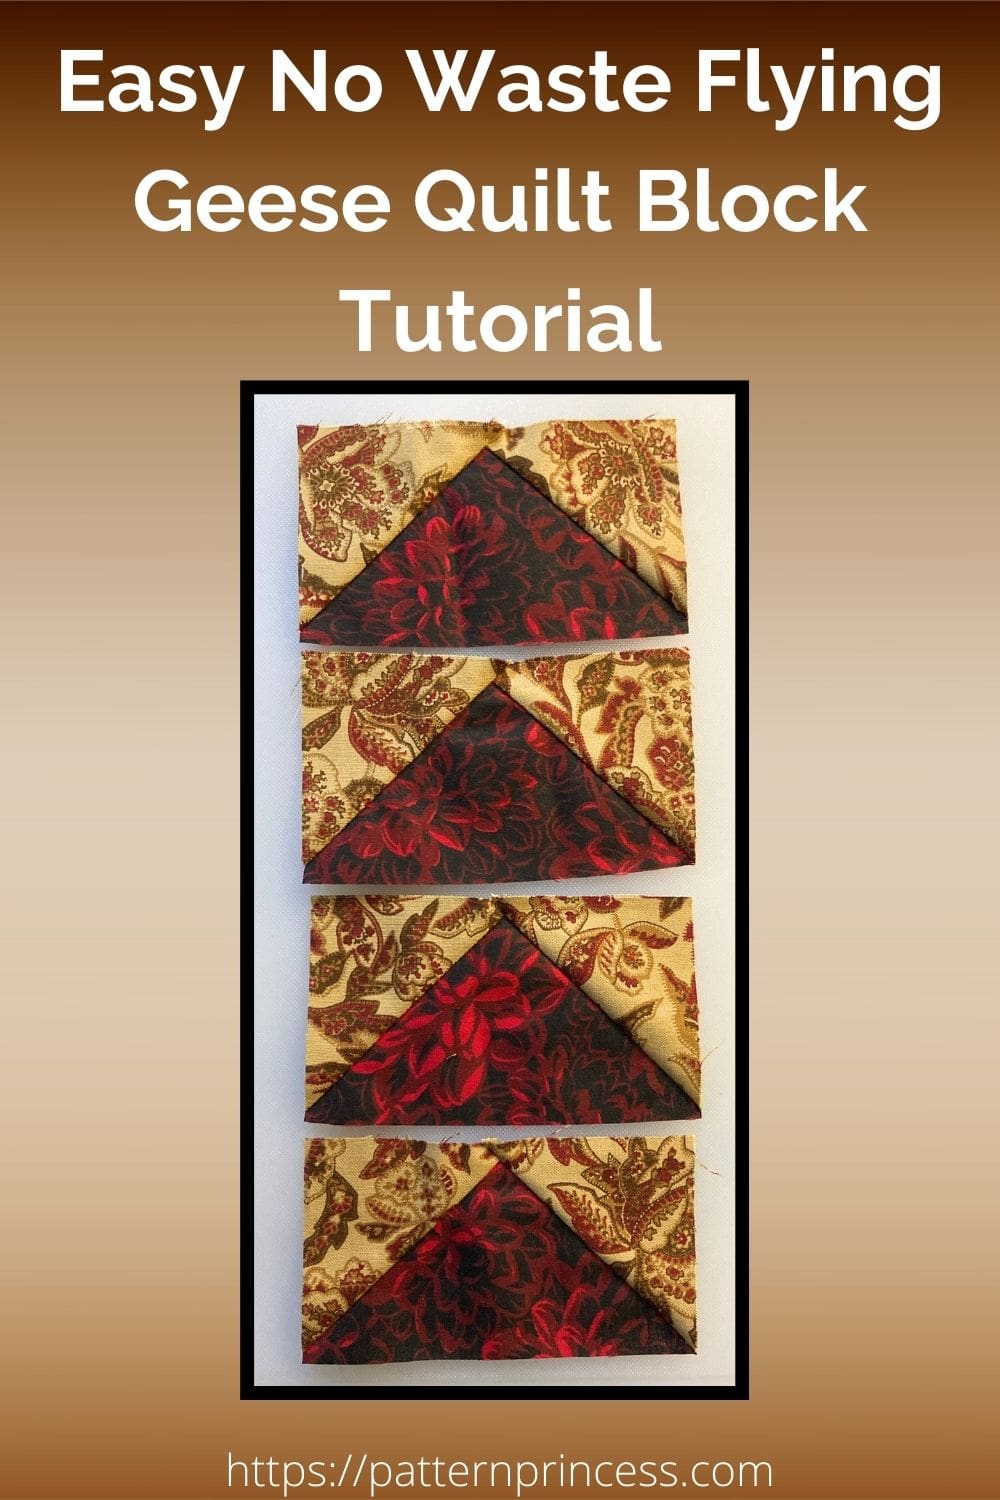
The no waste flying geese method is an efficient technique that eliminates fabric waste and speeds up the process. Flying geese quilt blocks are a favorite among quilters due to their versatility and aesthetic appeal.
This also sometimes referred to as four-at-a-time or the cut, sew, cut, sew method.
Four at a Time Flying Geese Units
Use one large square and four smaller squares of fabric to make four flying geese quilt blocks at the same time. With this simple and relatively easy method, you can speed up the process.
Flying Geese can stand alone as a single block, stacked on top of each other to give the appearance of geese flying in the sky, or can be used to make many other famous quilt blocks.
The large triangle on a flying geese quilt block is the goose. And the two smaller triangles on either side of the goose are the sky.
Ways to Use Flying Geese blocks
There are so many ways to use this rectangular block in your quilts.
They make an awesome quilt border around or within a quilt. Flying geese blocks are incredibly versatile and can be used in a multitude of quilt designs to create striking visual effects.
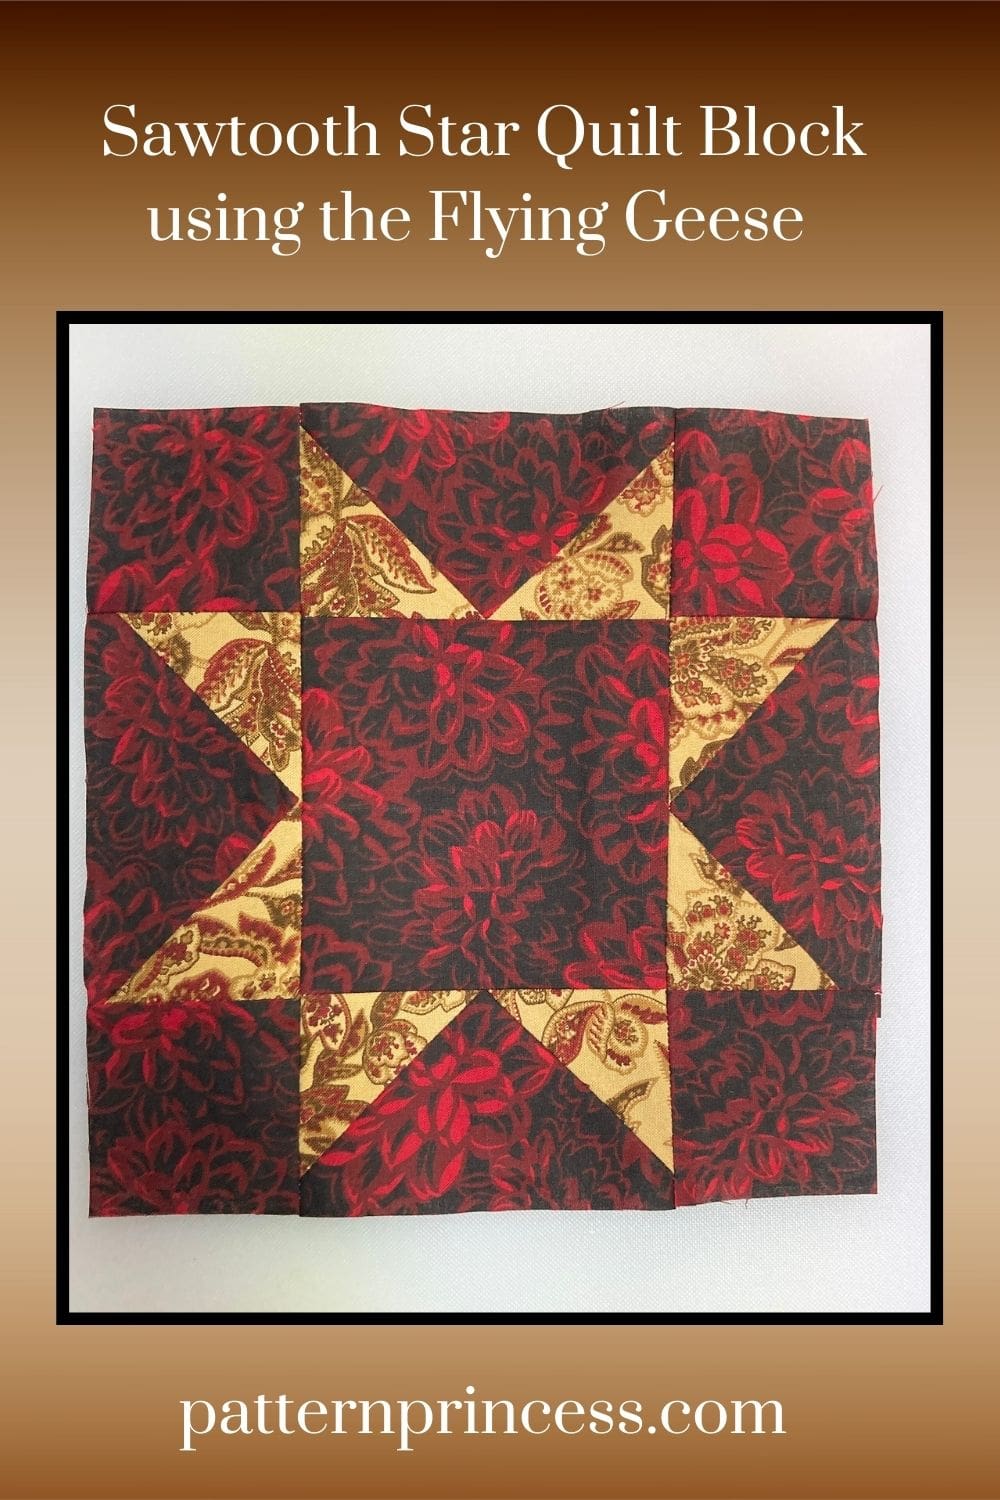
These blocks are often utilized to form the points of star blocks, such as the classic Sawtooth Star, adding a dynamic and traditional element to the quilt. They can be arranged in rows to create chevron or zigzag patterns, guiding the eye across the quilt with a sense of movement.
Additionally, flying geese blocks make excellent borders, framing the quilt and providing a cohesive finish. When used in medallion quilts, they enhance the central motif and add intricate detailing around the edges. Whether they’re forming arrows that point the way or pivoting to create visual interest, flying geese blocks bring a charming and directional quality to any quilt design.
Formula for Varying the Size
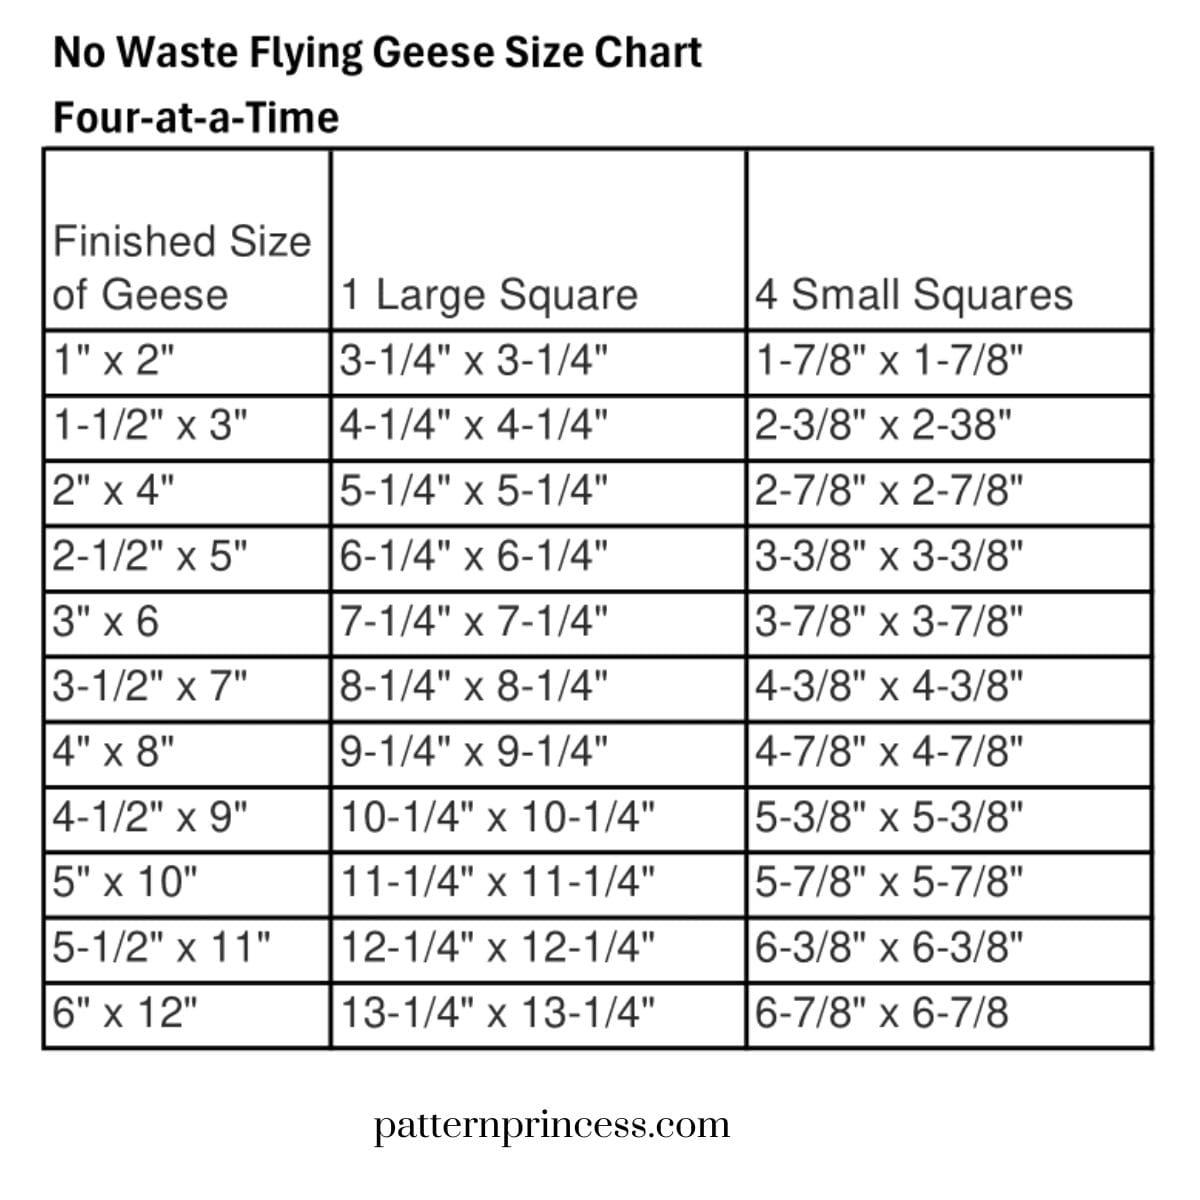
This technique uses one large square and four small squares. In simple terms, to change the size, the large square should be the size of the finished width you desire the Flying Geese to be + 1 ¼”. The four smaller squares should be the height of the finished unit you want plus ⅞”.
When making four-at-a-time flying geese, you can use a simple formula to vary the size of the finished quilt block. Here’s the formula and an explanation of how to calculate the fabric sizes needed for your desired finished size:
Formula for Four-at-a-Time Flying Geese
Here is a full breakdown of how to calculate your squares using this technique.
Desired Finished Size:
Let’s denote the desired finished size of the flying geese block as:
- Finished Width (W)
- Finished Height (H)
For traditional flying geese, the height (H) is typically half the width (W), i.e., H = W/2.
Cutting Dimensions:
To make four flying geese blocks at once, you will need:
- One large square for the goose fabric
- Four small squares for the background fabric
Calculating the Size of the Large Square (Goose Fabric):
The size of the large square should be:
Large Square Size = ???? + 1.25
Calculating the Size of the Small Squares (Background Fabric):
The size of the small squares should be:
Small Square Size = H + 0.875
Example Calculation:
Suppose you want to make flying geese blocks with a finished size of 4 inches wide and 2 inches high:
- Finished Width (W) = 4 inches
- Finished Height (H) = 2 inches
Using the formula:
Large Square Size (Goose Fabric):
Large Square Size = W + 1.25 = 4 + 1.25 = 5.25 inches
Small Square Size (Background Fabric): Small Square Size = H + 0.875 = 2 + 0.875 = 2.875 inches
So, for flying geese blocks that finish at 4 inches by 2 inches, you will cut:
- One large square of the goose fabric at 5.25 inches by 5.25 inches. Using fractions, this would be 5 ¼” X 5 ¼”.
- Four small squares of the background fabric at 2.875 inches by 2.875 inches. Using fractions, this would be 2 7/8” X 2 7/8”.
Adjusting for Different Sizes:
Simply substitute your desired finished width (W) and height (H) into the formulas to determine the fabric sizes needed for any other dimensions.
The chart below the written directions shows some of the more common sizes.
Directions: Easy No Waste Flying Geese Quilt Block Tutorial
Skill Level
Easy
Materials Needed
- Fabric for geese (main triangles)
- Fabric for background (small triangles)
- Rotary cutter and mat
- Quilting ruler
- Sewing machine
- Iron and ironing board
- Fabric marking pen or pencil
Pattern Notes
The instructions below will produce 4 – 2” x 4” finished blocks. 4- 2 ½” X 4 ½” unfinished blocks.
Sew fabrics together using ¼” seam allowances.
Sew fabric with the right sides together.
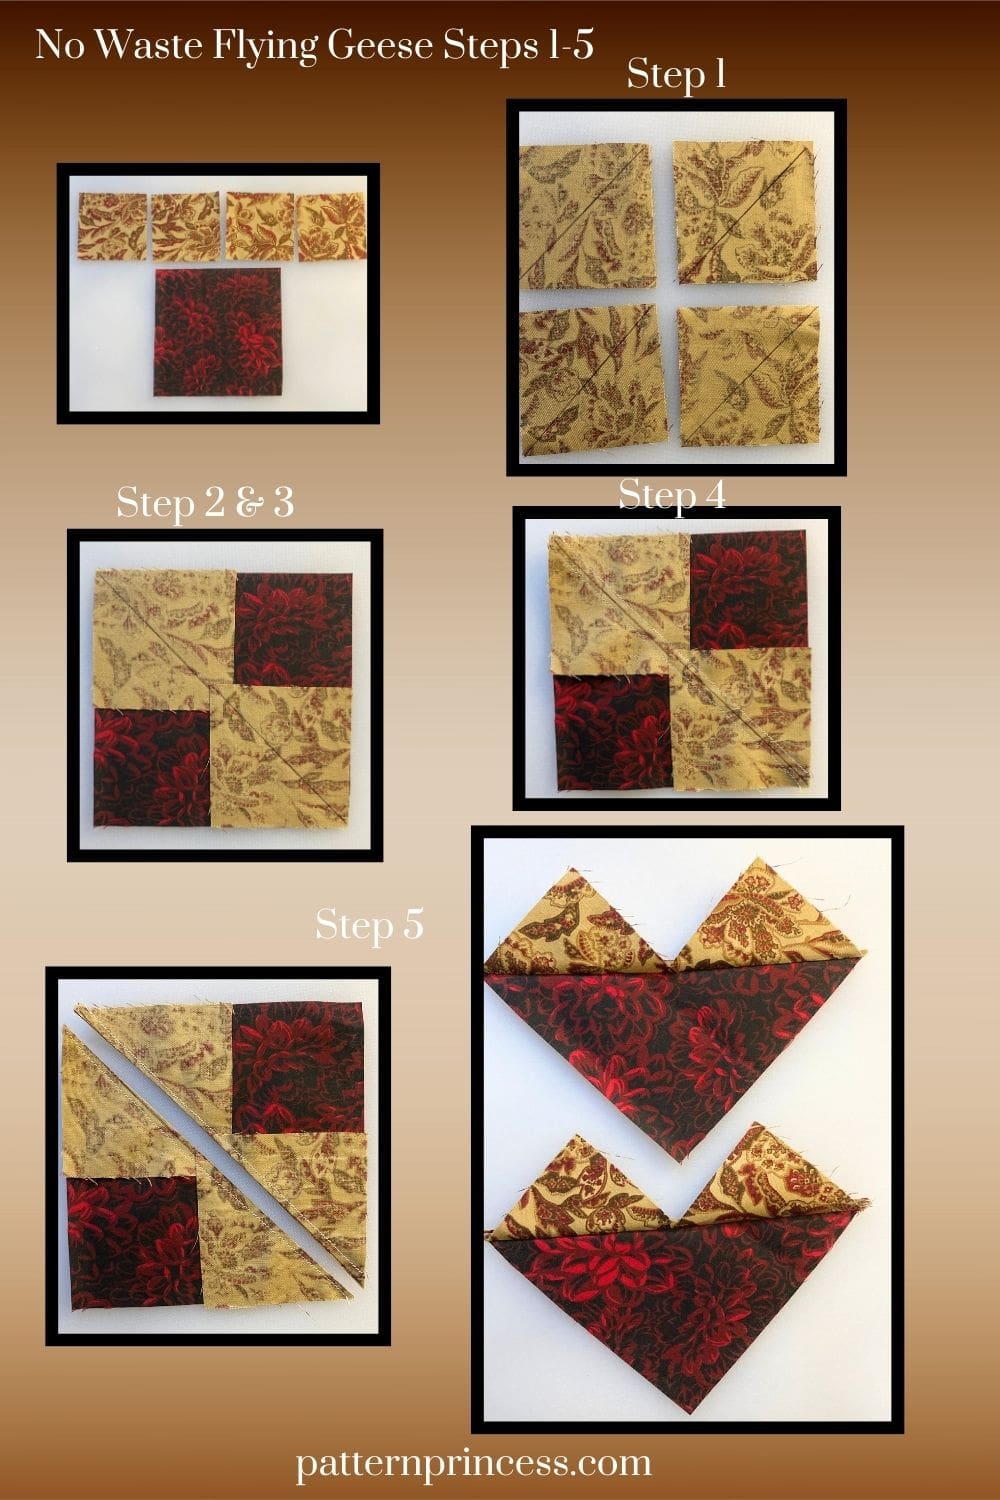
Step 1: Cutting Fabric
For this no-waste method, you’ll need:
- One large square of geese fabric 5.25 inches by 5.25 inches. Using fractions, this would be 5 ¼” X 5 ¼”. This is the goose fabric.
- Four small squares of background fabric 2.875 inches by 2.875 inches. Using fractions, this would be 2 7/8” X 2 7/8”. This is the sky fabric.
Ensure your cuts are precise for accurate blocks.
Step 2: Marking Guidelines
On the wrong side of each small square, draw a diagonal line from one corner to the opposite corner using a fabric marking pen or pencil.
Step 3: Placing Pieces
Align two small squares onto opposite corners of the larger square with the right sides together. The marked line should be facing up.
The two small squares will overlap just a little bit in the middle. Pin them in place.
Step 4: Sewing
Sew a scant ¼” seam on both sides of the drawn line.A scant seam is just a little less than ¼”.
Remove the pins as you come up to them. Don’t forget to sew a scant ¼” seam allowance on BOTH sides of the line!
Step 5: Cutting and Pressing
Cut apart on the drawn line to separate into two units. You can use either a rotary cutter or carefully cut along the line with a scissors to separate into two units.
Press each of the units open toward the small “sky” triangle pieces. Some people think that at this stage they look a bit ling “dog ears” poking out.
Step 6: Adding the Remaining Small Squares
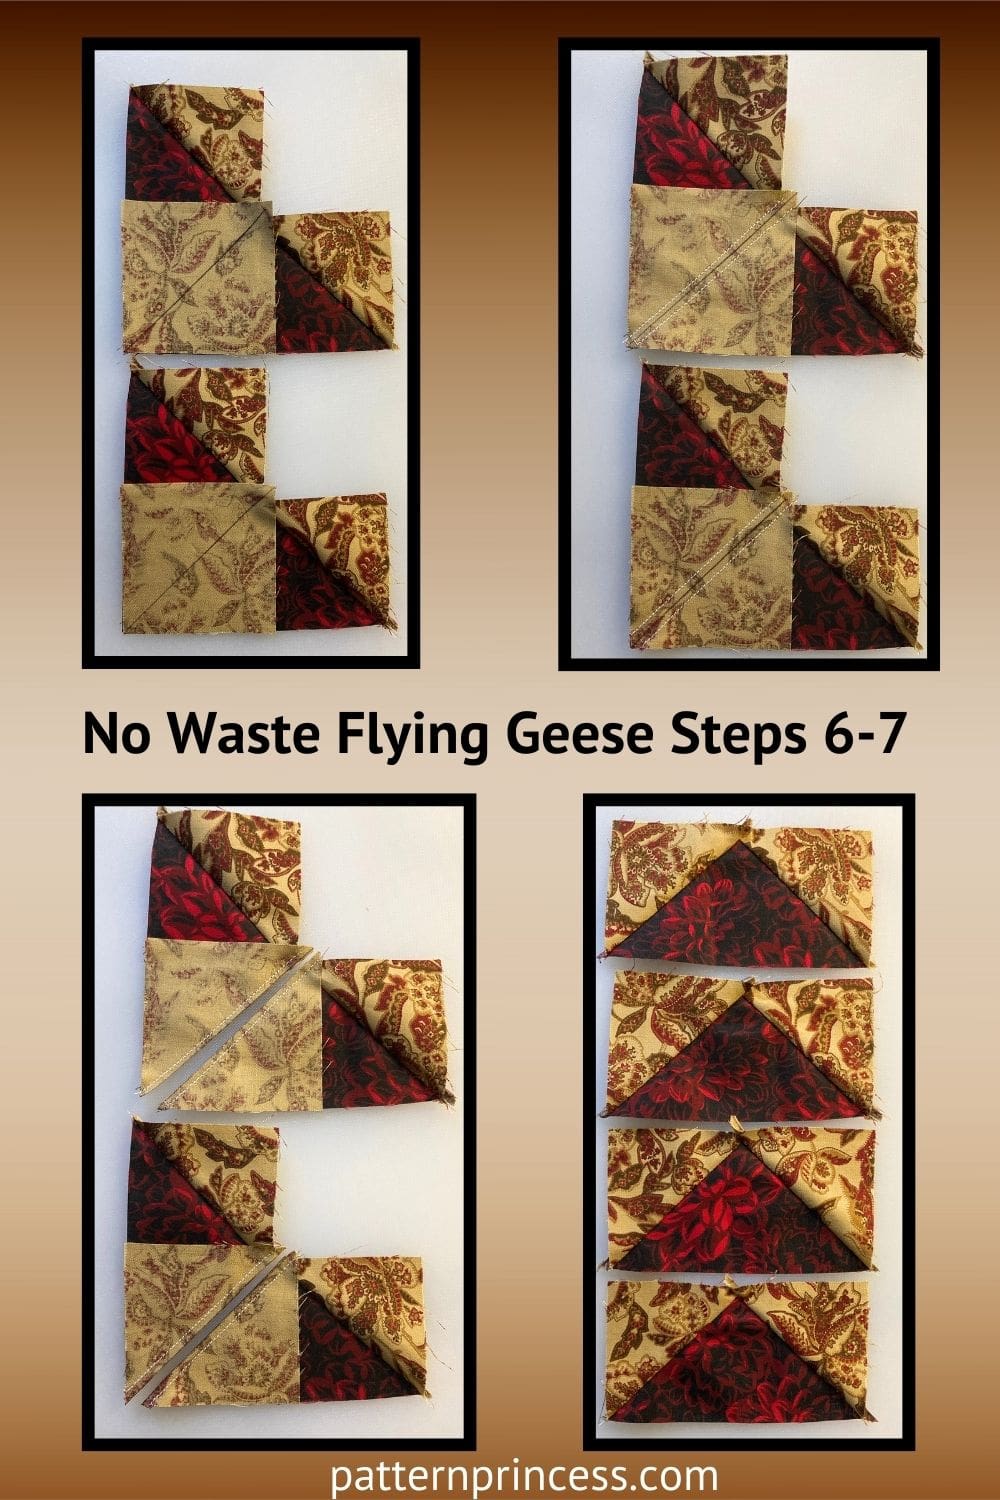
For each of the two units align a small square onto the corner without anything sewn to it with the right sides together. The diagonal line should be facing up. Pin in place
Sew a scant ¼” seam on each side of the drawn line.
Step 7: Sewing and Cutting Again
Sew a scant quarter-inch seam on both sides of the drawn diagonal lines. Cut apart on the drawn line of each unit and press the units open toward the small “sky” pieces.
You will now have four flying geese blocks with no fabric waste!
Trimming Flying Geese Blocks: Why It Matters
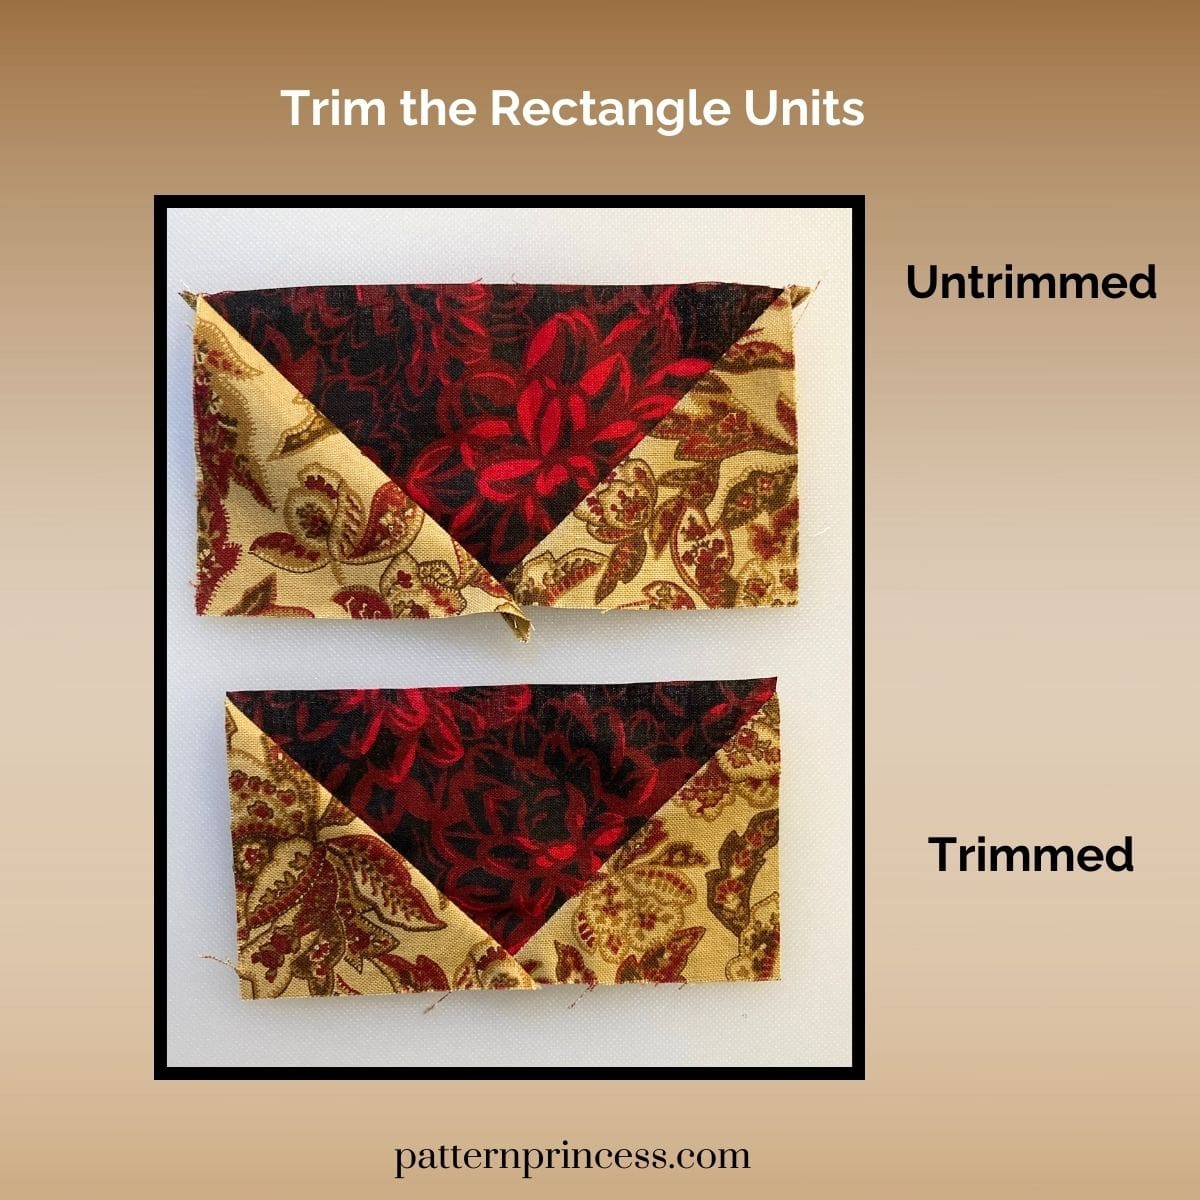
Trimming your Flying Geese blocks is an essential step that’s often overlooked. While it may seem tedious or unnecessary, taking the time to trim ensures precision and makes sewing your blocks together much easier.
Why trim? Accuracy is key. By trimming, you’ll ensure your blocks fit together neatly, without any unnecessary bulk or misalignment.
Before you begin trimming, remember this crucial tip: Allow for a ¼” seam allowance beyond the triangle’s tip. Neglecting this can lead to losing the sharp point of your triangle when you sew the blocks together.
When trimming, always remove equal amounts from all sides of your block to keep the triangle centered and maintain its intended shape.
Trim the right and top sides of the block. This will be very minimal if anything at all that needs to be trimmed off.
Once trimmed, you are done. An easy way to make four quick and fun flying geese quilt blocks. They are ready for you to incorporate into your next quilt or quilt block.
The no-waste method for making flying geese quilt blocks is a game-changer for quilters who want to maximize their fabric use and minimize waste.
Easy No Waste Flying Geese Quilt Block Tutorial
Equipment
- Rotary cutter and mat
- Quilting Ruler
- Sewing Machine
- Iron and ironing board
- Fabric marking pen or pencil
Materials
- Fabric for geese main triangles
- Fabric for background small triangles
Instructions
Step 1: Cutting Fabric
- For this no-waste method, you’ll need:
- One large square of geese fabric 5.25 inches by 5.25 inches. Using fractions, this would be 5 ¼” X 5 ¼”. This is the goose fabric.
- Four small squares of background fabric 2.875 inches by 2.875 inches. Using fractions, this would be 2 7/8” X 2 7/8”. This is the sky fabric.
- Ensure your cuts are precise for accurate blocks.
Step 2: Marking Guidelines
- On the wrong side of each small square, draw a diagonal line from one corner to the opposite corner using a fabric marking pen or pencil.
Step 3: Placing Pieces
- Align two small squares onto opposite corners of the larger square with the right sides together. The marked line should be facing up.
- The two small squares will overlap just a little bit in the middle. Pin them in place.
Step 4: Sewing
- Sew a scant ¼” seam on both sides of the drawn line. A scant seam is just a little less than ¼”.
- Remove the pins as you come up to them. Don’t forget to sew a scant ¼” seam allowance on BOTH sides of the line!
Step 5: Cutting and Pressing
- Cut apart on the drawn line to separate into two units. You can use either a rotary cutter or carefully cut along the line with a scissors to separate into two units.
- Press each of the units open toward the small “sky” triangle pieces. Some people think that at this stage they look a bit ling “dog ears” poking out.
Step 6: Adding the Remaining Small Squares
- For each of the two units align a small square onto the corner without anything sewn to it with the right sides together. The diagonal line should be facing up. Pin in place
- Sew a scant ¼” seam on each side of the drawn line.
Step 7: Sewing and Cutting Again
- Sew a scant quarter-inch seam on both sides of the drawn diagonal lines. Cut apart on the drawn line of each unit and press the units open toward the small “sky” pieces.
- You will now have four flying geese blocks with no fabric waste!
Notes
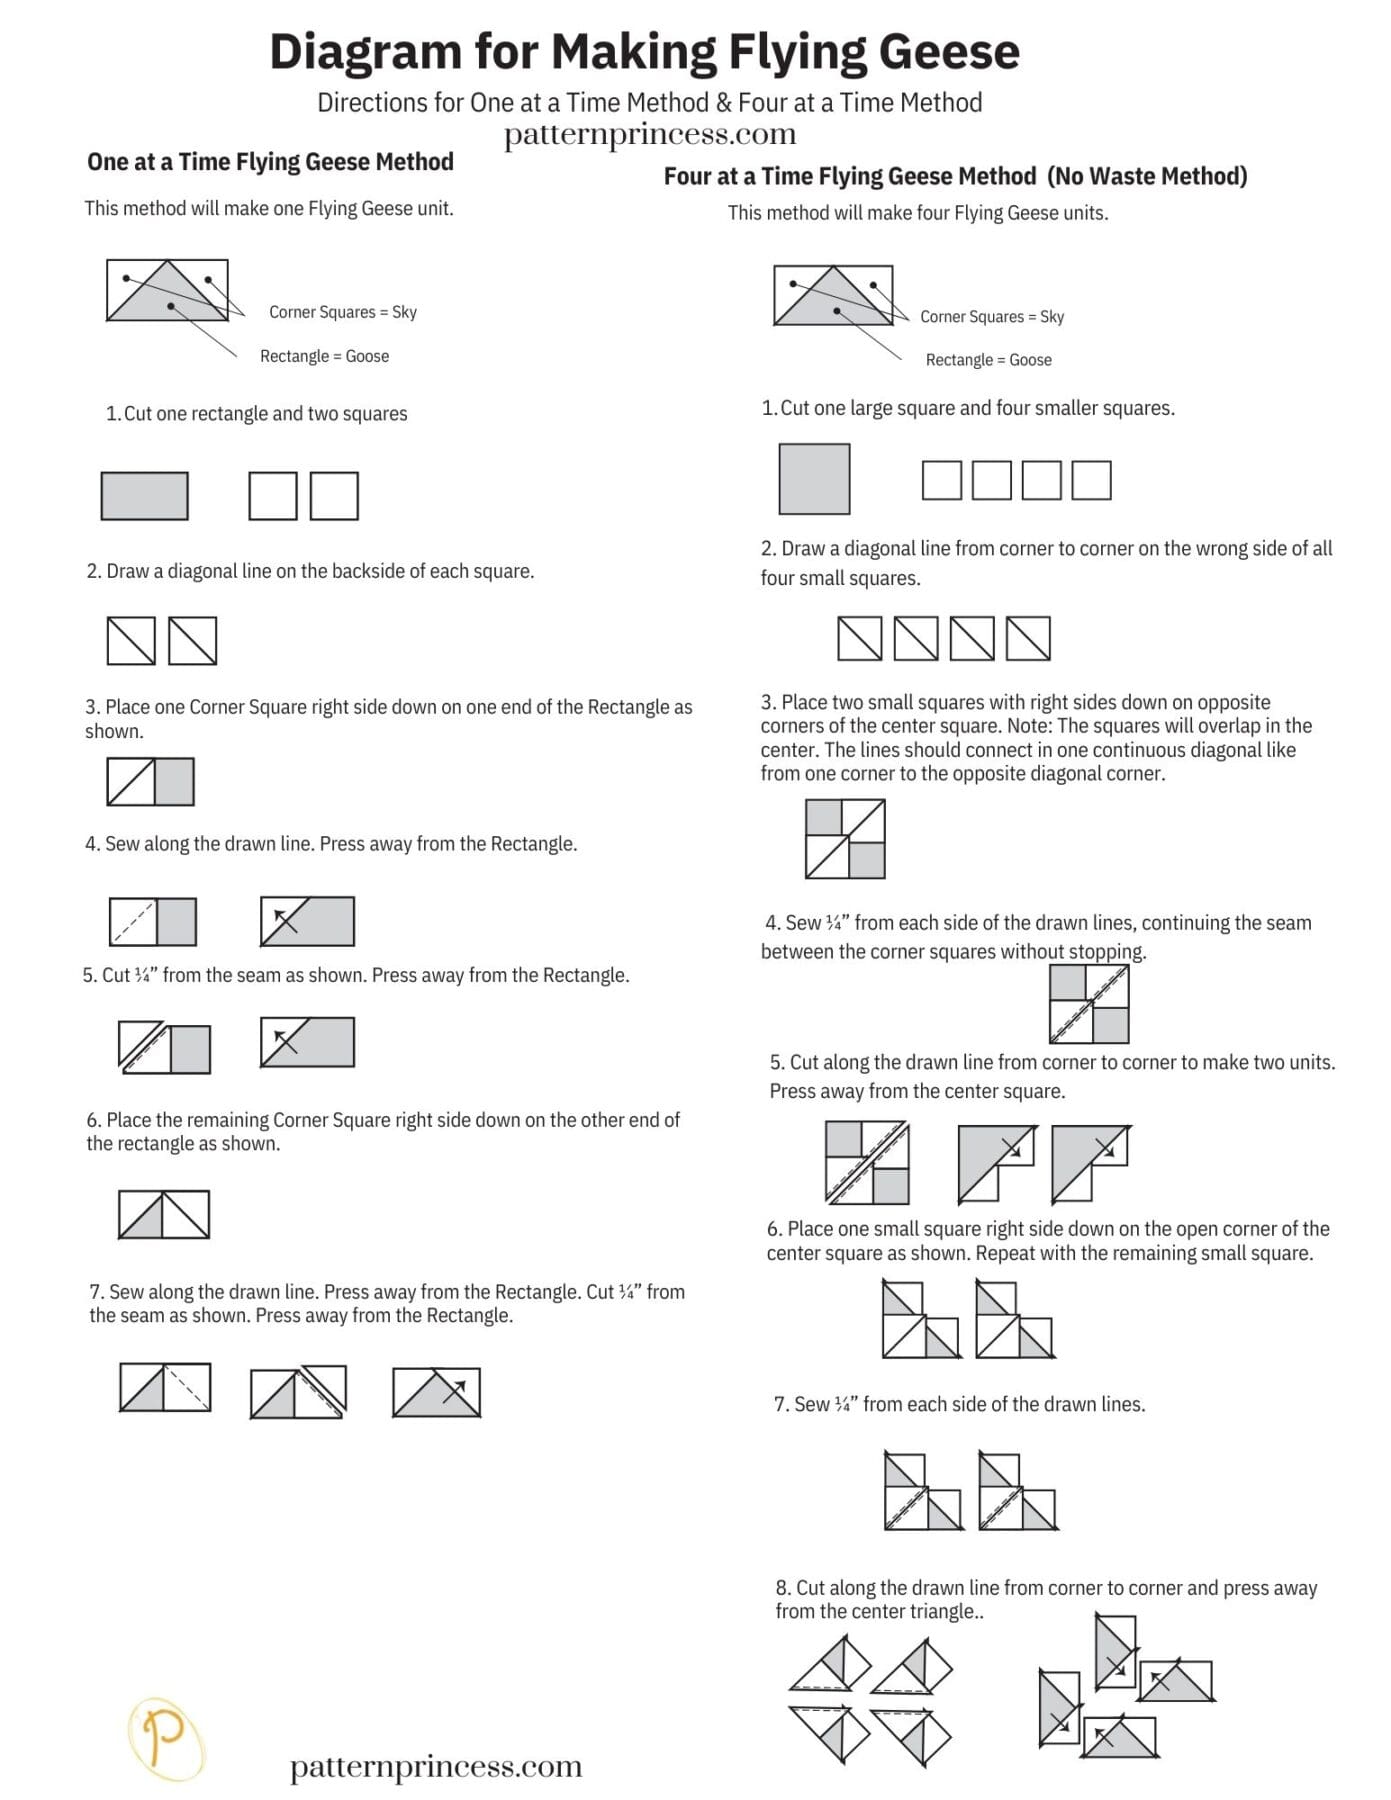
There are different ways to create flying geese. If you are only making one or two, you might want to refer to this tutorial on making one flying geese at a time.

You can find Victoria crocheting, quilting, and creating recipes. She has cooked in restaurants for over 20 years, including many larger parties. She learned to crochet when she was just 11 years old and has been crocheting ever since; over 50 years now. Over 40 years ago, she loved her first class in sewing and continues to hone her skills in quilting. Many have enjoyed the handmade gifts over the years. In her professional career, she has worked in management in a wide variety of businesses including higher education as a dean of a division. All the while attending college part-time to achieve her doctorate in higher education with an emphasis in e-learning.

Great way to make four at a time.