Last updated on July 4th, 2024 at 11:28 pm
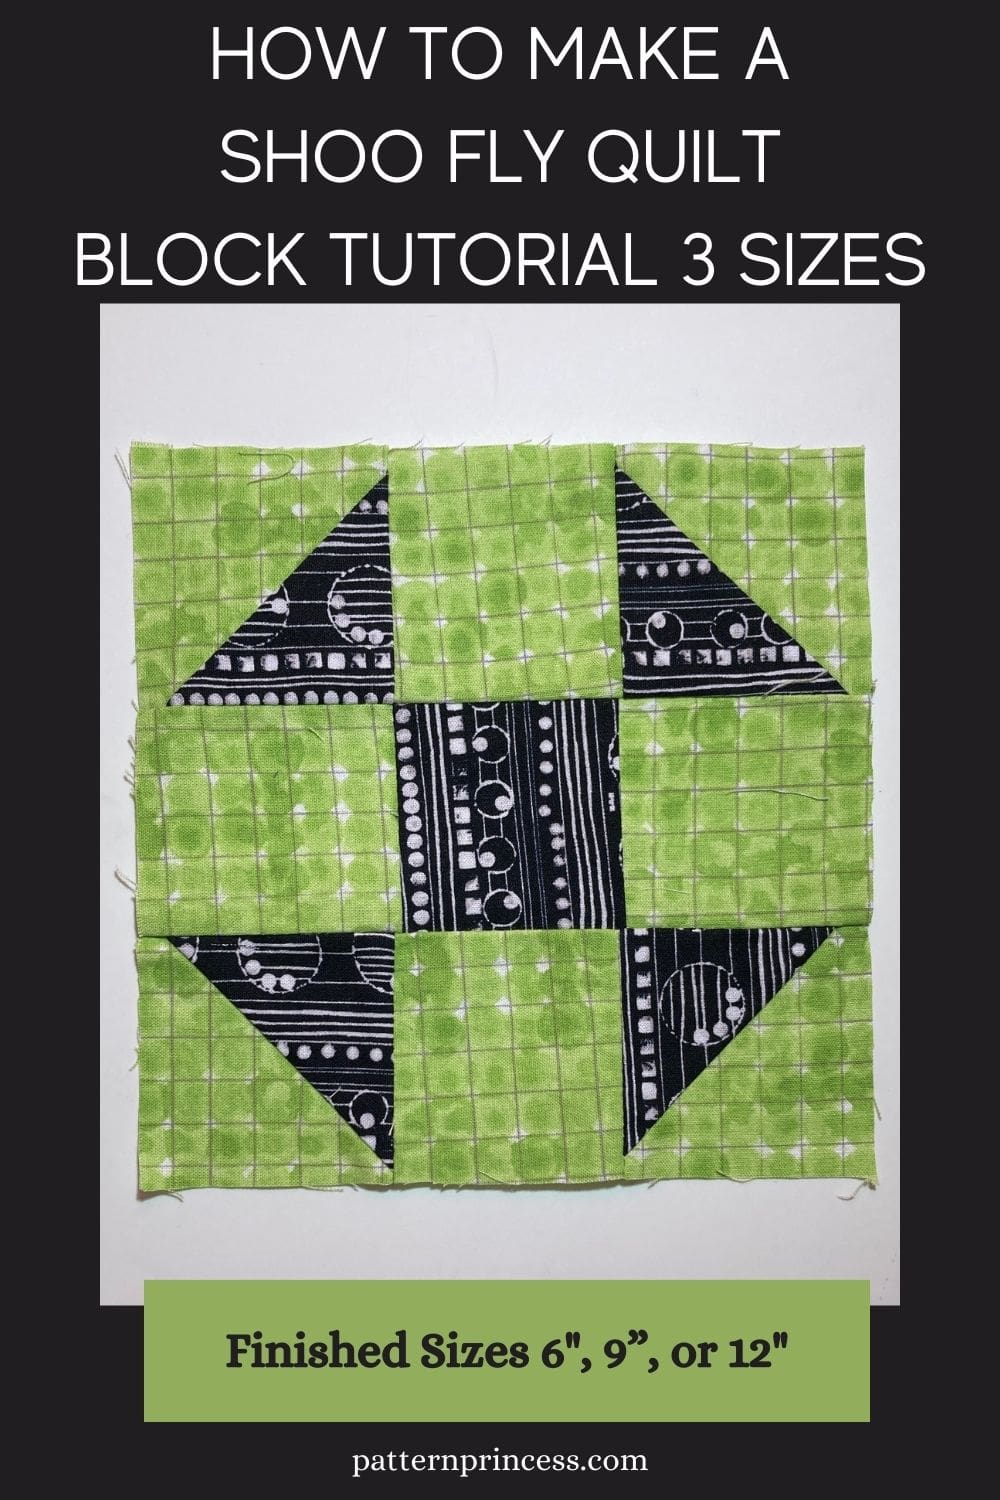
The Shoo Fly Quilt Block, known for its simplicity and timeless appeal, has graced quilting projects for generations. Make this in 3 sizes. This square is generally considered suitable for beginners and intermediate quilters. Its construction involves basic piecing techniques like sewing straight seams and making half-square triangles.
Despite its straightforward construction, this beloved block boasts a rich history and goes by various aliases, including Eight Cornered Box, Fifty Four Forty or Fight, Simplicity, and Hole in the Barn Door.
Whether you’re a beginner eager to delve into quilting or an experienced quilter seeking a classic design, the Shoofly block offers endless possibilities for creative expression and quilt-making enjoyment.
Post contains affiliate links, and we earn commissions if you shop through the links on this page. For more information, please read the disclosure section under the About Us page.
9-Patch Quilt Square
This is an easy quilt block consisting of 5 squares and four half square triangles. If you are new to quilting, this tutorial for how to sew half square triangles is helpful. It includes a chart for making half square triangles from 1” to 12” along with a diagram.
Get Your Ad Free Printable PDF Pattern in our Etsy Shop
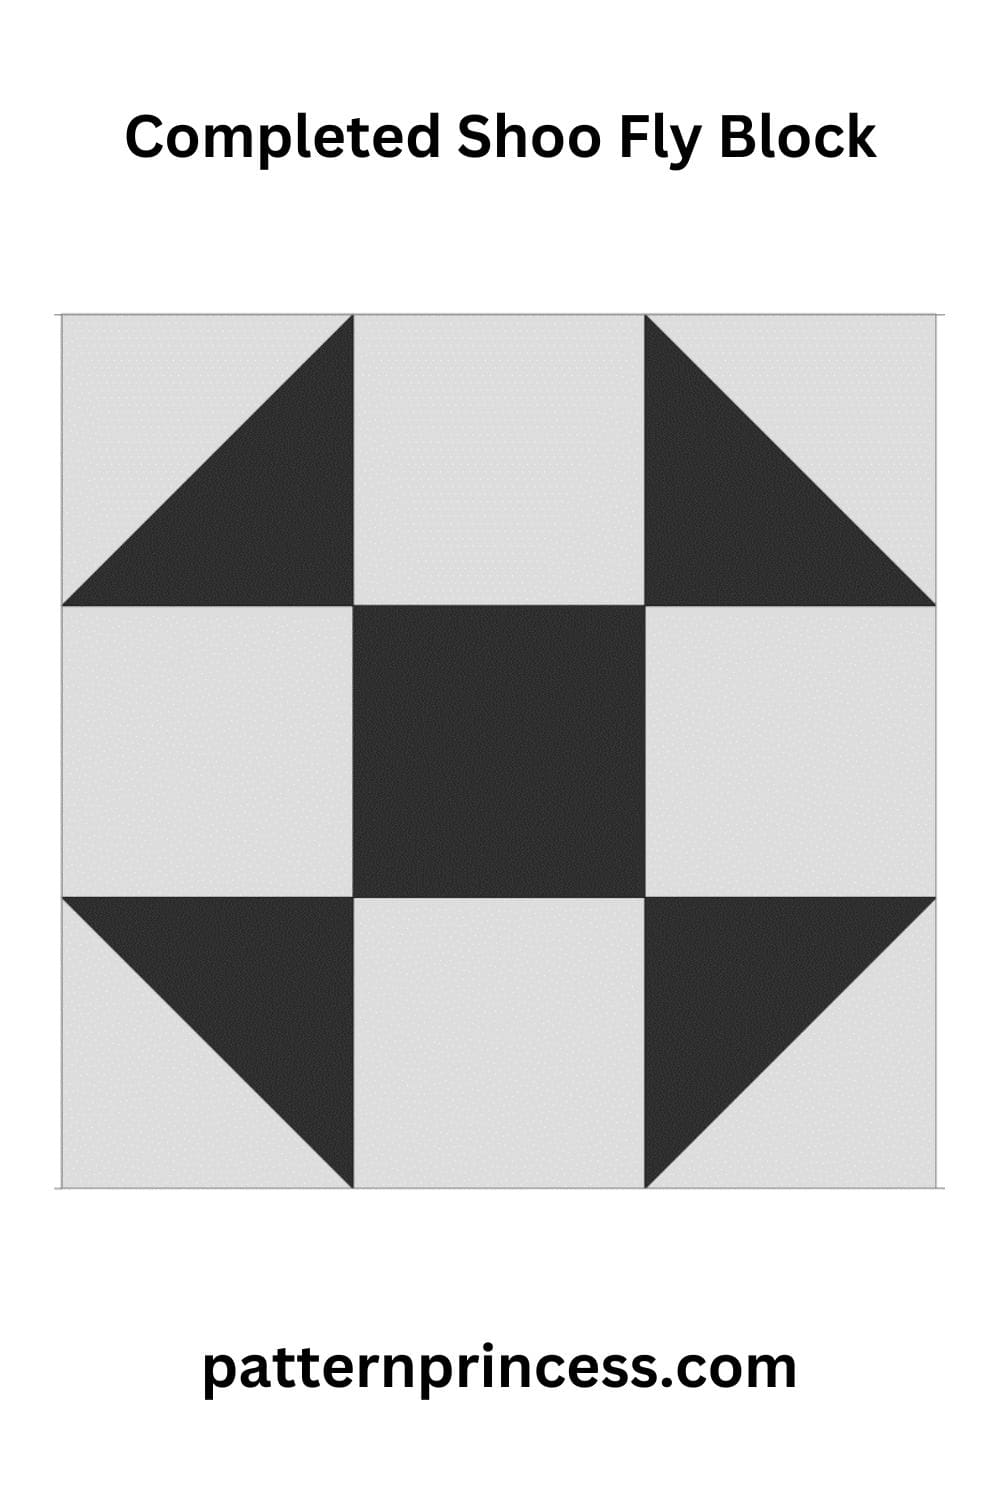
How to Create a Shoo Fly Quilt Block
These blocks will measure 6 ½”, 9 ½”, and 12 ½” unfinished square after you are done constructing them. How to create a Shoo Fly Quilt Block in 6″, 9”, or 12″ finished size. The finished size of a quilt block refers to the size the block is after it is sewn into a quilt.
This traditional quilt block will work with solid fabrics, printed fabrics, or a combination of the two. However, this block design lends itself to dark squares and light squares.
The green and black square shown in this pattern I plan on using in a shoo fly quilt pattern soon.
Pattern Notes
Pin pieces before sewing them together to help align seams.
Accurately measure and cut fabric pieces as it will enhance the finished table runner.
All seams are sewn with 1/4 inch seam allowance.
Seams can be pressed open, or you can press seams to one side or the other, I will have those suggestions within the instructions.
Materials Needed:
Fabric for the background square (usually a light color).
Fabric for the half-square triangles (can be contrasting or complementary to the background fabric).
Equipment / Tools
- Pencil
- Scissors
- Quilting Ruler
- Rotary Cutter
- Straight pins
- Iron
- Ironing board with a pad
- Sewing Machine
- My Favorite Quilting Supplies
Below is a chart providing the fabric cutting measurements for creating Shoofly quilt blocks in 6-inch, 9-inch, and 12-inch finished sizes. These measurements include seam allowances:
6″ Finished Quilt Block
- 2 pieces Fabric 3 1/2″ x 3 ½” for Half Square Triangle
- 2 pieces Background Fabric 3 1/2″ x 3 1/2″ for Half Square Triangle
- 4 pieces Background Fabric 2 ½” x 2 ½”
- 1 piece Fabric 2 ½” x 2 ½” for Center of Block
9″ Finished Quilt Block
- 2 pieces Fabric 4 1/2″ x 4 1/2″ for Half Square Triangle
- 2 pieces Background Fabric 4 1/2″ x 4 1/2″ for Half Square Triangle
- 4 pieces Background Fabric 3 ½” x 3 ½”
- 1 piece Fabric 3 ½” x 3 ½” for Center of Block
12″ Finished Quilt Block
- 2 pieces Fabric 5 1/2″ x 5 1/2″ for Half Square Triangle
- 2 pieces Background Fabric 5 1/2″ x 5 1/2″ for Half Square Triangle
- 4 pieces Background Fabric 4 ½” x 4 ½”
- 1 piece Fabric 4 ½” x 4 ½” For Center of Block
Quick Square Size Chart for Reference
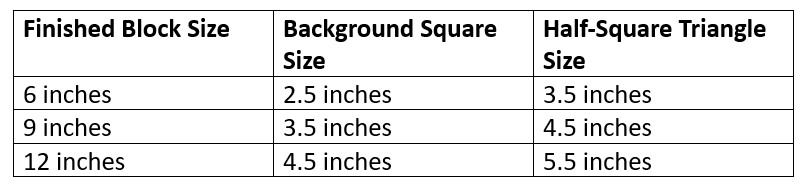
These measurements assume a 1/4-inch seam allowance is used throughout the construction of the quilt block. Adjustments can be made as needed based on your personal preference or quilting techniques.
Here’s a step-by-step guide to sewing a Shoofly quilt square:
Instructions:
Create the 6″ Finished Block
For this block, you will need.
- 2 pieces Fabric 3 1/2″ x 3 ½” for Half Square Triangle
- 2 pieces Background Fabric 3 1/2″ x 3 1/2″ for Half Square Triangle
- 4 pieces Background Fabric 2 ½” x 2 ½”
- 1 piece Fabric 2 ½” x 2 ½” for Center of Block
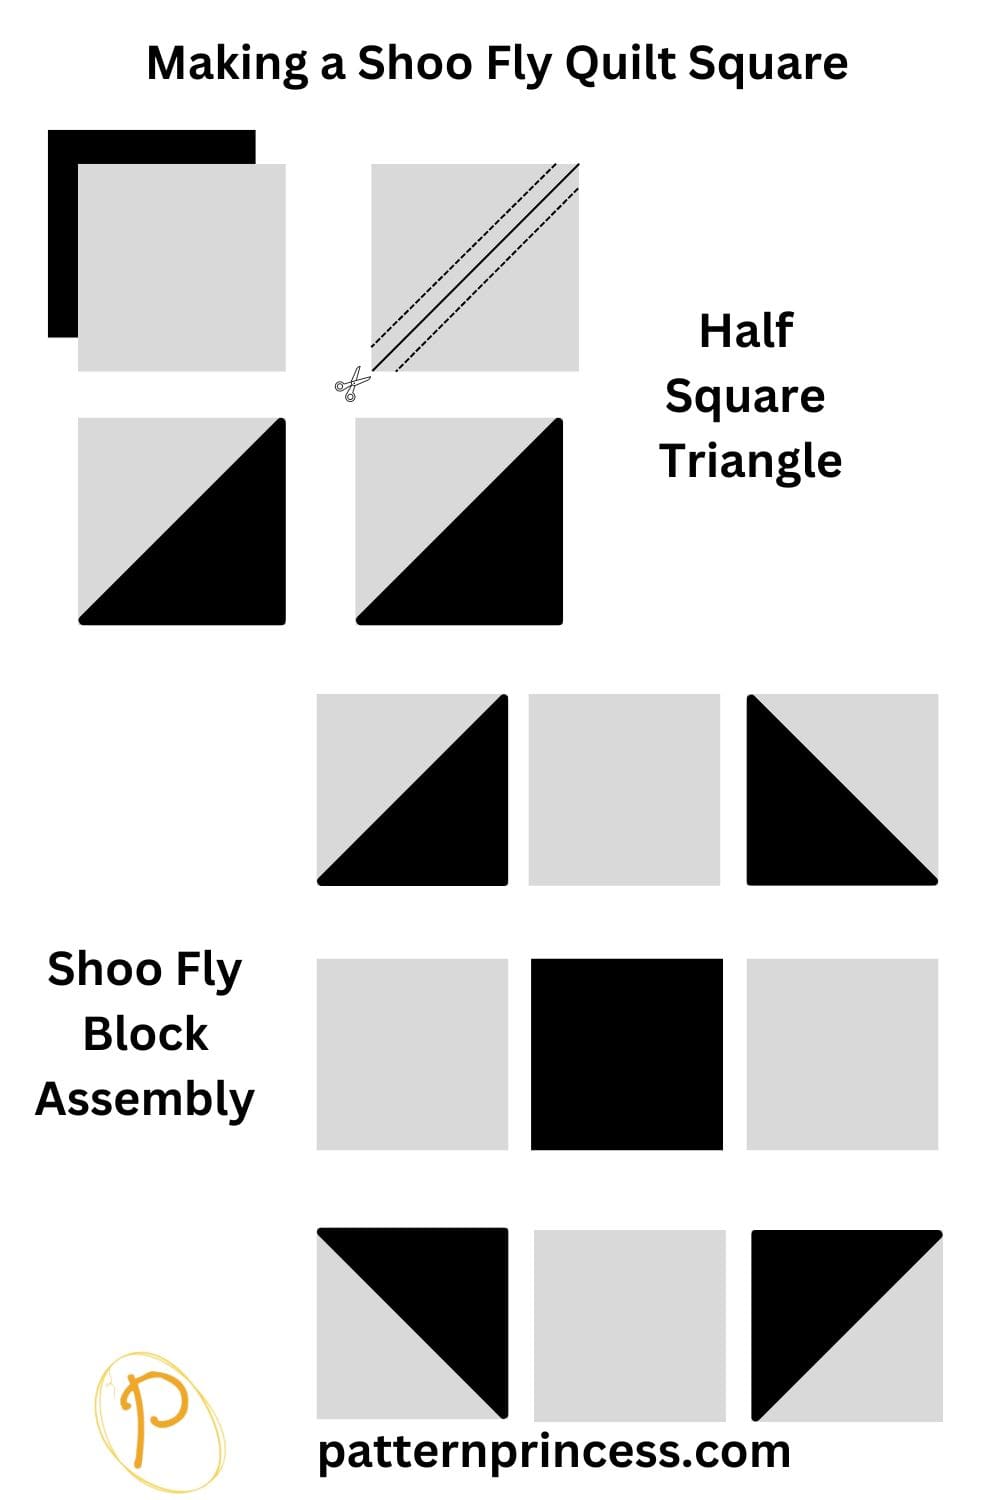
Create 4 Half Square Triangles from your 3 1/2″ fabric pieces. Begin by drawing a diagonal line down the center of the block on the wrong side of the lighter fabric.
To create the Half Square Triangles, place one 3 1/2″ fabric piece on top of one 3 1/2″ background fabric piece, right sides facing.
On your sewing machine, sew ¼” on both sides of the diagonal line.
Align a ruler alongside of the marked center line and using a rotary cutter, cut through both layers of the squares along the center line.
Press the seams open or to the darker fabric.
Trim the excess fabric to ensure the block is square. Trim block to 2 ½” x 2 ½”.
Repeat steps with the other two 3 1/2″ fabric squares.
You now have 4 half square triangles.
Assembling the Block
Arrange the half square triangles and squares of fabric in three rows with 3 blocks to each row. Refer to diagram.
Sew each of the three rows together.
Sew row 1, and press seams to the left. For row 2, press the seams to the right. Row 3, press the seams to the left.
Finally, sew the three rows together nesting the seams.
The shoo fly quilt block is ready to sew into your project.
Create the 9″ Finished Block
For this block, you will need.
- 2 pieces Fabric 4 1/2″ x 4 1/2″ for Half Square Triangle
- 2 pieces Background Fabric 4 1/2″ x 4 1/2″ for Half Square Triangle
- 4 pieces Background Fabric 3 ½” x 3 ½”
- 1 piece Fabric 3 ½” x 3 ½” for Center of Block
Create 4 Half Square Triangles from your 4 1/2″ fabric pieces. Begin by drawing a diagonal line down the center of the block on the wrong side of the lighter fabric.
To create the Half Square Triangles, place one 4 1/2″ fabric piece on top of one 4 1/2″ background fabric piece, right sides facing.
On your sewing machine, sew ¼” on both sides of the diagonal line.
Align a ruler alongside of the marked center line and using a rotary cutter, cut through both layers of the squares along the center line.
Press the seams open or to the darker fabric.
Trim the excess fabric to ensure the block is square. Trim block to 3 ½” x 3 ½”.
Repeat steps with the other two 4 1/2″ fabric squares.
You now have 4 half square triangles.
Assembling the Block
Arrange the half square triangles and squares of fabric in three rows with 3 blocks to each row. Refer to diagram.
Sew each of the three rows together.
Sew row 1, and press seams to the left. For row 2, press the seams to the right. Row 3, press the seams to the left.
Finally, sew the three rows together nesting the seams.
The shoo fly quilt block is ready to sew into your project.
Create the 12″ Finished Block
For this block, you will need.
- 2 pieces Fabric 5 1/2″ x 5 1/2″ for Half Square Triangle
- 2 pieces Background Fabric 5 1/2″ x 5 1/2″ for Half Square Triangle
- 4 pieces Background Fabric 4 ½” x 4 ½”
- 1 piece Fabric 4 ½” x 4 ½” For Center of Block
Create 4 Half Square Triangles from your 5 1/2″ fabric pieces. Begin by drawing a diagonal line down the center of the block on the wrong side of the lighter fabric.
To create the Half Square Triangles, place one 5 1/2″ fabric piece on top of one 5 1/2″ background fabric piece, right sides facing.
On your sewing machine, sew ¼” on both sides of the diagonal line.
Align a ruler alongside of the marked center line and using a rotary cutter, cut through both layers of the squares along the center line.
Press the seams open or to the darker fabric.
Trim the excess fabric to ensure the block is square. Trim block to 4 ½” x 4 ½”.
Repeat steps with the other two 5 1/2″ fabric squares.
You now have 4 half square triangles.
Assembling the Block
Arrange the half square triangles and squares of fabric in three rows with 3 blocks to each row. Refer to diagram.
Sew each of the three rows together.
Sew row 1, and press seams to the left. For row 2, press the seams to the right. Row 3, press the seams to the left.
Finally, sew the three rows together nesting the seams.
The shoo fly quilt block is ready to sew into your project.
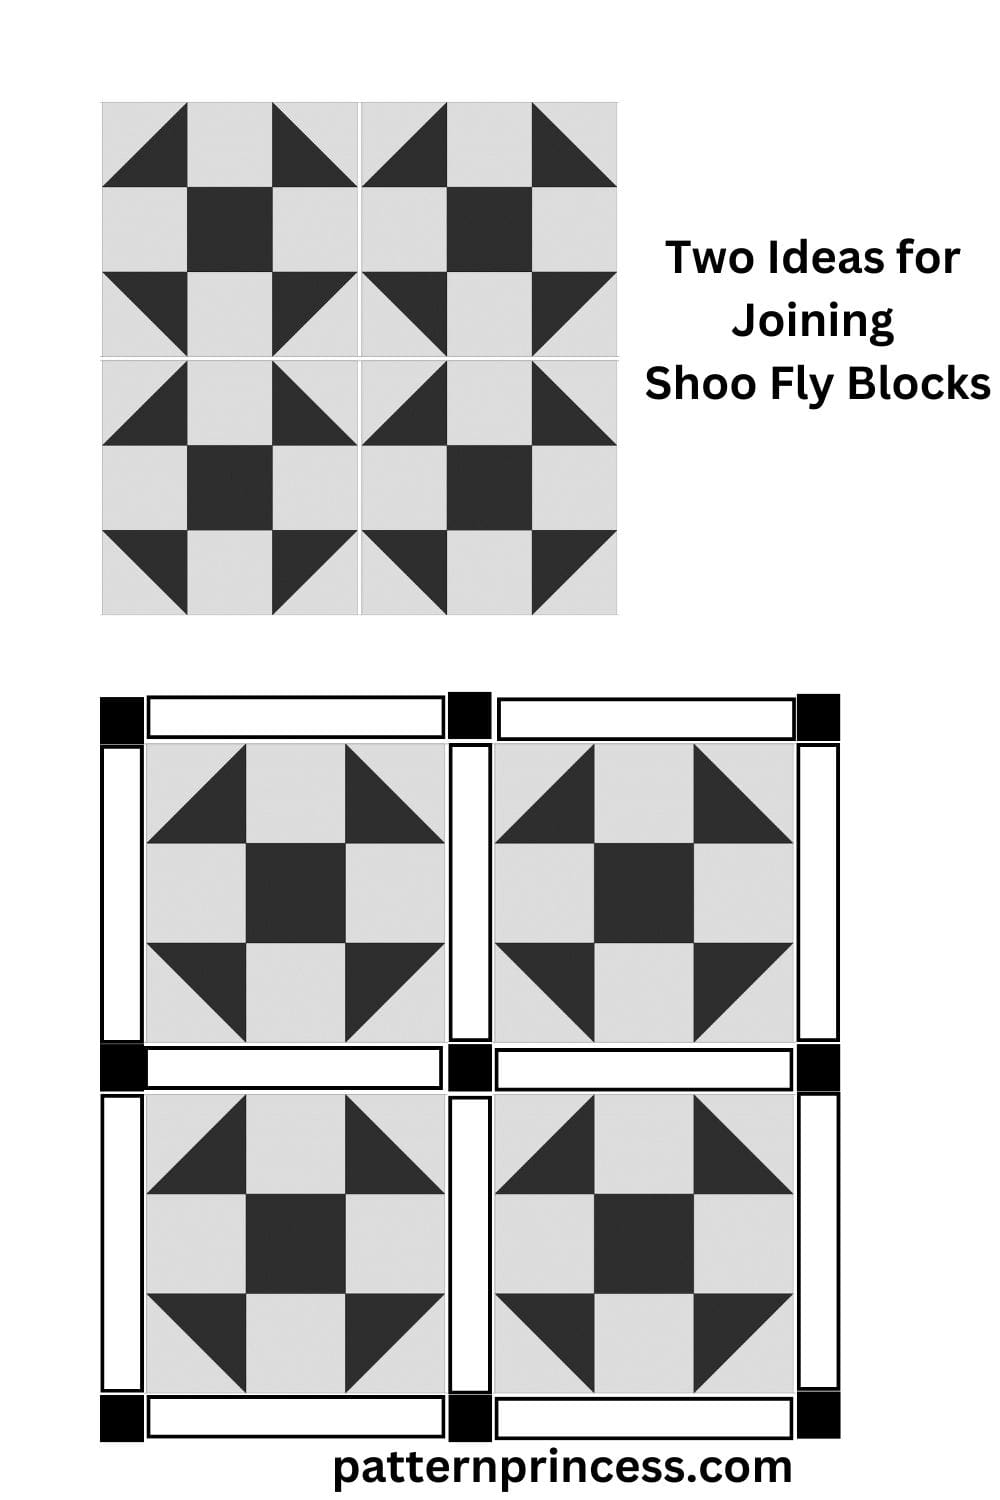
Repeat these steps to create as many Shoofly blocks as you need for your quilt. When joining blocks together, be sure to match seam allowances carefully for a neat finish.
If you enjoyed this free pattern, we have others for you to explore.

You can find Victoria crocheting, quilting, and creating recipes. She has cooked in restaurants for over 20 years, including many larger parties. She learned to crochet when she was just 11 years old and has been crocheting ever since; over 50 years now. Over 40 years ago, she loved her first class in sewing and continues to hone her skills in quilting. Many have enjoyed the handmade gifts over the years. In her professional career, she has worked in management in a wide variety of businesses including higher education as a dean of a division. All the while attending college part-time to achieve her doctorate in higher education with an emphasis in e-learning.