Last updated on July 4th, 2024 at 11:41 pm
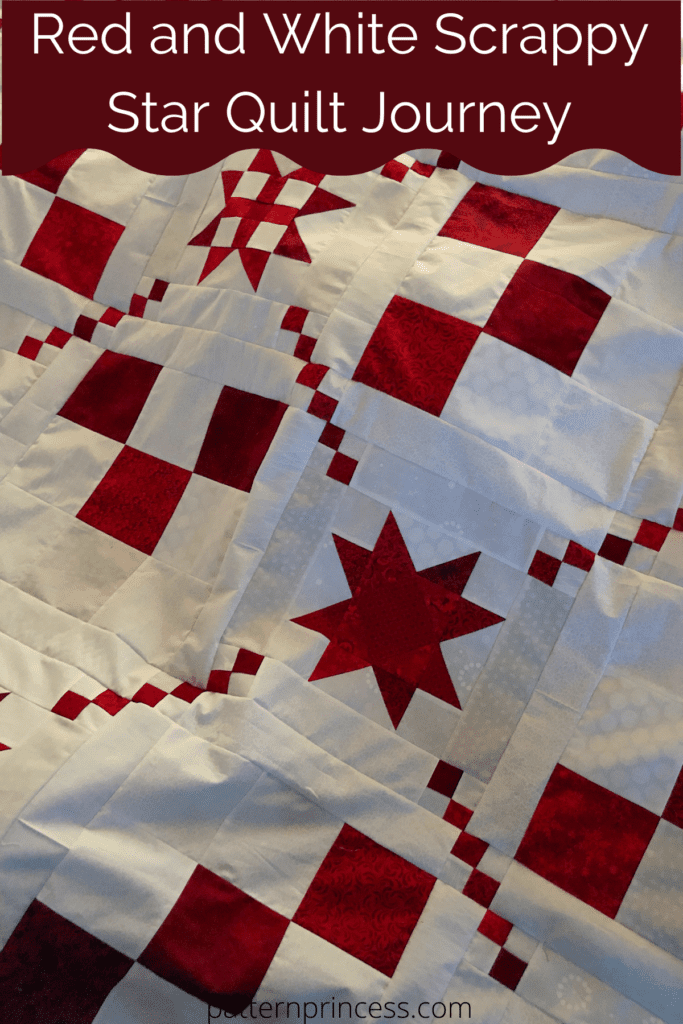
This red and white scrappy star quilt is my first ever quilt! I have sewn on and off for decades. There have been many dresses, shirts, tablecloths, and curtains that I have made through the years. Especially when I was first married and barely had two pennies to rub together. It was so much cheaper to purchase fabric and make your own items.
Years later when my daughter and her friends were in 4-H, I helped them learn to sew. That was almost ten years ago already and the only sewing I have done since then is mending holes and tears in clothing.
Post contains affiliate links, and we earn commissions if you shop through the links on this page. For more information, please read the disclosure section under the About Us page.
Quilting Has Always Been on My Bucket List
I knew since it had been a while since I really sewed anything and making clothing and curtains requires slightly different skills than quilting, it might be a tough go. However, this has been in the back of my mind as something I would like to do someday when I retire. Well, that is still a handful of years away.
In the last few years, I was moved to a new department at work, and I have gotten very close to my two co-workers. One of them makes gorgeous quilts and we would bring our crafting makes into the office to show each other.
We talked many times of her starting a blog like I had a few years ago. Finally, one day, she took the plunge and I have been helping guide her on the side as she continues her blogging journey. I kept telling her I was going to start with quilting a potholder and eventually make some of her beautiful quilt patterns.
Scrappy Stars Quilt Pattern
She designed this Scrappy Stars Quilt and I fell in love!
I have details of how I made this quilt here in my quilting journey here. However, if you’d like additional illustrations and all the pattern particulars, you can refer to the lakegirlquilts website for them. All these blocks are described in detail, with lots of additional pictures for each of them.
Scrappy Stars Easy Quilt Pattern for Beginners
Quilt Pattern Basics
There are a few basics to consider when cutting, measuring, and sewing this beauty.
Accurate cutting and sewing enhances your final product.
Pin your pieces together before sewing them to ensure proper seam alignment.
Nest your seams. This means that the seams of each row are aligned, and the pieces fit together almost like the pieces of a puzzle.
Use a ¼-inch seam allowance. I recommend using a special presser foot with a ¼-inch guide if you have one for your machine. This will help you get uniform seams, and matching points and corners.
Press seams as it states in the directions. This will help when you are piecing things together. The seams will nest together nicely.
When adding the four patch squares to the sashing, make sure that they are facing the correct way. I referred to the quilt photo repeatedly to make sure that I did it correctly the first time.
Materials Needed to make the Red and White Scrappy Star Quilt
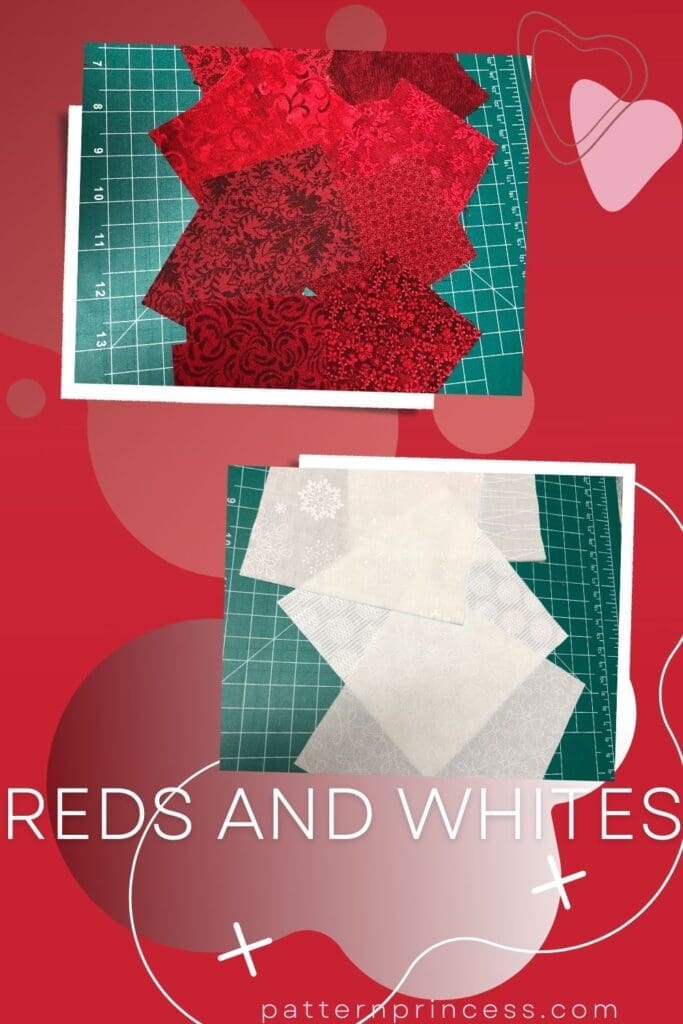
Use 100% cotton quality fabric for making this quilt.
The Scrappy Star quilt is made with red and white fabric. But you can really make this quilt in any color you’d like. As you can see there were several shades of red and white cotton fabric used in my quilt and Bonnie’s quilt. Her whites were a bit more cream, and I stayed closer to the white shades.
Red Fabric
You’ll need a total of about 1 ¾ yards of red fabric to make all the blocks and binding for this quilt.
White Fabric
You’ll need a total of about 3 ¾ yards of white fabric to make all the blocks and sashing for this quilt.
Red Binding Fabric
You’ll need ¾ of a yard of 44-inch fabric to make the binding for this quilt.
Backing Fabric
You’ll need 4 ¼ yards of 44-inch fabric for the backing of this quilt.
Batting
You’ll need a piece of batting measuring 80-inch x 80-inch for this quilt. Use a full-size batting and trim to this size. I suggest a thin, cotton batting like Warm & Natural.
Thread
I suggest using a good quality thread to sew your quilt. I like to use thread like Gutermann thread or Coats Cotton Covered Quilting & Piecing thread. You’ll need a couple spools of thread to piece this quilt together.
If you are going to machine quilt your Scrappy Stars, you will need another 3-4 spools of thread.
My Quilting Journey
Here is my story of how I worked through each sawtooth star block, the nine-patch block, four patches and the sashing. I have two blocks that have a mistake; kept them in. I will tell you how I fixed them rather than redoing them.
Create all the flying geese before you start the sawtooth star blocks. Sew 52 red and white flying geese blocks which measure 2 ½-inch x 4 ½-inch unfinished. There are 13 sets of 4 to make up the 52 flying geese. For each set you will need to cut 1 – 5¼-inch white square and 4 – 2⅞-inch red squares.
This pattern will walk you through the Easy No Waste Flying Geese Technique used to make these blocks successfully.
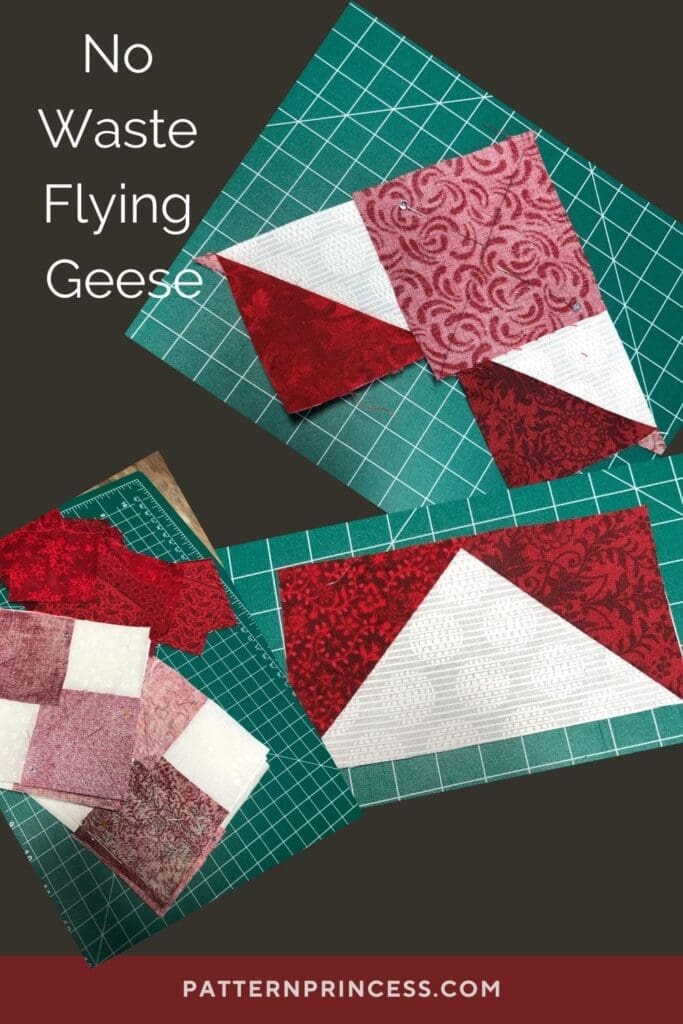
It is a bit tedious and my first one took hours; however, once I knew what I was doing, I was moving along nicely.
It was nice to be able to pick off a pile as I worked through all thirteen fancy star blocks.
Finally figured out today what a leader and ender was. I thought they were used because I was not setting the stitches like I did when sewing clothing, etc. In quilting, you just start sewing and continue sewing forward without taking a back stitch or two. So, I thought that somehow helped with adding one piece right after the other.
Figuring Out the Ruler
My first struggle was measuring. There I stood with my new rotary cutter, which I had never used before, a brand-new ruler and fabric. Trying to find the 7/8 marking on the ruler with lines going every which way.
My daughter happened to come over and I called her into my sewing room. It took her a few seconds to show me where the marking was. When I asked her how she knew so fast, she explained the eight little black lines on the edge of the ruler. I was looking for lines with the writing on them.
Once I could read the ruler, I was off to the races. As I stood there trying to use the rotary cutter for the first time. My daughter smiled at me and said…look at you, learning something new.
Remember, it was almost 10 years since I had done any real sewing from a pattern and my sewing was of making clothing and curtains. Well, I sewed the first flying geese block, and the edges were not aligning. My friend had me measure my ¼ seam marking on my sewing machine. I was not quite accurate.
After ripping out the stitches and measuring my machine and double checking the sewing line on the fabric, the flying geese were coming out nicely. Making sure that your seams are ¼-inch will assure that your points, seams, corners, and edges line up nicely.
Nesting Seams
After completing the second part of the flying geese, nesting seams came back to me. This helps the fabric lay flat and the pieces join in just the right spot. When nesting the seams, it is important to press the seams so that they do not create bulk. It is important to read the detail for each block that includes the nesting.
Trimming Blocks
When trimming the flying geese, I found the Quiltcut Ultra Grid ruler to help me align the angles and find the center point so I could trim accurately. It made the trimming so much easier. At first glance, this ruler looks way too busy and complicated. This has turned out to be the best quilting ruler for me.
Once I began making all the different blocks in this quilt, I continued to use the ruler to align things and trim. The lines would suddenly run along a seam, and it made perfect sense as I laid the ruler on top of the blocks. It helped me have confidence that I was measuring and cutting correctly.
Laying out the Blocks for the Best Look
I used my cutting surface area to lay out the final block before I sewed it together. That way, I put the red and white fabrics in places that had the best look.
Thirteen Different Sawtooth Star Blocks
There are 13 different sawtooth star blocks in this easy quilt pattern. As I worked through each one, I learned so many skills. Now that I have completed this quilt top, when I look at other quilt patterns, they make so much more sense in how they are pieced together.
Making the flying geese blocks at the beginning was a bit busy work. However, once I started making the various star blocks and all I had to do was choose a flying geese block from the pile and sew it on, that made this part fun.
In addition to the flying geese blocks, cut 52 – 2 ½-inch x 2 ½-inch white squares. These squares will be used for the corners of each sawtooth star block.
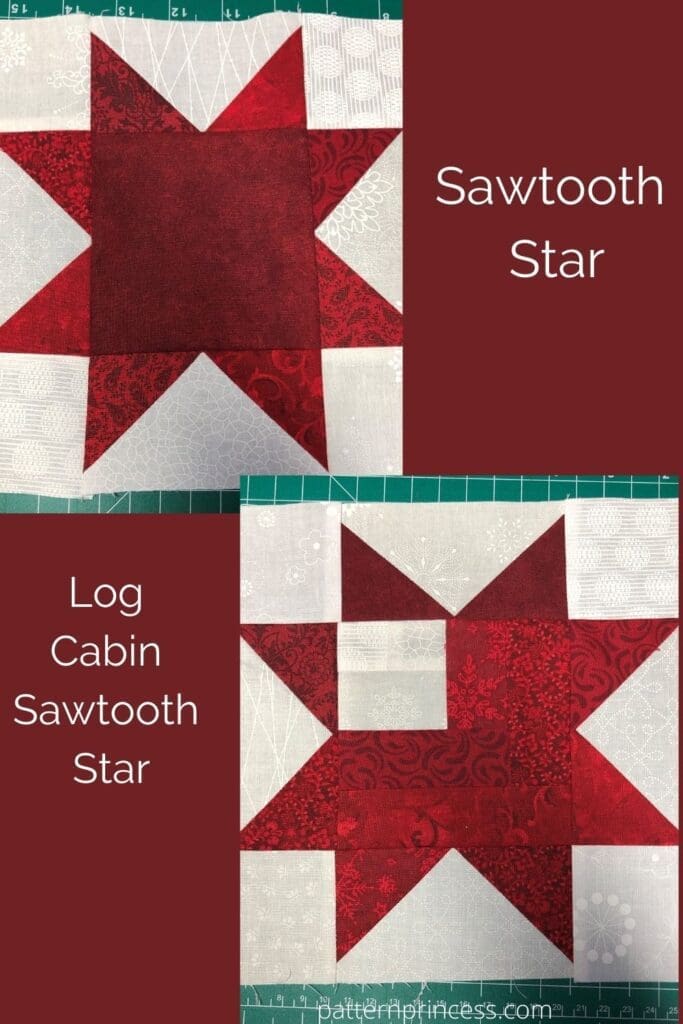
Sawtooth Star Quilt Block
This was the first fancy block I made. This uses one 4 ½-inch X 4 ½-inch red square, four flying geese and four of the 2 ½-inch x 2 ½-inch white squares.
Log Cabin Sawtooth Star
The center clock is made up of strips of white and red fabric. Make sure to trim to 4 ½-inch X 4 ½-inch square before adding the flying geese and four white squares make up the corners and star points.
Trimming each square to size was key in making sure that the next step in the process aligned correctly.
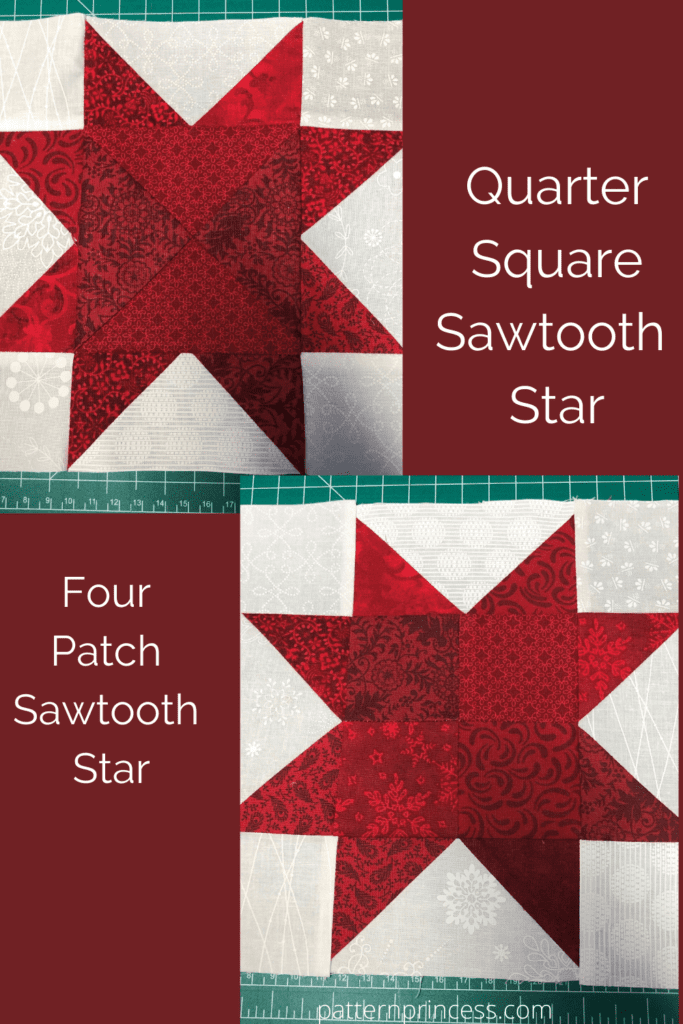
Quarter Square Sawtooth
For this block, I used two different shades of red fabric for the center square. After drawing a diagonal line, sewing ¼-inch seam on each side, and cutting along the pencil line, you will be left with two squares. One can be used in another project, the other creates the center for this block.
When I was squaring up all the sawtooth quilt blocks, I found this one to be too small! It almost looked like I had trimmed it – good grief. I was ½-inch too small all the way around. Therefore, I cut white strips ¾-inch and sewed it onto the square. If you look closely at the quilt itself, you will see this one, but unless you are looking for this mistake, not sure if it is noticeable.
Four patch Sawtooth
Along with the first quilt block, this one was probably the next easiest one to complete. The center square is made from a four patch with the flying geese on each side and the white square in each corner.
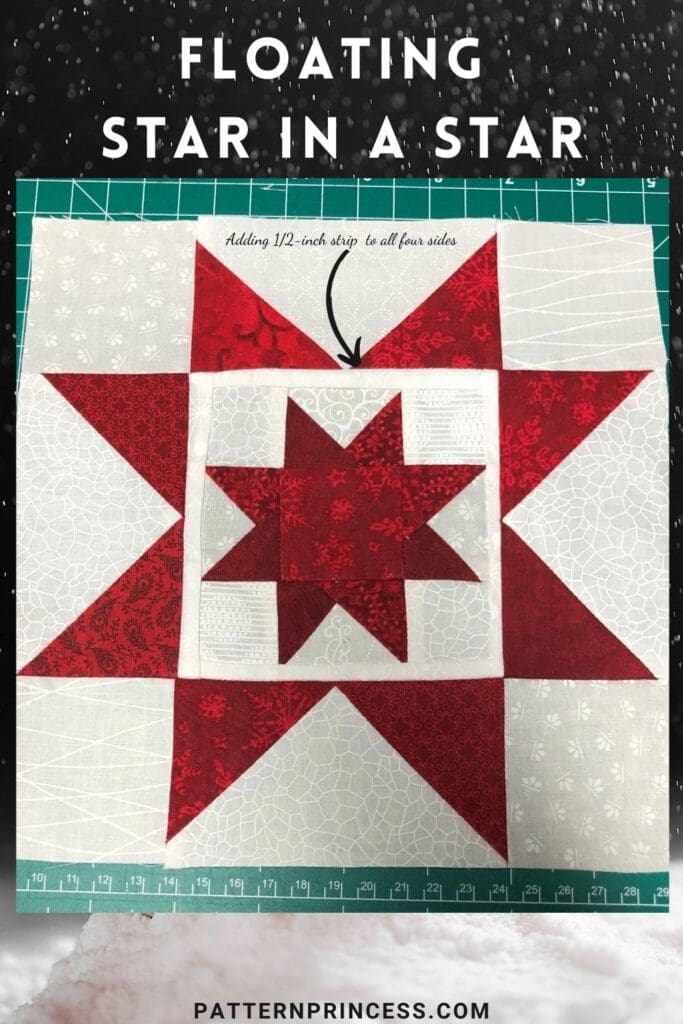
Star in a Star Sawtooth
This is one of my favorite quilt blocks of this pattern. However, I messed it up!
Look closely at the center star.
When I measured this completed square before I added the flying geese and the white corner squares, it only measured 4-inches.
Don’t ask me how I ended up doing that, but I did. Rather than redoing the center square, I decided to add a 1/2 -inch strip of white fabric on all four sides.
Bonnie said it could be called a floating star in a star now. I still love it!
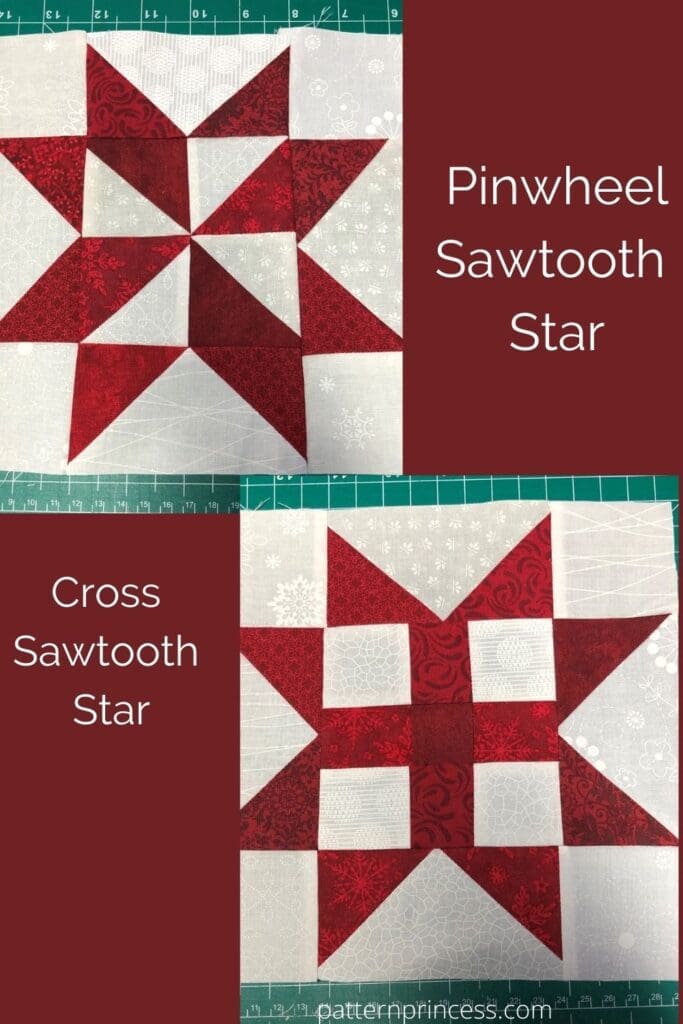
Pinwheel Sawtooth
Create a total of four half square triangle blocks and arrange them in a pinwheel formation for the center square. Of course, this is finished off with the pre-made flying geese and four white squares. It really does make each quilt block so much easier.
Cross Sawtooth
This one was a bit tricky to figure out. For some reason, it was hard to align the red strips of fabric with the center. There are four corner squares of white fabric and a red square for the center with four red strips attached to each side of the center red square.
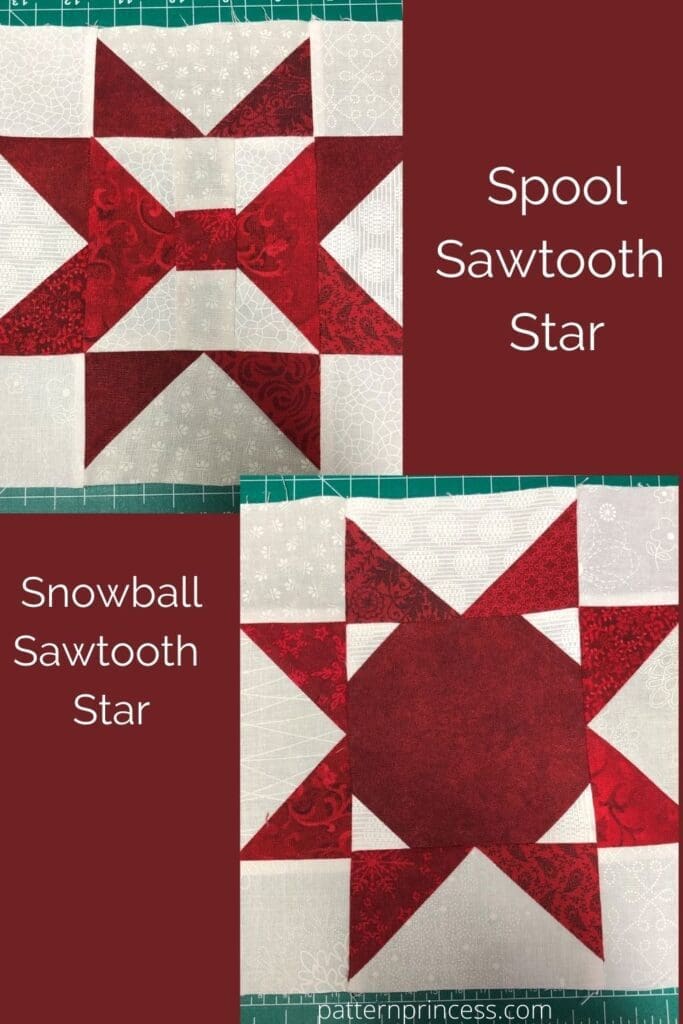
Spool Sawtooth
Making this one took me a few tries. Sewing the red and white squares to each other was the easy part. I found it very difficult to get the center red square lined up.
Snowball Sawtooth
After using the seam ripper a few times on the Spool Sawtooth, it was nice to have an easy quilt block to make. Just attach the four squares of white fabric to the larger red square corners. Sew a diagonal line and trim. Finish with the rest of the pre-made pieces to complete the sawtooth.

Square in a Square Sawtooth
Another easy block. I made sure that I used various shades of red to create depth. The center square is on a diagonal and the corner squares are sewn on each end to form a triangle shape and square off the center square.
Striped Sawtooth
Join strips of red fabric in various shades to create the center square.
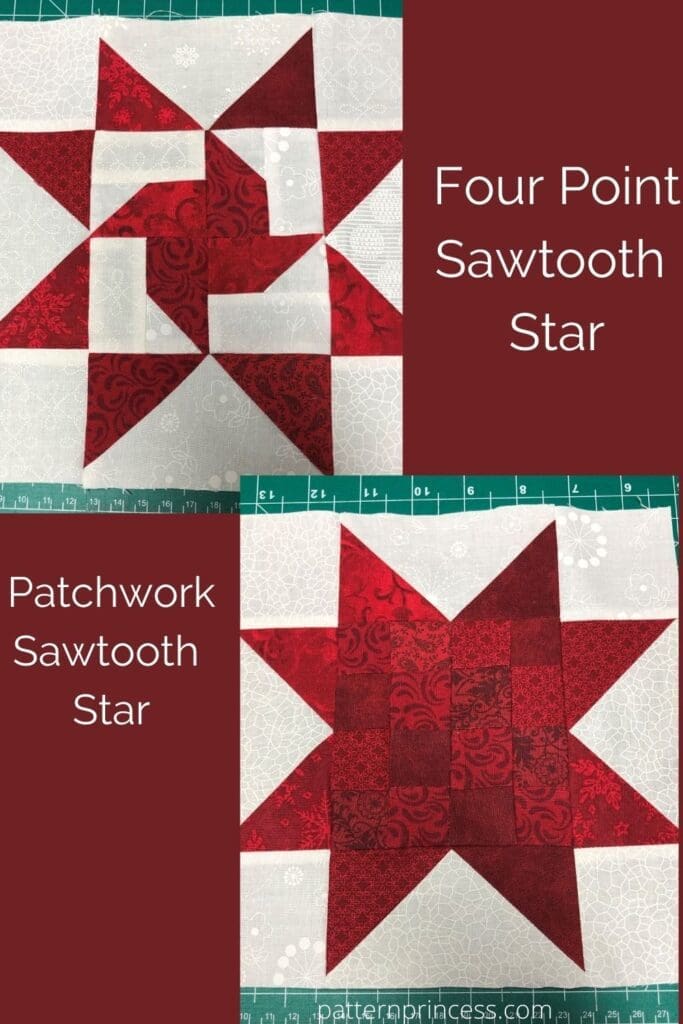
Four Point Star Sawtooth
I love how complicated this looks, yet it really is quite easy to accomplish. The center is made with a four patch of red fabric. Then there are four small red and white half squares. And four rectangle white strips. By the time I arrived at this block pattern, this whole quilting process was getting easier to comprehend.
Patchwork Sawtooth
The last fancy quilt block is the patchwork sawtooth. The entire center square is made up of 16 smaller red squares 1 ½-inch X 1 ½-inch. Again, use a few shades of the red fabric to give this square depth.
Trimming the Squares
Finally made all the fancy 8 ½ x 8 ½ squares. I am so happy with how they turned out! I feel like each one taught me a new skill in measuring, cutting, laying out the fabric, and stitching. They are so beautiful. Before I went onto the nine patch blocks, I trimmed these squares. I used the larger 12 ½-inch ruler for this.
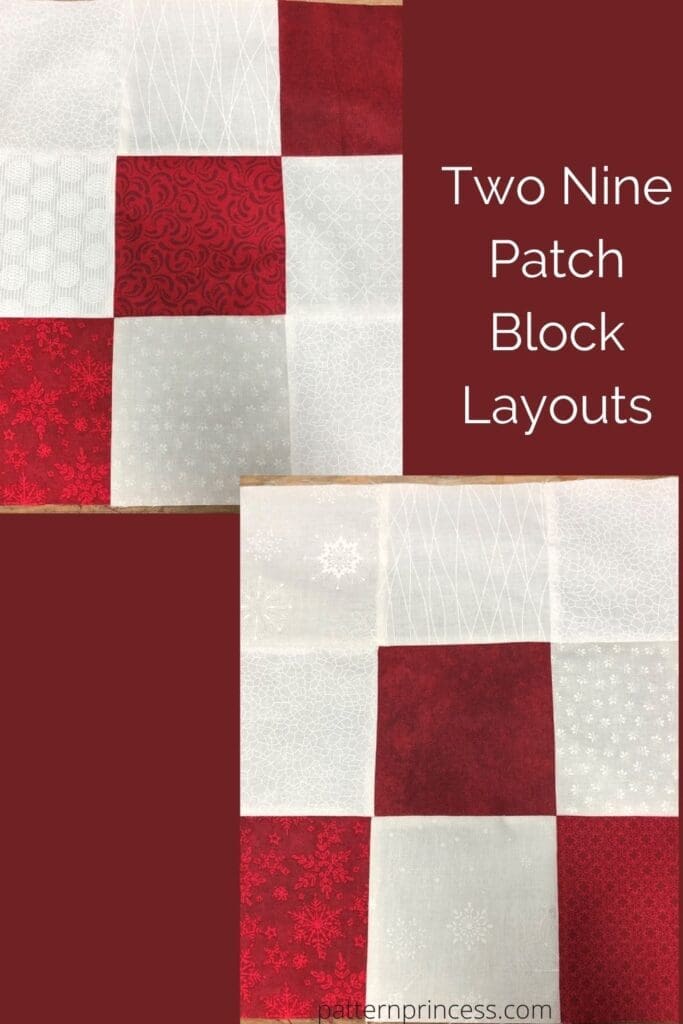
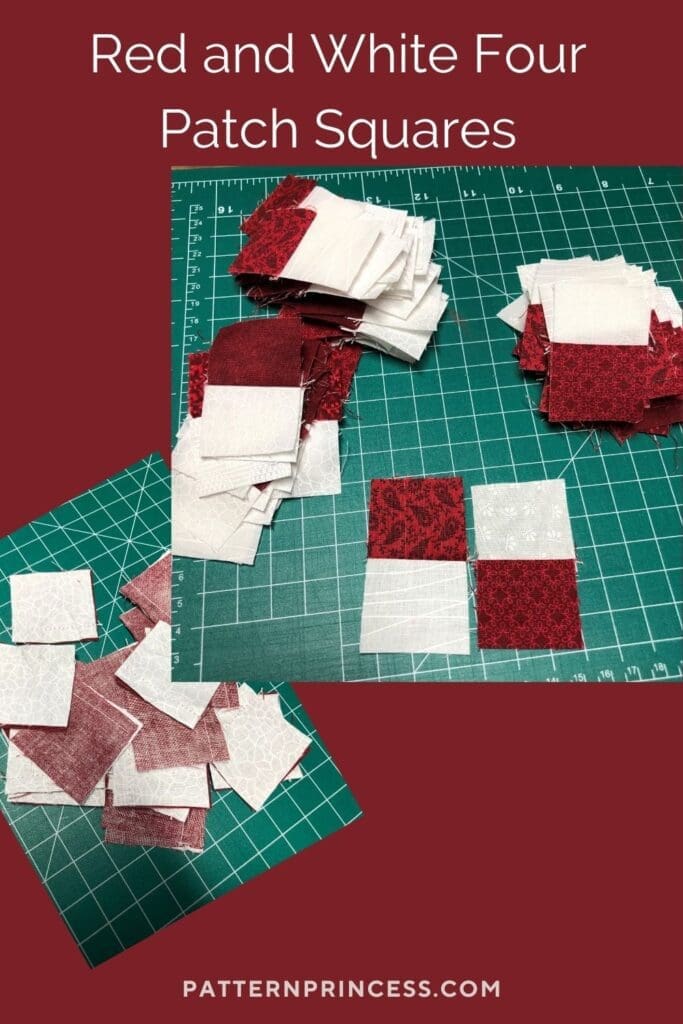
Nine Patch Blocks
Now it is onto the 9 patch blocks. Good grief, there are 36 red squares and 72 White squares. It took me half hour to just measure and cut out 18 red squares. This is going to take me awhile.
My sewing area is set up in my basement. I think each time I go to switch the laundry from the washer to the dryer, etc. I will spend a bit of time cutting out more of the squares. Not sure if I could really keep at this for three or four hours at a time. Seems a bit tedious. I will push on and get this beauty finished.
This was so much easier than I thought it would be. The 9 patch blocks went together quickly.
Here are the two nine patch blocks that are used.
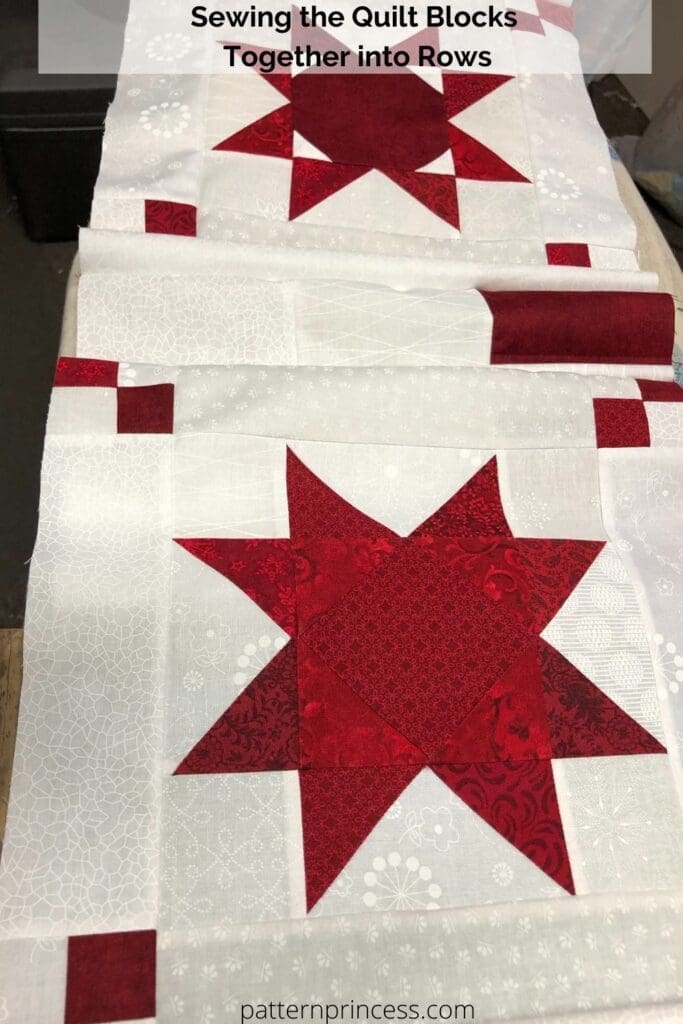
Adding the Sashing
There is sashing between the blocks in the rows and sashing between the rows of blocks. The four patches are placed on the ends of the white strips of fabric.
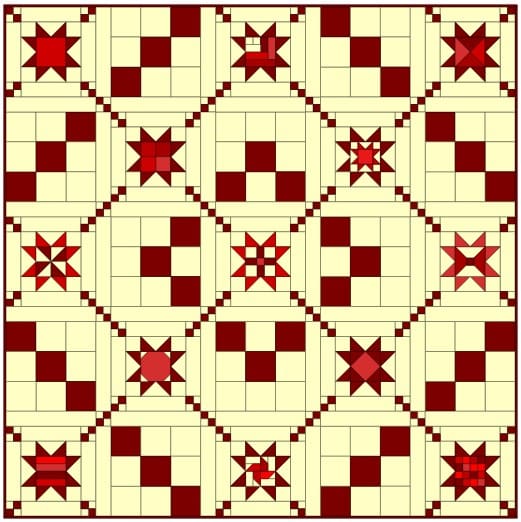
I used the photo of the quilt to triple check the placement of each four patch. Make sure that the red and white squares are facing the correct way on the top and bottom of each block.
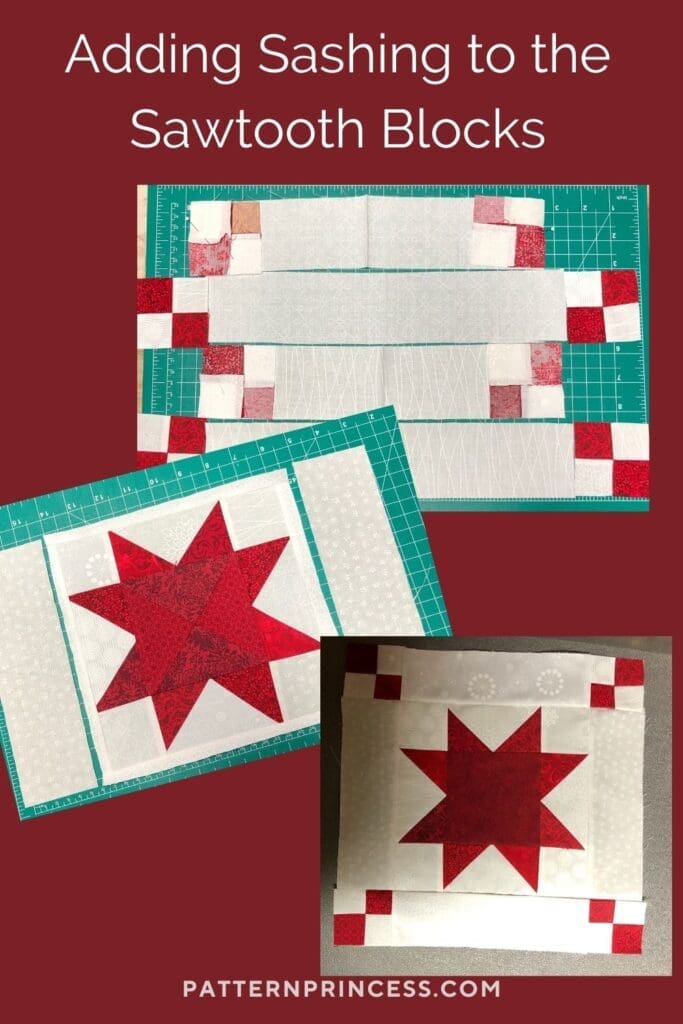
Additionally, when adding the sashing strips of fabric between the rows there are four patches between the white strips as this creates the smaller diagonal squares that run through the pattern.
Quilt Backing Fabric
I used a 44-inch-wide fabric that was 4 ¼-yards. Make sure to wash it and iron it before using it as the quilt backing. Further, trim the fabric to 80-inches X 80-inches so it extends beyond the edges of the quilt top.
Making the Binding
I had some of the dark red cotton fabric left; therefore, I made the binding all one color using what was left. Cut 8- 2 ½-inch X 44-inch strips. Join each strip to make approximately 300-inches of binding.
Time to Try Quilting
I decided to start practicing my quilting skills with scrap fabric and batting.
Years ago, I had watched television shows showing how easy it was to quilt. I tried a few times on my older Pfaff 213 model and I could not figure out how to make this work.
My machine did not have a quilt foot attachment; therefore, I ordered at least 5 quilting feet that I thought would work on my low shank machine. Of course, none of them would work. After doing several hours of research, I finally realized that my machine is not really made for quilting. It does work wonderful for piecing.
It was time to get serious about this craft. So, it was time to start researching the purchase of my first quilting sewing machine. If I am going to continue having fun at this new hobby, I best get the right tools. This is the sewing machine that I purchased for quilting. Singer 7285Q Patchwork Quilting Machine the best part is that it was on sale today.
Quilting Machine
Now that I have practiced a bit of quilting, my good friend Bonnie has offered to use her quilting machine to quilt this nice size quilt.
Everything is ready for this step. I am excited to see how that entire process is done.
The last part for this quilt will be sewing on the binding. Washing the quilt with a couple of color catchers in the washing machine. They are great for catching any of the red dye that may bleed during the wash.
This Red and White Scrappy Star Quilt journey is one I will always be grateful for. I am so ready for the next pattern, and I am so proud that I kept at it even when I messed up. The result is an absolutely gorgeous heirloom quilt that can be passed down through the generations with the story of my first quilt.
There is a red and white quilt show this fall that Bonnie and I are going to enter with our versions of her quilt design. What a fun time it will be.
I have yet to make the potholder; however, I did make a cute Pocket Mug Rug.

You can find Victoria crocheting, quilting, and creating recipes. She has cooked in restaurants for over 20 years, including many larger parties. She learned to crochet when she was just 11 years old and has been crocheting ever since; over 50 years now. Over 40 years ago, she loved her first class in sewing and continues to hone her skills in quilting. Many have enjoyed the handmade gifts over the years. In her professional career, she has worked in management in a wide variety of businesses including higher education as a dean of a division. All the while attending college part-time to achieve her doctorate in higher education with an emphasis in e-learning.