The 3D Zigzag Waffle Stitch is a textured ripple stitch featuring raised front-post double crochet ridges. If you love stitches with bold texture and eye‑catching depth, this stitch is about to become a new favorite. It creates a thick, dimensional texture that looks complex but works up with a simple, repeatable rhythm. Whether you’re making blankets, scarves, or cozy home décor, this stitch adds instant visual drama and a satisfying squish factor. In this tutorial, I’ll walk you through everything you need to know to crochet the 3D ZigZag Waffle Stitch step by step.
About the 3D ZigZag Waffle Stitch
Some stitches feel like they sculpt themselves as you work, and the 3D ZigZag Waffle Stitch is one of those magical textures. With every row, the fabric rises into deep ridges and angled peaks that create a beautiful zigzag motion across the surface. It’s thick, warm, and wonderfully tactile — the kind of stitch you can’t help but run your fingers across. If you’re looking for a stitch that looks impressive but is surprisingly easy to memorize, this one is a joy to learn and even more fun to use in blankets and winter projects.
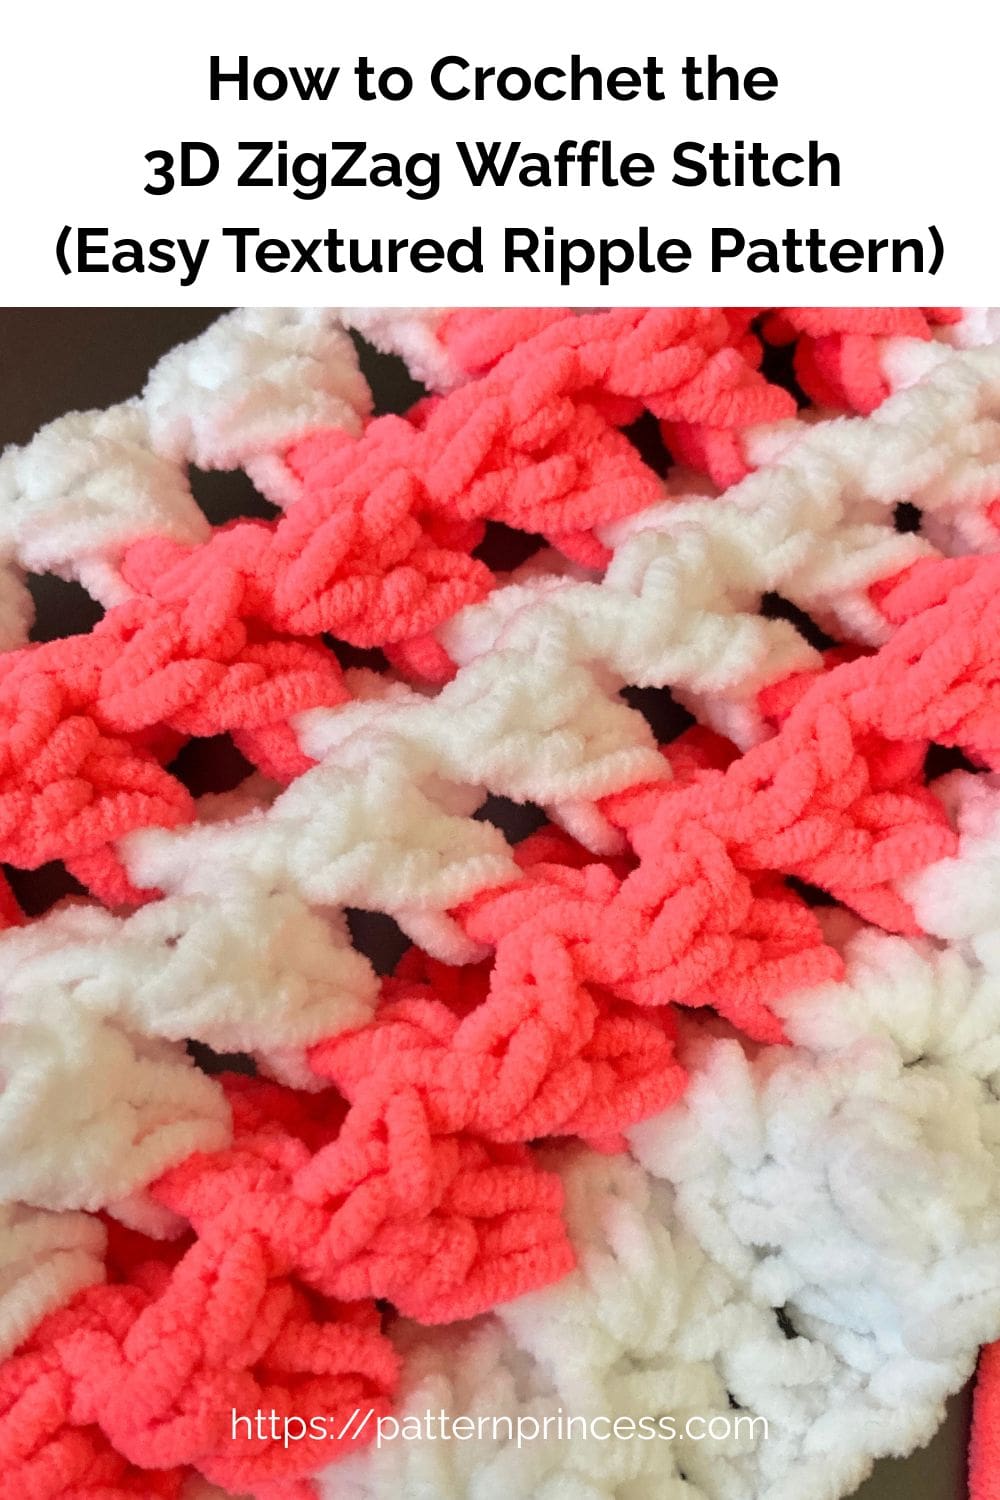
Built with clusters front post double crochet stitches, this stitch combines eye-catching dimension with a surprisingly simple repeat. The repeating pattern quickly becomes relaxing and enjoyable once established.
One of the things we love most about this stitch is how versatile it can be. The texture is dramatic becomes the focal point of a project.
Why You’ll Love This Stitch
- Creates dramatic three-dimensional texture.
- Easy-to-memorize row repeat.
- Works beautifully with solid, striped, or variegated yarn.
- Adds warmth without becoming overly dense.
- Suitable for advanced beginners ready to learn front post stitches.
- Easily customizable for projects of any size.
Best Yarn Choices
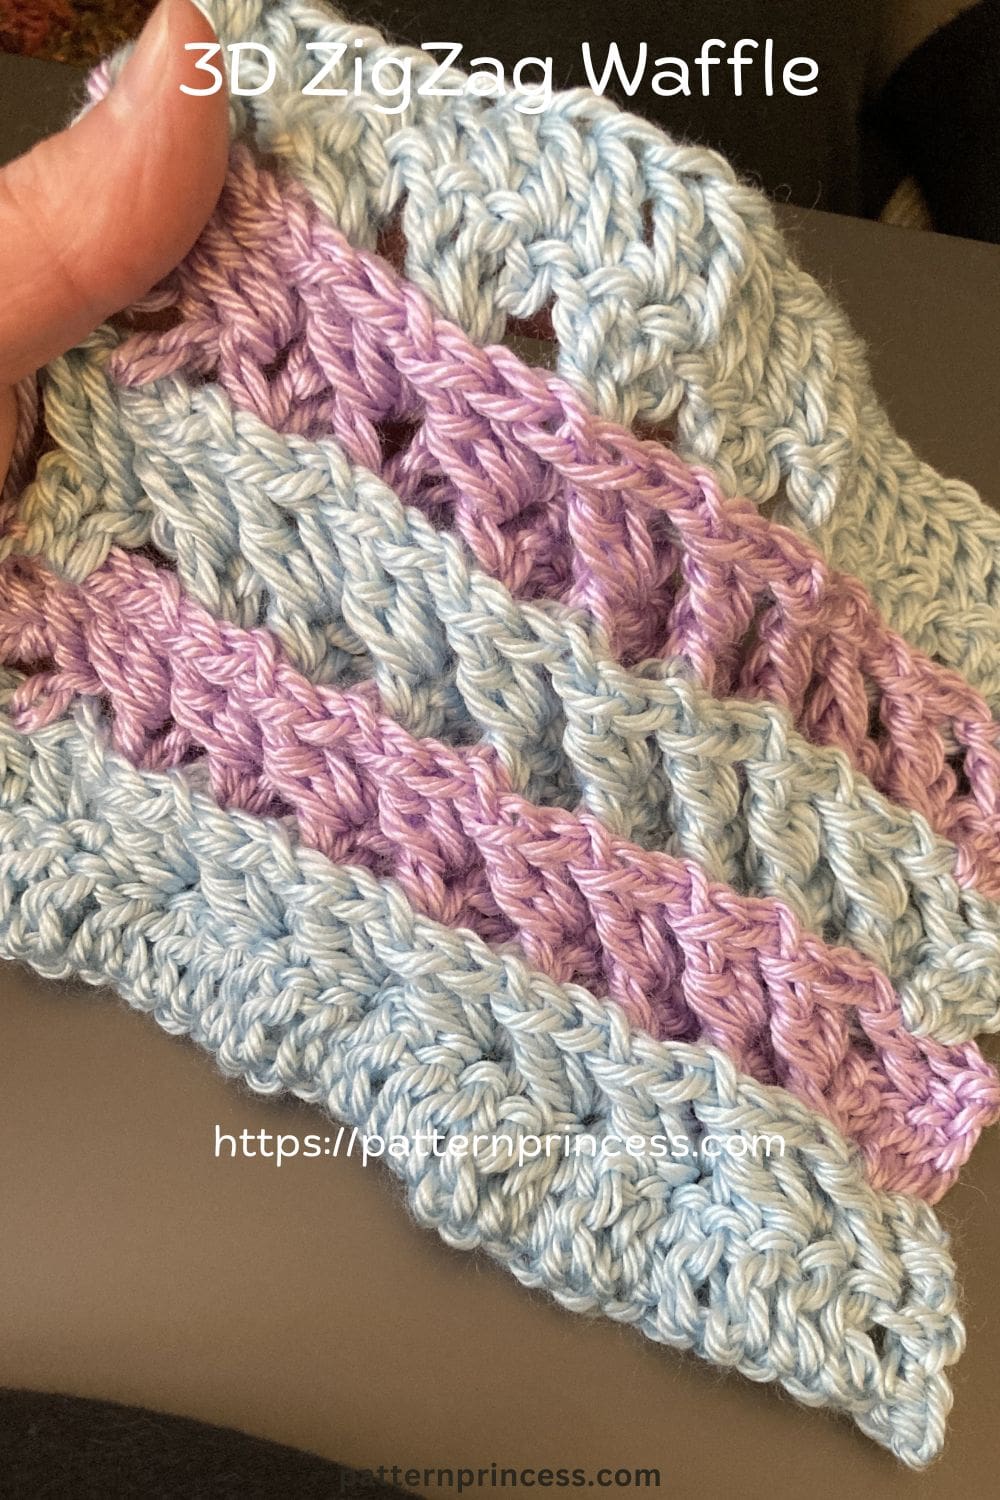
Whether worked in a single color, self-striping yarn, or alternating color rows, the stitch creates a unique look every time. The raised ridges catch the light beautifully and add extra depth and visual interest to any project.
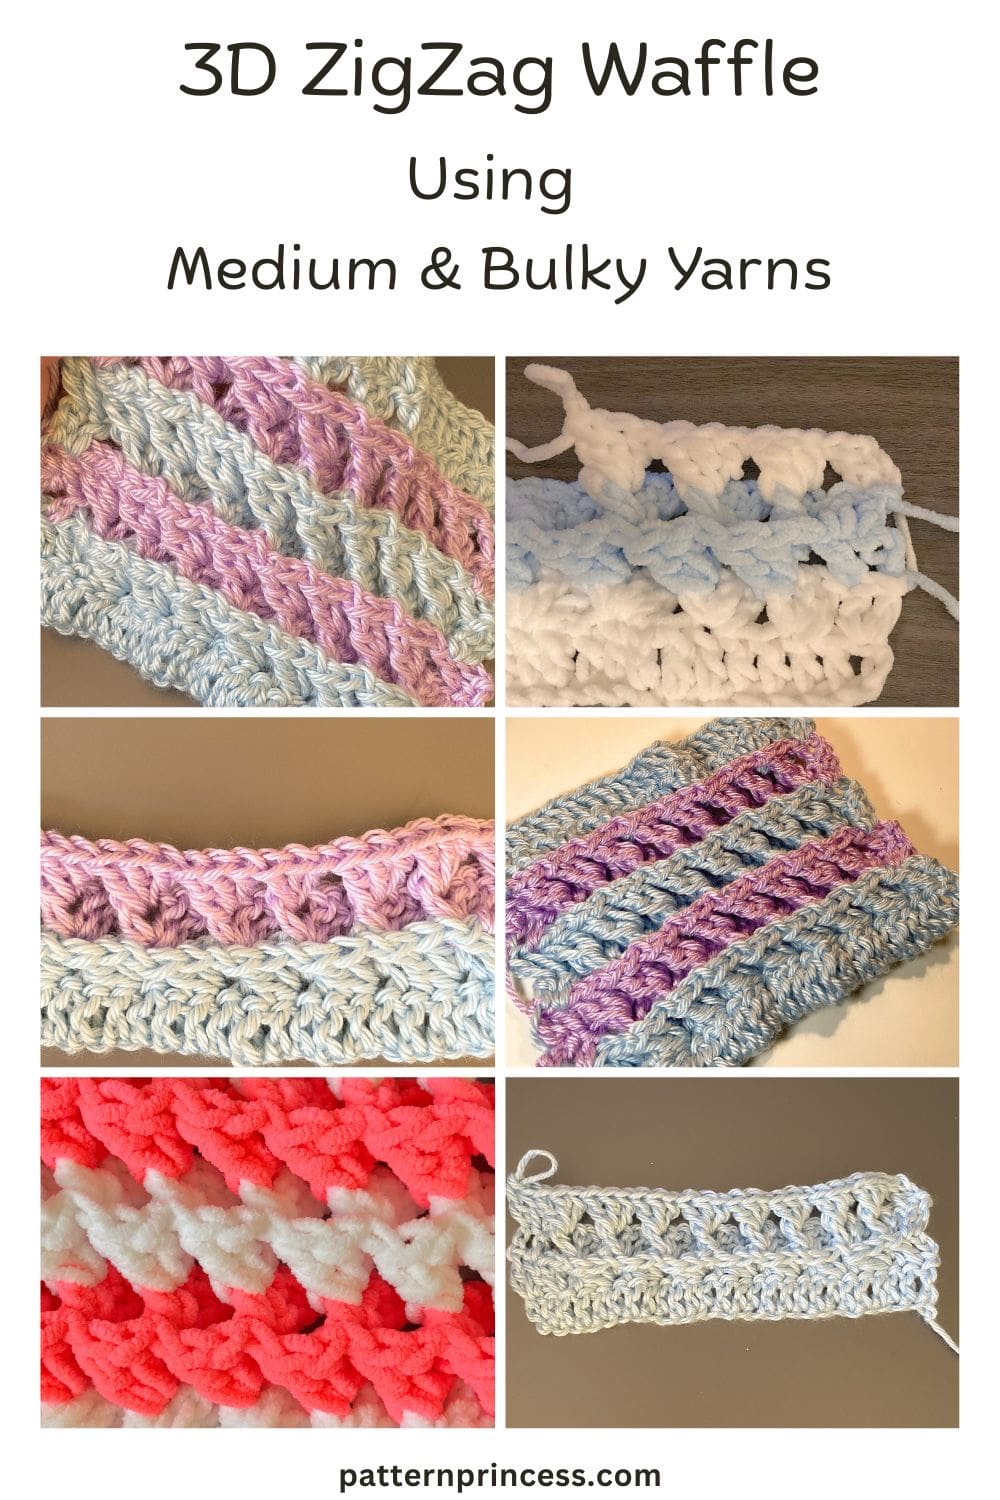
This stitch works well with a variety of yarn weights and fibers.
Medium Weight (#4) Yarn
Creates excellent stitch definition and allows the texture to stand out clearly. This is a great choice for stitch tutorials, scarves, shawls, baby blankets, and throws.
Bulky Weight (#5) Yarn
Produces a wonderfully soft, squishy fabric with extra dimension. The raised ridges become even more pronounced, making it ideal for cozy blankets, lapghans, and home décor projects.

Variegated and Self-Striping Yarns
Create beautiful color transitions while highlighting the raised texture. The changing colors add movement and visual interest to the zigzag design.
Two-Color Designs
Alternating colors every row or every two rows emphasizes the peaks and valleys of the stitch pattern and creates a bold geometric appearance.
Avoid novelty yarns with excessive texture, as they can hide the beautiful stitch definition.
Project Ideas
The 3D ZigZag Waffle Stitch is perfect for projects that benefit from texture and warmth.
Try using this stitch for:
- Throw blankets
- Baby blankets
- Lapghans
- Bed runners
- Scarves
- Cowls
- Table runners
- Pillow covers
- Pet blankets
- Home décor accents
Because of the raised texture, this stitch is especially effective in projects where both appearance and softness are important.
Get your ad free printable PDF in our Etsy Shop.
Directions: 3D ZigZag Waffle Crochet Throw Blanket Pattern
Skill Level
Advanced Beginner – Intermediate
You should be able to work the double crochet stitch and work it around the posts of the stitches below. Once you have mastered this method, you are ready for this pattern.
Gauge
The gauge will depend on the yarn and crochet hook used.
Size
The size depends on the number of chain stitches and rows crocheted.
Varying the Size
Use stitch multiples of 12 + 4 to vary the width. Increase or decrease rows to vary the length.
Materials
This stitch pattern works beautifully with medium (#4) and bulky (#5) weight yarns. The samples shown were worked in both medium weight and bulky weight yarn to demonstrate the versatility of the stitch.
Crochet hook recommended on yarn package.
Yarn Needle
Scissors
Stitch Markers
Measuring Tape
Abbreviations
- CH = Chain
- DC = Double Crochet
- FPDC = Front Post Double Crochet
- SK = Skip
- SP = Space
- ST = Stitch
- STs = Stitches
- [ ] = Repeat Between, also the information for different sizes
Pattern Notes
Written in US Terms
Turn at the end of each row.
The chain 3 at the beginning of each row counts as a double crochet.
There are links for video tutorials for both left and right hand crocheters and photos to help with the pattern.
The raised zigzag ridges are formed by working Front Post Double Crochet stitches around the final double crochet stitch of each 3-double crochet cluster from the previous row.
Special Stitches Used
Double Crochet (DC)
Yarn over, insert the hook through both loops and pull up a loop. Next, yarn over and pull through two loops on the hook. Lastly, yarn over again and pull through the last two loops on the hook.
HOW TO CROCHET THE DOUBLE CROCHET STITCH video tutorial
Front Post Double Crochet (FPDC)
Front post stitches are raised crochet stitches on the surface of the fabric facing you. Note: Because a post stitch is shorter than a normal stitch, you make the turning chain with one chain stitch less than the normal turning chain requires.
Yarn over, insert the hook from front to back between the posts of the first and second double crochet of the row below. Then insert the hook from the back to the front between the posts of the second and third stitches. (The hook should now be positioned horizontally behind the double crochet that you are working around).
Yarn over, pull the yarn around the post of the stitch. There should now be 3 loops on the hook.
Now you’ll be working on the loops on the hook. Yarn over, pull the yarn through 2 loops on the hook. Lastly, yarn over again and pull through the last two loops on the hook.
HOW TO CROCHET THE FRONT POST DOUBLE CROCHET video tutorial
Begin Crochet Pattern
Start by making a slip knot and adding the loop on the hook.
Chain a stitch multiple of 12 + 4.
The sample size is 28 chain stitches.
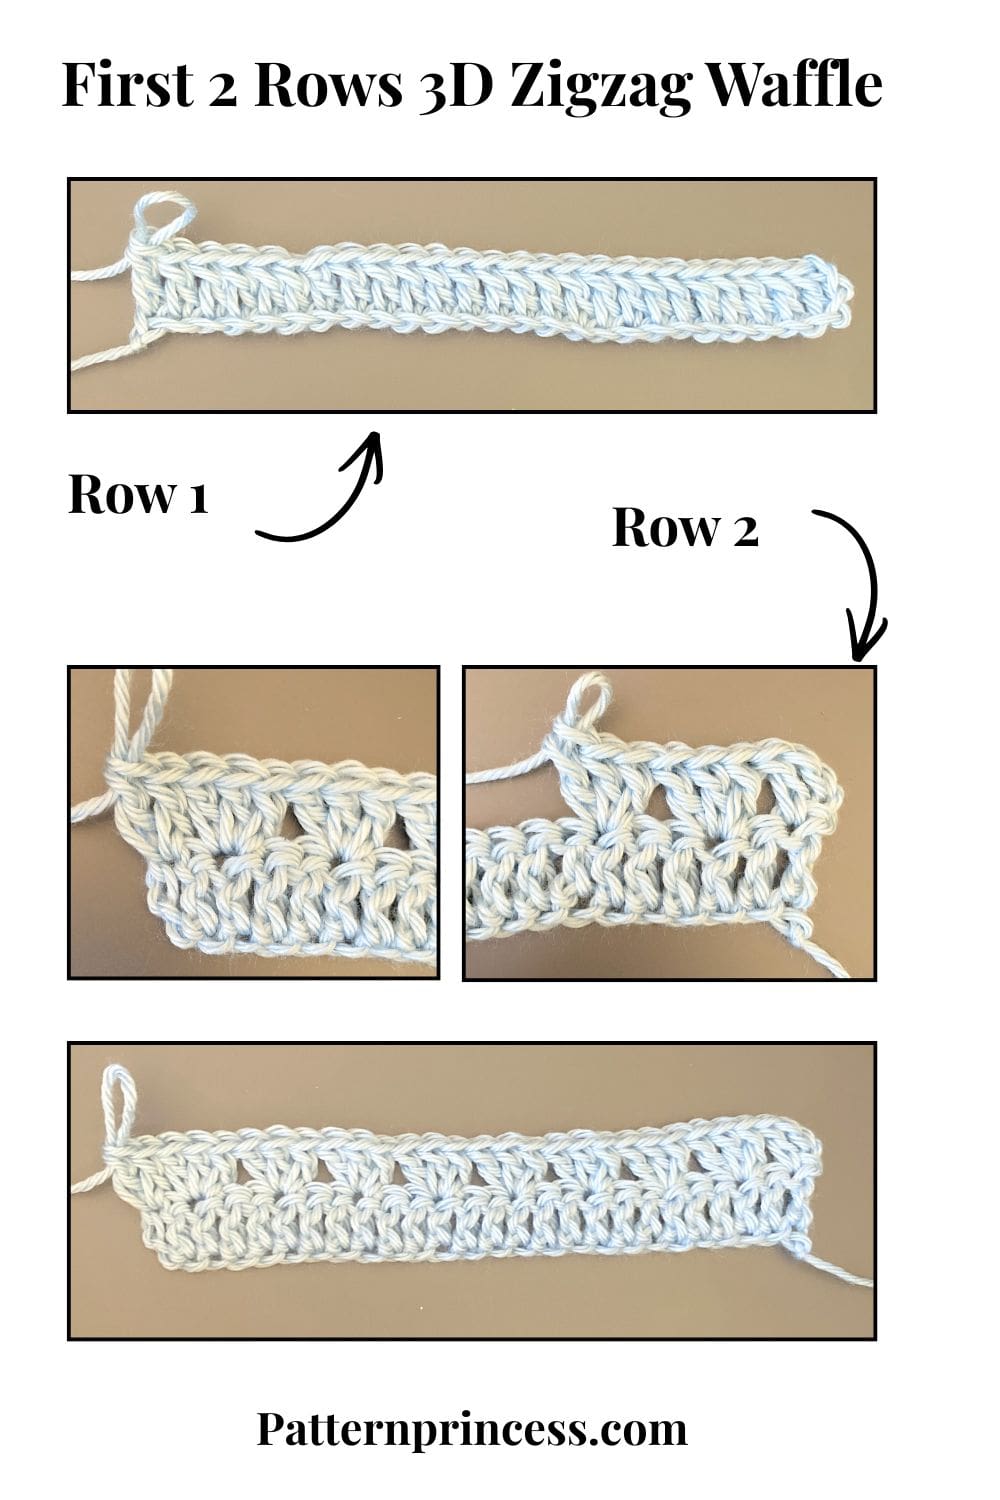
Row 1
Skip 3 STs (Counts as a DC). In the 4th ST from the hook, work a DC in the back bump and each ST across. Turn.
Row 2
CH 3 (Counts as DC). DC in the same ST. SK 1 ST work 3 DC in the next ST. [SK 2 STS, work 3 DC in the next ST]. Repeat across. When there are two stitches left, SK 1 ST, work 2 DC in the last ST. Turn
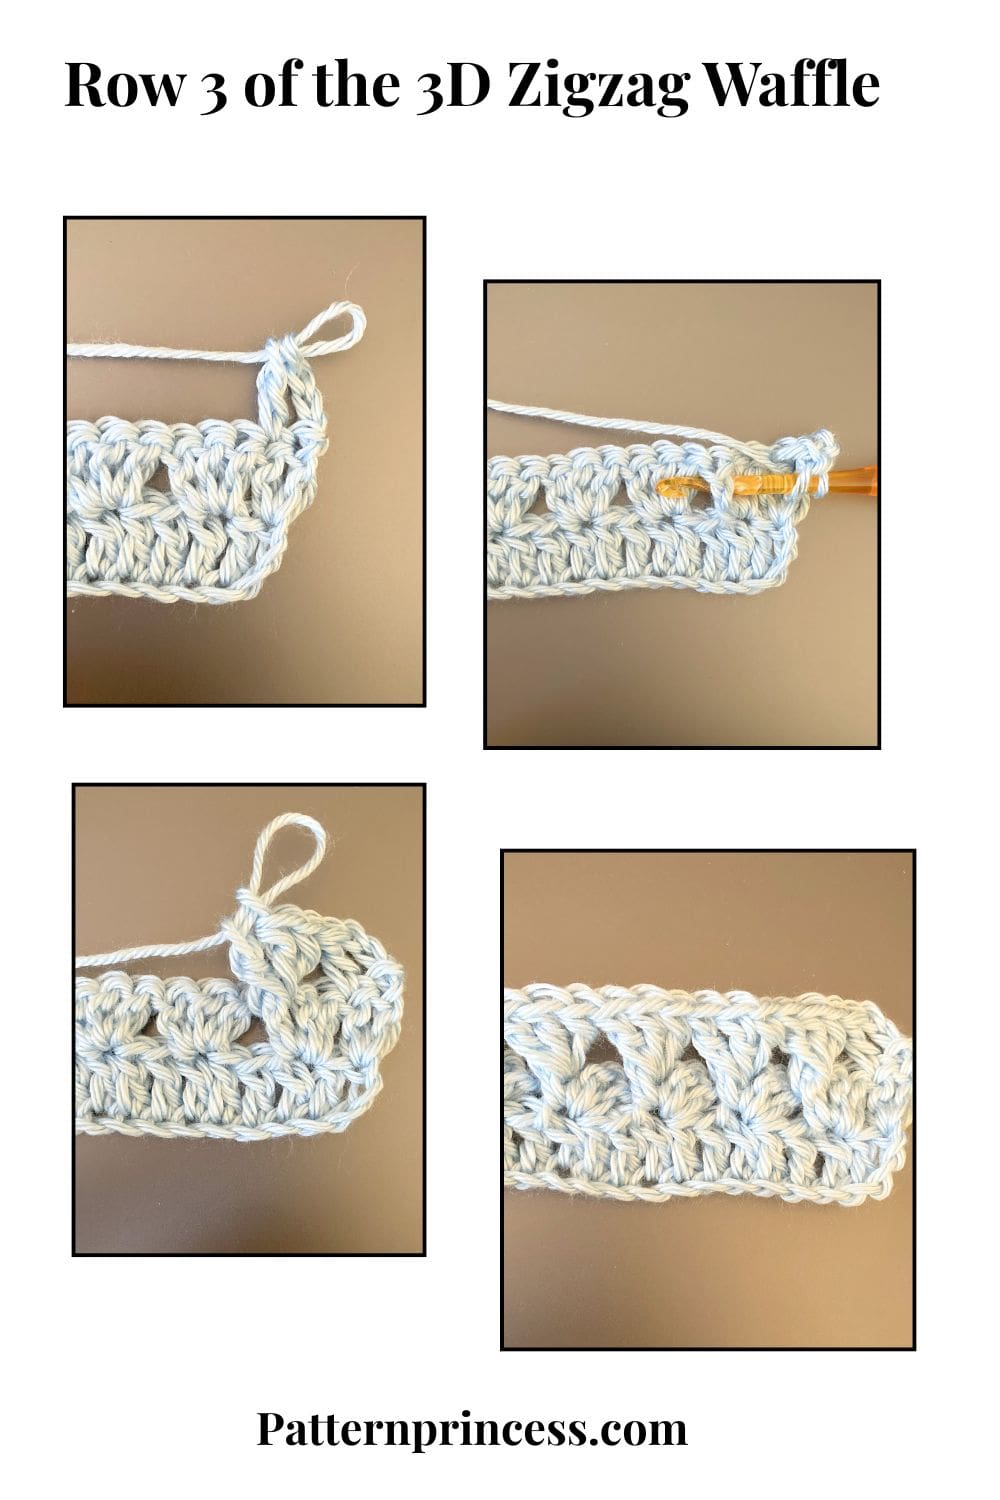
Row 3
CH 3 (Counts as DC). Work 1 DC in the DC ST. [SK to the last ST of the previous row 3 DC cluster. Work 3 FPDC]. Repeat between [ ] across. End with 1 DC in the last 2 DC STs. Turn
Rows 4 and Beyond
Repeat row 3.
Last Row
If you would like the last row to look just like the first row work a row of double crochet stitches.
CH 3 (Counts as a DC). DC in each ST across.
Finishing
After you work the last SC ST, cut off the yarn leaving about a 12-inch long tail. Pull the yarn tail through the last loop on the hook.
Thread the yarn needle with the yarn tails and weave them through the crochet stitches back and forth until the yarn feels secure. Snip off the excess yarn.
If you are a beginner crocheter, you can find more detail on finishing your crochet project on the website.
Crochet Video Tutorials of the 3D ZigZag Waffle Crochet Stitch
Right hand 3D ZigZag Waffle video
Left hand 3D ZigZag Waffle video
We hope that you have enjoyed this lovely crochet pattern. Here are a few more free patterns to inspire your next project.

You can find Victoria crocheting, quilting, and creating recipes. She has cooked in restaurants for over 20 years, including many larger parties. She learned to crochet when she was just 11 years old and has been crocheting ever since; over 50 years now. Over 40 years ago, she loved her first class in sewing and continues to hone her skills in quilting. Many have enjoyed the handmade gifts over the years. In her professional career, she has worked in management in a wide variety of businesses including higher education as a dean of a division. All the while attending college part-time to achieve her doctorate in higher education with an emphasis in e-learning.