Last updated on April 15th, 2026 at 10:36 am
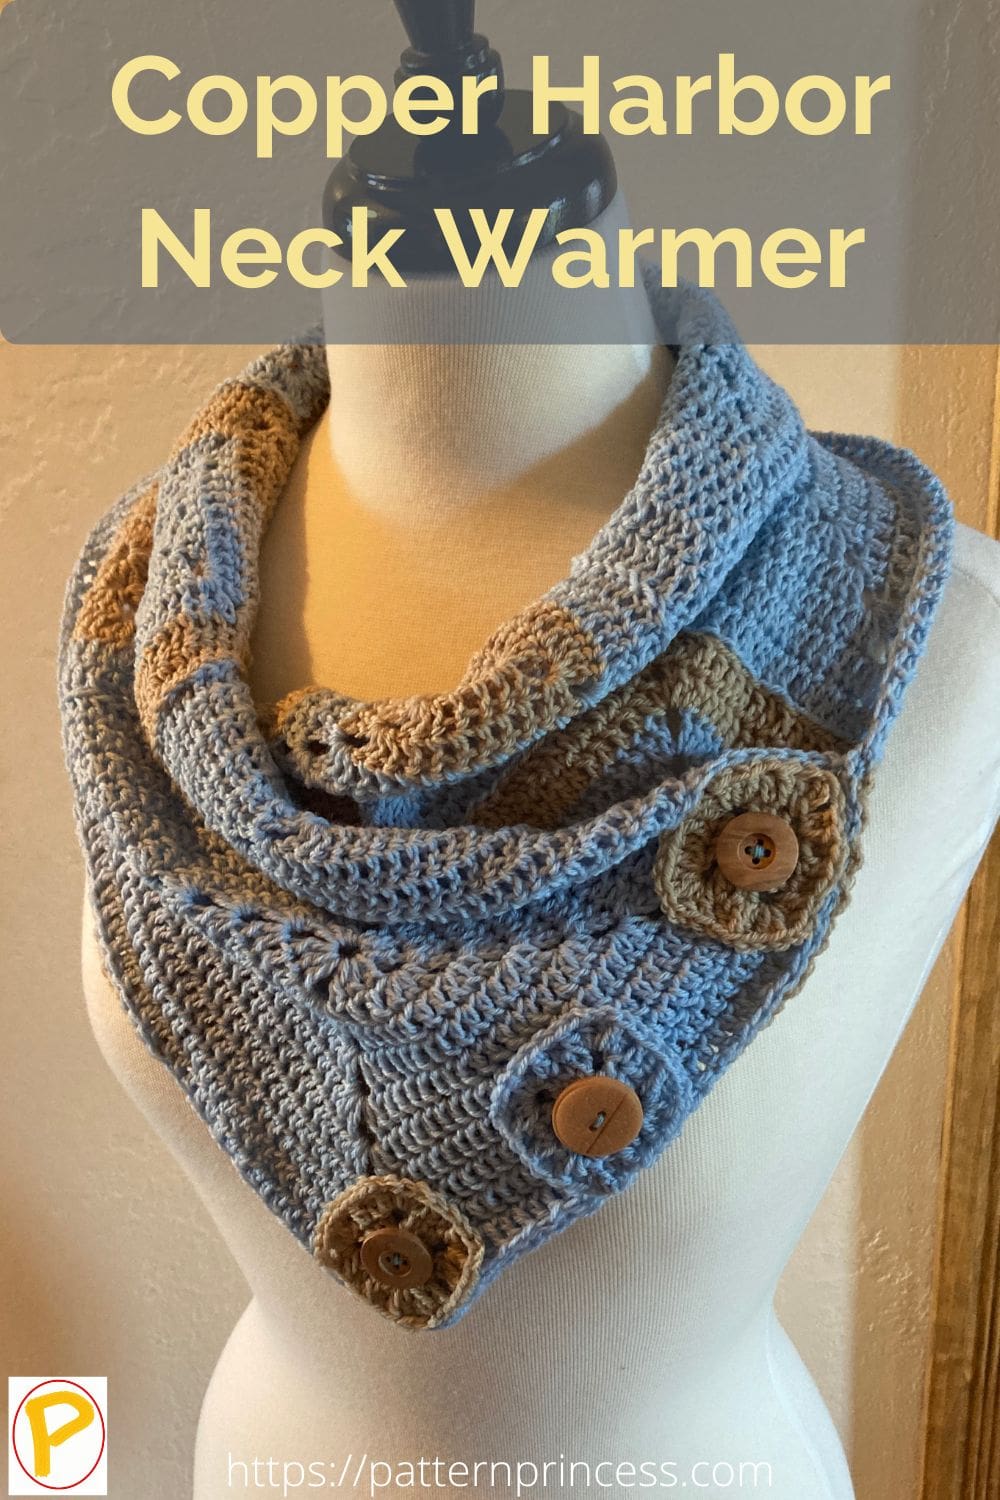
The Copper Harbor Neck Warmer is perfect for keeping your neck warm on chilly days. Make one for yourself or give it as a gift to someone special.
Winter is coming! Well, maybe not for a few more months, but it’s never too early to start thinking about ways to keep warm. This neck warmer is perfect for those chilly days when you don’t want to wear a full scarf. Plus, it’s really easy to crochet. Stay warm and stylish this winter.
With just a few basic stitches, you can create this stylish and functional accessory. This project is a great way to use up leftover yarn, and it’s perfect for winter. In this post, I’ll share the pattern with you, along with some tips on how to make it. I hope you enjoy it!
Post contains affiliate links, and we earn commissions if you shop through the links on this page. For more information, please read the disclosure section under the About Us page.
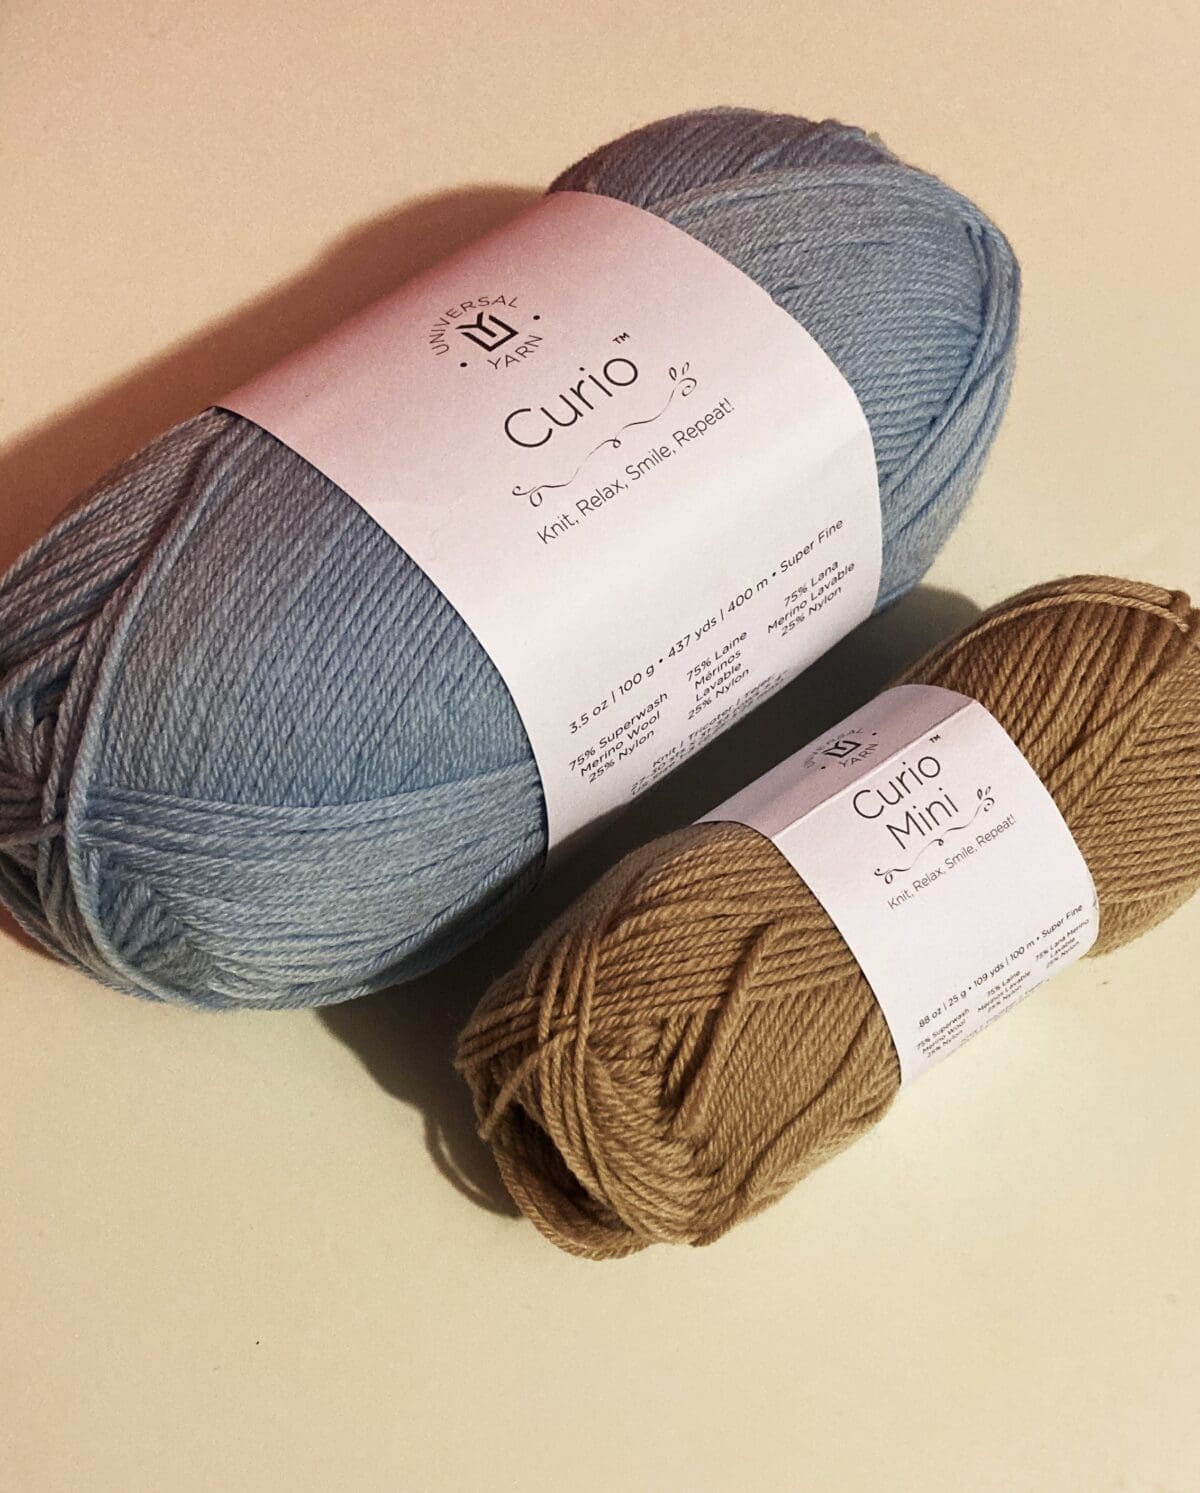
Yarn Supplied by Universal yarn
Recently, I was at a conference and got two skeins of Curio Universal Yarn. I chose the bag with the colors Lighthouse and Crouton. One skein was 437 yards and the other was a scant 109 yards.
For the next couple of weeks, as I worked on my other crochet projects, I kept wondering what I would make with the yarn. Making a scarf kept coming to the top of the list. Finally, after about two months of thinking about this, I came up with the perfect design. In my head anyway!
This is the result of my design and I love the results and hope you do too.
Naming the Copper Harbor Neck Warmer
Recently, our family went on a three-day family vacation. It has been the first vacation we have taken together in over a decade. It was short, but so nice! We went to the upper peninsula in Michigan.
When I came home, I made this neck warmer. The colors just happened to be named lighthouse and crouton. We toured a lighthouse and the beauty of Lake Superior, and the sandy shores reminded us of the yarn colors. So, it just seemed fitting.
Solid Granny Square Scarf
This neck warmer is made using various sizes of the solid granny square. The pattern I have for the solid granny square is unique in that it has no seams! Normally, when you see a solid granny square, you can see the seam on one side. That is not the case with these little beauties.
See my free solid granny square tutorial.
There are also video tutorials for both a left hand and right hand crocheter on working the solid granny square.
Crochet Scarf Joined
This crochet pattern for the cowl is made from joining crochet squares to make a flat rectangle. Join the rectangle ends, add the smaller squares and buttons and you are all set to wear this lovely handmade accessory.
Just slip over your head and you are all set to go. This is very nice under a fall and winter coat for a bit of extra warmth while adding style to your outfit.
Directions: Copper Harbor Neck Warmer
Skill Level
Beginner
Gauge
19 stitches every 4 inches
Finished Size
9 inches wide x 36 inches long
Materials
Lighthouse color Curio Universal Yarn 1 skein, 400 yards.
Crouton color Curio Universal Yarn 1 skein, 109 yards.
Size H Crochet Hook. (The yarn packaging suggests using a C to E crochet hook). However, I wanted a loose looking stitch and used a slightly larger hook.
Three 1-inch Buttons
Light Blue Thread
Sewing Needle
Tapestry Needle
Scissors
Abbreviations
CH = Chain
DC = Double Crochet
SL ST = Slip Stitch
SP = Space
ST = Stitch
STs = Stitches
[ ] = Repeat between
Pattern Notes
Details for each granny square used in this crochet pattern will be provided after the general directions for completing a solid granny square.
Crochet Pattern Directions
Begin
Round 1
CH 3 (Counts as DC). In the 3rd ST from the hook work (2 DC, CH 2, 3 DC, CH 2, 3 DC, CH 2, 3 DC, CH 2). Join to the top DC ST with a SL ST.
Round 2
CH 3 (Counts as DC). DC in the same corner CH 2 SP. DC in each ST across (3 DC). Work in the corner CH 2 SP (2 DC, CH 2, 2 DC). Continue working a DC in each ST across and in each corner CH 2 SP work (2 DC, CH 2, 2 DC) 2 more times. Continue working the DC in each ST across the last side (3DC). When you get to the final corner work (2 DC, CH 2) then a SL ST into the top of the first CH 3 to close the round.
Round 3 and Beyond
Continue repeating round 2. The only difference is that each round will have more double crochet stitches on each side. Stitches on each side = 7 DC.
For round 4 there will be 11 DC STs to work on each side.
Round 5 there will be 15 DC STs to work on each side, and so on.
Finish by weaving in yarn ends and removing the excess yarn.

Details on Squares
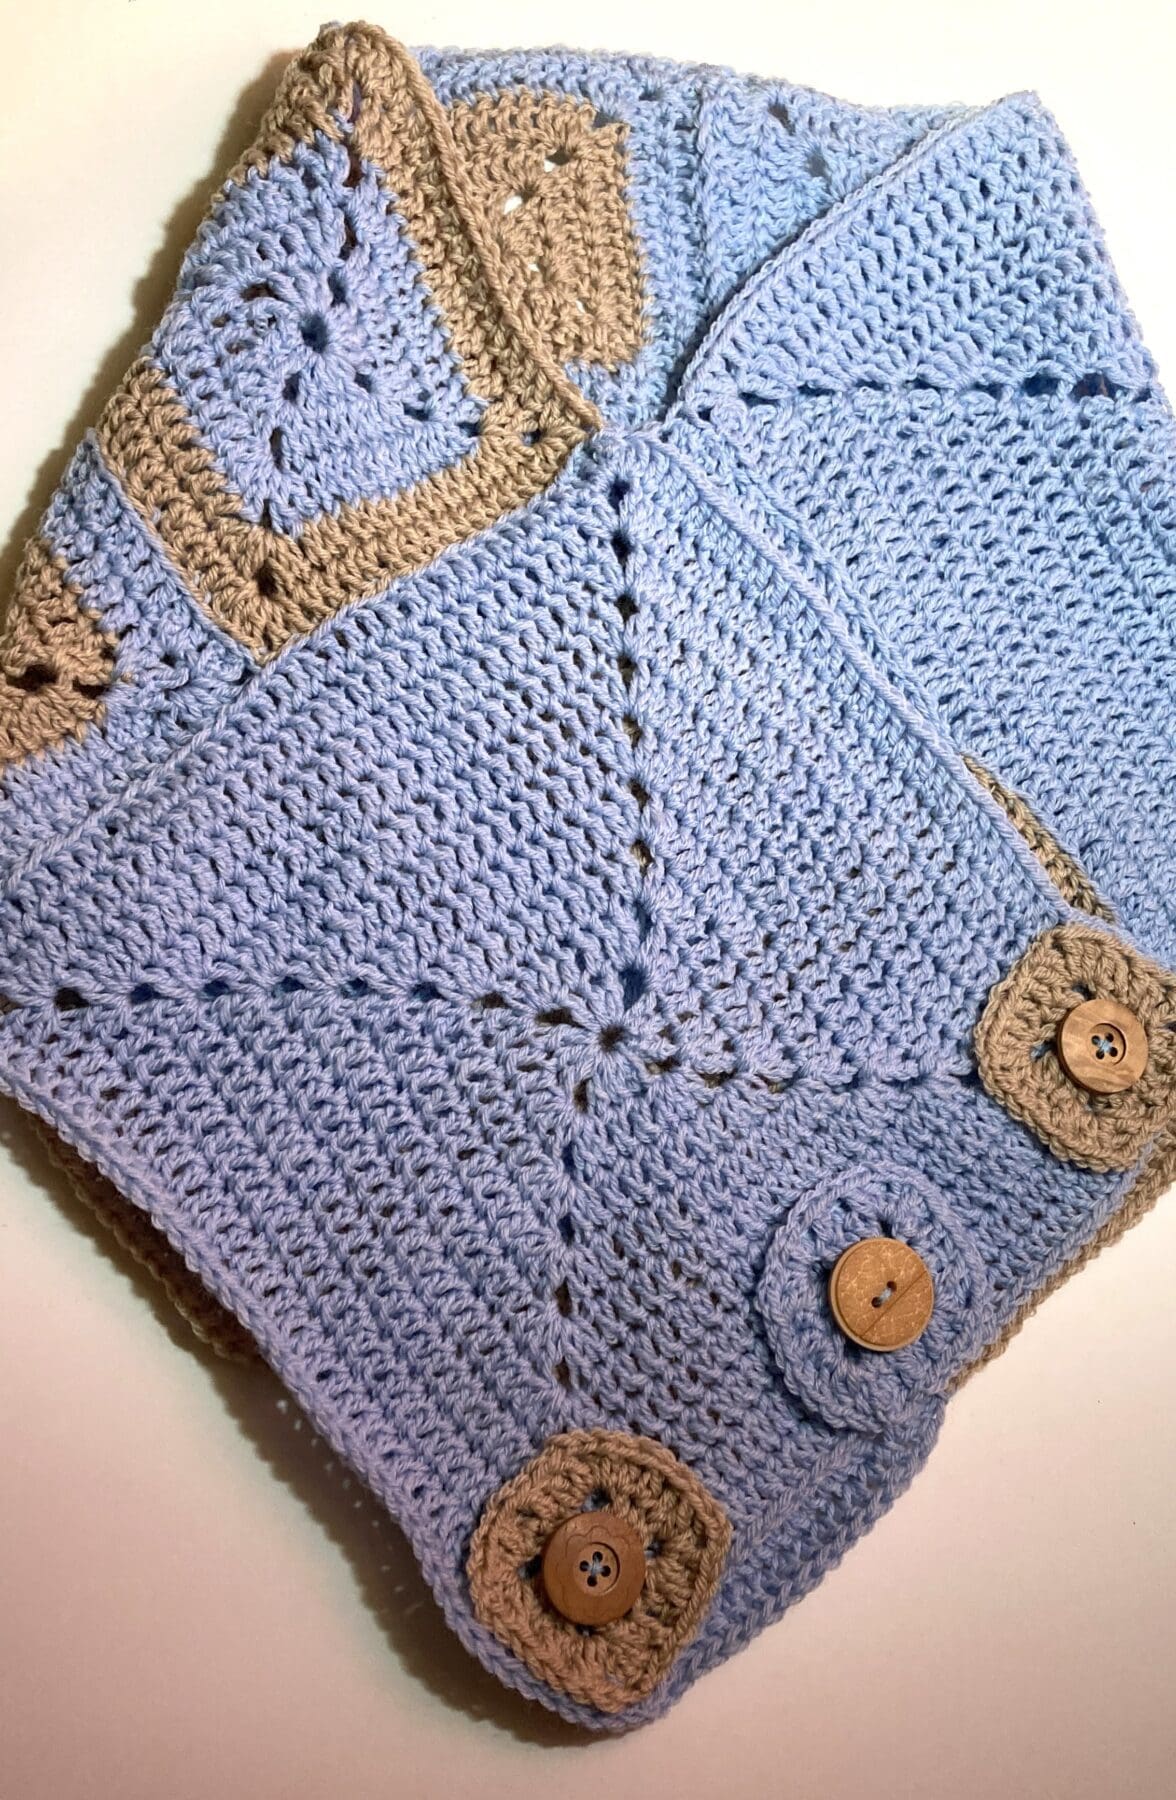
2 Larger lighthouse color squares. Using the Lighthouse yarn crochet two squares that are 10 rounds. Finished size 9 X 9-inches.
8 two-toned color squares. 4 with three rounds of crouton in the middle and two rounds of lighthouse color (5 rounds total). 4 with three rounds of lighthouse in the center and two rounds of crouton (5 rounds total). Finished size of each square 4.5 X 4.5-inches.
2 smaller crouton color squares. 2 rounds. Finished size 2 X 2-inches.
1 smaller lighthouse color square. 2 rounds. Finished size 2 X 2-inches.
Finishing.
Weave in all the yarn ends for each square and cut off the excess yarn.
Joining the Solid Granny Squares
Use the joining method of your choice. However, I used the invisible joining method and the leftover lighthouse color yarn.
If this method is new to you, here is my video tutorial on the invisible join.
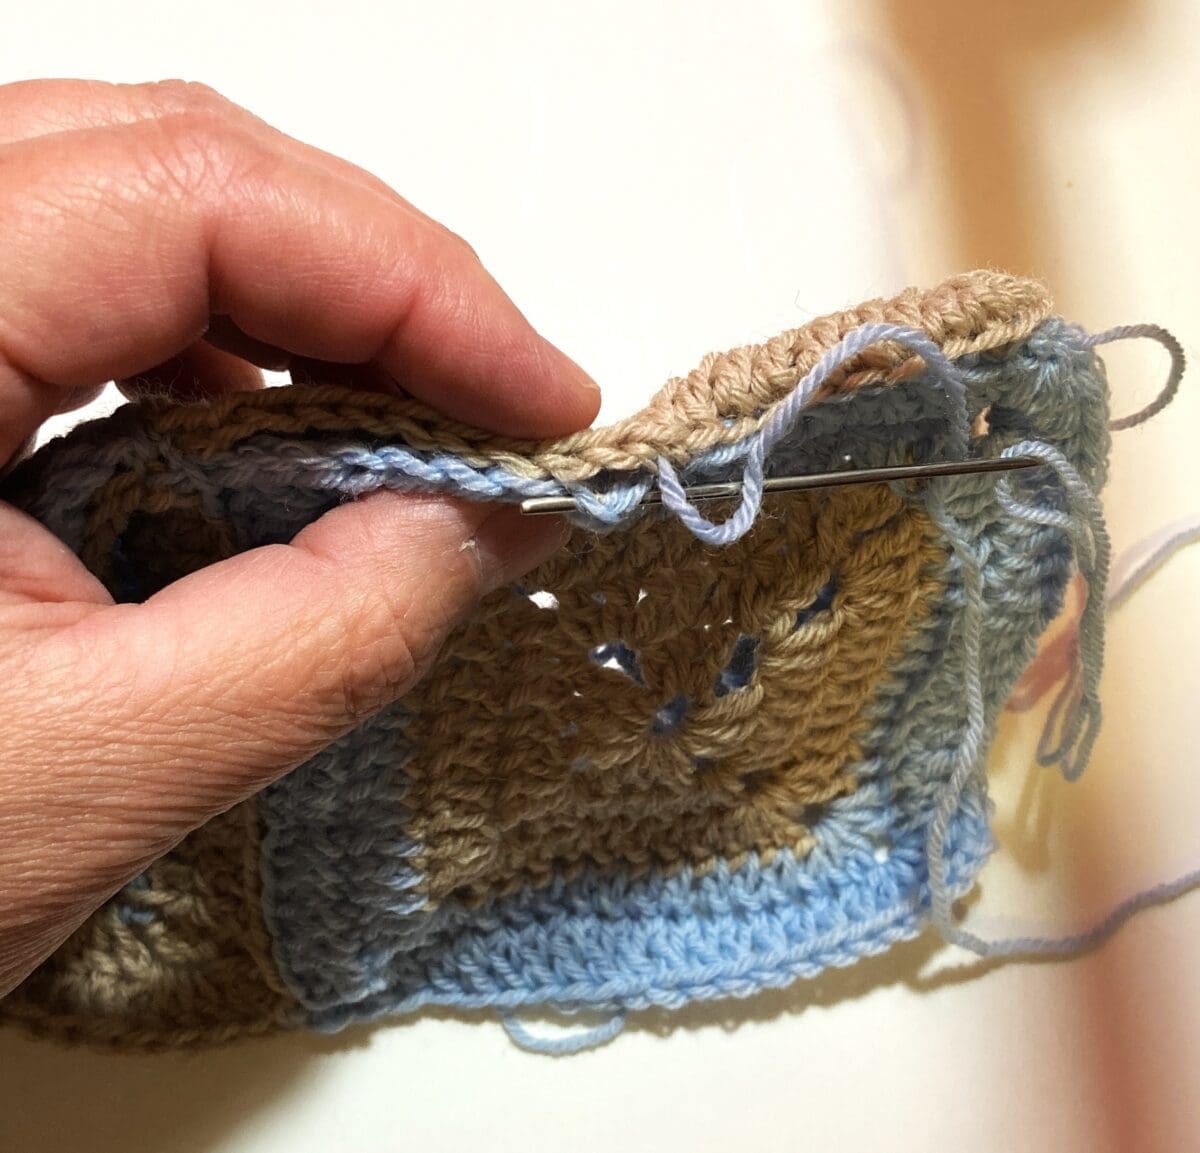
Begin by joining 4 of the two-toned 4.5 X 4.5-inch squares together. I chose to alternate the squares.
Repeat joining the remaining 4.5 X 4.5-inch squares.
See the photo for reference on how I joined my squares.
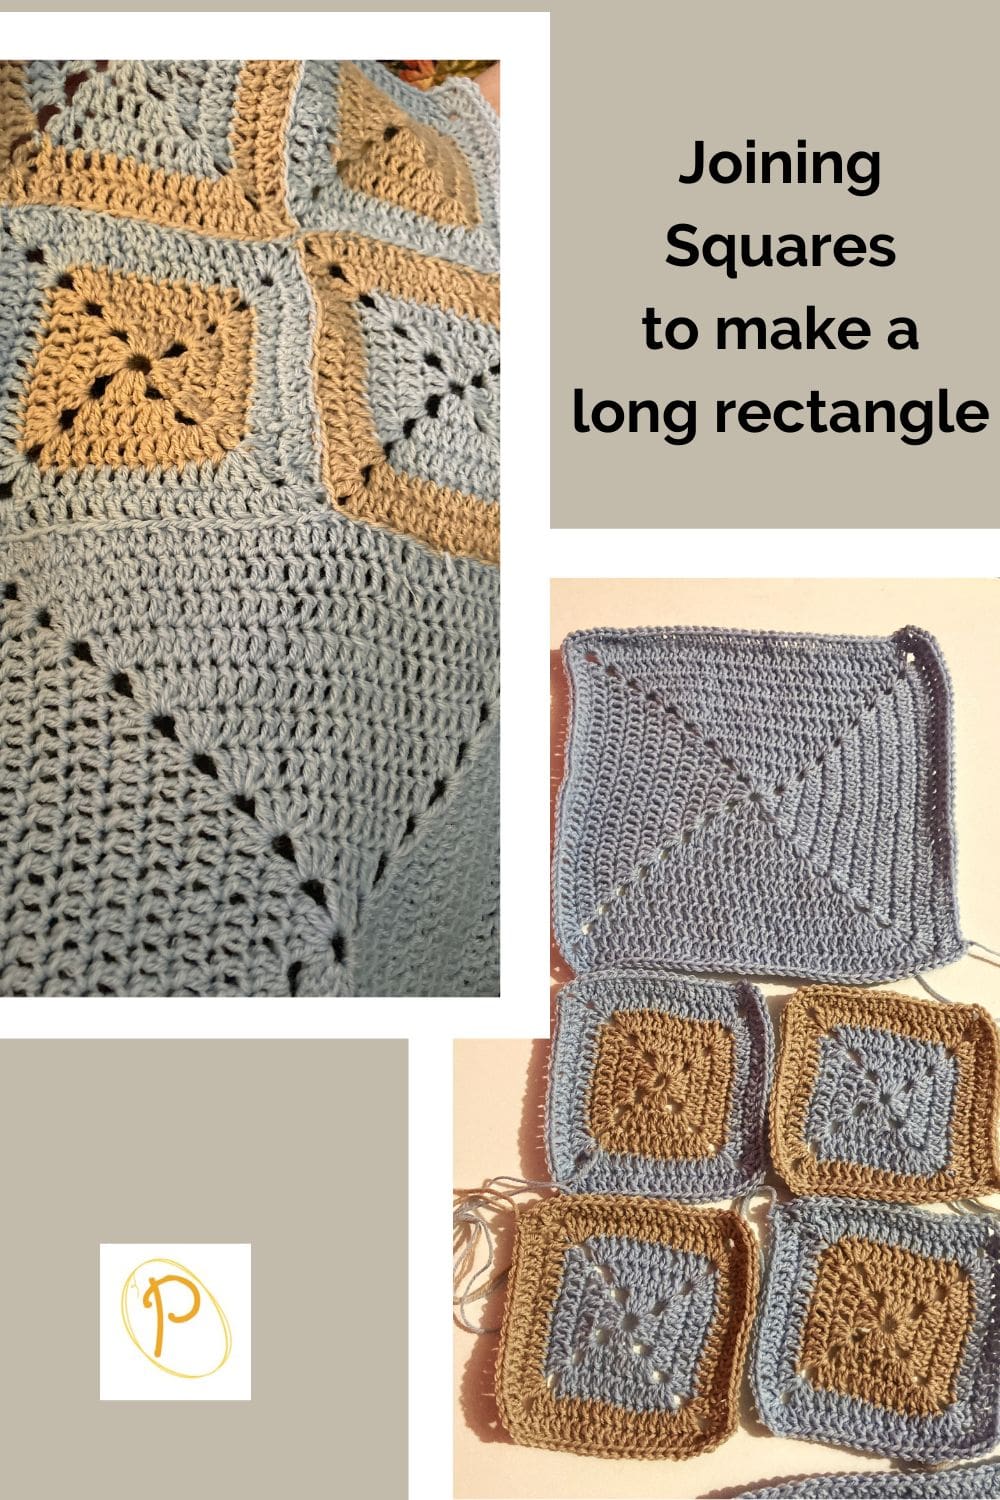
Now there should be 4 squares 9 X 9-inches. Two solid and two of them made with the two-toned smaller squares sewn together.
Next join the 4 larger squares together using the same joining method. I chose to begin with the two-tone square, then add the solid lighthouse color square, then the two-tone square, and finally the solid lighthouse color square.
There should be 2 crouton color and 1 lighthouse color 2 X 2-inch squares left.
Using the Lighthouse color yarn, sew those onto the end of the lighthouse color square. (Don’t worry about the yarn showing through on the bottom as this will be covered up when the ends of the scarf are sewn together. I just weaved the yarn up and down through the layers).
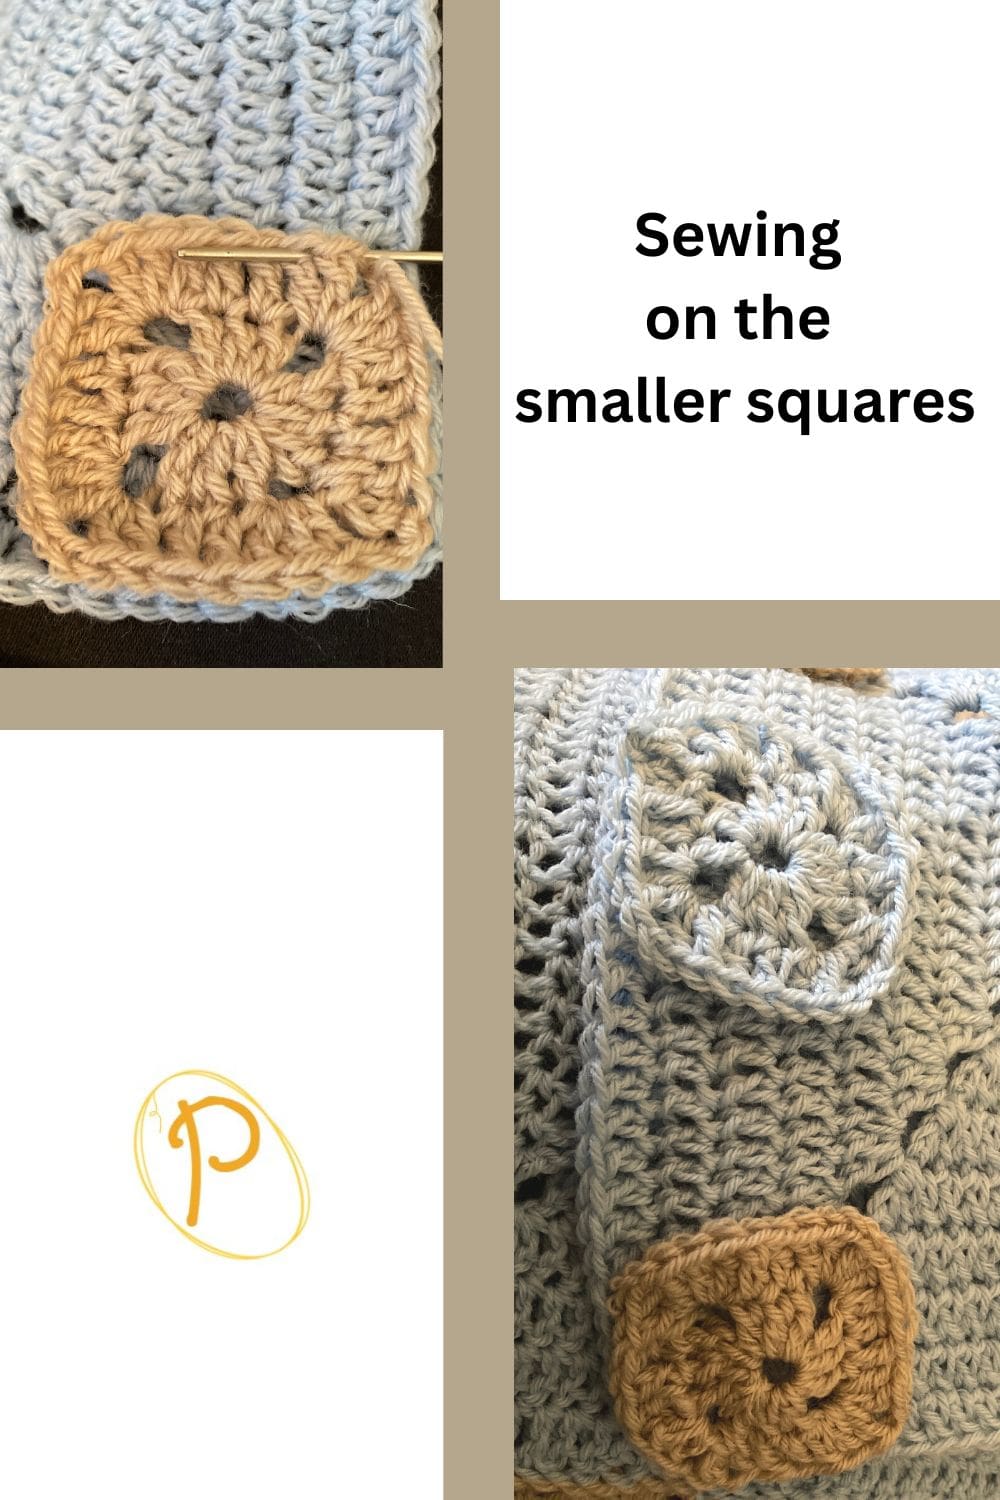
I arranged a crouton color on each end and the lighthouse color in the middle. (I ran out of the crouton color).
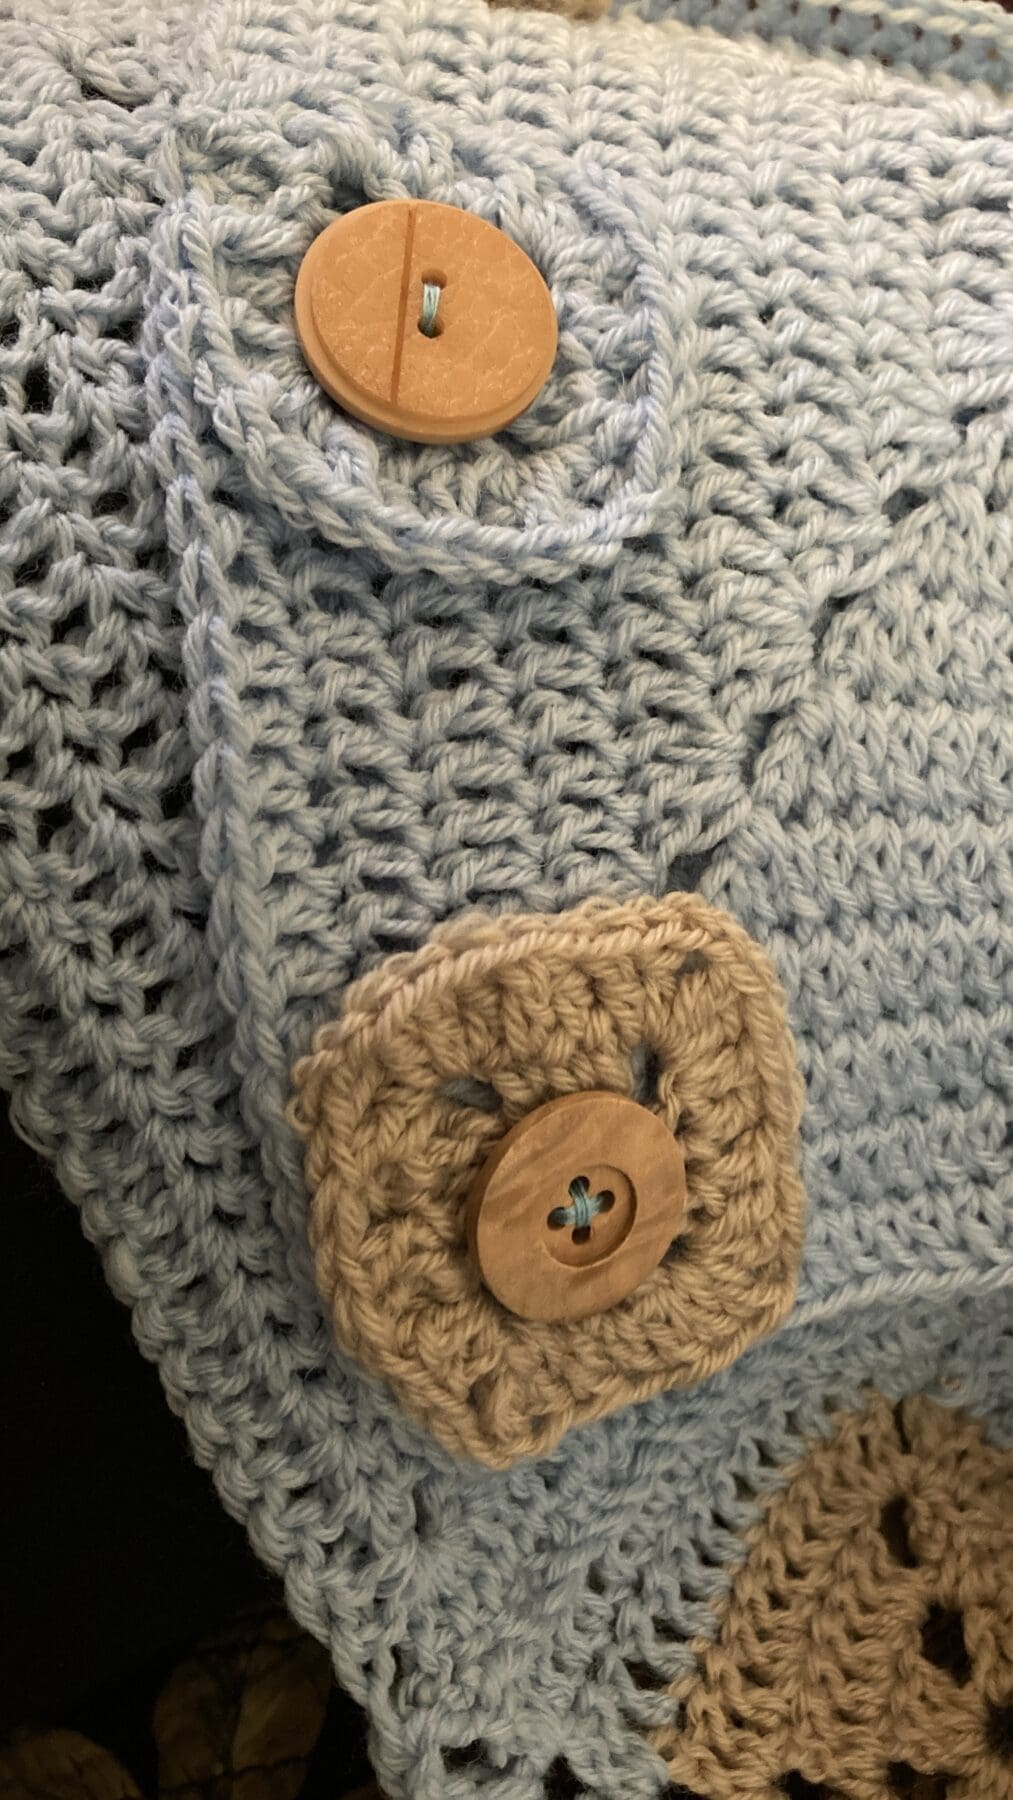
Once the yarn squares are securely attached, it is time to sew on the buttons. I used light blue thread with three wooden buttons. (If you look closely, two of the buttons are the same, one is not. I used what I had on hand).
It is time for the final step.
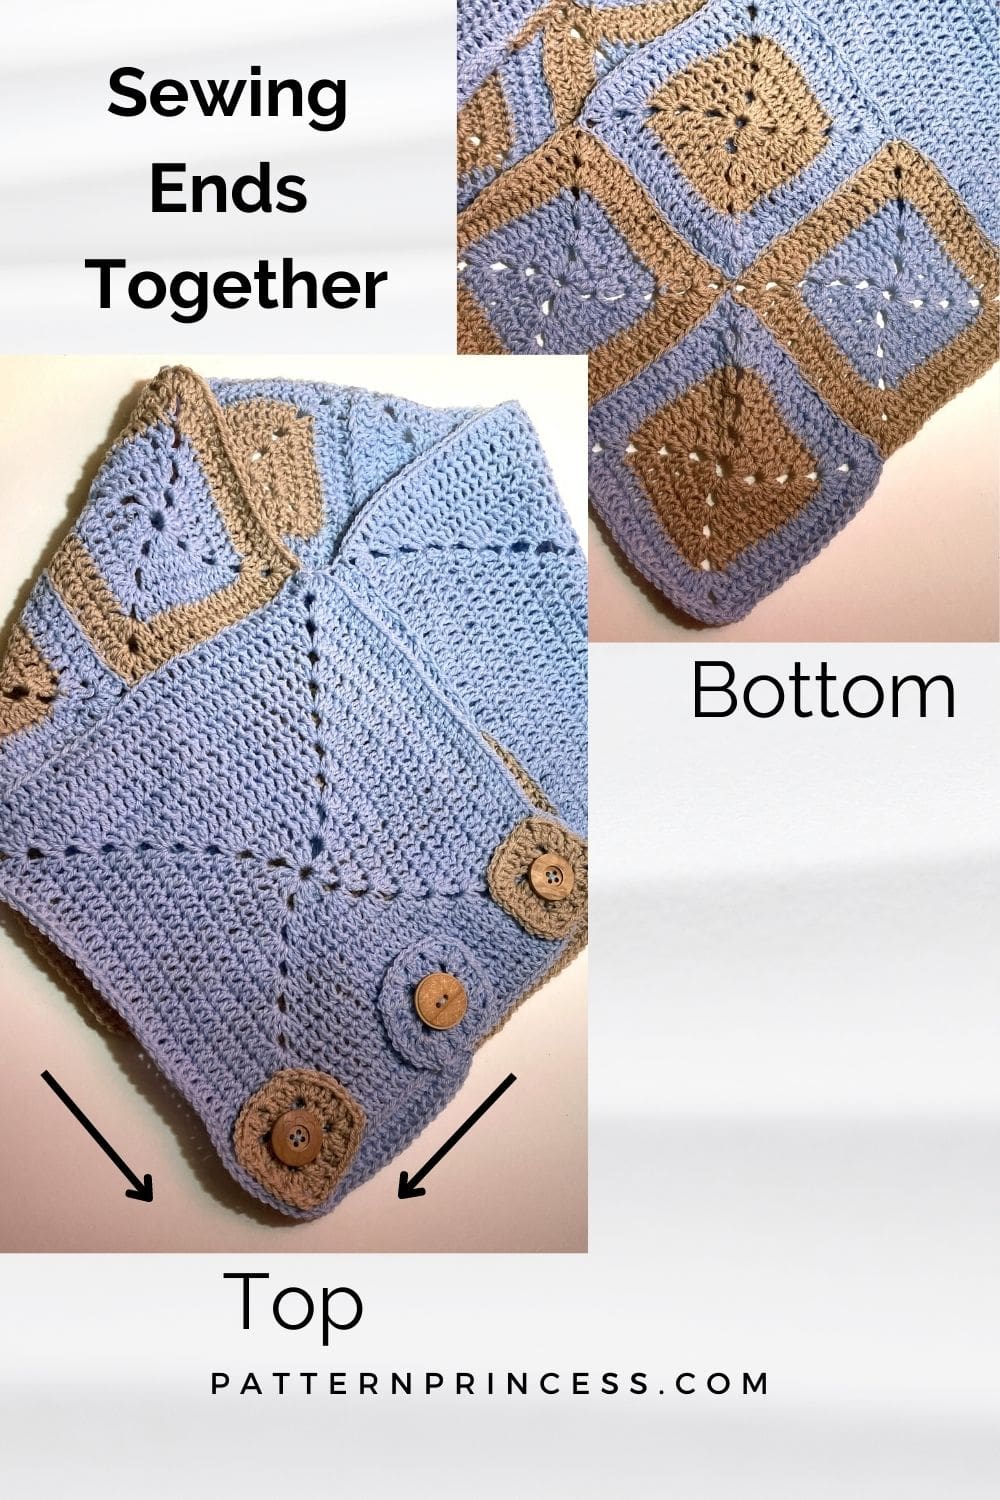
Arrange the end of the scarf that you just sewed the buttons on over the top of the other end of the scarf; making sure not to twist the scarf. The right sides should be facing up on both ends of the scarf.
Using the lighthouse color yarn, sew the top square onto the bottom square on the bottom two sides.
See the photo to help with how to arrange the scarf and where to sew together to turn this into a neck warmer.
This Copper Harbor Neck Warmer is ready to wear!
Just slip over your head and style. That’s it!

You can find Victoria crocheting, quilting, and creating recipes. She has cooked in restaurants for over 20 years, including many larger parties. She learned to crochet when she was just 11 years old and has been crocheting ever since; over 50 years now. Over 40 years ago, she loved her first class in sewing and continues to hone her skills in quilting. Many have enjoyed the handmade gifts over the years. In her professional career, she has worked in management in a wide variety of businesses including higher education as a dean of a division. All the while attending college part-time to achieve her doctorate in higher education with an emphasis in e-learning.
Hi. I want to print this patters as well as a couple of patterns that came with the email containing this pattern. I can’t figure out how to do this. Can you help?
Hello,
All the patterns are free on the website. However, if you want to print ad free versions, you can find them in our Etsy Shop. https://patternprincessetsy.etsy.com
Thanks and take care.
Vicky