Last updated on July 5th, 2024 at 12:08 am
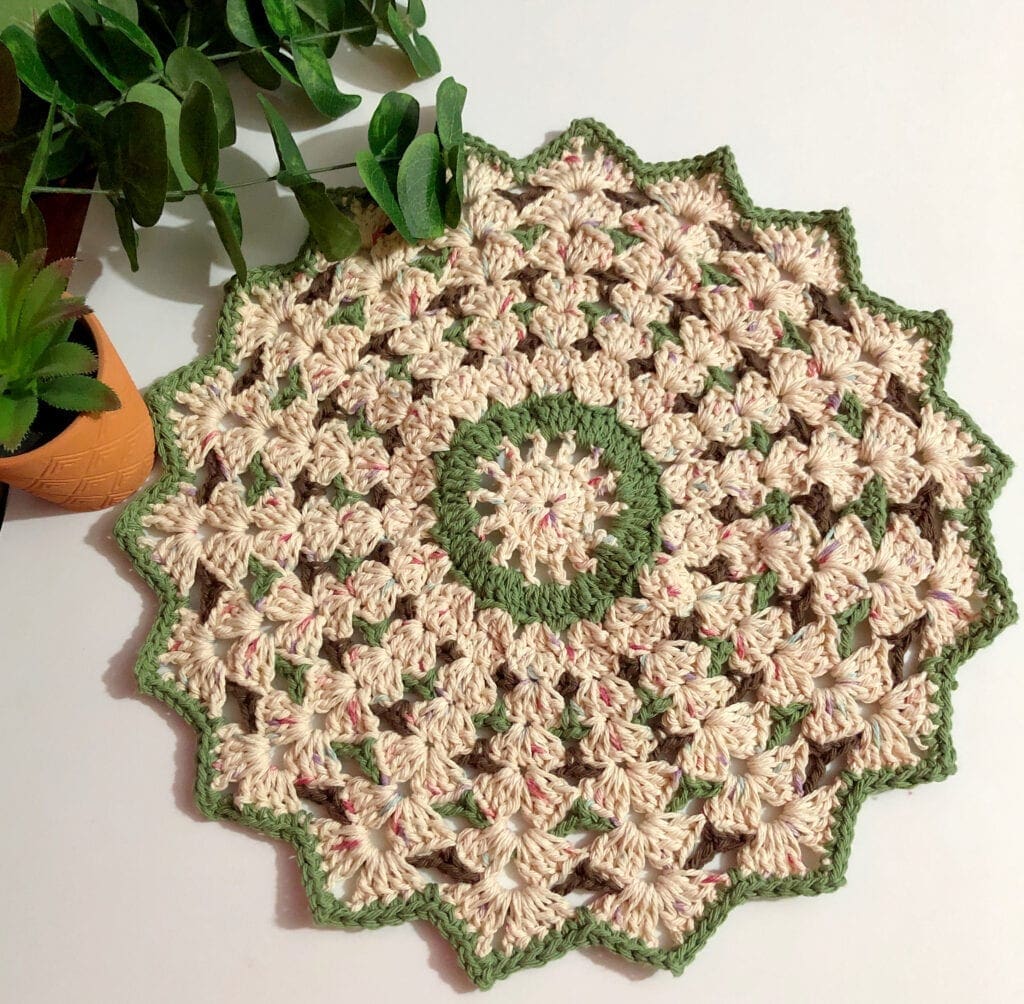
This Crochet Shell Stitch Round Doily is an easy way to create handmade items for your home décor. In an afternoon, make a lovely accent piece that is unique to your color scheme.
When it comes to crochet, there are so many different stitches to choose from. But for a classic look, the shell stitch is always a favorite. In this tutorial, you’ll learn how to make a round doily using the shell stitch. This is a great way to make handmade gifts too.
It’s sure to add some elegance to your home décor.
Post contains affiliate links and we earn commissions if you shop through the links on this page. For more information please read the disclaimer on the About Us page.
Crochet Round Doily Pattern
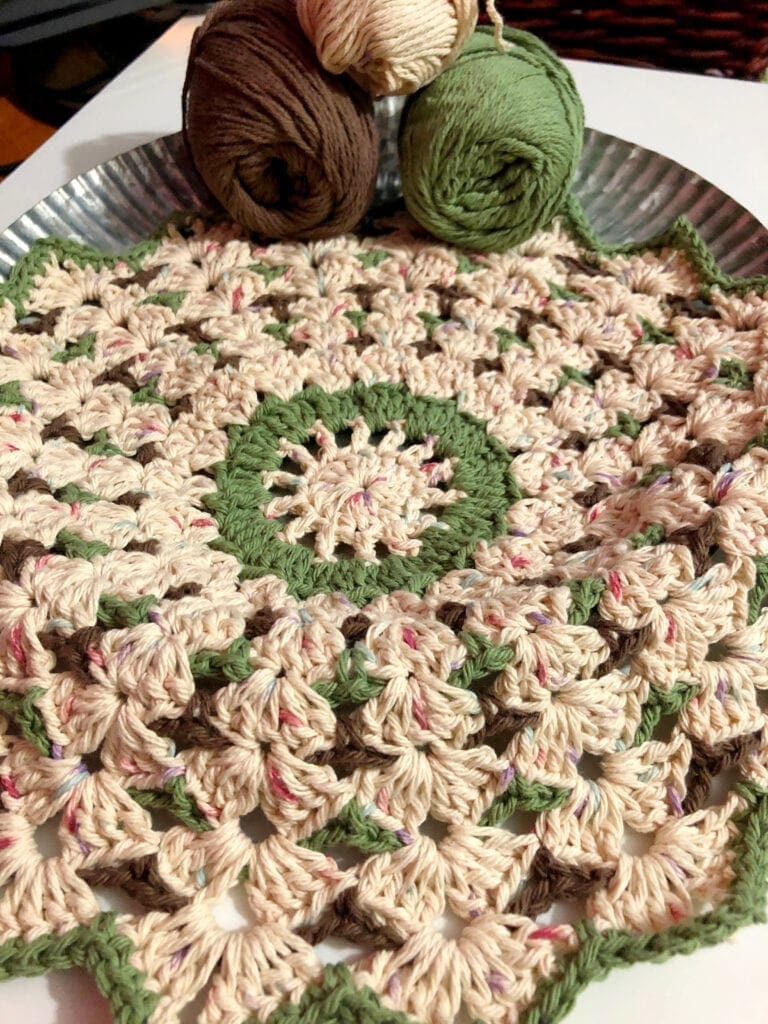
Embellish your tables and furniture with this lovely mat. Creating this charming design requires only basic crochet stitches. I’ve crafted it with a contrasting color of green and brown for both the center and the edges. However, using a variegated yarn for crocheting would also produce an appealing look.
Home Decoration with Handmade Crochet Doilies
This round doily was made for my sister. Using less than three small skeins of cotton yarn and in just an afternoon of time; make a lovely doily. The colors in her home are the colors in the doily.
My sister is one of those people that can take a bit of this and that, and within minutes, have her home decorated just beautiful with it. I have to really think and struggle to do my home decorating.
Sometimes, I have my daughter or sister come over and help me. However, when it comes to other creative handiwork – that is an area that I can do well. I can’t wait to see how my sister displays this pretty center piece.
Yarn Colors Used in Pattern
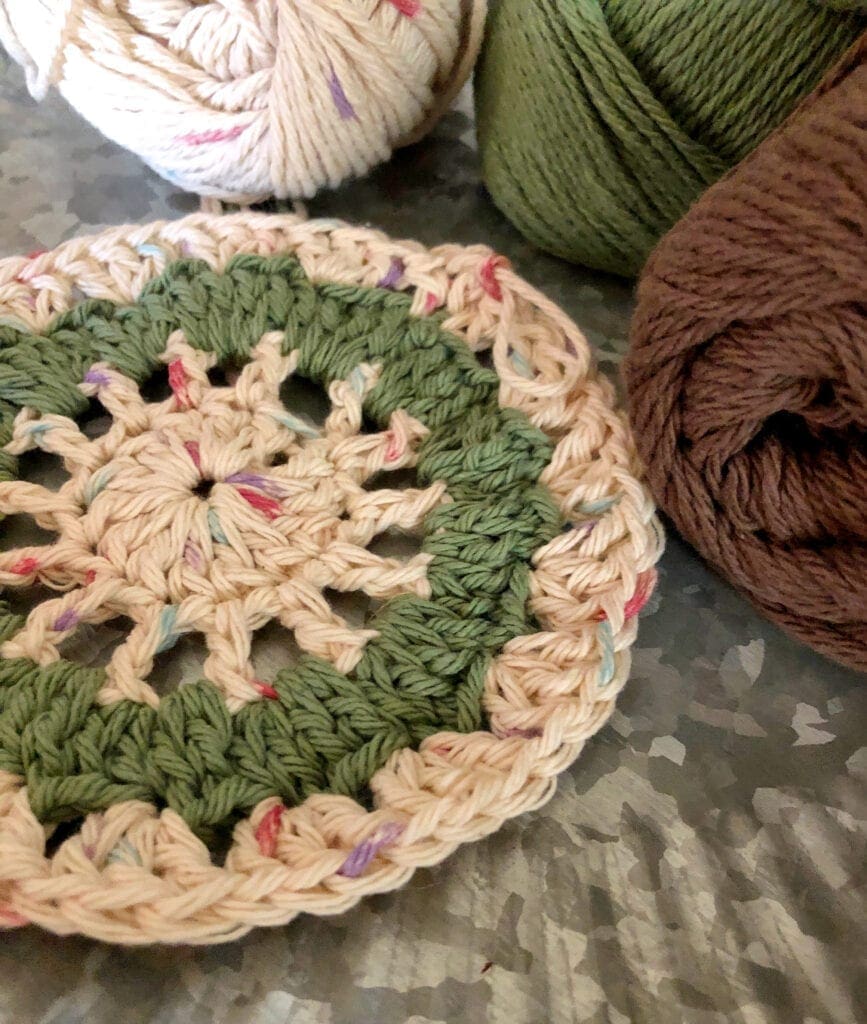
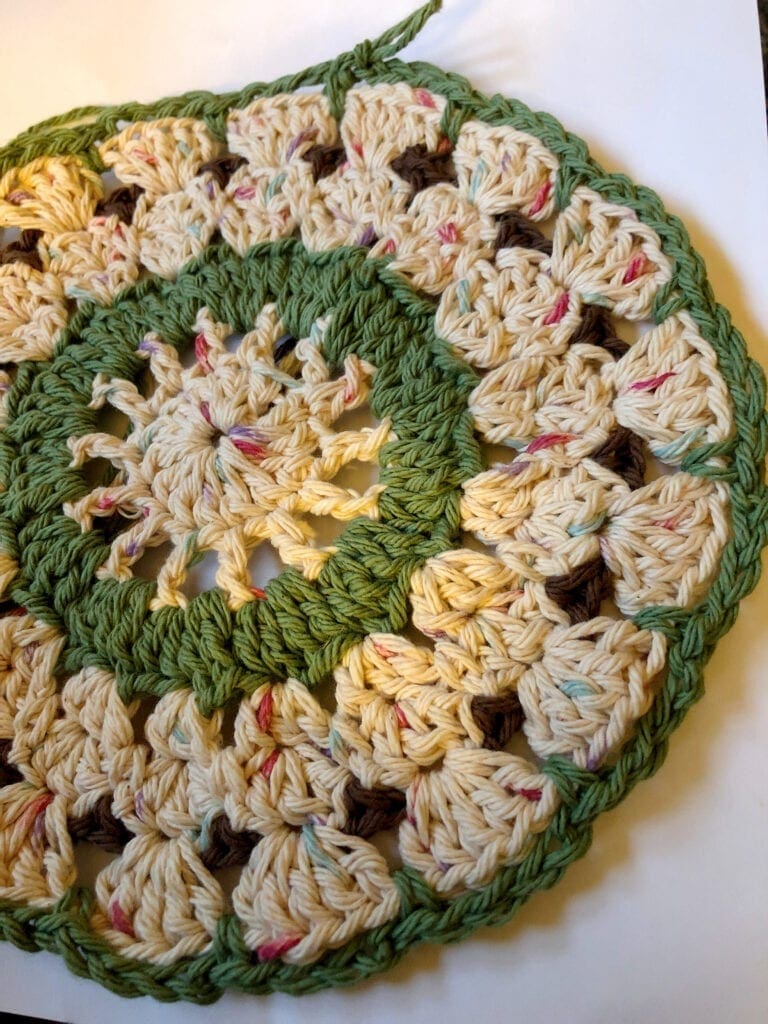
Today, I used a variegated lighter colored yarn with the green and brown yarns as an accent color. These earth tone yarns compliment each other well. I was debating how to complete the doily – with or without an accent color.
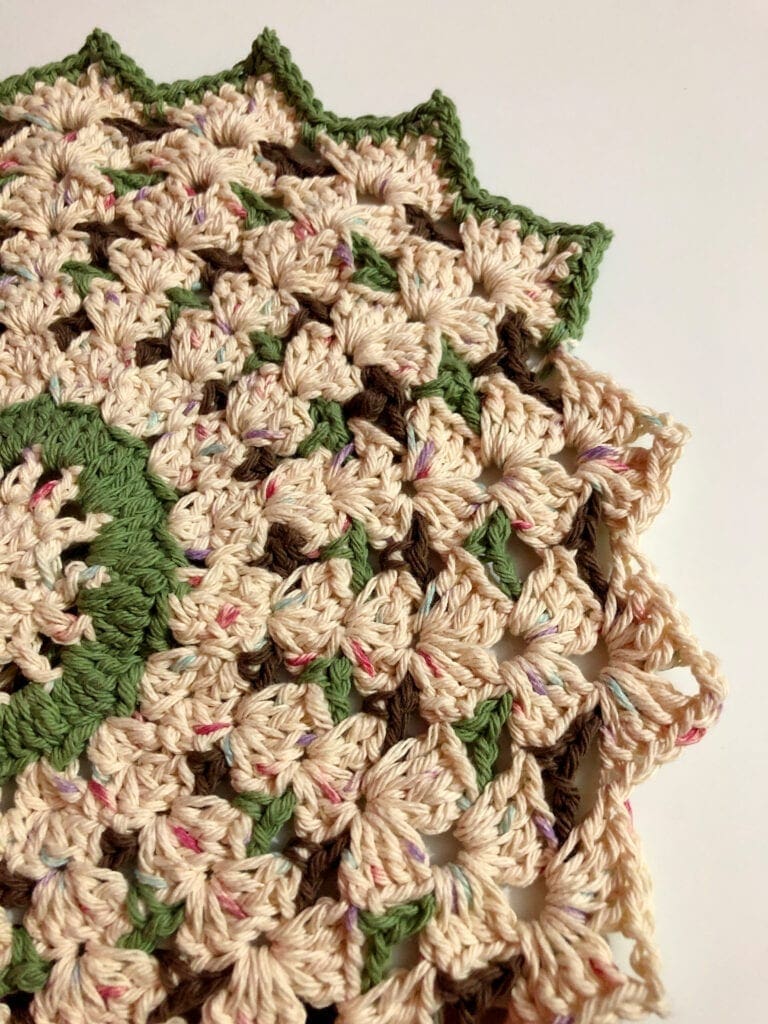
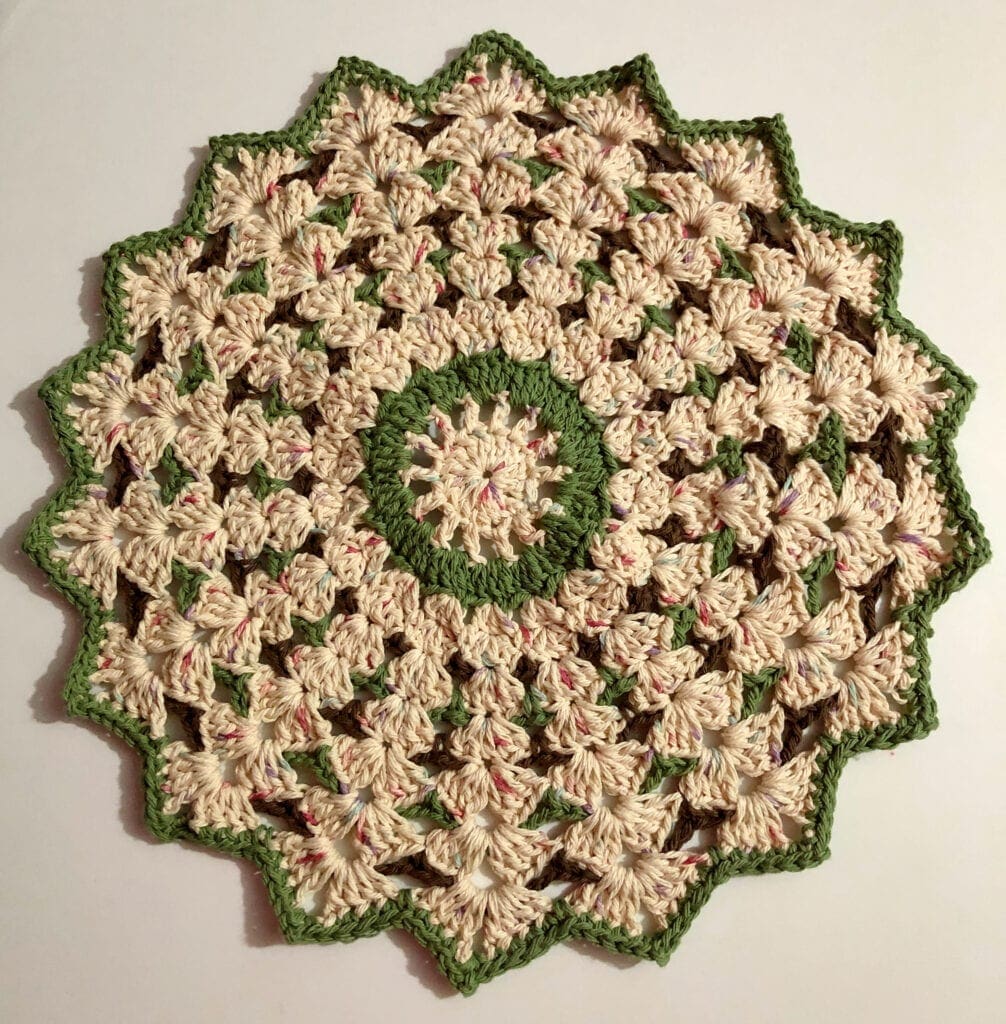
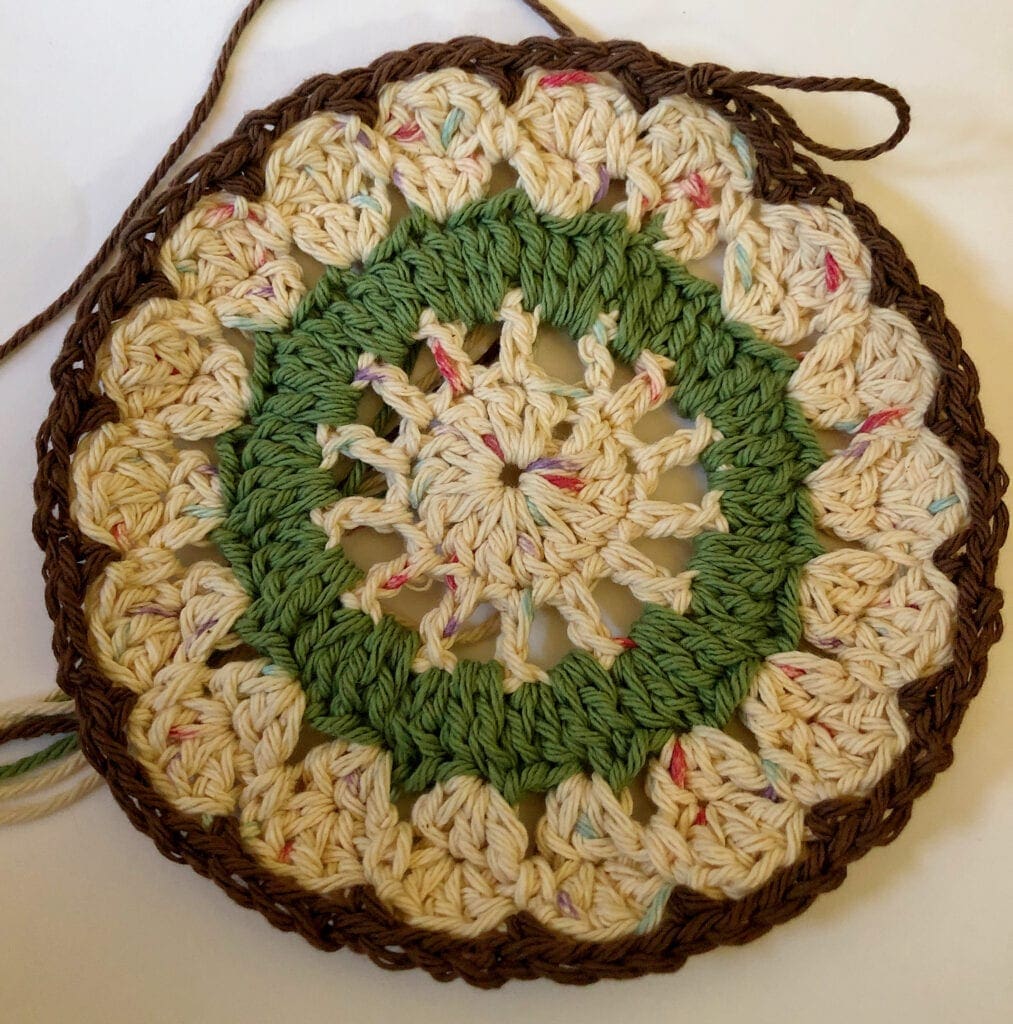
The photo below shows the doily with and without the last green row completed. My husband and I decided that the green edge seemed to complete the project as it gave the pattern a bit of symmetry as the green was used as one of the solid color rows early on. A perfect finish touch that brings the design all together.
However, I am going to make a few more of these using other colors. I really am liking the look of this particular doily pattern. This could be made in a solid color, bright color, even Halloween or Christmas yarn colors.
It really adds beauty around a home decorating color scheme or a certain holiday. Enjoy creating your own beautiful doily by pairing three colors together.
Popular Crochet Doilies
Doilies are a popular crochet projects as they are quick and can be easy designs to make. They have a lot of character.
Directions: Crochet Shell Stitch Round Doily Free Pattern
Skill Level
Advanced Beginner
Gauge
16 double crochet per four inches; however, the gauge is not critical in this crochet pattern.
Size
Approximately 15 inches around from the tip of one point to the opposite one.
Pattern Notes
This doily is worked in the round. The pattern increased incrementally as each round is added to help the doily lay flat.
The pattern is not turned after each round, rather, the circle is completed by doing a slip stitch into a starting stitch.
The double crochet and chain stitches change in the shell stitch area throughout the pattern. This helps keep the rows of the shell stitches straight and allows the stitches in each row to increase as well.
Chain 3 counts as DC.
This pattern is written in US Terms.
Materials
Potpourri Sugar’n Cream cotton yarn, 150 yards. If you are not able to find this yarn locally, you can find it on Amazon.
Dark Taupe Peaches and Creme cotton yarn, approximately 100 yards. If you are not able to find this yarn locally, you can find it on Amazon.
Rosemary Peaches and Creme cotton yarn, approximately 100 yards. If you are not able to find this yarn locally, you can find it on Amazon.
Crochet Hook Size H, 5.0mm hook
Yarn Needle
Scissors
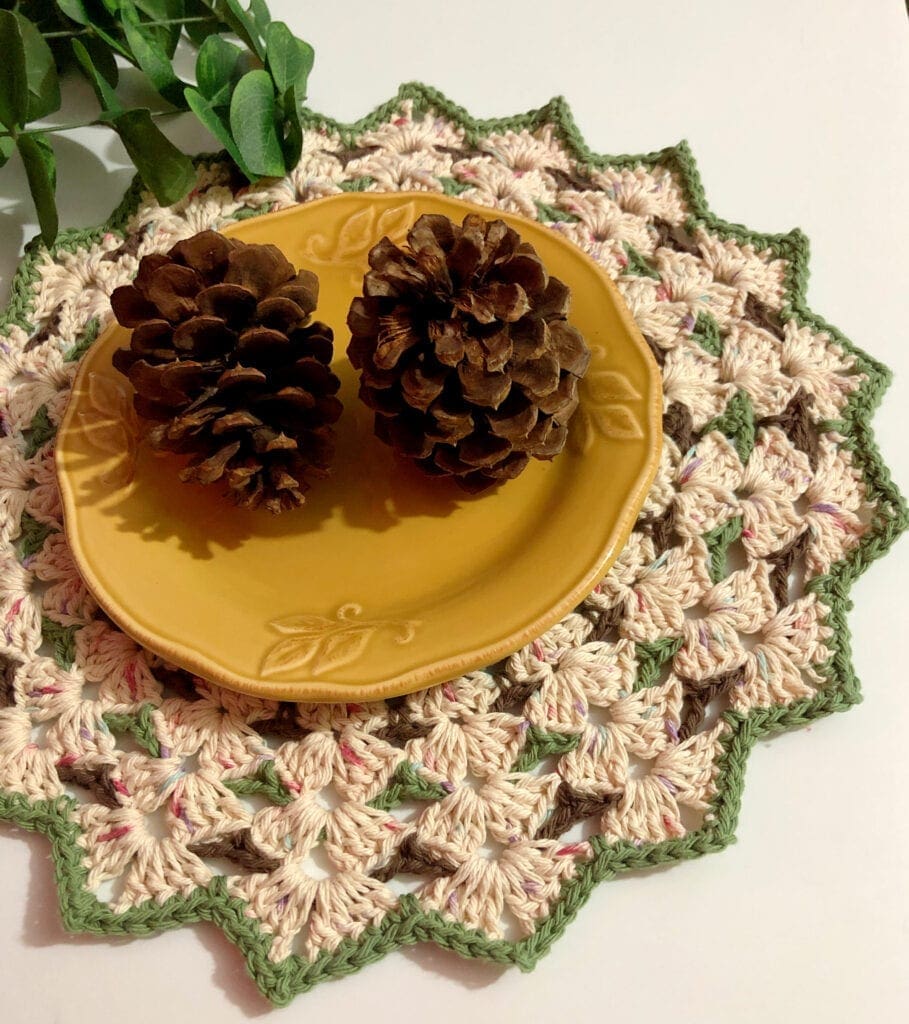
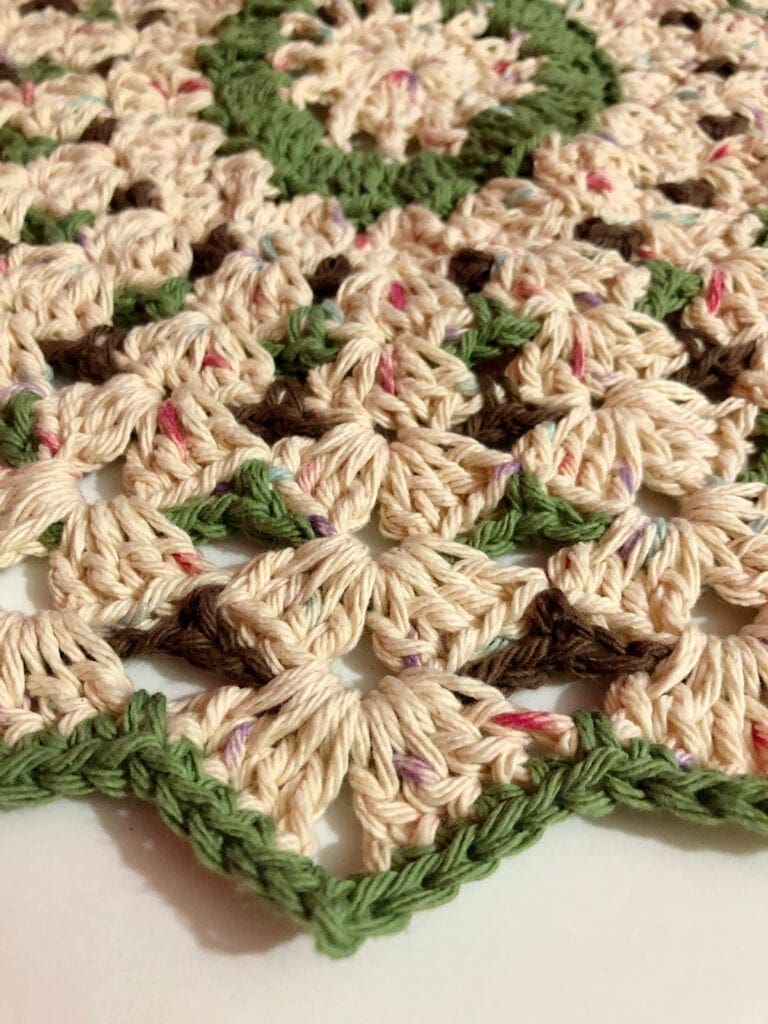
The little pops of color every other row creates simple lines. It is nice when a crochet project is quick and easy with such beautiful results.
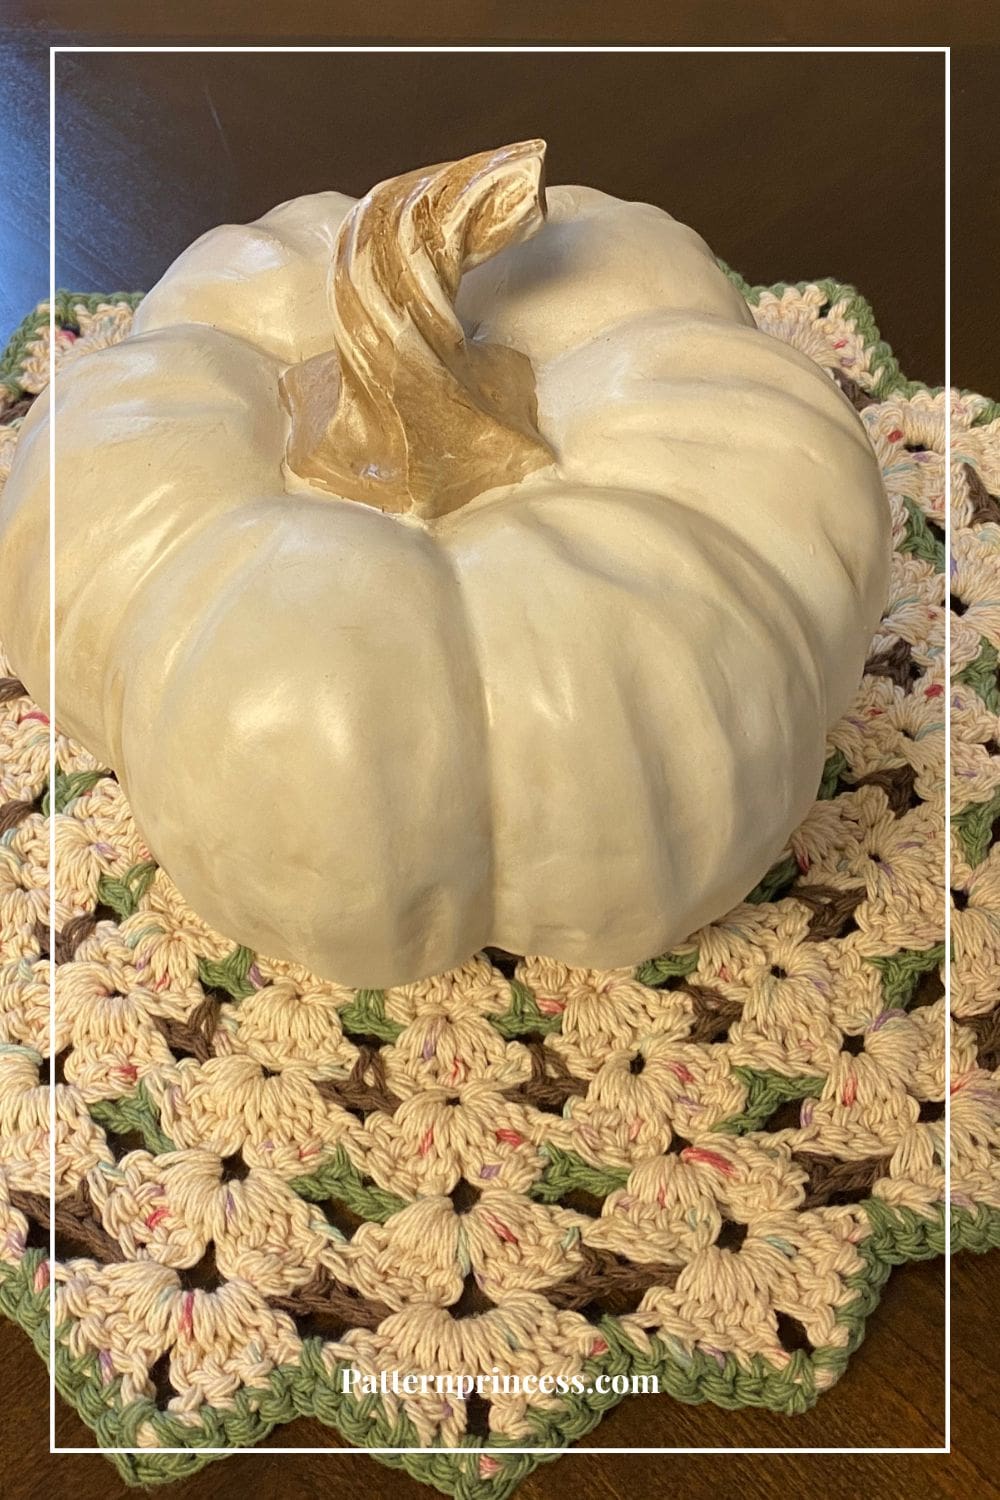
I made this centerpiece for my sister for her birthday.
She was so happy to receive it. Here is a photo that she sent me with a fall table decoration on it.
It is a relatively easy pattern that looks like it is an intricate design.
What kind of yarn is good for crocheting a doily?
When crocheting a doily, you’ll generally want to use a yarn that is lightweight, has a fine texture, and provides good stitch definition. A thicker yarn would be quite bulky; therefore, these other yarn options are better to use.
Cotton Thread: This is one of the most popular choices for crocheting doilies. It comes in various thicknesses, with size 10 being a common choice for finer doilies. Cotton thread provides a delicate and crisp look to the finished doily.
Lace Weight Yarn: Yarns labeled as “lace weight” are very fine and work well for intricate doily patterns. They often have a silky or shiny finish, which adds an elegant touch to the finished piece.
Bamboo Yarn: Bamboo yarn is smooth, lightweight, and has a gentle sheen. It’s a good option if you’re looking for a yarn with a slight drape and softness.
Silk Yarn: Silk yarn is luxurious and provides a beautiful sheen. It’s great for special, heirloom-quality doilies that you want to showcase.
Mercerized Cotton: Mercerized cotton is treated to enhance its luster, strength, and color retention. It’s a versatile option that combines the benefits of cotton with a slight sheen.
Microfiber Yarn: Microfiber yarn is very soft and has a subtle sheen. It’s a modern alternative that offers a delicate appearance while being easy to care for.
Synthetic Blends: Some blends of synthetic fibers can provide a fine texture and durability. They might not have the same natural look as cotton or silk, but they can still create beautiful doilies.
Abbreviations
CH = Chain Stitch
DC = Double Crochet
SC = Single Crochet
SK = Skip
SL ST = Slip Stitch
SP = Space
ST = Stitch
STs = Stitches
[ ] = Repeat Between
How to crochet a doily step by step
Throughout this pattern, there is a photo tutorial to help with the stitches in each round.
Begin
Begin using the Potpourri yarn.
CH 4, SL ST into first CH to form circle.
Round 1
CH 3 (counts as DC), work 12 Dc in ring, SL ST into the top of beginning CH 3 ST. (13 DC + 1 CH 3)
Round 2
SL ST into first ST, CH 4 (counts as DC , CH 1), [in next ST work DC, CH 1]. Repeat around. Join with SL ST into 3rd CH of the beginning CH 4. (14 DC = 14 CH SP)
Round 3
Change Color with a SL ST – Rosemary
CH 3, 2 DC in each DC and CH ST around. End with a DC by the first CH 3, End with a SL ST into the top of the beginning CH 3 ST. (55 DC + 1 CH 3)
Round 4
Change Color with a SL ST – Porpourri
CH 3, DC in the same ST [SK 2 DC, 3 DC in the next ST]. Repeat around between [ ], end with SK the last 2 DC, DC in the first ST SP, SL ST into the top of the beginning Ch 3 ST. (By having a DC on either side of the initial CH 3, it hides the starting spot). (18 clusters of 3 DC).
Round 5
You should be in the middle of the previous row 3 DC SP. In that middle DC ST, complete CH 3, 2 DC, SK 1 DC, SC in the SP between the previous round sets of 3 DC groups. [SK 1 DC, 3 DC in next ST, SK 1 DC, SC in SP between the previous round sets of 3 DC groups]. Repeat around between [ ]. (18 clusters of 3 DC)
Round 6
Still using the Potpourri, SL ST over to the SC SP. Then change color to the Dark Taupe with a SL ST.
Complete SC in the Same SP, [CH 3, SK 3 DC, SC in the SC SP]. Repeat around between [ ]. Join with a SL ST to the first SC.
Round 7
Still using the Dark Taupe, SL ST into the next 2 Chains. (you should be in the middle just over the middle DC ST of the row below). Then change color to the Porpourri with a SL ST.
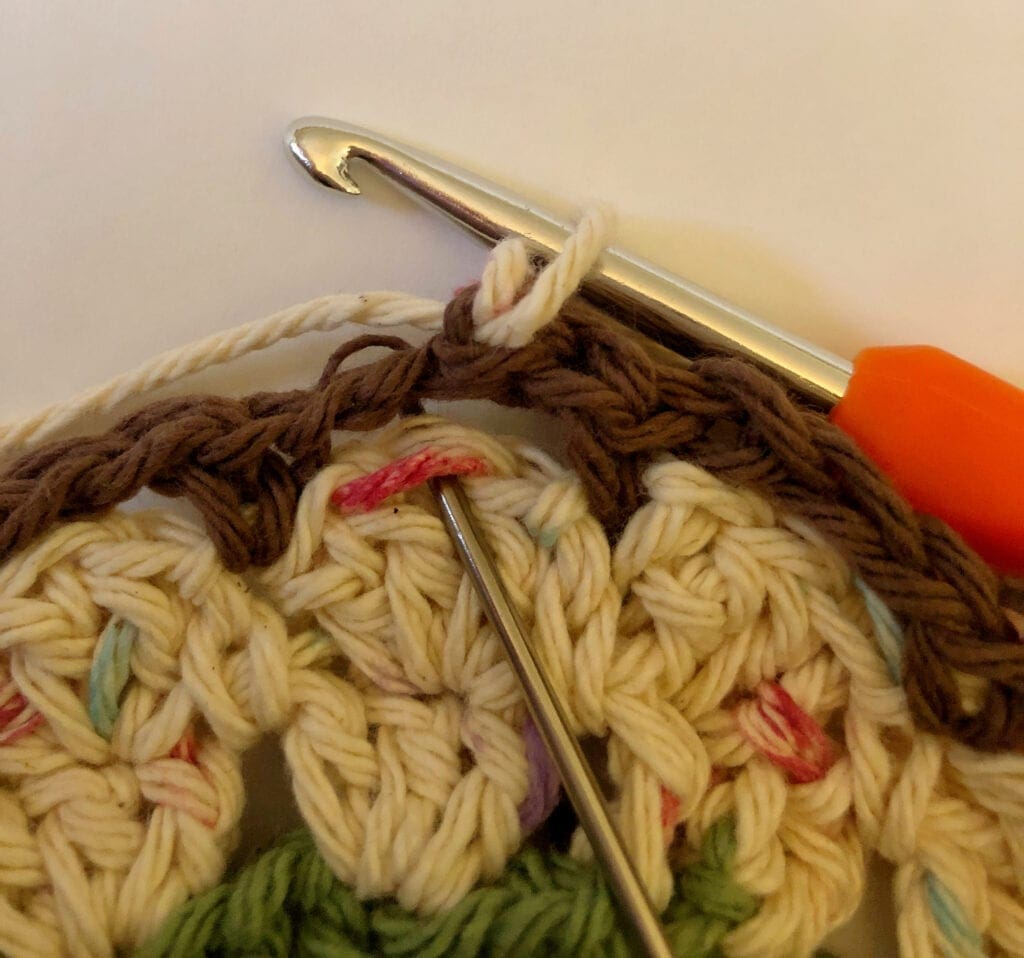
In the middle DC of the 3 DC cluster from round 5, complete 5 DC. Making sure to capture the CH STs of round 6. [SK DC, SC, DC work 5 DC in center DC]. Repeat between [ ] around. Join with a SL ST into the top ST of the first DC. (18 5-DC Clusters)
The photo below has a yarn needle pointing to the place where you would complete the first DC ST.
Round 8
Still using the Portpourri, SL ST over to the SC SP. Then change yarn to the Rosemary yarn with a SL ST.
In the SC SP, complete a SC, [CH 4, SK 5 DC, SC in the next SC]. Repeat around between the [ ]. End with a SL ST into the first SC.
Round 9
Still using the Rosemary yarn, SL ST over 2 CH SP. (you should be in the middle just over the middle DC ST of the 5 DC row below). Change the yarn to Potpourri yarn with a SL ST.
In the middle DC of the 5 DC cluster from round 7, complete 5 DC. Making sure to capture the CH STs of round 8. [SK 2 DC, SC, 2 DC work 5 DC in center DC]. Repeat between [ ] around. Join with a SL ST into the top ST of the first DC. (18 5-DC Clusters)
Round 10
Still using the Portpourri, SL ST over to the SC SP. Then change yarn to the Dark Taupe yarn with a SL ST.
In the SC SP, complete a SC, [CH 5, SK 5 DC, SC in the next SC]. Repeat around between the [ ]. End with a SL ST into the first SC.
Round 11
Still using the Dark Taupe, SL ST over 2 CH SP (you should be in the middle just over the middle DC ST of the 5 DC row below). Then change yarn to the Potpourri with a SL St.
In the middle of the 5 DC cluster from round 9, complete 4 DC, CH 2, 4 DC. Making sure to capture the CH STs of round 10. [SK 2 Dc, SC, 2 DC work 4 DC, CH 2, 4 DC in the center DC]. Repeat between [ ] around. Join with a SL ST into the top ST of the first DC. (18 Shells of 4 DC, CH 2, 4 DC)
Round 12
Change to the Rosemary yarn. SC in the same ST, CH 7. [SK 4 DC, CH 2, 4 DC, SC between the DCs of the Shells]. Join with a SL ST to the first SC.
Round 13
Still using the Rosemary yarn, SL ST in 3 Ch STs until you are over the CH 2 SP from round 11 below. Then change the yarn to Potpourri with a SL ST.
In the CH 2 SP, work 4 DC, CH 2, 4 DC, SK 8 DC,[in the next CH 2 SP, work 4 DC, CH 2, 4 DC, SK 8 DC]. Repeat between [ ] around. Join with a SL ST to the top of the first DC. (18 shells)
Round 14
Join Dark Taupe with a SL ST. SC in the same ST. [CH 7, SK 4 DC, CH 2, 4 DC. SC between the DCs of the shells]. Join with a SL ST to the first SC.
Round 15
Still using the Dark Taupe, SL ST over 3 CH STs until you are over the middle of the CH 2 SP of round 13. Then join the Potpourri yarn with a SL ST.
[In the CH 2 SP, work 4 DC, CH 3, 4 DC. SK 8 DC]. Repeat between the [ ] around. Join with a SL ST to the top of the first DC.
Note: you could consider this complete at the end of Round 15. However, I think that the entire look is pulled together with the Rosemary yarn in the next row.
Round 16
Join the Rosemary yarn, SC in the same space, [SC in the next 3 DC, in the CH 3 SP (SC, CH 2, SC). SC in the next 4 DC, SC in the SP between the shells]. Join with a SL ST into the first SC. (you should have a SC in each DC ST, with a SC, CH 2, SC in each CH 3 SP).
Finishing
Weave in all yarn ends and remove excess.
We have other free crochet doily patterns you may enjoy making. They too have a simple design using basic stitches. The granny stitch a beloved look and it is perfect for vintage designs. However, when paired with the right color and design, it can become modern again.
Make one today for your own living room or to give to someone special. Doilies are a great project for a quick make with beautiful results.
Christmas Rectangle Doily Free Crochet Pattern
Beginner Granny Square Doily Free Pattern
Here is another pattern using thread yarn.
Gothic Crochet Doily Table Topper
I hope that you liked this pattern. If you are looking for more ideas for crocheted projects, here are a few others you may enjoy.

You can find Victoria crocheting, quilting, and creating recipes. She has cooked in restaurants for over 20 years, including many larger parties. She learned to crochet when she was just 11 years old and has been crocheting ever since; over 50 years now. Over 40 years ago, she loved her first class in sewing and continues to hone her skills in quilting. Many have enjoyed the handmade gifts over the years. In her professional career, she has worked in management in a wide variety of businesses including higher education as a dean of a division. All the while attending college part-time to achieve her doctorate in higher education with an emphasis in e-learning.
i don’t understand round 12. the pic looks like you only chained one between each 4 in row 11. and why is it a chain 7 at the beginning? row 12 is smaller than 11 so my work is warping. help?
Hi,
This does work out. A few people have made this and their results were gorgeous. I hope you keep at it and finish yours too. Maybe double check where you are placing the single crochet stitch. That might be the issue. You can always email me too v@patternprincess.com. I’ll do what I can to help.
Vicky
I made it for Christmas so I used white, free and red. It turned out great! I wanted to show you a picture of it but can’t figure out how. Sorry.
Hi,
That sounds lovely. You can post it on social media and tag me @patternprincess1 or email me a photo. I would love to see it. v@patternprincess.com
Vicky
Pingback: 20 Free Crochet Doily Patterns - DIYCraftsGuru
Pingback: Beautiful Woven Crochet Blankets - Pattern Center
Hi,y name is Priyanka.. I love work.. would it b ok with u if I do a video tutorial on this doily… I will b giving u full credit and giving all the information to your blog, website pattern. . I am a youtuber and have channel dedicated to crochet… I love this art and want the world to knw how amazing it is n spread love n creativity ❤️ I wud appreciate if I cud get ur permission fr the videos tut on my channel ❤️
Plz visit my channel
I have sent you and email.
Vicky
Pingback: Beautiful Doilies for Autumn with Free Crochet Patterns
Pingback: Quick and Easy Crochet Applique Patterns - Pattern Center
Pingback: Sweet Easy Crochet Lace Doilies - Pattern Center