Last updated on October 18th, 2024 at 03:39 pm
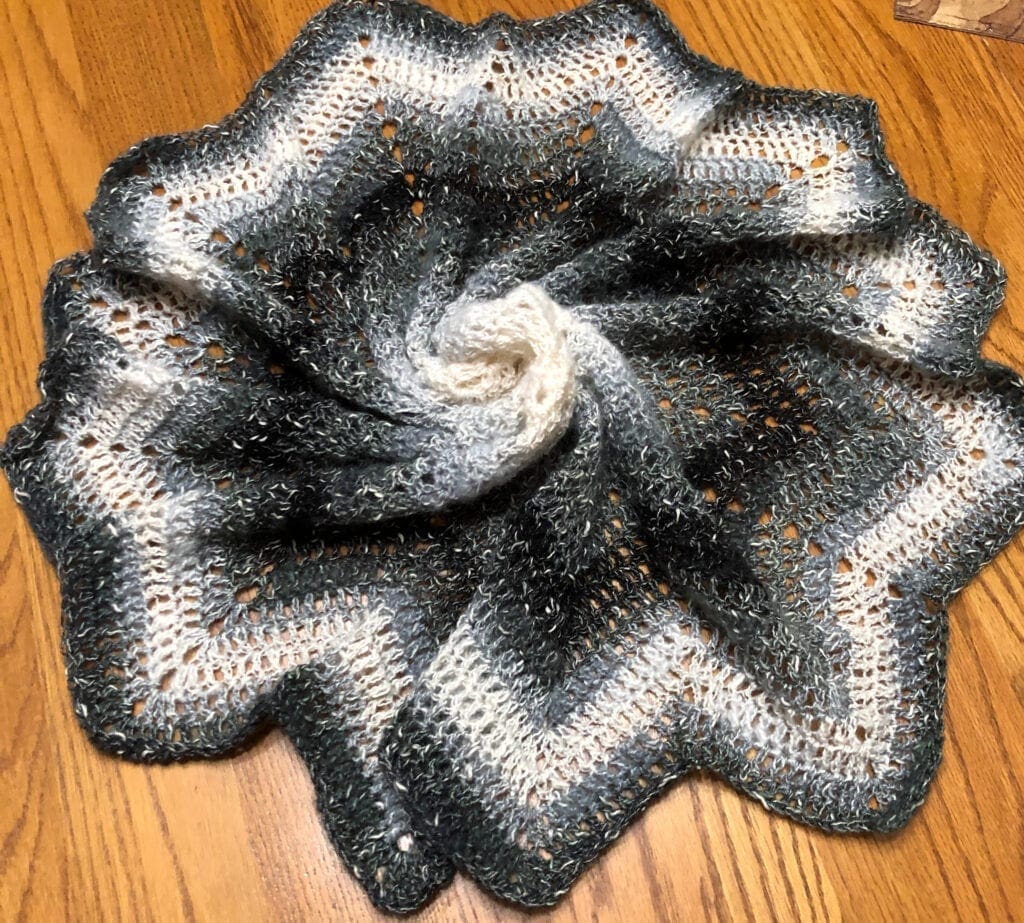
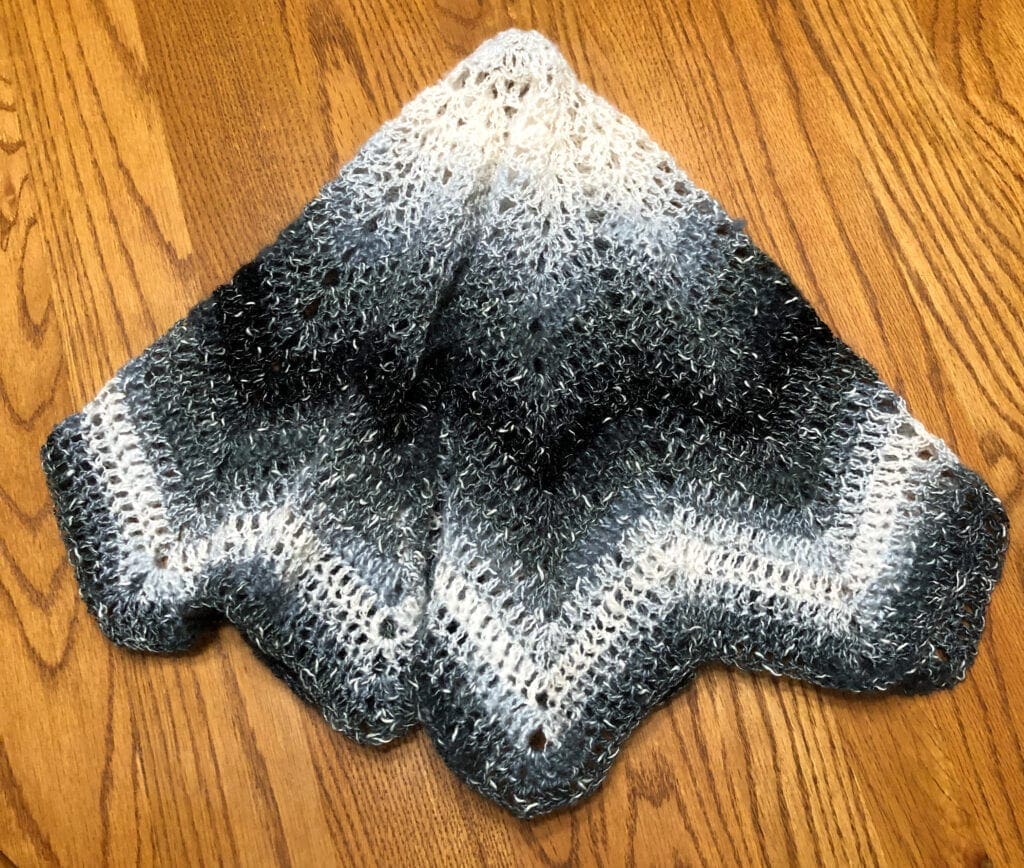
This Gothic 12-Point Star crochet center piece is made with one skein of yarn. The crochet pattern is worked in the round with the size increasing as you continue to work through the project.
Are you looking for a project that is a little bit dark and dramatic?
Consider Gothic crochet. This center piece is the perfect way to add some spooky style to your fall décor. Best of all, it is easy to crochet, so even advanced beginner crocheters can create this masterpiece. So get ready to add a touch of the macabre to your home with this gothic crochet center piece.
Autumn Harvest Blog Hop
This virtual event features an impressive collection of 31 unique and free crochet patterns, all designed with the rich and warm colors of autumn in mind. Make sure to stop by Stardust Gold Crochet for the Hop
One Skein of Yarn for Tablecloth
With this tablecloth being made of just one skein of yarn that is normally used to crochet a shawl. Using one skein of yarn is economical and fun. If you are a person that does not enjoy weaving in your yarn ends from changing color; this pattern is for you.
The yarn that was used in this pattern today has all the color changing done for you. Just enjoy watching the colors emerge as you crochet.
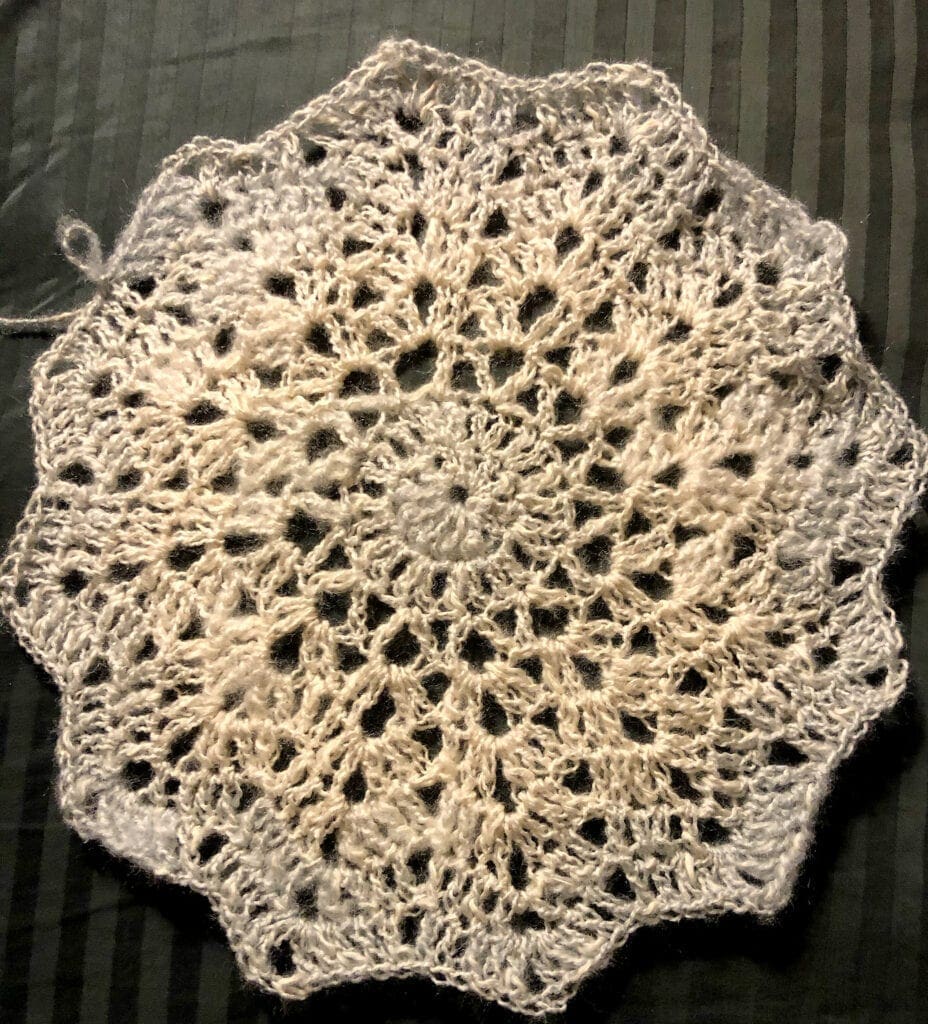
A few months ago, I had purchased quite a bit of this yarn on sale. I have made some lovely shawls with this yarn. If you have not seen those yet, you can find them with this link.
I thought I would see how this yarn would look making something else. Therefore, I used the Fen Shui Grey Shawl in a Ball yarn to make this pretty center piece.
Get the PDF pattern in our Etsy Shop.
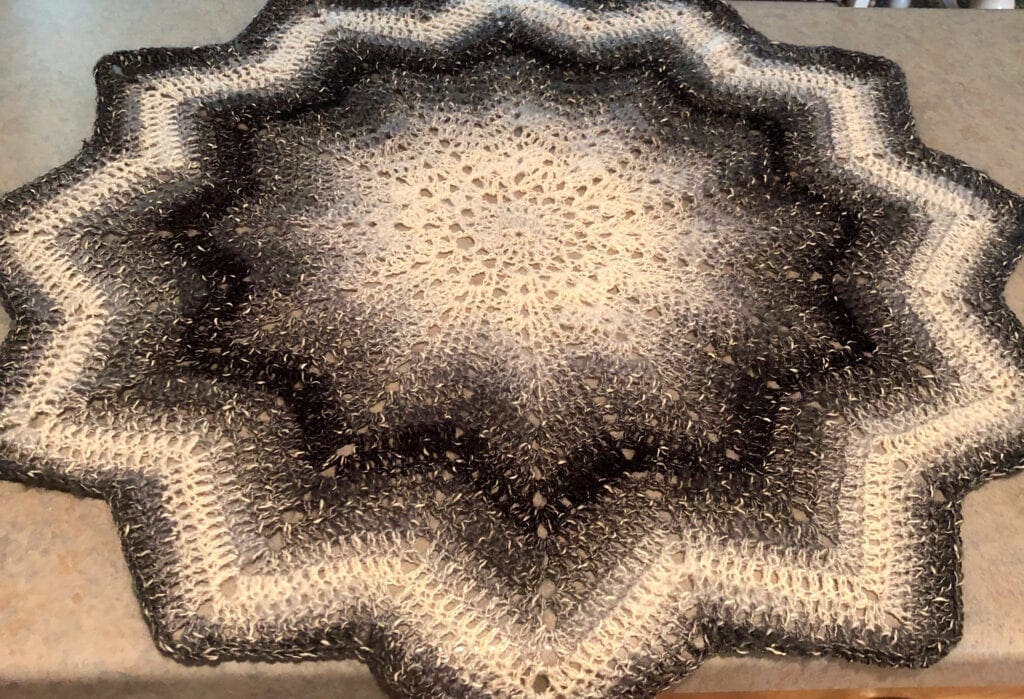
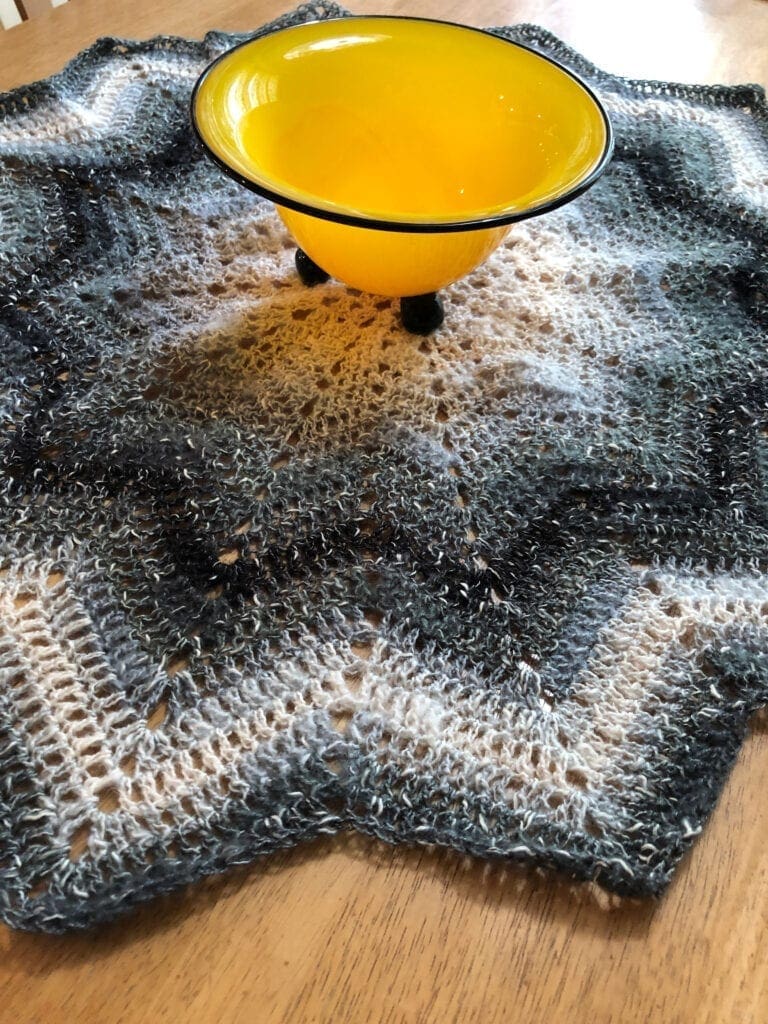
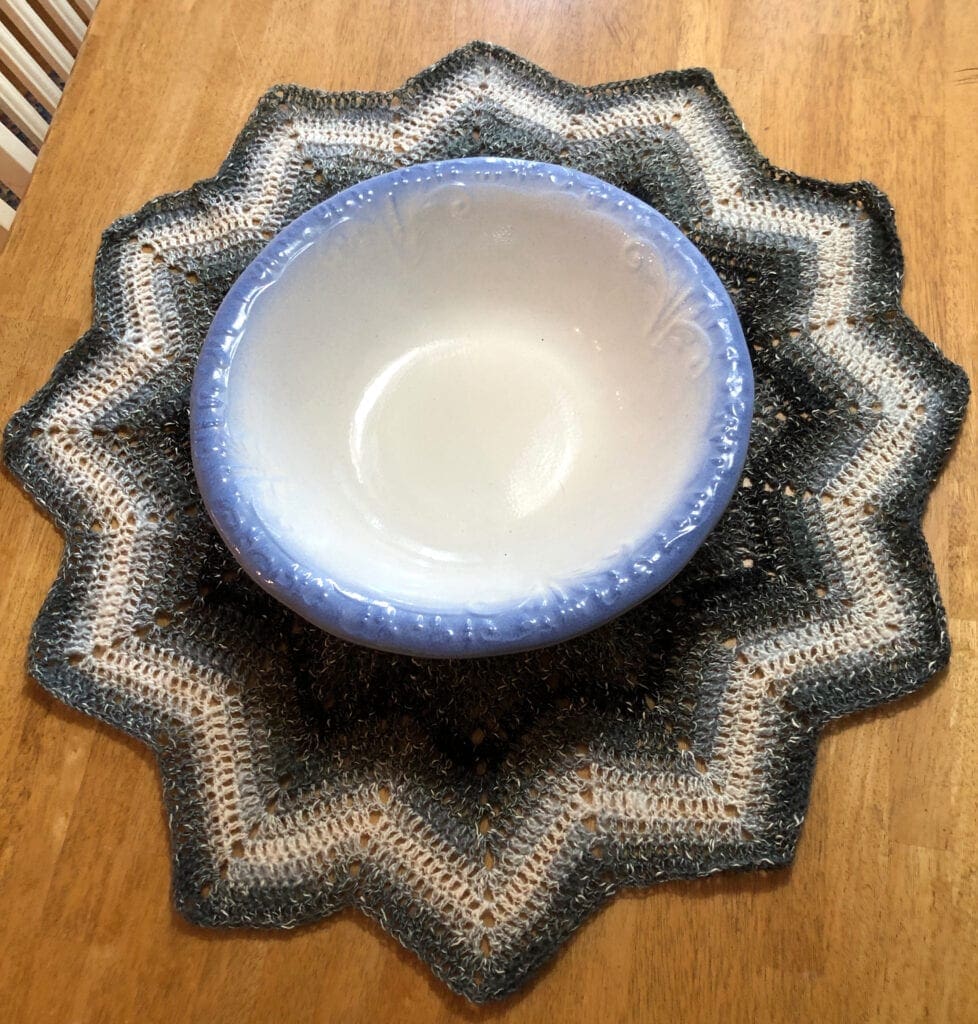
Just perfect for the grey and white home decor colors. If you love to decorate for fall or Halloween, this would be a great addition to your decorating inspiration.
Just take a look at how the tablecloth looks with an innocent looking ceramic cat placed in the center. (I thought even that was a little creepy looking…good for Halloween).

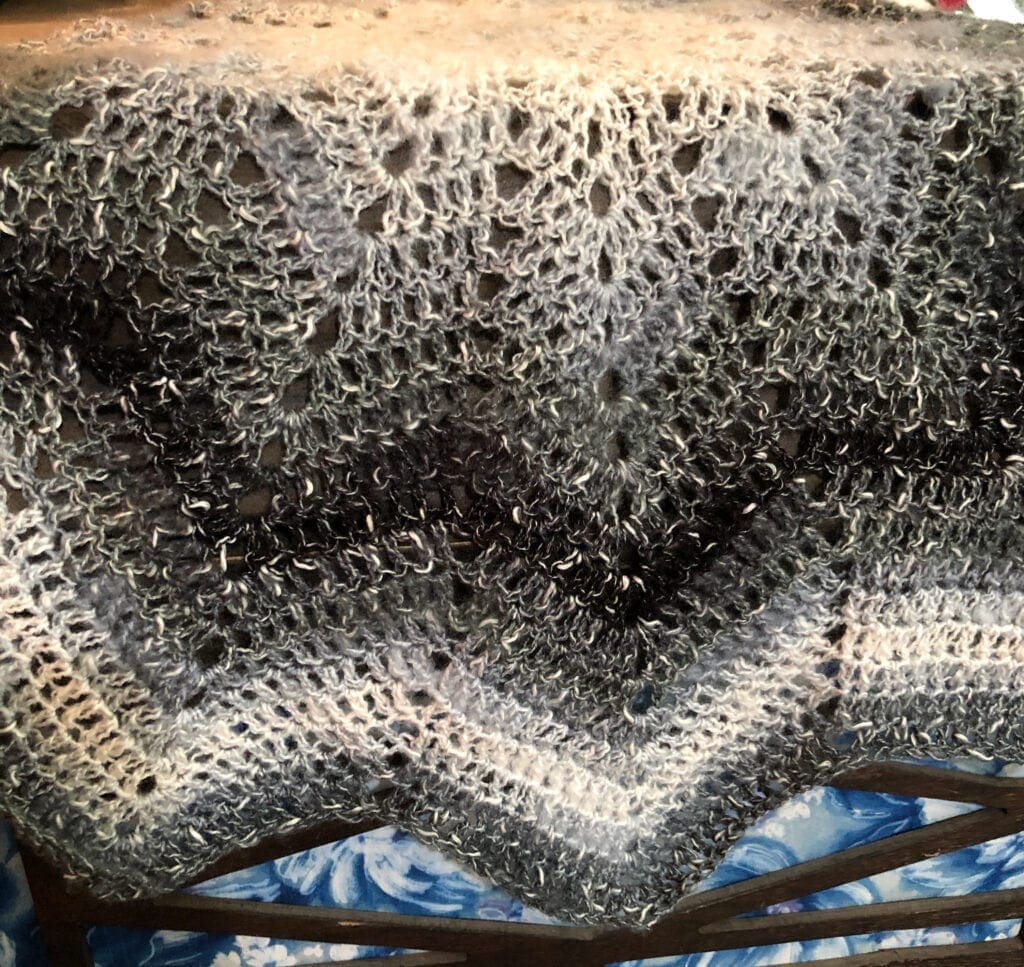
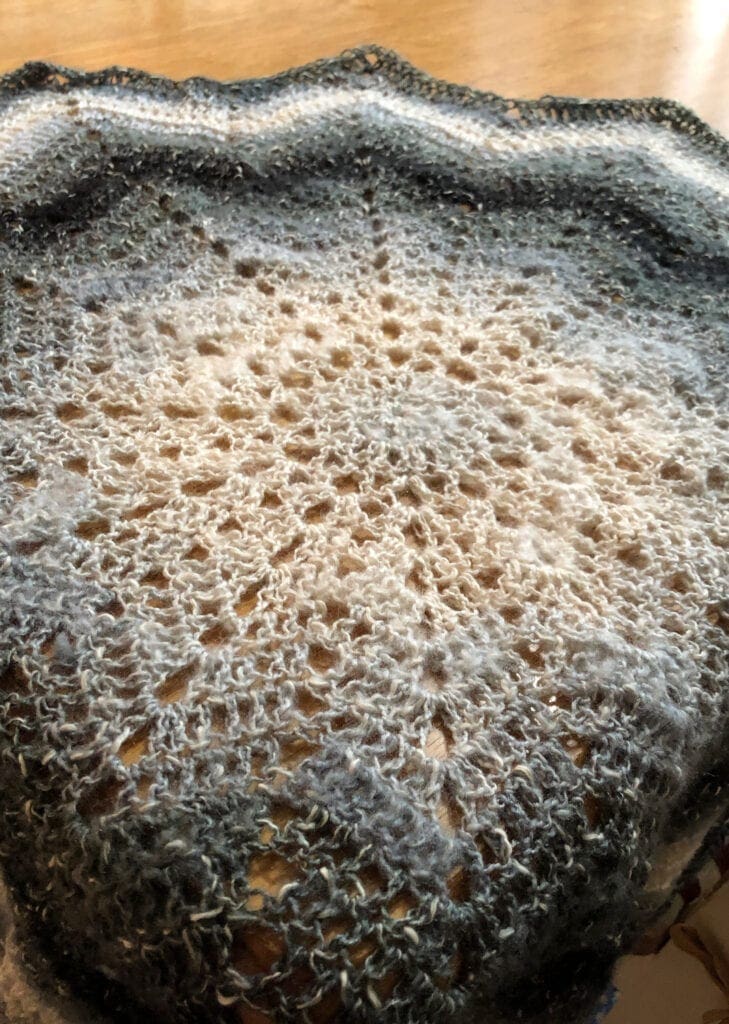
Spider Web Effect
My daughter and I both thought that this crochet pattern paired with this color and type of yarn worked up into a lovely tablecloth that has a spider web effect.
If you look closely in the photo below, you will notice that in some places, the yarn is a little extra fuzzy. To be honest, I almost ripped out what I had done so far. However, as my daughter and I really started to look at the drape and look, we felt I should continue as it was beginning to have that spider web effect. Then we thought about Halloween decorations.
12-Point Star Crochet Project
This particular pattern is a 12-point star that is worked in the round. Increase the size as you work through the pattern.
Working the Star Points
The star is crocheted in a chevron style. When making the points to the star, stitches are added. On the other hand, in making the valleys of the star, stitches are skipped.
It is important to count the stitches between the points to make sure that the pattern aligns properly.
Video on 12-Point Star Stitch
There is a video tutorial of this crochet pattern below the written pattern for this 12-point star blanket for both left hand and right hand crocheters.
Directions: Gothic Crochet Center Piece
Skill Level
Confident Beginner to Intermediate
Gauge
Gauge is not critical for this pattern. 12 Stitches per 4 inches.
Size
32 inches around. Measured from the tip of one peak to the tip of a peak on the other side.
Materials
Fen Shui Grey Lion Brand Shawl in a Ball 481 yards. Just one skein
If you are not able to find the yarn locally, you can get it at Amazon.
Size J Crochet Hook
Size I Crochet Hook for the last round
Yarn Needle
Scissors
Abbreviations
CH = Chain
DC = Double Crochet
SK = Skip
SL ST = Slip Stitch
ST = Stitch
Special Stitches
Small Shell: (DC, CH 2, DC) in same space
Large Shell: (2 DC, CH 2, 2 DC) in same space
Pattern Notes
Written in US Terms.
Always CH 2 at the beginning of a round, not 3. This makes the join less visible.
Starting with Round 5, and beyond, you will be completing between 2 rounds of the large shell and 1 round of the small shell. Adding stitches between the shells as needed and making the valley by skipping two stitches.
Directions
Starting with the larger crochet hook Size J. You will use this hook for all the rows except for the last one.
Begin
CH 4, Join with ST ST to form a ring.
Round 1
CH 2 (Counts as first DC throughout the pattern), work 11 DC inside the ring. (12 DC). Join with SL ST into the top of the beginning CH 2 ST. (Continue to join the end of the round in this manner throughout the pattern).
Round 2
CH 2, DC in same ST, 2 DC in each DC around. (24 DC). Join with a SL ST into the top of the beginning CH 2 ST.
Round 3
CH 2, [SK next DC, work (DC, CH 2, DC) in next DC]. Repeat between [ ] around, ending with DC in the base of the beginning ST, CH 2. Join with a SL ST into the top of the beginning CH 2 ST. At the end of this round, you should have (12 small shells). I will note this at the end of the rows as we continue the pattern throughout.
Round 4
In CH 2 SP, Work (CH 2, DC, CH 2, 2 DC) in CH 2 SP. [Work large shell in each CH 2 SP]. Repeat between [ ] around. Join with a SL ST into the top of the beginning CH 2 ST. (12 large shells)
Round 5
CH 2 (counts as DC). [work large shell in CH 2 SP, DC in next DC, Sk next 2 DC, DC in next ST]. Repeat between [ ] around. Join with a SL ST into the top of the beginning CH 2 ST. (large shells, plus 1 DC)
Round 6
CH 2, DC in next ST [work large shell in CH 2 SP, DC in each of the next 2 DC, SK the next 2 STs, DC in each of the next 2 DC] Repeat between [ ] around. Ending with SK 2 STs. Join with a SL ST into the top of the beginning CH 2 ST. (large shells, plus 2 DC)
Round 7
CH 2, DC in next 2 STs [work small shell in CH 2 SP, DC in next 3 STs, SK 2 STs, DC in the next 3 STs]. Repeat between [ ] around. Ending with SK 2 STs. Join. (small shells, plus 3 DC)
Round 8
CH 2, DC in next 2 STs [work large shell in CH 2 SP, DC in next 3 STs, SK next 2 STs, DC in next 3 STs]. Repeat between [ ] around. Ending with SK 2 STs. Join. (large shells, plus 3 DC)
Round 9
CH 2, DC in next 3 STs [work large shell in CH 2 SP, DC in next 4 STs, SK next 2 STs, DC in next 4 STs]. Repeat between [ ] around. Ending with SK 2 STs. Join. (large shells, plus 4 DC)
Round 10
CH 2, DC in next 4 STs [work small shell in CH 2 SP, DC in next 5 STs, SK next 2 STs, DC in next 5 STs]. Repeat between [ ] around. Ending with SK 2 STs. Join. (small shells, plus 5 DC)
Round 11
CH 2, DC in next 4 STs [work large shell in CH 2 SP, DC in next 5 STs, SK next 2 STs, DC in next 5 STs]. Repeat between [ ] around. Ending with SK 2 STs. Join. (large shells, plus 5 DC)
Round 12
CH 2, DC in next 5 STs [work large shell in CH 2 SP, DC in next 6 STs, SK next 2 STs, DC in next 6 STs]. Repeat between [ ] around. Ending with SK 2 STs. Join. (large shells, plus 6 DC)
Round 13
CH 2, DC in next 6 STs [work small shell in CH 2 SP, DC in next 7 STs, SK next 2 STs, DC in next 7 STs]. Repeat between [ ] around. Ending with SK 2 STs. Join. (small shells, plus 7 DC)
Round 14
CH 2, DC in next 6 STs [work large shell in CH 2 SP, DC in next 7 STs, SK next 2 STs, DC in next 7 STs]. Repeat between [ ] around. Ending with SK 2 STs. Join. (large shells, plus 7 DC)
Round 15
CH 2, DC in next 7 STs [work large shell in CH 2 SP, DC in next 8 STs, SK next 2 STs, DC in next 8 STs]. Repeat between [ ] around. Ending with SK 2 STs. Join. (large shell, plus 8 DC)
Round 16
CH 2, DC in next 8 STs [work small shell in CH 2 SP, DC in next 9 STs, SK next 2 STs, DC in next 9 STs]. Repeat between [ ] around. Ending with SK 2 STs. Join. (small shells, plus 9 DC)
Round 17
CH 2, DC in next 8 STs [work large shell in CH 2 SP, DC in next 9 STs, SK next 2 STs, DC in next 9 STs]. Repeat between [ ] around. Ending with SK 2 STs. Join. (large shells, plus 9 DC)
Round 18
CH 2, DC in next 9 STs [work large shell in CH 2 SP, DC in next 10 STs, SK next 2 STs, DC in next 10 STs]. Repeat between [ ] around. Ending with SK 2 STs. Join. (large shells, plus 10 DC)
Round 19
CH 2, DC in next 10 STs [work small shell in CH 2 SP, DC in next 11 STs, SK next 2 STs, DC in next 11 STs]. Repeat between [ ] around. Ending with SK 2 STs. Join. (small shell, plus 11 DC)
Round 20
CH 2, DC in next 10 STs [work large shell in CH 2 SP, DC in next 11 STs, SK next 2 STs, DC in next 11 STs]. Repeat between [ ] around. Ending with SK 2 STs. Join. (large shell, plus 11 DC)
Round 21
CH 2, DC in next 11 STs [work large shell in CH 2 SP, DC in next 12 STs, SK next 2 STs, DC in next 12 STs]. Repeat between [ ] around. Ending with SK 2 STs. Join. (large shell, plus 12 DC)
Round 22
This round *** Change the Crochet Hook to the Smaller Hook Size I
I had to do this, as I did not have enough yarn to make it all the way round. It was very close. Therefore, I ripped out this round and used a smaller hook size so I could make this last round. However, I still only had a few inches left! Yikes.
CH 2, DC in next 12 STs [work small shell in CH 2 SP, DC in next 13 STs, SK next 2 STs, DC in next 13 STs]. Repeat between [ ] around. Ending with SK 2 STs. Join. (small shell, plus 13 DC)
Finishing
Weave in the 2 yarn ends. Cut off any excess. In my case with such as little about of yarn left, I actually made a few little knots in the end to make sure it held.
Video on 12-Point Star Stitch
Right Hand Crochet Tutorial to show how the chevron pattern is worked in the round to create this 12-Point Star pattern.
Left Hand Crochet Tutorial to show how the chevron pattern is worked in the round to create this 12-Point Star pattern for folks that crochet left handed.
If you loved this post, please share. It helps to show me that these types of posts are helpful – thank you!
I hope that you liked this pattern. If you are looking for more ideas for crocheted projects, here are a few others you may enjoy.

You can find Victoria crocheting, quilting, and creating recipes. She has cooked in restaurants for over 20 years, including many larger parties. She learned to crochet when she was just 11 years old and has been crocheting ever since; over 50 years now. Over 40 years ago, she loved her first class in sewing and continues to hone her skills in quilting. Many have enjoyed the handmade gifts over the years. In her professional career, she has worked in management in a wide variety of businesses including higher education as a dean of a division. All the while attending college part-time to achieve her doctorate in higher education with an emphasis in e-learning.
Pingback: Crochet 12-Point Star Blanket – Pattern Princess