Last updated on June 16th, 2026 at 03:29 pm
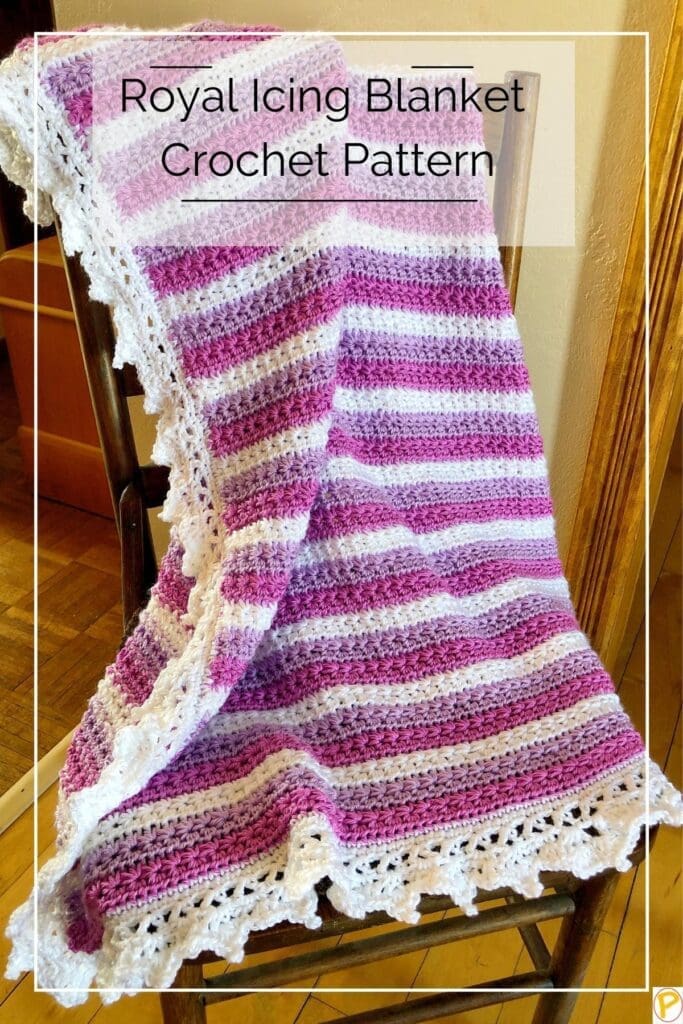
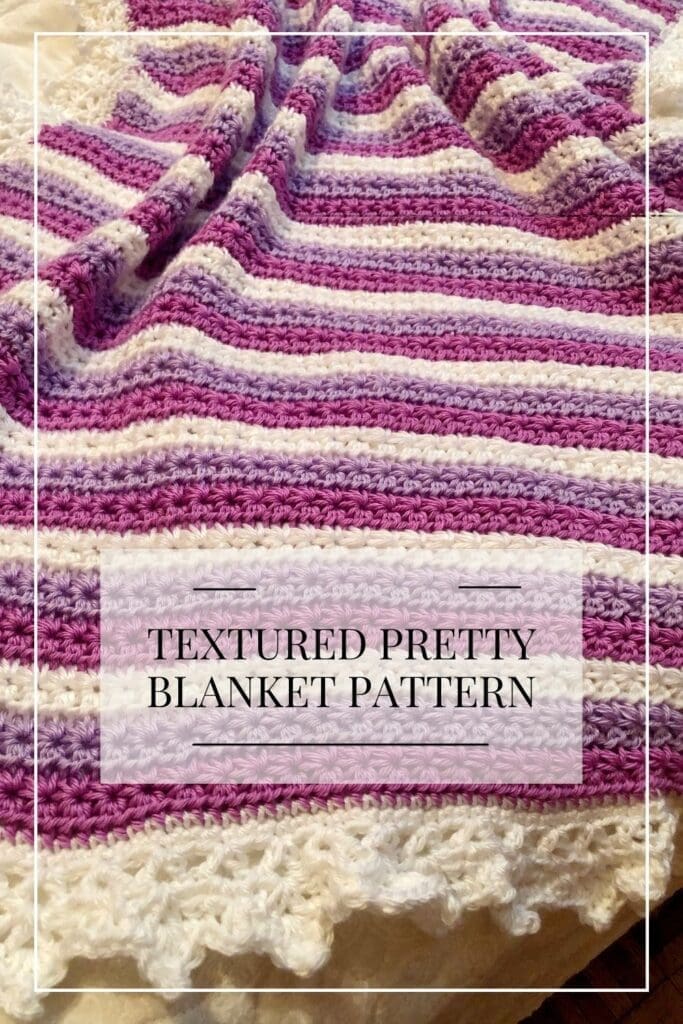
If you’re looking for a crochet project that’s both beautiful and just a little challenging, then this Royal Icing blanket crochet pattern is perfect for you. This gorgeous afghan is made with multiple colors of yarn and features a lacy shell stitch border.
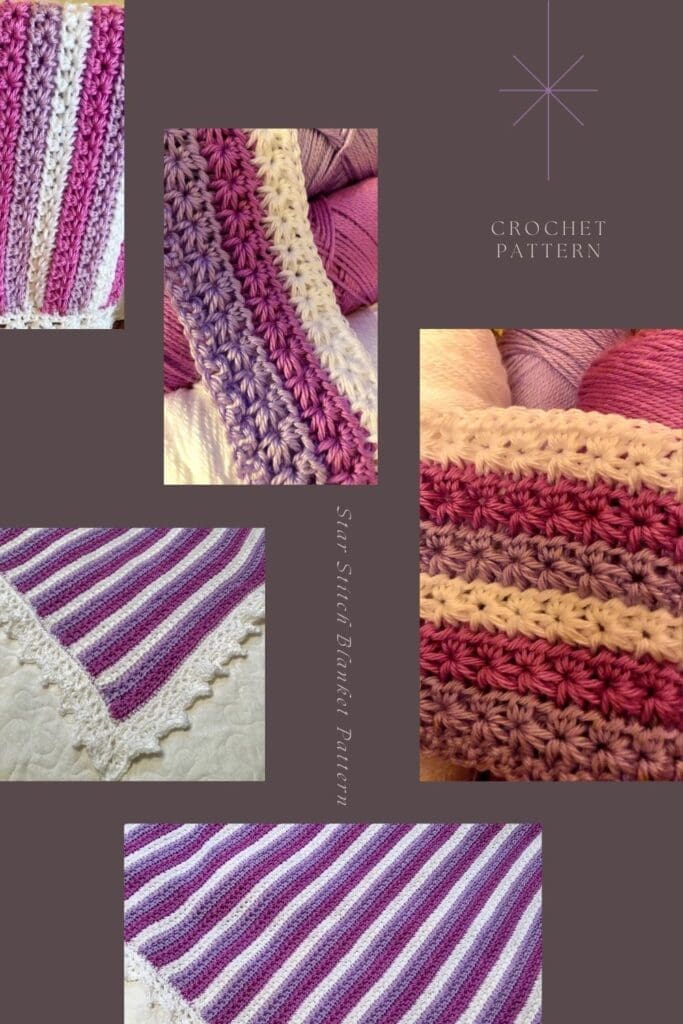
The throw blanket combines the elegant star stitch with soft color transitions for a design that looks far more complicated than it actually is. The textured stitches create beautiful rows of starbursts while the decorative shell and picot border give the finished blanket a sophisticated look. Since the yarn is carried up the sides rather than cut after every color change, you’ll spend less time weaving in ends and more time enjoying the crochet process.
Crochet Star Stitch Blanket Pattern
The star stitch is a simple crochet stitch that uses single crochet and half double crochet stitches. Crochet two rows of stitches to achieve this lovely starburst pattern. It’s really not as hard as it seems. Once you learn where to place your hook in just the right places, it’s smooth sailing from there.
Why You’ll Love This Pattern
- Easy-to-learn star stitch repeat
- Video tutorial included
- Minimal yarn ends to weave in
- Soft drape with Caron Simply Soft
- Decorative border with optional picot edging
- Great size for lap blankets and gifts
Simple and Elegant Crochet Border for a Blanket
Since you will be adding a border to this blanket pattern, the yarn that is carried up the side is covered up nicely.
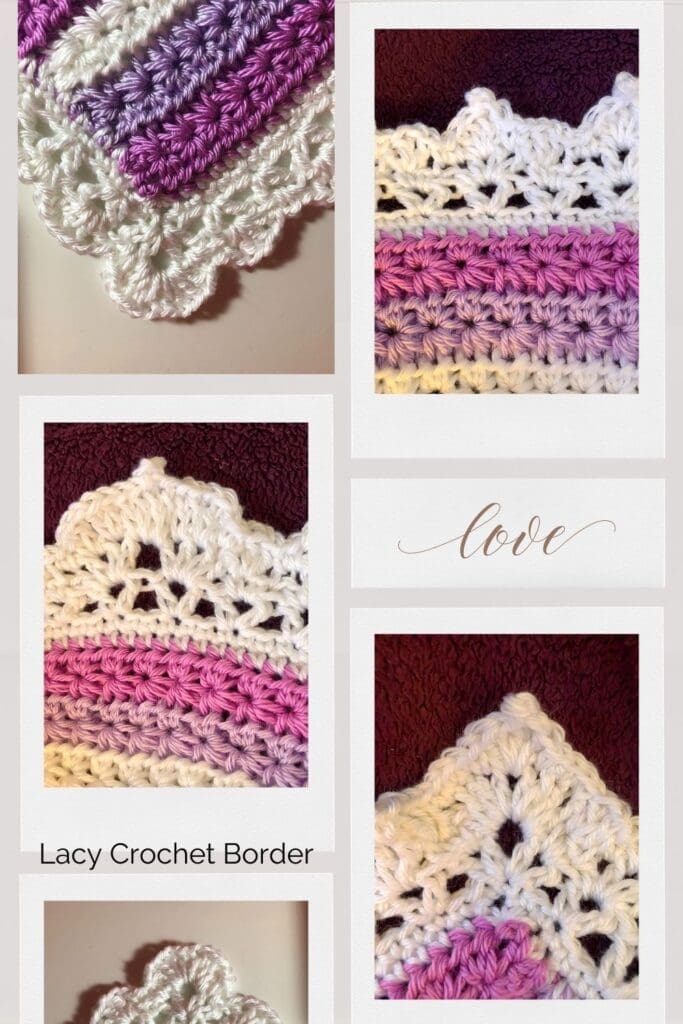
The fancy crochet border is achieved with five rounds of crochet stitches. The fourth round creates the rounded shell on the edges and corners, which is perfect if you want to stop after the fourth round.
However, if you like the look of a pointed shell, then continue and add the fifth round. The point is made using the picot stitch.
Best of all, the pattern is easy to follow, so even beginner crocheters can create a stunning piece of art. So, grab your hook and get started today.
Lacy Edging Crochet Options
If you end up with an even number of v-stitches, then you will need to do something in the middle of the edge to make sure that the stitches on the end of the row work out to have all four corner stitches look the same.
However, if you use an odd number of v-stitches, then the crochet pattern used for the edging can be worked the same as the corner stitches will come out perfectly.
In the video, I have shown the stitches for both the even number of v-stitches and odd number of v-stitches.
I think it might even be a matter of preference in how you would like your lacy edging to look on your crochet throw.
Yarn Substitutions
This blanket was designed using Caron Simply Soft yarn, a popular worsted weight (#4) acrylic yarn known for its soft feel, beautiful drape, and subtle sheen. If you can’t find the exact yarn or would like to use something from your stash, there are several great alternatives that will work well with this pattern.
When substituting yarn, choose a worsted weight (#4) yarn with a similar thickness to maintain the blanket’s size and appearance. Always crochet a small gauge swatch before beginning to ensure your finished blanket matches the intended measurements.
Recommended Yarn Substitutes
Lion Brand Basic Stitch Anti-Pilling
A soft acrylic yarn that offers excellent stitch definition and durability. It’s a wonderful choice for blankets that will be used and washed frequently.
Premier Everyday Worsted
This smooth, easy-care acrylic yarn creates a soft, cozy blanket with great stitch definition, making the star stitch texture stand out beautifully.
Red Heart Soft
Softer than traditional Red Heart Super Saver, this yarn has a gentle feel and slight sheen that resembles Caron Simply Soft.
Knit Picks Brava Worsted
A budget-friendly acrylic yarn available in a wide variety of colors. It provides excellent stitch definition and creates a comfortable, durable blanket.
Stylecraft Special DK (Held Double)
If you have access to Stylecraft yarn, holding two strands together can create a similar weight and produce a wonderfully soft finished blanket.
Fiber Options
While acrylic yarns are the easiest to care for and closest to the original design, you can also use acrylic blends or soft wool blends for added warmth and texture. Keep in mind that natural fibers may affect the drape, finished size, and yardage requirements.
No matter which yarn you choose, the beautiful texture of the star stitch and the decorative border will shine through, allowing you to create a blanket that is uniquely your own.
Beginning Chain Counts for Different Blanket Sizes
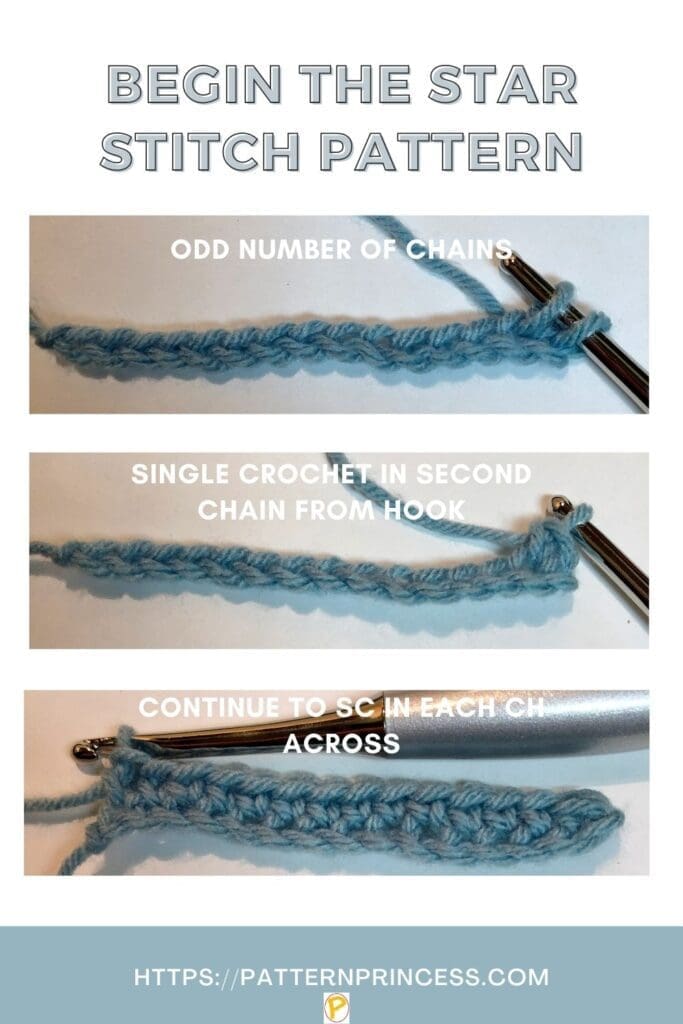
The star stitch requires an odd number of chains. More often, I am asked how many beginning stitches are required for various sizes of a pattern. If you are interested in making this in a different size than what I did today, I have provided the beginning stitch count that I would use for each blanket size.
- Security – 51
- Baby – 111
- Toddler – 141
- Lapghan – 131
- Throw – 173
- Twin – 205
- Queen – 291
- King – 351
Directions: Royal Icing Blanket Crochet Pattern
Skill Level
Advanced Beginner or Intermediate
Gauge
16 single crochet for every 4 – inches
Size
43 – inches wide X 54 – inches long
Abbreviations
- CH = Chain
- DC = Double Crochet
- HDC = Half Double Crochet
- SC = Single Crochet
- SC5Tog = Single Crochet 5 Together
- SK = Skip
- SL ST = Slip Stitch
- STs = Stitches
- YO = Yarn Over
- [ ] = Repeat Between
Special Stitches
Picot Stitch
Starting from the stitch where you want the Picot stitch to be, Chain (CH) 3. Insert your hook in the third chain from the hook and complete a Slip Stitch (SL ST).
I have a video on my You Tube channel if you want a quick video tutorial on how to crochet the picot stitch.
Star Stitch
The star stitch is made using a two-row repeat. You can find a full tutorial with photos and a link to a video tutorial for the star stitch.
V-Stitch
Double crochet, chain 1, double crochet into the same stitch.
Materials
The amounts of yarn and size of this blanket is for the Toddler – 141 size.
Orchid Caron Simply Soft. 2 skeins are used for the blanket. Approximately 630 yards.
Blackberry Caron Simply Soft. 2 skeins are used for the blanket. Approximately 630 yards.
White Caron Simply Soft. 4 skeins, 2 skeins are used for the blanket, 1.25 skeins are used for the border. Approximately 1,200 yards.
Crochet Hook Size J 6.0mm
Tapestry Needle
Scissors
Crochet Pattern Notes
Written in US Terms.
I like to start this stitch off with a row of single crochet as it provides a nice foundation for the first row of the star stitch. This row is optional, but if you are going to add a crochet border on your work, this will greatly reduce any unsightly gaps in the beginning chain row.
Work with loose even tension. This helps the star stitch form nicely and have a bit more symmetrical look.
The placement of each stitch is important in making the daisy shape of this stitch. Therefore, it is essential that you place the hook in the correct stitch each step of the way.
Work the picot stitch using a chain three with a slip stitch back into the beginning chain stitch
Carry the yarn up the side. If you are unsure how to do this, make sure to reference the video tutorial. The link is near the bottom of this pattern.
Change the yarn color every two rows. Beginning with row four.
Begin Crochet Pattern
Beginning with the white yarn.
Chain 141 stitches
Row 1
In the second CH from the hook, SC and in each ST across. Turn
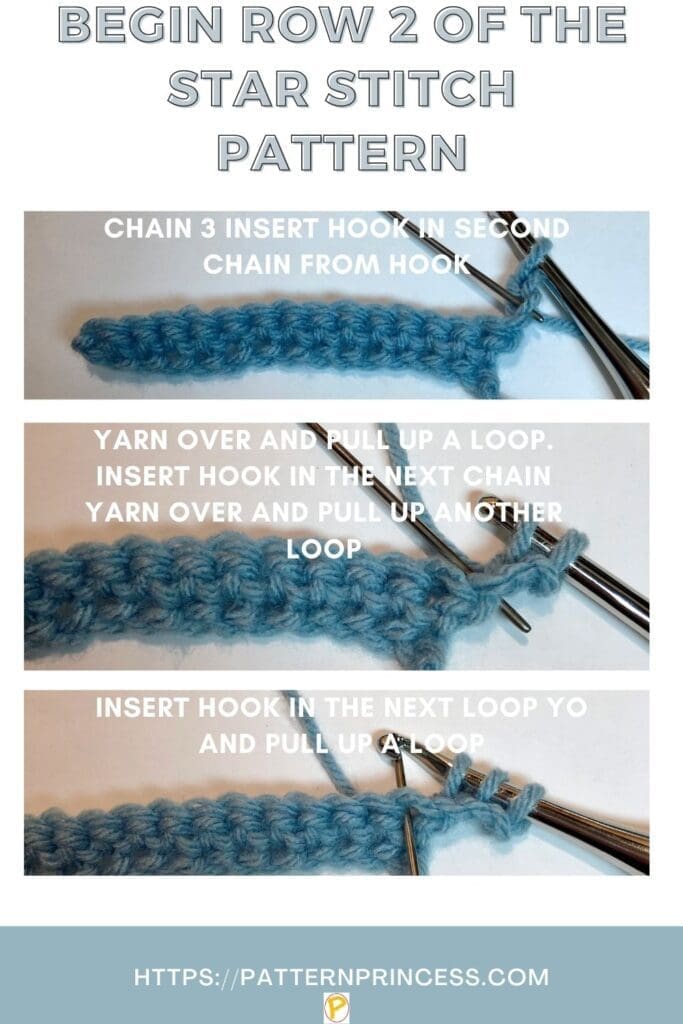
Row 2
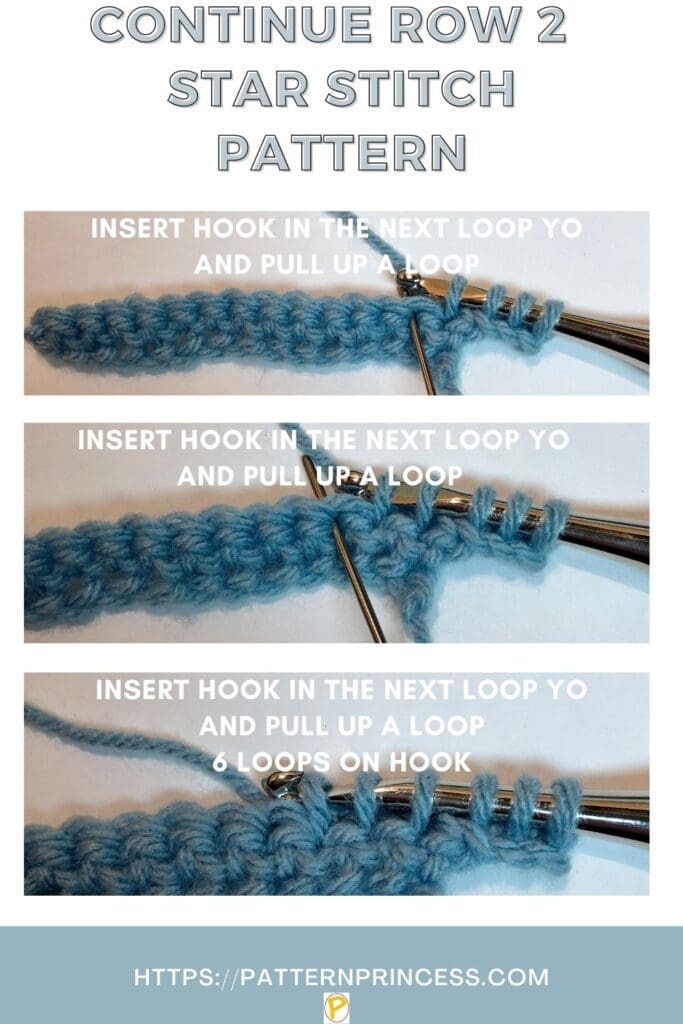
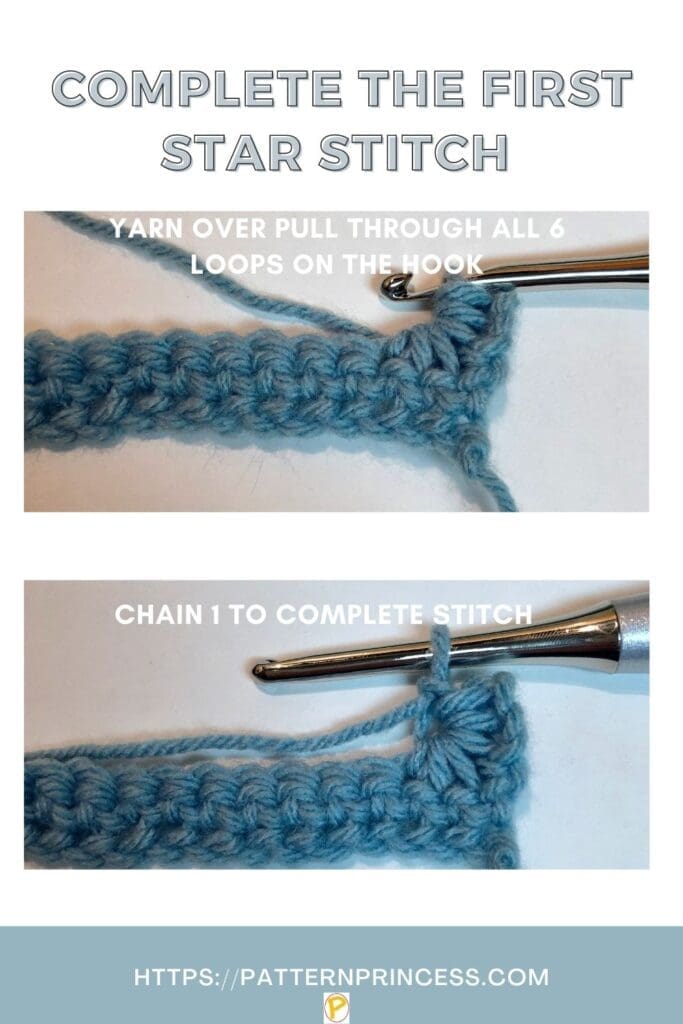
CH 3, insert the hook in the 2nd CH from the hook, YO and pull up a loop. Insert the hook in the next CH, YO and pull up a loop. There should be 3 loops on the hook. Insert the hook in the next ST, YO and pull up a loop. There should be 4 loops on the hook. Insert the hook in the next ST, YO and pull up a loop. You should have 5 loops on the hook. Insert the hook in the next ST, YO and pull up a loop. There should now be 6 loops on the hook. YO and pull through all 6 loops on the hook. CH 1 to complete the star. (Note: that was a SC5 Tog).
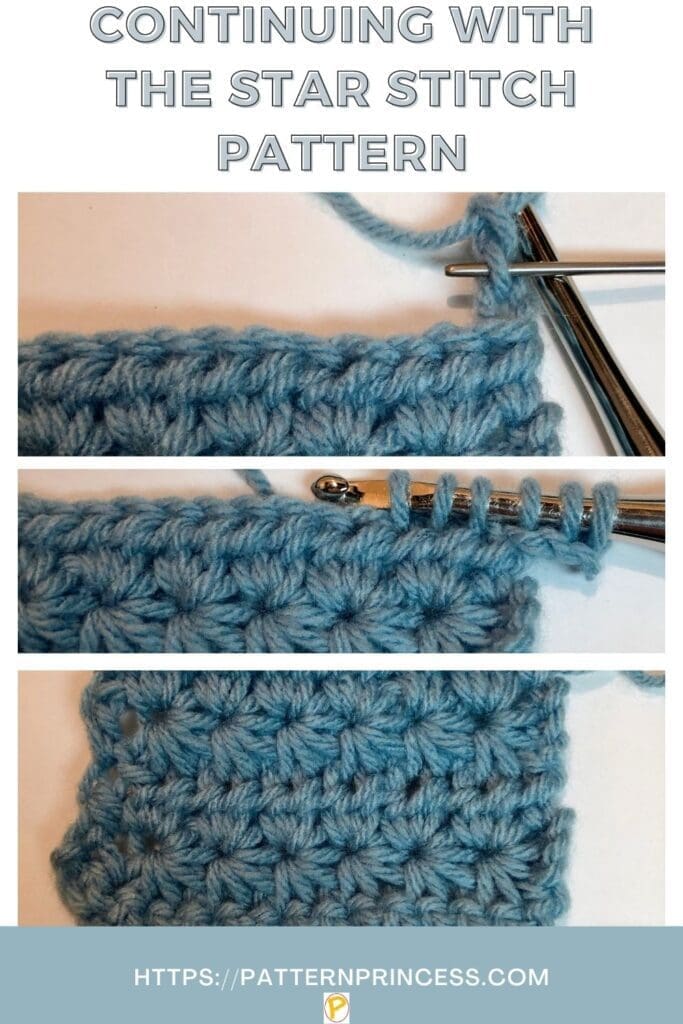
Second Star Stitch in the Row
Begin working the second star stitch. [In the eye or center hole that was just made, insert your hook, YO and draw up a loop. Insert the hook into the space between the last two STs from the first star. YO and draw up a loop. There will now be three loops on the hook. Next, insert the hook into the same stitch where the last stitch was worked for the previous star stitch. YO and draw up a loop. There are now four loops on the hook. Insert the hook in the next ST, YO draw up a loop for five loops on the hook. Insert the hook in the next ST, YO draw up a loop for six loops on the hook. YO and draw the yarn through all six loops on the hook.
Finish the star with a CH 1 to close the second star.] Repeat between the [ ] across the row to continue making star stitches. When you get to the end, make one HDC in the last stitch. CH 1 turn.
Row 3
In the eye of the star stitch from the row below, crochet two HDC stitches. Continue working 2 HDC in each star stitch eye across. End with a HDC in the last ST. Turn
Row 4
Switch yarn to the Orchid color.
Repeat row 2.
Row 5
Repeat row 3
Row 6
Switch yarn to the Blackberry color.
Repeat row 2.
Row 7
Repeat row 3.
Rows 8-112
Repeat rows 2-3 until your desired length is reached.
Change the yarn color every two rows.
Finishing
Work a chain stitch, cut the yarn off leaving about a 12-inch tail. Draw the yarn through the chain stitch and pull snug. Use the yarn needle to weave in the yarn tail and snip off excess yarn.
Crochet Lacy Shell Stitch Border
Finishing off this Royal Icing Blanket Crochet Pattern with a lovely lacy shell stitch border really brings the whole look together.
I used the white yarn for the border. It took one full skein and approximately 100 yards of another skein of the white yarn.
Additionally, I worked the rounds of the crochet border with the star stitch pattern facing me.
Round 1
Using the white yarn, join the yarn along one of the edges in the stitch that is next to the corner stitch. Ch 1 (does not count as a ST). SC in each ST around. In each corner ST, work 3 SC. This will help the corners lay flat. For the sides, ease the SC STs between the rows of STs. I found 2-3 STs for each row to work. End with a SL ST into the first SC ST. (Ideally, you will want an odd number of stitches for each side and end).
Round 2
CH 1, SC in each ST around. With a (SC, CH 1, SC) in each corner ST. End with a SL ST into the first SC ST.
Round 3
CH 4 (Counts as a DC and a CH 1). DC in the Same ST. (This is a V-Stitch). SK 2 STs, work (DC, CH 1, DC) in the next ST. Repeat around with a (2 DC, CH 2, 2 DC) in each corner CH 1 ST. End with a SL ST into the first CH if the first CH STs of the round.
Hint: refer to the crochet border photos so the notes below make sense.
The number of V-Stitches will set you up for the crochet shells that will be worked in round four (even or odd).
Crochet an odd number of V-Stitches, provides the perfect foundation for the right amount of shells with the single crochet stitches between. Therefore, make sure that you have an odd number of V-Stitches on each side.
Optional even number of V-Stitches. If you prefer the placement of the two shells next to each other in the middle of the edge, then make sure that there is an even number of V-Stitches.
If you do not have quite the correct number of single crochet stitches. That is okay, this round is an easy one to alter and no one will even know. With that said, you might need to skip three stitches rather than two for your desired finished look to your lacy edge. I hope this makes sense in how I have explained this.
I counted the number of v-stitches for each side and end of the throw before moving onto the next side.
Round 4
SL ST into the middle of the V-Stitch. Work (CH 3 (Counts as DC), CH 1, DC, DC, CH 1, DC). In the next V-Stitch work (SC, CH 1, SC).
Note: you should have one V-Stitch between the first V-Stitch you are working in and the corner. That is okay, you will end with a SC stitch pattern in that V-Stitch. Note, in the V-Stitch before each corner ST and after, you should have the SC, CH 1, SC stitch pattern.
[In the next V-Stitch work DC, CH 1, DC, DC, CH 1, DC). In the next V-Stitch work (SC, CH 1, SC)]. Repeat between [ ] to the first corner CH 2 SP work (DC, CH 1, DC, DC, CH 1, DC) X 2.
Begin the next side with the [(SC, CH 1, SC) in the first V-Stitch. In the next V-Stitch work (DC, CH 1, DC, DC, CH 1, DC)]. Repeat between [ ] until the next corner.
Corner
In the corner CH 2 SP work (DC, CH 1, DC, DC, CH 1, DC) X 2. Then work the (SC, CH 1, SC) in the remaining V-Stitch. End with a SL ST into the top CH of the first CH 3.
Round 5
CH 1, SC in the CH SP, SK the next DC. Between the 2 DC STs, work (2 DC, CH 3, SL ST back in the first CH (this is your first Picot ST), 2 DC). SK next DC, SC in CH 1 SP, SC in the next DC, SK the SC, in the CH 1 SP work (SC, CH 1, SC). SK the next SC ST. [SC in the next DC, SC in the CH 1 SP, SK the next DC. Between the 2 DC STs, work (2 DC, CH 3, SL ST back in the first CH, 2 DC). SK next DC, SC in CH 1 SP, SC in the next DC. Next, SK the SC, in the CH 1 SP work (SC, CH 1, SC). SK the next SC ST.] Repeat between [ ] until the corner.
Corner
After the last SC, CH 1, SC on the edge work a SC in the DC, SC in the CH 1 SP. SK the DC ST. Between the DC STs work (2 DC, Picot, 2 DC). SK DC ST, SC in the CH 1 SP, SC in the DC ST.
Continue with the pattern beginning with the (DC, CH 1, DC) in the CH 1 SP. [SC in the next DC, SC in the CH 1 SP, SK the next DC. Between the 2 DC STs, work (2 DC, CH 3, SL ST back in the first CH, 2 DC). SK next DC, SC in CH 1 SP, SC in the next DC, SK the SC, in the CH 1 SP work (SC, CH 1, SC). SK the next SC ST.] Repeat between [ ] until the corner.
If you had the even number of V-Stitches and have the two shells next to each other in the middle of the edge, here is the pattern for that section in round 5. SC in the DC, SC in the CH 1 SP. Between the DC STs, work 2 DC, CH 1. In the CH SP, work 2 DC, In the SP between the two shells, work (2DC, Picot, 2 DC). In the CH 1 SP work 2 DC, CH 1, In the SP between the two DC, work 2 DC. Work a SC in the CH 1 SP, SC in the DC SP.
Finishing
Work a chain stitch, cut the yarn off leaving about a 12-inch tail. Draw the yarn through the chain stitch and pull snug. Use the yarn needle to weave in the yarn tail and snip off excess yarn.
Crochet Video Tutorials of Blanket Pattern
Find the Crochet Star Stitch Tutorial
Right Hand Star Stitch Tutorial
Left Hand Star Stitch Tutorial
Video Tutorial showing working rounds 1, 4, and 5 of the crochet border.
Another afghan that I made with an elegant crochet border like this Royal Icing Blanket Crochet Pattern, is the Winter Holiday Season Colors Granny Square Afghan.

You can find Victoria crocheting, quilting, and creating recipes. She has cooked in restaurants for over 20 years, including many larger parties. She learned to crochet when she was just 11 years old and has been crocheting ever since; over 50 years now. Over 40 years ago, she loved her first class in sewing and continues to hone her skills in quilting. Many have enjoyed the handmade gifts over the years. In her professional career, she has worked in management in a wide variety of businesses including higher education as a dean of a division. All the while attending college part-time to achieve her doctorate in higher education with an emphasis in e-learning.
How can I get a printable pattern for the Star Stitch blanket. It is beautiful!
Thank you so much Carole. Here is a link to the blanket pattern in our Etsy shop. https://patternprincessetsy.etsy.com/listing/1184613900/royal-icing-star-stitch-crochet-blanket
Vicky
Thank you for this beautiful pattern. I was wondering if you knew how many yards it would take for a king size blanket? Thank you again.
Hi, while this is a nice size blanket now, for a king size, I would double the yarn yardage. Because a king size you should make about 106 X 100 inches. Hope this helps. Enjoy the pattern.
Vicky
Thank you for a beautiful blanket pattern you don’t see many star stitch blankets but yours is lovely
Awe. Thank you so much! I enjoyed crocheting this one. Enjoy the pattern.
Vicky