Last updated on March 6th, 2025 at 06:01 pm
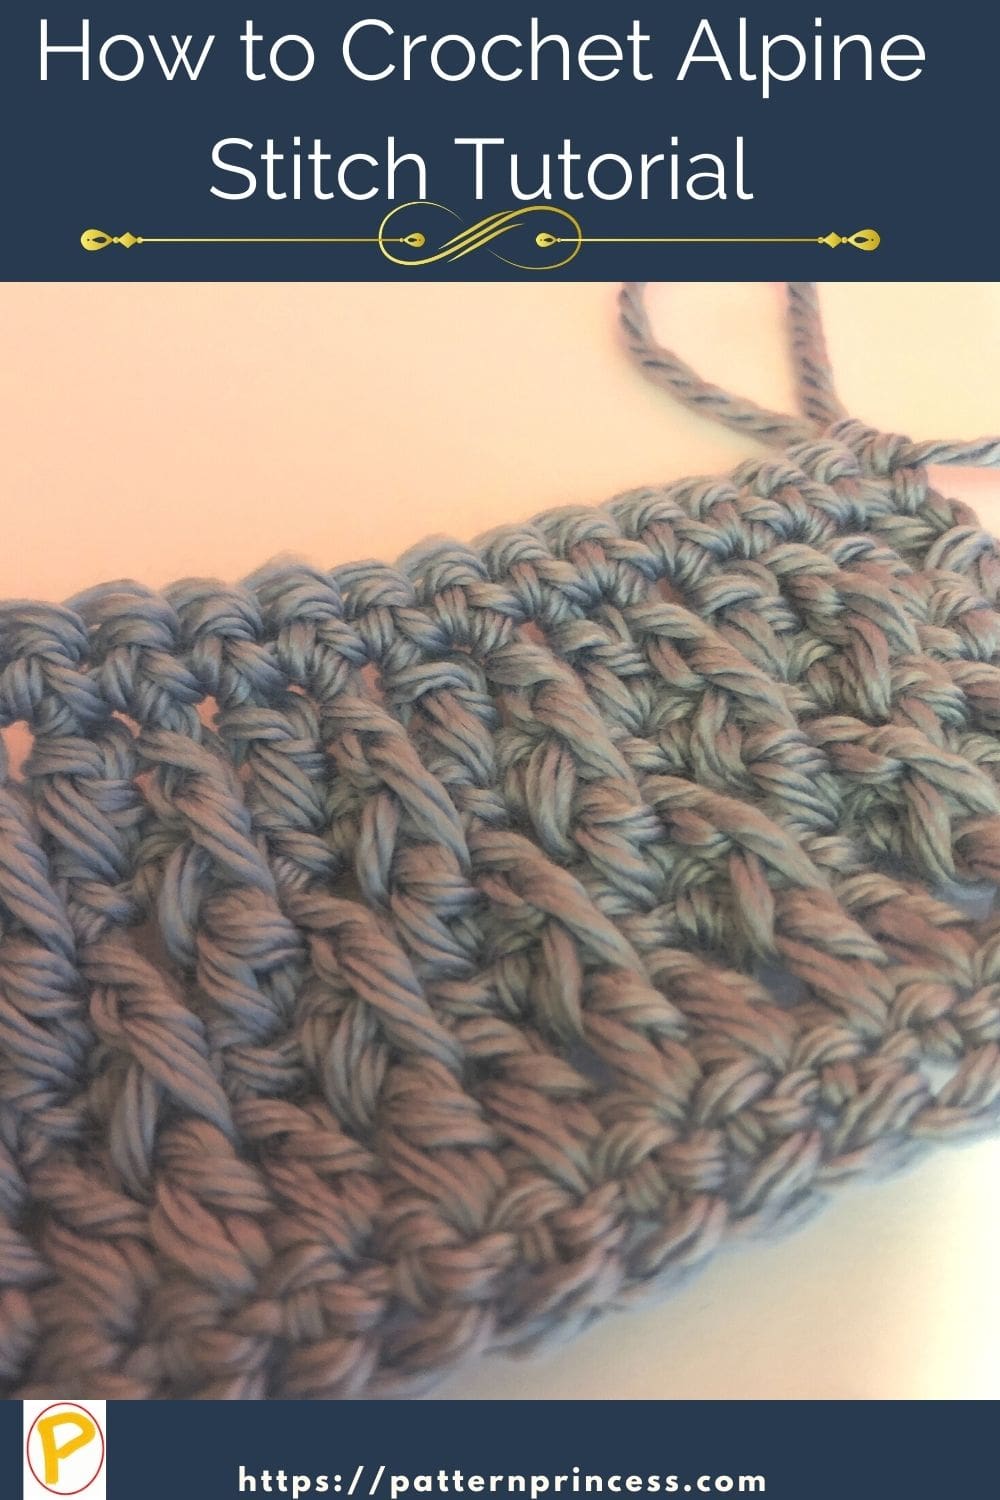
In this tutorial, I will show you how to crochet an Alpine Stitch. It is a fun and easy stitch to work that looks hard. It has raised stitches that are staggered that have the appearance of mini crochet cables.
Once you’ve mastered it, you’ll be able to use it in all sorts of projects, homewares such as pillows and placements, baby blankets, shawls, cushion covers, and cowls.
This stitch is perfect for creating a textured fabric with lots of character. The right side and wrong side both have a gorgeous look. The right side has a beautiful textured diamond shape pattern, and the wrong side has a flat defined pattern on the other side Best of all, it’s quite easy to learn as it is a repeat of four rows. There is a couple of rows of set up before you get started on the Alpine Stitch.
Is The Alpine Stitch Easy?
The unique texture of this stitch may look difficult. However, this look is achieved with just a few simple rows of crochet. Therefore, it is perfect for an advanced beginner. If you can single crochet and double crochet, you can master this pattern.
A step-by-step photo tutorial and video tutorial is included in this pattern. I love finding new crochet projects to make. Each one gives my crochet work variety. As I continue to increase my skills, I am building confidence to continue to try lots of projects.
Repeating Rows of Stitches This pattern uses an odd number of chains. However, you will find some that use an even number of chains. I have a pattern that uses the Foundation Chainless Single Crochet and because of this, the pattern begins with an even stitch count. This can be confusing if you are new to crochet. The free pattern for the alpine stitch blanket is available on the website.
No matter which way you start this crochet project, make sure to read the pattern you are using. Once you get going, they all use this to complete the Alpine stitch. Alternating rows of double crochet and front post stitches and rows of single crochet.
Is the Alpine Stitch a Yarn Eater?
Yes, it is a yarn eater as with many crochet stitches that create texture. Taller stitches tend to use less yarn because they are not as dense. However, the front post double crochet uses extra yarn because you are wrapping the yarn around the post. Additionally, a single crochet stitch used more yarn than a double crochet.
Is the Alpine Stitch Stretchy?
It is slightly stretchy. While this pattern is on the dense side, it still provides a little stretch, which makes it perfect for cuffs, hat brims, blankets, and blanket borders too.
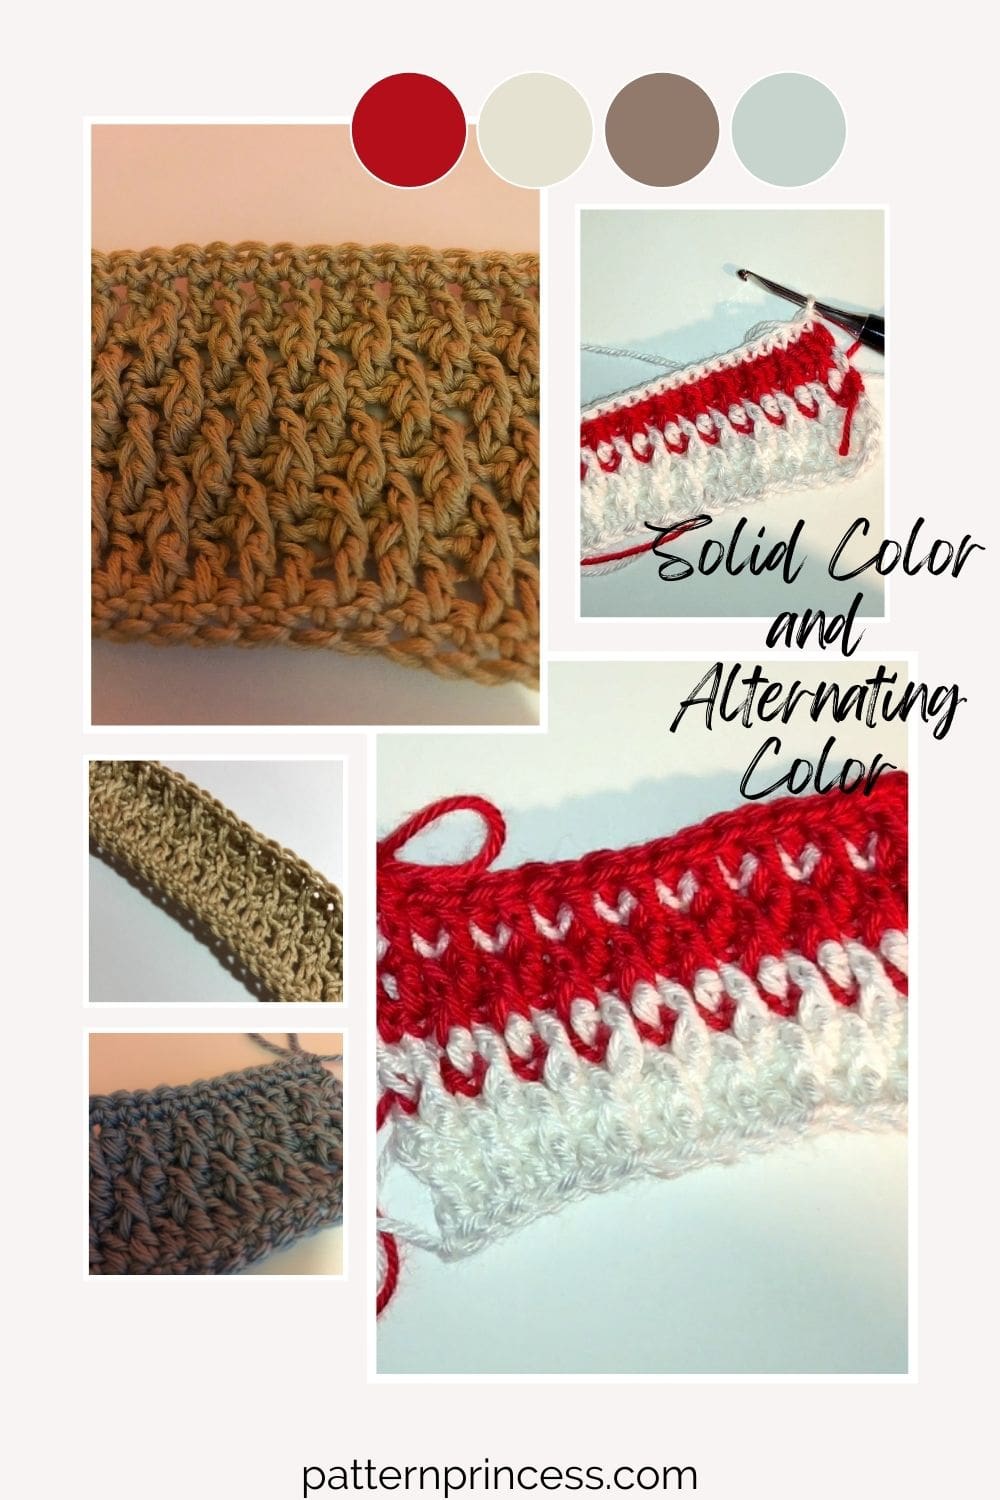
Change Colors for a Beautiful Variation
This stitch pattern works for a variegated yarn and solod color yarn or changing yarn colors throughout. You can see in the photo how gorgeous the yarn looks with the defined texture and color changes. The front post double crochet stitches give this one more sprinkle of color to help provide great visual appeal.
Video Tutorials on Changing Color working this stitch.
Directions: How to Crochet Alpine Stitch Tutorial
Skill Level
Advanced Beginner or Easy Intermediate Crochet
Be able to work the single crochet, double crochet, and front post double crochet stitches.
Materials
Any weight yarn works with this pattern.
The crochet hook should be compatible with the yarn used.
Today, I used Lion Brand Coboo with a Size H crochet hook. The yarn calls for a size G hook. I went one size larger to reduce the chance of curling.
Tapestry Needle
Scissors
Abbreviations
- CH = Chain
- DC = Double Crochet
- FPDC = Front Post Double Crochet
- SK = Skip
- SL ST = Slip Stitch
- ST = Stitch
- STs = Stitches
- [ ] = Repeat Between
Special Crochet Stitches
Front Post Double Crochet (FPDC)
Yarn over, insert the hook from front to back between the posts of the first and second double crochet of the row below. Then insert the hook from the back to the front between the posts of the second and third stitches. (The hook should now be positioned horizontally behind the double crochet that you are working around). Yarn over, pull the yarn around the post of the stitch. There should now be 3 loops on the hook. Yarn over, pull the yarn through 2 loops on the hook. Lastly, yarn over again and pull through the last two loops on the hook.
**For this pattern, the FPDC is worked in the DC rows below the SC row. **
Pattern Notes
The pattern is a repeat of single crochet rows and double crochet, front post double crochet rows
When the stitch below is a double crochet, then work a front post double crochet. If the row below is a front post double crochet, work a double crochet.
Due to the alternating stitch pattern, when the first stitch is a double crochet (DC) and the next stitch is a front post double crochet (FPDC) the row will end with a FPDC and the last stitch will be a DC.
This pattern works well for any number of foundation chain stitches. Today, I used an odd number of 31 chains. However, you could also use an even number of stitches.
Chain 1 at the beginning of the row does not count as a stitch.
Chain 2 at the beginning of the row does count as a stitch. The chain 2 is shorter than a normal beginning chain 3 for a double crochet. The shorter starting chains helps reduce the gap at the end of the row. The front post double crochet is a shorter stitch than the double crochet.
Prevent Gaps on First Row If you plan on using a crochet border on your Alpine stitch, I like to start with a no chain single crochet stitch, also called chainless foundation single crochet. The video tutorial for this no chain single crochet.
Why use this to start the project? By using this starting crochet stitch rather than a chain stitch followed by a row of single crochet is the reduction of a gap. The chain stitches tend to gap when the first row of the border is added.
Another way to lessen the gap is to work the first-row stitches in the back bump of the chain stitch.
Prevent Curling in Alpine Stitch
The most significant method of preventing curling when using this stitch pattern is to use a bit looser tension.
Further, then working the front post double crochet stitches, bring the yarn up to the height of the row when working the stitches. This will help loosen the tension.
If you still experience the unwanted curling, try a larger crochet hook size than what the yarn calls for.
Directions
Chain 31 stitches (Sample Size)
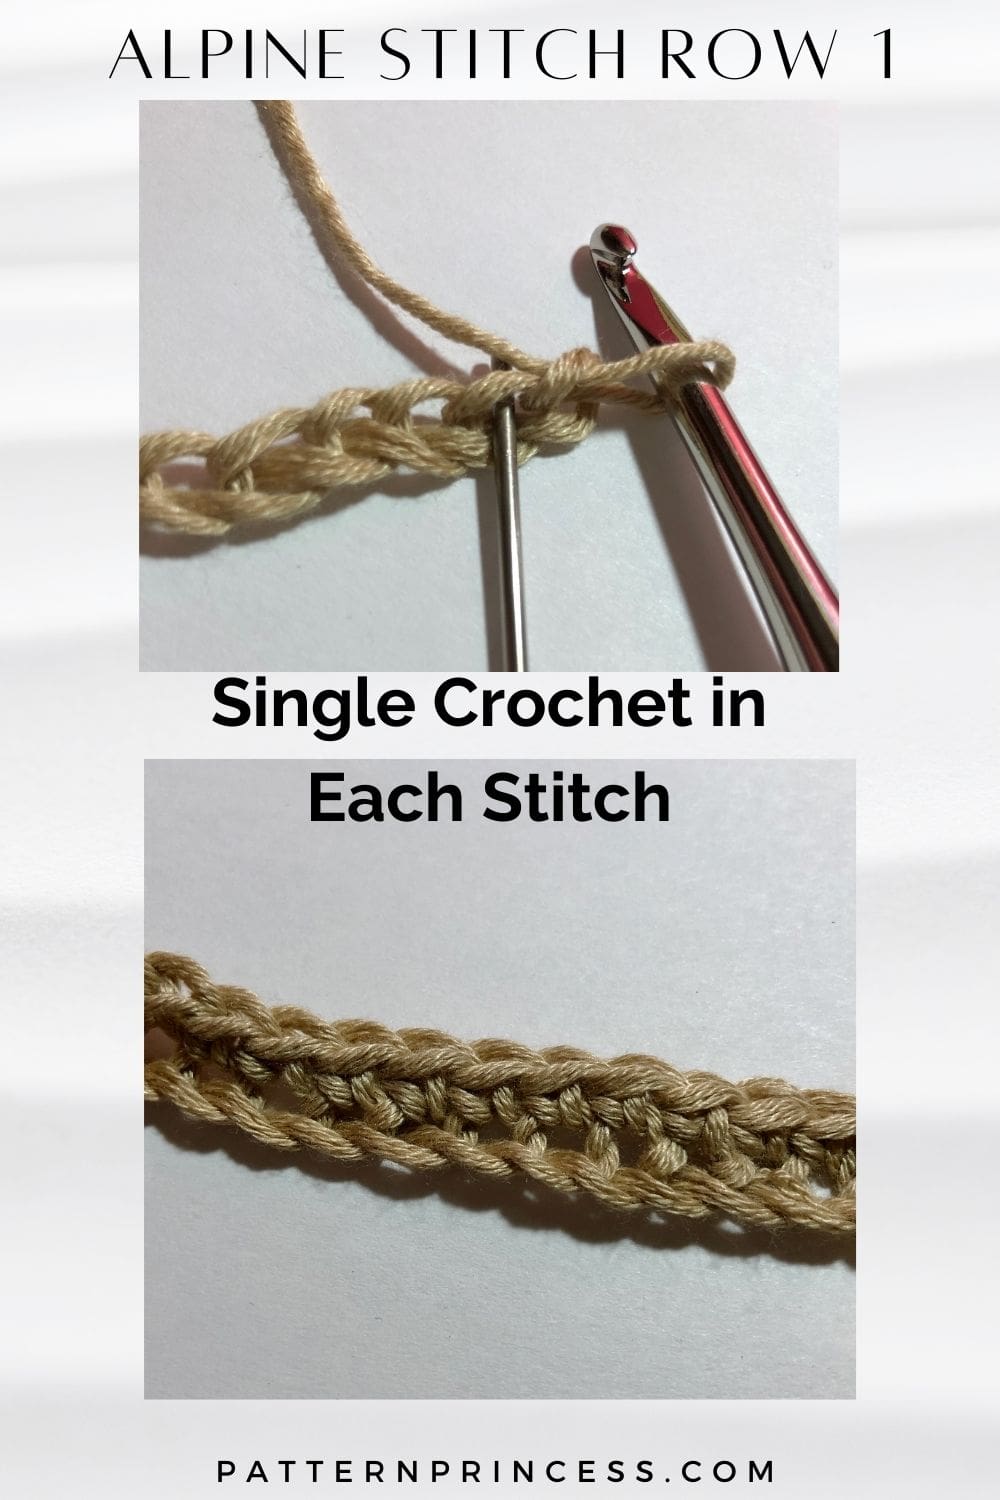
Row 1
In the 2nd CH from the hook, SC and in each ST across. Turn
Optional to the beginning chain stitch and row 1 directions. (Begin with 30 no chain single crochet).
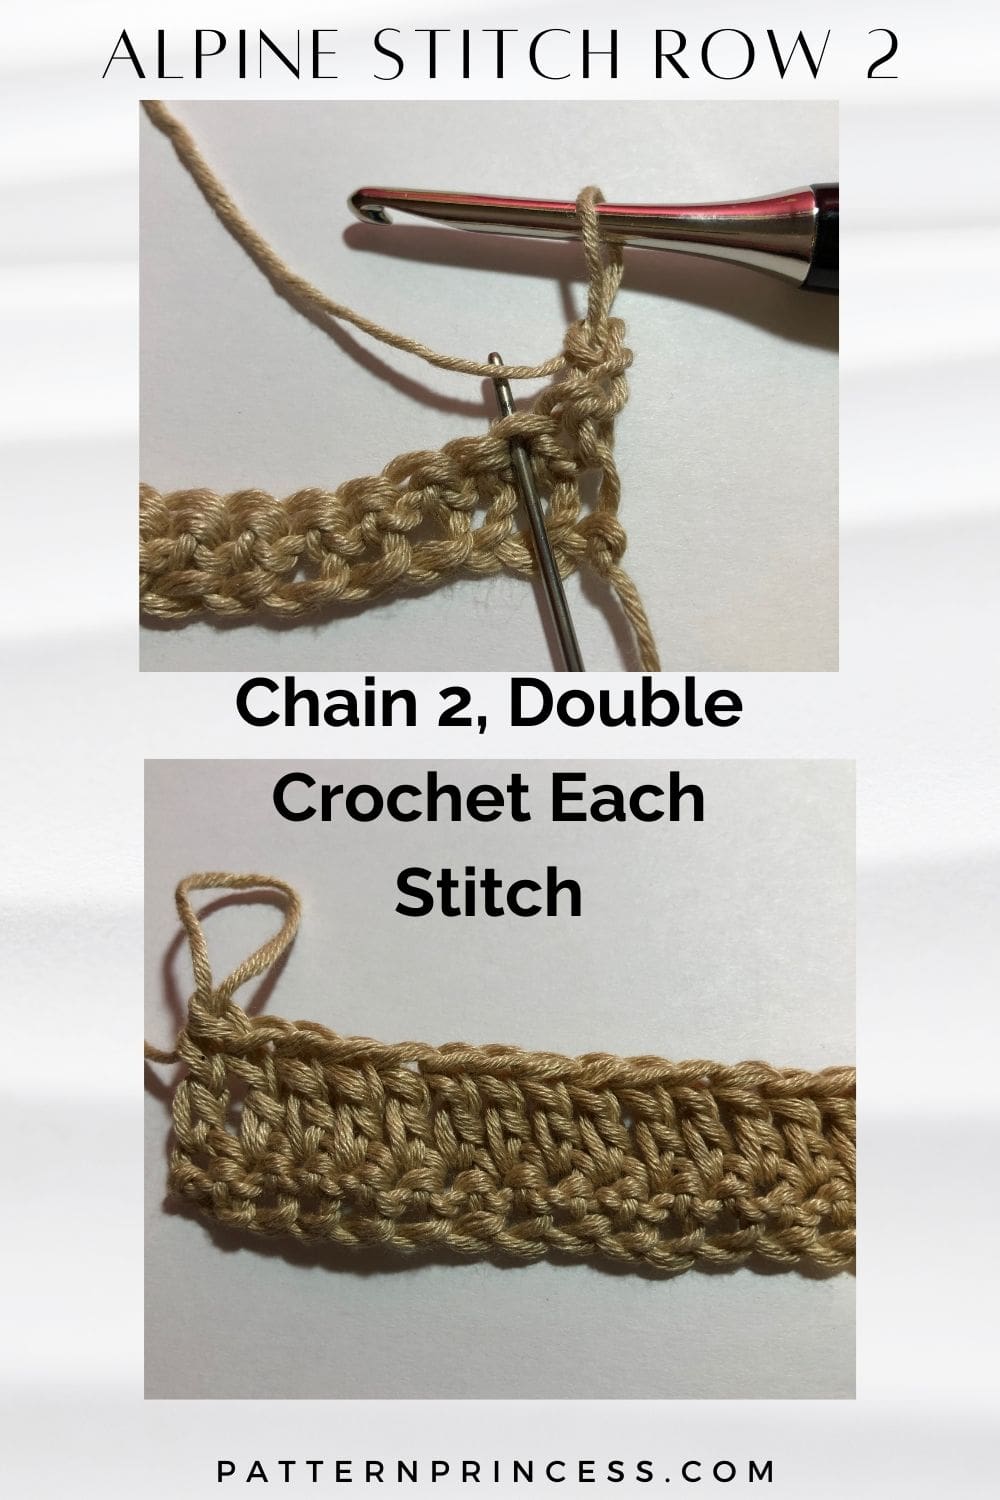
Row 2
CH 2 (Counts as Double Crochet), DC in each ST across. Turn
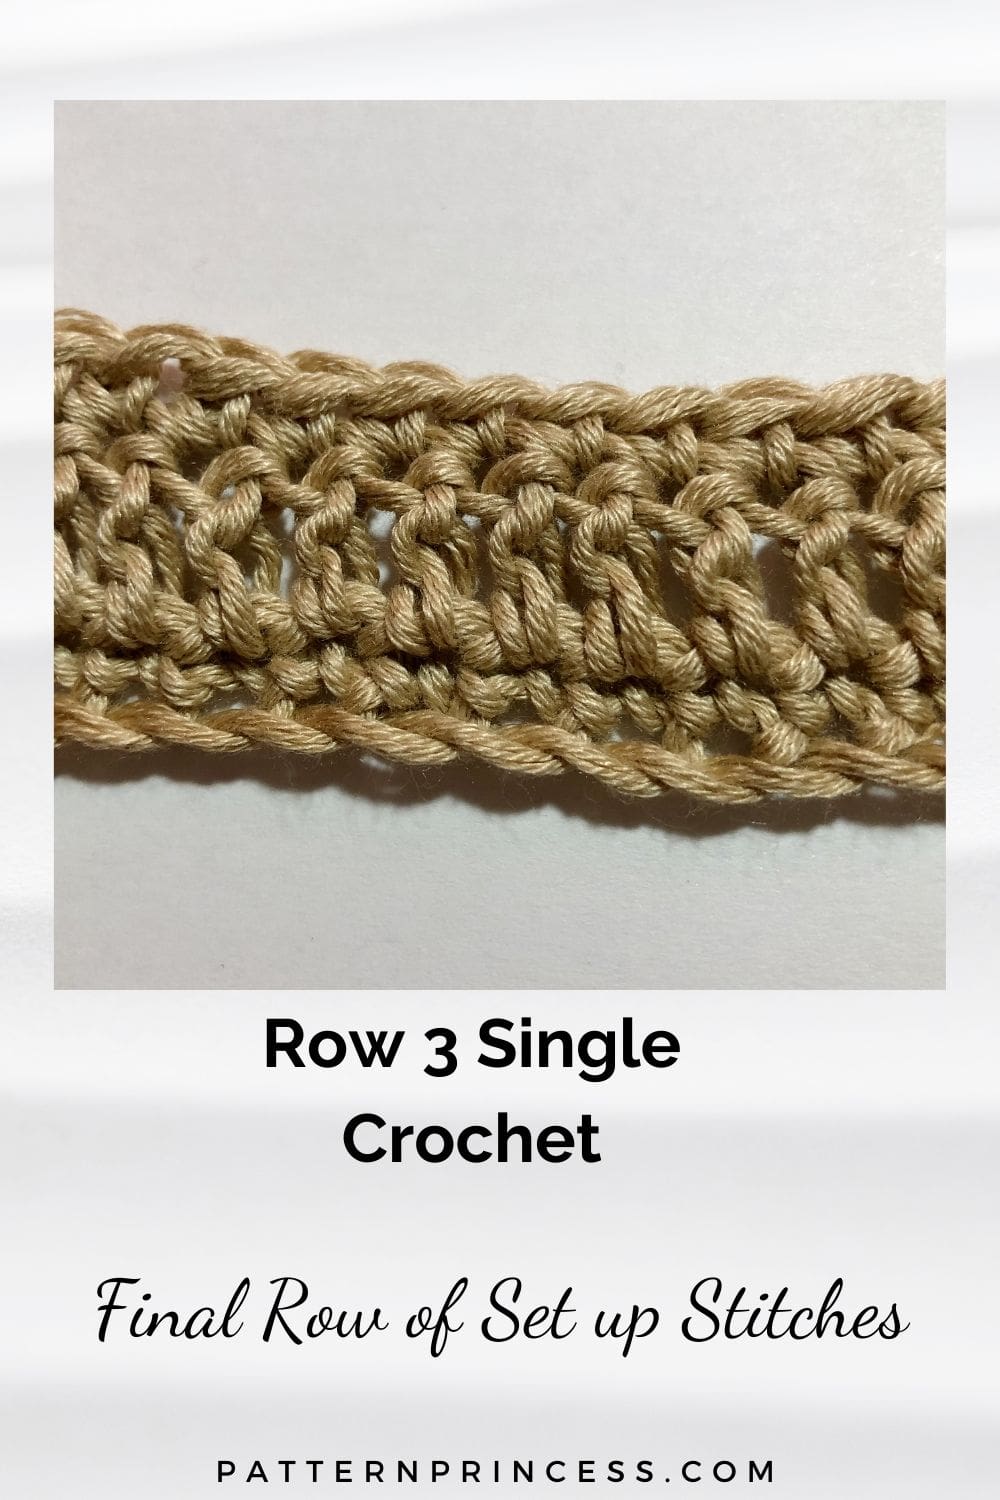
Row 3
CH 1 (Does Not Count as a Stitch), SC in each ST across. Turn
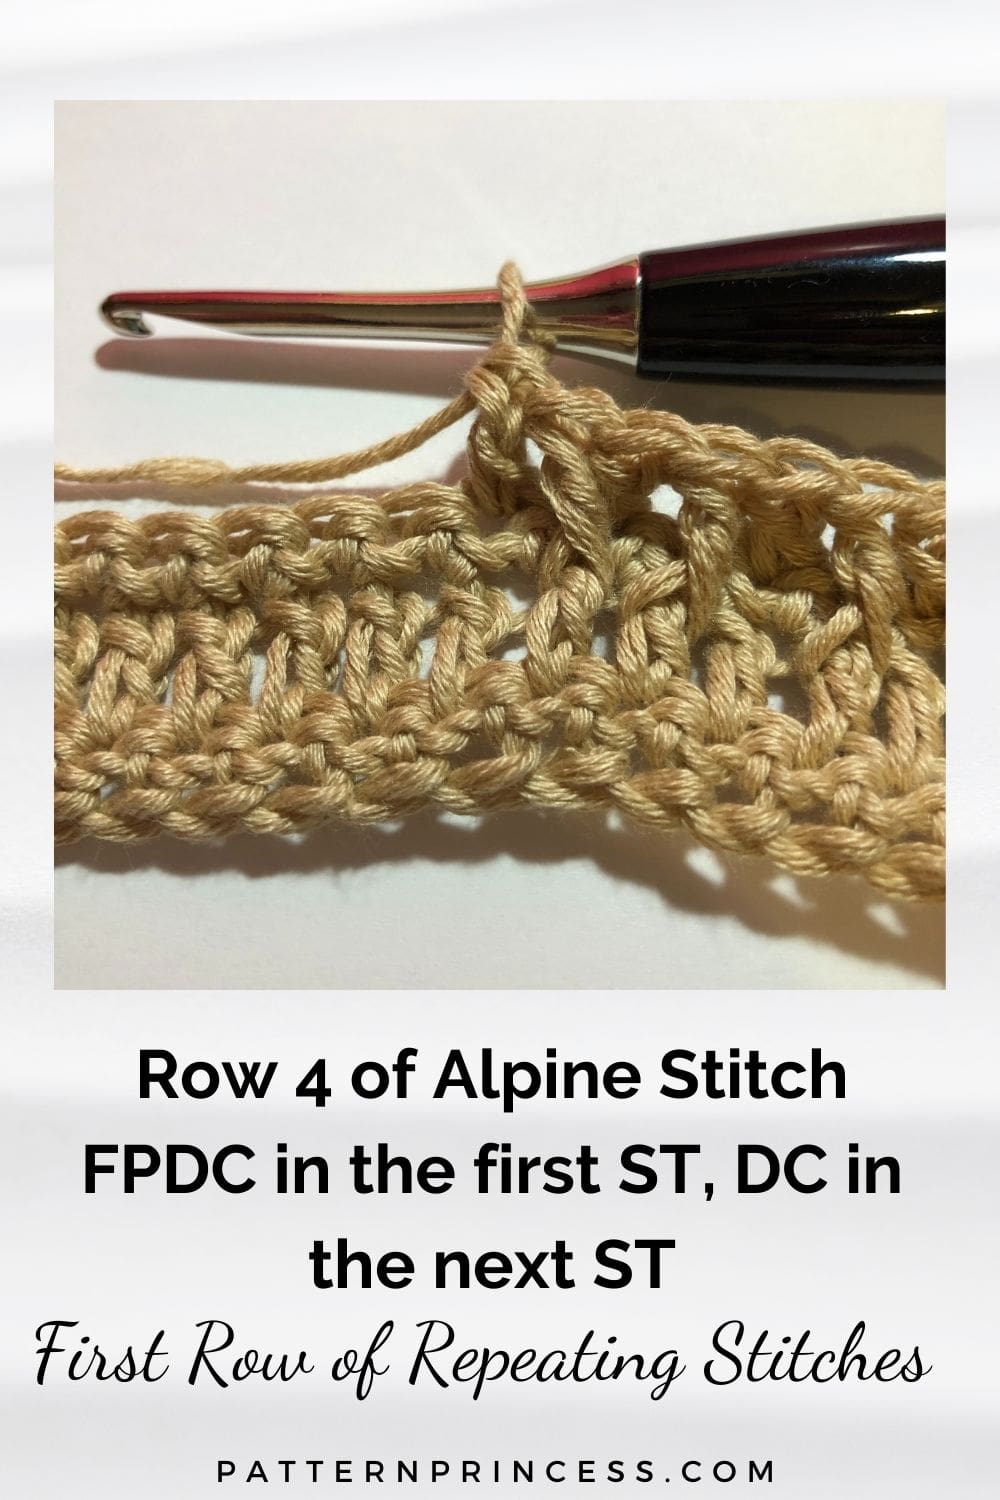
Row 4
CH 2 (Counts as Double Crochet), [FPDC in the first ST, DC in the next ST]. Repeat across between [ ]. In the last ST, work a DC. Turn.
**For this pattern, the FPDC is worked in the DC rows below the SC row. **
Row 5
CH 1 (Does Not Count as a Stitch), SC in each ST across. Turn.
Note. The next two rows are almost the same rows 4 and 5. However, here you work the front post double crochet stitches in the double crochets from row four. Creating the alternating pattern of alpine stitch.
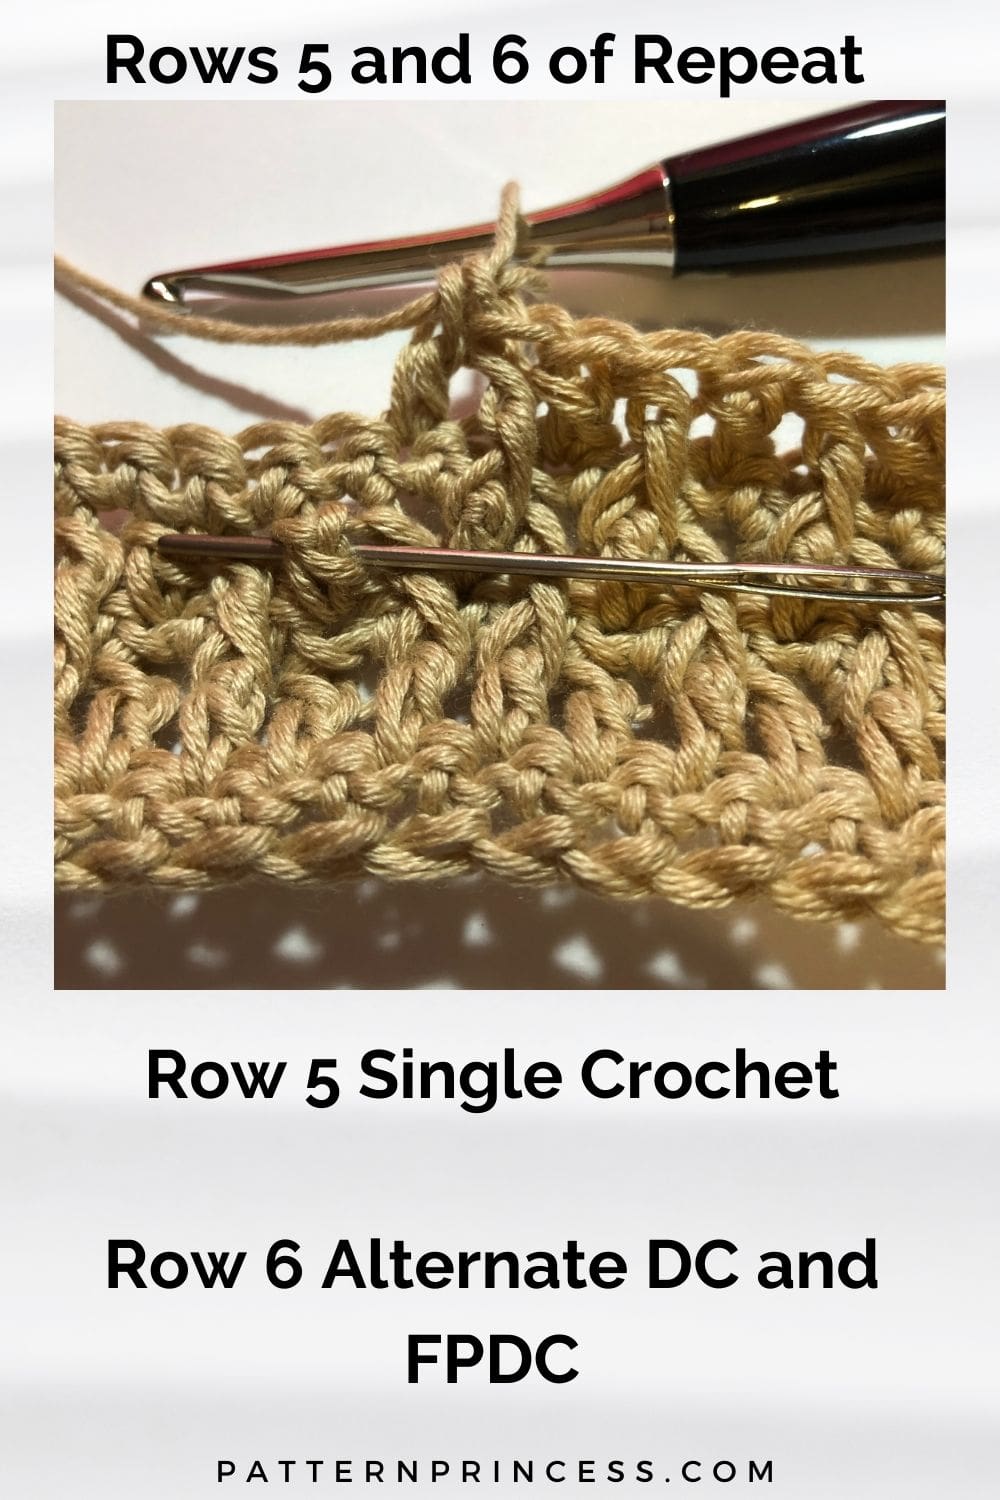
Row 6
CH 2 (Counts as Double Crochet), [DC in the first ST, FPDC in the next ST]. Repeat across between [ ]. In the last ST work a DC. Turn.
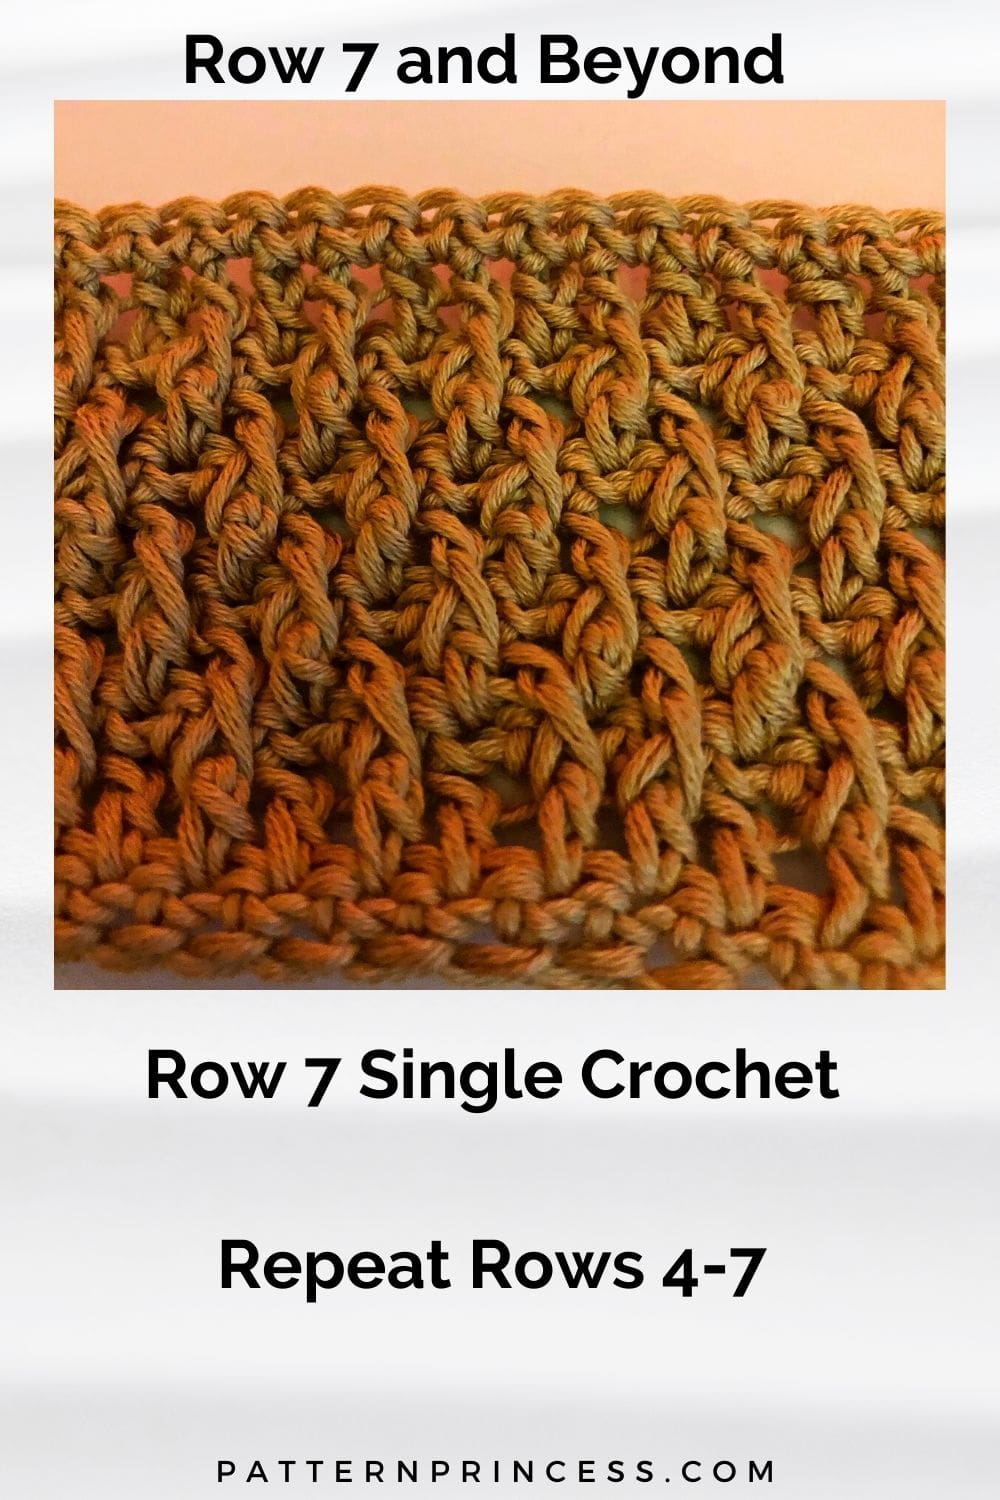
Row 7
CH 1, SC in each ST across. Turn.
Repeat rows 4–7 to desired length.
The last row will look nicer if you end with a single crochet row or regular double crochets.
Find other Crochet Stitch Tutorials to help you grow your crocheting skills.
Pattern Variation
Some people prefer a taller stitch. In place of the double crochet and the front post double crochet, use the treble crochet stitch. If you do this, when starting out the row, use a turning chain of 3. This will provide enough height at the beginning of the row.
Video Tutorial How to Crochet Alpine Stitch

You can find Victoria crocheting, quilting, and creating recipes. She has cooked in restaurants for over 20 years, including many larger parties. She learned to crochet when she was just 11 years old and has been crocheting ever since; over 50 years now. Over 40 years ago, she loved her first class in sewing and continues to hone her skills in quilting. Many have enjoyed the handmade gifts over the years. In her professional career, she has worked in management in a wide variety of businesses including higher education as a dean of a division. All the while attending college part-time to achieve her doctorate in higher education with an emphasis in e-learning.