
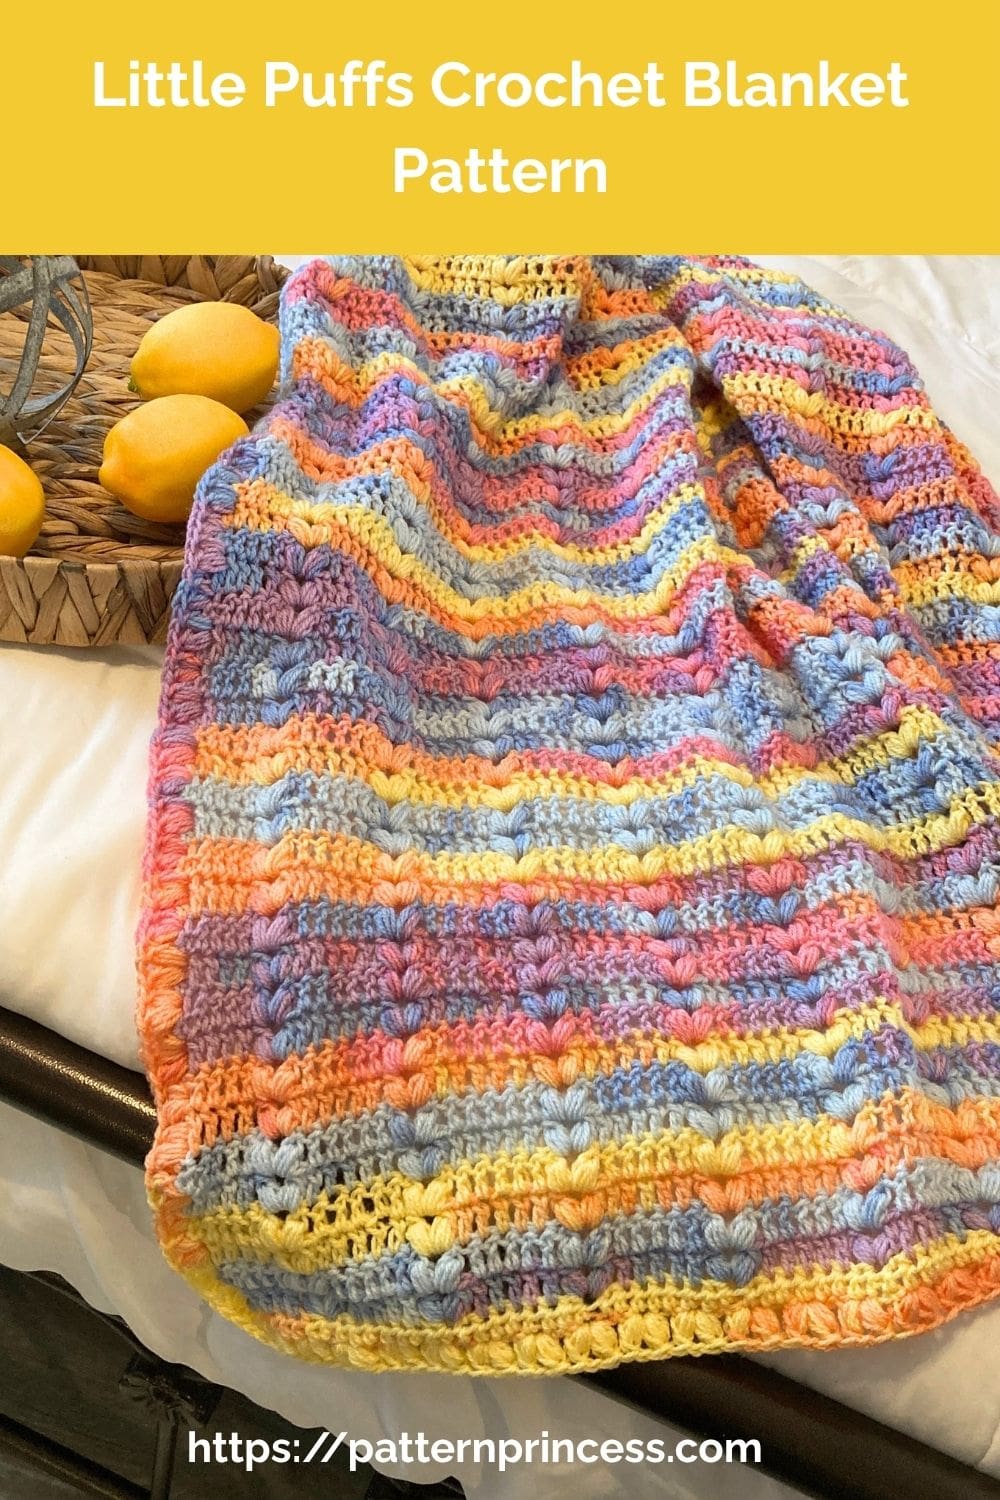
The Little Puffs Crochet Blanket is a soft, textured blanket featuring small puff stitches worked close together to create a beautiful raised texture. The repeating stitch pattern is easy to memorize, making this a relaxing project once you get into the rhythm.
This blanket is written in 11 sizes, from baby through king, so you can make a little blanket for a new baby or a generously sized blanket for a bed. You can also choose whether to add the optional one-round puff stitch border for a more finished, decorative edge.
Stitch Inspiration
Last year, I made a large blanket for my nephew called the Double Crochet Puff Stitch Heart Crochet Blanket. This new design was inspired by that blanket, but there are a few important differences.
The previous blanket uses a double crochet puff stitch with 10 stitches between the sets of puff stitches. For this version, I wanted to create the same general visual effect on a smaller scale, so I used a single crochet puff stitch with only 5 stitches between the puff stitch groups.
The result is a smaller, more closely textured puff stitch design that works beautifully for a baby blanket and can easily be made in larger sizes.
The Story Behind the Little Puffs Blanket
The baby-size blanket shown in these photos started as a project to use some of my yarn stash. As I worked with the soft, cheerful colors, I couldn’t help but think of a rainbow baby and the hope and new beginnings that this can represent.
What is a Rainbow Baby?
A rainbow baby is a baby born after a pregnancy or infant loss, such as a miscarriage, stillbirth, or newborn loss. Just like a rainbow appears after the storm, the rainbow baby can represent hope, healing, and new beginnings.
I had a rainbow baby in mind when I made this particular little blanket. The idea of creating something soft and comforting from colorful yarn felt especially meaningful to me, and that thought became part of the inspiration behind this design.
I think the puffs look like little hearts, which adds to the charm of this baby blanket.
Sometimes a handmade blanket is more than just a collection of stitches. It can hold a memory, a little bit of hope, or simply the love that went into making it.
Why You’ll Love This Blanket
Easy Repeating Stitch Pattern. Once the stitch pattern is established, this is a one-row repeat with a comfortable rhythm that makes this a relaxing blanket to crochet.
Beautiful Texture. The closely spaced puff stitches create little raised details throughout the blanket without making the design overly complicated.
Reversible Design. The stitch pattern looks beautiful on both sides, so there is no right or wrong side to the finished blanket.
11 Blanket Sizes. Make the size that fits your needs, from a small baby blanket all the way to a king-size blanket.
Optional Puff Stitch Border. Finish your blanket with one round of puff stitches for a decorative edge that echoes the texture of the blanket. Or, leave the border off for a simple, clean finish.
Great for Color Play. The stitch pattern works beautifully in a single color, multiple colors, or variegated and self-striping yarn.
A Great Stash Yarn Project. This is also a fun way to use yarn you already have on hand. Combine coordinating colors or let leftover yarn create its own colorful pattern.

Choosing Yarn for Your Little Puffs Blanket
The texture of this blanket makes it especially enjoyable to crochet with a smooth yarn that allows the puff stitches to stand out.
A solid color will showcase the texture beautifully, while several coordinating colors can create stripes or color blocks. Variegated, self-striping, and long-color-change yarns can also give the blanket a completely different look without requiring frequent color changes.
Color Ideas for Little Puffs
The sample shown here uses a soft, colorful yarn that creates gentle bands of color throughout the baby-size blanket. You certainly don’t have to use pastel or rainbow colors. Try neutrals for a classic look, soft pastels for a nursery blanket, or deeper colors for a cozy throw.
Although the sample uses soft rainbow colors, there are so many ways to approach the color palette for this blanket.
Try:
- One solid color for a classic textured blanket
- Two colors worked in alternating stripes
- Several colors for a cheerful, colorful blanket
- Soft pastels for a baby or nursery blanket
- Neutrals for a modern throw
- Coordinating colors for a seasonal blanket
- Variegated or self-striping yarn for effortless color changes
And if you’re looking for a stash-busting project, this is a great one to experiment with. Small amounts of leftover yarn can be combined to create your own unique color story.

Get Your Ad Free Printable PDF in our Etsy Shop.
Directions: Little Puffs Crochet Blanket
Skill Level
Advanced Beginner to Intermediate. The stitch pattern is repetitive and easy to memorize, but the puff stitch requires working through several loops at once. Keeping your tension relaxed will make the puff stitches easier to complete.
Gauge
Approximately 11 stitches and 6 rows = 4 x 4 inches in pattern.
Size
- Stroller Blanket: Without Border 28 X 28 inches, With Border 30 x 30 inches.
- Baby Blanket: Without Border 34 X 34 inches, With Border 36 x 36 inches.
- Toddler Blanket (shown): Without Border 40 X 40 inches, With Border 42 x 42 inches.
- Small Throw: Without Border 43 X 48 inches, With Border 45 x 50 inches.
- Medium Throw: Without Border 48 X 58 inches, With Border 50 x 60 inches.
- Large Throw: Without Border 58 X 68 inches, With Border 60 x 70 inches.
- X Large Throw: Without Border 68 X 78 inches, With Border 70 x 80 inches.
- Twin: Without Border 68 X 98 inches, With Border 70 x 100 inches.
- Full: Without Border 78 X 98 inches, With Border 80 x 100 inches.
- Queen: Without Border 88 X 98 inches, With Border 90 x 100 inches.
- King: Without Border 104 X 98 inches, With Border 106 x 100 inches.
Work your starting chain using a multiple of 8 + 6 until you reach your desired width. To make it longer or shorter increase or decrease the rows.
The crochet border will add approximately 1 inch to each side, or about 2 inches to both the width and length.

Materials
Lion Brand Yarn Ice Cream, 3 Light / DK, 100% Acrylic. 394 yards each skein. Care. Machine Wash, Machine Dry.
Yarn Color: Parfait
- Stroller Blanket: 765 yards, 2 skeins.
- Baby Blanket: 1,100 yards, 3 skeins.
- Toddler Blanket (shown): 1,480 yards, 4 skeins.
- Small Throw: 1,920 yards, 5 skeins.
- Medium Throw: 2,600 yards, 7 skeins.
- Large Throw: 3,600 yards, 10 skeins.
- X Large Throw: 4,800 yards, 13 skeins.
- Twin: 6,000 yards, 16 skeins.
- Full: 6,800 yards, 18 skeins.
- Queen: 7,700 yards, 20 skeins.
- King: 9,050 yards, 23 skeins.
If you are not able to find the yarn locally, you can purchase it online. Savings Center – Pattern Princess
Size I Crochet Hook 5.5mm
Yarn Needle
Scissors
Tape Measure
Abbreviations
- CH = Chain
- DC = Double Crochet
- HDC = Half Double Crochet
- Puff = Puff Stitch
- SC = Single Crochet
- SK = Skip
- SP = Space
- ST = Stitch
- Stacked SC = Stacked Single Crochet
- STs = Stitches
- [ ] = Repeat Between
Pattern Notes
Written in US terms.
There is no right or wrong side to this pattern. This means it looks the same on both sides.
Puff stitches can use a little more yarn than standard stitches and can also affect your tension.
Don’t pull the loops too tightly. Give each puff enough height so that the texture can develop properly.
Links for Video Tutorials for the blanket and the border are located after the written pattern.

Crochet Stitches
Chain Stitch (CH ST)
Begin the chain stitch by making a slip knot on the crochet hook. Leave about a 5-inch tail on the yarn. This will be weaved in later.
Next snug up the yarn loop that is on the crochet hook; while it should be firm, it should also be loose enough to slide on the hook with ease.
Keeping the loop on the hook, insert the hook in the stitch, wrap the yarn over the crochet hook from back to front. Draw the yarn through the loop. (The first chain stitch is complete).
Double Crochet Stitch (DC)
Yarn over, insert the hook through both loops and pull up a loop. Next, yarn over and pull through two loops on the hook. Lastly, yarn over again and pull through the last two loops on the hook.
Half Double Crochet (HDC)
Yarn over, insert the hook through both loops of the next stitch and pull up a loop. Yarn over and pull through all three loops on the hook. For height, this stitch is between the single crochet and double crochet.
Russian Join
I used the Russian Join for changing the yarn right where I was crocheting in the project.
The Russian join is a secure way to join yarn, perfect for crochet projects where you don’t want visible joins. This method uses a yarn needle or tapestry needle to weave the ends of yarn back into itself.
Steps for a Russian Join.
- Take the two strands that you want to join together and cross them over each other.
- Fold each strand of yarn over on itself making sure to fold over the new strand.
- Take the tails and work them back in to the yarn that they came from.
- Using a pointy yarn needle, feed a short 2-3 inch tail back into itself.
- Pull the yarn through the fibers. Do this for each strand of yarn.
- Cut off any remaining ends of yarn and carry on with your crochet project.
This method works best for yarns like wool or acrylic. As long as it has plies or strands of yarn that you can work into. So, chenille yarn wouldn’t work for this method.
Here is a video tutorial on how to join yarn using the Russian Join.

Special Stitches
Puff Stitch (Puff)
Step 1: Yarn over, insert hook into stitch, and pull up a loop. (3 loops on hook)
Step 2: Yarn over, insert hook into same stitch, and pull up a loop. (5 loops on hook)
Step 3: Yarn over, insert hook into the same stitch, and pull up a loop. (7 loops on hook).
Step 4: Yarn over, insert hook into the same stitch, and pull up a loop. (9 loops on hook).
Step 5: Yarn over, pull through the first 8 loops on hook (skip the last one).
Step 6: Yarn over, pull through remaining two loops. Puff Stitch complete.
Stacked Single Crochet (Stacked SC)
Step 1: CH 1. Work a single crochet into the first stitch. (Insert your hook into the first stitch of the row, yarn over, and pull up a loop. Yarn over again and pull through both loops on the hook). Single crochet complete.
Step 2: Work a single crochet stitch stacked on top of the first stitch. (Insert your hook into the left vertical bar of the single crochet you just made (It’s the post of the stitch), yarn over, and pull up a loop. Yarn over and pull through both loops on the hook). The second single crochet is now stacked on top of the first stitch.
Begin Pattern
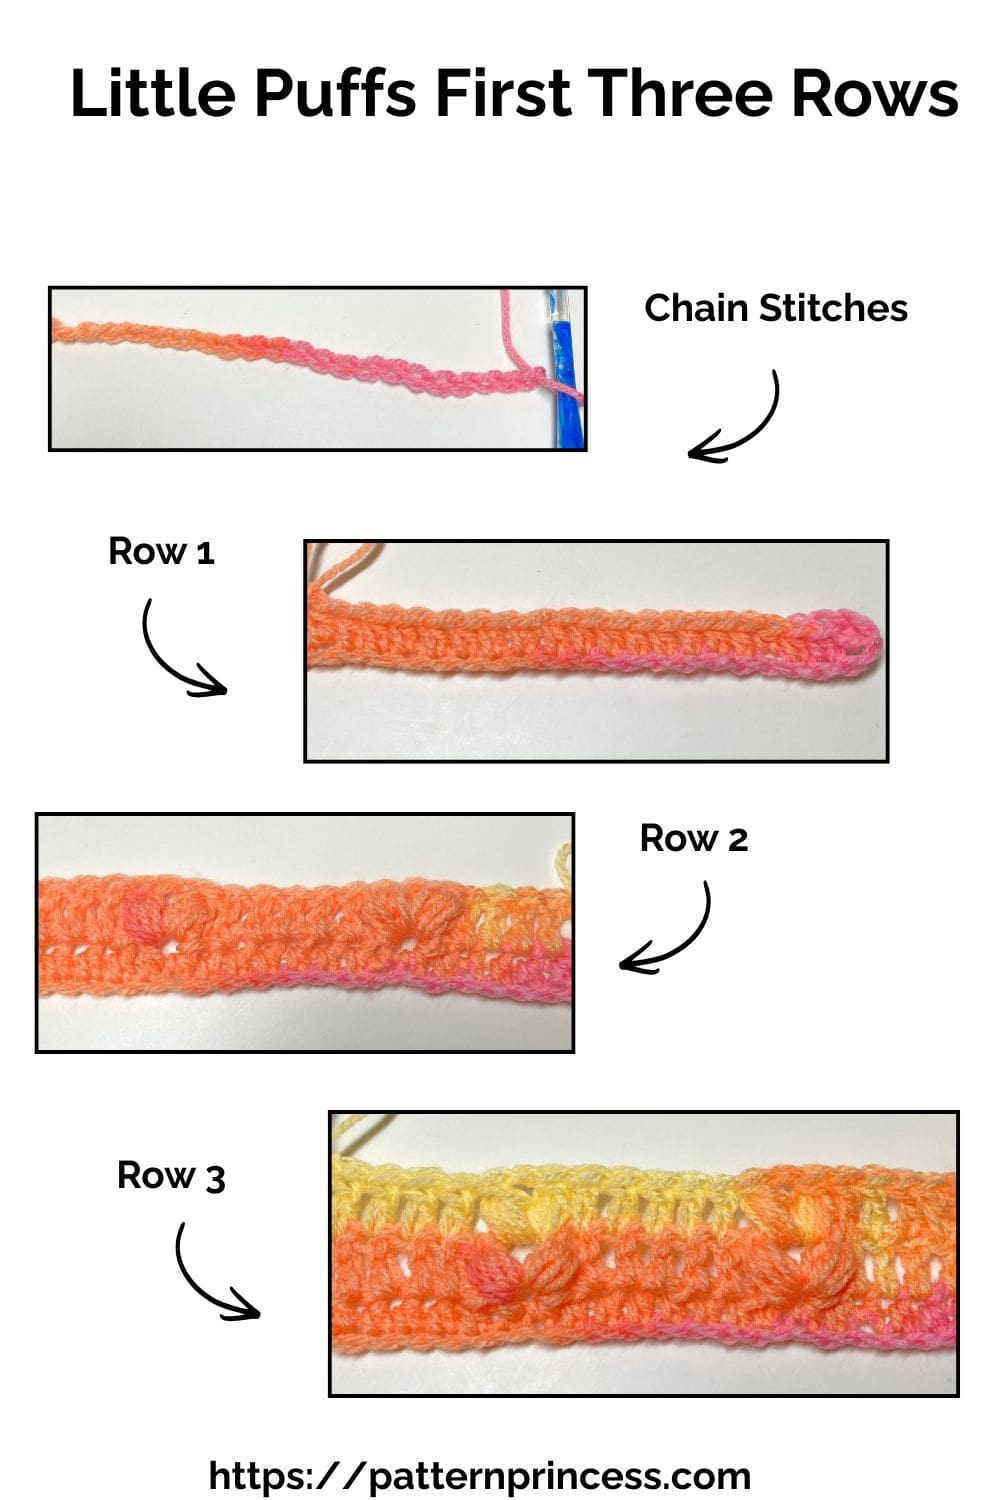
Start with a Slip Knot. Place the slip knot on your crochet hook.
Begin Chain Stitches
Start with a chain using a stitch multiple if 8 + 6.
- Stroller Blanket: 78 chain stitches.
- Baby Blanket: 102 chain stitches.
- Toddler Blanket (shown): 118 chain stitches.
- Small Throw: 126 chain stitches.
- Medium Throw: 142 chain stitches.
- Large Throw: 174 chain stitches.
- X Large Throw: 198 chain stitches.
- Twin: 198 chain stitches.
- Full: 230 chain stitches.
- Queen: 262 chain stitches.
- King: 310 chain stitches.
Row 1
HDC in the second ST from the hook and in each ST across. Turn
Row 2
CH 1 (Doesn’t Count as a ST). Work a Stacked SC in the first ST (Counts as a DC). DC in the next 4 STs. [SK the next ST. In the next ST work (1 Puff, CH 1, 1 Puff). SK the next ST. DC in the next 5 STs]. Repeat across between [ ]. Turn
Row 3
Note: for this row, you’ll be working the puff stitches in the CH SP between the puff stitches of the previous row.
CH 1 (Doesn’t Count as a ST). Work a Stacked SC in the first ST (Counts as a DC). DC in the next 4 STs. [SK the first Puff. In the CH SP work (1 Puff, CH 1, 1 Puff). SK the next Puff. DC in the next 5 STs]. Repeat across between [ ]. Turn
Rows 4 and Beyond
Repeat Row 3.
After your final row, you can finish your blanket as-is or continue directly to the optional crochet border.
- Stroller Blanket: 43 rows.
- Baby Blanket: 53 rows.
- Toddler Blanket (shown): 62 rows.
- Small Throw: 74 rows.
- Medium Throw: 90 rows.
- Large Throw: 106 rows.
- X Large Throw: 121 rows.
- Twin: 152 rows.
- Full: 152 rows.
- Queen: 152 rows.
- King: 152 rows.
Crochet Border
After the last stitch, continue with the border, don’t cut the yarn.
Border Note: The border is worked continuously around the blanket, with two puff stitches separated by a chain-1 space in each corner. Along the side edges, the puff stitch groups are worked into every other row.
Round 1
In the first corner work (1 Puff, CH 1, 1 Puff). On the side work (1 Puff, CH 1, 1 Puff) in every other row. If you have 1 row left, SK that row.
In the second corner work (1 Puff, CH 1, 1 Puff). On the bottom row work (1 Puff, CH 1, 1 Puff) in the first ST. [SK 2 STs in the next ST work (1 Puff, CH 1, 1 Puff)]. Repeat across. If you have 1 ST left, SK that ST.
In the third corner work (1 Puff, CH 1, 1 Puff). On the side work (1 Puff, CH 1, 1 Puff) in every other row. If you have 1 row left, SK that row.
In the last corner work (1 Puff, CH 1, 1 Puff) On the top row work (1 Puff, CH 1, 1 Puff) in the first ST. [SK 2 STs in the next ST work (1 Puff, CH 1, 1 Puff)]. Repeat across. If you have 1 ST left, SK that ST. End with a SL ST into the top of the first Puff.
Finishing
Use the tapestry needle to weave in the yarn tails on the back side of the work. I like to weave back and forth 3 to 5 times. Cut off the excess yarn.
Video Tutorials on our YouTube channel
The Little Puffs Crochet Blanket
Crochet Puff Stitch Border
We hope that you have enjoyed this lovely crochet pattern.
XO
Vicky & Casey


You can find Victoria crocheting, quilting, and creating recipes. She has cooked in restaurants for over 20 years, including many larger parties. She learned to crochet when she was just 11 years old and has been crocheting ever since; over 50 years now. Over 40 years ago, she loved her first class in sewing and continues to hone her skills in quilting. Many have enjoyed the handmade gifts over the years. In her professional career, she has worked in management in a wide variety of businesses including higher education as a dean of a division. All the while attending college part-time to achieve her doctorate in higher education with an emphasis in e-learning.
Stay connected with Pattern Princess
Add Pattern Princess as a preferred source in Google Search to make it easier to find our crochet patterns, recipes, quilt patterns, and other creative projects when you're looking for something new to make.
