Last updated on March 27th, 2026 at 09:07 am
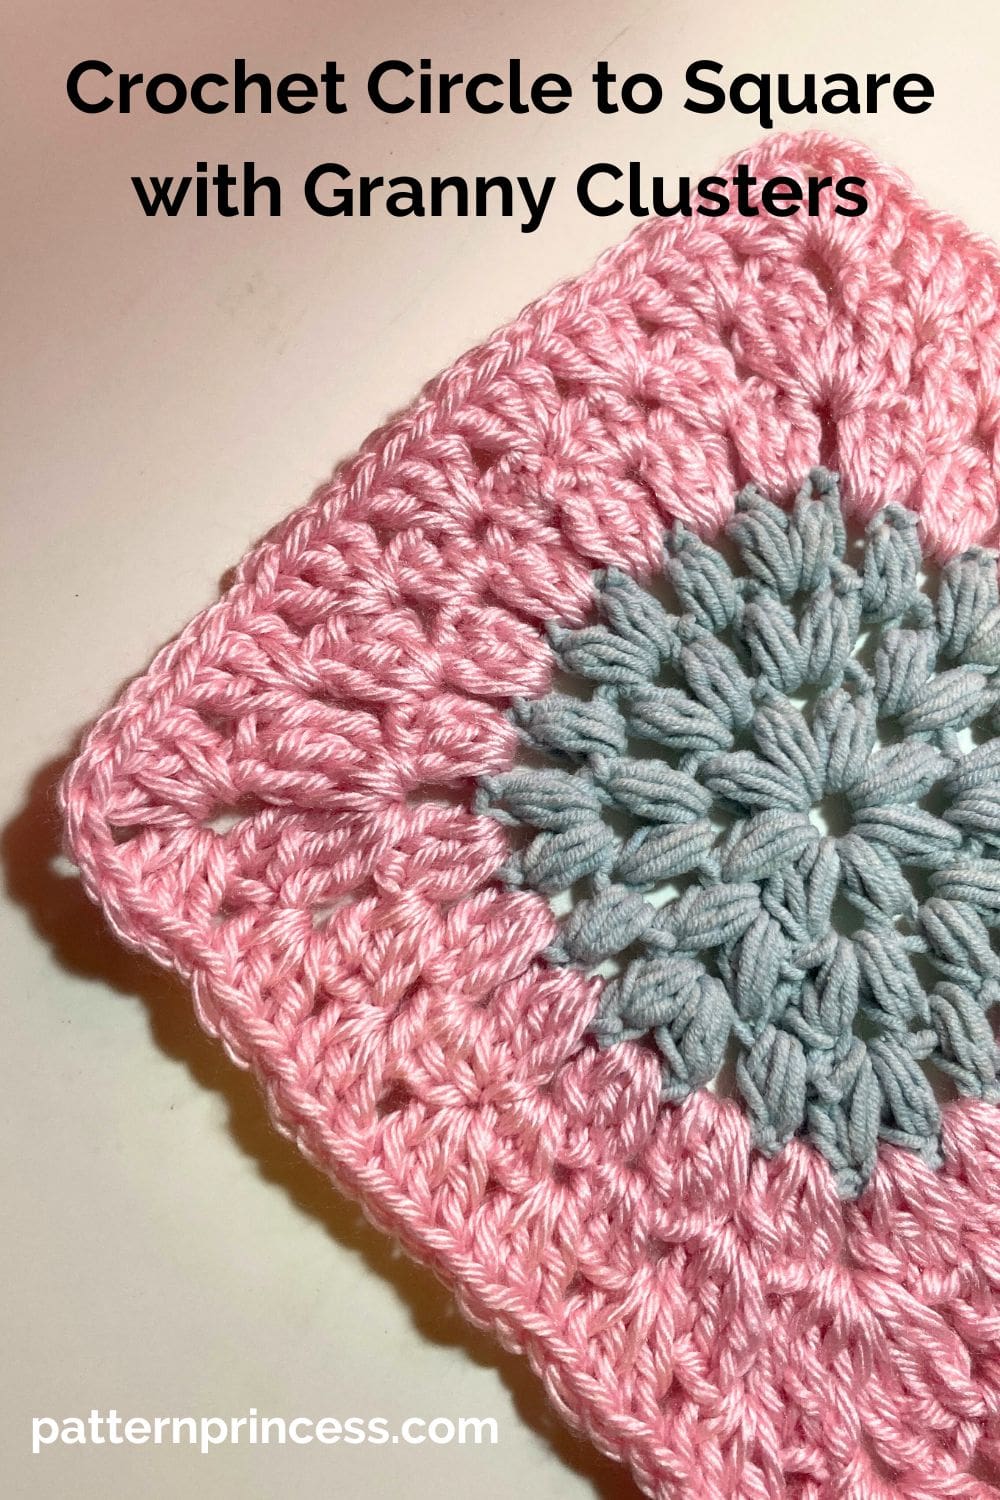
If you’ve ever wondered how to turn a crochet circle into a square using classic granny clusters, you’re in the right place. This free pattern is a great way to transform a round granny into a beautiful square design—perfect for baby blankets, scrap yarn projects, or colorful afghans.
We’ll start with a crochet circle center and build out with granny clusters, using simple double crochets to create that familiar traditional granny feel with a little different twist.
This easy square pattern works up quickly and is ideal for trying out a different color combination in each round. You can keep it simple or get creative with your yarn choices—either way, it’s a fun and flexible crochet granny technique that works for different people and project styles.
As you follow along, I’ll guide you through each round, from the 1st dc to the final corner spaces, making sure your stitch count stays on track. I’ll also show you how to identify the next stitch, where to place your first dc, and how to evenly space your granny clusters to keep the edges straight and corners sharp.
All you need is your favorite crochet hook, some yarn (leftovers work great!), and a few minutes to dive into this beginner-friendly tutorial. Whether you’re making a single square or planning a full square blanket, this method is a great addition to your crochet skills.
Get Your Ad Free Printable PDF in our Etsy Shop
Directions: Crochet Circle to Square with Granny Clusters Skill Level
This crochet project is perfect for an advance beginner.
Size
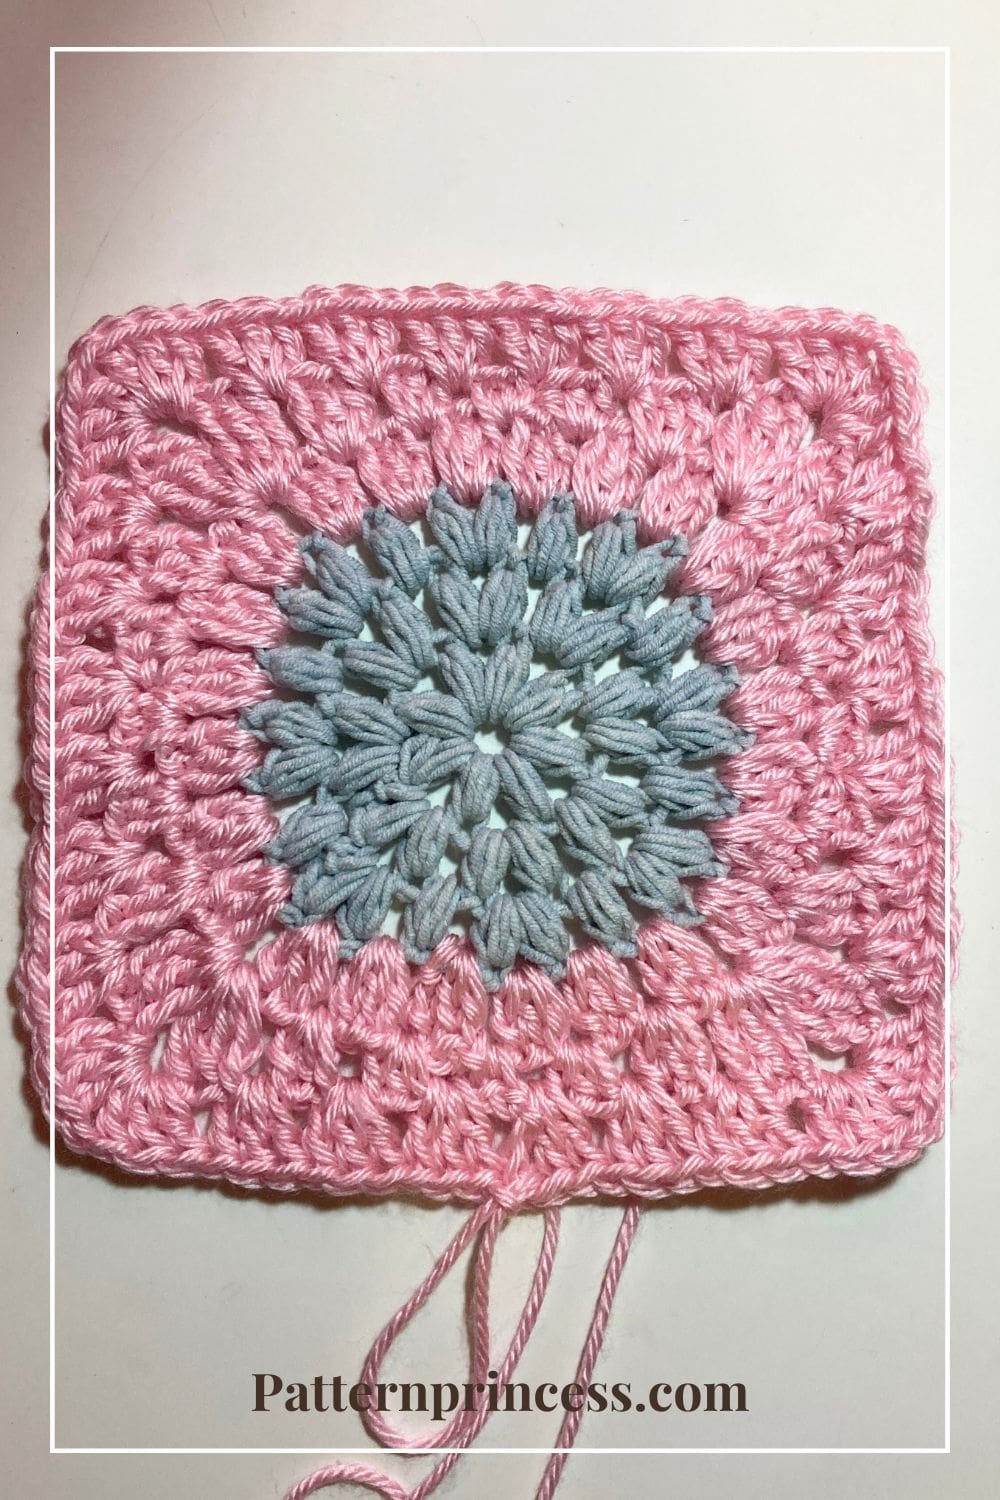
Approximate completed granny square size 6” X 6”.
Gauge
Approximately 12 stitches and 4 rounds per 4 inches. Your gauge will depend on the yarn and crochet hook you choose for your project.
Materials
Yarn. While you can use any yarn weight for this pattern, I suggest a medium worsted weight yarn to practice in two colors. One yarn color for the center circle and a different color for the square. 75 yards of each color.
Crochet hook size that matches your yarn weight.
- Crochet Hook Size H 5.0mm for turning the circle to a square
- Crochet Hook Size I 5.5mm for the center circle
Scissors
Tapestry needle
Abbreviations
- CH = Chain
- DC = Double Crochet
- HDC = Half Double Crochet
- PS = Puff Stitch
- SC = Single Crochet
- SK = Skip
- SL ST = Slip Stitch
- SP = Space
- ST = Stitch
- STs = Stitches
- TR = Treble Crochet
- [ ] = Repeat Between
Pattern Notes
This pattern uses 8 puff stitches in the first round. Each round begins with a partial puff stitch.
Written in US crochet terms.
Two Methods to Begin a Circle
The first thing we do is make a circle to crochet round 1 in. This can be done using one of two methods.
- Use a magic ring to form a circle. If you are new to crochet, here is a tutorial on How to Crochet the Magic Circle (magic ring).
- Chain 4 or 5 stitches and slip stitch back into the first chain to form a circle.
There are pros and cons to each method. Using the magic ring allows you to pull the center closed after crocheting the first round of stitches. However, it may not have as much strength as creating the circle with chain stitches.
Crochet Stitches
Chain Stitch CH
Begin the chain stitch by making a slip knot and adding the loop on the crochet hook.
Keeping the loop on the hook, wrap the yarn over the crochet hook from back to front using the hook to draw the yarn through the loop that is currently on the hook. (The first chain stitch is complete).
HOW TO CROCHET THE CHAIN STITCH video tutorial
Double Crochet (DC)
Yarn over, insert the hook through both loops and pull up a loop. Next, yarn over and pull through two loops on the hook. Lastly, yarn over again and pull through the last two loops on the hook.
HOW TO CROCHET THE DOUBLE CROCHET STITCH video tutorial
Half Double Crochet (HDC)
Yarn over, insert the hook through both loops of the next stitch and pull up a loop. Yarn over and pull through all three loops on the hook. For height, this stitch is between the single crochet and double crochet.
HOW TO CROCHET THE HALF DOUBLE CROCHET STITCH video tutorial
Single Crochet (SC)
Insert the hook, pull up a loop. Yarn over and pull through the two loops on the hook.
HOW TO CROCHET THE SINGLE CROCHET STITCH video tutorial
Treble Crochet (TR)
Yarn over twice, insert the hook through both loops and pull up a loop. Next, yarn over and pull through two loops on the hook. Yarn over again and pull through the next two loops. Lastly, yarn over again and pull through the last two loops on the hook.
TREBLE CROCHET AND TREBLE CROCHET TWO TOGETHER
Special Stitches
Puff Stitch.
3 HDC Cluster Puff Stitch. To make a puff stitch, it’s as if you’re crocheting a group of half-double crochet stitches all together in the same stitch. These instructions are for a puff stitch with 3 stitches. Remember, you can have any number of stitches in your puff stitch, depending on how puffy you want your texture to look. Today, I will be showing you using the 3 stitches for the puff.
A regular puff stitch in this pattern is to yarn over, insert hook, yarn over again and pull up a loop. You will need to do this a total of three times. So, yarn over and pull up a loop. Now you’ve done it twice. At this point, you should have five loops on your hook. You have one more time to go. Yarn over and pull up another loop. Now there should be seven loops on your hook. In this pattern, every regular puff stitch should have seven loops on the hook. Now you’re ready to yarn over and pull through all seven loops on your hook. Work a chain one to close the top. That’s it.
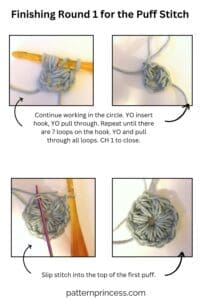
Here are Video Tutorials for Crocheting the Puff Stitch in the Round
Make the Center Circle
Crochet Hook Size I 5.5mm
Begin
Start by making a slip knot and adding the loop on the hook. For the crochet tutorial today, I used the chain stitch method.
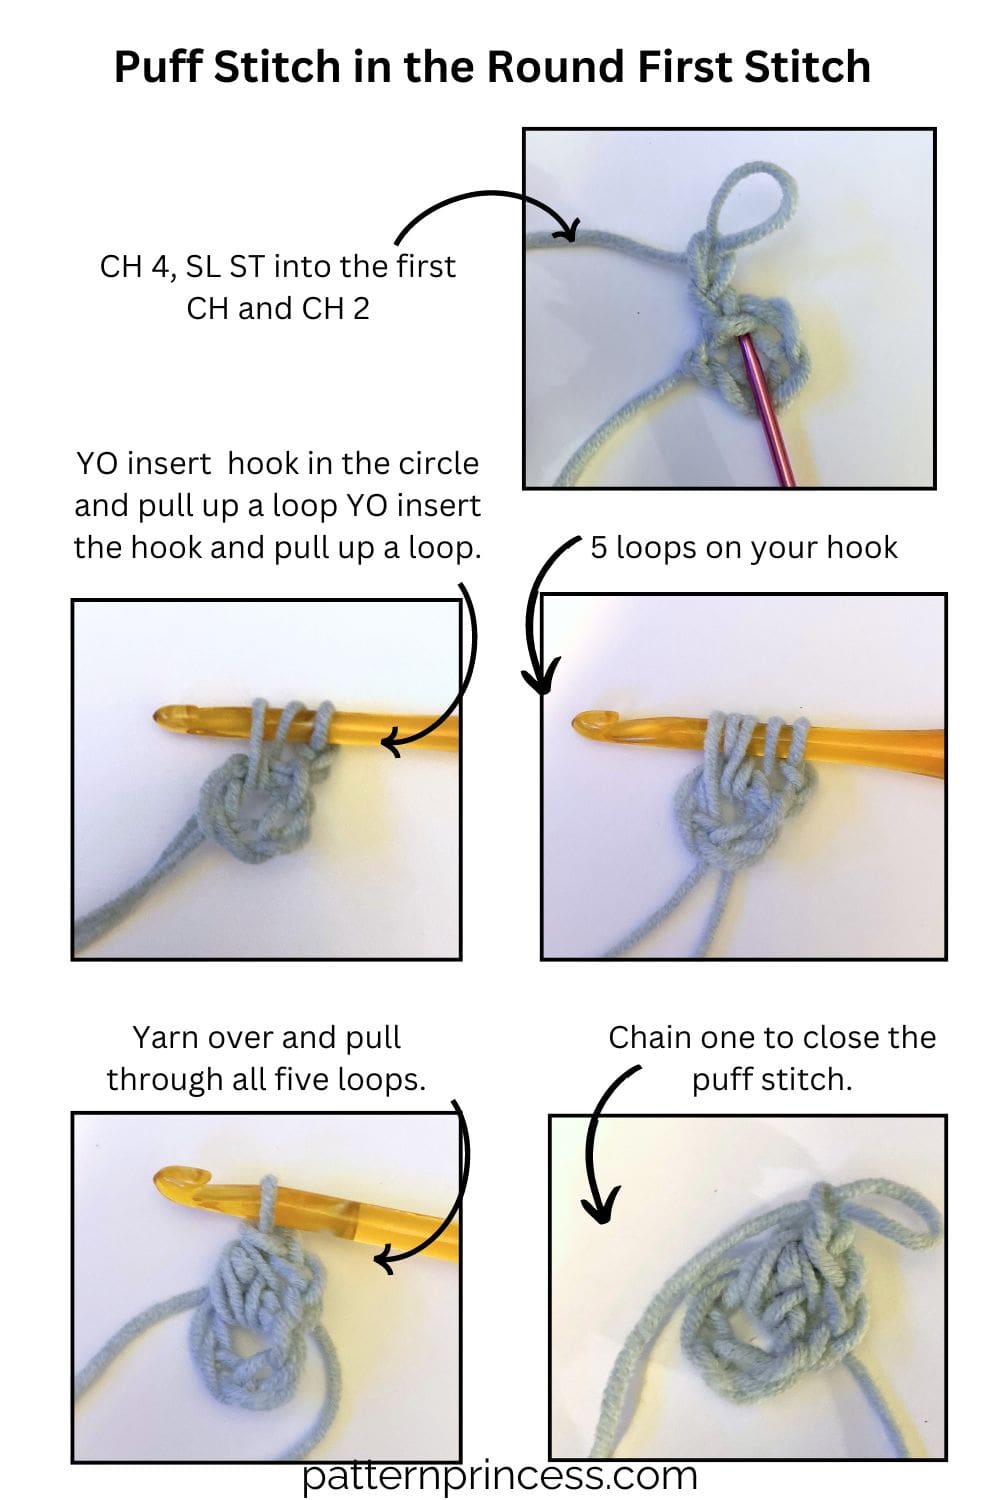
Chain 4, Slip Stitch back into the first chain to close the circle and make a ring.

Round 1
This round and each round start with a partial puff stitch. Also, for round 1, you will be working your stitches inside the circle.
CH 2 (counts toward your first puff stitch). Now you need to work 2 more stitches. Work a partial puff stitch. Yarn over insert your hook in the circle and pull up a loop and then yarn over insert the hook and pull up a loop. At this point, you should have 5 loops on your hook. Yarn over and pull through all five loops. Finish with a chain one to close the puff stitch.
Since we are starting with 8 puff stitches for round 1. We need to make 7 more puff stitches.
Yarn over, insert the hook in the circle. Yarn over again and pull up a loop. This is the first stitch. Yarn over, insert the hook in the circle, yarn over and pull up a loop. This is the second stitch and there should be five loops on your hook. Let’s work the last stitch. Yarn over, insert the hook in the circle, yarn over and pull up a loop. Now there should be seven loops on your hook. Now close it up by completing a chain one.
Repeat the PS 6 more times.
At this point, you should have a total of 8 puff stitches complete. Let’s close round 1. Slip stitch into the top of the first puff.
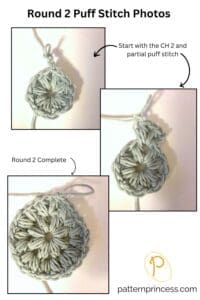
Round 2
In this round, you will double the number of puffs.
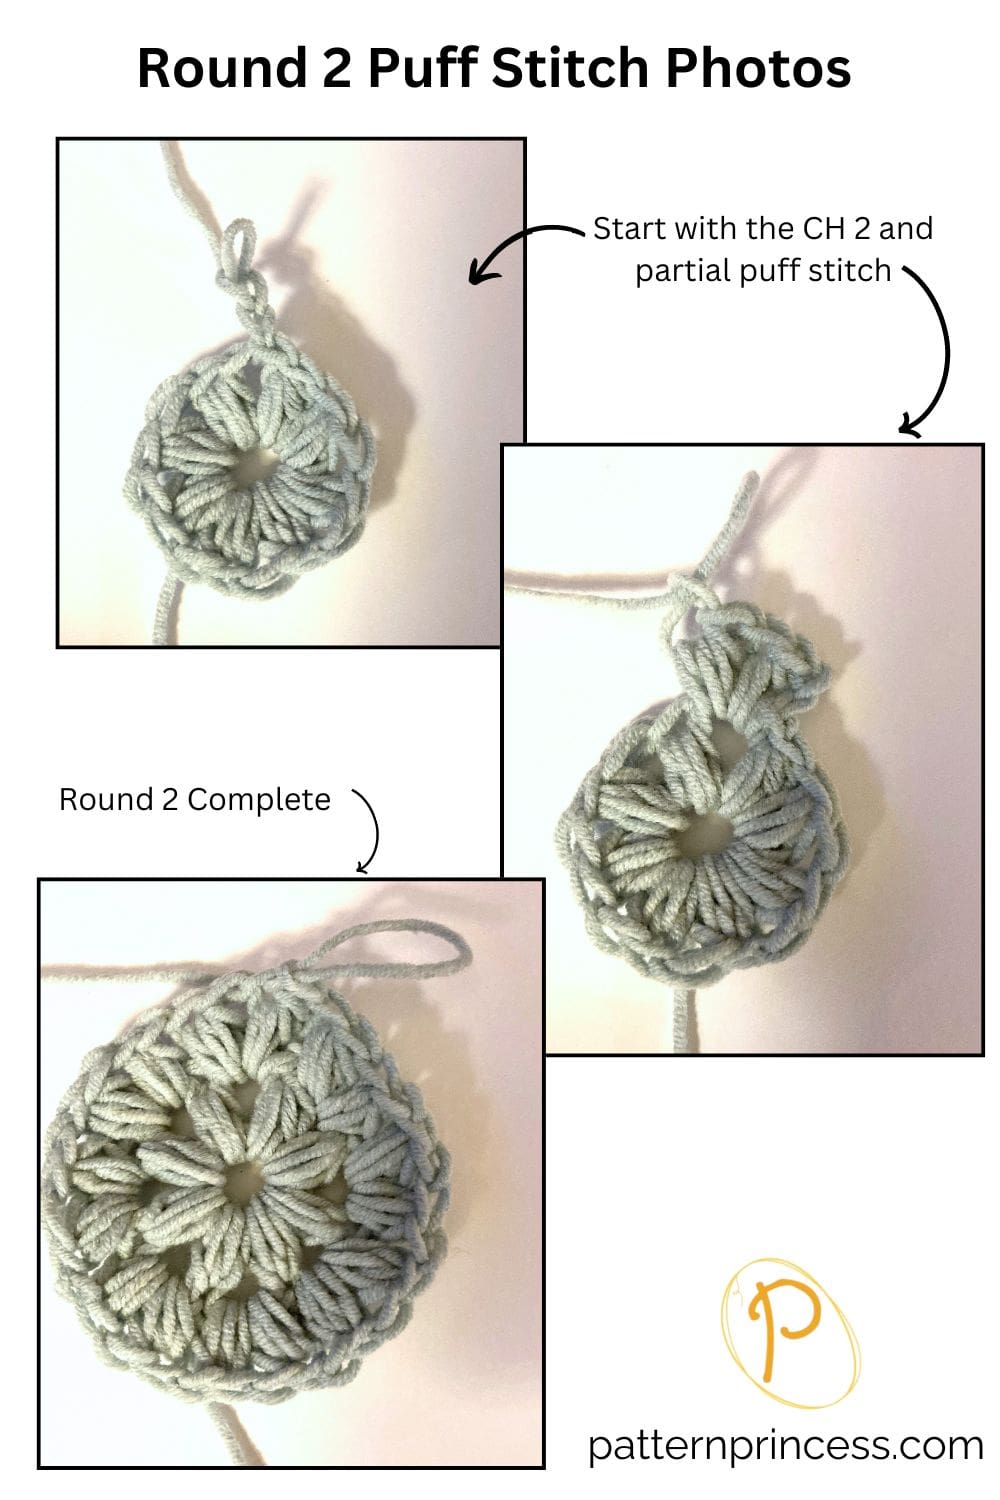
SL ST into the first chain space between the puffs.
Begin with the partial puff stitch. In the same SP, work full PS.
Insert your hook in the next stitch, which is the Cain Stitch Space and work a complete PS. Chain to finish. In the same SP work another complete PS. CH ST to finish.
Continue moving around to each SP working 2 PS in each SP. When you have 16 STs completed, close round 2 by SL ST to the top ST of the first puff.
Round 3
In this round you will add 8 more puffs. We keep the circle flat by adding the extra puff every other space.
Work a partial PS. In the same SP work another PS. Move to the next SP and work 1 PS. [In the next SP work 2 PS, in the next SP work 1 PS]. Repeat between [ ] until you have completed 24 Puff STs in this round. Close round 3 by SL ST to the top ST of the first puff.
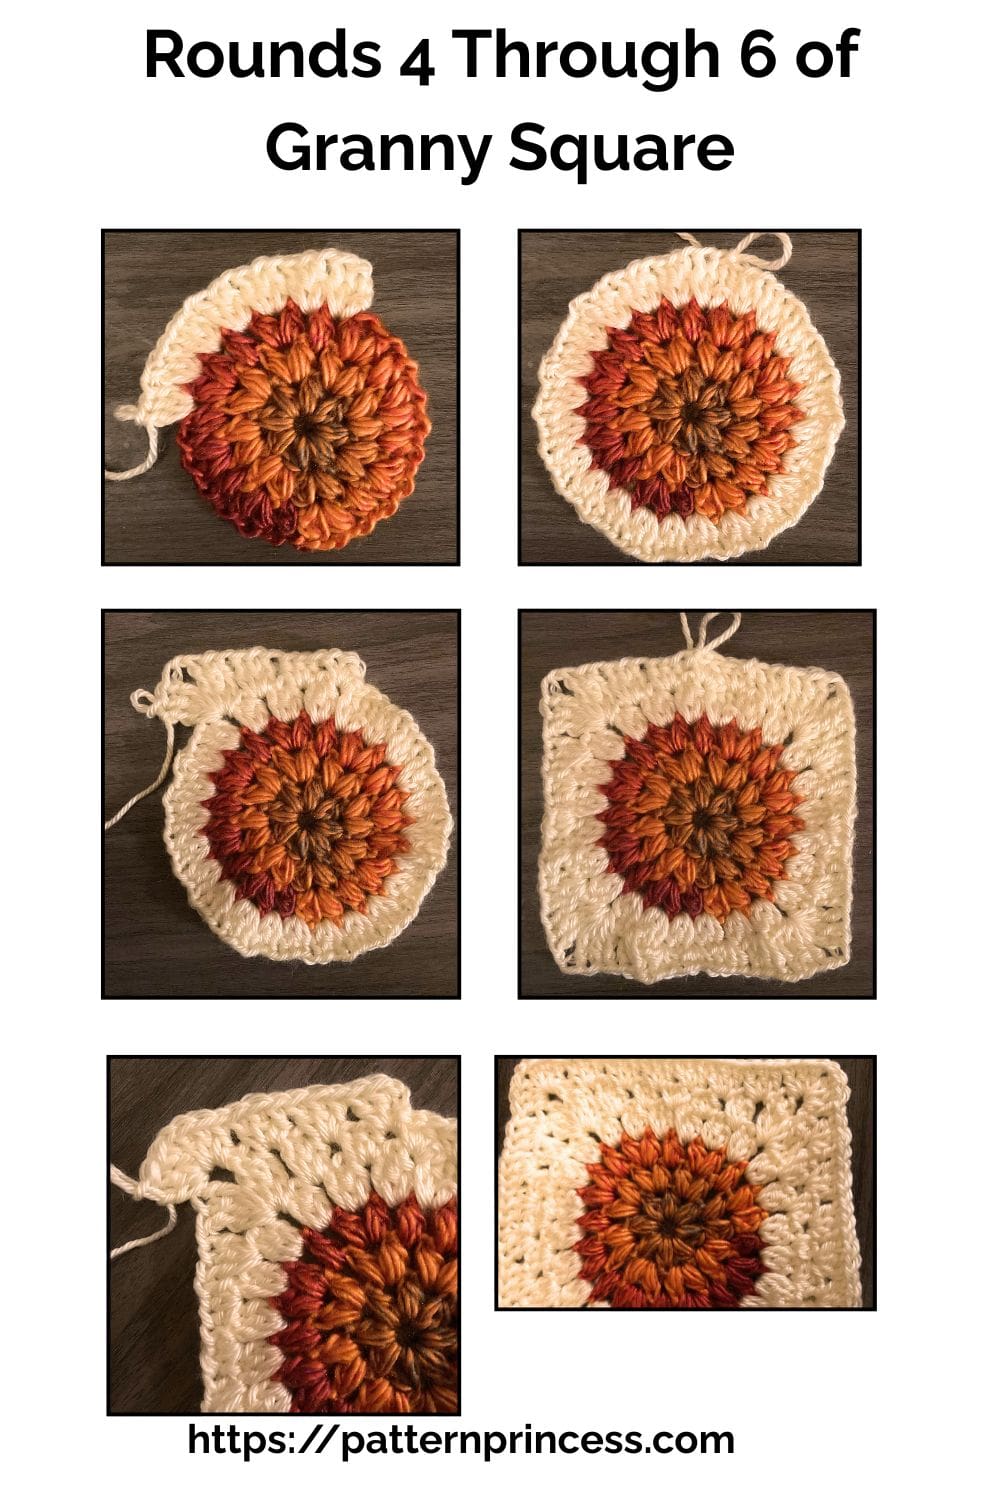
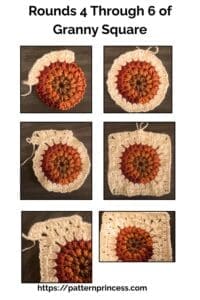
Round 4
Using smaller crochet hook Size H 5.0mm
Change Color. Join yarn between any two puff stitches.
CH 3 (Counts as DC). 2 DC in the same SP. 3 DC in each SP around the circle. SL ST into the top of the beginning CH ST to Join. (24, 3 DC clusters)
Round 5
In this round we are creating corners.
Note. The stitches in this round and round 6 are worked between the clusters of stitches from the previous round.
SL ST into the next SP between the 3 DC clusters, CH 1. (Does Not count as a ST). 3 SC in the same SP, 3 HDC in the next SP, 3 DC in the next SP. Work (3 TR, CH 1, 3 TR) in the next SP. (First corner). [3 DC in the next SP, 3 HDC in the next SP, 3 SC in the next SP, 3 HDC in the next SP, 3 DC in the next SP ((3 TR, CH 1, 3 TR) in the next SP]. (Second corner). Repeat between [ ] around two more times. Then finish the first side by working 3 DC in the next SP, 3 HDC in the next SP, SL ST into the first SC ST to join. (There should be 4 corners complete and 28 clusters of STs total).
Variation. in the corner SP you can also work a CH 2 or CH 3 rather than the CH 1 depending on the size of the hole you desire for the corners.
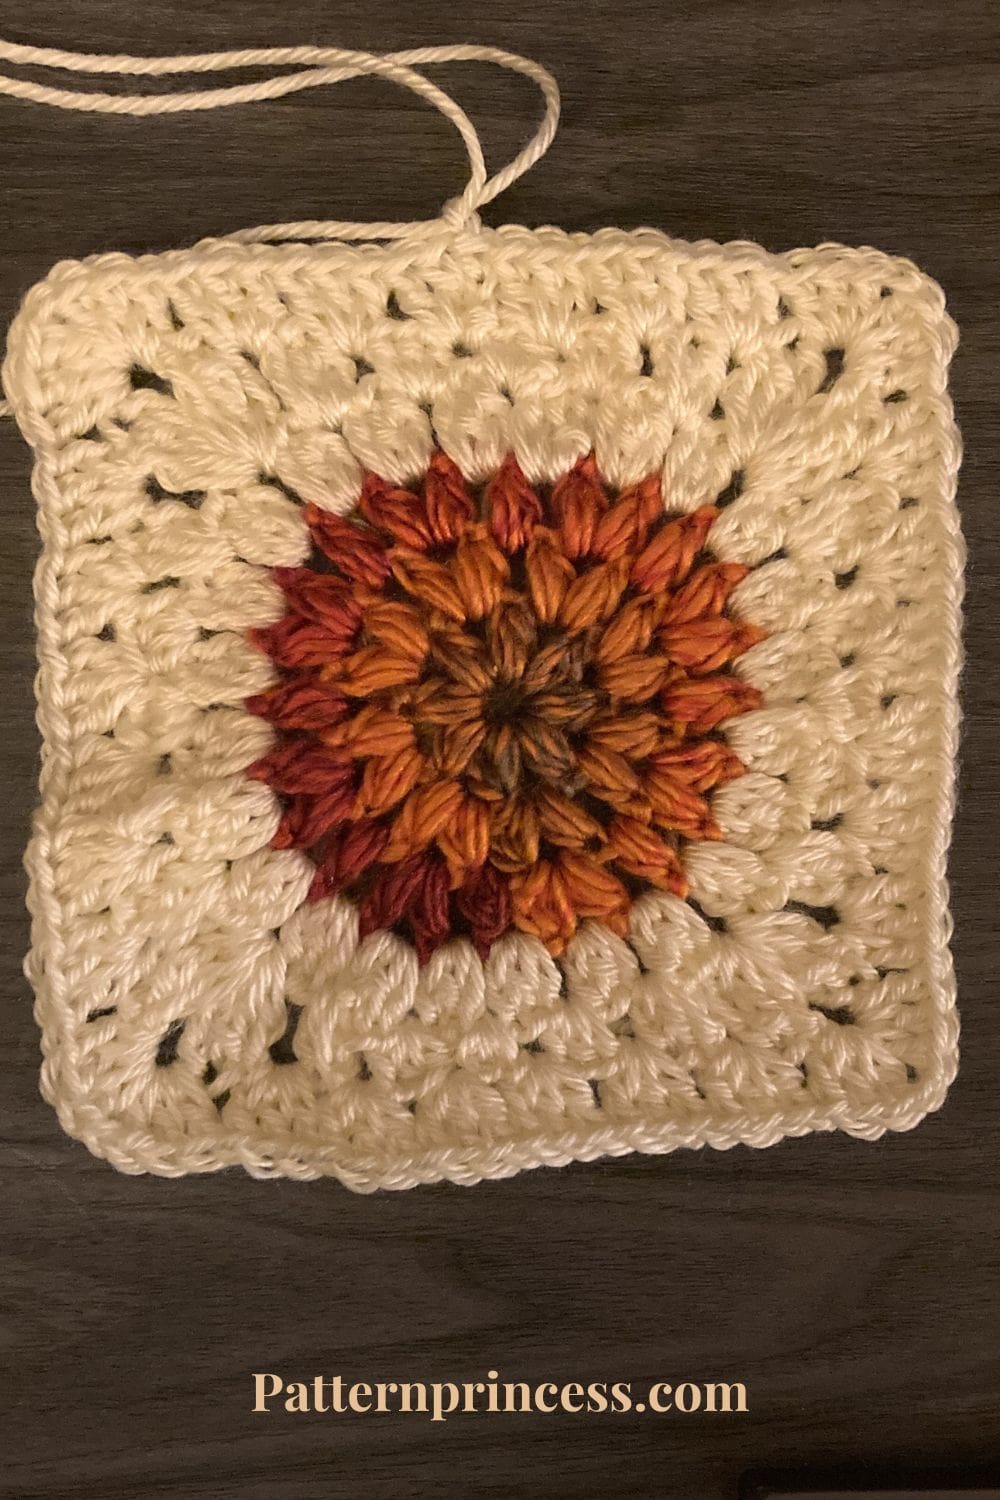
Round 6
SL ST into the next SP between the clusters. CH 3, 2 DC in the same SP. [Work 3 DC in each SP between the clusters to the corner. In the corner work (3 DC, CH 1, 3 DC)]. Repeat between [ ] around three more times. End with a SL ST to the top CH of the first CH STs to join. (There should be 32 clusters of STs total).
Rounds 7 and Beyond
If you wish to make the square larger, you can continue adding rounds to the square using the instructions for round 6. The rounds on each side will increase by 1 cluster with each round complete.
Finishing
Cut off a long tail about 10-12 inches. Pull the yarn through the last stitch. Use the tapestry needle to weave the yarn back and forth through the crochet stitches. At least 4 or 5 times. Cut off any excess yarn.
Video Tutorials
Video Tutorial for the Puff Stitch in the Round
Video Tutorials for Squaring the Circle Using Granny Clusters
How to Join the Granny Squares
Video Tutorial on the Invisible Joining Method
Once you’ve made a few of these squares, it’s time to turn them into something beautiful!
Blocking Squares
Blocking your granny squares is an important step that helps your finished pieces look neat, professional, and uniform in size.
It evens out the stitches, defines the shape, and makes joining squares much easier—especially when you’ve used different stitch styles like circles and granny clusters.
Simply pin your squares to the correct dimensions on a blocking mat, lightly spray with water or steam, and let them dry completely.
A little time spent blocking goes a long way toward giving your project that polished, finished look!
We have a whole blog post dedicated to helping explain How to Block Crochet Spray, Wet, or Steam Blocking
We hope you have enjoyed this gorgeous free crochet pattern for turning a crochet circle to square using granny clusters.
Here are a few other free patterns to inspire your next pattern.
Crochet Circle to Square with Granny Clusters
Equipment
- 1 Crochet Hook Size H 5.0mm for turning the circle to a square
- 1 Crochet Hook Size I 5.5mm for the center circle
- Scissors:
- Tapestry Needle
Materials
- 75 yards Yarn. While you can use any yarn weight for this pattern. I suggest a medium worsted weight yarn to practice in two colors. One yarn color for the center circle and a different color for the square. 75 yards of each color.
Instructions
Make the Center Circle
- Crochet Hook Size I 5.5mm
- Start by making a slip knot and adding the loop on the hook. For the crochet tutorial today, I used the chain stitch method.75 yards Yarn.
- Chain 4, Slip Stitch back into the first chain to close the circle and make a ring.


Round 1
- This round and each round start with a partial puff stitch. Also, for round 1, you will be working your stitches inside the circle.
- CH 2 (counts toward your first puff stitch). Now you need to work 2 more stitches. Work a partial puff stitch. Yarn over insert your hook in the circle and pull up a loop and then yarn over insert the hook and pull up a loop. At this point, you should have 5 loops on your hook. Yarn over and pull through all five loops. Finish with a chain one to close the puff stitch.
- Since we are starting with 8 puff stitches for round 1. We need to make 7 more puff stitches.
- Yarn over, insert the hook in the circle. Yarn over again and pull up a loop. This is the first stitch. Yarn over, insert the hook in the circle, yarn over and pull up a loop. This is the second stitch and there should be five loops on your hook. Let’s work the last stitch. Yarn over, insert the hook in the circle, yarn over and pull up a loop. Now there should be seven loops on your hook. Now close it up by completing a chain one.
- Repeat the PS 6 more times.
- At this point, you should have a total of 8 puff stitches complete. Let’s close round 1. Slip stitch into the top of the first puff.
Round 2
- In this round, you will double the number of puffs.
- SL ST into the first chain space between the puffs.
- Begin with the partial puff stitch. In the same SP, work full PS.
- Insert your hook in the next stitch, which is the Cain Stitch Space and work a complete PS. Chain to finish. In the same SP work another complete PS. CH ST to finish.
- Continue moving around to each SP working 2 PS in each SP. When you have 16 STs completed, close round 2 by SL ST to the top ST of the first puff.
Round 3
- In this round you will add 8 more puffs. We keep the circle flat by adding the extra puff every other space.
- Work a partial PS. In the same SP work another PS. Move to the next SP and work 1 PS. [In the next SP work 2 PS, in the next SP work 1 PS]. Repeat between [ ] until you have completed 24 Puff STs in this round. Close round 3 by SL ST to the top ST of the first puff.
Round 4
- Using smaller crochet hook Size H 5.0mm
- Change Color. Join yarn between any two puff stitches.
- CH 3 (Counts as DC). 2 DC in the same SP. 3 DC in each SP around the circle. SL ST into the top of the beginning CH ST to Join. (24, 3 DC clusters)
Round 5
- In this round we are creating corners.
- Note. The stitches in this round and round 6 are worked between the clusters of stitches from the previous round.
- SL ST into the next SP between the 3 DC clusters, CH 1. (Does Not count as a ST). 3 SC in the same SP, 3 HDC in the next SP, 3 DC in the next SP. Work (3 TR, CH 1, 3 TR) in the next SP. (First corner). [3 DC in the next SP, 3 HDC in the next SP, 3 SC in the next SP, 3 HDC in the next SP, 3 DC in the next SP ((3 TR, CH 1, 3 TR) in the next SP]. (Second corner). Repeat between [ ] around two more times. Then finish the first side by working 3 DC in the next SP, 3 HDC in the next SP, SL ST into the first SC ST to join. (There should be 4 corners complete and 28 clusters of STs total).
- Variation. in the corner SP you can also work a CH 2 or CH 3 rather than the CH 1 depending on the size of the hole you desire for the corners.
Round 6
- SL ST into the next SP between the clusters. CH 3, 2 DC in the same SP. [Work 3 DC in each SP between the clusters to the corner. In the corner work (3 DC, CH 1, 3 DC)]. Repeat between [ ] around three more times. End with a SL ST to the top CH of the first CH STs to join. (There should be 32 clusters of STs total).
Rounds 7 and Beyond
- If you wish to make the square larger, you can continue adding rounds to the square using the instructions for round 6. The rounds on each side will increase by 1 cluster with each round complete.
Finishing
- Cut off a long tail about 10-12 inches. Pull the yarn through the last stitch. Use the tapestry needle to weave the yarn back and forth through the crochet stitches. At least 4 or 5 times. Cut off any excess yarn.
Notes
Abbreviations
- CH = Chain
- DC = Double Crochet
- HDC = Half Double Crochet
- PS = Puff Stitch
- SC = Single Crochet
- SK = Skip
- SL ST = Slip Stitch
- SP = Space
- ST = Stitch
- STs = Stitches
- TR = Treble Crochet
- [ ] = Repeat Between

You can find Victoria crocheting, quilting, and creating recipes. She has cooked in restaurants for over 20 years, including many larger parties. She learned to crochet when she was just 11 years old and has been crocheting ever since; over 50 years now. Over 40 years ago, she loved her first class in sewing and continues to hone her skills in quilting. Many have enjoyed the handmade gifts over the years. In her professional career, she has worked in management in a wide variety of businesses including higher education as a dean of a division. All the while attending college part-time to achieve her doctorate in higher education with an emphasis in e-learning.
A lovely pattern for a granny square.