Last updated on March 27th, 2026 at 09:38 am
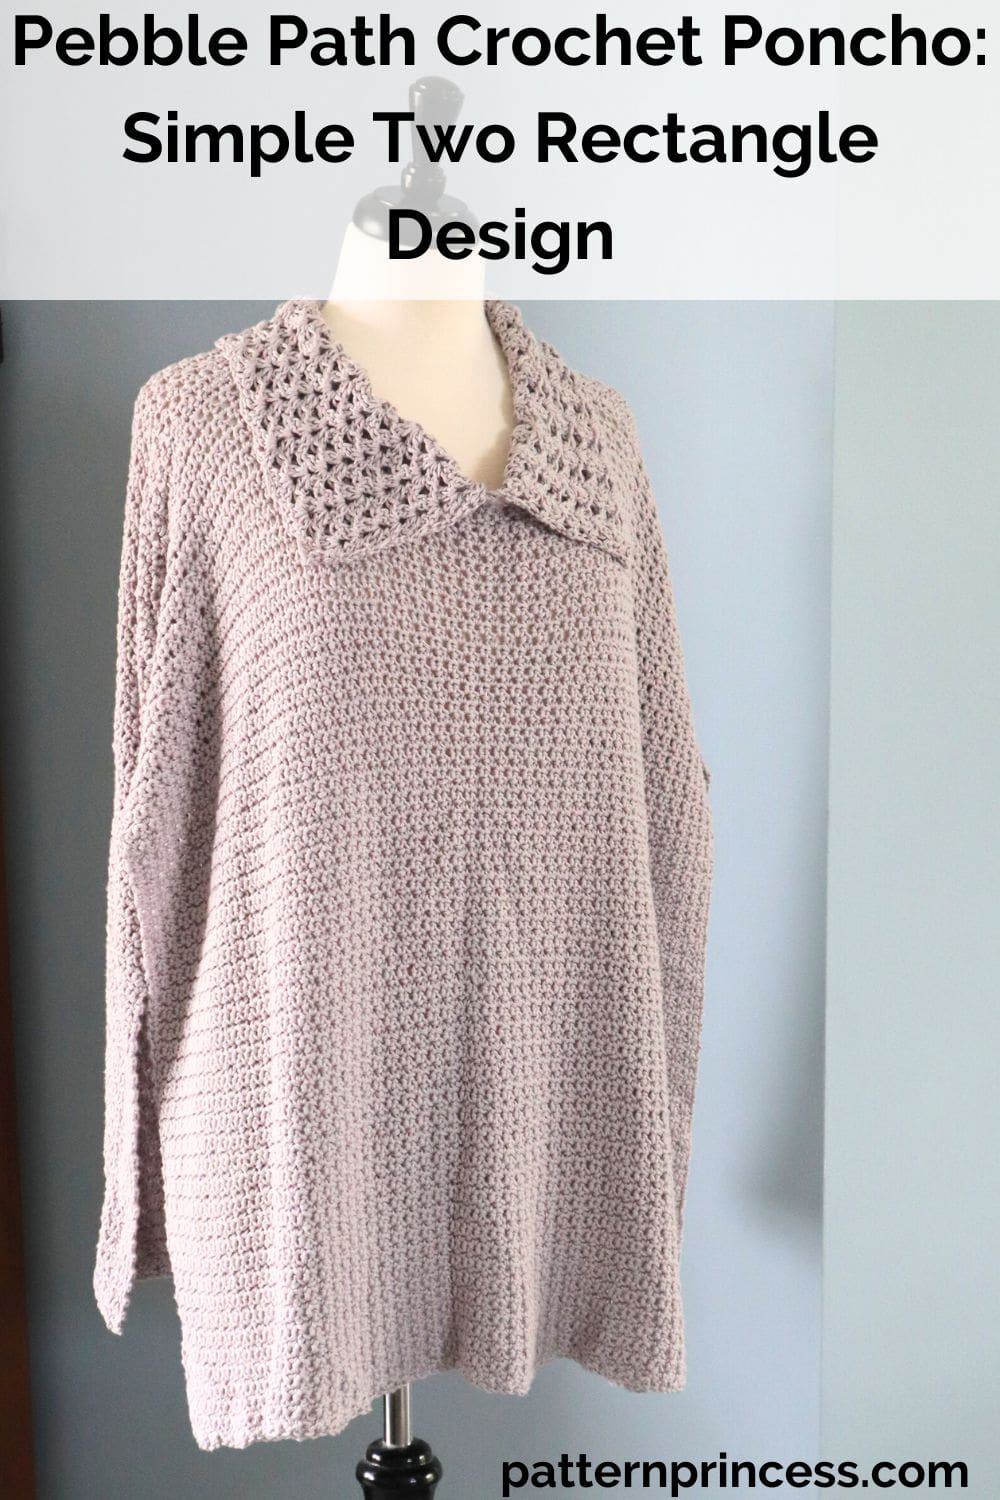
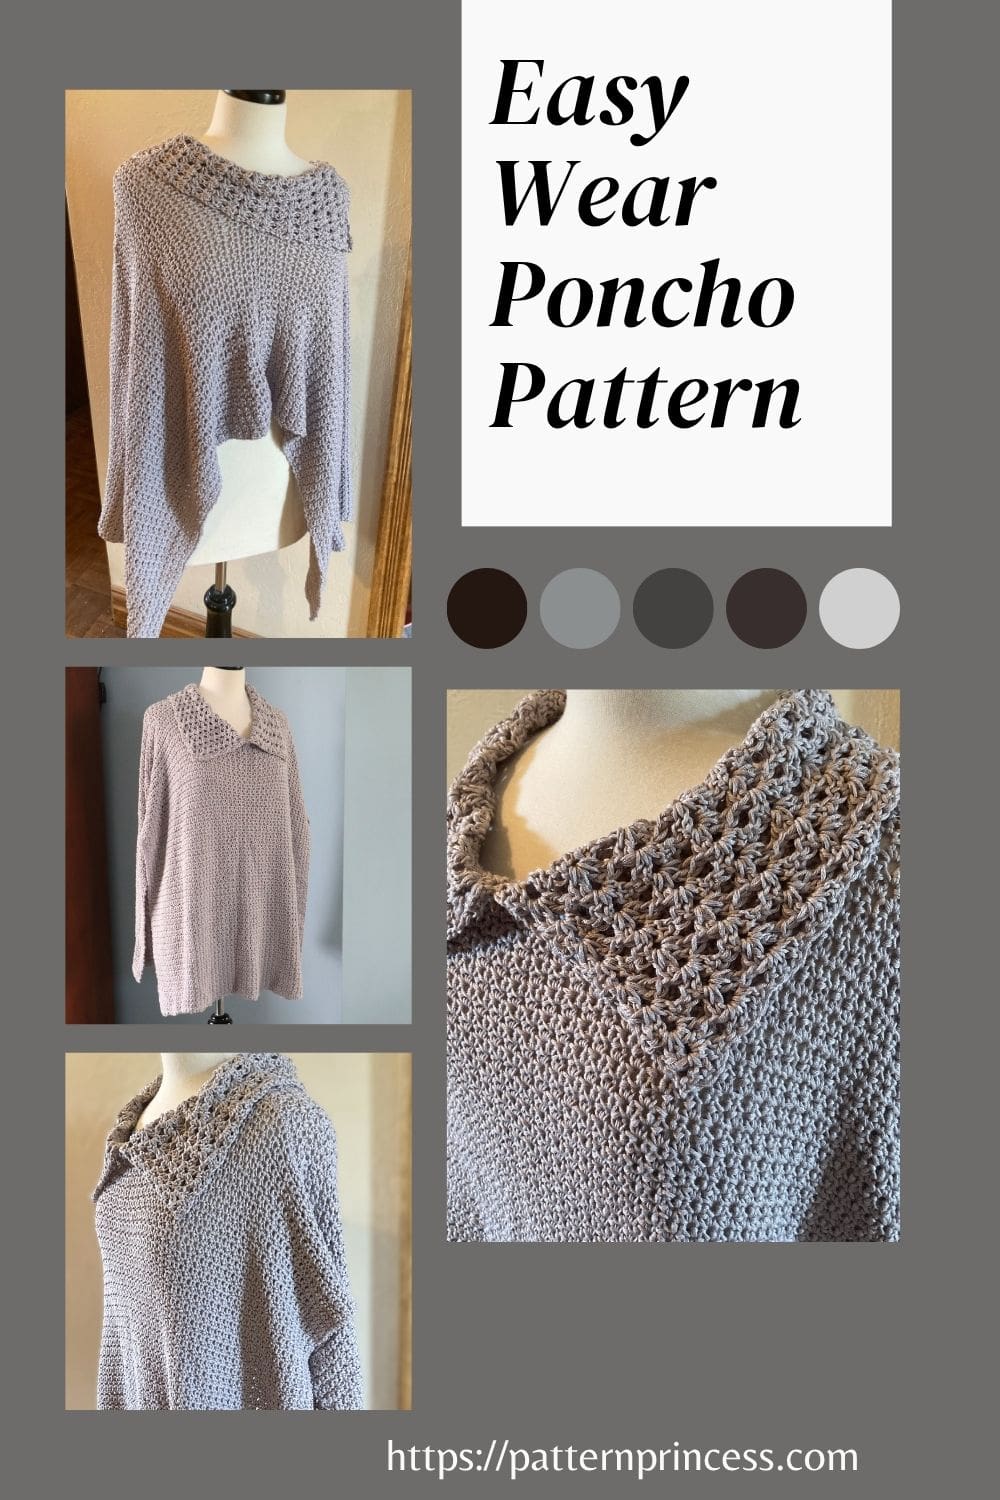
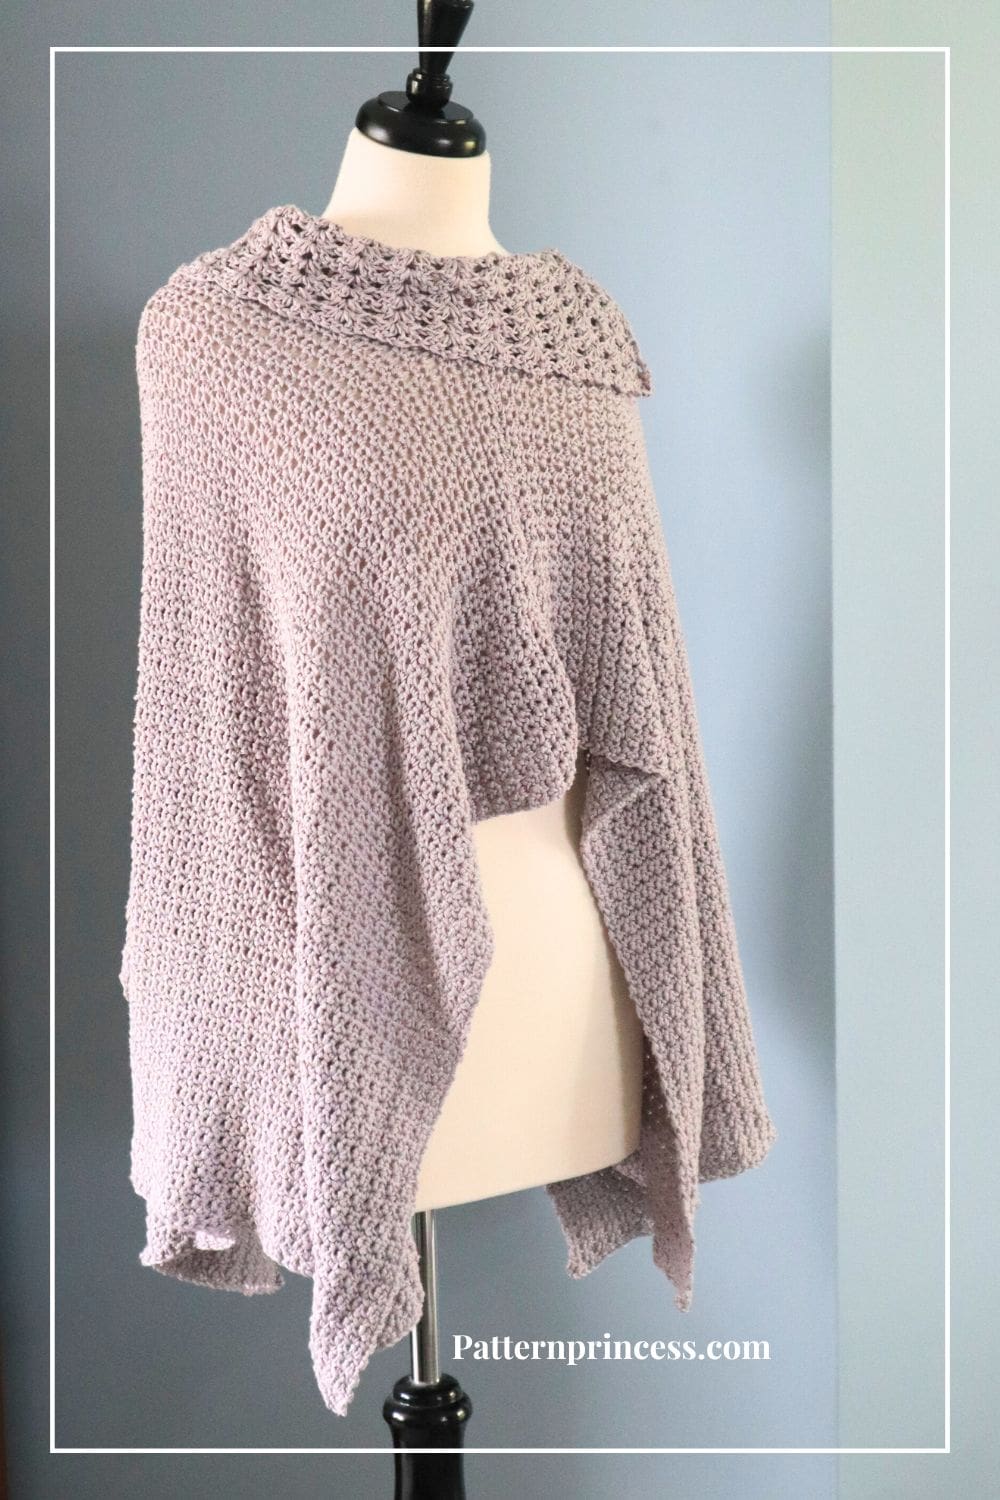
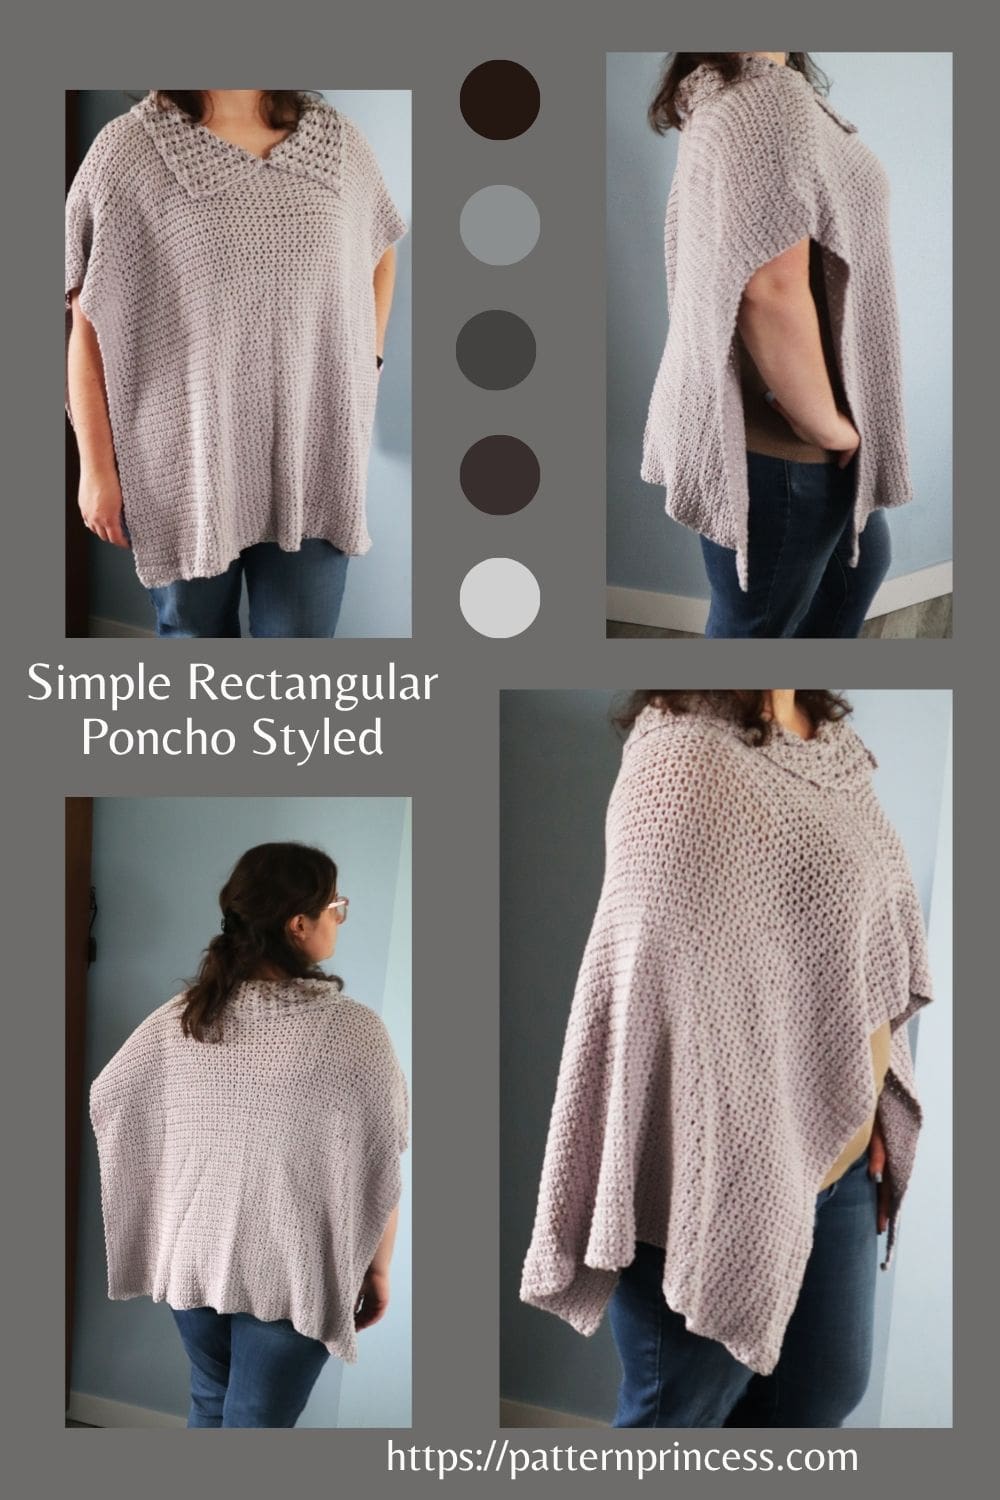
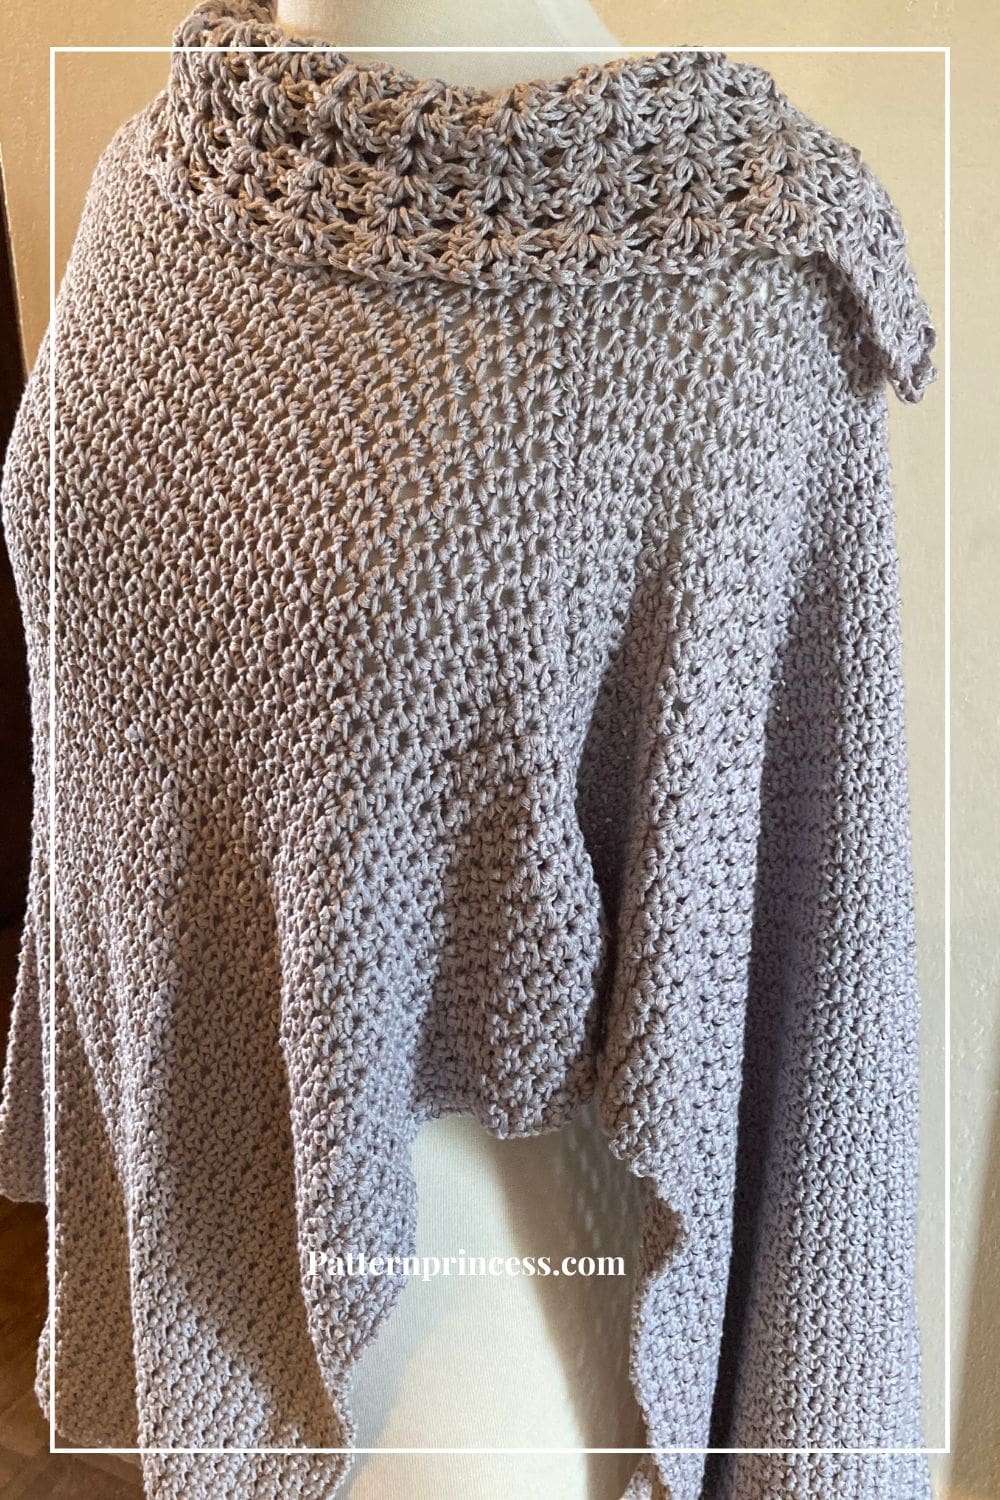
This Pebble Path Crochet Poncho is designed with simplicity in mind. This cozy layering piece is made from just two rectangles with no complicated shaping and no stress. If you’re new to garment-making or simply love a relaxing, satisfying project, you’re going to adore this design.
Whether this is your first wearable crochet pattern or you’re looking for an easy weekend make, this poncho delivers effortless style with beginner-level stitches.
Crocheted with soft lightweight (category 3) yarn in a gentle gray hue, this poncho has a gorgeous drape and timeless appeal.
Pattern Inspiration
The name Pebble Path was inspired by walking along a quite garden path in the misty morning. The natural light grey tone and soft texture creates a comfortable fit garment. Yet, it’s trendy and fashionable enough for dressing up or everyday wear.
It’s an ideal transitional piece for cooler spring days, breezy summer evenings, or layering up in the fall.
Beginner-Friendly Wearable
Crochet your rectangles. Sew a quick shoulder seam joining them into the poncho shape. Add the simple crocheted collar, and you’re finished!
No buttons, no fringe (unless you want to add some). Just straightforward steps with a beautiful, wearable result.
If you’ve been wanting to try your first handmade garment, this pattern is the perfect place to begin.
???? What Is a Crochet Poncho?
A crochet poncho is a stylish, drapey garment that slips over your head and rests comfortably on your shoulders—like a soft, open sweater without sleeves.
Traditionally made in a square or rectangular shape, it’s worn as a layer over other clothing to keep warm or add style.
Crochet ponchos range from chunky and cozy for winter to lightweight and lacy for breezy summer evenings.

Types and Styles of Crochet Ponchos
Crochet ponchos come in a wide variety of shapes and styles, including:
- Rectangle or Square Ponchos. Made from two simple rectangles sewn together. Great for beginners!
- Circular or Round Ponchos. Often lacy or flowy, worked in the round from the neckline down.
- Asymmetrical Ponchos. Feature one longer side for a modern, dramatic look.
- Tunic-Style Ponchos. Similar to a poncho, but with side seams or arm openings for a more fitted silhouette.
- Cowl-Neck Ponchos. Include a built-in collar or cozy neckline for extra warmth.
???? Is It Easy to Crochet a Poncho for Beginners?
Yes! Ponchos are one of the easiest garments to crochet, especially when made from simple shapes like rectangles.
They don’t require complicated shaping, fitting, or sleeves, which makes them the perfect first garment for new crocheters. Patterns like the Pebble Path Crochet Poncho are designed specifically with beginners in mind.
How to Spot an Easy Crochet Poncho Pattern
If you’re just starting out, here are a few things to look for when choosing your first poncho pattern:
- Made from Simple Rectangles. No shaping, just straight stitches and easy seams.
- Uses Basic Stitches or a One-Row Repeat. Think single crochet, half double crochet, or double crochet. Repeating rows make the pattern easy to remember.
- Clear Instructions with Photos or Diagrams. Look for patterns written for beginners with explanations and visuals when possible.
???? Beginner Crochet Tips for Making a Poncho
If this is your first time making a wearable item, don’t worry—here are a few tips to help you succeed:
- Check Your Gauge. Before starting, crochet a small swatch to match the pattern’s stitch gauge. This ensures your poncho comes out the right size.
- Take Your Measurements. Measure your shoulder width and desired length so you can customize the rectangles if needed.
- Use Basic Stitches. Stick with beginner stitches like half double crochet or double crochet for an easy rhythm.
- Seaming. Don’t stress over joining rectangles! Use a whip stitch, mattress stitch, or slip stitch to seam the shoulders.
- Use Lightweight Yarn. Choose a #3 (DK/light) yarn for a poncho that drapes well and isn’t too bulky. It creates a flattering fit without the weight of thicker yarns.
Wearing the Poncho
Wear with the rectangle to the front and back and the joined collar to the front. Turn to move the points to make an asymmetrical poncho in the front and back. Turn the rectangles to the sides for a different style. Showing the sides with the longer drape making the front shorter.
✨ Crochet Garment Pattern for Novice Crocheter
- Made from two rectangles + collar
- No shaping or seaming experience needed
- Uses soft #3 light yarn for a graceful drape
- A perfect first garment for beginners
- Easily customizable in size or yarn color
- Pattern uses two beginner-friendly crochet stitches, the Single Crochet Grit Stitch and the Iris Stitch.
Directions: Pebble Path Crochet Poncho: Simple Two Rectangle Design
Skill Level
Suitable for the Confident Beginner Crocheter
Gauge
For the Poncho Rectangle. 15 stitches per 4 inches.16 rows of the stitch pattern per 4 inches.
For the Collar Rectangle. 14 stitches per 4 inches. 8 rows of the stitch pattern per 4 inches.
Make a Gauge Swatch
A gauge swatch is a small piece you work first to check how many stitches you have per inch. Checking the gauge helps make sure that your finished piece will not turn out too big or small. Changing the yarn or using a smaller or larger crochet hook can change the gauge.
I like to use the tape measure to help make sure that the starting chain and length is the correct size.
Size
Poncho Sizes. The poncho is made from two rectangles.
The size of the poncho shown uses two rectangles size 23” long X 35” wide. This does not include the collar.
*The dimensions given below are the size of each finished rectangle.
- S/M = 20-22” long x 25-30” wide
- L/XL = 23-26” long x 31-40” wide (shown)
- 2XL/3XL = 27-30” long x 41-50” wide
Changing the size of the poncho.
Use a tape measure to check the size.
For the poncho, the starting chain determines the width. To change the size of width, use multiples of 2 + 1 for the beginning chain.
The number of rows determines the length. Increase or decrease the number of rows.
Collar Sizes. This is made from one collar.
- S/M = 4” long x 26” wide
- L/XL = 5” long x 28” wide (shown)
- 2XL/3XL = 6” long x 30” wide
For the collar, the starting chain determines the width. You can change the desired width by starting your foundation chain with multiples of 4 plus 3.
The number of rows determines the length. Increase or decrease the number of rows.
Abbreviations
- CH = Chain
- DC = Double Crochet
- SC = Single Crochet
- SK = Skip
- SP = Space
- ST = Stitch
- STs = Stitches
- [ ] = Repeat Between
Materials
Yarn. Lion Brand Coboo in the color Silver. Each skein has 232 yards. 3.05oz./100g/number 3 light yarn weight.
For the poncho shown I used 7 skeins for a total of 1,600-1,624 yards.
Suggested yarn for each size poncho.
- S/M: 5 skeins, about 1,000 yards
- L/XL: 7 skeins, about 1,600 yards
- 2XL/3XL: 10 skeins, about 2,300 yards
Crochet Hook Size I 5.5mm for the collar
Crochet Hook Size L 8.0mm for the poncho
Yarn Needle for sewing in yarn ends and sewing on the collar.
Tape Measure
Clips or Stitch Markers
Scissors
If you are not able to find the yarn locally, you can purchase it online using the links on our Savings Center – Pattern Princess.
The Pattern Sections
- Crochet the body of the poncho
- Crochet the collar
- Joining the rectangles
- Attaching the collar
- Video tutorials
Pattern Notes
Written in US Terms.
Turn at the end of each row.
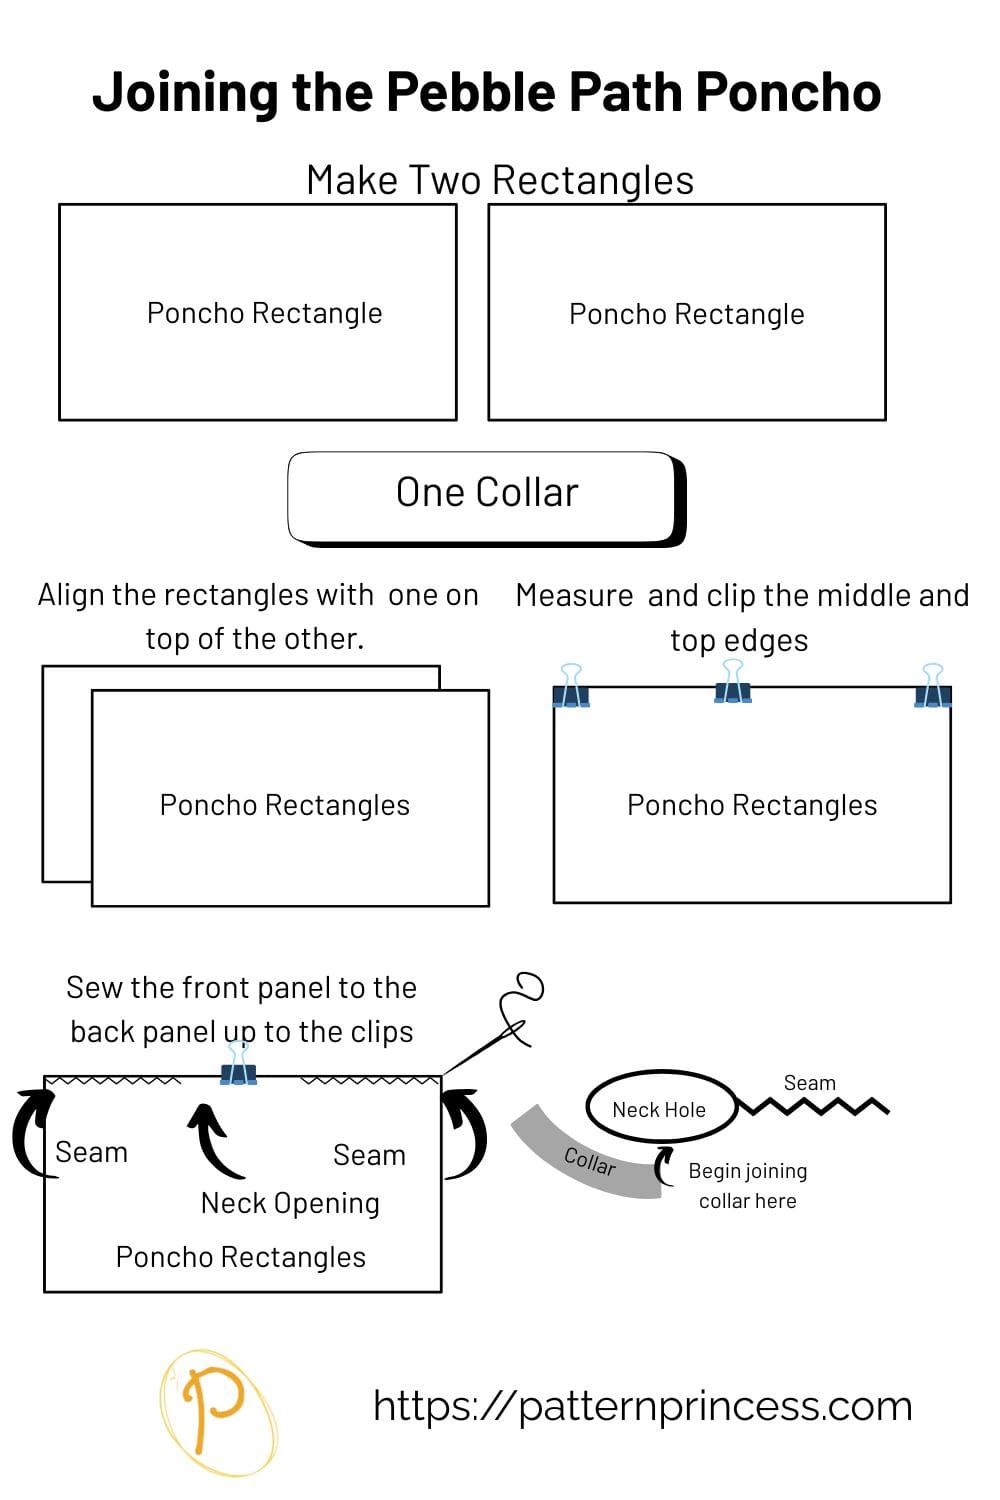
The poncho is made from two simple rectangles.
The collar rectangle is worked separately and sewn on.
Stitch counts are given in the order S/M (L/XL, 2XL/3XL).
Refer to the diagram for poncho assembly.
There is a video tutorial for joining, the single crochet grit stitch, and the Iris stitch after the written pattern.
Crochet Stitches
Chain Stitch CH
Begin the chain stitch by making a slip knot and adding the loop on the crochet hook.
Keeping the loop on the hook, wrap the yarn over the crochet hook from back to front using the hook to draw the yarn through the loop that is currently on the hook. (The first chain stitch is complete).
HOW TO CROCHET THE CHAIN STITCH video tutorial
Double Crochet (DC)
Yarn over, insert the hook through both loops and pull up a loop. Next, yarn over and pull through two loops on the hook. Lastly, yarn over again and pull through the last two loops on the hook.
HOW TO CROCHET THE DOUBLE CROCHET STITCH video tutorial
Single Crochet (SC)
Insert the hook, pull up a loop. Yarn over and pull through the two loops on the hook.
HOW TO CROCHET THE SINGLE CROCHET STITCH video tutorial
Two Double Crochet V-Stitch
This means you work two double crochet stitches, chain 1, and two double crochet stitches all in one stitch. Today, this becomes the Iris Stitch Cluster.
This pattern uses both the How to Crochet the Single Crochet Grit Stitch Tutorial – Pattern Princess and the How to Crochet Iris Stitch Pattern with Video – Pattern Princess. We have separate blog posts on the stitches; however, the step-by-step photos are within the written directions to help with the pattern also.
Begin Crochet Pattern
For the Poncho
Using the Size L Crochet Hook 8.0mm
*Make Two of the same size
Work the foundation chain in multiples of 2 + 1. I’ve given the range of stitches to work based on your desired size.
- S/M = 25” CH 95, 30” CH 113
- L/XL = 31” CH 116, 35” CH 133 (shown), 40” CH 151
- 2XL/3XL = 41” CH 155, 45” CH 169, 50” CH 189
Start by making a slip knot and adding the loop on the hook. Work the number of chain stitches indicated for your desired size.
Use a tape measure to double check the length of your foundation chain.
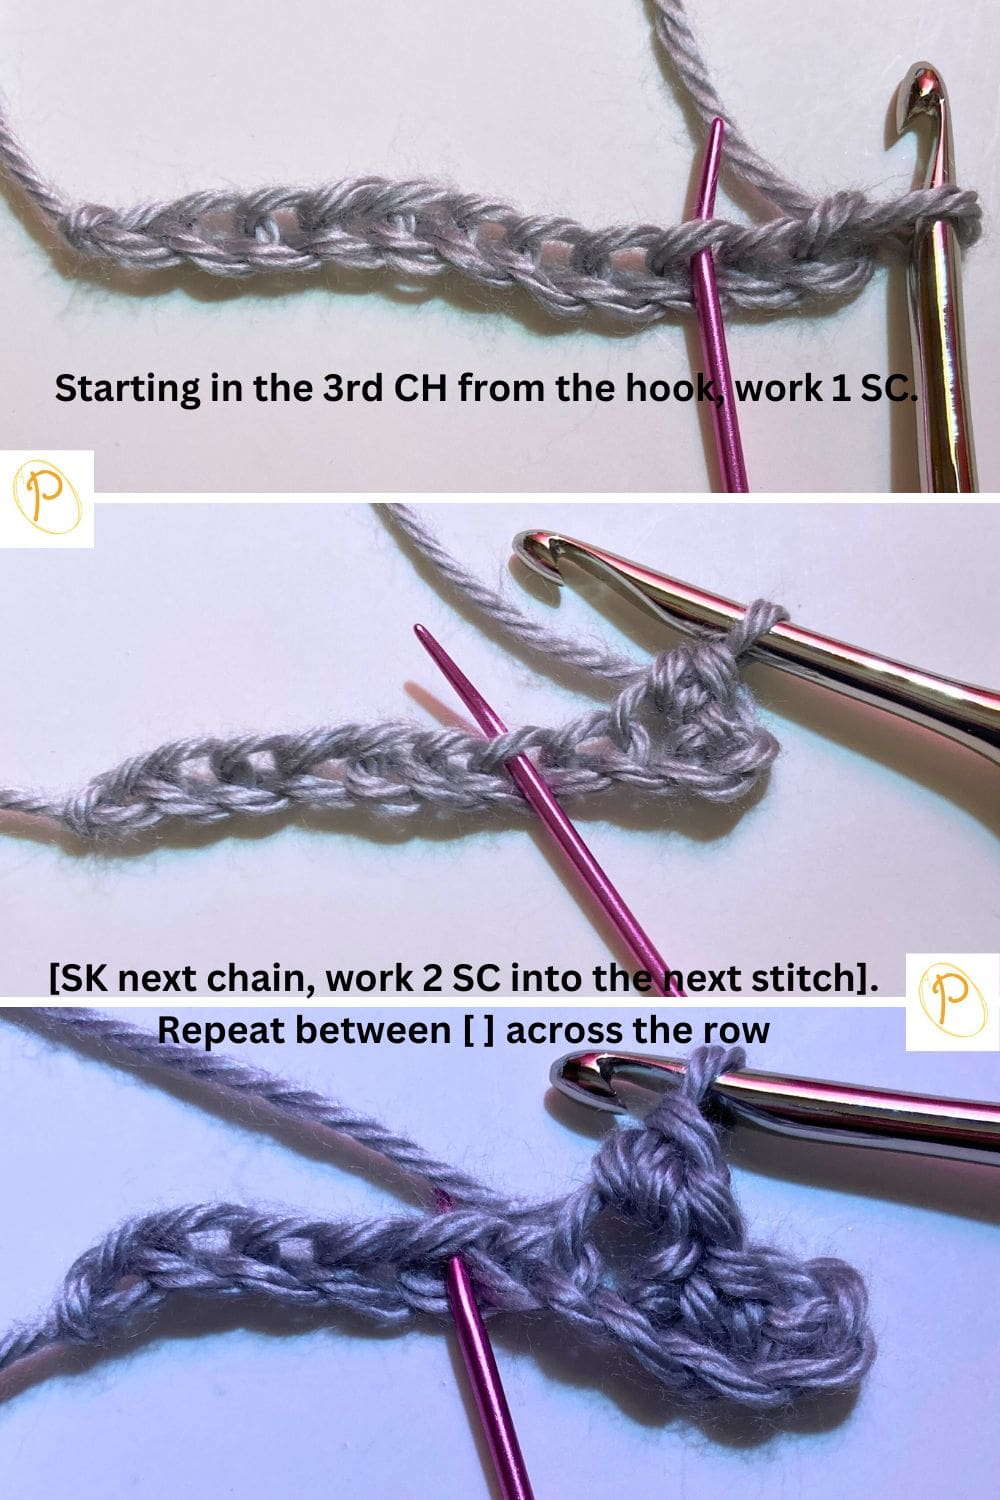
Row 1
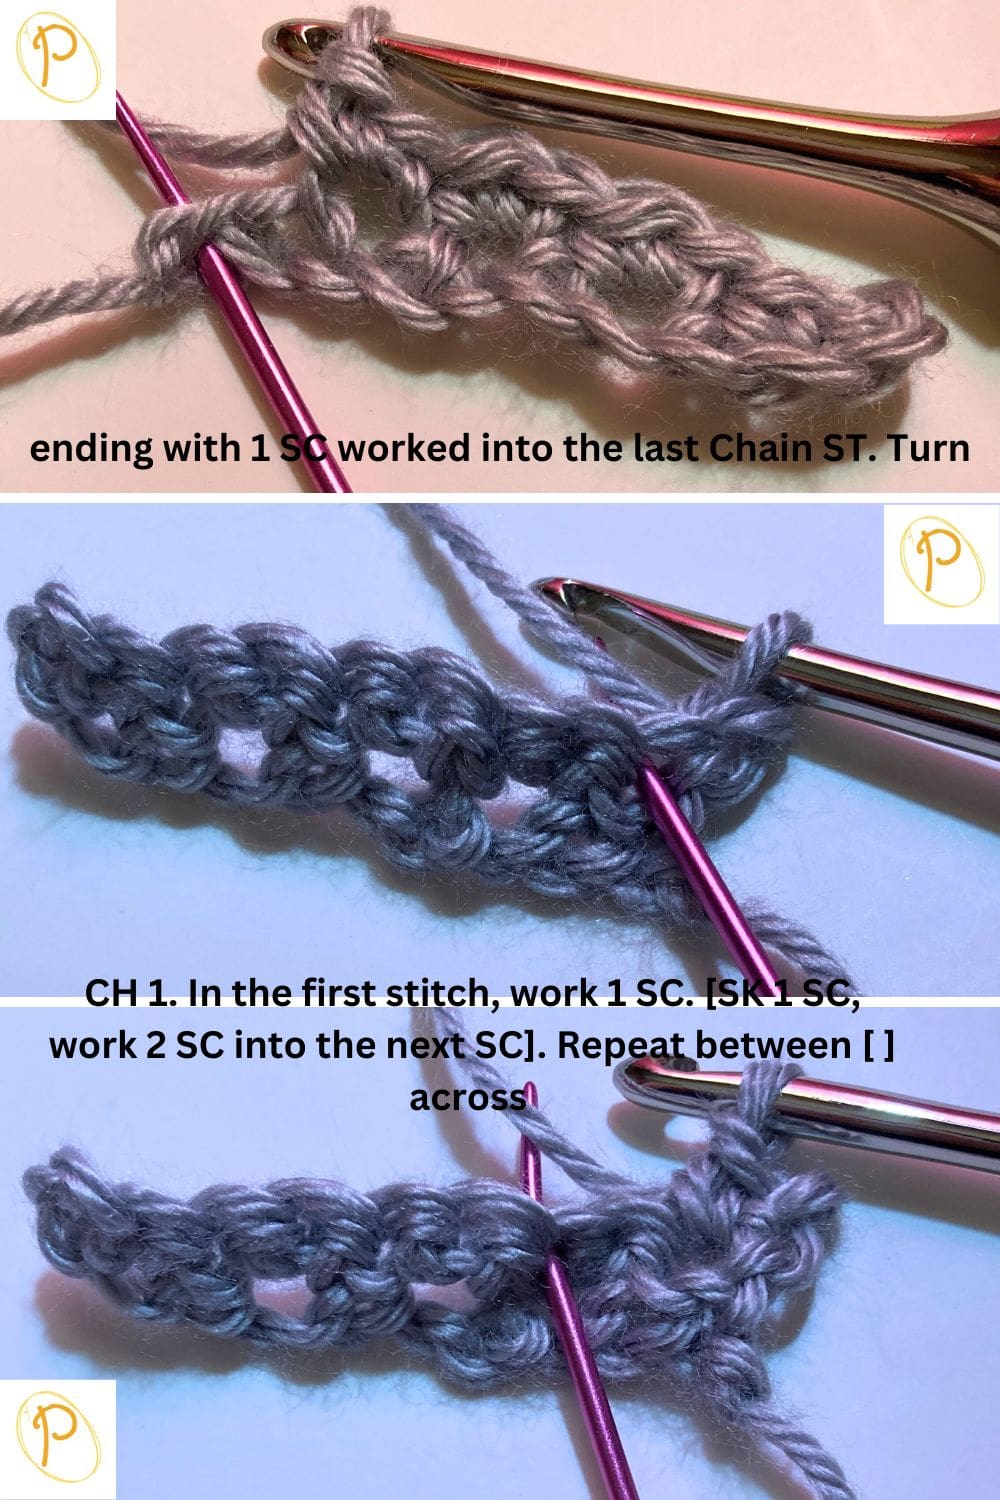
Starting in the 3rd CH from the hook, work 1 SC. [SK next chain, work 2 SC into the next stitch]. Repeat between [ ] across the row ending with 1 SC worked into the last Chain ST. Turn
Row 2
CH 1. In the first stitch, work 1 SC. [SK 1 SC, work 2 SC into the next SC]. Repeat between [ ] across the row. End with 1 SC worked into the last SC.
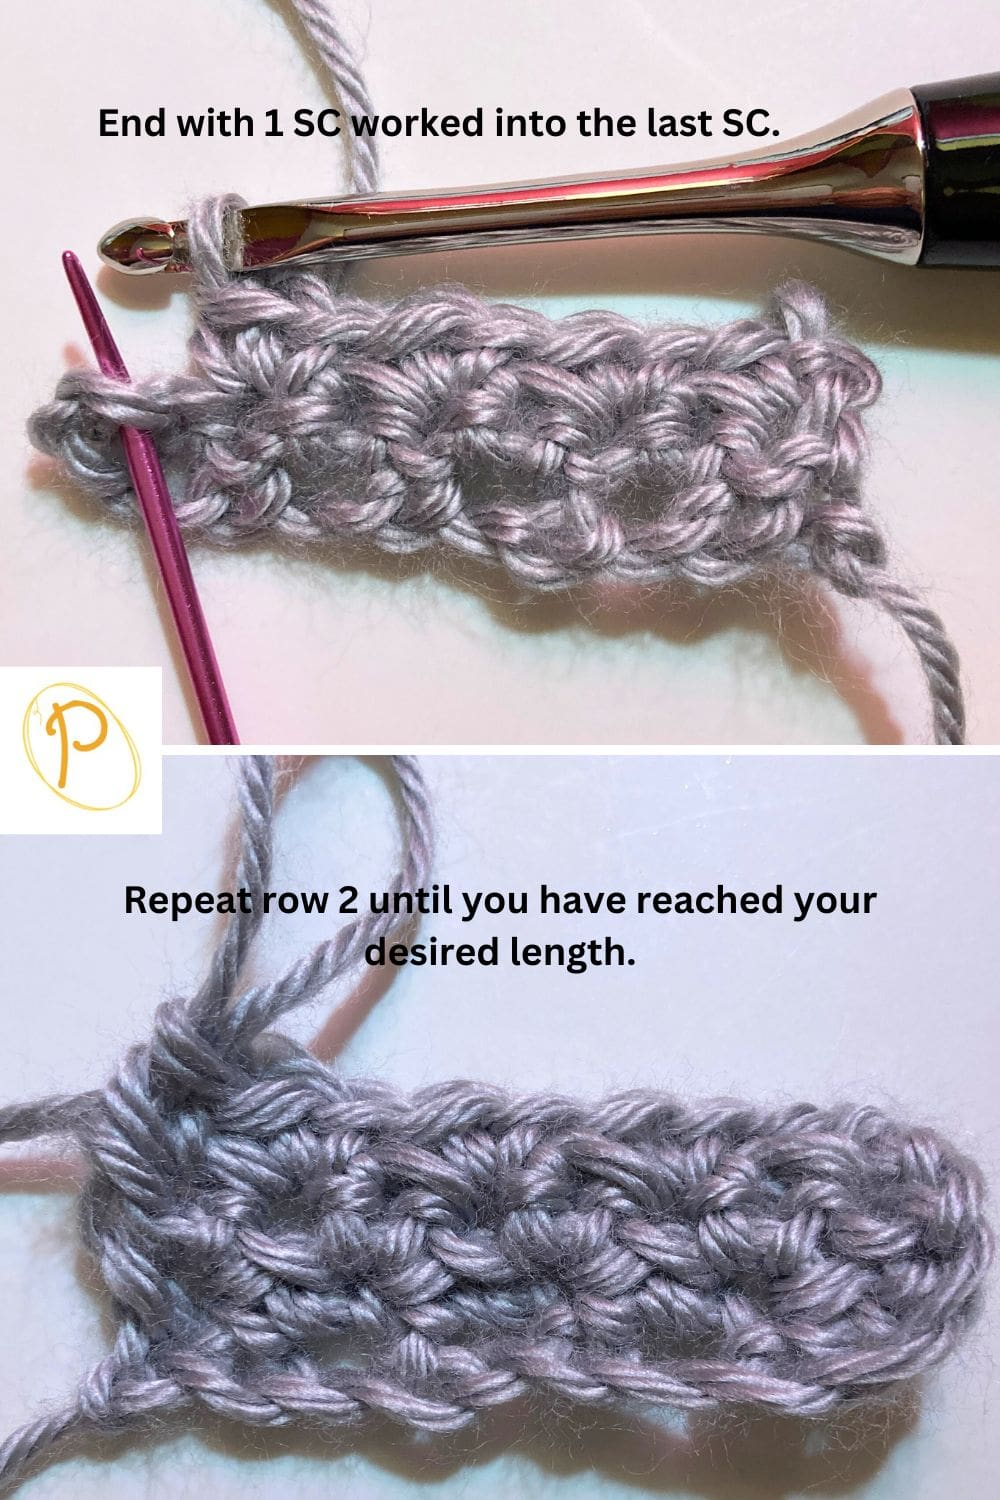
Rows 3 and Beyond
Repeat row 2 until you have reached your desired length.
- S/M = 20” = 80 Rows, 22” = 88 Rows
- L/XL = 23” = 96 Rows (Shown), 26” = 104 Rows
- 2XL/3XL = 27” = 108 Rows, 30” = 120 Rows
*Make the second rectangle
Finishing
Pull the yarn through the last loop.
After the last stitch, leave about a 10-12 inch yarn tail. Pull the tail through the last stitch. Using the tapestry needle, weave in the yarn ends. Cut off the excess yarn.
Set the two rectangles aside.
Crochet the Collar
*Make One
Use the crochet hook size I 5.5mm for the collar
Start by making a slip knot and adding the loop on the hook.
Collar Sizes
- S/M = 26” wide = CH 91 STs
- L/XL = 28” wide = CH 99 STs (shown)
- 2XL/3XL = 30” wide = CH 107 STs
Make a foundation chain any stitch combination using multiples of 4 plus 3.
Chain 91, 99, or 107 depending on your desired size. (Use a tape measure to double check the length of your foundation chain.
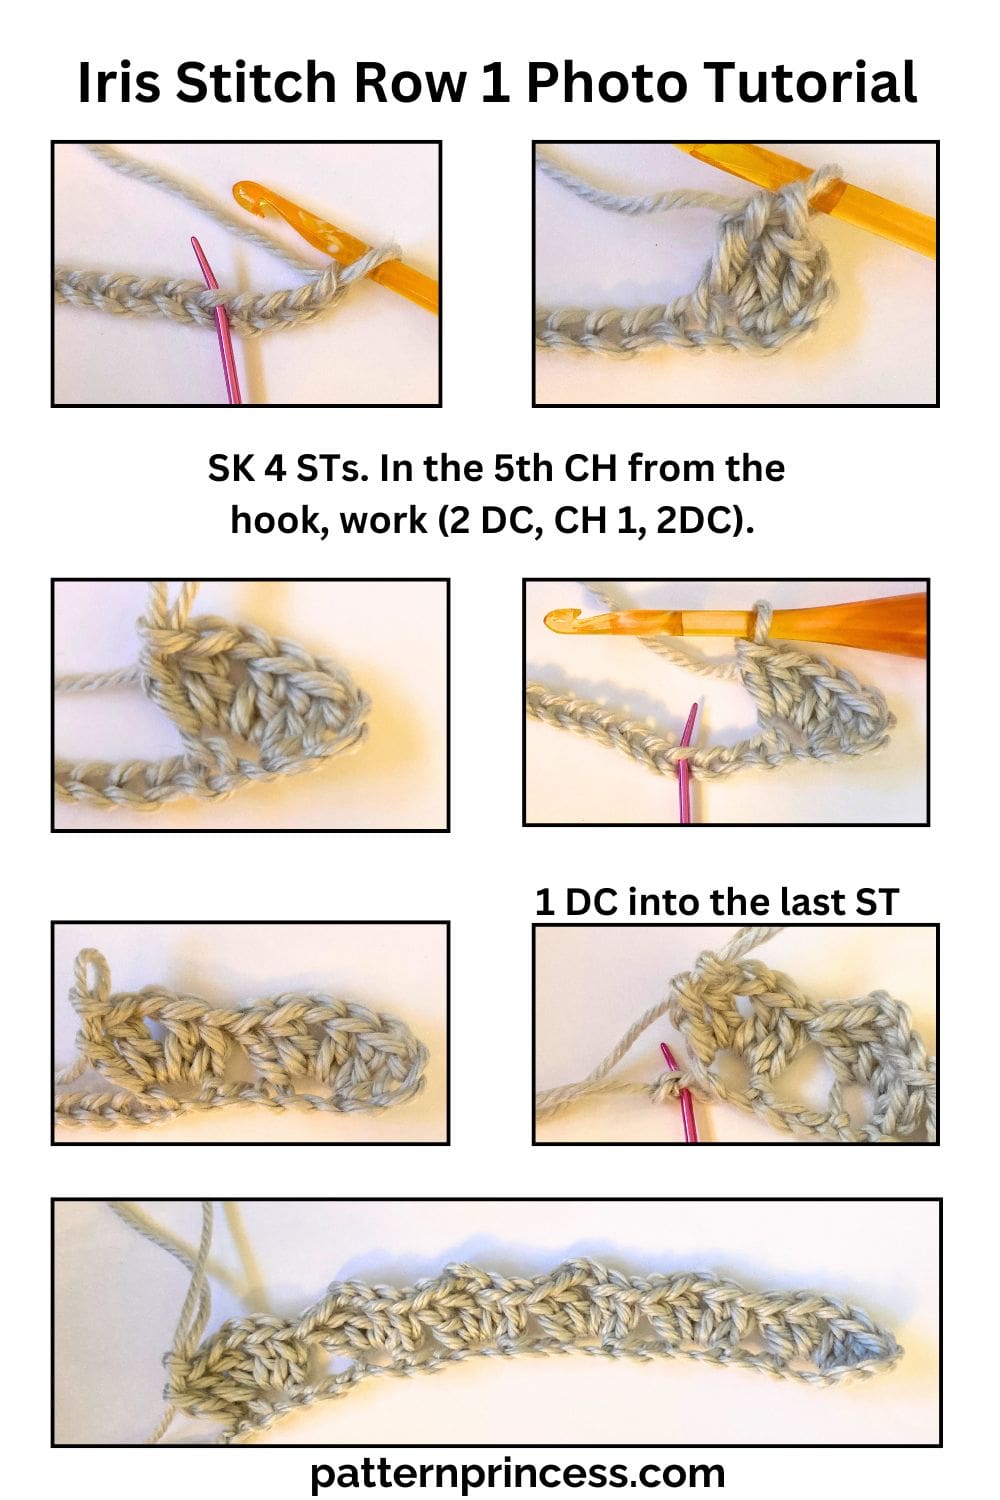
Row 1
SK 4 STs. In the 5th CH from the hook, work (2 DC, CH 1, 2DC). [SK 3 STS, in the 4th CH ST work (2DC, CH 1, 2DC)]. Repeat across between [ ] to the last 2 CH STs. Then SK 1 ST and work 1 DC into the last ST. Turn
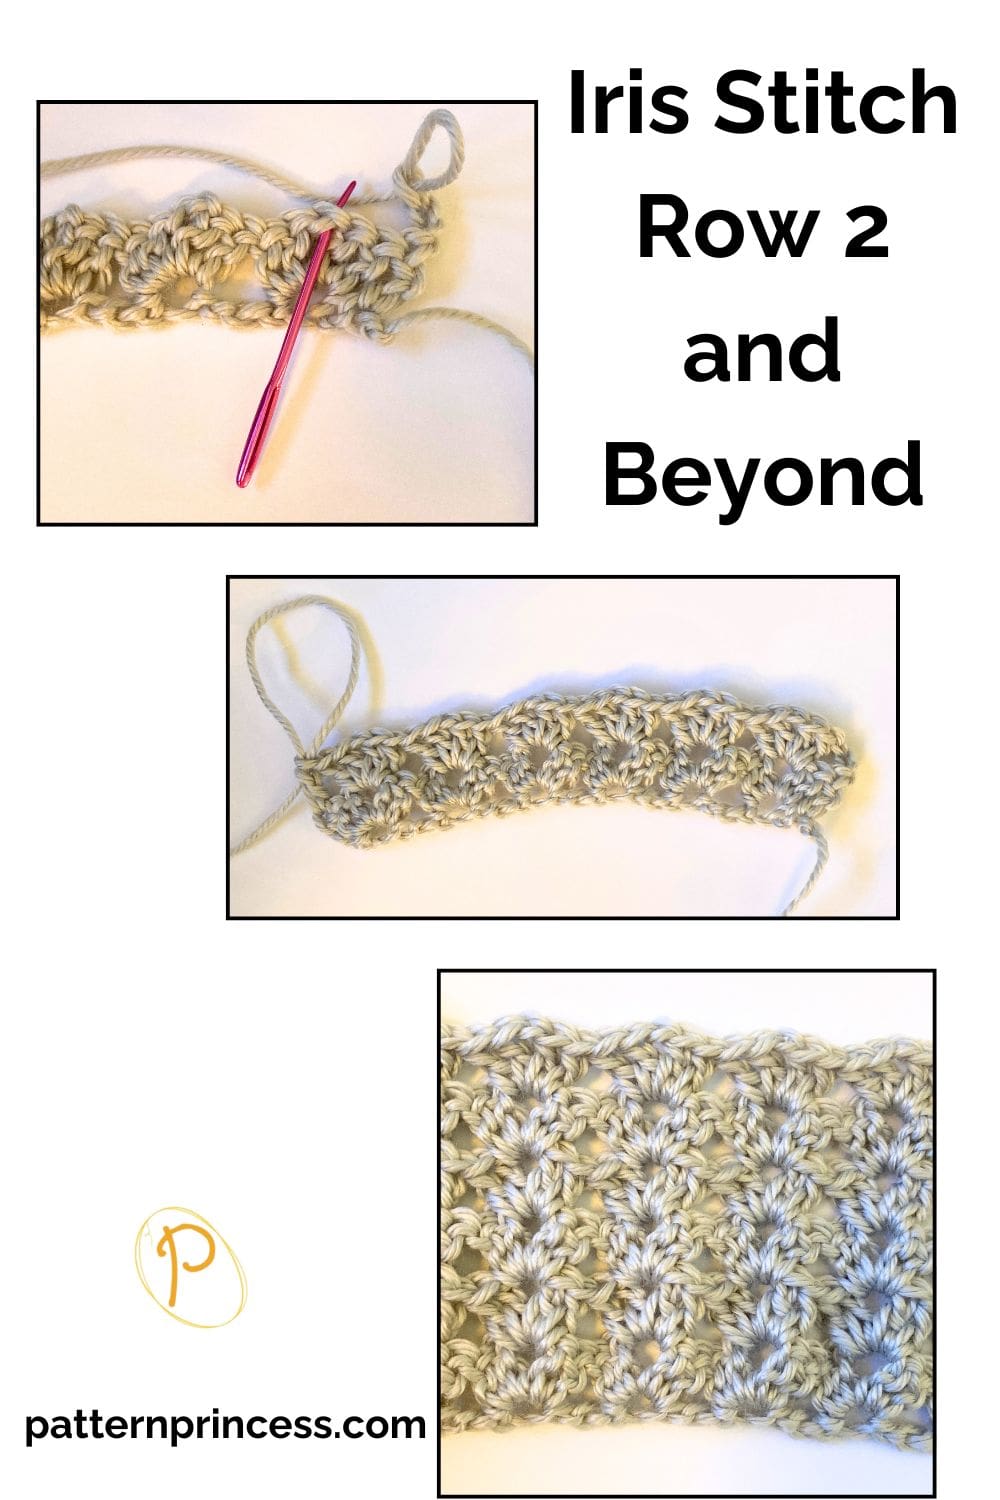
Row 2
CH 3. SK 2 DC. In the CH SP of the row below, work (2DC, CH 1, 2DC). [SK to the next CH SP and work (2DC, CH 1, 2DC)]. Repeat across between [ ]. End with 1 DC in the top of the turning chain. Turn
Rows 3 and Beyond
Continue to repeat row 2 until you reach the desired length. Here are the suggested rows. Make sure to use a tape measure to check the length without stretching.
- S/M = 4” long = 8 rows
- L/XL = 5” long = 9 rows (shown)
- 2XL/3XL = 6” long = 10 rows
Finishing
Pull the yarn through the last loop.
Cut the yarn leaving a 10-12 inch yarn tail. Pull through the last loop. Using your tapestry needle, weave the yarn back and forth through the crochet stitches. Then snip off any excess yarn.
Set the collar aside.
Joining the Rectangles
Align the rectangles with the stitches facing the same way, one on top of the other.
The nice part about the single grit stitch is that there is no right side or wrong side.
Fold in half to find the middle. Place a stitch marker in each rectangle or place a clip to hold both panels together there. Then place stitch markers or clips on the top corners.
Measure the Neck Opening
Measure from the middle clip on either side.
- S/M = 5 inches
- L/XL = 6 inches
- 2XL/3XL = 7 inches
Place a clip on both the right and left of the middle. This is the outer edge of the neck opening.
Thread the yarn needle and begin at the top corners. And sew the front panel to the back panel up to the stitch markers you just measured on either side of the middle.
I sewed one way, then back the other way for extra stability on each shoulder seam.
Use a whipstitch or mattress stitch to sew the front and back rectangle panels together for the poncho.
- Whipstitch. Insert the needle from back to front, wrapping the yarn around the edges in a spiral motion.
- Mattress Stitch. Work through the middle of the stitches on the edges of both pieces, creating an almost invisible seam.
Keep the Tension Even. As you sew, ensure the yarn is snug but not so tight that it puckers or distorts the fabric.
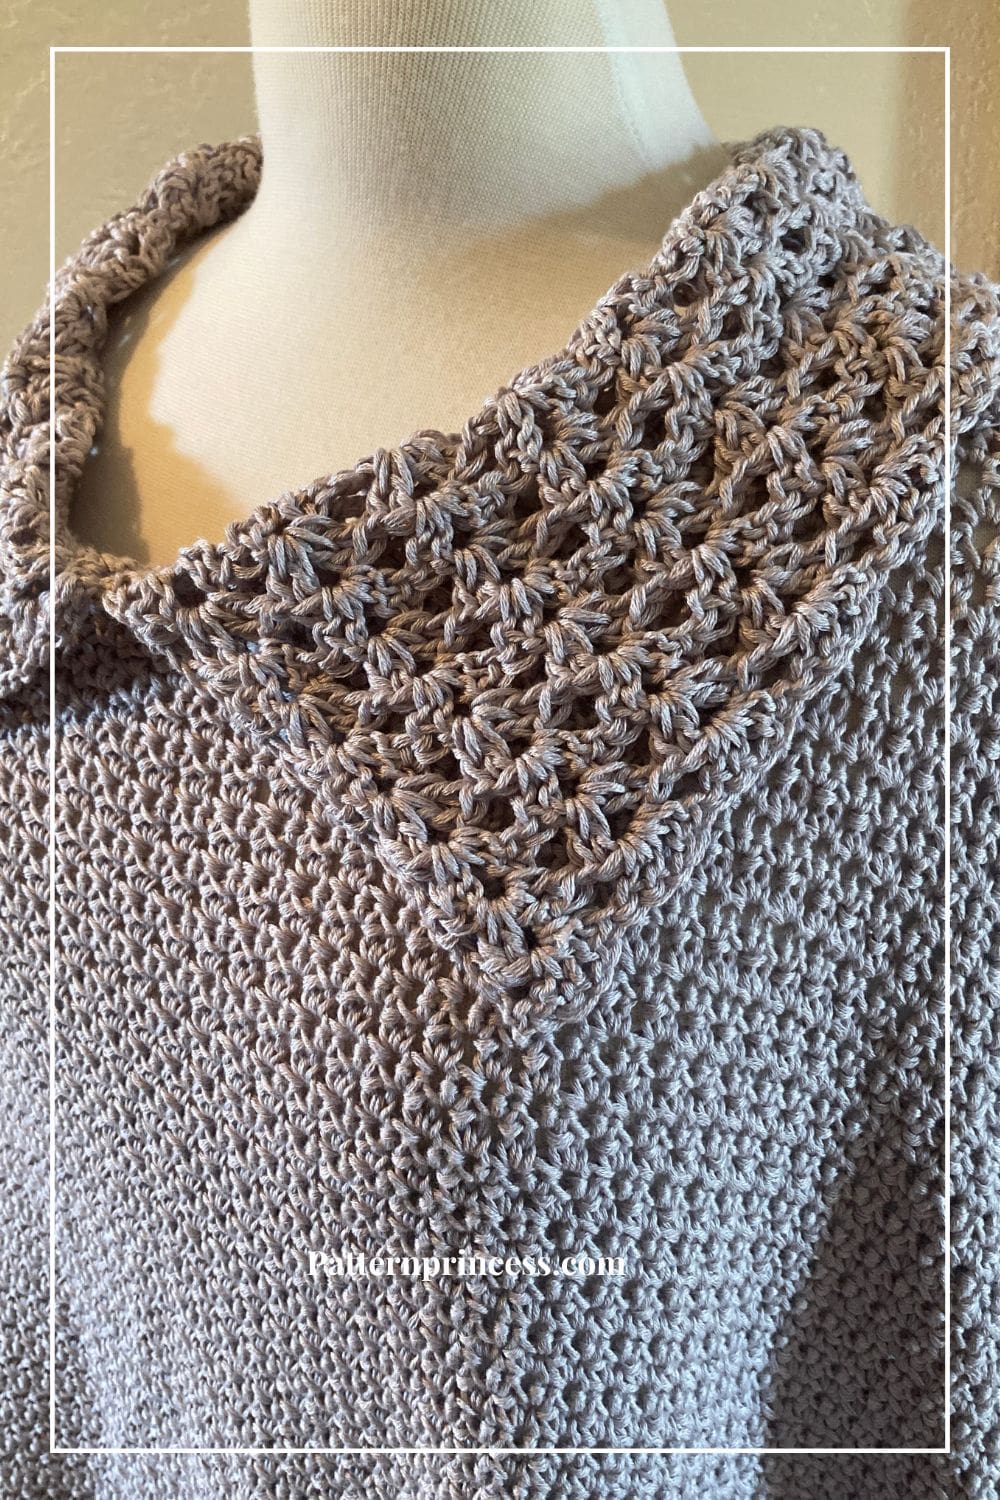
Join the Collar to the Crochet Poncho
Align the Collar and Poncho
Lay the poncho flat and position the collar and poncho with the right sides together. Make sure that the collar edge aligns evenly with the joining line of the poncho. Use stitch markers or clips to secure the collar in place, ensuring it’s evenly distributed around the neck.
Using the same middle stitch marker, align one end of the collar to the middle. I joined the first row of stitching to the poncho neck opening.
Note. I overlapped the ends of my collar. However, you could just meet them together and not overlap.
Using a yarn needle and a length of yarn about 50-70 inches long sew the collar to the poncho.
Thread the yarn through the yarn needle and start sewing the collar and the poncho neckline together.
Begin at one end of the collar leaving a 6–8-inch yarn tail.
Use a whipstitch or mattress stitch to sew the collar to the poncho.
I sewed the collar one way, then back the other way for extra stability.
Finish the Seam
Once you’ve sewn all the way around the neckline, weave in any remaining yarn tails with the yarn needle, hiding it within the stitches of the poncho or collar. Cut off the excess yarn.
Video Tutorials from our YouTube channel
The Poncho Shoulder Seam Video Tutorial
Video Tutorials of the Single Crochet Grit Stitch
Video Tutorials of the Iris Crochet Stitch
Here are a few ideas for your next crochet projects.

You can find Victoria crocheting, quilting, and creating recipes. She has cooked in restaurants for over 20 years, including many larger parties. She learned to crochet when she was just 11 years old and has been crocheting ever since; over 50 years now. Over 40 years ago, she loved her first class in sewing and continues to hone her skills in quilting. Many have enjoyed the handmade gifts over the years. In her professional career, she has worked in management in a wide variety of businesses including higher education as a dean of a division. All the while attending college part-time to achieve her doctorate in higher education with an emphasis in e-learning.