
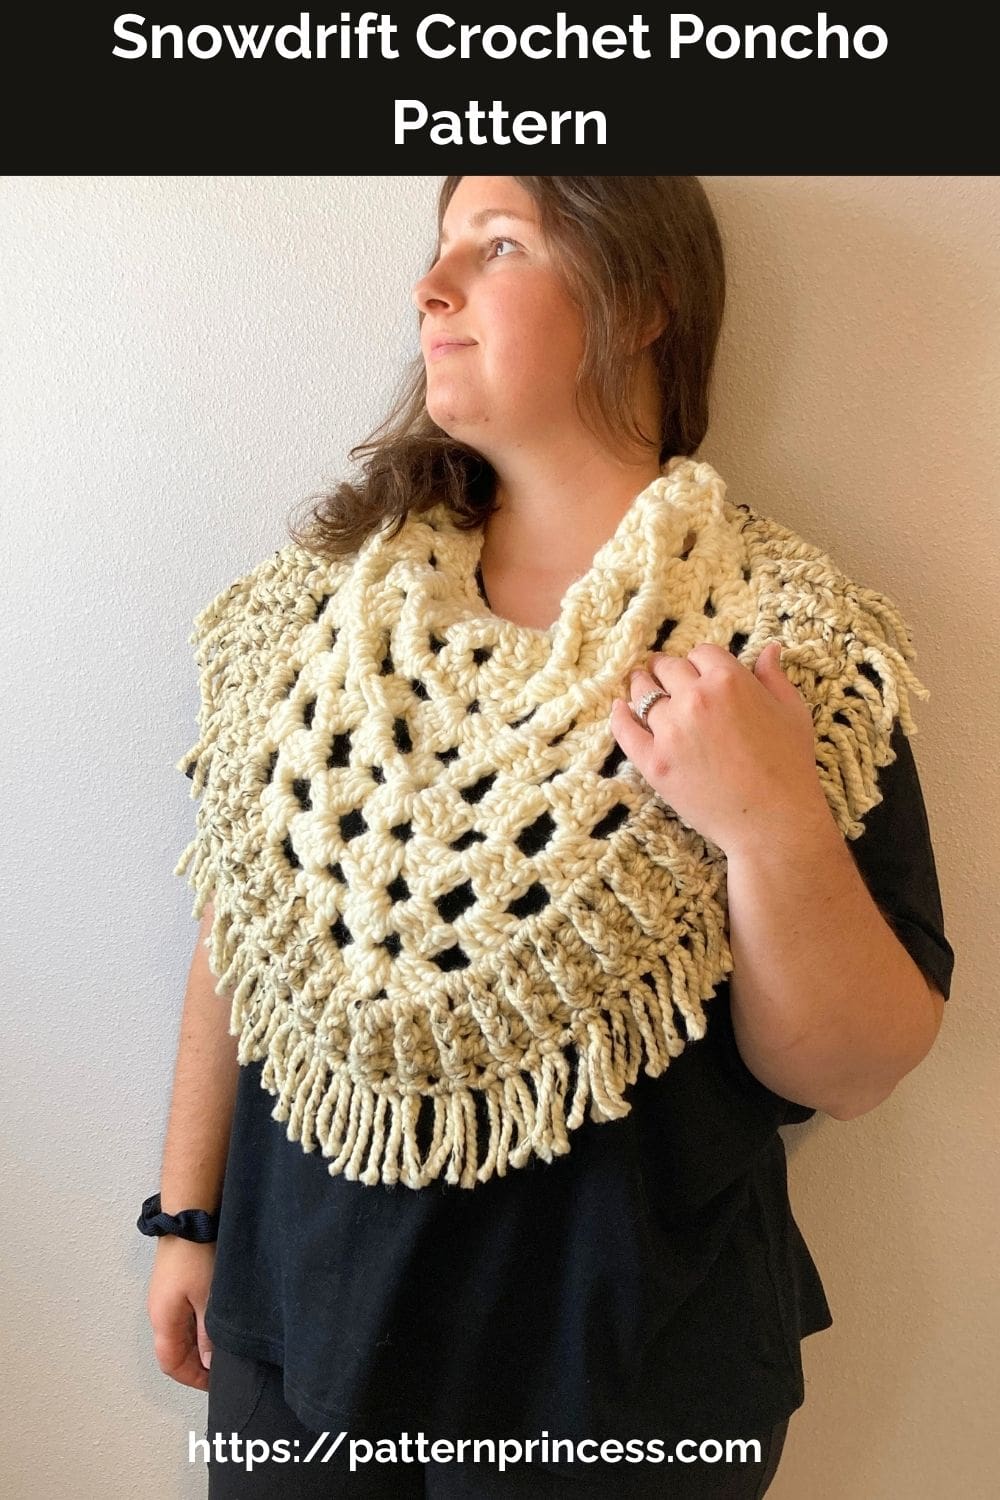
Make the cozy Snowdrift Crochet Poncho with bulky yarn and fringe. This easy-to-wear pattern includes six sizes from Small to 3X Large.
Sometimes an idea just can’t wait
The Snowdrift Crochet Poncho started with an idea that popped into my head, and I couldn’t wait to see if I could make it work. I had already ordered yarn from Lion Brand, but when I happened to stop at Walmart later that same day, I couldn’t resist taking a look at the yarn aisle.
There I found several colors of Lion Brand Wool-Ease #6 yarn that looked beautiful together. They weren’t the colors I had ordered, but they were perfect for the idea I had in my head. So, of course, I brought them home and got started!
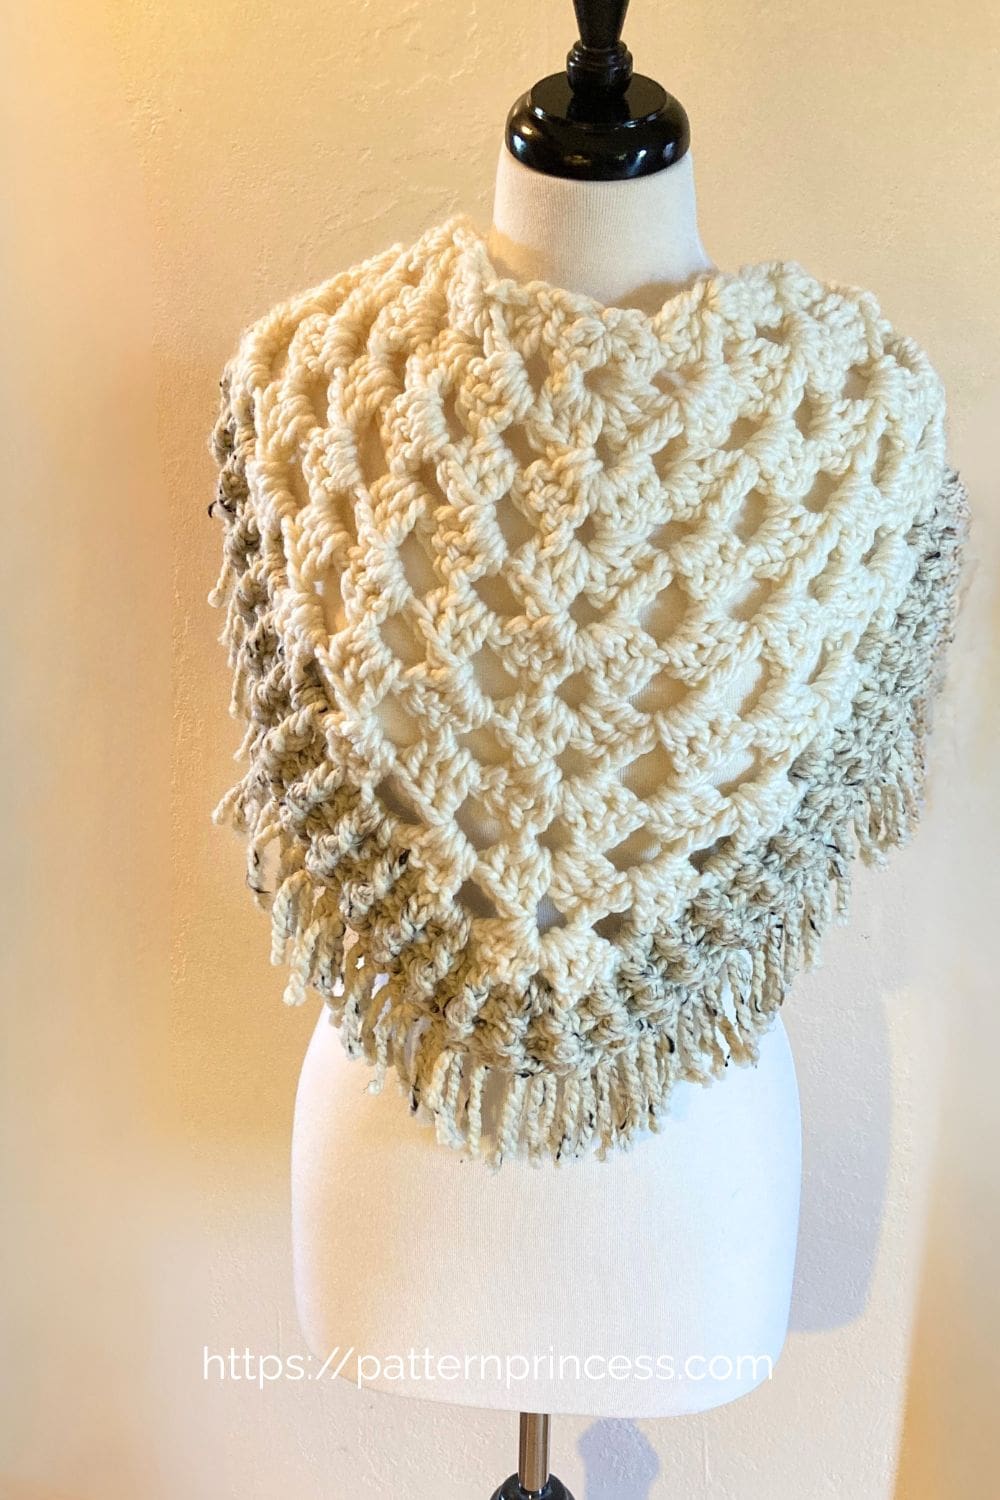
This poncho came together in a weekend, which is always a pretty good sign that a design is meant to be. I love the combination of the soft, bulky yarn, open texture, and long fringe. The finished piece is cozy and warm while still having plenty of drape and movement.
About the Snowdrift Poncho
The Snowdrift Crochet Poncho is a cozy, oversized layer designed to add warmth and texture to your cold-weather wardrobe. Worked from the top down, the poncho works up quickly while the open stitch pattern creates beautiful drape.
The contrasting lower section adds visual interest with textured front post and back post double crochet stitches, while the long fringe gives a fun, relaxed finishing touch.
With six sizes from Small through 3X Large, you can choose the fit that feels most comfortable for you.
The Snowdrift Poncho is designed as a relaxed, comfortable layer rather than a close-fitting garment. The generous fit allows it to be worn over a shirt, sweater, or other layers.
Whether you’re heading out on a chilly day or simply want an extra cozy layer at home, this is a fun and satisfying project to crochet and wear.
Snowdrift Poncho at a Glance
- Skill Level: Advanced Beginner / Intermediate
- Sizes: Small–3X Large
- Yarn: #6 Super Bulky
- Hook: Size N, 9 mm
- Construction: Worked top down and joined at the wide edge
- Special Features: Textured ribbing and fringe
- Videos: Right- and left-handed tutorials included
Why You’ll Love the Snowdrift Poncho
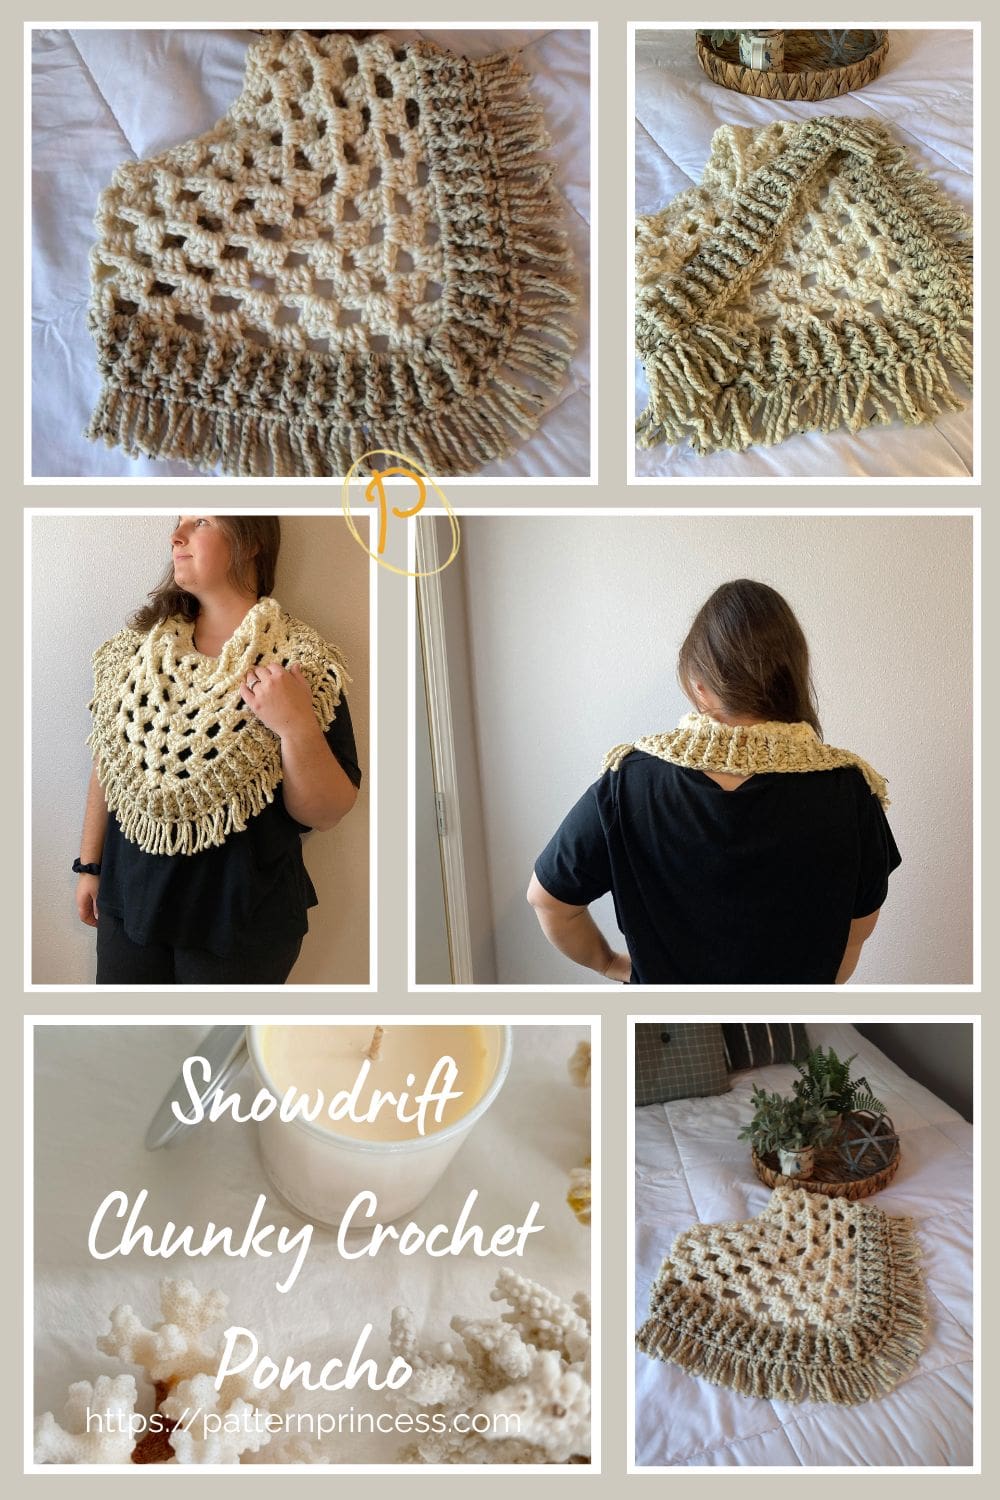
- Quick to crochet — made with chunky yarn
- Worked from the top down — watch your poncho take shape as you crochet
- Six sizes — Small through 3X Large
- Cozy and warm — perfect for chilly weather and easy to slip over your head
- Reversible design — the stitch pattern looks beautiful from either side
- Beautiful texture — the lower section features front post and back post double crochet
- Fun fringe finish — because fringe just makes it better
- Great for gifting — a handmade wearable with plenty of personality
Choosing Your Yarn
This crochet pattern is made with Lion Brand Wool-Ease yarn. The thicker yarn gives the poncho a cozy, substantial feel while allowing the open stitch pattern to remain soft and drapey.
When choosing a different yarn, look for a bulky #6 yarn with good drape. Keep in mind that changing yarn fibers or yarn thickness can affect the finished size, drape, and amount of yarn needed.
While this is shown in soft neutral shades, this design would also be beautiful in a single solid color, a subtle tonal combination, or even a variegated yarn.
Pattern Construction
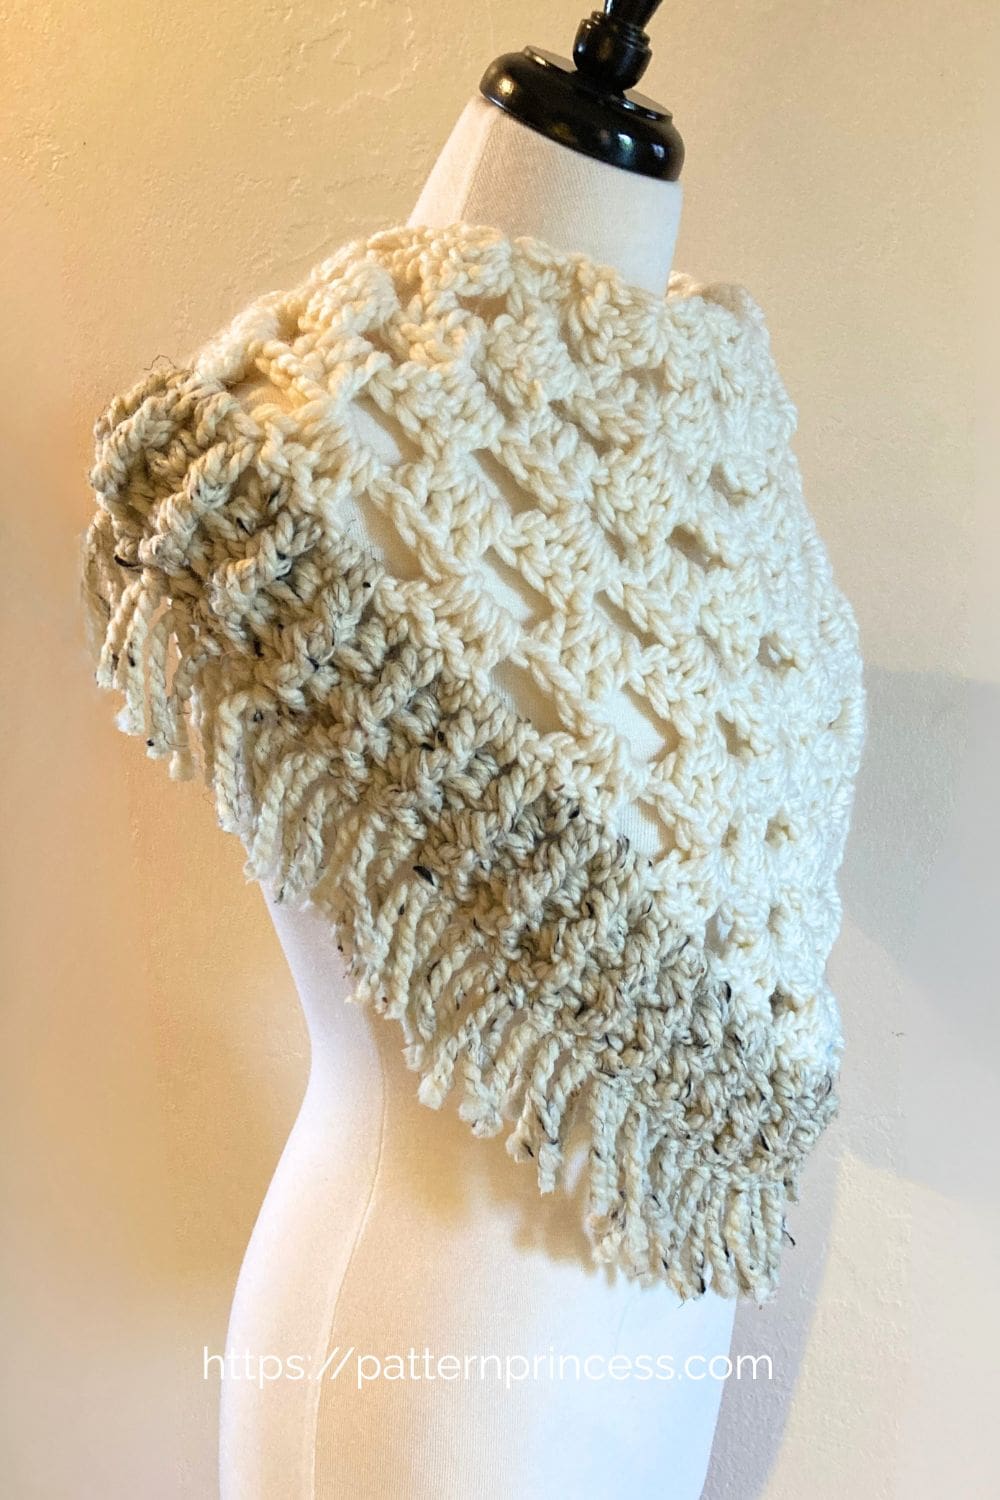
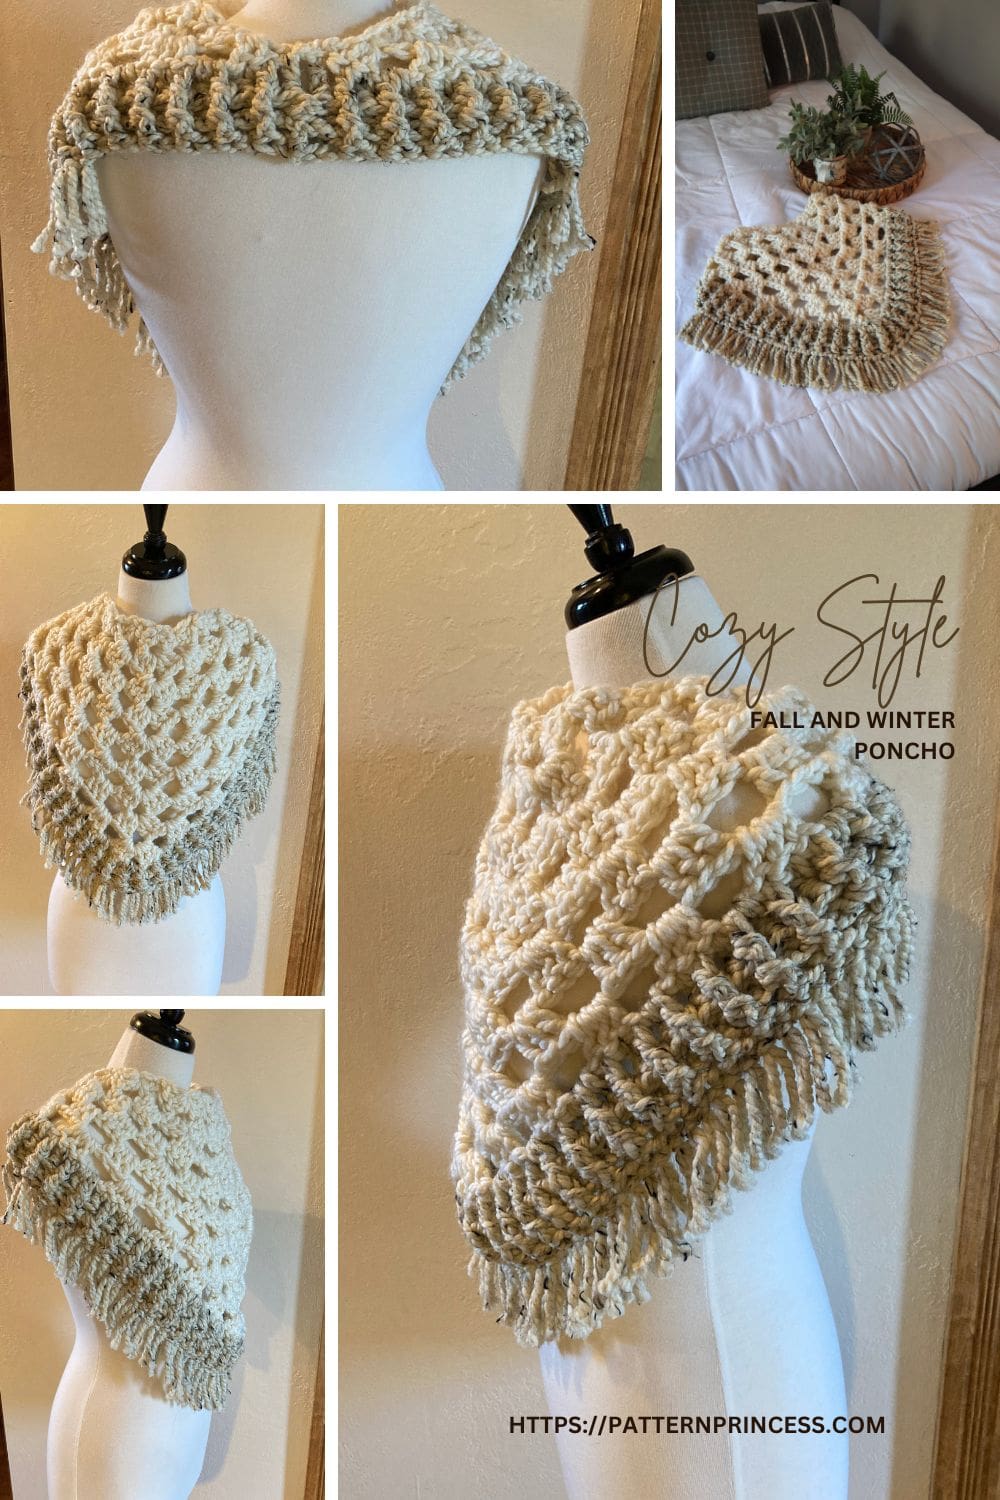
This is worked from the top down, beginning at the neckline and working outward to create the wide, flowing shape of the poncho.
When the main portion is finished, the two ends of the wide edge are joined with a slip stitch, transforming the flat piece into the poncho. A new yarn color is added, followed by several rows of front post double crochet and back post double crochet to create a textured finish around the lower edge.
Finally, add the fringe, and you’re done! It’s that easy to turn a simple crocheted piece into a cozy, wearable poncho.
Get your Ad Free Printable PDF in our Etsy Shop.
Directions: Snowdrift Crochet Poncho Pattern
Skill Level
Advanced Beginner / Intermediate
Gauge
Approximately 8 stitches and 3 1/2 rows of pattern every 4 X 4 inches.
Size
| Size | Center Triangle | Finished Poncho* |
| Small | 20″ W × 11″ L | 25″ W × 16″ L |
| Medium | 21″ W × 12″ L | 26″ W × 17″ L |
| Large | 22″ W × 13″ L | 27″ W × 18″ L |
| X-Large | 23″ W × 14″ L | 28″ W × 19″ L |
| XX-Large | 24″ W × 15″ L | 29″ W × 20″ L |
| XXX-Large | 25″ W × 16″ L | 30″ W × 21″ L |
*Measurements taken without fringe.
Note: the sizes increase by 1″ in the center triangle and 1″ in the finished measurement for each size increase.
To change the size, increase or decrease the rows of the center triangle. The three border rounds remain the same for each size.
Materials
Lion Brand Wool-Ease Thick & Quick #6 Super Bulky Yarn. Each skein contains 106 yards.
Colors
A: Fisherman
B: Oatmeal
- Small: yarn color A: 60 yards, yarn color B: 75 yards. Total yardage 135 yards. 1 skein of each color. 2 skeins total.
- Medium: yarn color A: 70 yards, yarn color B: 85 yards. Total yardage 155 yards. 1 skein of each color. 2 skeins total.
- Large: yarn color A: 80 yards, yarn color B: 95 yards. Total yardage 175 yards. 1 skein of each color. 2 skeins total.
- X-Large (shown): yarn color A: 90 yards, yarn color B: 105 yards. Total yardage 195 yards. 1 skein of each color. 2 skeins total.
- XX-Large: yarn color A: 100 yards, yarn color B: 145 yards. Total yardage 245 yards. 1 skein of A, 2 skeins of B. 3 skeins total.
- XXX-Large: yarn color A: 120 yards, yarn color B: 155 yards. Total yardage 275 yards. 2 skeins of each color. 4 skeins total.
Size N Crochet Hook 9mm
Yarn Needle
Scissors
Stitch Marker
Measuring Tape
If you are not able to find the yarn locally, you can purchase it online. Savings Center – Pattern Princess
Abbreviations
- BPDC = Back Post Double Crochet
- CH = Chain
- DC = Double Crochet
- FPDC = Front Post Double Crochet
- SK = Skip
- SP = Space
- ST = Stitch
- STs = Stitches
- [ ] = Repeat Between
Pattern Notes
Written in US terms.
This pattern is worked from the top down with the size continuing to grow with each row. There is a center triangle worked flat and joined on the wide end. Followed by rounds of ribbing. Then finished off with the addition of fringe.
There is no right or wrong side to this pattern. This means it looks the same on both sides.
Links for Video Tutorials for the poncho are located after the written pattern.
Pattern Tip: Adjusting the Neck Opening
The neckline can be adjusted slightly when joining the two ends of the poncho. For a smaller neck opening, join the ends directly with a slip stitch. For a slightly larger opening, add a few chain stitches before joining.
I joined one of my samples without additional chains, while another sample uses three chains to create a slightly larger neck opening.
Crochet Stitches
Back Post Double Crochet (BPDC)
The back post stitches push out on the side of the fabric facing away from you. Because a post stitch is shorter than a normal double crochet stitch, the row starts with a chain 2 rather than the usual chain 3.
Yarn over, insert the hook from back to front between the posts of the first and second double crochet of the row below. Then insert the hook from the front to the back front between the posts of the second and third stitches. (The hook should now be positioned horizontally in front of the double crochet that you are working around).
Yarn over, pull the yarn over the post of the stitch. There should now be 3 loops on the hook. Yarn over, pull the yarn through 2 loops on the hook. Last, yarn over again and pull through the last two loops on the hook.
Chain Stitch (CH ST)
Begin the chain stitch by making a slip knot on the crochet hook. Leave about a 5-inch tail on the yarn. This will be weaved in later.
Next snug up the yarn loop that is on the crochet hook; while it should be firm, it should also be loose enough to slide on the hook with ease.
Keeping the loop on the hook, insert the hook in the stitch, wrap the yarn over the crochet hook from back to front. Draw the yarn through the loop. (The first chain stitch is complete).
Double Crochet Stitch (DC)
Yarn over, insert the hook through both loops and pull up a loop. Next, yarn over and pull through two loops on the hook. Lastly, yarn over again and pull through the last two loops on the hook.
Front Post Double Crochet (FPDC)
Front post stitches are raised crochet stitches on the surface of the fabric facing you.
Because a post stitch is shorter than a normal double crochet stitch, the row starts with a chain 2 rather than the usual chain 3.
Yarn over, insert the hook from front to back between the posts of the first and second double crochet of the row below. Then insert the hook from the back to the front between the posts of the second and third stitches. (The hook should now be positioned horizontally behind the double crochet that you are working around).
Yarn over, pull the yarn around the post of the stitch. There should now be 3 loops on the hook. Yarn over, pull the yarn through 2 loops on the hook. Lastly, yarn over again and pull through the last two loops on the hook.
Begin Pattern
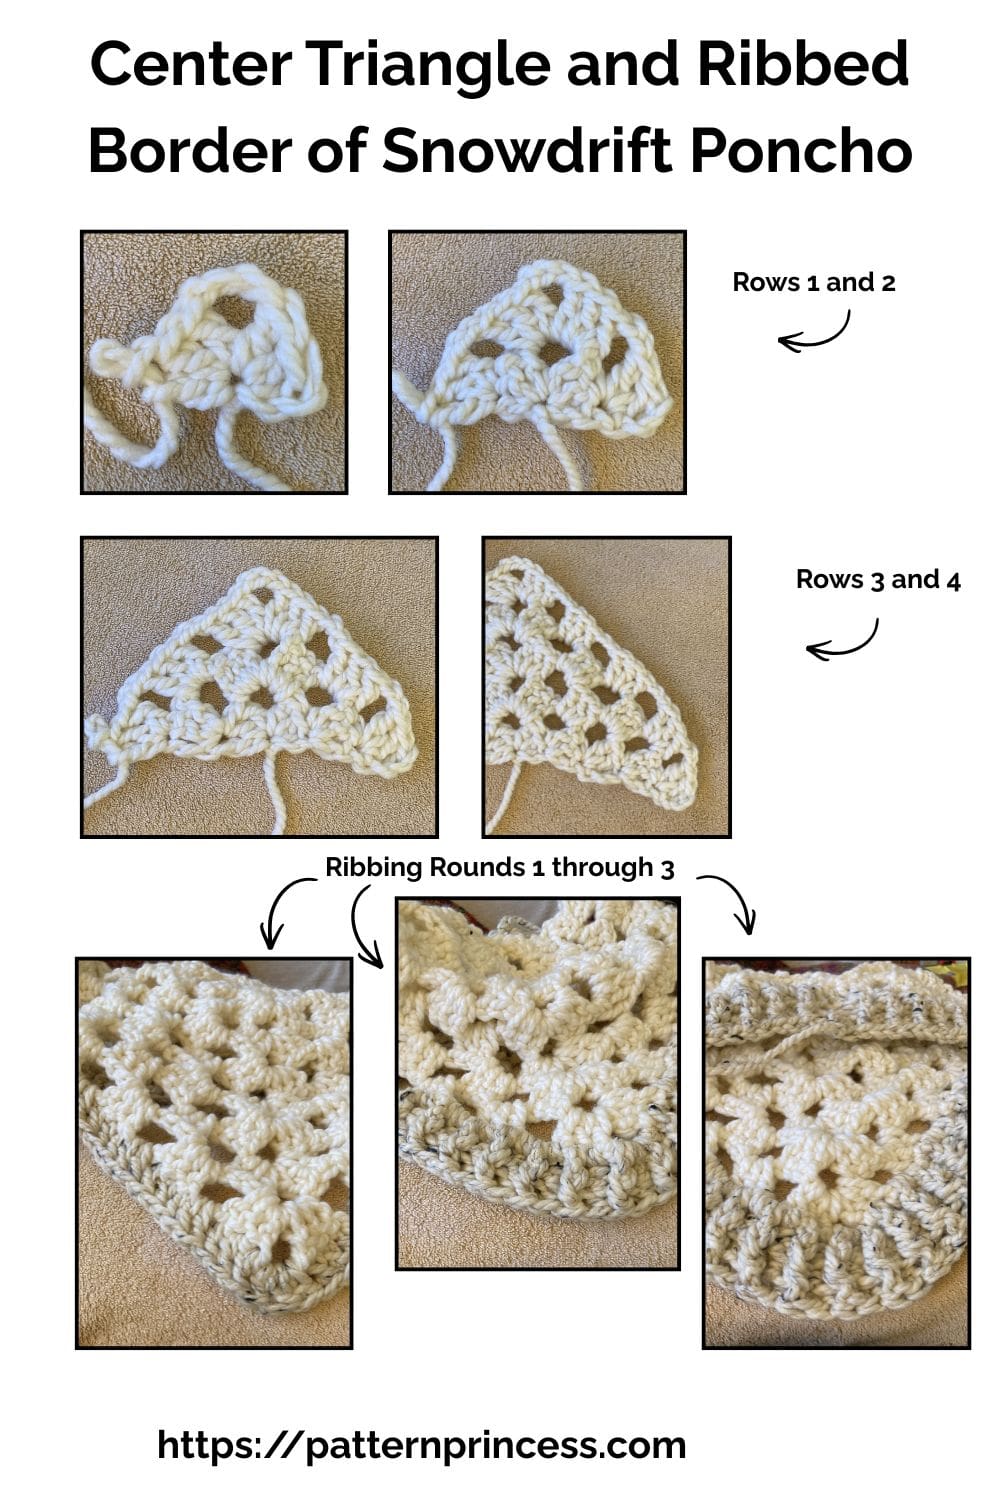
Crochet the Center Triangle using Yarn Color A
Row 1
CH 3. In the 3rd CH from the hook (the very first CH ST you made) work 3 DC, CH 3, 3 DC. Turn. (6 DC, 3 CH)
Row 2
CH 3 (Counts as a DC). 2 DC in the first ST, CH 2, SK 2 DC. In the CH 3 SP work (3 DC, CH 3, 3 DC, CH 2). SK 2 DC. In the last ST work 3 DC. Turn (12 DC, 7 CH)
Row 3
CH 3 (Counts as a DC). 2 DC in the first ST, CH 2, SK 2 DC. In the CH 2 SP work 3 DC, CH 2 SK 3 STs. In the CH 3 SP work (3 DC, CH 3, 3 DC, CH 2). SK 3 STs. In the CH 2 SP work 3 DC, CH 2 SK 2 STs. In the last ST work 3 DC. Turn (18 DC, 11 CH)
Row 4
CH 3 (Counts as a DC). 2 DC in the first ST, CH 2, SK 2 DC. [In the CH 2 SP work 3 DC, CH 2 SK 3 STs. In the next CH 2 SP work 3 DC]. Repeat between [ ] to the CH SP just before the center. At the center CH 2, SK 3 DC. In the CH 3 SP work (3 DC, CH 3, 3 DC). [CH 2, SK 3 DC. In the CH SP work 3 DC] Repeat across to the last CH SP. There should be 3 STs left. CH 2, SK 2 STs, in the last ST work 3 DC. Turn (24 DC, 15 CH)
Rows 5 and Beyond
Continue repeating row 4 to the desired size
Here are the number of rows for the six suggested sizes:
- Small: 6 rows.
- Medium: 7 rows.
- Large: 8 rows.
- X-Large (shown): 9 rows.
- XX-Large: 10 rows.
- XXX-Large: 11 rows.
Finishing the Center Triangle
When the main portion is finished, join the two ends of the wide edge with a slip stitch. This transforms the flat piece into the poncho.
Sizing Note: This is optional. On the video I discuss the option of adding a few chain stitches before joining the ends with a slip stitch.
On one poncho I just joined the ends with no additional chain stitches. (This fits over my head nicely with no issues). The one on the video, I added three chain stitches as the person I made it for wanted the neck hole a bit larger.
Cut off the yarn leaving a 10–12-inch tail. Using the yarn needle, weave in the yarn ends and snip off the excess yarn.

Crochet the Ribbing Border
Change to Yarn Color B
Join new yarn color B to the stitch you just worked a SL ST in.
Round 1
Working on the bottom side (not the neck opening), CH 3 (Counts as a DC). DC in each ST and CH St around. Join with a SL ST into the top of the first CH 3. Turn
Round 2
In this round, you will be alternating between the FPDC and BPDC stitches around.
CH 2 (Counts as a DC). [FPDC in the next ST. BPDC in the next ST]. Repeat around between [ ], End with a SL ST into the top CH of the first CH 2. Turn
Round 3
In this round, you will again be alternating between the FPDC and BPDC stitches around. However, you will be working a FPDC where you did a BPDC in the 2nd round and a BPDC where you did a FPDC in the 2nd round.
CH 2 (Counts as a DC). I ended my 2nd round with a BPDC, so I will start with a FPDC. My next stich will be a BPDC. [FPDC in the next ST, BPDC in the next ST]. Repeat around between [ ]. Ending with a SL ST into the top CH of the first CH 2.
Finishing
Cut off the yarn leaving a 10–12-inch tail. Using the yarn needle, weave in the yarn ends and snip off the excess yarn.
Attaching Fringe
There are two options for this fringe.
1. Have fringe around the entire poncho.
2. Have fringe from the shoulder to the front and other shoulder. Leaving the back without fringe.
In my samples, I chose option 2. To make sure that I had the fringe starting and ending evenly, I counted from the center stitch in the back 14 stitches on both sides and placed a stitch marker.
It was easy to see exactly where to start and stop the fringe.
Make the Fringe
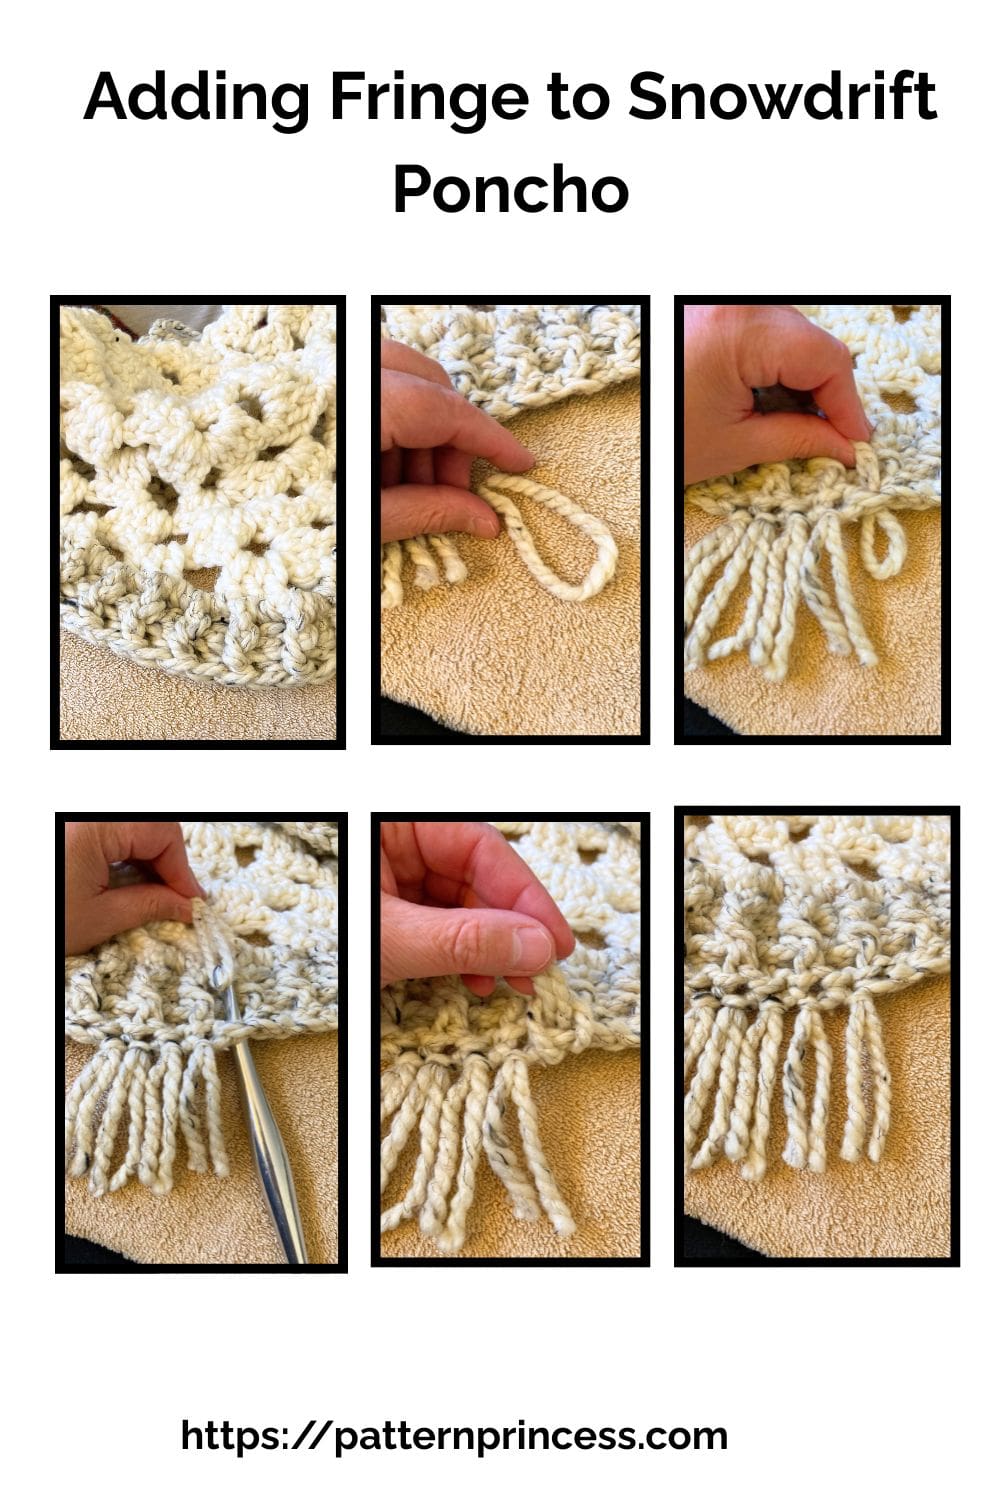
Cut a 7-inch piece of fringe for each ST around. When folded in half and tied onto the poncho, it will be about 3 ½ inches.
You can adjust the length of the fringe to your preference. Just keep in mind that you need to double the desired ending length. As it will be half the length when each strand folds in half.
For perfectly even strands, wrap yarn around a book or cardboard template and cut one edge or both as needed to get your desired length.
I used my 14-inch laptop as my template. I counted the stitches that needed fringe, then wrapped the yarn around the laptop, keeping the yarn snug but not tight. Then I held the strands together and cut the yarn on one end. Then I folded the bundle in half and cut it again to create my 7-inch strands.
Attach Fringe (Lark’s Head Knot Method)
This is the cleanest, most common method.
- Hold the strand together (depending on how thick you want each tassel/fringe you can use 1, 2, or 3 strands held together).
- Fold the bundle in half to make a loop.
- Insert your hook into the stitch or space where the fringe will go.
- Grab the folded loop with your hook and pull it partway through.
- Feed the loose ends through the loop.
- Pull snugly to secure.
This creates a neat, professional fringe knot.
Trim the Fringe if needed
Once all fringe is attached, lay your project flat.
Use sharp scissors to trim the ends straight, angled, or curved depending on the look you want.
Your Snowdrift Crochet Poncho is ready to wear or gift.
Video Tutorials for the Snowdrift Crochet Poncho on our YouTube Channel

You can find Victoria crocheting, quilting, and creating recipes. She has cooked in restaurants for over 20 years, including many larger parties. She learned to crochet when she was just 11 years old and has been crocheting ever since; over 50 years now. Over 40 years ago, she loved her first class in sewing and continues to hone her skills in quilting. Many have enjoyed the handmade gifts over the years. In her professional career, she has worked in management in a wide variety of businesses including higher education as a dean of a division. All the while attending college part-time to achieve her doctorate in higher education with an emphasis in e-learning.
Stay connected with Pattern Princess
Add Pattern Princess as a preferred source in Google Search to make it easier to find our crochet patterns, recipes, quilt patterns, and other creative projects when you're looking for something new to make.
