Last updated on March 27th, 2026 at 09:46 am
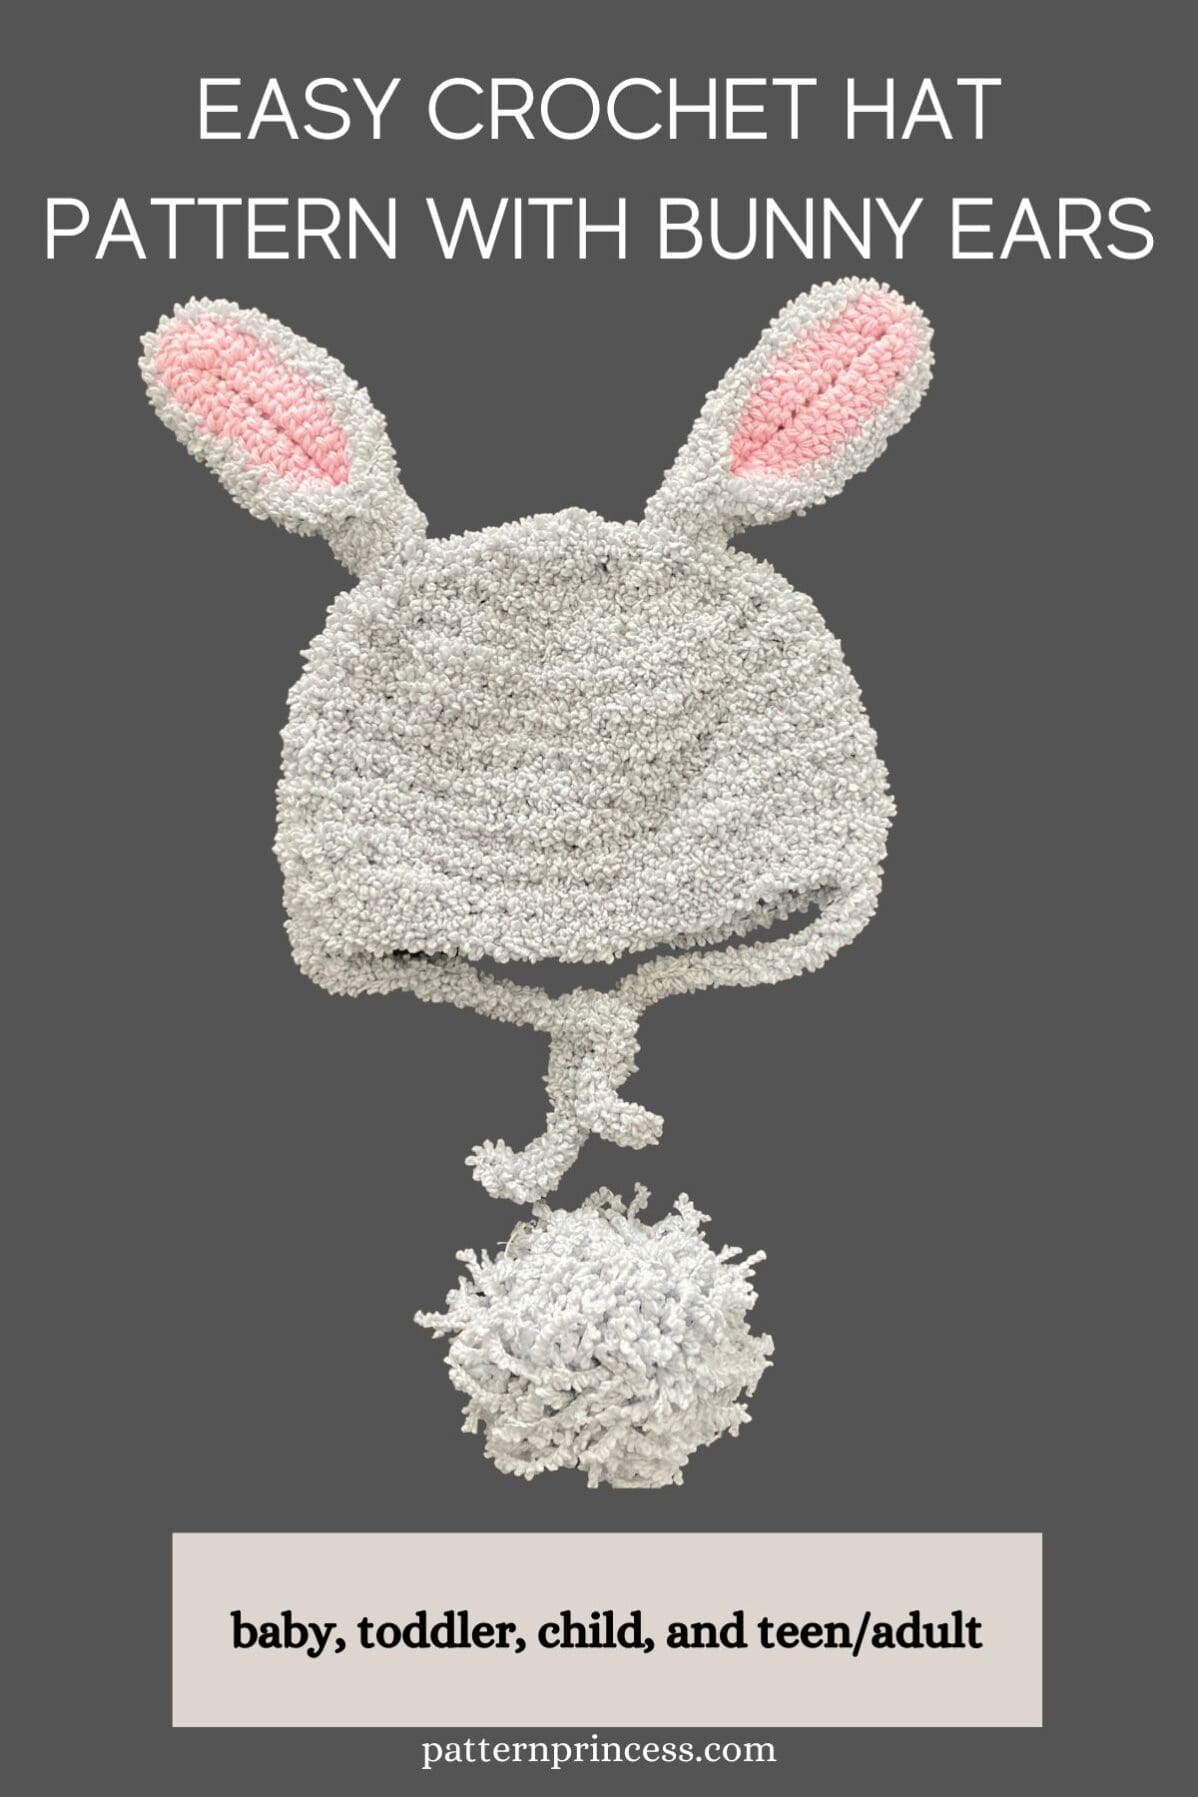
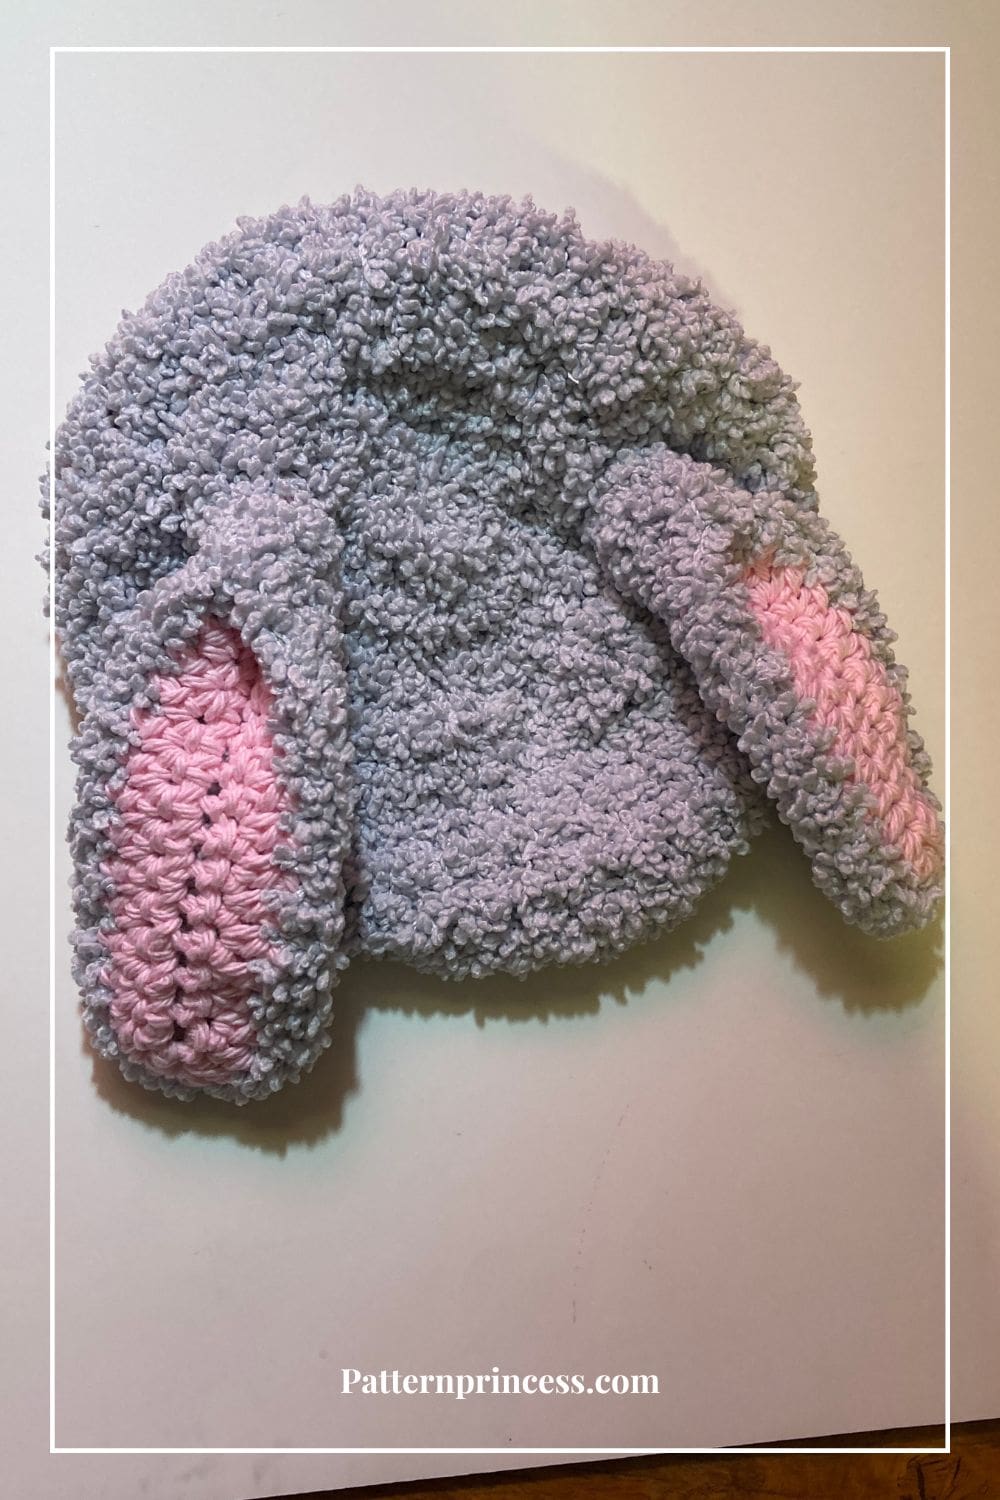
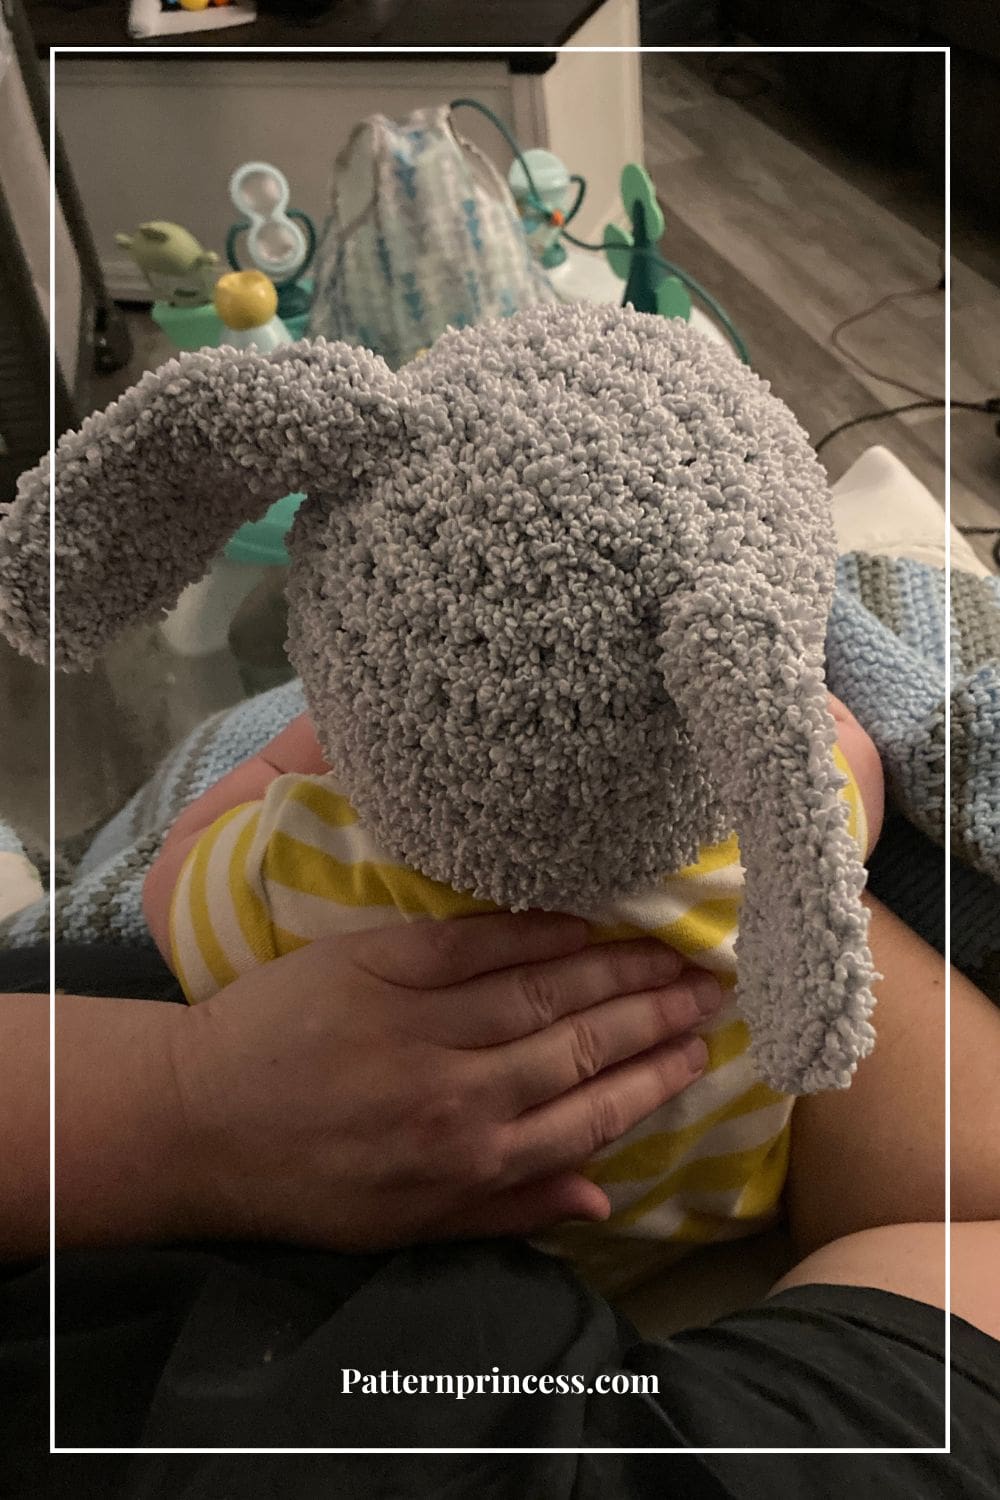
I’m sharing an adorable easy crochet hat pattern with bunny ears that is surprisingly simple to make. This charming accessory adds an extra touch of whimsy and playfulness to a classic hat design, making it perfect for little ones.
Whether you’re a seasoned crochet enthusiast or a beginner eager to embark on a new project, this pattern is designed to be approachable and enjoyable for all skill levels.
Today, I used a fluffy grey yarn for the outer bunny ears and beanie hat and a pink cotton yarn for the inside of the bunny ears. However, this pattern also works for a worsted weight yarn and in any color. You could make the crochet ears and hat in pink and have the inner ear in white yarn as an accent color.
Post contains affiliate links, and we earn commissions if you shop through the links on this page. For more information, please read the disclosure section under the About Us page.
Create A Cozy Beanie with This Easy Free Crochet Pattern
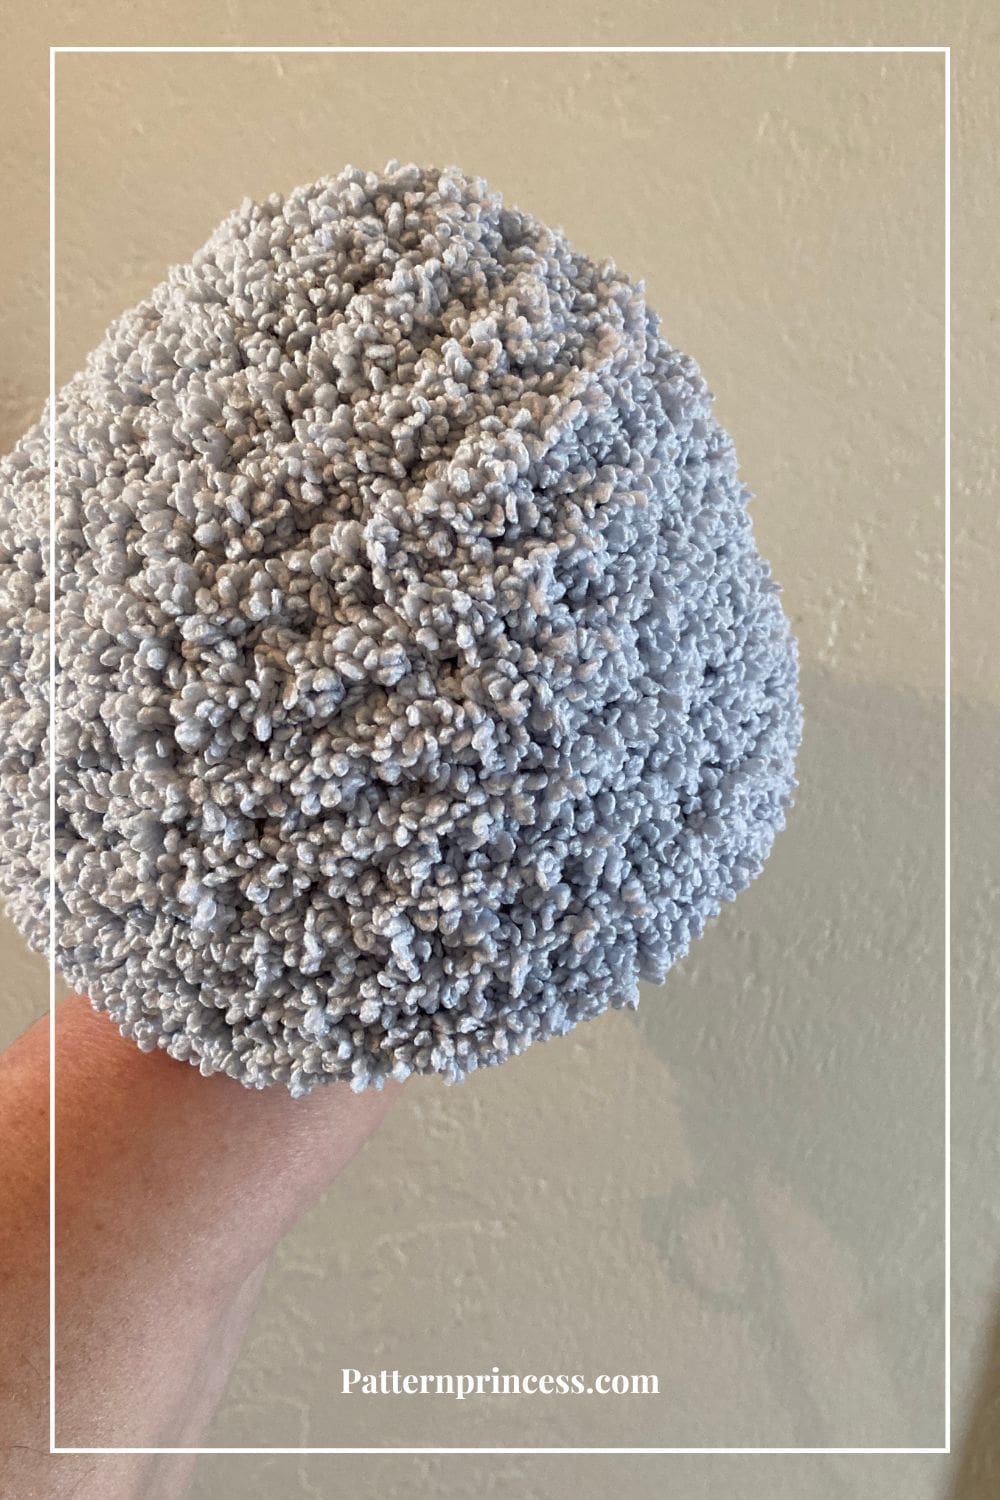
This beanie pattern is worked from the top down growing in size with each round. Therefore, there is no need to sew seams together or gather the top edge together. It really is an easy crochet beanie pattern as it just uses basic crochet stitches.
However, the ears are made separately and sewn on the crochet beanie after the beanie has been crocheted.
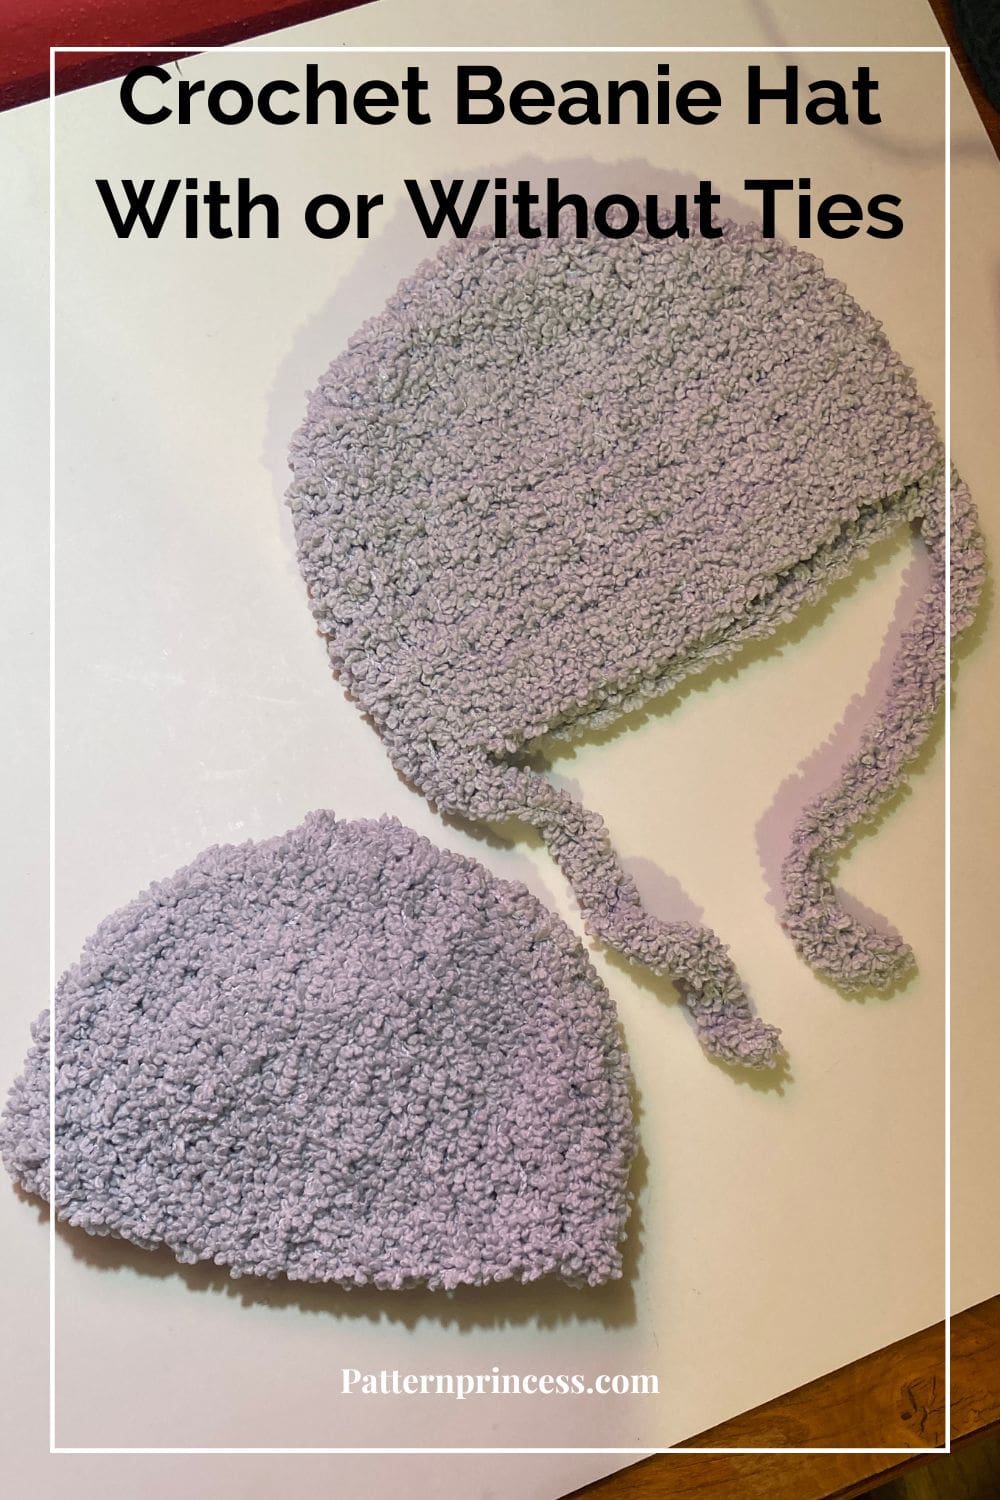
The bunny ears are optional. This hat is soft and warm on its own. Additionally, you may choose to add straps to the hat for babies and toddlers. It helps hold the hat in place.
Girls and Boys Hat Pattern
The fluffy and soft hat is just perfect as a gender neutral beanie in any color. In fact, this hat is warm and comfy and is perfect for the whole family. Just change the beginning crochet stitches in the first round and the number of rounds crocheted.
Easy and Delightful Crochet Hat Pattern
We are delighted to present an easy and delightful crochet hat pattern that is sure to capture your heart. The star of the show? Bunny ears!
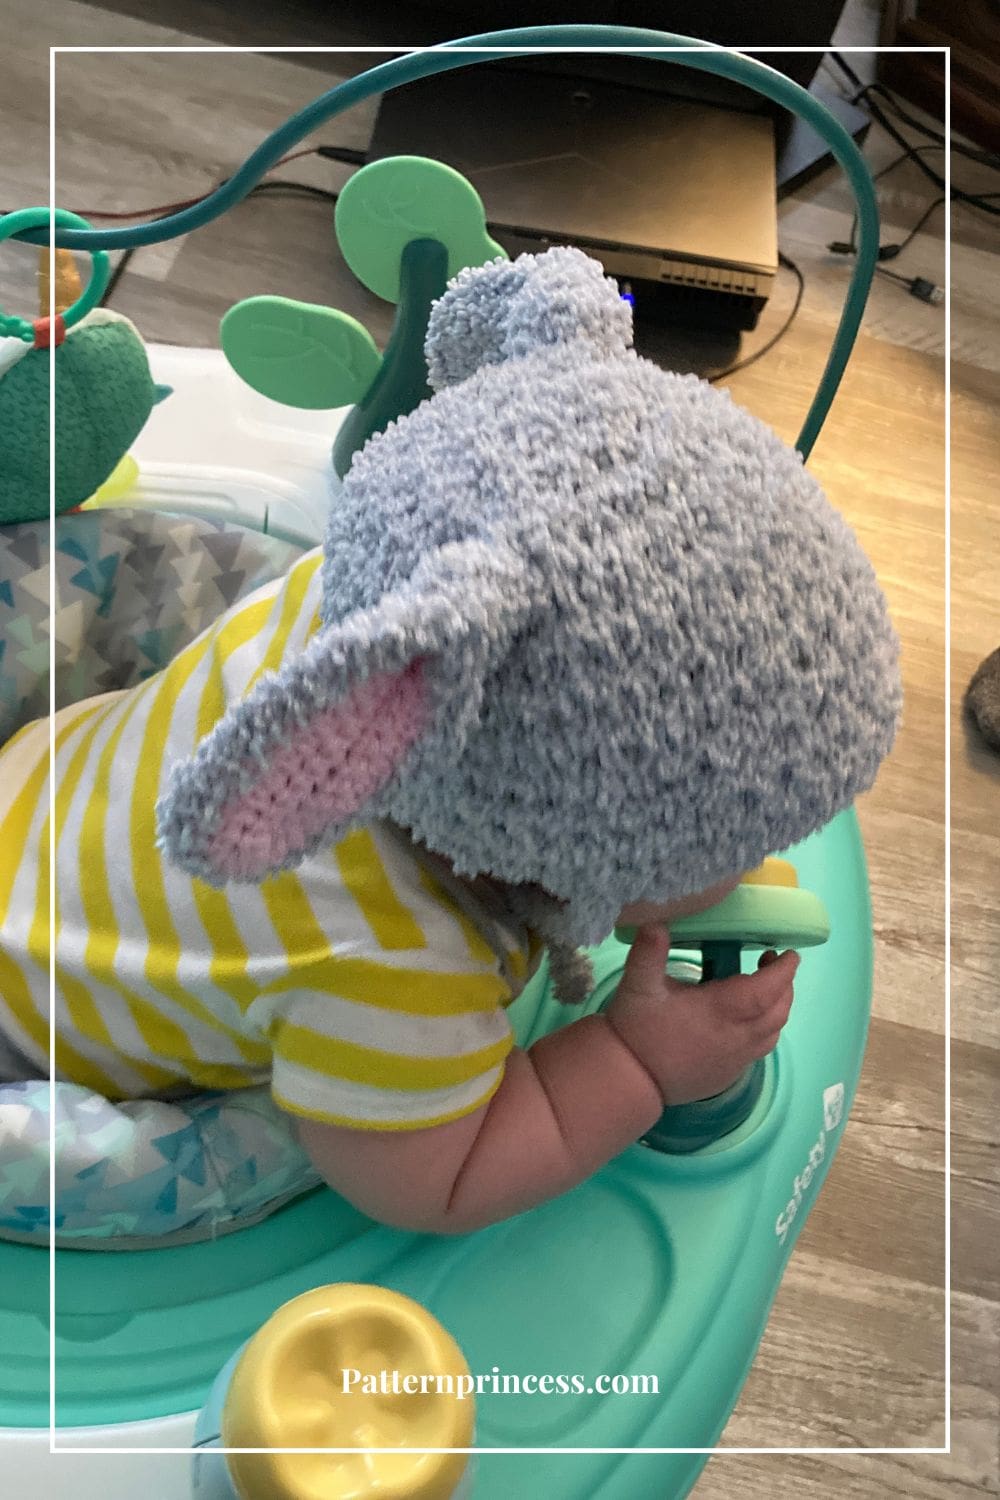
Keep those precious heads warm and snug while simultaneously delighting their little imaginations. Perfect for Easter or any time of the year.
This Crochet Pattern Includes Four Sizes
With its versatility and customization options, this crochet hat pattern can be tailored to fit babies and children alike.
From a newborn’s first adventures to a child’s playful explorations, this hat will bring smiles and warmth to your loved ones.
Crochet Directions for baby, toddler, child, and adult.
This pattern can be made for anyone in the family. Remember, the ears and straps are optional of course, but they sure are adorable.
Gather your crochet hook and yarn so you can make your own delightful bunny ears crochet hat.
Bulky Yarn Crochet Hat Pattern Free
The yarn I chose for this hat pattern is Lion Brand Baby Soft Boucle which is a super thick and fuzzy yarn. It pairs nicely with the Peaches and Creme pink cotton yarn for the inside of the ears.
While the soft fuzzy yarn really helps make this hat have the look and feel of the bunny, it can be hard to see your stitches. However, I have a way around that.
How to Crochet Floppy Bunny Ears Free Pattern
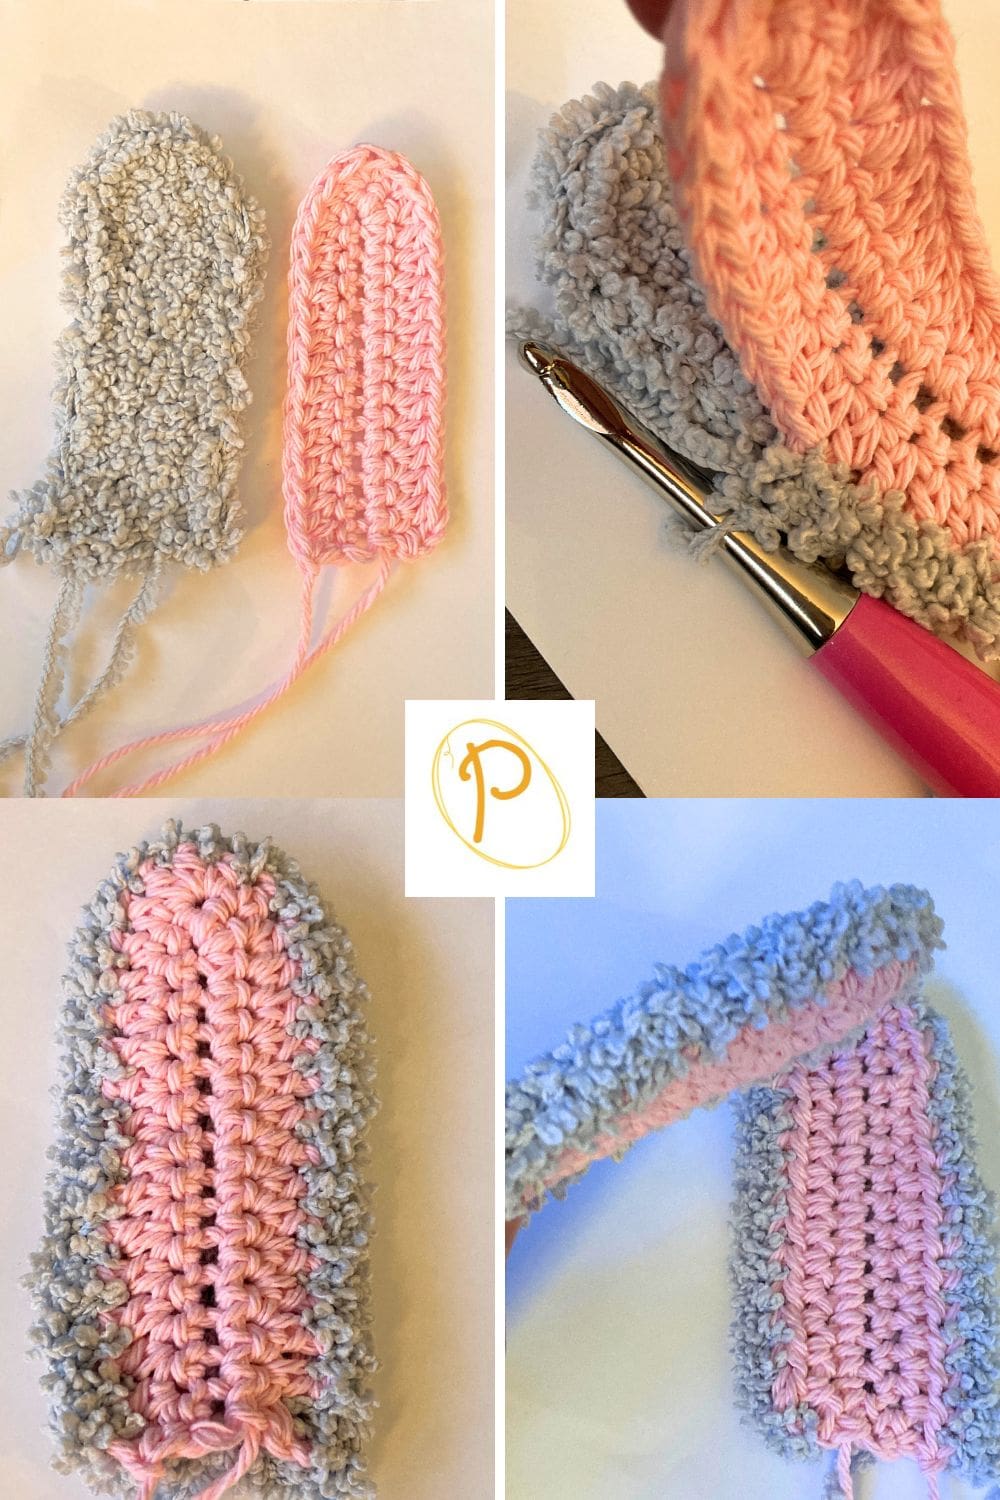
The bunny ears are worked in two pieces and two separate yarn colors. Start in the center of the inside of the ear working in an oval shape. Then the outer ear is crocheted with the same method as the inner ear. The two oval earpieces are joined together on the outer edge leaving longer yarn tales. Use the tales to sew the ears in place on the hat.
The bunny ears are made separately from the beanie hat. Therefore, they can be used to sew onto a headband for a crochet bunny ears headband or any other fun idea.Or make the hat and add a faux fur pom pom. It is a great way to make an easy project and keep or give as a handmade gift during the Holidays.
Get all the details below the hat pattern.
Pointy Ears Rather than Floppy Ears
When you are crocheting the inside of the ears and the outside of the ears, you could insert a like color pipe cleaner along side the initial chain stitches on both sides. Then just crochet around them and continue with the pattern.
This will provide more stability and help the ears stay straight up or since the pipe cleaners have a metal wire in them, they are bendable. Which allows you to position the ears.
How to Measure Crochet Hat Sizes
To measure crochet hat sizes accurately, you will need to determine the circumference of the head for which the hat is intended. Here’s a step-by-step guide on how to measure crochet hat sizes:
Obtain a measuring tape: Use a flexible measuring tape or a piece of string and a ruler that can be used to measure the head circumference.
Position the measuring tape: Place the measuring tape or string around the widest part of the head. The tape should sit just above the eyebrows and ears, and around the back of the head where the base of the skull meets the neck.
Take the measurement: Make sure the measuring tape is snug but not too tight. Note the measurement in inches or centimeters.
Determine the hat size: Hat sizes are typically categorized by age groups or head circumference ranges. Here are some general guidelines:
Newborn: 12-14 inches (30-35 cm)
0-3 months: 14-15 inches (35-38 cm)
3-6 months: 15-16 inches (38-41 cm)
6-12 months: 16-18 inches (41-46 cm)
Toddler (1-3 years): 18-20 inches (46-51 cm)
Child (3-10 years): 20-22 inches (51-56 cm)
Teen/Adult: 22-24 inches (56-61 cm)
Adjust the pattern: By adjusting stitch counts, crochet hook, or yarn used you can change the sizing. Modify the pattern accordingly to achieve the desired size based on the measurement you obtained.
Remember that these are general guidelines, and individual head sizes may vary. It’s always best to measure the specific recipient’s head for an accurate fit.
Additionally, crochet hat patterns will have gauge requirements, so make sure to check the pattern instructions for any additional sizing information. It is a good idea to make a small swatch first to check your gauge.
Can I use a substitute yarn for this crochet hat?
This is a commonly asked question on hats. Remember using a different yarn weight will change the size of the hat. Therefore, when substituting yarn for any pattern, but especially a hat pattern, use a measuring tape.
Some hats start with the brim and others such as this one begins at the top and work down to the brim.
How to use a substitute yarn for a beginner crochet beanie
Use the tape measure. Measure the circumference of the brim and the area that would be over the crown of the head from ear-to-ear.
When crocheting a top down hat, use this method.
For the baby and toddler size, this hat pattern starts off with 8 DC. For the child and adult size, the pattern begins with 10 DC.
Once you have taken your measurements, follow the crochet pattern stopping every few rows to measure the hat. As you continue adding rows, the hat continues to grow.
When crocheting a hat from the brim up, use this method.
Take the head measurements then create the brim width according to the measurements; not the stitch count noted in the pattern.
In other words, chain the number of stitches to get the brim length, then follow the instructions for the brim height. Make sure to take measurements every few rows measuring for the brim and the part of the hat that goes over the crown of the head.
Pro Tip. Make sure NOT to stretch or pull on the hat when you are measuring. This can cause the sizing to be incorrect.

Directions: Easy Crochet Hat Pattern
Skill Level
Easy Crochet for a confident beginner
Size
This beanie hat comes in 4 different sizes.
Newborn Baby 12-14 inches at hat brim and 10 inches over the crown of the head measuring ear-to-ear.
Toddler 18-20 inches at the hat brim and 12 inches over the crown of the head measuring ear-to-ear.
Child 20-22 inches at the hat brim and 15 inches over the crown of the head measuring ear-to-ear.
Teen/Adult 22-24 inches at the hat brim and 18 inches over the crown of the head measuring ear-to-ear.
Gauge
6 Stitches every 4 inches
Materials
Lion Brand Baby Soft Boucle in the color Cloud. Used for the hat.
- 60 yards for newborn baby
- 75 yards for toddler
- 90 yards for child
- 110 yards for teen/adult
Peaches and Crème cotton yarn in the color Pastel Pink. For the inside of the bunny ear.
- 20 yards up to child size ears
- 40 yards for teen/adult ears
Where to find the yarn if you are not able to find it locally?
Lion Brand Boucle can be hard to find. Amazon had this in stock when I made this pattern.
Boucle yarn substitutions that would work are the Lion Brand Homespun and Bernat Pipsqueak yarn.
Peaches and Creme cotton can be found at Amazon and our local Walmart often stocks it too.
Crochet Hook Size K 6.5 MM for the beanie hat
Crochet Hook Size H 5.0 MM for the floppy bunny ears
Tapestry Needle
Scissors
Abbreviations
CH = Chain
DC = Double Crochet
HDC = Half Double Crochet
SC = Single Crochet
SK = Skip
SL ST = Slip Stitch
ST = Stitch
STs = Stitches
[ ] = Repeat Between
Pattern Notes
The first round worked into the circle uses a CH 3 which counts as a stitch.
CH 2 of each round does not count as a stitch.
Place the first stitch of each row in between the same stitch as the join.
Due to the fuzzy yarn making it hard to see the stitches, the stitches are worked between the stitches of the previous row below.
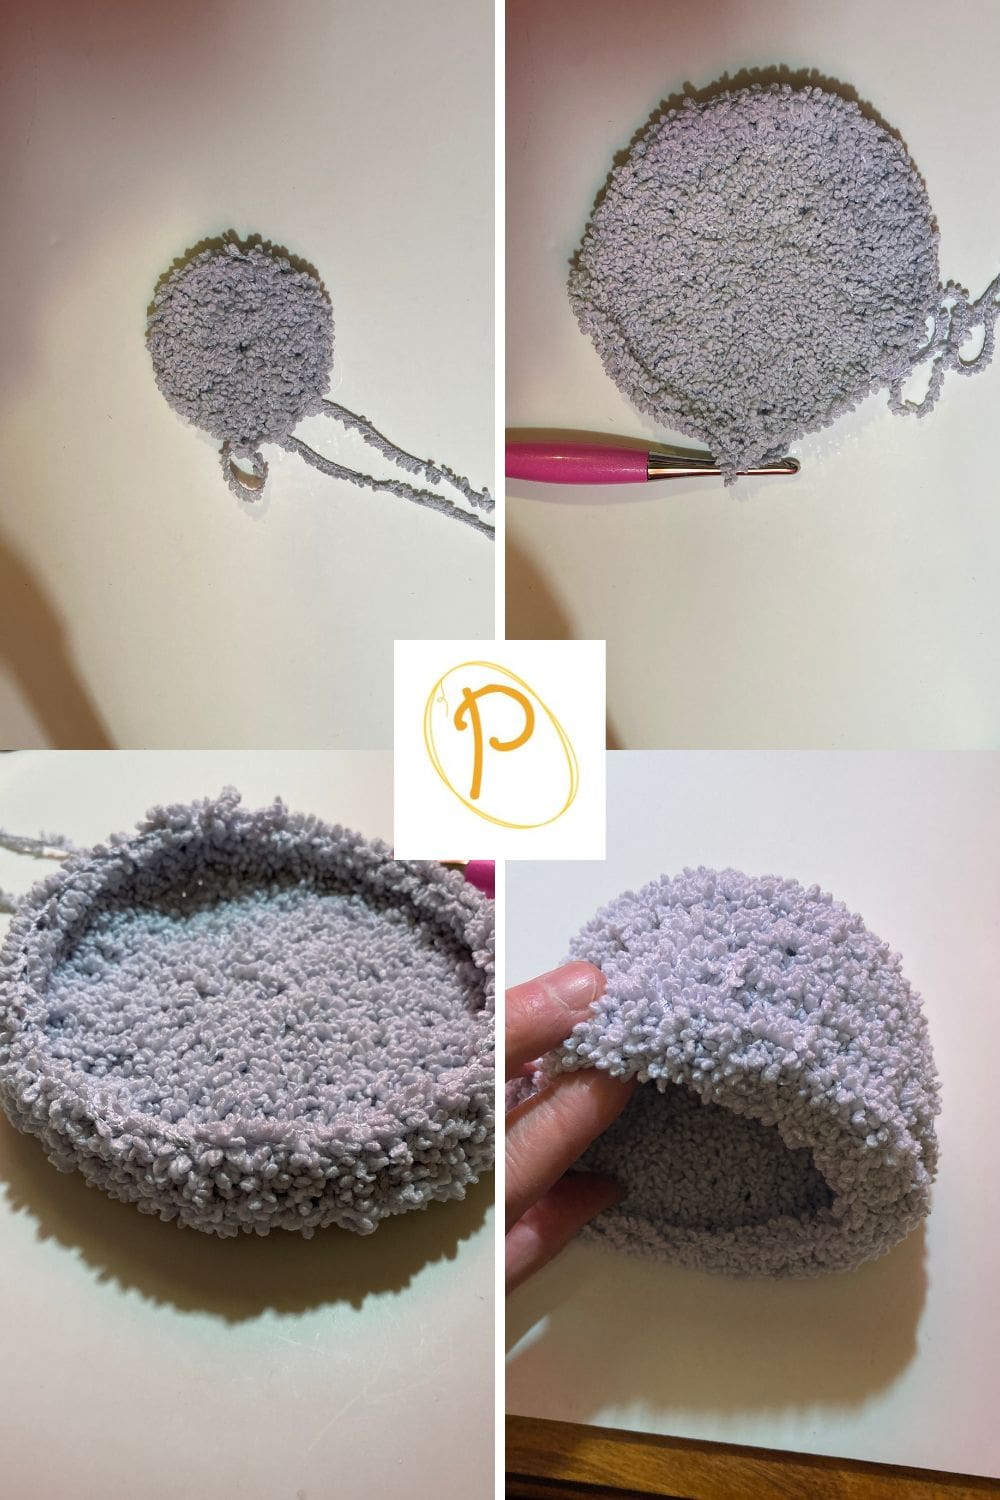
This pattern is worked in the round from the top down. The size of the hat grows with each round added.
Round 5 when there is a double crochet between each stitch, the hat will start to curl and form the sides.
Use Size K crochet hook for the beanie hat and ties.
Use Size H crochet hook for the bunny ears.
Rather than the CH 4 and SL ST into the first CH to form the ring, you could use the magic ring or magic circle as it is also sometimes referred to. If you are not familiar with this method, you can find a full free tutorial for the magic circle on the website.
If you prefer to make slouchy hats for the teen/adult size without the ears, continue adding a few more rounds.
Photo and Video Tutorials
This Pattern Comes with Photos to help with the pattern directions, as well as video tutorials for both a left hand crocheter and a right hand crocheter. You will find the video tutorial links below the written pattern.
Newborn Baby Beanie Directions
Begin
CH 4. Join with SL ST to first CH to form circle.
Round 1
CH 3 (Counts as DC). Work 7 more DC into the circle. SL ST to top of first CH 3 ST to join. (8 STs).
Round 2
CH 2 (Does Not count as a DC). 2 DC between each ST around. SL ST to top of first CH 3 ST to join. (16 STs).
Round 3
CH 2 (Does Not count as a DC). [1 DC between first ST, 2 DC between next ST]. Repeat around between [ ]. SL ST to top of first CH 3 ST to join. (24 STs).
Round 4
CH 2 (Does Not count as a DC). [1 DC between first ST and next ST, 2 DC between next ST]. Repeat around between [ ]. SL ST to top of first CH 3 ST to join. (32 STs).
Rounds 5-10
CH 2(Does Not count as a DC). 1DC between each ST around. SL ST to top of first CH 3 ST to join. (32 STs).
Finishing
If you plan on adding ties, do not cut off yarn yet. Move down to the instructions for the hat ties.
If you do not plan on adding the hat ties, snip off the yarn leaving about a 10-inch tail. Weave in yarn ends and remove the excess yarn.
Toddler Beanie Directions
Begin
CH 4. Join with SL ST to first CH to form circle.
Round 1
CH 3 (Counts as DC). Work 9 more DC into the circle. SL ST to top of first CH 3 ST to join. (10 STs).
Round 2
CH 2 (Does Not count as a DC). 2 DC between each ST around. SL ST to top of first CH 3 ST to join. (20 STs).
Round 3
CH 2 (Does Not count as a DC). [1 DC between first ST, 2 DC between next ST]. Repeat around between [ ]. SL ST to top of first CH 3 ST to join. (30 STs).
Round 4
CH 2 (Does Not count as a DC). [1 DC between first ST and next ST, 2 DC between next ST]. Repeat around between [ ]. SL ST to top of first CH 3 ST to join. (40 STs).
Rounds 5 – 10
CH 2(Does Not count as a DC). 1DC between each ST around. SL ST to top of first CH 3 ST to join. (40 STs).
Finishing
If you plan on adding ties, do not cut off yarn yet. Move down to the instructions for the hat ties.
If you do not plan on adding the hat ties, snip off the yarn leaving about a 10-inch tail. Weave in yarn ends and remove the excess yarn.
Child Beanie Directions
Begin
CH 4. Join with SL ST to first CH to form circle.
Round 1
CH 3 (Counts as DC). Work 9 more DC into the circle. SL ST to top of first CH 3 ST to join. (10 STs).
Round 2
CH 2 (Does Not count as a DC). 2 DC between each ST around. SL ST to the top of the first DC ST to join. (20 STs).
Round 3
CH 2 (Does Not count as a DC). [1 DC between first ST, 2 DC between next ST]. Repeat around between [ ]. SL ST to the top of the first DC ST to join. (30 STs).
Round 4
CH 2 (Does Not count as a DC). [1 DC between first ST and next ST, 2 DC between next ST]. Repeat around between [ ]. SL ST to the top of the first DC ST to join. (40 STs).
Round 5
CH 2(Does Not count as a DC). [1DC between first ST and next 2 STs, 2 DC between next ST]. Repeat around between [ ]. SL ST to the top of the first DC ST to join. (50 STs).
Rounds 6-13
CH 2(Does Not count as a DC). 1DC between each ST around. SL ST to the top of the first DC ST to join. (50 STs).
Finishing
If you plan on adding ties, do not cut off yarn yet. Move down to the instructions for the hat ties.
If you do not plan on adding the hat ties, snip off the yarn leaving about a 10-inch tail. Weave in yarn ends and remove the excess yarn.
Teen/Adult Beanie Directions
Begin
CH 4. Join with SL ST to first CH to form circle.
Round 1
CH 3 (Counts as DC). Work 9 more DC into the circle. SL ST to top of first CH 3 ST to join. (10 STs).
Round 2
CH 2 (Does Not count as a DC). 2 DC between each ST around. SL ST to the top of the first DC ST to join. (20 STs).
Round 3
CH 2 (Does Not count as a DC). [1 DC between first ST, 2 DC between next ST]. Repeat around between [ ]. SL ST to the top of the first DC ST to join. (30 STs).
Round 4
CH 2 (Does Not count as a DC). [1 DC between first ST and next ST, 2 DC between next ST]. Repeat around between [ ]. SL ST to the top of the first DC ST to join. (40 STs).
Round 5
CH 2(Does Not count as a DC). [1DC between first ST and next 2 STs, 2 DC between next ST]. Repeat around between [ ]. SL ST to the top of the first DC ST to join. (50 STs).
Round 6
CH 2(Does Not count as a DC). [1DC between first ST and next 3 STs, 2 DC between next ST]. Repeat around between [ ]. SL ST to the top of the first DC ST to join. (60 STs).
Rounds 7
CH 2(Does Not count as a DC). [1DC between first ST and next 4 STs, 2 DC between next ST]. Repeat around between [ ]. SL ST to the top of the first DC ST to join. (70 STs).
Rounds 8-17
CH 2(Does Not count as a DC). 1DC between each ST around. SL ST to the top of the first DC ST to join. (70 STs).
Finishing
If you plan on adding ties, do not cut off yarn yet. Move down to the instructions for the hat ties.
If you do not plan on adding the hat ties, snip off the yarn leaving about a 10-inch tail. Weave in yarn ends and remove the excess yarn.
Crocheting Hat Ties
Tie Straps up to Child
Size of hat tie about 8-inches.
Do not cut yarn after the final round and working the SL ST. Instead start the ties.
Begin
CH 25
Row 1
In the 2nd CH from the hook work a SC and in each ST across until you are back at the hat brim. SC into the hat brim.
Lay the hat on a flat surface so you know where to work the tie for the other side of the hat. SL ST over to that area. CH 25. In the 2nd CH from the hook work a SC and in each ST across until you are back at the hat brim.
Finishing
Snip off the yarn leaving about a 10-inch tail. Weave in yarn ends and remove the excess yarn.
Ties for Teen/Adult
Size of hat tie about 16-inches.
Do not cut yarn after the final round and working the SL ST. Instead start the ties.
Begin
CH 31
Row 1
In the 2nd CH from the hook work a SC and in each ST across until you are back at the hat brim. SC into the hat brim.
Lay the hat on a flat surface so you know where to work the tie for the other side of the hat. SL ST over to that area. CH 31. In the 2nd CH from the hook work a SC and in each ST across until you are back at the hat brim.
Finishing
Snip off the yarn leaving about a 10-inch tail. Weave in yarn ends and remove the excess yarn.
Directions: Crochet Bunny Ears Floppy Pattern
Materials
Lion Brand Baby Soft Boucle in the color Cloud. Used for the hat.
Peaches and Crème cotton yarn in the color Pastel Pink. For the inside of the bunny ear.
Size H Crochet Hook 5.0 MM for the floppy bunny ears
Size K Crochet Hook 6.5 MM for the Outside of the floppy bunny ears
Tapestry Needle
Scissors
Gauge
Using Size H Hook
Peaches and Crème cotton yarn 15 SC every 4 inches
Size K Crochet Hook 6.5 MM for the Outside of the floppy bunny ears
Lion Brand Baby Soft Boucle 6 Stitches every 4 inches
Crocheting Bunny Ears up to Child Size 2 ½ inches wide X 5 inches long
Make 2 of the ears.
Crochet the Inside of the Ears
Begin
Use the Peaches and Crème cotton yarn and Size H crochet hook.
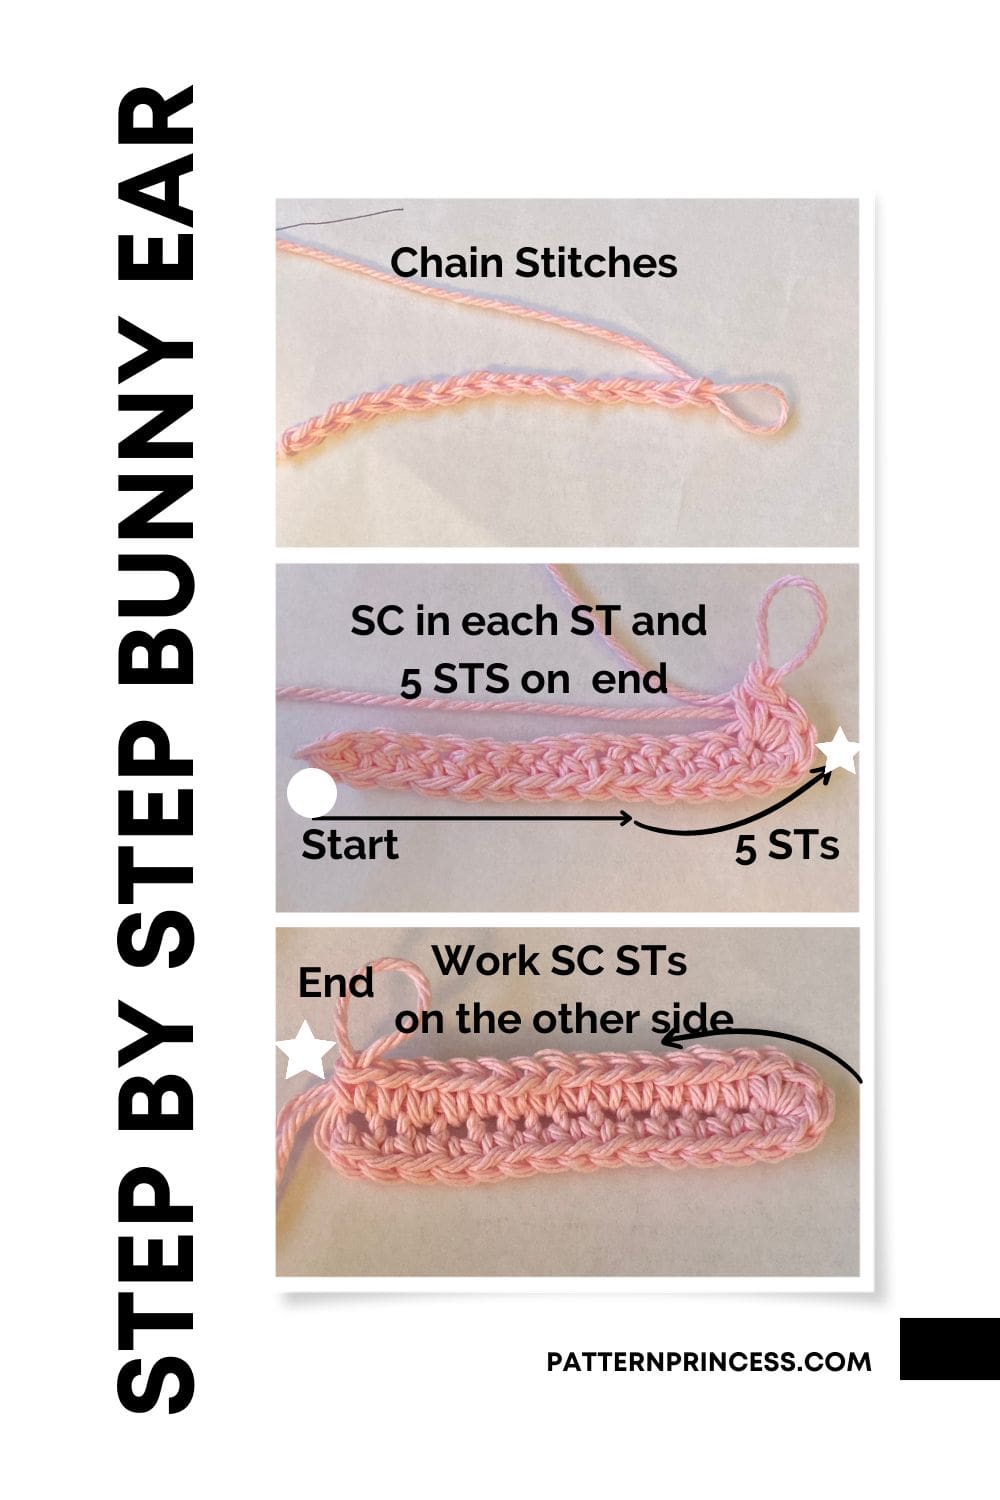
CH 15
Round 1
SC in the 2nd CH from the hook (Counts as a SC) and in each of the next 12 STs. Work 5 SC in the last ST. Continue working down the opposite side of the CH STs and SC in the next 13 STs. You should end up where you started on the other side of the CH ST. Turn (31 SC)
Round 2
CH 2 (Counts as a HDC). HDC in the next 14 STs. 3 HDC in end ST. Continue working down the other side with a HDC in each of the next 15 STs. (33 STs).
Finishing
Cut the yarn leaving a 10-12-inch yarn tail.
Pull the yarn through the last ST and set aside.
Repeat the steps to make another inside earpiece.
Crochet the Outside of the Ears
Begin
Use the Lion Brand Baby Soft Boucle and Size K crochet hook.
CH 13
Round 1
SC in the 2nd CH from the hook (Counts as a SC) and in each of the next 10 STs. Work 5 SC in the last ST. Continue working down the opposite side of the CH STs and SC in the next 11 STs. You should end up where you started on the other side of the CH ST. Turn (27 SC)
Round 2
CH 2 (Counts as a HDC). HDC in the next 12 STs. 3 HDC in end ST. Continue working down the other side with a HDC in each of the next 13 STs. (29 STs).
Do not cut yarn at this point.
Joining the Inner and Outer Ear Sections to Make the Bunny Ear
Round 3
Place an inner ear on top of the outer ear. Working with the Boucle yarn, work a SC into each ST around the inner ear. (33 STs).
Finishing
Cut the yarn leaving a 10-12-inch yarn tail.
Pull the yarn through the last ST and set aside.
Repeat the steps to make another bunny ear.
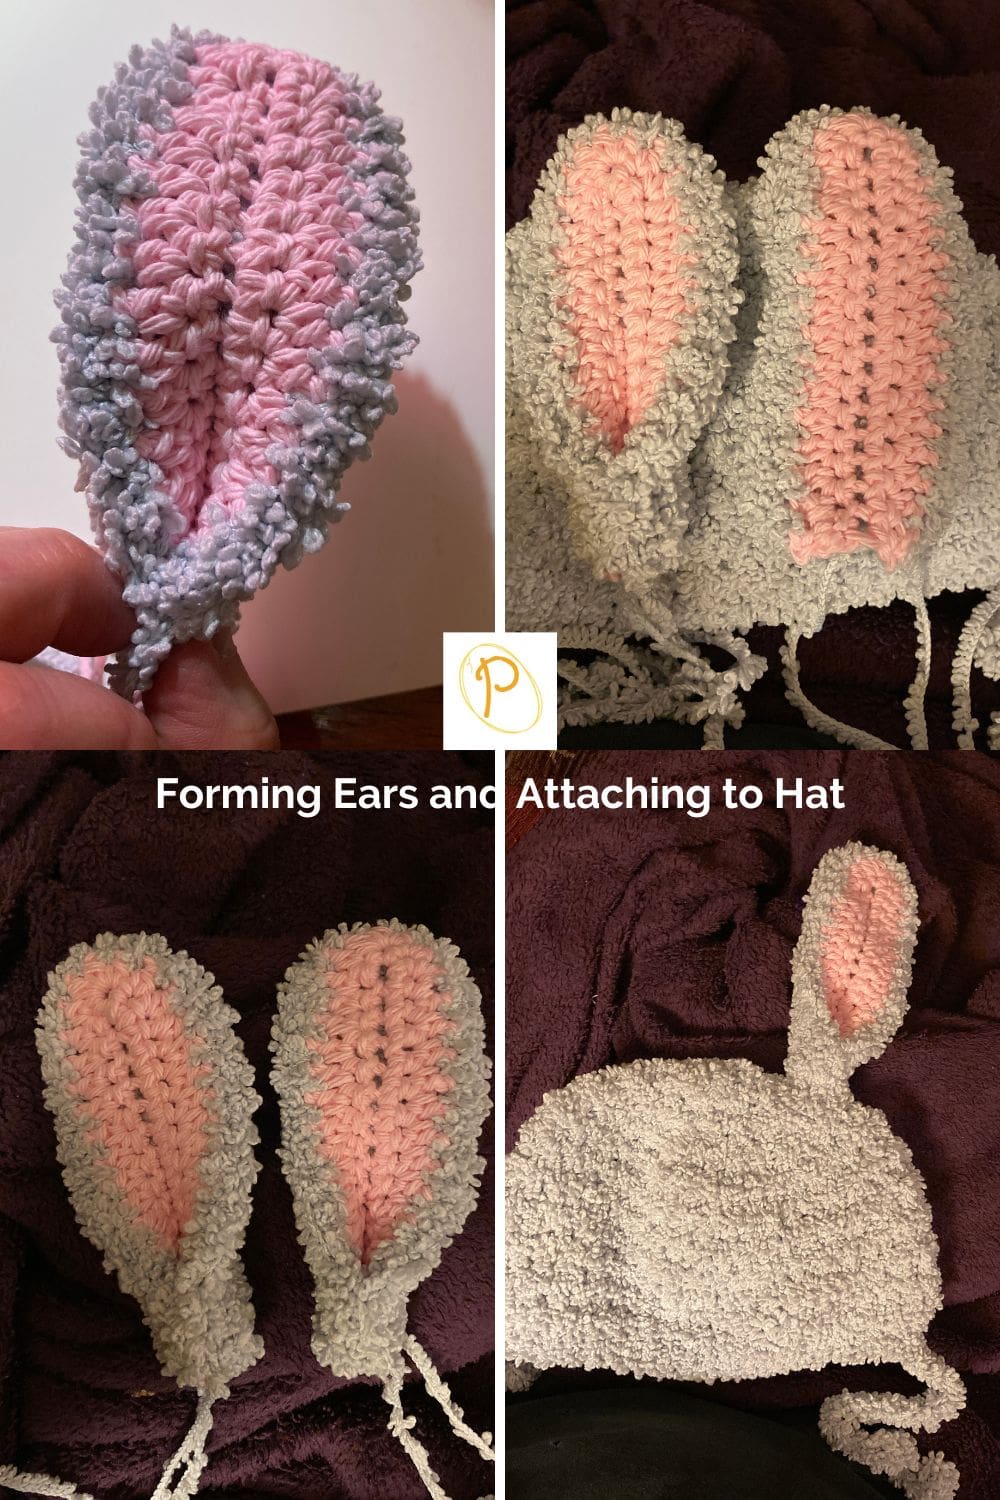
You have two options for the ears.
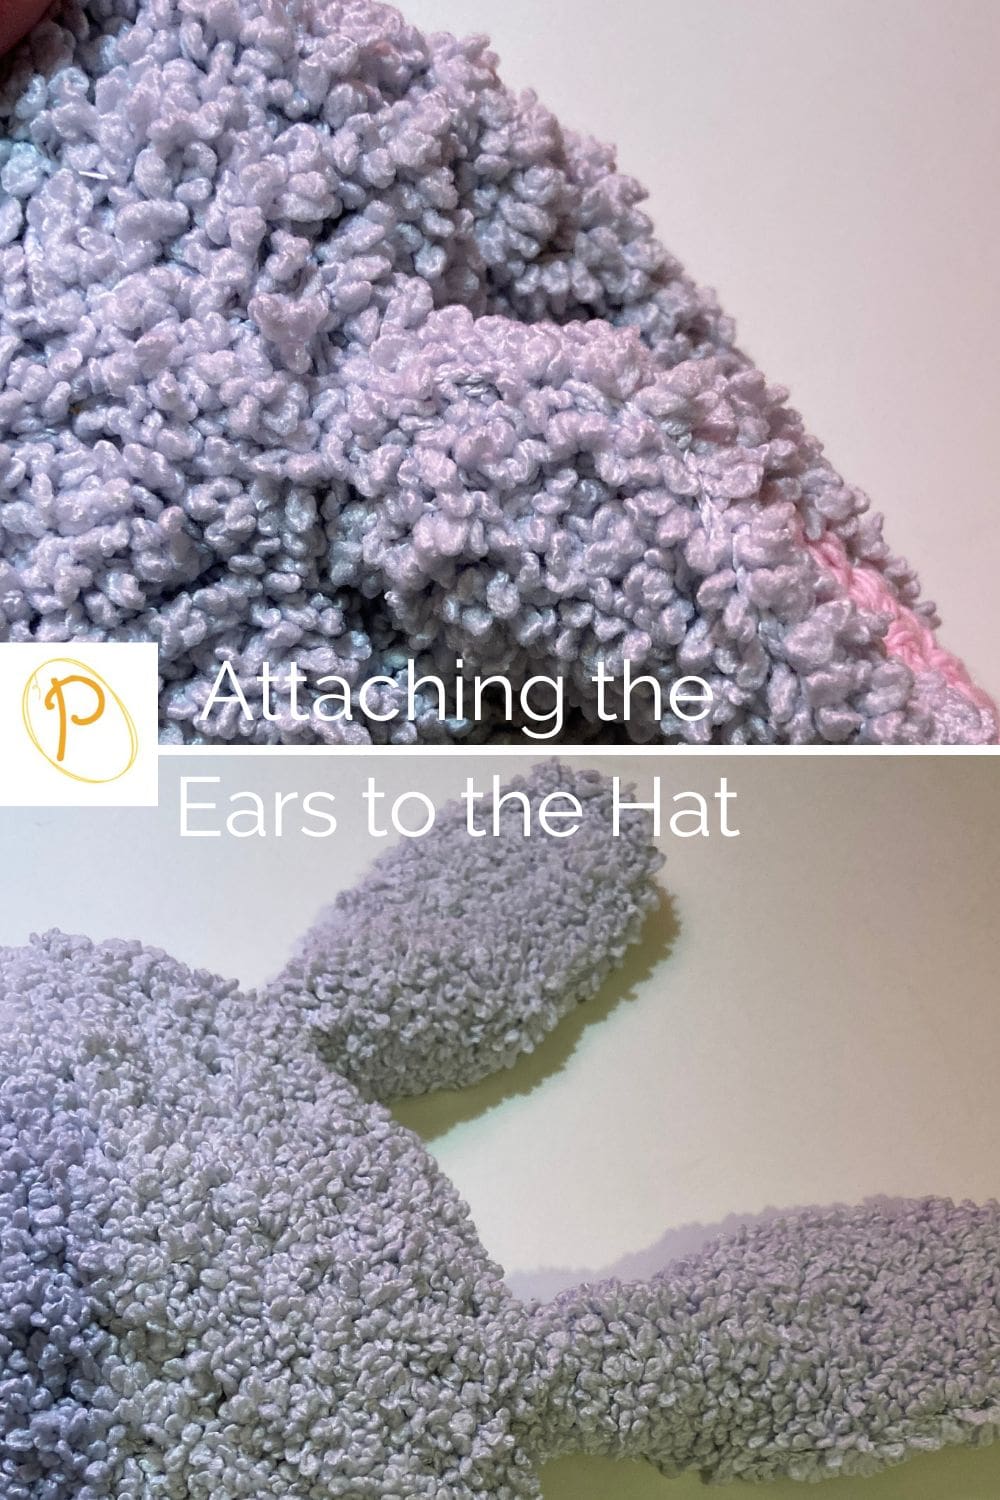
- At this point, you can just position bunny ears onto the beanie and use the yarn tails to sew into place.
- Give the ears a bit more stability and shape by folding the bottom sides toward the center. Use pink yarn to sew together about the bottom 1-inch. Then, position bunny ears onto the top of the hat and use the yarn tails to sew into place.
Weave in all the yarn ends using the yarn needle and cut off any excess yarn.
Pro Tip. When sewing the ear into the hat sew all the way around it to make sure it is secure, and no pink is showing through. This way, it stays in place when flopping about and looks really nice.
Crocheting Bunny Ears up to Teen/Adult Size 3 ½ inches wide X 7 inches long
Make 2 of the ears.
Crochet the Inside of the Ears
Begin
Use the Peaches and Crème cotton yarn and Size H crochet hook.
CH 23
Round 1
SC in the 2nd CH from the hook and in each of the next 20 STs. Work 5 SC in the last ST. Continue working down the opposite side of the CH STs and SC in the next 21 STs. You should end up where you started on the other side of the CH ST. Turn (47 SC)
Round 2
CH 2 (Counts as a HDC). HDC in the next 22 STs. 3 HDC in end ST. Continue working down the other side with a HDC in each of the next 23 STs. Turn (49 STs).
Round 3
CH 2 (Counts as a HDC). HDC in the next 24 STs. 3 HDC in end ST. Continue working down the other side with a HDC in each of the next 25 STs. Turn (51 STs).
Finishing
Cut the yarn leaving a long tail. About a 10-12-inch yarn tail.
Pull the yarn through the last ST and set aside.
Repeat the steps to make another inside earpiece.
Crochet the Outside of the Ears
Begin
Use the Lion Brand Baby Soft Boucle and Size K crochet hook.
CH 21
Round 1
SC in the 2nd CH from the hook and in each of the next 18 STs. Work 5 SC in the last ST. Continue working down the opposite side of the CH STs and SC in the next 19 STs. You should end up where you started on the other side of the CH ST. Turn (43 SC)
Round 2
CH 2 (Counts as a HDC). HDC in the next 20 STs. 3 HDC in end ST. Continue working down the other side with a HDC in each of the next 21 STs. (45 STs).
Round 3
CH 2 (Counts as a HDC). HDC in the next 22 STs. 3 HDC in end ST. Continue working down the other side with a HDC in each of the next 23 STs. (47 STs).
Do not cut yarn at this point.
Joining the Inner and Outer Ear Sections to Make the Bunny Ear
Round 4
Place an inner ear on top of the outer ear. Working with the Boucle yarn, work a SC into each ST around the inner ear. (49 STs).
Finishing
Cut the yarn leaving a 10-12-inch yarn tail.
Pull the yarn through the last ST and set aside.
Repeat the steps to make another bunny ear.
You have two options for the ears.
- At this point, you can just position bunny ears onto the beanie and use the yarn tails to sew into place.
- Give the ears a bit more stability and shape by folding the bottom sides toward the center. Use pink yarn to sew together about the bottom 1-inch. Then, position bunny ears onto the beanie and use the yarn tails to sew into place.
Weave in all the yarn ends and cut off any excess yarn.
See photo above in how the ear should look when sewn in the Child Size. When sewing the ear into the hat sew all the way around it to make sure it is secure, and no pink is showing through. This way, it stays in place when flopping about and looks really nice.
Video Tutorials
Here is a written tutorial with photos and links to video tutorials on how to crochet in the round.
Video Tutorial for Beanie Hat and Bunny Ears
Left Hand Video Tutorial
Right Hand Video Tutorial
Bonus!
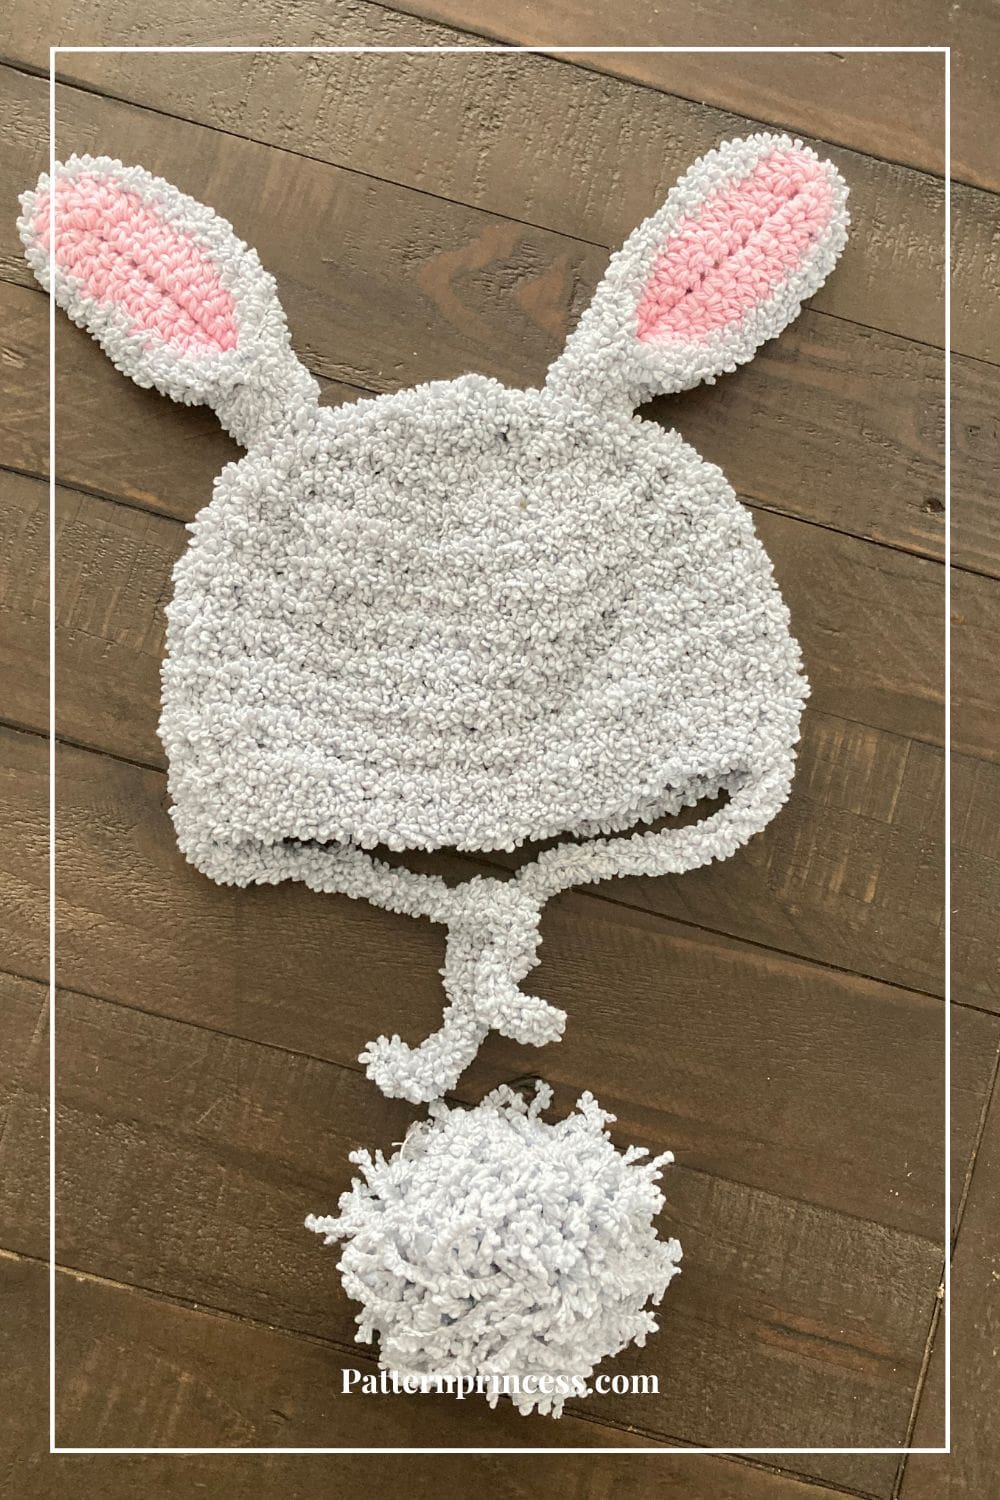
Make a Pom Pom Bunny Tail
Use cardboard or a pom pom maker to make a cute bunny tail. Use safety pins to attach to the outside of the clothing.
We even have a tutorial on how to make pom poms.
Browse our other crochet projects. There are lots of easy crochet patterns for a beginner crocheter that use basic stitches.

You can find Victoria crocheting, quilting, and creating recipes. She has cooked in restaurants for over 20 years, including many larger parties. She learned to crochet when she was just 11 years old and has been crocheting ever since; over 50 years now. Over 40 years ago, she loved her first class in sewing and continues to hone her skills in quilting. Many have enjoyed the handmade gifts over the years. In her professional career, she has worked in management in a wide variety of businesses including higher education as a dean of a division. All the while attending college part-time to achieve her doctorate in higher education with an emphasis in e-learning.